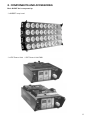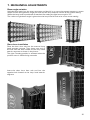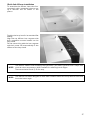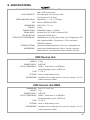
1
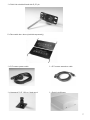
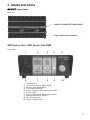
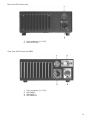
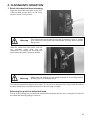
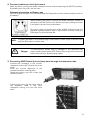
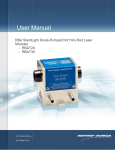
Battery powered LED fixture
User´s Manual
THELIGHT Luminary for cine and TV, S.L.
December 2011
INTRODUCTION
This guide provides information about how to use the product functions to illuminate with this
equipment as well as warnings on his use.
The 4LIGHT is a product of professional use for interior locations or studio and must be operated
only by qualified technical personnel.
To obtain the maximum features, please read the following operating instructions very carefully
before using this fixture for the first time. Please keep these operating instructions for you and
subsequent users to reference in the future.
THELIGHT Luminary for cine and TV, S.L.
Safety Precautions
Exemption from Liability
Warranty
For your own safety, please read and follow all safety
instructions and warnings.
THELIGHT Luminary for cinema and TV, S.L. does not assume
any responsibility for lighting failures caused by malfunction of
this product.
The manufacturer disclaims liability for any damage to
persons or property caused by inappropriate operation,
damage of this kind lies in the responsibility of the operator.
This product is manufactured to local specifications and the
warranty is valid within the country of purchase. Should the
product fail or malfunction while you are abroad, the
manufacturer assumes no responsibility for servicing the
product locally or bearing the expenditure incurred thereof.
Marking
www.thelight.com.es
The total or partial reproduction of this guide is prohibited without the express written permission of THELIGHT.
THELIGHT technology is protected under Spanish license laws with international patents pending.
Information and specifications in this document are subject to change without notice.
2011 © Copyright THELIGHT. All rights reserved.
2
SAFETY PRECAUTIONS
Various symbols are used throughout this instruction manual and on the product to prevent physical
harm to you or other people and damage to property.
The symbols and their meanings are explained below.
Warning
Danger
Possible risk of injury or damage to equipment
This symbol indicates the risk of electric shock or fire danger that could
result in injury or damage to equipment.
This equipment has been checked and meets the requirements of general safety for electronic
devices. These requirements are specified to provide a reasonable protection against
electromagnetic interferences when the equipment is used in commercial environments.
This equipment generates, uses and can emit waves of radio frequency, and if not properly used
following the instructions of this manual can produce interferences in radio communications. The use
of this equipment in residential areas can produce interference, the user will be the only responsible
of correcting them.
CAUTION: Though the light generated by LED does not produce any heat, for what his use turns out
to be very comfortable for the actors, the lamp head acts as a heat sink through its back part.
Surface can reach a temperature between the 50 ºC and the 80 ºC. Please use protective gloves if
you touch the lamp head at the heat sink.
Do not attempt to open any of the device or component housings. To
reduce the risk of electric shock, do not remove lamp head or Control
Unit cover. No user-serviceable parts inside. Maintenance and repair
work to be carried out only by THELIGHT Service Centre.
Danger
Do not cover the aluminium lamp head heat sink while using it. Proper
ventilation must be provided. Avoid exposing the lamp head to the heat
radiation of other light fixtures.
The lamp head is equipped with high power LEDs. Due to their high lightoutput intensity don’t stare directly into the light source.
The V-lock mount or the XLR4 receptacle can be used for powering the 4LIGHT by battery.
Warning
Relevant information on Battery use
Use only original chargers. Don’t short the battery. Respect the service
and the safety manual of the battery.
To ensure maximum performance of the 4LIGHT equipment use only
high-load capacity batteries with a high continuous draw meaning a
Discharge Current of at least 9A.
3
TABLE OF CONTENTS
1.
2.
3.
4.
5.
6.
7.
8.
Introduction…………………………………………………………………………………………………............................
Safety precautions….………….…………………………………………………………………………........................
Table of contents.……………….……………………………………………………………………..............................
Main features……………………………………………………………………………………………………....................
Components and accessories…………………………………………………………………..........................
Names and parts…………….…………………………………………………………………………...........................
4LIGHT lamp head……………………………….…………………………………………………….....................
VDC Control Unit / VDC Control Unit DMX……………..…………………………......................
Placing into operation…..………………………………………………………………………………......................
Quick link swivel ball head mounting………………………………………………..………..................
Removing the Quick link swivel ball head mounting ….…………………………………………
Connect a battery on the V-lock mount ………………………………………………………..………..
Connecting VDC Control Unit and lamp head through the extension cable……
Disconnecting the extension cable ……..……………………………………………………..................
Placing the VDC Control Unit in the stand mast………………...........................................
Securty cables…………….…………………………………………………………………………………………………
Digital Adjustments………..…………………………………………………………………………...........................
Turning the power On/Off………..……………………………………………………………………………….
COLOR TEMPERATURE………………..…………………………………………………………………………….
TURBO…………………………………………………………………………………………………………………………….
DIMMER…………………………………………………………………………………………………………………………
-/+ GREEN………………………………………………..…………………………………………………………………..
DMX 512 Control ……………..……………….……………………………………………………………………………
Mechanical Adjustments ………………….……………………………………………………………………………
Beam angle variation………….……….………………………………………………………………………………
Barn doors installation….……………………………………………………………………………………………
Quick link diffuser installation………………………………………………………………….....................
Specifications…,,,,………………………………………………………………………………………………………………
4LIGHT………………………………………………………………………………………...........................................
VDC Control Unit…………………………………………………………………………………….........................
VDC Control Unit DMX...……………………………………………………………………….........................
Chromaticity coordinates diagram…….……………………………………………………….………..............
Photometrics……………………………………………………………………………………………………………………….
Regulations.………………….……………………………………………………………………………………………………...
Declaration of conformity…………………………………………………………………………………………………
Warranty..…………………………………………………………………………………………………………………………….
2
3
4
5
6
8
8
8
10
10
10
11
11
12
12
12
13
13
13
13
14
14
15
16
16
16
17
18
18
18
18
19
20
21
23
24
4
1. MAIN FEATURES
4LIGHT is an LED panel housing a total of 96 high power LED. It has been specially designed and its
colorimetry calibrated for professional photography, cinematography and television industry use.
4LIGHT main innovative features are:
•
Variable Colour Temperature
•
Stable colour dimming
•
Green/magenta bias control
•
Very high light output
•
Low power draw
•
High CRI digitally calibrated light
•
V-lock mount battery operated
•
Lightweight lamp head
NOTE ABOUT MEASURING COLOUR TEMPERATURE (CCT)
4LIGHT incorporates the innovative THELIGHT technology based on high power LED triplets + Fresnel
lens + CPU control software to obtain the wide range of calibrated colour temperatures combined
with a high colour rendering index CCT.
We must remark that colour meters in use today are designed for a full spectrum source such as
incandescent lights and therefore cannot be used to accurately read the correlated colour
temperature (CCT) of the light emitted by THELIGHT and other LED light fixtures.
The eventual diversions to green display as CC10M or CC15M in hand-held colour meters are due to
these unaccuracy on reading of the light emitted by LED and must not be considered.
THELIGHT guarantees pure white light and correct colorimetry of the light delivered by its high power
LED luminaries which have been calibrated in laboratory according to CIE 13.3-1995 international
standards for measurement of the CRI and chromatic coordinates (x, and CIE-1931).
The reliability of this digital equipment is supported by the calibration THELIGHT has made in
laboratory by spectrophotometer, which precision is half-yearly calibrated according to the National
Institute of Standards (NIST) of the United States and of the Physikalisch-Technische Bundesanstalt
(PTB) of Germany.
In order that the advanced THELIGHT luminaries could be used together with other light sources,
THELIGHT has accurately calibrated both the CCT and the chromatic coordinates to match them with
traditional light sources following tungsten and daylight standards.
The digital Control Unit allows a further and precise green/magenta correction along the whole scale
of colour temperatures.
5
2. COMPONENTS AND ACCESSORIES
Each 4LIGHT kit is composed by:
1 x 4LIGHT lamp head
1 x VDC Control Unit / VDC Control Unit DMX
6
1 x Quick link swivel-ball head with 3/8” pin
2 x Removable barn doors (available separately)
1 x 2,5 meters power cable
1 x 2,5 meters extension cable
1 x Hexagonal 5/8” (16mm ) baby spud
1 x Quick link diffusser
7
3. NAMES AND PARTS
4LIGHT lamp head
Rear view
VDC Control Unit /VDC Control Unit DMX
Front view
1
2
3
4
5
6
7
8
9
10
Power switch
Colour temperature digital display
Intensity level digital display
Turbo status blue LED
Green/magenta offset status green LED
Power output
Colour temperature adjustment buttons
Intensity adjustment buttons
On/off turbo button
Green/magenta knob
8
Rear view VDC Control Unit
1. Fuse receptacle (1 x 15A)
2. XLR4 VDC input
Rear view VDC Control Unit DMX
1.
2.
3.
4.
Fuse receptacle (1 x 15A)
XLR DMX in
XLR4 VDC in
XLR DMX out
9
4. PLACING INTO OPERATION
1. Quick link swivel ball head mounting
Align the swivel ball head plate to the four
rivets located at the back of the lamp
head as shown in the picture.
Warning
On mounting the lamp head on any type of support, tripod or ceiling
grid make sure the swivel ball head handle is facing down towards
the ground.
Slide the swivel ball head plate until the
four shoulder rivets drop into the
receptacle. The locking pin will snap into
place when the plate is properly seated.
Warning
Make sure the locking pin has totally entered in his housing before
proceeding to use the light fixture.
The standard swivel ball head comes with a 3/8" pin to be clamped into a grip head and allows
the lamp head to be oriented and locked in a broad range of angles.
Removing the quick link swivel ball head
Pull up on the locking pin and slide the swivel ball head plate until the four rivets get free. Extract
the swivel ball head by pulling it upwards.
10
2. Connect a battery on the V-lock mount
Either the V-lock mount or the XLR4 receptacle can be used for powering the 4LIGHT by battery.
Any battery form 9 to 36 V can be used.
Relevant information on Battery use
Use only original chargers. Don’t short the battery. Respect the service and the safety manual of
the battery.
When powering the 4LIGHT through the XLR4 connector located at
the back of the VDC Control Unit check the proper polarity as shown
in the picture at the Control Unit bottom.
To ensure maximum performance of the 4LIGHT equipment use only
high-load capacity batteries with a high continuous draw meaning a
Discharge Current of at least 9A..
power the 4LIGHT lamp head through mains power a power supply of at least 14A
NOTE: To
and 9 to 36V output must be used.
Danger
To avoid electric shocks and/or damages in the equipment the
power switch located at the VDC Control Unit front panel must be off
before connecting or disconnecting cables.
3. Connecting VDC Control Unit and lamp head through the extension cable
Connect the connector in the circular
receptacle at the VDC Control Unit front
panel.
Verify the correct alignment of the
connectors before inserting them.
Rotate the locking ring until it clicks into
the lock position.
Connect the same way the other end of
the extension cable in the input
receptacle coming out from the lamp
head.
11
Disconnecting the extension cable
Grab the connector firmly, turn the ring to unlock it and pull to extract it.
NOTE: The lamp heads can operate with a maximum extension cable length of 10 meters.
extension cable is provided with two equal connectors in every end: both can be
NOTE: The
connected either in the VDC Control Unit or in the lamp head.
4LIGHT lamp head can be battery powered with the VDC Control Unit included in
NOTE: The
the kit or mains powered with the optional VAC Control Unit.
4. Placing the VDC Control Unit in the stand mast
You can place the VDC Control Unit in the stand mast for a handy use close to the lamp head.
To do so you will need to use a regular Super Clamp (not included in the 4LIGHT kit) and insert
the Hexagonal 5/8” (16mm ) baby spud.
Once installed the hexagonal spud just
slide the holder located at the VDC
Control Unit bottom over the spud plate
until properly seated, as shown in the
picture.
5. Security cables
The lamp head is provided with
several holes specially design to
insert one o more 5mm snaps and
their safety cable.
Warning
When the lamp head and any other component is mounted in a
hanging position it must be secured with a safety cable rated at a
minimum of ten times the weight of the light fixture including its
accessories.
12
5. DIGITAL ADJUSTMENTS
The VDC Control Unit doubles as power supply and digital remote controller of the following light
parameters through its programmed CPU:
•
Calibrated Colour Temperature variation
•
Stable colour dimming
•
Green/magenta bias control
Turning the Power On/Off
Turn on the equipment by switching the power button towards the I position. Switch the power button
towards 0 position to turn it off.
The light settings always remain stored when the VDC Control Unit is powered off.
Both the lamp head and the VDC Control Unit are electrically protected
against power failures but to avoid possible electric shocks and/or
equipment damages make sure the power switch located at the VDC
Danger Control Unit front panel will be off before connecting or disconnecting
cables.
In case of extreme over tension replace the 15Ah fuse from inside the fuse
holder located at VDC Control Unit back. (see picture on page 9)
If a power failure would happen or the cable would be accidentally disconnected the VDC
Control Unit would entry on Error mode and the number 8 would show in the digital
NOTE: display.
To reset the equipment and resume the light values turn the switch power off, connect
extension cable and switch on the power button.
COLOR TEMPERATURE Variation
Colour temperature can be easily increased or reduced through the +/- buttons located at the VDC
Control Unit front panel. Above them a digital display indicates at all times the selected colour
temperature. The value 3.2 corresponds to 3200K and the value 3.3 to 3300K and so on.
Push the + button to increase colour temperature or push the – button to decrease it. If you keep
pushed any of the buttons the you will get a continuous variation.
push on the buttons will increase or decrease the colour temperature in calibrated
NOTE: Every
increments of 100 Kelvin.
TURBO
By activating the TURBO button (a blue LED lights up on the screen of the Control Unit) maximum
light output is achieved in the colour temperature selected and the value 9 will appear on the
dimmer display.
13
DIMMER Light intensity variation
The dimmer of the VDC Control Unit is totally digital and guarantees the regulation of light intensity
with minimal changes in the selected colour temperature.
Light intensity can be easily increased or reduced through the +/- buttons located at the VDC
Control Unit front panel. Above them a digital display indicates at all times the selected dimmer value
from a minimum of 1 to a maximum of 9.
Push the + button to increase light intensity or push the – button to decrease it. If you keep pushed
any of the buttons the you will get a continuous variation.
push on the buttons will increase or decrease the light intensity in calibrated
NOTE: Every
increments of ! stop.
-/+ GREEN Green/magenta bias control
Green/magenta bias switch located at the VDC Control Unit front panel lets you easily alter the
colour of the light emittting at any colour temperature towards green or magenta in increments of /+ 1/8 and ".
When this switch is not in the standard position a green LED light turns on in the VDC Control Unit to
warn that the light emitted no longer guarantees the correct chromaticity.
THELIGHT guarantees the correct colorimetry for light emitting from their high power
light fixtures, calibrated in the laboratory according to current international
NOTE: LED
standards of the CIE 13.3-1995 for the average CRI and the chromatic co-ordinates (x, y
CIE-1931). This certifies that our luminaries have no green/magenta deviation.
Full adjustment is possible in a range of colour temperatures from 3900K to 5800K.
NOTE: From 2800K to 3900K and from 5800K to 8500K the adjustment is possible only on
1/8 and " plusgreen.
14
6. DMX 512 CONTROL (only VDC Control Unit DMX)
THELIGHT lightning fixtures have been designed for a full DMX control from the 5-pin DMX port
located at the back of the VDC Control Unit DMX.
Connect the DMX cable coming from your console into the DMX IN male connector located at the
back fo the VDC Control Unit DMX. Beside the DMX IN there is also a DMX OUT connector to daisychain fixtures.
Adressing channels
Push both + and - COLOR TEMPERATURE buttons at the same time and then switch on the power
button. Wait a few seconds for the three digital displays to blink.
Now you can define the start address. To do so just push the + or – DIMMER buttons to increase or
decrease the first fixture address. Once you have chosen the desired address number push the
TURBO button to save the selection.
Keep in mind the following points regarding DMX control:
!
!
!
!
THELIGHT DMX protocol uses 3 channels per fixture
After the DMX address is entered the Control Unit will automatically assign the following two
channels.
If you wish to control several THELIGHT fixtures at the same values you will have to set them
to the same address.
If you wish to control several THELIGHT fixtures independently you will have to offset their
address by 3 channels. Example:
fixture1 address 001 -- fixture2 address 004 -- fixture3 address 007
DMX Channels
When you connect your console to the VDC Control Unit DMX you will be able to control THELIGHT
fixtures through 3 channels:
!
Channel 1 (start address)
– COLOUR TEMPERATURE
From 2.5 to 6.5 (from 2800Kelvin to 8500Kelvin)
Fader at 0
2.8 means 2800Kelvin
Fader at 100
8.5 means 8500Kelvin
!
Channel 2 (start address + 1)– DIMMER
!
Channel 3 (start address + 2)– GREEN/MAGENTA correction
fader at 0%
-1/4 Green
fader at 25%
- 1/8 Green
fader at 50%
standard position (green/magenta at 0)
fader at 75%
+1/8 Green
fader at 100%
+1/4 Green
Do not use microphone cables or other general purpose two-core cables designed for
audio or signal use. They are not suitable for DMX 512. Problems due to wrong cabling
not be immediately perceptible.
NOTE: may
Microphone cables may appear to work fine, but systems built with such cables may fail
or be susceptible to random errors.
Cable must comply with RS-485 DMX protocol (EIA485).
A DMX terminator should be plugged into the final, empty, OUT connector of the last slave
on the daisy chain.
NOTE:
A terminator is a stand-alone male connector with a built-in 120 ! resistor, matching the
cable characteristic impedance, connected across the primary data signal pair.
NOTE
for Avolites
consoles users:
THELIGHT luminaries DMX working personality can be configured to be
recognised by Avolites consoles.
Download the personality files to install into Avolites consoles from
www.avolitesdownload.com/PersonalityLibrary/?mainPage=Main.asp&ID=3516
15
7. MECHANICAL ADJUSTMENTS
Beam angle variation
Hold the lamp head from the outer segments and bend it in or out to the wanted concave or convex
shape. Choose the light beam angle you need and the lamp head will remain at the chosen setting.
When the lamp head is positioned at standard flat setting the light beam angle is 35º.
The maximum light beam angle is given when the lamp head is bend at its more convex setting.
Barn doors installation
Place the barn door axle into the external lamp
head segment grooves. Then insert one end of
the axle into the hole located at the lamp head
exterior segment as shown in the picture.
The right mounting position is achieved when the
product name is visible facing outwards.
Insert the other barn door axle end into the
opposite hole located at the lamp head exterior
segment.
16
Quick link diffuser installation
To assemble the diffuser insert the four
magnets in their respective holes to setup a diffusion box as shown in the
picture.
Position the lamp head in its standard flat
setting.
Align the top diffuser box magnets with
their respective screws located on the
lamp head.
Do the same thing with the low magnets
and their power will automatically fix the
diffuser to the lamp head.
The diffuser softens and broadens the light beam, yet retains general beam shape with
NOTE: minimal colour temperature shift. Excellent for softening harsh edges.
The transmission lost is 2/3 of a stop.
diffuser has been designed so that when installed allows the lamp head to bend and
NOTE: The
focus the beam angle.
17
8. SPECIFICATIONS
4LIGHT
COLOUR TEMPERATURE
adjustable from 2800K a 8500K
(with 100K increments)
dimmable with minimal colour shift
(increments of 1/2 stop)
adjustable +/- 1/4 y 1/8 steps
90 from 2900K a 6500K
339 x 207 x 71 mm
2,4 kg
99W 28V (maximum 120W)
variable from 30º to 65º (standard 35º)
more than 50.000 hours
UME (Minimum Emitting Unit) made up of: 3 high-power LED
with a selected BIN + Fresnel lens + CPU control with
THELIGHT software
quick link swivel-ball head with 10mm pin, adjustable yoke
LIGHT INTENSITY
GREEN/MAGENTA BIAS
CRI
DIMENSIONS
WEIGHT
POWER DRAW
BEAM ANGLE
LED RATED LIFE
THELIGHT LED TECHNOLOGY
RIGGING OPTIONS
ACCESSORIES
quick link swivel-ball head with 16mm female, magnetic
attach diffuser, removable barn doors, waterproof case
VDC Control Unit
DIMENSIONS 172 x 173 x 87 mm
WEIGHT 1,5 kg
POWER SUPPLY 9-36 VDC
OUTPUT FREQUENCY 20KHz flicker-free up to 3000fps
still photography up to 1/6000 sec
FUSE 1 x 15 A
OPTIONS Vlock or Gold battery mount
ACCESSORIES hexagonal 16mm baby spud to mount on a stand, 5 or 10
meters extension cables
VDC Control Unit DMX
DIMENSIONS
WEIGHT
POWER SUPPLY
OUTPUT FREQUENCY
292 x 173 x 87 mm
2 kg
9-36 VDC
20KHz flicker-free up to 3000fps
still photography up to 1/6000 sec
FUSE 3 x 15 A
OPTIONS Vlock or Gold battery mount
ACCESSORIES hexagonal 16mm baby spud to mount on a stand, 5 or 10
meters extension cables
18
CHROMATITY COORDINATES DIAGRAM
(x, y CIE-1931)
Shown on the diagram are the THELIGHT lamp head chromaticity coordinates (x, y CIE-1931) feed and digitally controlled
by its Control Unit and they are compared with the reference illuminants. These reference illuminants are the Planckian
locus radiator set below 5000K and the CIE daylight reference is set over 5000K. The Planckian locus radiator
references the chromaticity for several tungsten lamps colour temperatures while the daylight locus typify daylight type D
illuminants.
The diagram evidence the light emanated by THELIGHT luminary at every colour temperature entirely matches with the
described locus reference so that the colour of the light produced is essentially the same as incandescent and daylight. It
is also remarkable the minimum green/magenta deviation over the locus reference along the range of colour
temperatures (means minimal difference between THELIGHT chromaticity coordinates and the ideal reference line).
CALIBRATION
The Instrument Systems scanning spectrometer, model Spectro 320, serial number 30932004, with its accessory
TOP-100 has been calibrated according to the United States National Institute of Standards (NIST) and the German
Physikalisch-Technische Bundesanstalt (PTB) standard references.
ACCURACY
The Instrument Systems scanning spectrometer, model Spectro 320, serial number 30932004, with its accessory
TOP-100 has an imprecision over the spectral radiometric results delivered lower than 1%.
Specifications subject to change without notice. THELIGHT technology is protected under Spanish license laws with international patents pending.
THELIGHT luminary for cine and tv, S.L.
www.thelight.com.es
19
PHOTOMETRICS
24 fps / 500 ASA
4LIGHT
5600K
3200K
Lux
F-Stop
Fc
meters
Fc
F-Stop
Lux
5500
16
510
1
418
11.7
4500
740
5,6
69
3
56
4.8
600
Readings made with scanning spectrometer at stable temperature, Control Unit set at maximum light intensity (Turbo On
and dimmer at 9 setting), lamp head at standard flat setting and measurement instrument positioned perpendicular over
the luminary surface center.
CALIBRATION
The Instrument Systems scanning spectrometer, model Spectro 320, serial number 30932004, with its accessory
TOP-100 has been calibrated according to the United States National Institute of Standards (NIST) and the german
Physikalisch-Technische Bundesanstalt (PTB) standard references.
ACCURACY
The Instrument Systems scanning spectrometer, model Spectro 320, serial number 30932004, with its accessory
TOP-100 has an imprecision over the spectral radiometric results delivered lower than 1%.
Specifications subject to change without notice. THELIGHT technology is protected under Spanish license laws with international patents pending.
THELIGHT luminary for cine and tv, S.L.
www.thelight.com.es
20
REGULATIONS
This equipment is designed to meet the following regulations and safety standards for battery
powered technology equipment:
ENVINRONMENTAL
THELIGHT devices are certified and intended for indoor use (lamp head IP21, VDC Control Unit IP41)
LAMP HEAD OPERATIÓN TEMPERATURE from -20º to +30º C
CONTROL UNIT OPERATIÓN TEMPERATURE from -20º to +50º C
OPERATING HUMIDITY from 30 to 90% RH non condensing
FUSE 1 x 15 A
21
22
DECLARATION OF CONFORMITY TO EMC DIRECTIVE 2004/108 EC
MANUFACTURER´S NAME:
MANUFACTURER´S ADDRESS:
Thelight luminary for cine and tv, S.L.
Plaza Val 1
22148 Colungo
HUESCA – SPAIN
[email protected]
www.thelight.com.es
declares that the products
MODELS:
4LIGHT LED panel + VDC Control Unit
6LIGHT LED panel + VAC Control Unit
4LONG LED panel + VAC Control Unit
VDC Control Unit DMX
4LONG-STUDIO
MANUFACTURED BY:
MANUFACTURED IN:
Thelight luminary for cine and tv, S.L.
Badalona (BARCELONA) SPAIN
MARK:
THELIGHT
COMPLY WITH THE CE DIRECTIVES:
GENERAL SECURITY:
2001/95/CE
EN 60598-1:2003+A1:2006 Luminaries: general requirements
DIRECTIVE:
2004/108/CE Electromagnetic Compatibility (E.M.C.)
ELECTROMAGNETIC COMPATIBILITY:
THELIGHT is intended to Electromagnetic Environment E2 (Commercial and light industrial).
STANDARD:
EN 61000-6-1:2005. Electromagnetic Compatibility, Generic immunity standard. Residential and light
industry.
EN 61000-6-3:2005. Electromagnetic Compatibility, Generic EMI standard. Residential and light
industry.
(IEC) EN 61000-6-4: 2005. Generic. Industrial environments emission (radiated)
EN 301489-1 v1.8.1 (2008-02) Radio Electric Spectrum (1 – 6 GHz Band)
EN 61000-3-2:2001/A2:2006 Harmonic current emissions a.c. Mains
EN 61000-3-3:1997/A2:2006 Voltage fluctuations and Flicker a.c. Mains
UNE-EN 55015:2007+A1:2008+A2:2009 EMI of electrical lighting and similar equipment (CISPR
15:2005)
EN 55015-1:2006 Lighting and similar equipment radioelectric radiation (conducted emissions,
radiated current)
Badalona, 27th September 2010
Javier Fdez. De Valderrama
Authorized Administrator
23
WARRANTY
THELIGHT high power LED light equipments are guaranteed to be free from defects in workmanship
and parts in a warranty period of one (1) year from the date of purchase. Defects that occur within
this warranty period, under normal use and care will be repaired or replaced at THELIGHT discretion,
solely at our option with no charge for parts or labor.
In the event of the equipment malfunction, contact the dealer from which you purchased the product.
Please note that you will be not be reimbursed for the cost of bringing the equipment to the
THELIGHT Repair Centre.
THELIGHT reserves the right to replace the product or relevant part with the same or equivalent
product or part, rather than repair it. Where a replacement is provided the products or part
replaced becomes the property of THELIGHT. THELIGHT may replace parts with refurbished parts.
Replacement of the product or a part does not extend or restart the Warranty period.
Returns or exchanges from the customers will be accepted within 15 days of delivery and will not
include the actual shipping costs. Item(s) must be in original packaging and condition, must not be
assembled, and must include its original user manual.
This warranty does not cover any damage resulting from:
! Failure to follow the instructions in the instruction manual;
! Repair, modification or overhaul not conducted by any authorized THELIGHT personnel.
! Fire, natural disaster, act of God, lightning, abnormal voltage, etc;
! Submergence in water (flooding), exposure to alcohol or other beverages, infiltration
of sand or mud, physical shock, or dropping of the equipment and other unnatural causes.
This warranty only applies to the lamp head and the Control Unit and not to the accessories, such as
the diffuser or barn doors, nor does it apply to the fuses and other consumables provided.
Any consequential damages arising from failure of the equipment, such as expenses incurred in
taking pictures or recording images or loss of expected profit, will not be reimbursed whether they
occur during the warranty period or not.
Parts essential to the servicing of the light equipment (that is, components required to maintain the
functions and quality of the fixture) will be available for a period of five years after the product is
discontinued.
THELIGHT Luminary for cine and tv, S.L.
www.thelight.com.es
The total or partial reproduction of this guide is prohibited without the express written permission of THELIGHT.
THELIGHT technology is protected under Spanish license laws with international patents pending.
Information and specifications in this document are subject to change without notice.
2011 © Copyright THELIGHT. All rights reserved.
24
25
THELIGHT Luminary for cine and TV, S.L.
www.thelight.com.es
2011 © Copyright THELIGHT. All rights reserved.
26