1
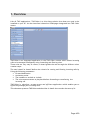
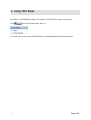
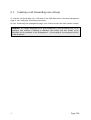
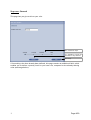
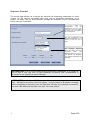
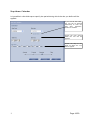
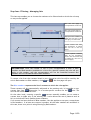
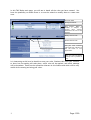
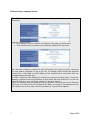
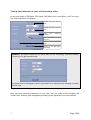
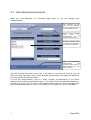
User Guide
TWS Rules V2.1
AMT/PTD/TLA/0028/2/1/EN
April 2007
Contact and Support
AASTRA MATRA Telecom
Address:
1 rue Arnold Schoenberg
78280 Guyancourt - France
Tel:
France: +33 1 30 96 42 42
Fax: +33 1 30 96 42 43
E-mail:
[email protected]
1
Page 2/20
User Guide
Table of Contents
1.
OVERVIEW ..........................................................................................................4
2.
USING TWS RULES ............................................................................................6
2.1.
Creating a call-forwarding rule (4 step) ................................................... 7
Step 1: General................................................................................................................................................ 8
Step two: Forward ........................................................................................................................................... 9
Step three: Calendar ..................................................................................................................................... 10
Step four: Filtering – Managing lists ........................................................................................................... 11
2.1.1.1. Shared contact list manager ................................................................................................ 13
2.1.1.2. Specific contact list manager ............................................................................................... 15
2.1.1.3. Example of how lists are used ............................................................................................. 16
2.2.
Displaying and managing rules ...........................................................16
2.2.
Displaying and managing rules ...........................................................16
Rule priority: example of use ....................................................................................................................... 18
Testing the behaviour of your call forwarding rules.................................................................................. 19
2.3.
1
Recording announcements.................................................................20
Page 3/20
1. Overview
Like all TWS applications, TWS Rules is a thin-client solution that does not need to be
installed on your PC. Its user interface is based on HTML pages integrated into TWS Caller
menus.
TWS Rules is an integrated application in the TWS Caller window which allows incoming
calls to be managed intelligently using forwarding and filtering rules.
These rules are very easy to create; a wizard guides the user through the different rulescreation steps.
The user himself or herself defines the criteria for routing and filtering incoming calls by
fixing the following parameters:
•
•
•
•
Forward destination
Activation period
The numbers to exclude or include
The voice announcement to play back before forwarding or transferring the
incoming call
TWS Rules is, therefore, an-easy-to-use and efficient application which enables you to
effectively manage your incoming calls.
This document presents TWS Rules and describes in detail how to make the most of it.
1
Page 4/20
NOTE : do not use the PBX and TWS phone forwarding functions to avoid a conflict of
rules between the PBX, TWS Phone and/or TWS Rules. Any reciprocal rule detected will
not be executed. For example, one of your rules provides for forwarding to a
correspondent who equally has a rule for forwarding to you.
1
Page 5/20
2. Using TWS Rules
By default, the TWS Rules window is located in the TWS Caller menu; to access it:
Click
(on the TWS Caller bar) then on:
You then have access to the TWS Rules menu comprising Rules and Announcements.
1
Page 6/20
2.1. Creating a call-forwarding rule (4 step)
To create a call-forwarding rule, click Rules in the TWS Rules menu: the main management
page of your intelligent forwarding rules opens.
On your forwarding-rule management page, click Create to start the rules creation wizard.
EXAMPLE: the images displayed give a good example of a call-forwarding rule for an
employee who attends a meeting on Mondays and Fridays and who wishes to be
disturbed only by members of the management. In the example, this employee will be
called Mr Hector.
1
Page 7/20
Step one: General
This page lets you give a title to your rule.
The 4 different steps.
It is possible to cancel the
operation at any moment.
Next step.
If forwarding rules have already been defined, this page contains an additional field, which
enables you to define a priority level for your new rule, compared to the already existing
rules (see image below).
1
Page 8/20
Step two: Forward
The second page allows you to define the inbound call forwarding parameters: to which
number will the calls be forwarded? With what type of forwarding (immediate, on no
answer, on busy)? Will an announcement message be broadcast to your correspondent
before calls are forwarded?
If the box is ticked, your
correspondent
will
be
forwarded to your voice mail.
Otherwise, enter the number
to which your correspondent
will be forwarded.
Will your correspondents be
forwarded immediately, on no
answer or when the line is
busy?
The messages displayed
here are those you have
recorded
from
the
Messages menu (cf. 2.3). If
you choose No message,
you cannot broadcast any
message.
INFORMATION: if for a rule the Delay before forwarding is Immediate, it is normal for
you to hear a first ring tone on your telephone set before your correspondent is
forwarded to the number you have indicated.
INFORMATION: if thanks to TWS Rules you forward your incoming calls to your voice
mail - TWS Mail or any other voice mail system – and you choose to broadcast a message
before forwarding is executed, your correspondent will hear two messages successively:
one from TWS Rules and the other from your voice mail system.
1
Page 9/20
Step three: Calendar
It is possible in this third step to specify the period during which the rule you define will be
applied.
If you tick No date limit,
the rule will be applied
indefinitely as from the
start date. Otherwise,
choose an end date.
Choose the time during
which the rule will be
applied.
Choose the days of the
week on which the rule
will be applied.
1
Page 10/20
Step four: Filtering – Managing lists
This last step enables you to choose the numbers to be filtered and to which the rule may
or may not be applied.
The rule will apply to
correspondents on this list.
The rule will not apply to
correspondents on this list.
Pop-ups on the numbers to
which the rule will or will
not apply. Click on them.
Create contact lists from
the directories to which
the rule will or will not
apply.
Create specific contacts
who do not necessarily
exist in the directories and
to whom the rule will or
will not apply.
INFORMATION: when the number of one of your correspondents is both in Blue
numbers and Red numbers (available on a list or as a specific contact) the rule will not
apply to this number, and this correspondent will not be forwarded because Red
numbers are first considered before Blue numbers.
To create a list from the contacts listed in your directories (this list will be used by the
rule in Red numbers or Blue numbers, click
or
; the next page will open.
The Blue numbers represent the list of contacts to which the rule applies:
These contacts will be systematically subjected to the existing rule. It is possible to use
contact lists from
directories, or to create specific contacts for the
rule. The
lists can be reused in all the rules.
On the other hand, creating a specific
contact manually enables you to create a
contact that is visible only in the existing rule. It also allows the use of patterns such as
06* (to include all French mobile phone numbers).
If no contact has been defined in Blue numbers, the rule applies to everyone, except those
in Red numbers. If at least one contact is present, all the other numbers are excluded. In
this case, there is no point in using filtering by Red numbers.
1
Page 11/20
Red numbers represent the list of contacts to whom the rule does not apply:
These contacts will be systematically ignored by the existing rule. It is possible to use
lists, or to create specific contacts for the
rule.
existing
If no contact has been defined in Red numbers, the rule applies to everyone, except those
in Blue numbers.
Different cases of rules:
•
A rule that does not contain any Blue number or Red number applies to all calls.
•
A rule containing only Blue numbers but no Red numbers applies only to calls whose
number is in the list of Blue numbers.
•
A rule containing Blue numbers and Red numbers applies only to calls from Blue
numbers and not Red numbers.
•
A rule containing no Blue number but Red numbers applies to all calls except calls
that are part of the list of Red numbers.
Contact lists created and
available for all rules
Contact lists created and
used by the rule currently
being created or modified
Add available lists to the
lists used by the rule.
Remove contact lists used
by the rule. Note: you can
only remove available lists
in Manage lists.
Create,
remove,
and
modify your contact lists
for the rules.
Finish choosing your lists
and return to the Filter
page.
Then click
1
to go to the list manager.
Page 12/20
2.1.1.1. Shared contact list manager
Editing/creating lists. To
create a list, choose
Create a new list.
Enter the name of your
list.
List
of
directories
authorised for TWS Rules.
Type the first letter of the
name or contact name you
are looking for. Display all
contacts in the selected
directory. Empty this area.
Delete the list selected on
top.
Save a new list or
modifications made to a
selected list.
Return to Choose filter
lists.
1
Page 13/20
The above screenshot shows how to Create a new list.
Selected
directory
ALGORIA
Empty search field for all
ALGORIA contacts
Add all numbers of this
contact.
Add all numbers of all
contacts.
4032 – Click here to filter this number
Remove this contact’s
number from the list.
Remove all numbers from
the list.
Click Save changes after
choosing the numbers, to
back up your list.
After creating the lists and returning to rule, the following window opens, for instance:
You can then add these lists for the rule you are creating or modifying, or for any other
rule you have created, then return to the Filter page.
1
Page 14/20
2.1.1.2. Specific contact list manager
To create specific contacts for a rule and which will be used by the rule as Blue numbers
or Red numbers, click respectively on
or
: the following page opens.
Surname
First name
Company
Office number
Home number
Mobile phone number
Help
and
balloon
information
Create contact to add it to
the contacts used by the
rule.
Delete all the contacts
created.
Delete contact.
Return to Choose filter
lists.
Contacts created here are immediately added to the contact lists used by the rule.
You must not fill in all the number fields; at least one is enough.
Only the surname and first name of a contact are displayed.
You can use an asterisk (*) to indicate a number prefix (06* for mobile phones, for
example).
1
Page 15/20
2.1.1.3. Example of how lists are used
EXAMPLE: Mr Hector is creating a rule that will allow only certain members of the
management team to disturb him during his meeting hours. So he is creating a list of
management team members (cf. 2.2.4.1) and adding specific contacts who will be
allowed to reach him (cf. 2.2.4.2).
He is applying the following filter:
The Red numbers are not subject to the forwarding rule. Mr Hector has chosen
forwarding to voice mail. Therefore, the management, Franck and Stephanie will not be
forwarded to his voice mail.
The Blue numbers are subject to the rule. Mr Hector has not added any contact there;
this means that any contact not included in the list of Red numbers will be subject to
the forwarding rule.
Mr Hector’s filter is correctly applied. He will only be disturbed by those persons he has
chosen.
INFORMATION:
When the Inclusive filter (blue number) list is empty, this means that all numbers are
subject to the rule.
When the Exclusive filter (red numbers) list is empty, this means that no number will be
exempted from the rule.
2.2. Displaying and managing rules
This is how your rules will be displayed in the menu TWS Rules then Rules.
1
Page 16/20
In this TWS Rules main page, you will see in detail all the rules you have created. You
have the possibility to delete them or to use the wizard to modify them or create new
ones.
Selection mark
Message broadcast
Rule priority. When a
number is subject to
several
rules,
priority
determines the one to be
applied.
Modify selected rule.
Delete selected rule.
Test your rules. Simulate
calls from your contacts to
see the result of rule
application.
The rule with the highest
priority level is placed on
top.
It is interesting at this level to be able to test your rules. Simulate calls from your contacts
to know how forwarding will take place, which rule will be applied, and which message
will be broadcast. These are the operations inherent in this feature and which will be very
useful while creating and using your rules.
1
Page 17/20
Rule priority: example of use
EXAMPLE: Mr Hector will be away for ten days. He creates the rule Absent
(clientele):
Moreover, he would like:
• his colleague Franck to take his call when he calls (Msg_to_Franck.wav)
• to be transferred on no answer to his assistant (4036) if she is present.
Now, Mr Hector wishes to classify his rules according to the order of priority. He places
the rule Absent (clientele) on top of the list. So anybody calling during the specified
period (from 11/01/2006 to 20/01/2006) will be transferred to voice mail with the
message Absent_Clientele.wav.
Mr Hector would not like anybody to disturb him during his meeting hours. Therefore,
Meeting is placed in the second position to filter those who may reach him. For the rule
News for Franck to work, Mr Hector places it in the third position.
Why? The Meeting rule also governs Franck’s numbers. They are part of the Exclusive
filter list; so if Franck calls on Thursday 05/01/2006, for instance, the Meeting rule will
not transfer him to voice mail, and the rule News for Franck will be applied.
1
Page 18/20
Testing the behaviour of your call forwarding rules
On the main page of TWS Rules (TWS Caller TWS Rules menu, then Rules), click Test rules.
The following screen is displayed.
Default call date. Date of
call.
Default call hour. Time of
call.
Enter
your
number.
contact’s
Press this button to start
the test.
The test result is displayed
here.
Return to the TWS Rules
main page.
EXAMPLE: Mr Hector would like to check that his call forwarding rules are working
correctly; so he performs this test.
He checks that his colleague Franck is forwarded to his assistant with message recorded
only for him.
After you have tested the behaviour of your rules, they are ready to work properly and
forward your incoming calls intelligently according to the parameters you have defined.
1
Page 19/20
2.3. Recording announcements
When you click Messages, the following page opens so you can manage your
announcements.
Have somebody call you
back from an extension.
You must do this to read or
record announcements.
Number of the extension
from
which
the
announcement will be
recorded or listened to
Recorded messages which
can be selected in order to
be listened to or deleted
Status of announcement
administration
and
extension number used. An
announcement has just
been saved here.
How does it work? Press Voice server call. A set calls you. Once the call is set up, you can
start recording, then stop, listen to the recorded announcement and repeat the operation
if you do not like the announcement.
To save the announcement, give it a name (Transfer_Std_Messagerie in the above
example) and click Save the announcement. The name of your announcement appears on
the list on the left. You can listen to the announcement again any time by clicking Hear
the selected announcement. You can even delete it and, above all, use it in TWS Rules.
1
Page 20/20