1
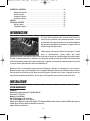
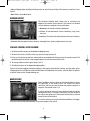
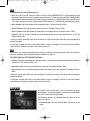
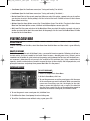
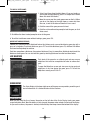
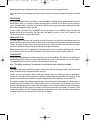
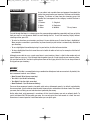
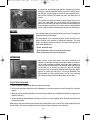
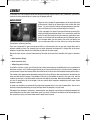
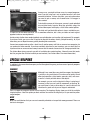
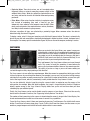
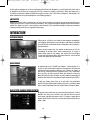
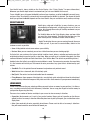
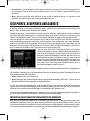
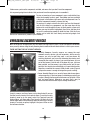
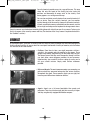
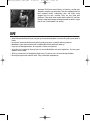
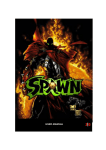
NEW_CW_manual_EN.qxd
9/20/05
9:10 AM
Page 1
USER’S GUIDE
NEW_CW_manual_EN.qxd
9/20/05
9:10 AM
Page 2
EPILEPSY WARNING
Please read this caution before you or your child play a video game:
Certain people are susceptible to epileptic fits or lose consciousness after
exposure to flashing lights or light patterns in our daily environment. Such people
may have a seizure while watching particular televised images or when they play
some video games. This phenomenon may appear even if the subject has no
history of previous difficulties.
If you or a member of your family has ever had symptoms related to epilepsy
(seizures or loss of awareness) when exposed to flashing lights, please consult
your doctor prior to use.
We advise that parents supervise the use of video games by their children. If you
or your child experiences any of the following symptoms while playing a video
game: dizziness, blurred vision, eye or muscle twitches, loss of awareness,
disorientation, any involuntary movement or convulsion, IMMEDIATELY
discontinue use and consult your doctor.
Standard Precautions When Playing Video Games:
• Do not stand or sit too close to the screen. Position yourself as far away from the
screen as the length of cable allows.
• Play video games on a small screen (preferably).
• Avoid playing if you are tired.
• Make sure that the room in which you are playing is well lit.
• Rest for a period of 10 to 15 minutes for every hour you play a video game.
NEW_CW_manual_EN.qxd
9/20/05
9:10 AM
Page 3
TABLE OF CONTENTS
INTRODUCTION . . . . . . . . . . . . . . . . . . . . . . . . . . . . . . . . . . . . . . . . . . . . . . . . . . . . . . 4
INSTALLATION . . . . . . . . . . . . . . . . . . . . . . . . . . . . . . . . . . . . . . . . . . . . . . . . . . . . . . 4
System Requirements . . . . . . . . . . . . . . . . . . . . . . . . . . . . . . . . . . . . . . . . . . . . 4
Installing Cold War. . . . . . . . . . . . . . . . . . . . . . . . . . . . . . . . . . . . . . . . . . . . . . . 5
Uninstalling Cold War. . . . . . . . . . . . . . . . . . . . . . . . . . . . . . . . . . . . . . . . . . . . . 5
RUNNING THE GAME . . . . . . . . . . . . . . . . . . . . . . . . . . . . . . . . . . . . . . . . . . . . . . . . . . 5
Screen Resolution and Sound Devices. . . . . . . . . . . . . . . . . . . . . . . . . . . . . . . . 5
StarForce Copy Protection . . . . . . . . . . . . . . . . . . . . . . . . . . . . . . . . . . . . . . . . 6
GAME MENUS . . . . . . . . . . . . . . . . . . . . . . . . . . . . . . . . . . . . . . . . . . . . . . . . . . . . . . . 7
Main Menu . . . . . . . . . . . . . . . . . . . . . . . . . . . . . . . . . . . . . . . . . . . . . . . . . . . . . 7
Game Options Screen. . . . . . . . . . . . . . . . . . . . . . . . . . . . . . . . . . . . . . . . . . . . . 7
Controls . . . . . . . . . . . . . . . . . . . . . . . . . . . . . . . . . . . . . . . . . . . . . . . . . . . . . . . 7
Audio . . . . . . . . . . . . . . . . . . . . . . . . . . . . . . . . . . . . . . . . . . . . . . . . . . . . 9
Video . . . . . . . . . . . . . . . . . . . . . . . . . . . . . . . . . . . . . . . . . . . . . . . . . . . . 9
In Game Menu . . . . . . . . . . . . . . . . . . . . . . . . . . . . . . . . . . . . . . . . . . . . . . . . . . 9
PLAYING COLD WAR. . . . . . . . . . . . . . . . . . . . . . . . . . . . . . . . . . . . . . . . . . . . . . . . . . 10
Getting Started . . . . . . . . . . . . . . . . . . . . . . . . . . . . . . . . . . . . . . . . . . . . . . . . 10
Object of the Game. . . . . . . . . . . . . . . . . . . . . . . . . . . . . . . . . . . . . . . . . . . . . . 10
Saving and Loading. . . . . . . . . . . . . . . . . . . . . . . . . . . . . . . . . . . . . . . . . . . . . . 10
Quicksave and Quickload . . . . . . . . . . . . . . . . . . . . . . . . . . . . . . . . . . . . 11
Level Objectives . . . . . . . . . . . . . . . . . . . . . . . . . . . . . . . . . . . . . . . . . . . . . . . . 11
Status Display . . . . . . . . . . . . . . . . . . . . . . . . . . . . . . . . . . . . . . . . . . . . . . . . . . 11
Battery/Power . . . . . . . . . . . . . . . . . . . . . . . . . . . . . . . . . . . . . . . . . . . . 11
Health Meter . . . . . . . . . . . . . . . . . . . . . . . . . . . . . . . . . . . . . . . . . . . . . 12
Enemy Alert Level . . . . . . . . . . . . . . . . . . . . . . . . . . . . . . . . . . . . . . . . . 12
Stealth Meter . . . . . . . . . . . . . . . . . . . . . . . . . . . . . . . . . . . . . . . . . . . . . 12
Holster . . . . . . . . . . . . . . . . . . . . . . . . . . . . . . . . . . . . . . . . . . . . . . . . . . 12
Item Selection Menu. . . . . . . . . . . . . . . . . . . . . . . . . . . . . . . . . . . . . . . . . . . . . 13
Movement. . . . . . . . . . . . . . . . . . . . . . . . . . . . . . . . . . . . . . . . . . . . . . . . . . . . . 13
Map Mode . . . . . . . . . . . . . . . . . . . . . . . . . . . . . . . . . . . . . . . . . . . . . . . . . . . . . 14
Actions Menu . . . . . . . . . . . . . . . . . . . . . . . . . . . . . . . . . . . . . . . . . . . . . . . . . . 14
COMBAT . . . . . . . . . . . . . . . . . . . . . . . . . . . . . . . . . . . . . . . . . . . . . . . . . . . . . . . . . . . 15
Ranged Combat . . . . . . . . . . . . . . . . . . . . . . . . . . . . . . . . . . . . . . . . . . . . . . . . 15
Close Combat . . . . . . . . . . . . . . . . . . . . . . . . . . . . . . . . . . . . . . . . . . . . . . . . . . 16
SPECIAL WEAPONS . . . . . . . . . . . . . . . . . . . . . . . . . . . . . . . . . . . . . . . . . . . . . . . . . . 16
INTERACTION . . . . . . . . . . . . . . . . . . . . . . . . . . . . . . . . . . . . . . . . . . . . . . . . . . . . . . 18
Searching Bodies . . . . . . . . . . . . . . . . . . . . . . . . . . . . . . . . . . . . . . . . . . . . . . . 18
Hiding Bodies . . . . . . . . . . . . . . . . . . . . . . . . . . . . . . . . . . . . . . . . . . . . . . . . . . 18
Healing Your Injuries (Using Medikits) . . . . . . . . . . . . . . . . . . . . . . . . . . . . . . . 18
Visibility and Noise. . . . . . . . . . . . . . . . . . . . . . . . . . . . . . . . . . . . . . . . . . . . . . 19
Luring Enemies. . . . . . . . . . . . . . . . . . . . . . . . . . . . . . . . . . . . . . . . . . . . . . . . . 19
TECH POINTS, BLUEPRINTS, AND GADGETS . . . . . . . . . . . . . . . . . . . . . . . . . . . . . . 20
Constructing Gadgets and Devices from Blueprints and Components . . . . . . 20
BYPASSING SECURITY DEVICES . . . . . . . . . . . . . . . . . . . . . . . . . . . . . . . . . . . . . . . . 21
ENEMIES . . . . . . . . . . . . . . . . . . . . . . . . . . . . . . . . . . . . . . . . . . . . . . . . . . . . . . . . . . 22
TIPS . . . . . . . . . . . . . . . . . . . . . . . . . . . . . . . . . . . . . . . . . . . . . . . . . . . . . . . . . . . . 23
NEW_CW_manual_EN.qxd
9/20/05
9:10 AM
Page 4
APPENDIX A: CONTROLS . . . . . . . . . . . . . . . . . . . . . . . . . . . . . . . . . . . . . . . . . . . . . 24
Movement Controls . . . . . . . . . . . . . . . . . . . . . . . . . . . . . . . . . . . . . . . . . . . . . 24
Action Controls . . . . . . . . . . . . . . . . . . . . . . . . . . . . . . . . . . . . . . . . . . . . . . . . 24
Inventory Controls . . . . . . . . . . . . . . . . . . . . . . . . . . . . . . . . . . . . . . . . . . . . . 24
Interface Controls . . . . . . . . . . . . . . . . . . . . . . . . . . . . . . . . . . . . . . . . . . . . . . 24
CREDITS . . . . . . . . . . . . . . . . . . . . . . . . . . . . . . . . . . . . . . . . . . . . . . . . . . . . . . . . . . 25
TECHNICAL SUPPORT . . . . . . . . . . . . . . . . . . . . . . . . . . . . . . . . . . . . . . . . . . . . . . . . 27
Online Support. . . . . . . . . . . . . . . . . . . . . . . . . . . . . . . . . . . . . . . . . . . . . . . . . 27
Telephone Support . . . . . . . . . . . . . . . . . . . . . . . . . . . . . . . . . . . . . . . . . . . . . 27
INTRODUCTION
It’s 1986, and the United States and the Soviet Union are
taking the first tentative steps toward perestroika—a sense
of friendship and cooperation that has not existed between
the two world superpowers for decades. It appears that the
Cold War might actually be over.
Unfortunately, not everyone thinks that glasnost is a good
thing. A fundamentalist faction within the Soviet
government doesn’t want the Cold War to thaw—they want it to heat up. Led by Barinsky, the radical head of
the KGB, a group of separatists is making a last, desperate attempt to return the USSR to the control of the
hard-line Communist regime by framing an American in a plot to assassinate the Soviet president and set off
a chain of events that could very well lead to World War III.
Matthew Carter, a hard-nosed American journalist following a tip from an informant, has just arrived in
Moscow to cover a story. He is hoping that this assignment will lead to the story of a lifetime. Instead, it leads
him into the thick of Barinsky’s plot. Now, instead of vying for a Pulitzer Prize, Carter is fighting to clear his
name, get to the bottom of Barinsky’s sinister plan, and—hopefully—get out of the Soviet Union alive.
INSTALLATION
SYSTEM REQUIREMENTS
MINIMUM
Operating System: Windows® 98/Me/2000/XP
Processor: 1.7 GHz CPU
Memory: 384 MB RAM
Hard Disk Space: 1.5 GB available
CD- or DVD-ROM Drive: 8X or Higher
Video: nVidia GeForce 3 (not Geforce 4MX) / ATI Radeon 8500 or better video card with 64 MB video memory
Sound: DirectX 9.0c or better compatible sound card
Input: Keyboard and Mouse
4
NEW_CW_manual_EN.qxd
9/20/05
9:10 AM
Page 5
RECOMMENDED
Operating System: Windows® 2000/XP
Processor: 2.4 GHz CPU
Memory: 512 MB RAM
Hard Disk Space: 1.5 GB available
CD- or DVD-ROM Drive: 8X or Higher
Video: nVidia GeForce FX 5700 / ATI Radeon 9600 or better ATI or nVidia video card with 128 MB video memory
Sound: DirectX 9.0c or better compatible sound card (Sound Blaster® X-Fi™ series recommended)
Input: Keyboard and Mouse
INSTALLING COLD WAR
To install Cold War:
• Insert Cold War Disc 1 in your CD- or DVD-ROM drive.
• If AutoPlay is enabled on your system, an Install screen appears automatically. If AutoPlay is not enabled,
double-click on the My Computer icon on your Windows desktop or select My Computer from the Windows
Start menu, and then double-click your CD- or DVD-ROM drive icon. If the Install screen still does not
appear, double-click the Setup file to begin installation.
• Follow the on-screen instructions to complete the installation of Cold War.
UNINSTALLING COLD WAR
To uninstall Cold War:
• Open the Windows Start Menu.
• Browse to the Cold War application and select Uninstall Cold War.
Alternatively, you can open the Windows Control Panel, select Add/Remove Programs, select Cold War, and
then click Remove.
RUNNING THE GAME
TO RUN COLD WAR:
• Make sure Cold War Disc 2 is in your CD- or DVD-ROM drive.
• If you have AutoPlay enabled, the game starts when you insert the CD. If you do not have AutoPlay
enabled, double-click the Cold War icon on your desktop or select the game from the Windows Start menu.
SCREEN RESOLUTION AND SOUND DEVICES
When you start the game for the first time, the Cold War First Run window opens, allowing you to set the
basic Cold War options. These settings are automatically used when the game starts. You can’t change these
options in-game, but you can access them by selecting Change options for Cold War from the Cold War
folder on the Windows Start menu.
5
NEW_CW_manual_EN.qxd
9/20/05
9:10 AM
Page 6
The Cold War Options window that you run from the Windows
Start menu has three tabs. To access the option controls, click
the tab for the options you want to adjust:
• Video Options: Set the game resolution and full-screen or
windowed mode.
• Sound: Select a sound card/driver.
• Troubleshooting: Reset all options to their defaults.
Additional video and audio options can be set from within the game. See “Game Options Screen” for details.
To exit the Cold War Options window and save the option settings, click OK at the bottom of the window. To
exit the Cold War Options window without saving the new settings, click Cancel.
VIDEO OPTIONS
On the Video options tab, select the screen resolution at which you want to run Cold War. Select a resolution
from the choices on the drop-down menu. Higher resolution provides better detail, but might cause
performance issues on slower computers.
To run the game in full-screen mode, click the checkbox. To run the game in a window, make sure this
checkbox is unchecked.
SOUND OPTIONS
On the Sound options tab, select the sound device that you want to use for Cold War. During installation, the
game automatically selects an appropriate sound device. To change sound devices, select the new device
from the drop-down menu. Check your hardware documentation to determine which sound option(s) will
work on your computer. To turn off all of the game sounds, select No Sound from the menu.
The Sound tab also has three buttons:
• Default: Reset the sound options to their original settings. The default device usually provides the best
audio experience.
• Compatible: Allow the game to search for and select a compatible sound device option. Try using this
option if you have problems with the default sound device.
• No Sound: Turn off all of the game sounds (music, dialog, and sound effects).
TROUBLESHOOTING
Select this tab if you experience any problems during the game. Click the Reset all options to default values
button to reset the options to the settings that were automatically selected when the game was installed.
Note that this resets not only the options set in the Cold War Options window, but also those set on the
in-game Game Options Screen.
STARFORCE COPY PROTECTION
Cold War is copy protected using the StarForce copy protection system.
THE READ ME FILE
The Read Me file contains all of the latest information about Cold War, including information about any
additions or changes to the game that were incorporated after this manual was printed. To view the Read Me
file, select Latest information about Cold War from the Cold War folder on the Windows Start menu.
6
NEW_CW_manual_EN.qxd
9/20/05
9:10 AM
Page 7
GAME MENUS
MAIN MENU
The Main Menu opens automatically when you load Cold War. The
following options are available. Click an option to select it.
• New Game: Start a new game of Cold War.
• Continue Game: Continue your most recently saved game.
When you select this option, you continue your most recent
game from the last saved location. (This option is inactive if no
saved games are available.)
• Load Game: Load a previously saved game. When you select
this option, the Load Game screen opens. To load a game, click
its name on the list. To exit the Load Game screen without loading a game, press ESC. (This option is inactive
if no saved games are available.)
• Options: Open the Game Options screen. (See “Game Options Screen” for details.)
• Exit Game: Quit Cold War and exit to the Windows desktop.
GAME OPTIONS SCREEN
The Game Options screen allows you to adjust game settings and
customize your controls. This menu is accessible from the Main
Menu and from the In-Game Menu.
The following options are available:
• Controls: Adjust mouse and game control settings.
• Video: Adjust the quality of the game image and select subtitle
options.
• Audio: Adjust sound volume and other audio options.
• Back: Return to the Main Menu.
Click an option to open its sub-menu. To exit the Game Options screen, click Back or press ESC.
Note: To set the screen resolution and select a sound device, open the Change Options for Cold War window
from the Cold War folder on the Windows Start menu. From this window you can also reset all of the game
option settings to their default values. (See “Screen Resolution and Sound Devices” for details.)
CONTROLS
The Controls Menu allows you to adjust the game controls to suit your style of play. The following options are
available:
• Keyboard Mapping: Open the Keyboard Mapping menu to change the default control keys for various
actions in the game.
7
NEW_CW_manual_EN.qxd
9/20/05
9:10 AM
Page 8
• Mouse Settings: Open the Mouse Settings menu to adjust the sensitivity of the mouse or invert the Y-axis
control.
• Back: Return to the Main Menu.
KEYBOARD MAPPING
The Keyboard Mapping menu allows you to customize the
keyboard and mouse action controls. The controls are divided
into the following categories for easy reference:
• Movement: All controls related to movement.
• Actions: All non-movement actions—reloading, using items,
and so on.
• Inventory: The controls for choosing items from your inventory.
• Interface: General game interface controls—view objectives, quick save/quick load, and so on.
TO RE-MAP A CONTROL, DO THE FOLLOWING:
1. Click the control category on the Keyboard Mapping menu.
2. On the list of actions, click the action you want to change to select it.
3. Press or activate the control (key, mouse button, mouse wheel) to which you want to map the control. The
control to which the action is now mapped appears next to the name of the action.
4. To re-map another control, repeat steps 2 and 3.
5. Click Back to return to the Keyboard Mapping Menu.
To reset all control mappings (and other options in the game) to their default settings, quit the game, select
Change options for Cold War from the Cold War folder on the Windows Start menu, and click Reset all options
to default values on the Troubleshooting tab.
MOUSE SETTINGS
Select the Mouse Settings option on the Controls Menu to adjust
the sensitivity of the mouse input. The higher the mouse
sensitivity, the less you have to move the mouse to produce a
response. The default value is 1.0.
To adjust the mouse sensitivity, move the mouse over the option
setting on the menu. To increase sensitivity, click the arrows to
the right of the option text. To decrease the sensitivity, click the
arrows to the left of the text.
To save the settings and return to the Controls Menu, click Apply.
To return to the Controls Menu without saving your changes, click Cancel.
8
NEW_CW_manual_EN.qxd
9/20/05
9:10 AM
Page 9
AUDIO
The Audio menu has the following options:
• EAX: Turn EAX on or off. Cold War supports Creative EAX® ADVANCED HD™ 3.0 Environmental Audio
technology that delivers the best gaming audio experience. To take advantage of EAX® ADVANCED HD™
Environmental audio technology in the game, you must equip your system with one of the Sound Blaster®
X-Fi™ series sound cards. If your system supports EAX Acoustics, it is automatically selected during setup.
• Music Volume: Adjust the volume of the background music. The default value is 100%.
• Speech Volume: Adjust the volume of character speech. The default value is 100%.
• Effects Volume: Adjust the volume of sound effects and ambient sound. The default value is 100%.
• Subtitles: Turn the in-game subtitles and those displayed during cut-scene animations on or off. The
default setting is On.
To adjust a setting, move the cursor over the option. Use the left and right arrow keys on the keyboard to
change the option.
To save your changes and return to the Game Options screen, click Apply. To return to the Game Options
screen without saving your changes, click Cancel or press ESC.
VIDEO
In this menu, you are given the opportunity to adjust your monitor settings to maximize the visual quality of
the game. Follow the on-screen instructions to complete this process.
THE VIDEO MENU HAS THE FOLLOWING OPTIONS:
• Gamma: Change the color brightness and color contrast of the image (as opposed to the overall brightness
and contrast). The default setting is 1.0.
• Brightness: Make the overall picture brighter or dimmer. The default setting is 100%.
• Contrast: Adjust the variation between the lightest and darkest parts of the picture. The default setting is
100%.
To adjust a setting, move the cursor over the option. Use the left and right arrow keys on the keyboard to
change the option.
To save your changes and return to the Game Options screen, click Apply. To return to the Game Options
screen without saving your changes, click Cancel or press ESC.
IN-GAME MENU
During the game, you can access the In-Game Menu to adjust
game options save and load games. To open the In-Game Menu,
press ESC at any time during the game.
The following options are available from this menu. Click an
option to select it.
• Continue Game: Close the In-Game Menu and return to the
game.
9
NEW_CW_manual_EN.qxd
9/20/05
9:10 AM
Page 10
• Save Game: Open the Save Game screen (see “Saving and Loading” for details.)
• Load Game: Open the Load Game screen (see “Saving and Loading” for details.)
• Restart Level: Restart the current game level. When you select this option, a prompt asks you to confirm
your decision to restart. On the prompt, click Yes to restart the level. Click No to return to the In-Game
Menu without restarting.
• Options: Open the Game Options screen (See “Game Options Screen” for details.) To return to the In-Game
Menu from the Game Options screen, click Back on the Game Options menu or press ESC.
• Quit Level: Exit the game and return to the Main Menu. When you select this option, a prompt asks you to
confirm your decision to abort the current level. On the prompt, click Yes to exit to the Main Menu. Click No
to return to the In-Game Menu.
PLAYING COLD WAR
GETTING STARTED
To start a new game of Cold War, select New Game from the Main Menu and then select a game difficulty
level.
OBJECT OF THE GAME
In Cold War, you play the role of Matthew Carter, a resourceful American reporter. Following a lead from a
trusted source, you have traveled to the Soviet Union to cover a breaking news story. Instead, you’ve
stumbled into the middle of a plot to destroy the growing amity between the Russians and the Americans—
and someone is determined to set you up as the architect of this nefarious plan. Using a combination of
ingenuity, stealth, and brute force, you must uncover the clues to the real plot, find the perpetrators, and
prove your innocence—and perhaps even prevent World War III in the process.
SAVING AND LOADING
TO SAVE YOUR GAME:
1. Press ESC to open the In-Game Menu.
2.On the In-Game Menu, click Save.
3. To save the game over an existing saved game, click the name
of the saved game you want to overwrite. When you move the
cursor over an existing save slot, the display on the right
shows a screen shot from that save, as well as the date and
time that it was saved. Click Yes on the confirmation prompt to
overwrite the selected saved game, or click No to cancel.
4. To save the game in a new saved game slot, click New Save.
5. Click OK on the Game Saved prompt to return to the game.
6. To exit the Save Game screen without saving a game, press ESC.
10
NEW_CW_manual_EN.qxd
9/20/05
9:10 AM
Page 11
TO LOAD A SAVED GAME:
1. Select Load Game from the Main Menu. (If you are loading a
saved game during game play, press ESC to open the In-Game
Menu and select Load Game.)
2.Move the cursor over the saved game names on the list. When
you do so, the display on the right shows a screen shot from
the save, as well as the date and time that it was saved.
3. Click the name of the game you want to load.
4. Click Yes on the confirmation prompt to load the game, or click
No to cancel.
5. Click OK on the Game Loaded prompt to return to the game.
6. To exit the Load Game screen without loading a game, press ESC.
QUICKSAVE AND QUICKLOAD:
Cold War has a Quicksave and a Quickload feature that allows you to save and load during game play with a
press of a single key. To activate Quicksave, press F5. To activate Quickload, press F9, and then click OK on
the Game Loaded prompt to continue.
Each time you perform a Quicksave, the previous Quicksave (if any) is overwritten. Quickload simply loads the
Quicksave saved game. You can also load this game by selecting Quicksave from the Load Game menu.
LEVEL OBJECTIVES
Each level of the game has an ultimate goal and one or more
objectives that must be accomplished in order to achieve that
goal.
To open the Objectives screen and view your mission goal and
objectives at any time during the game, press F1. To exit the
Objectives screen, press ESC or F1.
STATUS DISPLAY
The Status Display in the lower right corner of the game screen provides you with a great
deal of information. It is divided into four distinct sections.
BATTERY/POWER
When you are using the X-ray Camera, the meter on the left side of the Status Display tracks your power
usage and battery level. When the battery is fully-charged, the power meter extends to the top of the display.
As you use the camera, the power is drained, and the battery level drops toward the bottom of the display.
11
NEW_CW_manual_EN.qxd
9/20/05
9:10 AM
Page 12
When the power meter is empty, the battery is dead and the device will no longer function.
The X-ray Camera is self-charging—the battery level returns to full over time when the device is not being
used.
HEALTH METER
The bar at the bottom of the Status Display is your Health Meter. The length of the green bar displayed on the
Health Meter serves as a constant reminder of your physical condition. At full Health, the bar stretches
across the entire display. Each time you are injured, the bar gets progressively shorter, moving to the right.
When the bar disappears entirely, you die.
You can restore your Health by using Medikits to heal your wounds. To use a Medikit, press 6 to open the
Medikit section of your inventory, and then select the Medikit you want to use. (See “Inventory” and
“Healing Your Injuries” for more information.)
ENEMY ALERT LEVEL
The small square in the lower right corner of the Status Display to the right of the Health Meter serves as a
monitor for the current level of enemy alertness in your area. When nearby enemies are at ease, the square
is green. As enemy alertness increases—in response to alarms, sounds you have made, and so on—the square
turns first to yellow and then to red, which indicates the highest alert level.
When the alert level is red, it’s a good bet that the nearby enemy units are actively searching for you. Lay low
or hide for a minute or two until the Enemy Alert Level square returns to green, and then move on.
STEALTH METER
The blue bar along the right side of the Status Display is the Stealth Meter. This indicates the likelihood of
your being spotted or heard by an enemy. When the blue bar is short or non-existent, you are well-hidden.
The higher the blue bar rises, the easier it is for the enemy to locate you.
See “Visibility and Noise” for details on the finer points of being stealthy.
HOLSTER
The square in the center of the Status Display is your holster. The item that appears here is being held at the
ready, and can be easily accessed and used at any time.
To place an item in your holster, select it from your inventory and press E. When you select a new item for
your holster, any item that was already in the holster is automatically placed back in your inventory. To use
the item in your holster, press the E key or the left mouse button. (See “Inventory” for more details.)
The number or numbers that appear below the item in your holster indicate the number of uses the item has
remaining (in the case of items with a limited number of uses), or the amount of ammunition (in the case of
weapons). Weapon ammunition is indicated by two numbers—one showing the number of shots in the weapon,
the other showing the total amount of available ammunition you have for that weapon. For example, if the
pistol in your holster has 8/52 displayed below the weapon image, this means that there are currently 8
rounds in the pistol and 52 rounds total available for the weapon.
12
NEW_CW_manual_EN.qxd
9/20/05
9:10 AM
Page 13
ITEM SELECTION MENU
As you collect and assemble items and weapons throughout the
game, they are placed in your inventory. The items are sorted by
category. To retrieve an item from your inventory, press the
number that corresponds to the category in which the item is
stored:
1. Firearms
2. Slingshot
3. Mines
4. Explosives
5. Other
6. Medikits
7. X-ray Camera
To cycle through the items in a category, press the corresponding number key repeatedly until you get to the
item you want, or use the mouse wheel to scroll through the list. To exit the Inventory Display without
selecting an item, press ESC.
• To select an item from your inventory and place it in your holster, press E when the item is highlighted.
When you place a new item in your holster, any item currently in your holster is automatically returned to
your inventory.
• To use a highlighted item without placing it in your holster, click the left mouse button.
• To drop a highlighted item that cannot be used—a bottle of vodka or fuel can, for example—click the left
mouse button.
Although you are able to carry a great many items in your inventory, there is a limit to the number of each
type of item you can carry. If you attempt to pick up more items of a single type than your inventory allows,
you are informed of this. In order to pick up more items of that type, you must first use or drop an item of
that type from your inventory.
MOVEMENT
Movement in Cold War is accomplished using a combination of keyboard and mouse controls. By default, the
basic movement controls are as follows:
•
•
•
•
Move Forward: W (or the up-arrow key)
Turn Left: A (or the left-arrow key)
Turn Right: D (or the right-arrow key)
Move Backward: S (or the down-arrow key)
There are three movement speeds—slow walk, walk, and run. Movement speed is, by default, controlled by
the mouse wheel. Spin the mouse wheel forward to move faster and backward to move slower. The slower
you move, the less likely you are to be heard and spotted by the enemy.
On the other hand, quick movement is sometimes all that stands between you and an untimely death. To
sprint, hold down the CTRL key while you move. You can only sprint for a few seconds at a time. You must
then move at a normal pace for a brief time before you can sprint again.
13
NEW_CW_manual_EN.qxd
9/20/05
9:10 AM
Page 14
In many cases, maintaining a low profile is the only way to sneak
through a tricky or potentially hostile situation. To crouch, press
the Shift key. You can toggle in and out of crouch mode by pressing the Caps Lock key. The slower you move, the lower you can
crouch.
The camera view typically remains behind Carter, but you can
rotate the view (when you are standing still) by moving the
mouse in the direction you want the camera to move. When you
have a weapon in your hand, the camera remains locked behind
Carter’s right shoulder, and moving the mouse aims the weapon.
MAP MODE
You can keep track of your location by using your map. To toggle the
map on and off, press the M key.
The map appears as a translucent overlay on the screen. As you
move, the map shifts position to follow your progress. The map
shows the general layout of the area, and marks the position of
doors with colored lines:
• Green: Unlocked doors.
• Red: Locked doors that can be opened using a key.
• Blue: Locked doors that cannot be opened.
ACTIONS MENU
Most actions in the game—other than basic movement and
combat—are initiated from the Actions Menu. When an action or
set of actions becomes available, the Actions Menu appears to
show you the available choices. For example, when you walk up
to the body of an enemy you have just killed or knocked
unconscious, the Search Body and Grab Body commands might
appear. Or, when you walk up to a stash of equipment, the
Actions Menu lists the available items. (In this case, selecting
the item name from the Actions Menu picks up that item.)
TO USE THE ACTIONS MENU:
1. When the options appear, hold down the right mouse button.
2. Use the up and down arrow keys on the keyboard or the mouse wheel to scroll through the available
options.
3. When the action you want to perform (or item you want to pick up) is highlighted, release the right mouse
button to select it.
4. To exit the Actions Menu without selecting an action or an item, highlight Back To Game and release the
right mouse button.
When there is only one action or item listed on the Actions Menu, you can select it by simply clicking the right
mouse button. You can also automatically select the first item on the menu in this manner.
14
NEW_CW_manual_EN.qxd
9/20/05
9:10 AM
Page 15
COMBAT
In Cold War, you can accomplish many mission goals through stealth and wits—but, sometimes, you have no
choice but to use whatever force is necessary to defend yourself.
RANGED COMBAT
There are only a couple of ranged weapons in the game, but each
of these have a diversity of ammo types that can be shot from
them. It’s not a bad idea to keep a ranged weapon in your holster at all times just in case you need to get to it quickly.
To fire a weapon, first draw it from your holster by pressing E or
clicking the left mouse button. Once it is in your hands, move the
mouse so that the crosshairs on the screen are centered on your
target, and click the left mouse button to fire. Although you can
fire a weapon while you are moving, the faster you move, the
less accurate your shots are. Your accuracy is always best when
firing from a stationary position.
Your aim is important! If you can manage to inflict a critical wound, you can put your target down with a
minimal number of shots. For example, you can often eliminate an enemy with a single shot to the head,
whereas it might take several hits to the body to take out the same target.
Watch the color of your crosshair when aiming! The color of the crosshair identifies the target as friend or
foe:
• Red Crosshair: Enemy
• Green Crosshair: Ally
• Yellow Crosshair: Civilian
If you kill a civilian or an ally, you fail the mission—so be careful who you shoot! Note that you are allowed to
knock out civilians—and it is often a good idea to do so if you have the chance! A civilian can alert enemies to
your presence if given the chance. Other non-lethal forms of attack are also fine when dealing with civilians.
The numbers that appear below the weapon image in the Status Display show you how much ammunition you
have available for that weapon. The number on the left is the number of rounds in the gun’s clip, and the
number on the right is the total number of rounds available for reloading. When both numbers are zero, you
are out of ammunition for that weapon, and you should switch weapons immediately until more ammo
becomes available.
If rounds are available, you automatically reload your weapon when it runs out of ammunition. You can also
manually reload the weapon by pressing the R key when the weapon is in your hand.
Like other items, weapons, and devices, ammunition for your weapons can be found scattered throughout the
game. Whenever you find some ammunition, pick it up—even if it doesn’t work with any of the weapons you
are currently carrying. You never know when it might come in handy.
15
NEW_CW_manual_EN.qxd
9/20/05
9:10 AM
Page 16
CLOSE COMBAT
In many cases, you might not have access to a ranged weapon or,
even if you do, using one is not an option because it will draw
unwanted attention. In these situations, your only option when
you need to put an enemy out of commission is to engage in
close combat.
To deal with an enemy in this manner, you must sneak up behind
him and take him by surprise. When you get within range, the
Actions Menu opens and displays a list of close combat options.
The tried and true Knock Out option is always available to you—
a simple fist to the side of the head. This is sometimes effective, but is noisy and does not work against
opponents who are wearing helmets.
A wide variety of other close combat methods are available when you have the right equipment. For example,
if you have a knife, you can use the Slit option to dispatch the enemy silently (and permanently). Or, if you
have ether, you can Dope the enemy, quietly knocking him unconscious.
Unconscious enemies wake up after a short time. If another enemy unit finds an unconscious companion, he
can awaken his fallen comrade. If you have anesthetic injections in your inventory, you can select the Use
Injection action on an unconscious enemy to ensure that he remains unconscious for a longer period of time.
The Actions Menu always presents you with all available close combat options. Choose the one that works
best for you given the situation in which you are involved. (See “Actions Menu” for more information.)
SPECIAL WEAPONS
In addition to the conventional weapons you find throughout the game, you have several specialty weapons
available to you.
SLINGSHOT
Although it may seem like a very primitive weapon, the slingshot
is actually a very useful device. It can be used to quietly launch
offensive projectiles—sticky bombs, grenades, darts, and so on—
as well as a variety of other devices and objects.
For example, you can use the slingshot to fling a tracing bug at
an enemy so that you can track his movements on the map. Or,
you could shoot a coin or other object at a wall to distract the
attention of a guard so that you can slip past undetected.
Press 2 to open the slingshot section of your inventory. The Inventory Display shows you all of the available
slingshot options. Select the option you want and then aim and fire the slingshot just as you would any other
ranged weapon.
MINES
Mines are useful devices that you can use to remotely eliminate or incapacitate enemy personnel. There are
two basic mine types:
16
NEW_CW_manual_EN.qxd
9/20/05
9:10 AM
Page 17
• Explosive Mines: These basic mines are set to explode when
triggered, killing or seriously wounding anyone caught in the
weapon’s blast radius. While very effective, explosive mines are
very noisy and tend to draw lots of attention from nearby enemy
personnel.
• Ether Mines: Ether mines function similarly to explosive mines
but, instead of exploding, they emit a cloud of gas that
temporarily stuns enemies in the weapon’s zone of effect. Ether
mines are much quieter than explosive mines and are, therefore,
less likely to alert enemies to your presence.
All mines, regardless of type, are activated by a proximity trigger. When someone enters the device’s
detection range, the mine is triggered.
To deploy a mine, select it from your inventory and click the left mouse button. The mine is automatically
placed at your feet and armed. Mines should only be deployed in hidden locations—in dark, shadowed areas,
for example. If an enemy spots the mine before it goes off, he can disarm the weapon, rendering it useless.
X-RAY CAMERA
When you arrived in the Soviet Union, your normal camera was
replaced with a duplicate that is equipped with a powerful X-ray
device. While it was the enemy’s intention to use this top-secret
spy gadget as part of an elaborate plot to frame you, the joke is
on them! If you learn to use the X-ray Camera effectively, it can
be a great asset in your investigation and escape.
First and foremost, the X-ray Camera allows you to see through
walls. This comes in handy for examining a room before you
enter so that you know whether there are any enemies present.
This ability is passive—as long as you are in camera mode, you
can look through a wall by simply looking in that direction.
The X-ray camera is also an effective ranged weapon. When the camera has ammunition (which you can find
in the usual places—by searching fallen enemies, for example), you can use it to fire a burst of high-energy
radiation that can render an enemy unconscious for a short time. In order to be effective, you must aim your
shot at the target’s brain, which is (conveniently) readily visible when the X-ray Camera is active.
You can also indirectly attack a target by using the camera to blast an explosive near the enemy—a fire
extinguisher, for example. When the object explodes, the target is incapacitated by the blast. Explosive
objects appear orange in the X-ray Camera’s Display. Make sure you’re not too close when you blow
something up—you could be injured!
Finally, the X-ray Camera can be used to disable security cameras or laser fences. Take aim at the security
device and fire to render it inactive. (See “Bypassing Security Devices” for details.)
The number of shots remaining in the camera is shown below the camera’s image in the Status Display. You
do not need ammunition in order to use the camera’s normal X-ray capabilities.
To use the X-ray Camera, select it from your inventory by pressing 7 and then press E or click the left mouse
button. To switch out of camera view, press E again. To fire a blast from the camera, aim the camera as you
would any ranged weapon and click the left mouse button while in camera mode.
17
NEW_CW_manual_EN.qxd
9/20/05
9:10 AM
Page 18
As you gather components and start exchanging Tech Points for blueprints, you will eventually have access
to blueprints that allow you to upgrade the X-ray Camera by adding a zoom lens. When the zoom lens is
installed, use the mouse wheel to zoom the image in and out. (See “Tech Points, Blueprints, and Gadgets” for
more information on acquiring blueprints and building gadgets.)
ANESTHETICS
Anesthetics aren’t really a weapon per-se, but a means to keep an unconscious enemy unconscious for a
longer period of time. If you are carrying anesthetics, the Use Injection option appears on the Actions Menu.
Select this option to inject a dose of drugs into the body. This should be enough to keep most enemies
sleeping soundly until you are a good distance away.
INTERACTION
SEARCHING BODIES
When you’re a fugitive, you have to take weapons, equipment,
and supplies wherever you can find them—and there is no better
place to look for useful items than in the pockets of a freshly-dispatched enemy.
Nearly every enemy that you render unconscious or kill has
something of interest that’s worth searching for. To search a
body, move close to the enemy and select the Search Body
action from the Actions Menu. Any items found as a result of the
search are added to your inventory.
HIDING BODIES
As mentioned in the “Visibility and Noise” section below, it is
usually to your advantage to remain inconspicuous and leave no
evidence of your presence. Nothing says “there’s an enemy in
the vicinity” like the corpse of a hapless guard, so it’s important
that you tidy up after yourself when you dispatch an enemy.
Move the body into the shadows or hide it behind something to
minimize the chance that someone else will come along and find it.
To pick up a body, move close to it and select the Grab Body
option from the Actions Menu. When you reach a suitable hiding
place, select Drop Body from the Actions Menu to drop the body.
HEALING YOUR INJURIES (USING MEDIKITS)
No matter how careful you are, you’re bound to get hurt. Luckily,
Medikits are fairly easy to find if you take the time to search
every room and body you come across. It’s always a good idea to
keep a few of these on hand in case you need to patch yourself up
after a fight.
18
NEW_CW_manual_EN.qxd
9/20/05
9:10 AM
Page 19
Your Health level is always visible on the Status Display. (See “Status Display” for more information.)
Whenever your Health drops below its maximum level, you can use a Medikit to increase it.
To use a Medikit, press 6 to open the Medikit section of your inventory, scroll to the Medikit you want to use,
and press Enter. Your Health is automatically increased when the Medikit is selected. The amount of Health
boost you get from the Medikit depends on the size of the kit—they are available in small, medium, and large.
VISIBILITY AND NOISE
Stealth plays a big role in Cold War. In many situations, you are
outnumbered and outgunned, so fighting your way out is not an
option. Only through the mastery of stealthy movement can you
hope to succeed.
The Visibility Meter on the Status Display shows you how visible
you are at any given moment. The higher the blue bar rises, the
more visible you are. A number of factors affect visibility:
• Light: The brighter the area you are moving through, the more
visible you are. If you want to remain hidden, remain in the
shadows as much as possible.
• Cover: Hiding behind natural cover reduces your visibility.
• Posture: When you are crouched, you are less visible than when you are standing upright.
If all else fails, you can always find a place to hide. Look for closets, lockers, and other enclosed spaces that
might be big enough to conceal you for a short time. When you walk up to a suitable hiding place, the Hide
command becomes available on the Actions Menu. (See “Actions Menu” for details on performing actions.)
Another factor that affects your ability to remain hidden is sound. The more noise you make, the more likely
it is that enemies will notice you. The amount of noise you make at any given time is determined by your
actions:
• Slow Walk: This is the quietest form of movement and produces only minimal sound.
• Walk: Noisier than a slow walk, but still relatively quiet.
• Run/Sprint: The noisiest and most noticeable form of movement.
• Firing Weapons: Some weapons—like slingshots—are relatively quiet and might not draw the attention of
nearby enemies, while other weapons—like pistols and rifles—alert enemies to your presence immediately.
LURING ENEMIES
Sound can also be used to your advantage. When you want to draw an enemy to your position, it is often as
easy as making a noise that will catch the enemy’s attention. You can snap your fingers to lure the enemy to
your position by pressing the L key.
There are also a number of devices and objects you can use to draw an enemy’s attention:
• Cigarettes: Most enemies can’t resist a free pack of smokes. Drop a pack of cigarettes on the floor or
ground to attract an enemy’s attention. When they bend over to pick up the pack, you can take them out or
slip by them.
• Coins: Coins make lots of noise, especially when thrown. Throw a coin to distract an enemy’s attention—
they will move toward the sound instead of toward you.
19
NEW_CW_manual_EN.qxd
9/20/05
9:10 AM
Page 20
• Luring Device: If you’re looking for a high-tech way to distract an enemy, construct a luring device. It can
be set to make a loud sound that draws enemies toward it. You can attack or get away while they are
distracted.
• Mines: Not very subtle, but often effective. If you set off an explosive charge, it is certain to draw
attention. Just make sure that you’re not nearby when it goes off.
TECH POINTS, BLUEPRINTS AND GADGETS
In addition to being an ace reporter, Matthew Carter is skilled in the construction of useful gadgets and
devices. This is an ability that is bound to come in handy.
Throughout the game, you will find files and other technical materials, each of which is worth a number of
Tech Points. Many files and blueprints are found just where you’d expect to find them—briefcases and file
cabinets are good places to look. You can also find files on the bodies of enemies you incapacitate or kill.
Each time you pick up a file or other technical item, it adds to your Tech Point total. Tech Points represent
technical knowledge gained from reading the various documents you have obtained. You can use this knowledge to create blueprints for new gadgets. Once you’ve drawn up your blueprints for a new gadget, you can
then construct these gadgets and deadly devices. To convert your Tech Points into blueprints, press the F2
key. This opens the Assembly screen. To exit the screen at any time, press ESC.
There are seven Tech Levels. The higher the Tech Level, the more
advanced the gadget or device made possible by the blueprint. In
order to draw up blueprints at higher tech levels, you must first
design less complicated blueprints and build upon these until you
have enough knowledge (Tech Points) to design a more advanced
device. You must design three blueprints from the next lower level
in order to advance to the next level of gadgetry. For example, you
must have at least three Tech Level 1 blueprints before you can
start drafting blueprints from Tech Level 2.
To scroll through the Tech Levels on the Assembly Screen, press the up and down arrow keys on the keyboard.
The Assembly screen displays all of the blueprints that you can potentially obtain. The blueprint icons are
color-coded to denote their availability:
• Yellow: Blueprints that you already have.
• Green: Blue prints that can be designed when you have enough knowledge (Tech Points). These icons also
display the Tech Point cost required to create the Blue Print.
Use the arrow keys on the keyboard to scroll through the icons. The right-hand section of the Assembly
screen shows the name of the highlighted item and a brief description of its function. The total number of
Tech Points you currently have available appears at the bottom right, below the cost.
To purchase the highlighted blueprint, press Enter and click Yes on the confirmation prompt that follows. If
you do not want to purchase the blueprint, click No on the confirmation prompt.
CONSTRUCTING GADGETS AND DEVICES FROM BLUEPRINTS AND COMPONENTS
Once you have designed the blueprints for a new device, you can construct it—provided you have the proper
components. Components can be just about anything you find in the game—plastic bottles, screws, cans, and
so on. When you highlight a blueprint that you have designed (a yellow blueprint) on the Assembly screen,
icons representing the components required to build that item are displayed below the blueprint inventory.
20
NEW_CW_manual_EN.qxd
9/20/05
9:10 AM
Page 21
Yellow means you have the component available, red means that you don’t have the component.
A transparent gadget icon indicates that you do not have the required parts to assemble it.
To view an inventory of your components, press and hold the I key
while the Assembly screen is open. The number you have available
is displayed in the bottom right corner of each component icon. To
close the component inventory, release the I key.
To construct a gadget or device for which you have the blueprint
and all of the necessary components, use the arrow keys on the
keyboard to scroll through the icons on the Assembly screen until
the one you want to build is highlighted. Press Enter, and then click
Yes on the confirmation prompt to build the item. Click No if you
decide not to build the item. Newly constructed gadgets and
devices are automatically added to your inventory.
BYPASSING SECURITY DEVICES
Most of the places through which you must move are high-security areas, so you are bound to encounter
many security devices along the way. Knowing how to avoid and disarm these devices is vital to your success.
THERE ARE TWO TYPES OF SECURITY DEVICES:
• Security Cameras: Security cameras are among the most
common security devices you will encounter. Active security
cameras are easy to spot—they emit a red laser beam. By
watching the beam, you can easily determine the viewing area
covered by the camera. As long as you avoid the beam, you are
out of the camera’s field of view. If the beam hits you, you have
been spotted, and the enemy is very likely on the way to your
position. You should also avoid killing or incapacitating guards
when they are within the camera’s field of view—seeing a guard
collapse on-camera is enough to bring other guards running.
• Laser Security Fence: Laser security fences block some doors
and passageways. If the laser beams are blinking on and off, you
can pass through the fence while the beams are off (with a little
luck and good timing). Otherwise, you must find a way to
deactivate the fence in order to pass through undetected.
Security cameras and laser fences can be deactivated if you can
find the security terminal that controls them. To use the security
terminal, move up to the panel, select Use Terminal from the
Actions Menu, and then select Turn Security Off. Note that the
Actions Menu works a bit differently when you are using a security
terminal. To select an option, highlight it and press Enter or click
the left mouse button.
21
NEW_CW_manual_EN.qxd
9/20/05
9:10 AM
Page 22
Security terminals provide access to a map of the area. This map
shows not only the layout of the facility, but also tracks the
positions and movement of enemy units in the vicinity. Each
enemy appears as a red figure on the map.
You can also reactivate security devices from security terminals if
you so desire. From the security terminal, you can monitor
activity through all of the security cameras that terminal controls.
If there are multiple cameras controlled from the console, use the
left and right arrow keys on the keyboard to change camera views.
Security cameras can also be deactivated by hitting them with a blast from your X-ray camera. To do so, aim
the X-ray camera at the security camera and fire. (The function of the X-ray camera is explained in detail in
the “Combat” section.)
ENEMIES
As you might expect, given your situation in Cold War, there are plenty of people that would like nothing more
than to see you in prison—or, worse, dead. You can expect to encounter a variety of enemies, not all of whom
act and react in the same manner.
• Civilians: From time to time, you might encounter civilians—
scientists, for example—who are working for the enemy. These
people are unarmed, and generally run away when they see you.
That doesn’t mean that they aren’t dangerous, though—civilians
can alert other, more dangerous enemies to your presence.
Unfortunately, you cannot kill civilians—doing so causes you to
fail your current mission. Simply avoid civilians whenever
possible.
• Police and Guards: The most common enemies you encounter are
police and military personnel who patrol the various facilities
throughout the game. These enemies attack you on sight, but
have no special offensive or defensive abilities.
• Agents: Agents are a bit more formidable than guards and
policemen. They also attack on sight, but their accuracy is higher
and they are generally equipped with better weapons.
22
NEW_CW_manual_EN.qxd
9/20/05
9:10 AM
Page 23
• Spetsnaz: The Russian special forces, or Spetsnaz, are the most
dangerous enemies you encounter. They are equipped with the
best weapons—usually submachine guns and night vision
goggles—and are very accurate. They are also quite well
protected. Their body armor makes them harder kill, and their
helmets make them immune to being knocked out with a simple
punch. (See “Close Combat” for details.)
TIPS
• Look all around for items that you can pick up. You never know when a screw or dirty old rag can come in
handy.
• Lure guards away from the place you want to go by using coins, cigarettes and luring devices.
• Remember, if you shoot an enemy with a rubber bullet, he will eventually wake up.
• If you can see through windows, so can guards, civilians, and spetsnaz.
• Using the X-ray camera to blow up fuel cans and vodka bottles will create explosions. Try luring your
enemies close to them.
• The X-ray camera isn’t just for blowing things away. Its primary use is to reveal enemy locations.
• Do not place your mines in well lit areas. They can be seen and picked up.
23
NEW_CW_manual_EN.qxd
9/20/05
9:10 AM
Page 24
APPENDIX A: CONTROLS
The following table shows the default keyboard and mouse controls for Cold War. You can re-map the
keyboard controls to whatever settings you prefer. (See “Game Settings Screen” for details.)
MOVEMENT CONTROLS
Action
Move Forward
Move Backward
Turn/Strafe Left
Turn/Strafe Right
Crouch
Toggle Crouch
Sprint
Speed Up
Slow Down
Primary
W
S
A
D
Left SHIFT
CAPS LOCK
Left CTRL
Mouse Wheel Forward (Up)
Mouse Wheel Back (Down)
Secondary
Up-Arrow / NUM 8
Down-Arrow / NUM 2
Left-Arrow / NUM 4
Right-Arrow / NUM 6
Right SHIFT
—
Right CTRL
—
—
Primary
Left Mouse Button
R
E
L
H
X
Mouse Wheel Forward (Up)
Mouse Wheel Back (Down)
Secondary
C
—
—
—
—
—
—
—
Primary
1
2
3
4
5
6
Y
U
F
Secondary
—
—
—
—
—
—
—
—
—
Primary
M
F1
F2
F5
F9
Right Mouse Button
0
Secondary
TAB
—
—
—
—
—
—
ACTION CONTROLS
Action
Fire Weapon
Reload Weapon
Use Item/Weapon
Snap Fingers
Use Medikit
Use X-ray Camera
Zoom Camera In
Zoom Camera Out
INVENTORY CONTROLS
Action
Weapons
Slingshot
Mines
Explosives
Other Inventory Items
X-ray Camera
Quick-Select Pistol
Quick-Select AK-47
Select Previous Item
INTERFACE CONTROLS
Action
Toggle Map
Objectives
Assembly
Quick Save
Quick Load
Actions Menu
Reset Camera
24
NEW_CW_manual_EN.qxd
9/20/05
9:10 AM
Page 25
CREDITS
CUT SCENES
Jaroslav Cihelka
Ján Dusek
ADDITIONAL HUD AND INTERFACE
DESIGN
Russell Challenger
COLD WAR
HUD & INTERFACE
Martin Lysec
ADDITIONAL SCRIPT EDITING
David Ellis
DEVELOPED BY MINDWARE STUDIOS
Executive Producers
Karel Papík
Tomás -Sep- Pluharík
STORY
Karel Papík
David Hanzl
Tomás -Sep- Pluharík
Pavel Kríz
SCRIPT
Karel Papík
LEAD DESIGNER
Tomás -Sep- Pluharík
LEVEL DESIGNERS
Tomás -Sep- Pluharík
Rudolf -Jolly- Matousek
Pavel Kríz
David Hanzl
LEAD PROGRAMMER
Patrik Rak
XBOX LEAD PROGRAMMER
Michal Rehácek
PROGRAMMERS
Stepán Vondrák
Michal Celler
Peter Arbet
Petr Tovarys
Jirí Dvorák
CARTER CONCEPT ART
Adolf Lachman
ADDITIONAL GRAPHICS
David Hanzl
Jan Konopásek
Michal Habrdla
LEAD ARTIST
Lukinec
ENVIRONMENTAL ARTISTS
Michal Hochmajer
Lukás Kraina
Rado Turko
Michal Beran
Lukinec
CHARACTERS
Michal Beran
Jaroslav Cihelka
Lukinec
ANIMATIONS
Rado Turko
Outsider Development s.r.o.
Lukinec
LEAD PRODUCT MARKETING MANAGER
Byron Gaum
MUSIC & SFX
Ján Dusek
ASSOCIATE PRODUCT MANAGER
Chris Nesbitt
LOCALIZATION MANAGER
Martin Moravec
PUBLIC RELATIONS (KOHNKE
COMMUNICATIONS)
Erica Kohnke Kain
Sean Kauppinen
Christopher Clarke
Robin Rosales
SPECIAL THANKS TO
Andrew Bellomy
Mariano Pireddu
Givovanni Sanna
Jana Papíkova
Jana Pomajzlová Pluharíkova
Radka Rakova
Julínek
Eva Cihelková
Viktor Cihelka
Lenka Krainová
Katerina Minaríková
Eva Dudasová
Petr -Sleepless- Polácek
Jirí Pavlovsky
Jan Eisner
&
Pizza Palatino
ADDITIONAL PROGRAMMING
Jirí Dluhos
PLUGINS PROGRAMMING
Petr Robek
MARKETING AND PUBLIC
RELATIONS
NORTH AMERICAN PR COORDINATION
Duane Brown
ADDITIONAL PR
Tara Reed
LEAD ILLUSTRATOR PACKAGING
Russell Challenger
GRAPHIC DESIGN AND LAYOUT
Ed Hatim
Esther Sucre
Jay Kinsella
ADDITIONAL GRAPHIC DESIGN
Desmond Oku
MANUAL
David Ellis
WEBSITE DESIGN
Ryan Andal
PUBLISHED BY DREAMCATCHER
INTERACTIVE
LOCALIZATION
GERMAN LOCALISATION:
Jinglebell Communication
DREAMCATCHER DCNA
PRODUCTION
EXECUTIVE PRODUCER
George Chastain Jr.
PRODUCTION ASSISTANT
Daniel Torreblanca
ADDITIONAL PRODUCTION
Bill Mooney
Mark Harwood
Robert Stevenson
25
MANAGEMENT:
Alessandra Neve
Dror Bezerra de Melo
DREAMCATCHER EUROPE
PRODUCT MANAGER EMEA
John Gordon
MARKETING COORDINATION MANAGER
Frédérique Barkoff
JUNIOR PRODUCT MANAGER EMEA
Philippe Rapin
NEW_CW_manual_EN.qxd
9/20/05
9:10 AM
QUALITY ASSURANCE DCNA
MARKETING MANAGER GERMANY
Christian Streil
AGENT
Marc Biagi
GROUP MANAGER FRANCE
Alexandre Enklaar (Atari)
Timotenko
Marc Biagi
PRODUCT MANAGER FRANCE Mathias
Ahrens (Atari)
IVAN
Dave Rivas
PRODUCT MANAGER UK
Deane Punter (Koch media)
LAGODIN
Dan Castle
PRODUCT MANAGER ITALY
Fabio Cerutti (Atari)
RUSAKOV
Marc Biagi
MARKETING ARTISTIC DIRECTOR EMEA
Odile Mousseau
POLICEMAN
David Heath
WEBSITE EMEA
Eric Connille
SCIENTIST
Ryan Drummond
LOCALISATION
Christine Gervillié
Thomas Neveu
SPETSNAZ
Dan Castle-Marc Biagi
Jon St. John-Chris Wilcox
JUNIOR TERRITORY MANAGER
Aurélie Rodrigues
CIVILIANS
Dave Rivas-L
SALES ADMINISTRATION
Julie Oliny
ani Minella
Ryan Drummond
QA MANAGER
Mike Adams
QA LEAD
Daniel Torreblanca
TESTERS
Adrian Miller
Dan Dawang
Chris Elliot
Anthony Finelli
Vasso Kontoulis
Jeremy Norel
Robert Weiland
VOICE RECORDING - ENGLISH
VOICE TALENT - GERMAN
SASCHA DRAEGER
- Matthew Carter
STEPHIE KINDERMANN
- Sonya
CASTING/DIRECTING
Lani Minella (Audio Godz)
MARK BREMER
- Barinsky-Sergej
RECORDING STUDIO
Bill Corkery Productions
RÜDIGER SCHULZKI
- Grushkov-Timotenko
EDITING
Lethal Sounds
CHRISTOS TOPOULOS
- Rusakov
HOLGER POTZERN
- Kolja-Bondarchuk
VOICE TALENT - ENGLISH
CARTER
Ryan Drummond
EXECUTIVE MANAGEMENT
PRESIDENT & CEO
Richard Wah Kan
VP & CFO
Sean Carr
MANUFACTURING MANAGER EMEA
Bastien Lepetit
LOGISTICS ASSISTANT
Thomas Justino
Page 26
KONRAD HALVER
- Ivan-Lagodin
ULI PLEßMANN
- President
GRUSHKOV
Chris Wilcox
SONYA
Lani Minella
BARINSKY
David Heath
PRESIDENT
Jon St. John
BONDARCHUK
Dan Castle
26
VP OF PRODUCT DEVELOPMENT &
ACQUISITIONS
Robert Stevenson
VP OF MARKETING
Marshall Zwicker
BUSINESS DEVELOPMENT DIRECTOR
EMEA
Olivier Pierre
VP & CFO EMEA
Roch Roustan
MARKETING DIRECTOR EMEA
Simon Vivien
BUSINESS DEVELOPMENT EMEA
Stéphane Grynszpan
SPECIAL THANKS
Currin Cyr (Microsoft)
Scott Callan (Microsoft)
Nicole Presland (Microsoft)
Isabelle Massa (Nvidia)
Stephan Belisle
Lori Lue
Krystal Moon
Suzanne MacGillivray
Chantal Mauro
Andrew Bakchinov
Agnes So (ATI)
Carrie Cowan (Nvidia)
Peter Harrison (Creative Labs - UK)
Christopher Gamboa
(Creative Labs - US)
NEW_CW_manual_EN.qxd
9/20/05
9:10 AM
FRANCE
& FRENCH SPEAKING COUNTRIES
Page 27
ITALIA
ATARI
E-mail:[email protected]
Website:http://www.atari.it
DREAMCATCHER EUROPE
E-mail :[email protected]
Site Web :http://www.dreamcatchergames.com
Tech-line :08 92 68 00 96 (0,34€/mn)
Du mardi au vendredi de 10h à 13h et de 14h à 19h
ESPAÑA
DEUTSCHLAND
E-mail:[email protected] (in English only)
Website:http://www.dreamcatchergames.com
Hotline Technik:0190-84 60 48 (1,86€/mn)
Montag bis Donnerstag von 9:00-19:00
Samstag und Sonntag von 13:00-19:00
Hotline Tipps & Tricks:0190-84 60 49 (1,86€/mn)
Täglich 8:00 – 24:00
Ab dem 1.1.2006 gelten neue Telefonnummern,welche Sie
auf unserer Homepage finden können.
PROEIN,S.L.
E-mail:[email protected]
Website:http://www.proein.com
Tfno: 914 062 964
10:00 a 14:00 y 16:00 a 18:00 - Lunes a Viernes
PORTUGAL
PLAYGAMES
E-mail:[email protected]
Website:http://www.dreamcatchergames.com
Tel:22 608 83 33
Monday to Friday 9:00-12:30 / 14:00-18:00
GREECE
UNITED-KINGDOM
KOCH MEDIA LIMITED
Website (tech support):www.softwarehelpdesk.co.uk
Website:www.kochmedia.co.uk
E-mail:[email protected] (in English only)
Website:http://www.grupmulti.gr
Tel:30 210 94 80 00
© 2005 Mindware Studios s.r.o.Licensed exclusively to DreamCatcher International Inc.Package design © 2005 DreamCatcher Interactive design and mark are
trademarks of DreamCatcher Interactive Inc. Microsoft®,Windows® and DirectX® are registered trademarks of Microsoft Corporation. © 2005 Creative
Technology Ltd.The Creative logo is a registered trademark of Creative Technology Ltd.in the United States and/or other countries.NVIDIA,the NVIDIA logo,
and other NVIDIA marks are registered trademarks of NVIDIA Corporation in the United States and other countries.All other brands, product names and
logos are trademarks or registered trademarks of their respective owners.All rights reserved.
27
9/20/05
9:10 AM
Page 28
CLWDENMN
NEW_CW_manual_EN.qxd