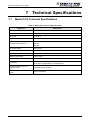
1
Medio P213 Reader
User's Guide
Revision 1.0
October 2010
Medio P213 Reader User's Guide
Publishing Information
Disclaimer and Limitation of Liability
All information herein is either public information or is the property of and owned solely by TAGSYS who shall have and
keep the sole right to file patent applications or any other kind of intellectual property protection in connection with such
information.
Nothing herein shall be construed as implying or granting to you any rights, by license, grant or otherwise, under any
intellectual and/or industrial property rights of or concerning any of TAGSYS’ information.
This document can be used for informational, non-commercial, internal and personal use only provided that:
♣
The copyright notice below, the confidentiality and proprietary legend and this full warning notice appear in all
copies.
♣
This document shall not be posted on any network computer or broadcast in any media and no modification of any
part of this document shall be made.
Use for any other purpose is expressly prohibited and may result in severe civil and criminal liabilities.
The information contained in this document is provided “AS IS” without any warranty of any kind. Unless otherwise
expressly agreed in writing, TAGSYS makes no warranty as to the value or accuracy of information contained herein.
The document could include technical inaccuracies or typographical errors. Changes are periodically added to the
information herein. Furthermore, TAGSYS reserves the right to make any change or improvement in the specifications
data, information, and the like described herein, at any time.
Therefore TAGSYS assumes no liability and is not responsible for customer applications or product or software which
include TAGSYS products.
TAGSYS HEREBY DISCLAIMS ALL WARRANTIES AND CONDITIONS WITH REGARD TO THE INFORMATION
CONTAINED HEREIN, INCLUDING ALL IMPLIED WARRANTIES OF MERCHANTABILITY, FITNESS FOR A
PARTICULAR PURPOSE, TITLE AND NON-INFRINGEMENT. IN NO EVENT SHALL TAGSYS BE LIABLE, WHETHER
IN CONTRACT, TORT OR OTHERWISE, FOR ANY INDIRECT, SPECIAL OR CONSEQUENTIAL DAMAGES OR ANY
DAMAGES WHATSOEVER INCLUDING BUT NOT LIMITED TO DAMAGES RESULTING FROM LOSS OF USE,
DATA, PROFITS, REVENUES, OR CUSTOMERS, ARISING OUT OF OR IN CONNECTION WITH THE USE OR
PERFORMANCE OF INFORMATION CONTAINED IN THIS DOCUMENT.
TAGSYS does not and shall not warrant that this product/system/equipment will be resistant to all possible attacks, and
shall not incur, and disclaims, any liability in this respect. Even if each product is compliant with current security
standards in force on the date of their design, security mechanisms' resistance necessarily evolves according to the
state-of-the-art in security and notably under the emergence of new attacks. Under no circumstances shall TAGSYS be
held liable for any third party actions, and in particular in case of any successful attack against systems or equipment
incorporating TAGSYS products.
TAGSYS disclaims any liability with respect to security for direct, indirect, incidental or consequential damages that result
from any use of its products. It is further stressed that independent testing and verification by the person using the
product is particularly encouraged, especially in any application in which defective, incorrect, or insecure functioning
could result in damage to persons or property, denial of service, or loss of privacy.
© 2000-2010 TAGSYS. All rights reserved.
Microsoft, Visual C++, Windows, and Windows NT are either registered trademarks or trademarks of Microsoft
Corporation in the U.S.A. and/or other countries.
I-Code is a registered trademark of Philips.
Tag-It is a registered trademark of Texas Instruments.
Printed in France.
TAGSYS – 785 Voie Antiope, Athélia III, 13600 La Ciotat, France.
Tel: +33 (0) 4.42.18.89.00 / Fax: +33 (0) 4.42.18.89.01
Document Reference: DOC14227A0
2/34
Revision 1.0
October 2010
Medio P213 Reader User's Guide
Read This First
Welcome to the TAGSYS range of products operating at the 13.56 MHz frequency. This range of
products is used to implement high-quality RFID systems for demanding applications.
This document provides information about how to install and use Medium Range Medio P213
TAGSYS RFID Tag Readers.
Audience
This document requires familiarity with RFID technology. It is intended for people in charge of
installing and using the product.
Conventions
Symbol
Meaning
CAUTION: A note that advises users that a specific action could result in the loss of data or
damage the hardware.
WARNING: A note that advises users that a specific action may result in physical harm.
A note that provides additional information that helps the user to perform a task or obtain the
best performance from the product.
If you need assistance
Please contact your nearest TAGSYS sales representative or the TAGSYS welcome desk at:
Telephone:
Fax:
E-Mail:
+33 (0) 4 42 18 89 00
+33 (0) 4 42 18 89 01
[email protected]
Website
http://www.tagsysrfid.com
Contact for Comments
We welcome your feedback to help us provide high quality documentation.
For technical comments, please contact our welcome desk:
Telephone:
Fax:
E-Mail:
+33 (0) 4 42 18 89 00
+33 (0) 4 42 18 89 01
[email protected]
Please remember to quote the Document Reference Number DOC14227A0, your job title and your
company.
October 2010
Revision 1.0
3/34
Medio P213 Reader User's Guide
Quality Issues
TAGSYS implements stringent quality controls at all stages of its manufacturing process. However,
should you find a defect with this product, please notify your TAGSYS Quality Service
representative using the dedicated Product Return Form.
Telephone:
Fax:
+33 (0) 4 42 18 89 36
+33 (0) 4 42 18 89 01
RoHS and WEEE Directives
RoHS (Restriction of the uses of certain Hazardous Substances)
TAGSYS certifies that this product is compliant with the European Directive 2002/95/EC for the
restriction in Electric and Electronic Equipments (RoHS) of the use of the following hazardous
substances:
•
Lead
•
Mercury
•
Cadmium
•
Hexavalent Chromium
•
Polybrominated biphenyl flame retardants
•
Polybrominated diphenyl ether flame retardants
This declaration is based on information provided by our suppliers and subcontractors.
WEEE (Waste Electrical and Electronic Equipment)
This product bears the selective sorting symbol for waste
electrical and electronic equipment (WEEE)
This means that this product must be handled pursuant to
European Directive 2002/96/EC in order to be recycled or
dismantled to minimize its impact on the environment.
For further information, please contact your local or regional
authorities.
4/34
Revision 1.0
October 2010
Medio P213 Reader User's Guide
Table of Contents
PUBLISHING INFORMATION __________________________________________________________ 2
DISCLAIMER AND LIMITATION OF LIABILITY __________________________________________________ 2
READ THIS FIRST ____________________________________________________________________ 3
AUDIENCE ____________________________________________________________________________ 3
CONVENTIONS _________________________________________________________________________ 3
IF YOU NEED ASSISTANCE ________________________________________________________________ 3
CONTACT FOR COMMENTS _______________________________________________________________ 3
QUALITY ISSUES _______________________________________________________________________ 4
ROHS AND WEEE DIRECTIVES ___________________________________________________________ 4
ROHS (RESTRICTION OF THE USES OF CERTAIN HAZARDOUS SUBSTANCES) ______________________ 4
WEEE (W ASTE ELECTRICAL AND ELECTRONIC EQUIPMENT) ___________________________________ 4
1
1.1
1.2
1.3
1.4
2
INTRODUCTION ___________________________________________________________________ 7
GENERAL ________________________________________________________________________ 7
PRODUCT DESCRIPTION ____________________________________________________________ 7
KEY FEATURES____________________________________________________________________ 8
DELIVERY ________________________________________________________________________ 8
FUNCTIONAL OVERVIEW __________________________________________________________ 9
2.1 FUNCTIONAL BLOCK DIAGRAM _______________________________________________________ 9
2.2 COMMUNICATION PROTOCOLS ______________________________________________________ 10
2.2.1 TAG-TO-READER INTERFACE ______________________________________________________ 10
2.2.2 READER-TO-HOST INTERFACE _____________________________________________________ 10
2.3 PERIPHERAL DEVICES _____________________________________________________________ 10
3
INSTALLING THE READER________________________________________________________ 11
3.1 PIN CONNECTIONS ________________________________________________________________ 11
3.2 POWER SUPPLY __________________________________________________________________ 12
3.3 ANTENNA _______________________________________________________________________ 12
4
SERIAL COMMUNICATION LINKS _________________________________________________ 13
4.1 GENERAL INFORMATION ON DATA ACQUISITION ________________________________________ 13
4.2 RS-232 INTERFACE _______________________________________________________________ 14
4.2.1 INSTALLING THE READER IN RS-232 MODE ___________________________________________ 14
4.2.2 SETTING THE HOST SYSTEM RS-232 COMMUNICATION LINK ____________________________ 14
4.2.3 ELECTRICAL SIGNAL REQUIREMENTS _______________________________________________ 15
4.3 RS-422 / RS-485 INTERFACE _______________________________________________________ 15
4.3.1 INSTALLING THE RS-422 INTERFACE ________________________________________________ 15
4.3.2 INSTALLING THE RS-485 FULL DUPLEX INTERFACE ____________________________________ 16
4.3.3 INSTALLING THE RS-485 HALF DUPLEX INTERFACE ____________________________________ 17
4.3.4 GROUNDING ARRANGEMENT ______________________________________________________ 18
October 2010
Revision 1.0
5/34
Medio P213 Reader User's Guide
4.3.5 ELECTRICAL SIGNAL REQUIREMENTS _______________________________________________ 19
5
CONNECTING PERIPHERAL DEVICES _____________________________________________ 20
5.1 USING THE UNIVERSAL INPUT PIN ____________________________________________________ 20
5.2 USING THE UNIVERSAL OUTPUT PIN __________________________________________________ 20
5.3 I/O ELECTRICAL SIGNAL REQUIREMENTS _____________________________________________ 22
6
STAND-ALONE MODE ____________________________________________________________ 23
6.1 STAND-ALONE MODE FEATURES ____________________________________________________ 23
6.1.1 CUSTOMIZED TAG TYPE READING __________________________________________________ 23
6.1.2 SERIAL COMMUNICATION TYPE ____________________________________________________ 24
6.1.3 CUSTOMIZED ASCII MESSAGE FORMAT _____________________________________________ 24
6.1.4 REPETITION OPTION _____________________________________________________________ 24
6.1.5 TRIGGER INPUT _________________________________________________________________ 25
6.1.6 OUTPUT SETTINGS ______________________________________________________________ 25
6.2 ENABLING STAND-ALONE MODE ____________________________________________________ 25
6.3 DISABLING STAND-ALONE MODE ____________________________________________________ 25
7
TECHNICAL SPECIFICATIONS ____________________________________________________ 26
7.1 MEDIO P213 TECHNICAL SPECIFICATIONS ____________________________________________ 26
8
MECHANICAL CHARACTERISTICS ________________________________________________ 27
8.1 DIMENSIONS AND GENERAL MECHANICAL INFORMATION_________________________________ 27
8.2 MARKINGS ______________________________________________________________________ 27
9
ELECTRICAL CHARACTERISTICS _________________________________________________ 28
9.1
9.2
9.3
9.4
9.5
ABSOLUTE MAXIMUM RATINGS ______________________________________________________ 28
POWER SUPPLY DC CHARACTERISTICS ______________________________________________ 29
COMMUNICATION LINK DC CHARACTERISTICS AND TIMINGS ______________________________ 30
ANTENNA ELECTRICAL AND TIMING CHARACTERISTICS __________________________________ 31
I/O ELECTRICAL CHARACTERISTICS __________________________________________________ 31
10 WARRANTY CONDITIONS _______________________________________________________ 32
10.1 WARRANTY _____________________________________________________________________ 32
10.2 WARRANTY EXCLUSIONS _________________________________________________________ 32
10.2.1 GENERAL PROVISIONS __________________________________________________________ 33
10.2.2 HOW TO RETURN DEFECTIVE PRODUCTS ___________________________________________ 33
6/34
Revision 1.0
October 2010
Medio P213 Reader User's Guide
1 Introduction
1.1
General
This document provides information about how to install and use the Medium Range Medio P213
TAGSYS RFID Tag Reader.
1.2
Product Description
TAGSYS Medio P213 RFID Tag Reader is intended for Original Equipment Manufacturer (OEM)
applications. The Medio P213 is Medium Range 13.56 MHz RFID reader designed to operate with
any TAGSYS RFID Tag using C210, C240, C270, C370, C370-L/S and ISO15693 chips.
Medio P213 reader requires minimal computing power from the host workstation (Windows®based PC or UNIX environment). It communicates easily with this host at a high speed, using the
simple TAGSYS enhanced communication protocol (STX-E).
Figure 1: Medio P213 TAGSYS RFID Tag Reader Application Overview
The Medio P213 TAGSYS RFID Tag readers are easy to integrate because of its:
•
•
small size
standard communication links
October 2010
Revision 1.0
7/34
Medio P213 Reader User's Guide
1.3
Key Features
Table 1: Medio P213 Key Features
Description
Medio P213
Operating Frequency
13.56 MHz
Compatibility
C210, C240, C270, C370, C370-L/S, ISO15693 chips
Stand-alone Mode
C210, C240, C270, C370, C370-L/S, ISO 15693 chips
Selectable Serial Link
RS-232, RS-422, RS-485 (Half or Full duplex)
Network Operating
Yes
I/Os
1 input and 1 output
Firmware upgradeable
Yes
1.4
Delivery
The Medio P213 TAGSYS RFID Tag Reader kit contains the following items:
Table 2: Package Contents
Quantity
Item
1
Medio P213 TAGSYS RFID Tag Reader
1
SMA/BNC Adaptor
4
Configuration jumpers
1
CD-ROM including:
1
8/34
•
Medio P213 Integrator's Guide
•
Medio P200u/s, P213, P232/3 Command Set
•
User-friendly Px Explorer software provided for test and debug operations on Windows
XP, 200x, Vista and Seven platforms
•
Tagsys Legacy Software Development Kit including
o DLLs and ActiveX
o Library Software Development Kit Documentation
o One set of source code and executable samples
•
Tagsys Universal Software Development Kit including
o Native DLL
o .NET Component
o One set of source code and executable samples
Welcome Letter / Product Return Form
Revision 1.0
October 2010
Medio P213 Reader User's Guide
2 Functional Overview
This section provides an overview of the architectural structure and peripheral devices of the Medio
P213 TAGSYS RFID Tag Reader. It also provides a summary of the special functions used to drive
the reader board and describes the automatic features managed by the Central Processing Unit
(CPU).
2.1
Functional Block Diagram
The Medio P213 architectural structure is based on a CPU that drives all reader functions.
It manages communications between the host system (connected to the “Reader-to-Host
interface”) and one or more TAGSYS RFID Tags using an antenna (connected to the “Tag-toReader interface”).
It also drives 1 Universal Input and 1 Universal Outputs.
Figure 2 illustrates the general architecture of Medio P213 TAGSYS RFID Tag Reader.
Figure 2: Overall Medio P213 Architecture
Periphe ra l Devices
Power
Suppl y
Powe r Supply
Opera ti ng
Mode
Host Conne ction s
R S-2 32
R S-4 22
R S-4 85
October 2010
Re ade rto-Host
Inter face
Stand-alone
Normal
1 Input and
1 Output
Interfac e
Central
Pr oce ssing
Unit
Medio P213
TAGSYS RFID Ta g Reader
Tag-toReaderInterface
Antenn a
AS CII
Protocol
S TX -E
Decoder/
Encoder
Revision 1.0
9/34
Medio P213 Reader User's Guide
2.2
Communication Protocols
2.2.1
Tag-to-Reader Interface
To read from TAGSYS RFID Tags, to write to their memory, or to activate their functions, a wide
command set is available. For a complete list of embedded commands and their description,
please refer to the Medio P213 Command Set document.
2.2.2
Reader-to-Host Interface
When the Medio P213 reader is connected to an antenna, it acts more as a protocol converter due
to the wide range of tasks it can perform. For more information about these tasks, refer to the
Medio P213 Command Set document.
Depending on the task requested by the user through the host interface, the reader retrieves
information from the TAGSYS RFID Tag or provides it with information using its own
communication protocol. The reader then converts the result of the operation into STX-E protocol
and returns the information to the host via the Reader-to-Host interface. For more information, refer
to the Medio P213 Command Set document.
The Reader-to-Host interface has two operating modes:
1. Normal Mode
The Reader-to-Host interface is the slave of the master host system. It waits for a valid
command from the host, performs the task and responds. This bi-directional
communication is achieved via the STX-E protocol. (For more information, please refer to
the Medio P213 Command Set document.)
2. Stand-alone Mode
The Reader-to-Host interface is independent from the host system. Stand-alone mode is
used by the Medio P213 reader to read tags and send their identification data to the host
system. This transmission takes place in ASCII format. While in this mode, the reader
cannot receive any commands.
For more information, please refer to Section 7, “Stand-alone Mode”.
2.3
Peripheral Devices
The I/O interface manages 1 input and 1 output that can drive or check external peripherals.
The input is compliant with open collector drivers, TTL/CMOS voltage levels and industrial levels
(up to 25V).
The output consists of a gate controlled MOSFET transistor driver that can drive up to 1.5A. It is
safe from current and thermal overloads. +5V current limited option is available to give TTL/CMOS
compliant levels.
The I/O pins are mainly used for static applications such as reading sensors or driving LEDs,
relays or buzzers. For more information, refer to Section 6.1 “Using the Universal Input pin” and
Section 6.2 “Using the Universal Output pin”.
10/34
Revision 1.0
October 2010
Medio P213 Reader User's Guide
3 Installing the Reader
This section explains how best to install the Medio P213 TAGSYS RFID Tag Reader board. The
physical description of the reader board is given in Section 9, “Mechanical Characteristics”.
3.1
Pin Connections
Connection System
Communication connector
J1A :
Sub-D9 Male
#2 :
Data transmitted to the reader for RS232 Mode (TD signal for PC)
RX+ signal for RS422 or RS485 mode
#3 :
Data sent by the reader for RS232 mode (RD signal for PC)
TX+ signal for RS422 or RS485 mode
#5 :
Ground
#6 :
RX- signal for RS422 or RS485 mode
#9 :
TX- signal for RS422 or RS485 mode
All other pins are not connected.
Power supply connector
J2A :
2.5mm Jack type (positive connection on the center pin)
IO Connector
J3
:
Industrial terminal block (screw connections)
#1 :
Configurable supply output
#2 :
High power output
#3 :
Ground for output
#4 :
Universal input
October 2010
Revision 1.0
11/34
Medio P213 Reader User's Guide
#5 :
Ground for input
Programmation Connector
J4
:
HE10 type
RF antenna connector
J5
:
3.2
SMA type
Power Supply
A DC power supply must be connected to J2 connector and must be able to withstand a peak
current of 600 mA (for 10V supply) when the reader is powered on. Please refer to Section 10,
“Electrical Characteristics” for more details about reader consumption.
The power pins accept an input voltage between 10 and 24 V DC.
3.3
Antenna
The J5 connector is dedicated to an antenna that is required for reading TAGSYS RFID Tags. This
can be a TAGSYS antenna or a custom-made model. The choice of the antenna must take into
account the following considerations:
•
•
•
Physical area (size) of the TAGSYS RFID Tag
Strength of the reader
Compliance with electrical characteristics (see Electrical Characteristics chapter)
The antenna has a passive design that features 50 ohm, 0° impedance characteristics at 13.56
MHz frequency.
12/34
Revision 1.0
October 2010
Medio P213 Reader User's Guide
4 Serial Communication Links
Medio P213 TAGSYS RFID Tag Readers are based on a Master-Slave communication system
where the host system acts as the master and the reader as the slave.
In Stand-alone mode, the reader is used as a master and the host system becomes the slave.
The Host-to-Reader interface accepts an RS-232, RS-422 or RS-485 (Full or Half Duplex)
communication links. The communication type is selected using the jumpers on the Serial
communication selector :
J4
J3
RS232
Mode
RS422
Mode
RS485
Mode
4.1
General Information on Data Acquisition
Communication takes place by sending frames (bytes) on the communication link. The bytes are
transmitted LSB first with one start bit and one stop bit as shown in Figure 3.
Figure 3: Structure of a Byte on the Communication Link
1
Start Bit
October 2010
LSB
MSB
8 bits with LSB First
Revision 1.0
0
Stop Bit
13/34
Medio P213 Reader User's Guide
Communication parameters are listed in Table 3. These parameters cannot be modified.
Table 3: Parameters for the Transmission of a Byte
Parameter
Value
Allowed Baud Rate
4800, 9600, 19200, 38400, 57600 or 115200 bps
(depending on the reader settings)
Default Baud Rate
38400
Start Bit
On
Number of data bits
8
Parity
None
Stop bit
1
The maximum period between the transmission of bytes is 10 ms, regardless of the applicable
baud rate.
4.2
RS-232 Interface
4.2.1
Installing the reader in RS-232 mode
To use the RS-232 interface, you can connect a NULL-MODEM RS232 cable to the suitable COM
port of a PC.
Please configure the Serial Communication Selector as shown in Chapter 5.
4.2.2
Setting the Host System RS-232 Communication Link
The host system RS-232 communication link must be set as shown in Table 4.
Table 4: RS-232 Allowed Settings on the Host System
Parameter
Value
Baud Rate
Accordingly to the reader Baud Rate Configuration
Start bit
On
Number of data bits
8
Parity
None
Stop bit
1
Data flow
None
14/34
Revision 1.0
October 2010
Medio P213 Reader User's Guide
4.2.3
Electrical Signal Requirements
Table 5 shows the electrical characteristics of the RS-232 interface pins.
Table 5: RS-232 Interface Pins - Electrical Characteristics
Parameters
Conditions
RS232 Input Voltage Range
Min.
-25
RS232 Input Voltage Low
25°C
RS232 Input Voltage High
25°C
Unit
+25
V
0.8
V
V
0.6
RS232 Input Resistance
Loaded with 3 kΩ
RS232 Output Short-circuit current
4.3
Max.
2
RS232 Input Hysteresis
RS232 Output Voltage Swing
Typ.
V
3
5
±5
±6.5
V
±60
mA
7
kΩ
RS-422 / RS-485 Interface
The RS-422 interface is compatible with EIA/TIA-422 standards.
The RS-485 interface is compatible with EIA/TIA-485 standards.
The RS-485 permits a balanced transmission line to be shared in Party Line or Multi-drop
mode. As many as 32 receiver (readers or repeaters) pairs can share a Multi-drop
network. If more readers are needed in the network, balanced line repeaters can be used
(a repeater takes the place of a reader on the network).
4.3.1
Installing the RS-422 Interface
Figure 4 shows how to connect the RS-422 interface. The balanced line RX+ and RX- corresponds
to the reader receiver and must be connected to the transmitter of the host. The balanced line TX+
and TX- corresponds to the reader transceiver and must be connected to the receiver of the host.
A 120-Ohm resistor should be
added at the end of a transmission
line in compliance with RS-422
specifications. This resistor can be
connected by connecting a jumper
on
the
RS422
Terminaison
selector.
When set to communicate according to RS-422 specifications, the reader always holds its
transceiver active and never switches it into Tri-state mode. The Host-to-Reader Interface should
not be unplugged.
October 2010
Revision 1.0
15/34
Medio P213 Reader User's Guide
Figure 4: Connection of the RS-422 Interface
TX+
RX+
R
TX-
RX-
RX+
TX+
R
RX-
TX-
Host To Reader
Interface
Host RS-422 Interface
Reader
4.3.2
Installing the RS-485 Full Duplex Interface
The RS-485 Full Duplex Standard requires 2 pairs of balanced lines, one for transmitting and
another for receiving data.
When testing your network installation, make sure that all the connected readers are :
- correctly supplied
- correctly configured (Communication link selector and Terminaison resistor)
- correctly connected (cable connections)
If one reader is faulty on the network, all the network may be mute to any command sent over
the network.
Make sure that all the readers are preset with a different network address to avoid network
conflicts. By default, a Medio P213 is preset with address 0.
16/34
Revision 1.0
October 2010
Medio P213 Reader User's Guide
Figure 5: Connection of the RS-485 Full Duplex Interface
TX+
R
TX-
RX+
R
RX-
Host RS-485 Full Duplex
Interface
RX+
RX-
TX+
TX-
RX+
RX-
TX+
TX-
Host To Reader Interface
Host To Reader Interface
Reader 1
Reader n
Figure 5 shows how to connect the RS-485 Full Duplex Interface in a Multi-drop network.
The balanced line TX+ and TX- corresponds to the reader transceiver and must be connected to
the receiver of the host (and other reader transceivers or repeater).
A 120-Ohm resistor should be added at the end of the two transmission lines in compliance with
RS-485 specifications. This resistor can be connected by connecting a jumper on the
RS422/RS485 Termination Selector on the end-line reader.
When set to communicate using the RS-485 interface, the reader always holds the transmission
lines before the start of any communication and returns to Tri-state mode at the end of
communication. The host system should do the same. The reader can be unplugged from the
balanced lines.
4.3.3
Installing the RS-485 Half Duplex Interface
RS-485 Half Duplex Standard requires only 1 pair of balanced lines, for both transmitting and
receiving data.
October 2010
Revision 1.0
17/34
Medio P213 Reader User's Guide
When testing your network installation, make sure that all the connected readers are :
- correctly supplied
- correctly configured (Communication link selector and Termination resistor)
- correctly connected (cable connections)
If one reader is faulty on the network, all the network may be mute to any command sent over
the network.
Make sure that all the readers are preset with a different network address to avoid network
conflicts. By default, a Medio P213 is preset with address 0.
The balanced line TX+ and TX- corresponds to the reader driver and must be connected to the
driver of the host (and other reader drivers or repeater).
The RS-485 Half Duplex interface is configured by setting the reader in RS-485 Full Duplex
mode and connecting pins RX+ and RX- to pins TX+ and TX- pins respectively on each
reader of a network.
Figure 6 shows how to connect the RS-485 Half Duplex Interface in a multi-drop network.
Figure 6: Connection of the RS-485 Half Duplex Interface
R
R
D+
D-
RX+
RX-
TX+
TX-
RX+
RX-
4.3.4
TX+
TX-
Host RS-485 Half Duplex
Interface
Host To Reader Interface
Host To Reader Interface
Reader 1
Reader n
Grounding Arrangement
In order for the generator and the receiver to operate correctly, a signal return path must exist
between the reader grounds of the equipment at each end of the interconnection. The reader
reference may be established by a third conductor connecting the common leads of the devices, or
it may be provided by the connection from each equipment item to a ground reference. Where the
reader reference is provided by a third conductor, the connection between the reader common and
the third conductor must contain a certain amount of resistance (e.g. 100 ohms) to limit circulating
currents when other ground connections are provided for safety.
18/34
Revision 1.0
October 2010
Medio P213 Reader User's Guide
Figure 7: Grounding Arrangement for RS-422 / RS-485
Third Conductor
Rg'
Rg'
Host System
MEDIO P013
GND
GND
Rg
Rg
Use Rg or Rg' resistors
Chassis
Reference
Earth (safety)
Reference
4.3.5
Electrical Signal Requirements
The following table shows the electrical characteristics of the RS-422/RS-485 interface pins.
Table 6: RS-422/ RS-485 Interface Pins - Electrical Characteristics
Parameters
Receiver Input Resistance
Receiver Input Current
Conditions
-7V < VCM < +12V
Min.
Typ.
12
24
VCM = +12V
VCM = -7V
Receiver Input Differential Threshold
2
6
RS-485
1.5
6
-0.2
+0.2
±250
±5
Revision 1.0
mV
mV
RS-422
Output Leakage Current
October 2010
200
40
Transceiver Output Short-circuit Current
mA
-0.8
-200
Change In Magnitude of Transceiver
Differential Output Voltage for Complementary
Output States
Unit
kΩ
1
Receiver Input Hysteresis
Transceiver Differential Output Voltage
Max.
V
V
mA
500
µA
19/34
Medio P213 Reader User's Guide
5 Connecting Peripheral Devices
5.1
Using the Universal Input pin
The reader input can be driven by a voltage source from 0V up to 24V referring to the input ground.
A relay (open chain transistor, switch…) can also be used to connect the input pin and its ground.
-
Low level input voltage is defined to be in the range of 0 to 1.5V
-
High level input voltage is defined to be in the range of 3 to 25V
5.2
Using the Universal Output pin
The output pin is an open drain power transistor that can drive a current up to 1.5A. When
activated, the power transistor connects the output pin and its ground.
The output transistor is protected against heating and current overload. If an overload happens, the
output stops driving current automatically. The output must be turned off to be re-activated.
You can use the Configurable
Supply Output pin of the IO
connector to deliver a supply to
an active system connected to
the output. You can set it to
deliver the supply used to
power the reader or a +5V
supply limited by a 470 Ohms
serial resistor by using the
Supply Output Pin Selector
with a jumper.
+5V
Supply
Output
J3
Reader
power
supply
Output
When the output is activated by the reader, a green led near the IO connector turns on.
Beware that the LED will stay on while the output is in thermal or current overload state.
The figure above describes the output
architecture:
Output supply jumper selector
Main power supply
5VDC
J3-1
470 Ώ
J3-2
J3-3
20/34
Revision 1.0
October 2010
Medio P213 Reader User's Guide
Example 1 : Connecting a LED to the Output
The LED’s cathode is connected to the
Output pin and its anode to the Output Supply
Pin. Note that the Output supply jumper
selector is configured to deliver 5V to supply
the LED. The internal serial resistor limits the
current delivered to the LED.
Example 2 : Connecting a Lamp (5W under 24 V) to the Output using the reader supply
The common wire (-) of the lamp is
connected to the Output pin (J3-2) and its
supply to the Output Supply Pin (J3-1). Note
that the Output supply selector is configured
to deliver the Power of the reader to the lamp.
The lamp needs a 24V power supply, so the
reader is supplied with 24V. The consumption
of the lamp is less than 1 Ampere, so it can
be connected directly to the reader output.
October 2010
Revision 1.0
21/34
Medio P213 Reader User's Guide
5.3
I/O Electrical Signal Requirements
Table 7 provides the electrical DC characteristics.
Table 7: I/O Interface Pins - Electrical Characteristics
Parameters
Conditions
Min.
Typ.
Max.
Unit
Input Voltage Low
0
2
V
Input Voltage High
3
25
V
1.5
A
Output Current
22/34
Revision 1.0
Note
October 2010
Medio P213 Reader User's Guide
6 Stand-alone Mode
Stand-alone Mode is designed to use the reader without using any command set. While in this
mode, the reader is limited to tag reading.
The reader sends the tag ID to the Host System using ASCII protocol via the Reader-to-Host
interface.
ASCII protocol is used in order to provide hexadecimal data that can be read by a variety of
terminal programs (e.g. Microsoft® HyperTerminal).
6.1
Stand-alone Mode Features
Table 8 lists the available features for each TAGSYS RFID Tag reader in Stand-alone mode.
Table 8: Available Features in Stand-alone Mode
Features
Medio P213
Customized tag type reading
C210
C240
C270 (Philips I.Code)
ISO 15693
Serial Communication Type
RS-232
RS-422
Baud Rate
4800, 9600, 19200, 38400, 57600, 115200 bps
Repetition Option
Available
Customized ASCII message format
STX/ETX Characters
Header String
Chip Description String
ID String (variable length)
End of Message String
Input Trigger
Available
Output for active trigger information
Available
Output for tag reading information
Available
6.1.1
Customized Tag Type Reading
When using Medio P213 readers, tags to be scanned can be configured using the “Set Standalone Mode” command. For more information, refer to the Medio P213 Command Set document.
October 2010
Revision 1.0
23/34
Medio P213 Reader User's Guide
6.1.2
Serial Communication Type
When used in Stand-alone mode, Medio P213 readers can communicate via the RS-232, RS-422
or RS-485 link types.
Stand-alone is not recommended in a network configuration.
6.1.3
Customized ASCII Message Format
When a TAGSYS RFID Tag is read, its data is transmitted to the host in the form of an ASCII
character frame.
Optional
Optional
2 to 16 characters
C240
2 to 16 characters
C270
2 to 16 characters
ISO15693
2 to 16 characters
Required
End of
Message
String
End of Text
<ETX>
(0x03)
1
character
Optional
C210
<CR/LF>
(Default)
0 to 16
characters
ID
Chip
Description
String
0 to 16
characters
Medio P213
“TAGSYS-“
Chip name
(Default)
0 to 16
characters
Size
<STX>
(0x02)
1
character
Description
Header
String
Start of Text
Table 9: Customized ASCII Message Format (TAGSYS RFID Tag is read)
Optional
Optional
Medio P213 readers can decode all chips in Standalone mode. Only the ID field is required in the
return ASCII message. All other fields are optional. The ID field length is programmable, the default
lengths are given in Table 10.
Table 10: Default ID Field Lengths
6.1.4
Chip Type
Default ID Field Length
C210 chip
16 (Total memory)
C240 chip
16 (Block 0 Page 0)
C270 chip
16 (Block 0 and Block 1)
ISO15693 chip
16 (UID)
Repetition Option
The reader constantly attempts to read any chips present in the field. When a chip ID is detected,
the reader can send the information to the host in one of 2 modes:
1. In “Repeated Read” mode, the reader returns a chip’s ID to the host with each successful
read operation.
2. In “Read Once” mode, the reader only returns the ID of a chip if the previous read
corresponds to a different chip, or if all reading attempts have failed 4 times (this feature
makes it possible to detect a chip’s potential exit out of the field).
24/34
Revision 1.0
October 2010
Medio P213 Reader User's Guide
6.1.5
Trigger Input
When the trigger capability is enabled, a trigger state is used to start and stop the RF scanning.
The trigger is connected to the input of the reader.
Depending on the reply settings of the trigger, the ASCII message can be sent during the trigger
activity (Repeated Read mode and Read Once mode are available) or at the end of the trigger. In
this last case, a message is always sent to the host system:
♣ if a tag has been read, the message contains its ID,
♣ if a tag has not been read, the message contains a No Message string (that can be defined)
as shown in Table 11.
Table 11: Customized ASCII Message Format (TAGSYS RFID Tag is not read)
Start of Text
Header String
No Tag Found
String
End of Message
String
End of Text
Description
<STX>
(0x02)
“TAGSYS-“
(Default)
“????????“
(Default)
<CR/LF>
(Default)
<ETX>
(0x03)
Size
1
character
0 to 16
characters
0 to 16
characters
0 to 16
characters
1
character
Medio P213
Optional
Optional
Required
Optional
Optional
6.1.6
Output Settings
The output of the reader can be used to monitor the trigger activity or the successful reads.
6.2
Enabling Stand-alone Mode
Medio P213 can be set in Stand-alone mode by using the “Set Stand-alone Mode” command
followed by a “Reset Reader” command. For more information, refer to the Medio P213 Command
Set document. You can also use the Px Explorer software provided with the reader.
6.3
Disabling Stand-alone Mode
The Medio P213 can be reset in Standard mode by sending the 'S' character using the
communication interface (for example, HyperTerminal).
October 2010
Revision 1.0
25/34
Medio P213 Reader User's Guide
7 Technical Specifications
7.1
Medio P213 Technical Specifications
Table 12: Medio P213 Technical Specifications
Reference
Medio P213
Size (L x W x H)
103 x 60 x 18 mm
Weight
66 g
DC power
10 to 24 V
Chip compatibility
C210, C240, C270, C370, C370-L/S, ISO 15693
Communication interface
RS-232
RS-422
RS-485
RF Output Power
1W Typical
Power consumption
3.0 W
Operating temperature
0° to +55°C
Storage temperature
-20° to +70°C
Mechanical fixation
Mechanical fixation with 4 screws (M3)
Conformity
CE
FCC parts 15 (Depending on configurations)
Communication protocol in
Standard mode
TAGSYS-specific STXE-2
ASCII protocol in Stand-alone
mode
User configurable
26/34
Revision 1.0
October 2010
Medio P213 Reader User's Guide
8 Mechanical Characteristics
8.1
Dimensions and General Mechanical Information
Figure 8: Medio P213 Reader: Mechanical Dimensions
90 mm
6.5
mm
7
mm
82 mm
SubD9
Connector
(Standard
Version)
60 mm
52 mm
30 mm
3.2 mm
13.5 mm
1.6 mm
SubD9
Connector
(Standard
Version)
11.5 mm
5.5 mm
4.5 mm
The values given have a tolerance of 0.2 mm.
8.2
Markings
The firmware application programmed in the reader and its version number are indicated on an
adhesive strip on the processor unit of the reader.
October 2010
Revision 1.0
27/34
Medio P213 Reader User's Guide
9 Electrical Characteristics
This chapter provides information about AC and DC and characteristics for all pins. It also gives
timing characteristics for the different interfaces.
9.1
Absolute Maximum Ratings
Parameter
Value
Ambient Operating Temperature
0°C to +55°C
Storage Temperature
-20°C to +70°C
Supply Voltage with respect to GND
25 V
Total Power Dissipation
3.0 W
Total Power Dissipation on Antenna
1W
DC Current Allowed on Power Pin
400 mA
Peak Current Allowed on Power Pin
600 mA
Input Voltage Range on RS232 Receiver pin
±25 V
Input/Output Voltage
+25 V
ESD Protection on RS232 pins
±2 kV
28/34
Revision 1.0
October 2010
Medio P213 Reader User's Guide
9.2
Power Supply DC Characteristics
Parameters
Conditions
Min. Typ. Max. Unit
Power Input Voltage
10
Power On Input Peak
Current
24
600
Power On Input Peak
Current Recovery Time
Power Input Current
V
mA
10
Comments
(Input voltage = 10V)
ms
Input Voltage = 12V
260
mA
RF On
Input Voltage = 12V
25
mA
RF Off
Reader Consumption vs Supply Voltage
(25°C)
Consumption (A)
0,35
0,3
0,25
0,2
0,15
0,1
0,05
0
10 11 12 13 14 15 16 17 18 19 20 21 22 23 24 25
Supply (Volts)
Consumption vs Temperature
(12 V Supply Voltage - RF On)
Consumption (A)
0,275
0,27
0,265
0,26
0,255
0,25
0
5
10
15
20
25
30
35
40
45
50
55
Temperature (°C)
October 2010
Revision 1.0
29/34
Medio P213 Reader User's Guide
9.3
Communication Link DC Characteristics and timings
Absolute Maximum Ratings:
♣ Input Voltages:
RX+, RX- to GND:
±25 V
♣ Output Voltages:
TX+, TX- to GND:
±18 V
Parameters
Conditions
RS232 Input Voltage Range
Min.
-25
RS232 Input Voltage Low
25°C
RS232 Input Voltage High
25°C
Loaded with 3 kΩ
-7V < VCM < +12V
RS-422, RS-485 Receiver Input Differential
Threshold
V
±6.5
V
±60
mA
24
kΩ
12
7
1
200
mA
2
6
RS-485
1.5
6
-0.2
+0.2
±250
±5
mV
mV
RS-422
RS-422 / RS-485 Output Leakage Current
kΩ
-0.8
40
RS-422 / RS-485 Transceiver Output
Short-circuit Current
V
V
mA
500
µA
IEC 1000-4-2 Air-Gap
Discharge
±4
kV
IEC 1000-4-2 Contact
Discharge
±2
kV
4800 Bps
+0.16
%
9600 Bps
-1.36
%
19200 Bps
+1.73
%
38400 Bps
+1.73
%
TX Inter-character time
30/34
V
±5
-200
RS-422, RS-485 Change In Magnitude of
Transceiver Differential Output Voltage for
Complementary Output States
RX - TX error on baud rate
0.8
5
RS-422, RS-485 Receiver Input Hysteresis
ESD Protection on both pins
V
V
VCM = +12V
VCM = -7V
RS-422, RS-485 Transceiver Differential
Output Voltage
+25
3
RS232 Output Short-circuit current
RS-422, RS-485 Receiver Input Current
Unit
0.6
RS232 Input Resistance
RS-422, RS-485 Receiver Input Resistance
Max.
2
RS232 Input Hysteresis
RS232 Output Voltage Swing
Typ.
10
Revision 1.0
ms
October 2010
Medio P213 Reader User's Guide
9.4
Antenna Electrical and Timing Characteristics
Parameters
Conditions
Min.
Typ.
RF output power
RF output impedance
Max.
Unit
1.2
W
(50, 0)
(Ω, °)
Comments
At 13.56 MHz
Figure 9 : Output Power vs. Temperature
RF Power vs Temperature (12 V power Supply)
1,4
Power (W)
1,3
1,2
1,1
1
0
5
10
15
20
25
30
35
40
45
50
55
Tem perature (°C)
9.5
I/O Electrical Characteristics
Parameters
Conditions
Min.
Typ.
Max.
Unit
Input voltage low
0
1.5
V
Input voltage high
3
25
V
Input current
1
Output current
October 2010
µA
1.5
Revision 1.0
Comments
A
31/34
Medio P213 Reader User's Guide
10 Warranty Conditions
10.1 Warranty
TAGSYS warrants that this Product shall comply with the functional specifications set forth herein
for a period of one year from the date of delivery to the Buyer.
This warranty is valid for the original Buyer of the Product and is not assignable or transferable to
any other party.
TAGSYS cannot be responsible in any way for, and disclaims any liability in connection with the
operation or performance of:
♣ any product in which the Product is incorporated;
♣ any equipment not supplied by TAGSYS which is attached to or used in connection with the
Product; or
♣ the Product with any equipment
This warranty does only cover the Product to the exclusion of any such other equipment.
Optimal operation and performance of the Product are obtained by using TAGSYS’ readers, by
applying TAGSYS installation guidelines and by having your installation reviewed by a TAGSYS’
technical consultant.
TAGSYS warranty does not cover the installation, maintenance or service of the Product and is
strictly limited to the replacement of Products considered as defective by TAGSYS and returned
according to the return procedure defined below; in such case, TAGSYS will, at TAGSYS’ option,
either replace every defective Product by one new Product or refund the purchase price paid by
Buyer to TAGSYS for the defective Product.
10.2 Warranty Exclusions
♣ Defects or damages resulting from storage of the Product under conditions which do not
comply with TAGSYS specifications or normal usage
♣ Defects or damages resulting from use of the Product in abnormal conditions (abnormal
conditions being defined as any conditions exceeding the ones stated in the product
specifications).
♣ Defects or damages from misuse, accident or neglect.
♣ Defects from improper testing, operation, maintenance or installation.
♣ Defects from alteration, modification except modifications or adjustments specifically described
in this Product reference guide, adjustment or repair, or any attempt to do any of the foregoing,
by anyone other than TAGSYS.
♣ Any action on Product that prevents TAGSYS from performing an inspection and test of the
Product in case of a warranty claim.
♣ Tampering with or abuse of the Product.
♣ Any use or incorporation by the Buyer or a third party of TAGSYS' Product into life saving or life
support devices or systems, or any related products, TAGSYS expressly excludes any liability
for such use.
32/34
Revision 1.0
October 2010
Medio P213 Reader User's Guide
10.2.1 General Provisions
This warranty sets forth the full extent of TAGSYS responsibility regarding the Product.
In any event, TAGSYS warranty is strictly limited to (at TAGSYS’ sole option) the replacement or
refund of the Products purchase price to TAGSYS, of Products considered as defective by
TAGSYS.
The remedy provided above is in lieu and to the exclusion of all other remedies, obligations or
liabilities on the part of TAGSYS for damages, whether in contract, tort or otherwise, and including
but not limited to, damages for any defects in the Products or for any injury, damage, or loss
resulting from such defects or from any work done in connection therewith or for consequential
loss, whether based upon lost goodwill, lost resale profits, impairment of other goods or arising
from claims by third parties or otherwise.
TAGSYS disclaims any explicit warranty not provided herein and any implied warranty, guaranty or
representation as to performance, quality and absence of hidden defects, and any remedy for
breach of contract, which but for this provision, might arise by implication, operation of law, custom
of trade or course of dealing, including implied warranties of merchantability and fitness for a
particular purpose.
10.2.2 How to Return Defective Products
The Buyer shall notify TAGSYS of the defects within 15 working days after the defects are
discovered.
Defective Products must be returned to TAGSYS after assignment by a TAGSYS Quality
Department representative of an RMA (Return Material Authorization) number. No Products shall
be returned without their proof of purchase and without the acceptance number relating to the
return procedure.
All Products shall be returned with a report from the Buyer stating the complete details of the
alleged defect.
Call +33 (0) 4 42 18 89 36 for return authorization and shipping address.
If returned Products prove to be non-defective, a charge will be applied to cover TAGSYS’ analysis
cost and shipping costs.
If the warranty does not apply for returned Products (due to age, or application of a warranty
exclusion clause), a quote for replacement will be issued, and no replacement will be granted until
a valid purchase order is received. If no purchase order is received within 30 days after the date of
TAGSYS quote, TAGSYS will return the products and charge the analysis cost and shipping costs.
All replaced Products shall become the property of TAGSYS.
The Product Return Form is included on the following page. This form should accompany any
product you need to return to TAGSYS for analysis in the event of a problem.
October 2010
Revision 1.0
33/34
Medio P213 Reader User's Guide
Product Return Form
Customer Profile:
Company: ................................................................
Address: ..................................................................
.................................................................................
.................................................................................
City & State:.............................................................
Zip Code: .................................................................
Country: ...................................................................
Contact Name: .......................................................
Contact e-mail: ......................................................
Contact Phone: ......................................................
Contact Fax:...........................................................
Order identification:
Product Name:.........................................................
Order Number (OEF):..............................................
Invoice Number: .....................................................
Return Quantity: ....................................................
Reason for return:
.........................................................................................................................................................................
.........................................................................................................................................................................
.........................................................................................................................................................................
.........................................................................................................................................................................
.........................................................................................................................................................................
To inform TAGSYS of this return, please email it to
[email protected]
Address to ship the product with this document attached:
TAGSYS
QUALITY DEPARTMENT
TAGSYS – 785 Voie Antiope, Athélia III,
13600 La Ciotat, France
To inform TAGSYS of this return, please also fax it to your Customer Service Representative
+33 (0) 4 42 18 89 01
Return Procedure:
The product returned will go through stringent quality controls.
A final analysis report will be sent to you as soon as possible.
Please contact your Quality Service representative for further details.
+33 (0) 4 42 18 89 36
This product bears the selective sorting symbol for waste electrical and electronic equipment
(WEEE)
This means that this product must be handled pursuant to European Directive 2002/96/EC in
order to be recycled or dismantled to minimize its impact on the environment.
For further information, please contact your local or regional authorities.
34/34
Revision 1.0
October 2010