1
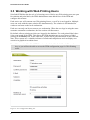
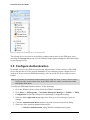
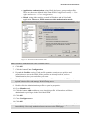
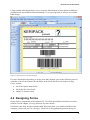
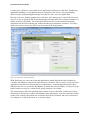
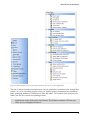
NiceLabel Portal User Guide © 2012 Euro Plus d.o.o. www.nicelabel.com Euro Plus d.o.o. Poslovna cona A 2 SI-4208 Šenčur, Slovenia tel.: +386 4 280 50 00 fax: +386 4 233 11 48 www.europlus.si [email protected] COPYRIGHTS Copyright © 1995-2012 Euro Plus d.o.o. All rights reserved. www.europlus.si www.nicelabel.com Information in this document is subject to change without notice. The software described in this document is furnished under a license agreement or nondisclosure agreement. The software may be used or copied only in accordance with the terms of those agreements. No part of the publication may be reproduced, stored in a retrieval system, or transmitted in any form or any means electronically or mechanically, including photocopying and recording for any purpose other than the purchaser's personal use without the written permission of Euro Plus d.o.o. Euro Plus d.o.o. Poslovna cona A 2 SI-4208 Šenčur Slovenia www.europlus.si TRADEMARKS NiceLabel, NiceLabel Pro, NiceForm, NiceWatch, NiceMemMaster, NiceData, NicePrint, NiceDriver, NiceLabel Print Center, Enterprise Print Manager, NiceWatch Server and NiceWatch Enterprise are trademarks or registered trademarks of Euro Plus d.o.o. in the U.S.A. and other countries. Niceware is a registered trademark of Niceware International, LLC. Microsoft and Windows are registered trademarks of Microsoft Corporation. Other brands and their products are trademarks or registered trademarks of their respective holders and should be noted as such. Table of Contents 1. Introduction .................................................................................................. 1 1.1 About this Manual ................................................................ 1 1.1.1 Typographical Conventions .......................................................... 1 2. Architecture .................................................................................................. 2 3. Configuring NiceLabel EPM ........................................................................ 3 3.1 3.2 3.3 3.4 3.5 Introduction to NiceLabel EPM............................................ 3 Enterprise Print Manager User Interface .............................. 3 Working with Web Printing Users ....................................... 4 Using the Storage Server ...................................................... 5 Configure Authentication ..................................................... 6 4. Designing Solutions for Web Printing ....................................................... 8 4.1 Designing Labels .................................................................. 8 4.2 Designing Forms ................................................................... 9 4.3 Creating Solutions .............................................................. 13 4.3.1 4.3.2 4.3.3 Compose your solution ............................................................... 13 Analyze your solution for problems ............................................ 14 Deploy your solution to the EPM Storage Server ....................... 15 4.4 Sample Solution Provided with the Software ..................... 16 5. Printing Labels on the Web ...................................................................... 17 6. Technical Support ...................................................................................... 19 6.1 Online Support .................................................................... 19 6.2 Contact Information ............................................................ 19 v NiceLabel Portal User Guide 1. Introduction 1.1 About this Manual This User Guide helps you install and integrate NiceLabel Portal into your enterprise IT environment. The User Guide contains the following sections: Introduction: Introduces the NiceLabel Portal software and lists the contents of the package. Architecture: Learn about NiceLabel Portal basics and understand its architecture. Configuring NiceLabel EPM: Learn about NiceLabel Enterprise Print Manager user interface and configuration. Designing Solutions for Web Printing: Learn to design label formats and printing applications, then learn to create and publish solutions online. Printing Labels on the Web: Learn about important set up steps before the solution can be used on the Web. Technical Support: Contacting technical support. 1.1.1 Typographical Conventions Text that appears in bold refers to menu names, file names are written as SETUP.EXE and user interface buttons are described as OK. Text that appears in italic refers to confirming actions such as Read only, locations such as Folder, or software window names. Text enclosed in <Less-Than and Greater-Than brackets> refers to keyboard keys such as <Enter>. Variables are enclosed in [brackets]. 1 NiceLabel Portal User Guide 2. Architecture NiceLabel Portal is a server/client based solution primarily designed for bar code label printing. On design workstations, users use NiceLabel Suite applications for label design and printing. The NiceLabel Solution Architect application is then used to create the solution file; this is the application for label printing for the Web printing user. Typically, you will have one design workstation. On the server, the NiceLabel Enterprise Print Manager (EPM) and NiceLabel Web Printing Server Web applications handle licensing for Web printing users and distribute their printing applications. All printing activities are logged in the NiceLabel EPM database. The administrator can use a standard internet browser to control the EPM, manage licenses, access solution files in the Web-based storage repository (Storage Server), set up and manage Web printing users, assign solutions to users, and view their printing history. The Web printing user requires an installation of printing components. No stand-alone installation is necessary; the components are installed within the browser. Essentially, the required installation is limited to Microsoft Silverlight (available also in Windows Update service) and an installation of the Web Printing Client Prerequisites (to reconfigure Silverlight settings and add certificate to the computer). To summarize, the NiceLabel Portal environment consists of the following components: • Server components: NiceLabel Enterprise Print Manager and NiceLabel Web Printing site • Design components: NiceLabel Suite and NiceLabel Solution Architect • Print client components, these are installed on each workstation that will print labels. Figure 1: NiceLabel Portal Architecture Once you have completed the steps in the NiceLabel Portal Installation Guide, you can proceed with the configuration of the components installed on the server, and of the components installed on the design workstation. 2 NiceLabel Portal User Guide 3. Configuring NiceLabel EPM 3.1 Introduction to NiceLabel EPM NiceLabel Enterprise Print Manager (EPM) is a Web application used to manage Web printing users in an enterprise environment. The administrator can manage the data repository (Storage Server), define Web printing users and assign their solutions; as well as see the label printing events executed by the Web users. Note: Before configuring NiceLabel EPM, make sure that the product is activated. For details see the NiceLabel Portal Installation Guide. The main features of Enterprise Print Manager are: • Web printing of labels stored on the server on local printers or server printers • Document Storage Server: access to server storage, where design users can save and retrieve solution files • Central print and event log • NiceLabel Web printing and NiceLabel design client licensing 3.2 Enterprise Print Manager User Interface The NiceLabel Enterprise Print Manager user interface is presented as a Web page. To access the functions of NiceLabel Enterprise Print Manager, start your Web browser and point to the address of the server where NiceLabel EPM is installed, for example: http://server/epm/home.aspx where server represents the computer name where you installed EPM. Note: You may access the EPM by pointing to http://server/epm, but the page will not load correctly if you have NiceLabel EPM and the Web Printing site installed on the same server. For additional explanations and solutions, see the NiceLabel Knowledge Base article KB201. The NiceLabel Enterprise Print Manager default screen displays a welcome page, presenting the main operational choices to the user. Once the user makes this first choice, he is forwarded to the relevant functional area of the software. Navigation between these areas is possible with the use of menu tabs Overview, Storage Server, History, Reports, and Administration. Open a particular functional area by clicking on the corresponding tab. For example, if you want to see all printing-related events that occurred in your environment, click the History tab. Note: For detailed information about NiceLabel Enterprise Print Manager, refer to NiceLabel Enterprise Print Manager User Guide. 3 NiceLabel Portal User Guide 3.3 Working with Web Printing Users NiceLabel EPM also has the role of a licensing server. Before any Web printing user can open his solution and print labels, the EPM administrator must add the user to the EPM and configure his account. Each active user will consume one Web printing license, even if he is not logged in. Multiple users can work with the same solution file simultaneously. The solution is downloaded for each user and runs on the local workstation. Each user can only run his account on one workstation. When the user logs in using the same username on another workstation, the first session will disconnect. By default, all user printing activities are logged in the database. For each printed label, there is an event stored in the EPM. This allows the EPM administrator to see a history of label printing in the History tab. At the same time, reports can be generated based on the collected data. These reports are a valuable indicator of trends and comparisons and can display user activities in graphical or tabular form. Note: Make sure that NiceLabel EPM is activated with the NiceLabel Portal Client software key, or you will not be able to access the EPM configuration page for Web Printing users. Figure 2: User configuration dialog box 4 NiceLabel Portal User Guide To configure Web printing users, do the following: 1. Go to the Administration tab and select Portal Clients. 2. Click Add new client. 3. Fill in the required parameters. 4. The most important parameter of a user (after the username and password) is the solution name. This is the name of the solution file (.SLNZ) available in the Storage Server. When the user successfully logs into the Web Printing site, this solution will run. The user cannot change the solution that he will use; only the EPM Administrator can do it. 5. Make sure to enable the option Active. If the user is not active, he cannot log in and run his solution. Note: See the NiceLabel EPM User Guide, the chapter Administrator ->Portal Clients for details about configuration parameters. 3.4 Using the Storage Server The Storage Server is a Web file repository. It is installed together with NiceLabel EPM on the same Windows Server. Storage Server allows label and form designers to store the label printing solutions to a central location available to all Web printing users. Technically, the files within the Storage Server are stored in the local MS SQL database. The Storage Server can be operated very much like files on your local disk drive. When a Web printing user logs into the Web page, his solution loads into a browser. The EPM administrator defines the solution for each user. The solution designer must store the solution file (.SLNZ) in the Storage Server, or the solution will not load for the user. The Storage Server is based on WebDAV technology and allows file sharing on the Web. The solution files in the Storage Server are accessible using the HTTP or HTTPS protocols. Using WebDAV ensures the solution designers can access the repository from any location (from the local company’s network or any other location) and can upload solutions for Web printing users. The shortcut for the Storage Server is created on each design workstation which has NiceLabel Suite activated with the same NiceLabel EPM. You will find it in the Favorites section in each Windows file system dialog box as Storage Server. The shortcut allows quick access to the frequent Storage Server users such as solution designers. 5 NiceLabel Portal User Guide Figure 3: Shortcut to the Storage Server in the Favorites The Storage Server can also be accessed by pointing your browser to the EPM page, then selecting the Storage Server tab. Use the controls on the right to manage the files and folders in your Storage Server. 3.5 Configure Authentication By default, access to the EPM is not protected. Anyone aware of the existence of the EPM server can gain access. If the security standards of your company require a higher level of security to protect access to EPM functionality, you can use the NiceLabel authentication feature. Note: It is possible to customize limited EPM access rights for users. A user’s access can be limited to only certain subsections in the EPM, while the others remain inaccessible and hidden from them. To enable the EPM authentication feature, do the following: 1. Go to the Windows Server where NiceLabel EPM is installed to. 2. Go to Start -> All Programs -> NiceLabel Enterprise Manager -> Utilities → EPM Configuration to open the Enterprise Print Manager Configuration utility. 3. Select the User rights and access page in the Enterprise Print Manager group of settings. 4. Click the Authentication Mode button to open the Authentication mode dialog. 5. Select one of the possible authentication modes: • Windows authentication, using Windows authentication system 6 NiceLabel Portal User Guide • Application authentication, using NiceLabel users, groups and profiles. These are the users defined in the same EPM Configuration utility -> User rights and access -> User configuration. • Mixed, using either entities created in Windows and in NiceLabel application. However, EPM cannot use this authentication mode. Figure 4: NiceLabel Authentication mode Note: Windows authentication is the common choice. 6. Click OK. 7. Click the button User Configuration. 8. Expand the Profiles section. Each profile contains certain access policies and permissions to access the EPM. Some profiles are already built-in, such as Administration, but you can define your own. Note: Usually, administrators and solution designers will have access to the EPM, so they can upload solution files and manage Web Printing users. 9. Double click the Administration profile to open its properties. 10. Go to Members tab. 11. Click the button Add to add new users into this profile. All members will have administrative privileges in the NiceLabel EPM. 12. Click OK. 13. Close Configure users. 14. Click OK. Note: Because you have enabled the authentication mode in step 5, the changes are applied immediately. Now only authorized users can access the EPM page. 7 NiceLabel Portal User Guide 4. Designing Solutions for Web Printing NiceLabel Portal includes desktop components which solution designers can use to create Web printing solutions. The foundation of any solution is a form application tailored to specific customer’s needs. Each solution must have at least one form. Usually, solutions provide the users with label printing on the Web, so label files are also a common part of the solution. The design (color scheme, position of objects) and the functionality of each solution depend on the customer’s requirements and the designer who creates them. With NiceLabel Portal, you receive a powerful application generator which does not require any programming skills to create a form-based solution. If the built-in features do not suffice, NiceLabel Portal includes Python programming language support, which that can enhance the possibilities of your forms. The solution contains everything needed for label printing. The usual solution contents are: • Forms: graphical application that the customer uses to control the activities • Labels: label templates containing objects as text, image, bar code, etc. • Images: images can be displayed on the form, or printed on the label As part of the solution items, there are also connections to the databases. Usually, label printing data is already stored in a database. The solution connects to the database, and based on the form design parameters and permissions, extracts the data and feeds it to label formats for printing. 4.1 Designing Labels Label formats are components of the solution file. To create a solution, use NiceLabel Solution Architect. See the chapter Creating Solutions for details. NiceLabel Pro is a label design application and is included with NiceLabel Suite. It is usually installed on the computer which fills the role of a designer. To run NiceLabel Pro at least one printer driver must be installed on the computer. NiceLabel Pro is a user-friendly graphical designer which provides an easy method to design label formats of different complexities and usage, from undemanding mailing labels to complex chemical and logistic labels. There are two main label format types: 1. Fixed label: In this case the label format includes fixed design objects only. All printed labels are identical copies of each other. Such label formats are used when the design and the contents never change. 2. Variable label: In this case, the label objects can be variable. The values for label objects are not hard-coded into the label design, but are dynamically allocated each time the label prints. On each label a set of variables is defined, such as Product Name, Price, Description, or Bar Code. Each object on the label that must display variable contents is linked with a variable. When the variable changes value, so does the object. 8 NiceLabel Portal User Guide Using variable label design allows you to reuse the label formats to print labels for different products/needs and minimize label maintenance. It is a good practice to always use variable label design. Figure 5: NiceLabel Pro, the label designer For more information about how to design your label formats, refer to the following sources, available on NiceLabel Portal CD and online at the NiceLabel Web site in the Learning Center section: • NiceLabel Quick Start Guide • NiceLabel Pro User Guide • Online 15-minute videos 4.2 Designing Forms Forms are key components of the solution file. Use NiceLabel Solution Architect to create a solution. See the chapter Creating Solutions for more details. NiceForm is the form designer included with NiceLabel Suite. It is usually installed on the computer, which will serve as a designer. NiceForm is the application generator that gives 9 NiceLabel Portal User Guide you the power ability to create multi-screen applications which run on the Web. Furthermore, application building is a straightforward process that does not involve any programming skills. No prior programming knowledge is needed to create your own application. Because of its user-friendly graphical user interface, the learning curve with NiceForm is not steep. It is easy to grasp the NiceForm philosophy of design and create working solutions in a matter of hours, if not faster. The idea behind NiceForm is to create a dedicated printing application for the Web printing user without needing a programmer's assistance. You don’t need to be a power user to use NiceForm and create such an application. Figure 6: NiceForm, the form designer With NiceForm you can create front-end applications which hide all the label complexity, variables and database connections under the hood. All that is left is a clean, easy-to-use form application customized to the printing user requirements. A typical application will collect data from the user (or connect to the database to obtain the necessary data), it will preview the label format on screen for a visual check, and it present a Print button. The form designer offers the standard form controls, such as edit fields, combo boxes (dropdown boxes), check boxes, tables with database data, and buttons. You can control the actions on the form. Usually, the actions are executed with a click of a button, but can be also based on a change of events in the form, or even timer-based. 10 NiceLabel Portal User Guide Figure 7: The available object (on the left) and actions you can use in your applications The list of actions includes standard actions, such as print label; open other form; change label printer; as well as executing program scripts (in Python syntax); posting data into a database table; managing databases; writing data to disk, and others. The common form will print out labels, but can also execute non-printing actions. Note: Some of the actions available in NiceForm are not available when running the applications on the Web in NiceLabel Portal. The Solution Architect will warn you when you use unsupported features. 11 NiceLabel Portal User Guide NiceForm Quick Tutorial The NiceForm allows the user to set values for variable label objects. These objects are linked to variables, so the solution designer’s job is: 1. In NiceLabel Pro, create a label format that defines the list of variables for variable objects on the label, such as Product Name, Price, Description, or Bar Code. 2. In NiceLabel Pro, create label objects, such as text, bar code or images and link them to these variables. 3. In NiceForm, import variables from the label. 4. Create form objects, such as edit fields, combo boxes and check boxes, and establish a connection to the imported variables. 5. Create a label preview object and a button object that defines the actions Open Label and Print Label. 6. Test the form to see if it operates as expected. Test-print the label. Note: To make the job of the form designer easier, steps 3-5 are done by the built-in New Form Wizard. All that is left for designer to do is test the application, and change its design to match the enterprise standards. Data Source for Variables Once a variable label is designed, define the variable values with different data sources, such as manual entry (prompted fields), calculations done on the label, values assigned by another application, or set the data to be obtained from an existing data source. Databases are common sources of data. You can configure NiceLabel Portal to obtain data from various database sources, such as Microsoft Excel spreadsheets, Microsoft Access filebased databases, or Microsoft SQL Server. The best practice for databases in NiceLabel Portal is using MS SQL databases. Usually, you will create a table object in the form and link it with the associated database table. Then, create the field mapping in table properties , and link the field from a database table with the respective variable name. This ensures that the values from the selected database records will be stored in the appropriate variable in the form. For more information about how to design your forms, refer to the following sources, available on NiceLabel Portal CD and online at NiceLabel Web site in the section Learning Center: 12 • NiceLabel Quick Start Guide • NiceForm User Guide • Online 15-minute videos NiceLabel Portal User Guide 4.3 Creating Solutions Once the designer has created labels and forms, just a few more tasks remain before you can use the solution online. Pack the files into a combined solution file. This is a compressed file which includes the label format, form layout and the application you have created. While labels are created in the NiceLabel Pro label designer and forms are created in the NiceForm form designer, solutions are created in NiceLabel Solution Architect. It is usually installed on the computer, which already has NiceLabel Pro and NiceForm installed. To create a solution from your label and form files, follow the three phases in the Solution Architect. Select the label and form files for the solution, resolve any possible problems in the designs, and deploy the solution to the EPM server. 4.3.1 Compose your solution Select the items (label formats, forms and images) that will compose your solution. 1. Start NiceLabel Solution Architect. 2. Click the New button to create a new empty solution. The Solution items pane above is empty. Add the items from the File Explorer pane below into the empty Solution items pane to add them into the solution. Note: You can also open the existing solution file (.SLNZ), just make sure it was created on this workstation. When you open the existing solution, NiceLabel Solution Architect will refresh already imported items. It will search for these items in the original folders, from where you initially imported them. If the items or folders are not found, you will see the error message. 3. In the File Explorer pane, navigate to the folder where you have stored the items you wish to put into the solution. Note: The solution can contain files of type label formats (.LBL), forms (.XFF) and images (.JPG and .PNG). 4. Select the item you wish to add to the solution and drag & drop the item into the Solution items pane, or click the Add items button. Note: You can use any Windows file manager (such as Windows Explorer) to drag and drop files into the Solution items pane. 5. Continue adding items until the solution contains all necessary items. 6. The best practice is to import the main form file first. Solution Architect will analyze the imported item and see if any other items link to it. For example: if you have a main menu form that opens other forms and prints several types of labels, all linked forms (.XFF) and label formats (.LBL) will be automatically imported at the same time. 13 NiceLabel Portal User Guide 7. If you made a mistake and added an unnecessary item, remove it by either drag & dropping it out of the Solution items pane, or select it and then click the items button. Remove 8. One form in the solution must be set as the default form. By default, the first imported form is default form. Select a new form and click the button to change the default form. Set as default form Note: The default form will automatically load for the Web printing user when he logs into the Web Printing site. 9. Hover your mouse over the item thumbnail to see details of the imported item. 10. If there is a problem identified in the imported item, the warning symbol will display over the thumbnail. Hover your mouse over the warning symbol to see the error description. 11. Click the Next button to move to the next step. 4.3.2 Analyze your solution for problems This step allows you to resolve any problems that were identified in the solution. If there is a problem with solution items (label formats, forms or images) you have added into your solution, the details about the problems will be displayed in the Compatibility Issues pane. All items in an error state are clearly marked with the Alert symbol. The display in the Compatibility issues pane depends on the item selection in the Solution items pane: • If no item is selected, the bottom pane displays alerts from all erroneous items. • If one item is selected, the bottom pane display alerts for this item only. Typically, alerts are reported because you have used some of the design features available in NiceLabel Pro or NiceForm, which are not available when printing labels on the Web. Before you can use the solution on the Web, you have to resolve all of the reported problems. To clear the alert state and clean up the solution, do the following: 1. Identify all items with the Alert symbol. 2. Select the item with Alert symbol then see the issues reported for it in the Compatibility issues pane. 3. Click the Open in designer button to open the selected item (label format or form) in the designer; NiceLabel Pro for label formats and NiceForm for forms. 4. Resolve the problem in the designer. 5. Save the label format or form. 6. Go back to the NiceLabel Solution Architect. 14 NiceLabel Portal User Guide 7. Click the Refresh button. 8. Repeat steps 2-7 until all alerts are resolved. 9. Click the Next button to move to the next step. 4.3.3 Deploy your solution to the EPM Storage Server In this step, you can preview the default form and deploy the solution to the EPM Storage Server to be used by the Web printing user. If there are still problems identified in the solution, the Solution Architect will warn you about them. Make sure to correct all the problems before continuing, or the solution will not work as expected. To deploy the solution, do the following: 1. Make sure that all reported problems in the design of your label formats and forms are resolved. Click the Refresh button to make sure the latest items are imported in the solution. 2. Click the Save button. 3. In the Save dialog box, navigate to the Favorites section and locate the Server. Storage 4. Expand it to see the contents of the Storage Server inside NiceLabel EPM. 5. Type in the solution name and save it. If you do not see the Storage Server in the Favorites section, NiceLabel Suite on your workstation did not get the license from the EPM server. To activate NiceLabel Suite, see the chapter Activation in the NiceLabel Portal Installation Guide. Alternatively, you can save the solution file to a local disk, then browse to your EPM server and upload the solution using the controls in the Storage Server. To open the Storage Server, open http://server/epm/DocumentStorage/AllItems.aspx, where server is the name of your Windows Server, where the NiceLabel EPM is installed. Solutions with Global Variables If your label formats use global variables, you will be able to upload their definition and current values to the EPM server. Each global variable in the label designer has a unique internal ID number. This number prevents global variables from overwriting each other. However, problems will likely occur if you design labels on several workstations, each with its own global variable settings. Once you upload the global variables to the EPM, you can manage them in EPM -> Administration -> Global Variables. Note: If you use global variables, the best practice is to create solutions and publish them to the EPM from a single workstation. This will prevent overwriting of the global variables, which may happen if solutions are deployed from several workstations. 15 NiceLabel Portal User Guide For more information about how to create your solutions with NiceLabel Solution Architect, refer to the following sources: • Help file for NiceLabel Solution Architect 4.4 Sample Solution Provided with the Software There is a sample solution included with NiceLabel Portal. The screenshots of label format and form depicted in the screenshots in this guide are from the sample solution. The sample will help you get started with NiceLabel Portal quicker. The sample files are installed with NiceLabel Suite in the standard Samples folder. The location of the sample folder depends on the type and language options of your Windows. By default, the folder is created in: c:\Program Files\EuroPlus\NiceLabel 5\Samples The files for the NiceLabel Portal sample solution are: • In folder Forms, the file Keripack.xff • In folder Labels, the files Keripack-Box Label.lbl and Keripack-Package Label.lbl • In folder Graphics, the file logo-nicelabel.jpg You can use the instructions in the previous chapters to open the files in designers (.XFF file in NiceForm, .LBL files in NiceLabel Pro) and see how they are constructed. To create a solution you can deploy for NiceLabel Portal, use NiceLabel Solution Architect and create the solution file (.SLNZ). To help you get started quickly, the solution file has already been prepared. The solution file is: • In folder Labels, the file Keripack.slnz If you are eager to see this solution running on the Web, do the following: 1. Open EPM, point to the http://server/EPM, where server is the name of Windows Server where EPM is installed. Log in, if necessary. Contact your administrator for the correct URL. 2. Open Storage Server tab. 3. Use the Storage Server controls to upload the .SLNZ file. 4. Open Administrator tab, select Portal Clients. 5. Create new Portal Client user. During the configuration associate the user with the uploaded solution file. 6. Open Web Printing site, point to http://server/WebPrinting, where server is the name of Windows Server where Web Printing site is installed. Contact your administrator for the correct URL. 7. Log in to the Web Printing site using the just-created user credentials. 8. The form from the solution will display. 16 NiceLabel Portal User Guide 5. Printing Labels on the Web Once the label formats and form applications are designed and the solution file is deployed on the server, the solution is ready to be used by Web printing clients. NiceLabel Portal gives you the possibility to create Web printing applications and publish them online with ease. Once the solution is deployed in the EPM Storage Server, do the following: 1. Make sure you have defined the Web Printing user inside the EPM -> Administration -> Web Printing Users. 2. Make sure the user authorization is setup properly. Note: This is a task for the administrator. See the NiceLabel Portal Installation Guide for the possible authorization types. 3. Make sure the correct solution is configured in the Web Printing user configuration. Each user can have one assigned solution from the Storage Server. 4. Provide the login information to the Web printing user. You need: a. URL link to the Web Printing site. If in doubt, consult the administrator who installed the Web Printing site. By default, the URL is http://server/WebPrinting, where the server is the name of Windows Server where Web Printing site is installed to. b. Username c. Password 17 NiceLabel Portal User Guide Figure 8: Checking for prerequisites 5. Resolve any issues with Silverlight and Web Printing Client Prerequisites installation, if they arise. The printing user must have installed Silverlight (add-on component from Microsoft) and must install the Web Printing Client Prerequisites in the browser. Note: See the chapter Installing Client Components for Printing User in the NiceLabel Portal Installation Guide for additional details. 18 NiceLabel Portal User Guide 6. Technical Support If you experience any technical difficulties using NiceLabel software, refer to the built-in help, User guides are available on the NiceLabel CD and online Knowledge Base. 6.1 Online Support You can find the latest builds, updates, workaround for common issues and Knowledge Base under the Support section on the product Web site at www.nicelabel.com. If you are unable to solve the problem on your own, contact your local vendor or representative offices. For more information, see: • Knowledge Base: http://kb.nicelabel.com • NiceLabel Tutorials: http://www.nicelabel.com/Learning-center/Tutorials • NiceLabel Forums: http://forums.nicelabel.com/ 6.2 Contact Information Head Office Euro Plus d.o.o. Poslovna cona A 2 SI-4208 Šenčur Slovenia Tel: +386 4 280 50 00 Fax: +386 4 233 11 48 [email protected] http://www.nicelabel.com North American Office Niceware International, LLC 200 South Executive Drive, Suite 200 Brookfield, Wisconsin 53005 USA Telephone: (888) 894-NICE (6423) Fax: (262) 784-2495 [email protected] http://www.nicewareintl.com German Office NiceLabel Germany GMBH Liebknechtstr. 29 63179 Obertshausen Tel:+49 (0)6104 405 400 [email protected] http://www.nicelabel.de China Office 中国 GARDEN BUSINESS CENTER Julu Rd. 889, Building 23, Office 8311 Shanghai 200040, PR China 电话:+ 21-62490371 传真:+ 21-62490372 [email protected] www.nicelabel.cn For a list of local NiceLabel representatives, see http://www.nicelabel.com/contact. 19