1
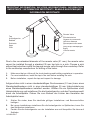
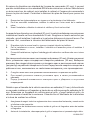
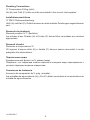
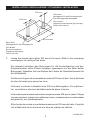
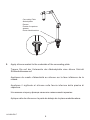
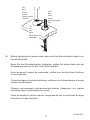
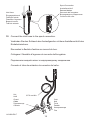
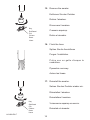
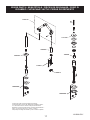
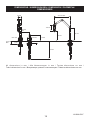
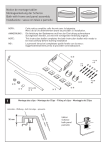
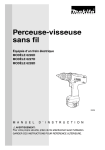
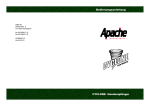
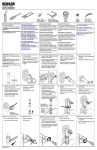
K-6227D Karbon™ Kitchen Sink Tap Karbon™ Spültischarmatur Robinet d’évier de cuisine Karbon™ Rubinetto da lavello per cucina Karbon™ Кран для кухонной раковины Karbon™ Grifo para fregadero de cocina Karbon™ Installation and User Guide Installations- und Bedienungsanleitung Guide d’installation & d’utilisation Guida all’installazione e all’uso Руководство по установке и эксплуатации Guía de instalación y uso 1 1101928-D2-F important information / WICHTIGE INFORMATIONEN / INFORMATION IMPORTANTE / INFORMAZIONI IMPORTANTI / ВАЖНАЯ ИНФОРМАЦИЯ / INFORMACIÓN IMPORTANTE Remote Valve Einhebelmischer Organe de commande Valvola a distanza Дистанционный клапан (регулятор температуры воды) Válvula remota Tap Auslaufgarnitur Robinet Rubinetto Кран Grifo Due to the non-standard diameter of the remote valve (51 mm), the remote valve cannot be installed through a standard 35 mm tap hole in a sink. Choose a sink without tap holes then install the tap and remote valve through the countertop. Refer to the countertop manufacturer for drilling of the holes. 1. 2. 3. Make sure that you follow all the local plumbing and building regulations in operation. For new installations, install the tap in the sink before installing the sink. Before installation, unpack the tap and inspect for damage. Aufgrund des nicht in einer standardmäßigen Durchmessers (51 mm) kann eines Standardspülbeckens nicht in einer standardmäßigen 35 mm Hahnlochbohrung eines Standardspülbeckens installiert werden. Wählen Sie ein Spülbecken ohne Hahnlochbohrung und installieren Sie die Auslaufgarnitur und das Fernsteuerventil durch die Arbeitsplatte. Ziehen Sie zum Bohren der Löcher den Hersteller der Arbeitsplatte heran. 1. 2. 3. Stellen Sie sicher, dass Sie sämtliche gültigen Installations- und Bauvorschriften befolgen. Bei neuen Installationen installieren Sie die Auslaufgarnitur im Spülbecken, bevor Sie das Spülbecken installieren. Packen Sie die Auslaufgarnitur vor der Installation aus und überprüfen Sie diese auf Schäden. 1101928-D2-F 2 En raison du diamètre non-standard de l’organe de commande (51 mm), il ne peut pas être installé dans un trou standard Ø35 mm de robinet sur un évier. Sélectionnez un évier sans trou de robinet, puis installez le robinet et l’organe de commande à travers le plan de travail. Consultez le fabricant du plan de travail pour percer les trous. 1. 2. 3. Respectez les règlementations en vigueur sur la plomberie et les bâtiments. Pour les nouvelles installations, installez le robinet sur l’évier avant de le mettre en place. Avant l’installation, déballez le robinet et vérifiez qu’il soit en bon état. A causa del suo diametro non-standard (51 mm), la valvola a distanza non può essere installata sul lavello nel foro standard da 35 mm. Scegliere un lavello senza fori per rubinetto, quindi installare il rubinetto e la valvola a distanza sul piano di lavoro. Per praticare i fori, consultare le istruzioni del fabbricante del piano di lavoro. 1. 2. 3. Rispettare tutte le norme locali in vigore su impianti idraulici ed edilizia. Per le installazioni a nuovo, installare il rubinetto sul lavandino prima di installare il lavandino stesso. Prima dell’installazione, togliere l’imballaggio del rubinetto e verificare che non ci siano danni. Дистанционный клапан имеет нестандартный размер (51 мм). Клапан не может быть установлен через стандартное отверстие раковины (35 мм). Выберите раковину без отверстий для крана и установите кран и дистанционный клапан (регулятор) на рабочей поверхности стола.Перед тем как сверлить отверстия в рабочем столе, ознакомьтесь со свойствами материала у его производителя. 1. 2. 3. Следуйте всем местным правилам сантехнических и строительных работ. При первой установке сначала установите кран, а затем устанавливайте раковину. Перед установкой внимательно осмотрите кран и убедитесь в отсутствии повреждений. Debido a que el tamaño de la válvula remota no es estándar (51 mm), dicha válvula no se puede instalar en el fregadero a través de un orificio para grifo estándar de 35 mm. Seleccione un fregadero sin orificios para el grifo, y luego instale el grifo y la válvula remota a través de la encimera. Consulte con el fabricante de la encimera a la hora de realizar los orificios. 1. 2. 3. Asegúrese de seguir todos los reglamentos de su zona sobre fontanería y construcción al efectuar esta operación. En ese caso de instalaciones nuevas, instale el grifo en el fregadero antes de instalar el fregadero. Antes de la instalación, desempaquete el grifo e inspeccione si presenta algún daño. 3 1101928-D2-F Plumbing Connections ⅜” Compression Fitting (inlet). Hot (H) and Cold (C) inlets must be connected to the correct inlet supplies. Installationsanschlüsse ⅜” DN15 Rohrverschraubung. Heiß (H) und Kalt (C)-Zuläufe müssen an die korrekten Zuleitungen angeschlossen sein. Raccords de plomberie Raccord pression ⅜” F (flexibles). Les entrées d’eau Chaude (H) et Froide (C) doivent être raccordées aux arrivées appropriées. Raccordi idraulici Raccordo a compressione ⅜”. Gli ingressi d’acqua calda (H) e fredda (C) devono essere raccordati in modo adeguato alle alimentazioni. Подключение воды Компрессионный фитинг на ⅜ дюйма (вход). Убедитесь, что подающие шланги горячей и холодной воды подсоединены к соответствующим входным отверстиям. Conexiones de fontanería Accesorio de compresión de ⅜ pulg. (entrada). Las entradas de agua caliente (H) y fría (C) deben conectarse a los suministros de entrada de agua correctos. 1101928-D2-F 4 Installation / Installazione / УСТАНОВКА / INSTALACIÓN Ø 51 mm Valve Hole Montageloch für den Einhebelmischer Trou de l'organe de commande Foro valvola Отверстие для клапана (регулятора) Orificio de la válvula Ø 35 mm 203 mm Max Spout Hole Montageloch für die Auslaufgarnitur Trou du bec Bocca di erogazione Отверстие для крана Orificio del caño 1. Locate the remote valve within 203 mm of the spout. Refer to the countertop manufacturer for drilling of the holes. Der Abstand zwischen den Bohrungen für die Auslaufgarnitur und den Einhebelmischer sollte 203mm betragen (gemessen von der Mitte beider Bohrungen). Beachten Sie zum Bohren der Löcher die Herstellerhinweise für die Arbeitsplatte. Positionnez l’organe de commande à moins de 203 mm du bec. Voir le fabricant du plan de travail pour percer les trous. Collocare la valvola a distanza entro 203 mm dall’erogatore. Per praticare i fori, consultare le istruzioni del fabbricante del piano di lavoro. Установите дистанционный клапан на расстоянии 203 мм от крана. Перед тем как сверлить отверстия в рабочем столе, ознакомьтесь со свойствами материала у его производителя. Sitúe la válvula remota a una distancia máxima de 203 mm del caño. Consulte con el fabricante de la encimera a la hora de realizar los orificios. 5 1101928-D2-F Concealing Plate Abdeckplatte Rosace Piastra di copertura Фланец Placa embellecedora 2. Apply silicone sealant to the underside of the concealing plate. Tragen Sie auf der Unterseite der Abdeckplatte eine dünne Schicht Silikondichtmasse auf. Appliquez du mastic d’étanchéité au silicone sur la face inférieure de la rosace. Applicare il sigillante al silicone sulla faccia inferiore della piastra di copertura. На нижнюю сторону фланца нанесите силиконовый герметик. Aplique sello de silicona en la parte de debajo de la placa embellecedora. 1101928-D2-F 6 3. Insert the tap through the mounting hole. Setzen Sie die Auslaufgarnitur in das Montageloch ein. Placez le robinet dans le trou de montage. Inserire il rubinetto nel foro di montaggio. Вставьте кран в монтажное отверстие. Inserte el grifo a través del orificio de montaje. 7 1101928-D2-F 4. Partially thread the screws into the ring. Drehen Sie die Schrauben teilweise in den Ring ein. Engagez partiellement les vis dans l’anneau Avvitare parzialmente le viti nell’anello. Частично вверните винты в кольцо. Enrosque los tornillos parcialmente en el anillo. Fibre Washer Unterlegscheibe (Glasfaser) Joint fibre Rondella in fibra Фибровая шайба Arandela de fibra 6 mm Metal Washer Metallunterlegscheiben Rondelle métallique Rondella in metallo Металлическая шайба Arandela metálica 1101928-D2-F Ring Anello Кольцо Anillo 8 5. Fit the fibre and metal washers onto the threaded shank Install the ring leaving approximately 6 mm between the ring and the countertop. Bringen Sie die Glasfaser- und Metallunterlegscheiben am Gewindeschaft an. Installieren Sie den Ring, indem Sie etwa 6 mm zwischen Ring und Arbeitsfläche freilassen. Installez le joint fibre et la rondelle métallique sur la tige filetée Installez l’anneau en laissant environ 6 mm entre l’anneau et le plan de travail. Infilare le rondelle in fibra e in metallo sull’asta filettata. Installare l’anello lasciando circa 6 mm tra l’anello e il piano di lavoro. Установите фибровую и металлическую шайбы на резьбовой хвостовик. Установите кольцо, оставив примерно 6 мм между кольцом и нижней поверхностью стола. Instale la arandela de fibra y la arandela metálica en el vástago roscado. Instale el anillo dejando aproximadamente 6 mm entre dicho anillo y la encimera. 6. Turn the ring until the screws are to the front and the back. Tighten the screws securely and evenly. Drehen Sie den Ring, bis die Schrauben nach vorne und hinten zeigen. Ziehen Sie die Schrauben sicher und gleichmäßig fest. Vissez l’anneau jusqu’à ce que les vis se trouvent à l’avant et à l’arrière. Serrez les vis à fond et uniformément Ruotare l’anello fino a quando le viti si trovano una davanti e una dietro. Stringere a fondo e in modo uniforme le viti. Проворачивайте кольцо до тех пор, пока винты не займут переднее и заднее положение (относительно крана). Затем аккуратно и равномерно закрутите винты. Gire el anillo hasta que los tornillos estén delante y detrás. Apriete los tornillos de forma segura y homogénea. 9 1101928-D2-F Remote Valve Einhebelmischer Organe de commande Valvola a distanza Дистанционный клапан (регулятор) Válvula remota 7. Apply silicone sealant to the underside of the remote valve. Install the remote valve through the hole in the countertop. Bringen Sie eine dünne Schicht Silikondichtmasse an der Unterseite des Einhebelmischers an. Installieren Sie den Einhebelmischer im Montageloch in der Arbeitsplatte. Appliquez du mastic d’étanchéité au silicone sur la face inférieure de la soupape éloignée Engagez l’organe de commande dans le trou du plan de travail. Applicare il sigillante al silicone sulla faccia inferiore della valvola a distanza. Installare la valvola a distanza nel foro sul piano di lavoro. Нанесите силиконовый герметик на нижнюю часть дистанционного клапана.Установите дистанционный клапан в отверстие рабочего стола. Aplique sello de silicona en la parte de debajo de la válvula remota. Instale la válvula remota a través del orificio en la encimera. 1101928-D2-F 10 Hot Heiß Chaud Freddo Горячая вода Caliente Cold Kalt Froid Caldo Холодная вода Fría On Auf Sur Apre Включение Encender 8. Before tightening the remote valve, make sure that the cold water supply is on the left hand side. Bevor Sie den Einhebelmischer festziehen, stellen Sie sicher, dass sich der Kaltwasseranschluss auf der linken Seite befindet. Avant de serrer l’organe de commande, vérifiez que l’arrivée d’eau froide se trouve à gauche. Prima di stringere la valvola a distanza, verificare che l’alimentazione di acqua fredda sia sulla destra. Прежде чем закрепить дистанционный клапан, убедитесь, что подача холодной воды осуществляется слева. Antes de apretar la válvula remota, asegúrese de que el suministro de agua fría está en el lado izquierdo. 11 1101928-D2-F 9. Partially thread the screws into the ring. Drehen Sie die Schrauben teilweise in den Ring ein. Engagez partiellement les vis dans l’anneau Avvitare parzialmente le viti nell’anello. Частично вверните винты в кольцо. Enrosque los tornillos parcialmente en el anillo. Countertop Arbeitsplatte Plan de travail Piano di lavoro Рабочий стол Encimera Washer Unterlegscheibe Rondelle Rondella Шайба Arandela Ring Anneau Anello Кольцо Anillo 1101928-D2-F 6 mm Ring Anneau Anello Кольцо Anillo 12 10. Slide the washer onto the remote valve threaded shank. Install the ring leaving approximately 6 mm between the ring and the countertop. Schieben Sie die Unterlegscheibe auf den Gewindeschaft des Einhebelmischers. Installieren Sie den Ring, lassen Sie zwischen Ring und Arbeitsplatte 6 mm frei. Faites glisser la rondelle sur la tige filetée de l’organe de commande. Installez l’anneau en laissant environ 6 mm entre l’anneau et le plan de travail. Far scivolare la rondella sull’asta filettata della valvola a distanza. Installare l’anello lasciando circa 6 mm tra l’anello e il piano di lavoro. Наденьте шайбу на резьбовой хвостовик дистанционного клапана. Установите кольцо, оставив примерно 6 мм между кольцом и нижней поверхностью стола. Deslice la arandela en el vástago roscado de la válvula remota. Instale el anillo dejando aproximadamente 6 mm entre dicho anillo y la encimera. 11. Turn the ring until the screws are to the front and the back. Tighten the screws securely and evenly. Drehen Sie den Ring, bis die Schrauben nach vorne und nach hinten zeigen. Ziehen Sie die Schrauben sicher und gleichmäßig fest. Vissez l’anneau jusqu’à ce que les vis se trouvent à l’avant et à l’arrière. Serrez les vis à fond et uniformément. Ruotare l’anello fino a quando le viti si trovano una davanti e una dietro. Stringere a fondo e in modo uniforme le viti. Проворачивайте кольцо до тех пор, пока винты не займут переднее и заднее положение. Затем аккуратно и равномерно закрутите винты. Gire el anillo hasta que los tornillos estén delante y detrás. Apriete los tornillos de forma segura y homogénea. 13 1101928-D2-F Spout Connection Auslaufanschluß Raccord de bec Raccordo dell’erogatore Водопроводное соединение Conexión del caño Inlet Hose Eingangsschlauch Flexible d’entrée Flessibile d’ingresso Входной шланг Tubo de entrada 12. Connect the inlet hose to the spout connection. Verbinden Sie den Schlauch der Auslaufgarnitur mit dem Auslaßanschluß des Einhebelmischers. Raccordez le flexible d’entrée au raccord du bec. Collegare il flessibile d’ingresso al raccordo dell’erogatore. Подключите входной шланг к водопроводному соединению. Conecte el tubo de entrada a la conexión del caño. Hot Heiß Chaud Caldo Горячая вода Caliente 1101928-D2-F Ø 76 mm Min Cold Kalt Froid Freddo Холодная вода Fría 14 13. Connect and tighten the supply hoses. Note! If the sink installation requires that you coil the supply hoses, maintain a 76 mm diameter inside the coil. Schließen Sie die Zulaufschläuche für Heiß- und Kaltwasser an den Einhebelmischer an und ziehen Sie sie fest. Hinweis! Wenn die Installation des Spülbeckens erfordert, dass Sie die Zufuhrschläuche aufrollen, dann wahren Sie einen Durchmesser von 76 mm innerhalb der Wicklung. Raccordez et serrez les flexibles d’alimentation Nota! Si l’installation de l’évier exige que vous enrouliez les flexibles d’alimentation, maintenez un diamètre de 76 mm à l’intérieur de l’enroulement Raccordare e stringere i flessibili d’alimentazione. NB! Se l’installazione del lavello richiede una torsione del flessibile di alimentazione, mantenere un diametro di 76 mm all’interno della torsione. Подсоедините и закрепите подающие шланги. Bнимание! Если для установки раковины требуется сгибать шланги, диаметр кольца должен быть не менее 76 мм. Conecte y apriete los tubos de suministro. Nota! Si la instalación del fregadero requiere que bobine los tubos de suministro, mantenga un diámetro de 76 mm dentro de la bobina. 14. Check for leaks. Prüfen Sie auf undichte Stellen. Cherchez les fuites. Verificare eventuali perdite. Проверьте на отсутствие утечки. Compruebe si hay fugas. 15 1101928-D2-F 15. Remove the aerator. Key Schlüssel Clé Chiave Ключ Llave Entfernen Sie den Perlator Retirez l’aérateur. Rimuovere l’aeratore. Снимите аэратор. Retire el aireador. 16. Flush the lines. Spülen Sie die Anschlüsse Purgez l’installation Pulire con un getto d’acqua le condutture. Промойте систему. Aclare las líneas. 17. Reinstall the aerator. 1101928-D2-F Key Schlüssel Clé Chiave Ключ Llave Setzen Sie den Perlator wieder ein. Réinstallez l’aérateur. Reinstallare l’aeratore. Установите аэратор на место. Reinstale el aireador. 16 SPARE PARTS / ERSATZTEILE / PIÈCES DE RECHANGE / PEZZI DI RICAMBIO / ЗАПАСНЫЕ ЧАСТИ / PIEZAS DE REPUESTO 1151676** 1071702** 1090945** 1090948 1090949** 1179931 1088913 R8A964NF R8A965NF **Finish/color code must be specified when ordering **Finish/Farbcode muss bei der Bestellung angegeben werden **Le code finition/couleur doit être indiqué à la commande Specificare il codice finitura/colore al momento dell'ordinazione** **Цвет и отделка должны быть указаны в заказе **Especifique el código de acabado y color al realizar el pedido 17 1101928-D2-F Maintenance / Wartung / MANUTENZIONE / Обслуживание и уход / MANTENIMIENTO Cleaning Caution! Risk of product damage. Many cleaners contain abrasive and chemical substances, and should not be used for cleaning stainless steel, enamel, plated or plastic fittings. These finishes should be cleaned using a mild washing up detergent or soap solution, rinsed and then wiped dry with a soft clean cloth. Reinigung Vorsicht! Viele Reinigungsmittel enthalten scheuernde und chemische Substanzen und sollten nicht zur Reinigung von Stahl-, Emaille- oder Kunststoffteilen oder beschichteten Armaturen verwendet werden. Diese Flächen sollten unter Verwendung eines milden Spülmittels oder einer milden Seifenlauge gereinigt, abgespült und dann mit einem weichen, sauberen Tuch trocken gerieben werden. Entretien Attention! Risque d’endommagement du produit. De nombreux produits contiennent des substances abrasives et chimiques et ne doivent pas être utilisées pour nettoyer l’acier inoxydable, l’émail, les éléments plaqués ou en plastique. Ces finitions doivent être nettoyées à l’aide d’un produit vaisselle doux ou une solution à base de savon, avant d’être rincées et essuyées avec un chiffon doux. Pulizia Attenzione! Rischio di danno al prodotto. Molti detergenti contengono sostanze abrasive e chimiche, e non vanno usati per la pulizia di elementi in acciaio inossidabile, smaltati, placcati o in plastica. Queste finiture devono essere pulite usando un detergente delicato per piatti o una soluzione saponosa; quindi sciacquare e asciugare con un panno morbido pulito. Чистка Осторожно! Существует риск повреждения изделия. Многие чистящие средства содержат абразивные и химические вещества, поэтому не могут быть использованы для чистки изделий из нержавеющей стали, пластика, а также эмалированных или хромированных изделий. Подобные изделия должны очищаться слабым моющим средством или мыльным раствором, промываться, а затем протираться чистой мягкой тканью. Limpieza Precaución! Riesgo de daños al producto. Muchos productos de limpieza contienen sustancias abrasivas y químicas y no deben utilizarse para la limpieza de accesorios de acero inoxidable, esmaltados, chapados o de plástico. Estas acabados deben limpiarse utilizando un detergente suave, o una solución de jabón, aclararse y por último secarse con un paño limpio y suave. 1101928-D2-F 18 dimensions / Abmessungen / DIMENSIONI / РАЗМЕРЫ / DIMENSIONES 52 mm 337 mm Max 102 mm 203 mm Max 176 mm Ø 67 mm 64 mm Max 1-1/4" Ø 67 mm 2" 227 mm 110 mm 64 mm 510 mm All dimensions in mm / Alle Abmessungen in mm / Toutes dimensions en mm / Tutte le dimensioni in mm / Все размеры указаны в миллиметрах / Todas las dimensiones en mm. 19 1101928-D2-F Customer Care Warranty conditions Deviations in colour and dimensions are according to the usual tolerance range. KOHLER reserves the right of product-related modifications in order to be in the position to immediately react to new requirements for the purpose of your safety. In special cases, this may result in price changes. All information – illustrations, product features, etc. – has been arranged with the utmost care. We would like to beg your understanding, if there are typo mistakes nonetheless. KOHLER does not assume warranty or further liability due to possible wrong information. Warranty period On the part of our distributor, you are granted a dealer warranty for the products manufactured by us for the periods of time listed below. The warranty period starts upon the date of purchase. If material or production defects should occur with our products during the warranty period, the defect product will be replaced by the dealer where you acquired the product. Warranty and compensation for damages are limited to the delivery of new products, provided that our products were installed professionally and treated according to the usual application and care instructions. kundenservice Garantiebestimmungen Farb- und Dimensionsabweichungen entsprechen der üblichen Toleranzspanne. Produktbezogene Änderungen behält sich KOHLER vor, um auf neue Anforderungen im Sinne Ihrer Sicherheit sofort reagieren zu können. In besonderen Fällen kann dies zu Preisänderungen führen. Alle Angaben – Abbildungen, Produktmerkmale usw. – wurden mit größtmöglicher Sorgfalt zusammengestellt. Sollte sich dennoch der Fehlerteufel eingeschlichen haben, bitten wir um Verständnis. Eine Gewähr oder weitergehende Ansprüche aufgrund möglicher fehlerhafter Angaben übernimmt KOHLER nicht. Garantiezeiten Auf die von uns hergestellten Produkte wird seitens unseres Vertriebshändlers eine Händlergarantie für die unten aufgeführten Zeiträume gewährt. Garantiebeginn ist das Datum des Kaufes. Sollten an unseren Produkten während der Garantiezeit Material- oder Herstellmängel auftreten, so erhalten Sie von dem Händler, bei dem Sie das Produkt erworben haben, Gewährleistung und Schadenersatz beschränken sich sich nur auf Lieferung neuer Produkte Ersatz. Voraussetzung hierfür ist allerdings, dass unsere Produkte fachgerecht installiert und dem üblichen Gebrauch und den Pflegehinweisen entsprechend behandelt wurden. 1101928-D2-F 20 Assistance client Conditions de la garantie Les variations de couleurs et de dimensions répondent aux critères de tolérance admissibles. Si besoin est, KOHLER se réserve le droit de modifier le produit aux fins de satisfaire au plus vite à toute nouvelle exigence en matière de sécurité. Dans certains cas particuliers, cela peut avoir un impact sur le prix du produit. Toutes les informations (illustrations, caractéristiques du produit, etc.) ont été rédigées avec le plus grand soin. Cependant, nous vous demandons de bien vouloir nous excuser en cas d’erreur typographique quelconque. KOHLER décline toute garantie ou autre responsabilité en cas d’informations erronées. Période de garantie De la part de notre distributeur, vous est accordée une garantie revendeur pour les produits que nous fabriquons pour les périodes indiquées ci-après. La période de garantie commence à la date de l’achat du produit. En cas de défaut matériel ou de fabrication survenu pendant la période de garantie, le produit défectueux sera remplacé par le revendeur chez qui vous l’avez acheté. La garantie et les indemnités en cas de dommages se limitent à la livraison de nouveaux produits, à condition que nos produits aient à l’origine été installés par des professionnels et utilisés conformément aux instructions fournies. ASSISTENZA CLIENTI Condizioni di garanzia Le variazioni di colore o dimensioni rispondono ai criteri di tolleranza ammissibili. KOHLER si riserva il diritto di modificare il prodotto allo scopo di soddisfare prontamente eventuali nuovi requisiti in materia di sicurezza. In casi speciali, questo può comportare anche una modifica di prezzo. Tutte le informazioni (illustrazioni, caratteristiche del prodotto, ecc.) sono state predisposte con la massima cura. Vi chiediamo di volerci scusare se ci dovessero essere comunque degli errori tipografici. KOHLER declina qualsiasi garanzia o altra responsabilità in caso di informazioni erronee. Periodo di garanzia Da parte del nostro distributore, le viene accordata una garanzia rivenditore per i prodotti da noi prodotti, per i periodi di tempo sotto specificati. Il periodo di garanzia inizia alla data d’acquisto. Se si dovessero verificare difetti di materiale o di produzione nei nostri prodotti durante il periodo di garanzia, il prodotto difettoso sarà sostituito dal rivenditore presso il quale lei ha acquistato il prodotto stesso. La garanzia e l’indennizzo per danni sono limitati alla distribuzione di prodotti nuovi, purché i nostri prodotti siano stati installati in modo professionale e utilizzati secondo le comuni istruzioni di applicazione e attenzione. 21 1101928-D2-F ПАМЯТКА КЛИЕНТУ Гарантийные условия Отклонения в цвете и размерах возможны в обычных допустимых пределах. KOHLER оставляет за собой право вносить изменения, необходимые для того, чтобы продукция удовлетворяла всем новым требованиям безопасности. В некоторых случаях это может повлечь за собой изменение цены. Вся информация (иллюстрации, технические характеристики и т. п.) готовится с особой тщательностью. Тем не менее, мы заранее приносим свои извинения за возможные типографские погрешности. KOHLER не несет гарантийной ответственности за неправильную эксплуатацию, связанную с ошибками в документации. Гарантийный период Наши дистрибьюторы предоставляют гарантию на изделия (гарантийные сроки указаны ниже). Гарантийный срок отсчитывается с момента покупки. Если в течение гарантийного периода будут обнаружены дефекты изготовления или материалов, изделие должен заменить дилер, у которого был приобретен этот товар. Гарантийные обязательства и компенсация возможных убытков ограничиваются доставкой нового изделия, в том случае, если изделие было установлено профессионально и эксплуатировалось с соблюдением всех норм и инструкций. CUIDADOS DEL CLIENTE Condiciones de la garantía Las desviaciones en el color y las dimensiones son conformes al intervalo de tolerancia habitual. KOHLER se reserva el derecho a efectuar modificaciones relacionadas con el producto para estar en posición de reaccionar inmediatamente ante nuevos requisitos dirigidos a la seguridad de los usuarios. En casos especiales, esto puede producir cambios de precio. Toda la información –ilustraciones, características del producto, etc.– se ha organizado con el máximo cuidado. Sin embargo, si hubiese errores tipográficos, nos gustaría solicitar su comprensión. KOHLER no asume garantías ni más responsabilidades ante posibles errores en la información. Período de la garantía Por parte de nuestro distribuidor, usted tiene garantizada una garantía de distribuidor para los productos fabricados por nosotros durante los períodos de tiempo que aparecen más adelante. El período de garantía empieza en la fecha de compra. Si en nuestros productos aparecen defectos de materiales o mano de obra durante el período de garantía, el producto defectuoso será sustituido por el distribuidor donde lo adquirió. La garantía y la compensación por daños se limitan a la entrega de nuevos productos, siempre que estos productos fuesen instalados de forma profesional y se hayan tratado de acuerdo con las instrucciones habituales de aplicación y cuidado. 1101928-D2-F 22 Contact / Kontakt / Contatti / КОНТАКТЫ / CONTACTO GB D Kohler UK Cromwell Road, Cheltenham, Gloucestershire GL52 5EP Tel: +44 (0) 870 850 5551 Kohler Gmbh Holtgarde 30, 45739 Oer-Erkenschwick Tel: +49 (0) 2368 91 87 0 www.kohler.co.uk www.kohlerco.de FR Kohler France Immeuble Le Cap - 3, rue de Brennus, 93631 La Plaine Saint Denis Cedex Tel: +33 (0) 1 49 17 37 37 www.jacobdelafon.fr IT RU Kohler Italia Kitchen and Bath S.r.l Cassina Plaza - edificio B - scala 2 - via Roma, 108 20060 Cassina de’ Pecchi (Mi) Tel: +39 02 94437100 www.kohleritalia.it Колер Рус 115184 Москва Новокузнецкая ул., 7/11, стр. 1, оф. 308, Россия Tel: +7 495 783 5223 www.jacobdelafon.ru ES Kohler España Ctra. De Logroño km.17, 50629 Sobradiel, Zaragoza Tel: +34 902 46 46 86 www.jacobdelafon.es 23 1101928-D2-F 1101928-D2-F 24 © Kohler Mira Limited, January 2009