1
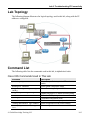
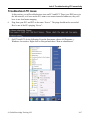
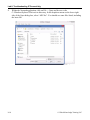
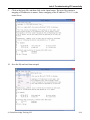
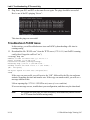
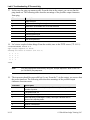
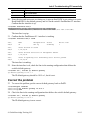
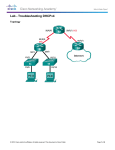
L6
Troubleshooting IP Connectivity
© Global Knowledge Training LLC
L6-1
Lab 6: Troubleshooting IP Connectivity
Objectives
In this lab, you will first diagnose and correct an IP connectivity issue on PC1 and PC2.
You will then download a config file into PxSW to introduce an IP connectivity problem
within your pod, which you will then diagnose and correct. You will download a config
file into PxR2 to introduce IP connectivity problems within your pod, which you will then
diagnose and correct. You will repeat the process with a file loaded into PxR1.
The objectives for this lab are:
• Diagnose and correct an IP connectivity issue on PC1 and PC2.
• Load a configuration file into PxSW that causes IP connectivity problems; diagnose and
correct the problem.
• Load a configuration file into PxR2 that causes IP connectivity problems; diagnose and
correct the problem.
• Load a configuration file into PxR1 that causes IP connectivity problems; diagnose and
correct the problem.
Important
Substitute your pod number for x and the router number for y in all instructions and
commands.
The passwords configured on the devices at this point are:
• Console and vty access: username: ccna, password: cisco
• enable secret: sanfran
L6-2
© Global Knowledge Training LLC
Lab 6: Troubleshooting IP Connectivity
Lab Topology
The following diagram illustrates the logical topology used in this lab, along with the IP
addresses configured.
Command List
The following table lists the commands used in this lab, in alphabetical order.
Cisco IOS Commands Used In This Lab
Command
Description
#clear ip arp address
Clears the specified entry in the ARP cache on a
switch.
#configure terminal
Enters global configuration mode.
#copy running-config startupconfig
Saves the running config to NVRAM.
#copy tftp running-config
Copies a file from TFTP server to running config.
>enable
Enters the EXEC privileged mode.
(config)#end
Terminates configuration mode.
#exit
Exit the current mode and go up one level.
(config)#interface type number
Enters configuration mode for the interface.
(config)#ip access-list type
name
Enters configuration mode for a named ACL.
© Global Knowledge Training LLC
L6-3
Lab 6: Troubleshooting IP Connectivity
(config)#ip default-gateway
address
Configures the specified IP address as the
default gateway for the switch.
(config-ext-nacl)#[no] permit |
deny condition
Creates an entry within a named ACL. With the
no parameter, deletes the entry.
#ping address
Sends an echo request to the specified address.
#show access-lists
Displays ACLs.
#show interfaces [type number]
Displays info about interfaces.
#show interfaces [type number]
trunk
Displays trunking info about an interface.
#show ip interfaces
Displays IP info about interfaces.
#show ip route
Displays the IP routing table.
#show running-config | include
expression
Displays the portions of the running
configuration that include the specified
expression.
(config-if)#[no] shutdown
Without the no keyword, enables the interface.
With the no keyword, disables the interface.
#telnet address
Establishes a Telnet connection to the specified
IP address. The telnet keyword can be omitted;
just entering an IP address will open a Telnet
connection
#traceroute address
Traces the route that packets take to the
specified address.
Windows Commands Used In This Lab
L6-4
Command
Description
ping address
Causes an ICMP echo message to be sent to
the destination, which should cause an ICMP
echo reply message to be returned.
tracert address
Traces the route that packets take to the
specified address.
© Global Knowledge Training LLC
Lab 6: Troubleshooting IP Connectivity
Procedure
In this lab, you will first diagnose and correct an IP connectivity issue on PC1 and PC2.
You will then download a config file into PxSW to introduce an IP connectivity problem
within your pod, which you will then diagnose and correct. You will download a config
file into PxR2 to introduce IP connectivity problems within your pod, which you will then
diagnose and correct. You will repeat the process with a file loaded into PxR1.
Note
This lab requires that the previous lab was completed correctly. If you have any
doubts, reset to this lab, as described in “Lab 0: Introduction, and Connecting to and
Using the Remote Lab Environment”.
Note
The Appendix “Troubleshooting Scenarios” provides information about each of the
troubleshooting files; refer to this appendix if you need assistance during this lab.
Verify initial configuration
1.
Connect to your PxR1. Ping from your PxR1 to the TFTP server (172.16.1.1). The ping
should be successful. If not, troubleshoot your configurations.
PxR1#ping 172.16.1.1
Type escape sequence to abort.
Sending 5, 100-byte ICMP Echos to 172.16.1.1, timeout is 2 seconds:
!!!!!
Success rate is 100 percent (5/5), round-trip min/avg/max = 1/1/4 ms
PxR1#
2.
Connect to your PxR2. Ping from your PxR2 to the TFTP server (172.16.1.1). The ping
should be successful. If not, troubleshoot your configurations.
PxR2#ping 172.16.1.1
Type escape sequence to abort.
Sending 5, 100-byte ICMP Echos to 172.16.1.1, timeout is 2 seconds:
.!!!!
Success rate is 80 percent (4/5), round-trip min/avg/max = 1/1/4 ms
PxR2#
3.
From PxR2, trace to the TFTP server (172.16.1.1).
PxR2#traceroute 172.16.1.1
Type escape sequence to abort.
Tracing the route to 172.16.1.1
VRF info: (vrf in name/id, vrf out name/id)
1 10.3.x.1 0 msec 0 msec 4 msec
2 192.168.xx.3 0 msec 0 msec 0 msec
3 172.16.1.1 0 msec 0 msec 0 msec
PxR2#
© Global Knowledge Training LLC
L6-5
Lab 6: Troubleshooting IP Connectivity
The trace should be successful. The packets should take the path via PxR1 (10.3.x.1), to the
core router (192.168.xx.3), and then to the TFTP server. If not, troubleshoot your
configurations.
4.
Connect to your PxSW. Ping from your PxSW to the TFTP server (172.16.1.1). The ping
should be successful. If not, troubleshoot your configurations.
PxSW#ping 172.16.1.1
Type escape sequence to abort.
Sending 5, 100-byte ICMP Echos to 172.16.1.1, timeout is 2 seconds:
!!!!!
Success rate is 100 percent (5/5), round-trip min/avg/max = 1/4/9 ms
PxSW#
5.
Connect to your PC1 and PC2. Ping from your PC1 and PC2 to the TFTP server
(172.16.1.1). The pings should be successful. If not, troubleshoot your configurations.
Here’s PC1 pinging the TFTP server:
Here’s PC2 pinging the TFTP server:
L6-6
© Global Knowledge Training LLC
Lab 6: Troubleshooting IP Connectivity
Troubleshoot PC issue
In this section, you will troubleshoot an issue on PC1 and PC2. There is no DNS server in
the lab network, so if users on the PCs want to use names instead of addresses, they will
have to use local name mapping.
6.
Ping from your PC1 and PC2 to the name “Server”. The pings should not be successful.
Here’s one of the PCs pinging “Server”:
7.
On PC1 and PC2, do the following: From the Start menu, choose All Programs ->
Windows Accessories. Right click on Notepad and chose “Run as administrator”.
© Global Knowledge Training LLC
L6-7
Lab 6: Troubleshooting IP Connectivity
8.
L6-8
Within the Notepad application, click on File -> Open and browse to the
C:\Windows\System32\Drivers\etc directory. In the dropdown menu on the lower right
side of the Open dialog box, select “All Files”. You should see some files listed, including
the hosts file.
© Global Knowledge Training LLC
Lab 6: Troubleshooting IP Connectivity
9.
Click on the hosts file, and then click on the Open button. The hosts file contains a
mapping of IP addresses to names. Enter a mapping of the IP address 172.16.1.1 to the
name Server.
10. Save the file and exit from notepad.
© Global Knowledge Training LLC
L6-9
Lab 6: Troubleshooting IP Connectivity
11. Ping from your PC1 and PC2 to the name Server again. The pings should be successful.
Here’s one of the PCs pinging “Server”:
This time the ping was successful.
Troubleshoot PxSW issue
In this section, you will troubleshoot an issue on PxSW by downloading a file into its
running config.
12. Download the file “IP-SW-a.txt” from the TFTP server (172.16.1.1) into PxSW’s running
config (don’t forget the suffix of “txt”):
PxSW#copy tftp run
Address or name of remote host []? 172.16.1.1
Source filename []? IP-SW-a.txt
Destination filename [running-config]?
Accessing tftp://172.16.1.1/IP-SW-a.txt...
Loading IP-SW-a.txt from 172.16.1.1 (via Vlan1): !
[OK - 223 bytes]
223 bytes copied in 8.044 secs (28 bytes/sec)
PxSW#
If the copy was successful, you will receive the “OK”, followed by the file size and some
statistics regarding the time and transfer rate. If the copy was unsuccessful, you will see a
message similar to this:
%Error opening tftp://172.16.1.1/IP-SW-a.txt (cause of error condition)
If an error message occurs, troubleshoot your configuration, and then retry the download.
Note
L6-10
Do not pass this point until you have successfully downloaded the problem file from
the TFTP server into PxSW’s running config.
© Global Knowledge Training LLC
Lab 6: Troubleshooting IP Connectivity
Examine connectivity
13. Clear PxSW’s IP ARP entry for the TFTP server 172.16.1.1.
PxSW#clear ip arp 172.16.1.1
14. Attempt to ping from your PxSW to the TFTP server (172.16.1.1). The ping should be
successful. If not, you have a problem to solve!
PxSW#ping 172.16.1.1
Type escape sequence to abort.
Sending 5, 100-byte ICMP Echos to 172.16.1.1, timeout is 2 seconds:
.....
Success rate is 0 percent (0/5)
PxSW#
In this case, the ping does not work.
Diagnose the problem
15. In this case, because of the TFTP transfer, we know that the problem is with PxSW’s
running config. Because the running config is relatively small (two pages or so), a
reasonable approach to troubleshooting might be to simply view the running config (“show
run”), and look for problems. This approach is not scalable in general, because in the real
world the problem usually isn’t caused by downloading a file for the specific purpose of
breaking the config. Instead, you could be faced with configs that are ten or more pages
long, and a trouble ticket that says “it doesn’t work” (giving you no idea where to start).
Therefore, instead of “show run”, we might approach things by using some commands in
an attempt to localize the problem. In this first IP connectivity troubleshooting exercise,
you’ll be “led by the hand” to get a feel for the process.
16. As an aid to troubleshooting, ask yourself the following questions:
16.1.
Did it ever work?
16.2.
Was anything changed?
16.3.
What are the symptoms?
16.4.
What could reasonably cause these symptoms?
© Global Knowledge Training LLC
L6-11
Lab 6: Troubleshooting IP Connectivity
17. In this case the ping was unsuccessful. From the dots in the output, you can see that the
ping timed out. The following table describes meanings of the possible output characters
from ping.
Character
Description
!
Reply received.
.
Timeout while waiting for a reply.
U
Destination unreachable error PDU was received.
Q
Source quench.
M
Could not fragment.
?
Unknown packet type
&
Packet lifetime exceeded.
I
User interrupted test.
18. Let’s test a couple of other things. From the switch, trace to the TFTP server (172.16.1.1).
PxSW#traceroute 172.16.1.1
Type escape sequence to abort.
Tracing the route to router (172.16.1.1)
1
2
3
4
*
*
*
*
*
*
*
*
*
*
*
PxSW#
Note
You can interrupt the traceroute by using the “escape sequence” which is the Ctrl-^
(or Ctrl-Shift-6) key sequence.
19. The traceroute should be successful but it’s not. From the *’s in the output, you can see that
the probe timed out. The following table describes meanings of the possible output
characters from traceroute.
L6-12
Character
Description
nn msec
For each node, the round-trip time (in milliseconds) for the specified
number of probes.
*
The probe timed out.
?
Unknown packet type.
A
Administratively unreachable. Usually, this output indicates that an
access list is blocking traffic.
H
Host unreachable.
N
Network unreachable.
P
Protocol unreachable.
© Global Knowledge Training LLC
Lab 6: Troubleshooting IP Connectivity
Q
Source quench.
U
Port unreachable.
I
User interrupted test.
20. Since the ping and traceroute are timing out, it appears that PxSW is not getting to a router.
Recall that PxR1 is the default gateway and it is on the switch's FastEthernet 0/1 interface.
Confirm that the interface is up.
PxSW#show interfaces fa0/1
FastEthernet0/1 is up, line protocol is up (connected)
Hardware is Fast Ethernet, address is 2401.c70f.4d81 (bia 2401.c70f.4d81)
The interface is up/up.
21. Confirm that the FastEthernet 0/1 interface is trunking.
PxSW#show interface fa0/1 trunk
Port
Fa0/1
Mode
on
Encapsulation
802.1q
Status
trunking
Native vlan
1
Port
Fa0/1
Vlans allowed on trunk
1,1x,2x,3x
Port
Fa0/1
Vlans allowed and active in management domain
1,1x,2x,3x
Port
Fa0/1
Vlans in spanning tree forwarding state and not pruned
1,1x,2x,3x
The interface is trunking.
22. Since the interface is ok, check the line in the running configuration that defines the
switch's default gateway.
PxSW#show run | include ip default-gateway
ip default-gateway 10.10.7.1
The IP default gateway should be 10.10.x.1, but it is not.
Correct the problem
23. To correct the problem, put the correct default gateway back on PxSW.
PxSW#configure terminal
PxSW(config)#ip default-gateway 10.10.x.1
PxSW(config)#end
24. Check the line in the running configuration that defines the switch's default gateway.
PxSW#show run | include ip default-gateway
ip default-gateway 10.10.x.1
The IP default gateway is now correct.
© Global Knowledge Training LLC
L6-13
Lab 6: Troubleshooting IP Connectivity
Verify connectivity
25. Attempt to ping from your PxSW to the TFTP server (172.16.1.1). The ping should be
successful.
PxSW#ping 172.16.1.1
This time, the ping does work.
Download additional problem files, to PxR2 and to PxR1
26. There are additional IP connectivity problem files. The first file is to download to PxR2,
and the second file is to download into PxR1 (they are not for PxSW):
• IP-PxR2-b.txt, where x is your pod number. For example, if you are on pod 5 use the
file IP-P5R2-b.txt
• IP-R1-c.txt
Important
You may not have time to do all of the troubleshooting files in class.
Important
The Appendix “Troubleshooting Scenarios” provides information about each of the
troubleshooting files. If after a few minutes you cannot discover the problem, we
suggest looking at this appendix for assistance.
27. Download the IP-PxR2-b.txt (substituting x with your pod number) problem file into
PxR2’s running config, then troubleshoot and correct the problem. When you have
corrected that problem, you can download the IP-R1-c.txt problem file into PxR1's running
config, then troubleshoot and correct that problem.
Only download one file at a time! When downloading, don’t forget the “txt” suffix.
Here is an example of downloading the file for the example Pod 6 into P6R2:
P6R2#copy tftp run
Address or name of remote host [172.16.1.1]?
Source filename []? IP-P6R2-b.txt
Destination filename [running-config]?
Accessing tftp://172.16.1.1/IP-P6R2-b.txt...
Loading IP-P6R2-b.txt from 172.16.1.1 (via GigabitEthernet0/0): !
[OK - 234 bytes]
234 bytes copied in 2.024 secs (116 bytes/sec)
P6R2#
Important
L6-14
Make sure you are downloading into the correct device, and substitute your pod
number for “x” in the file name!
© Global Knowledge Training LLC
Lab 6: Troubleshooting IP Connectivity
Here is an example of downloading the file for PxR1 (remember to only do this after you
have corrected the problem in PxR2):
PxR1#copy tftp run
Address or name of remote host [172.16.1.1]?
Source filename []?IP-R1-c.txt
Destination filename [running-config]?
Accessing tftp://172.16.1.1/IP-R1-c.txt...
Loading IP-R1-c.txt from 172.16.1.1 (via GigabitEthernet0/1): !
[OK - 257 bytes]
257 bytes copied in 2.028 secs (127 bytes/sec)
PxR1#
28. Perform some tests to determine what the symptoms of the problem are. The following are
some suggested tests and expected results. Make sure that you use the correct target
addresses, passwords and file names.
Test
Expected
Result
Ping from PC1 or PC2 to TFTP server (172.16.1.1).
Yes
Telnet from PC1 or PC2 to core router (192.168.xx.3).
No
Ping from PxSW to TFTP server (172.16.1.1).
Yes
Trace from PxSW to TFTP server (172.16.1.1).
Yes
Telnet from PxSW to core router (192.168.xx.3).
Yes
Ping from PxR1 to TFTP server (172.16.1.1).
Yes
Copy the file “tftp.txt” from the TFTP server (172.16.1.1) to
PxR1 or PxSW running config. (Note that the “tftp.txt” file
just contains comments, it will not change the configuration
when it is merged into the running config.)
Yes
Ping from PxR2 to TFTP server (172.16.1.1).
Yes
Trace from PxR2 to TFTP server (172.16.1.1).
Yes
Note
Your Result
Recall that PxR1 is configured with an ACL to deny PC1 and PC2 from being able to
telnet to the core router.
29. If your results don’t match the expected results, you have some troubleshooting to do!
After you fix the problem, run the tests again to verify the results. You may find these
commands helpful:
• copy tftp running-config (using the “tftp.txt” file)
• show access-lists
• show interfaces
© Global Knowledge Training LLC
L6-15
Lab 6: Troubleshooting IP Connectivity
• show ip interfaces
• show ip route
• ping destination
• telnet destination
• trace destination
Note
Do not pass this point until you have verified that the configuration issues have been
corrected.
Save the configurations
30. Save all of your pod devices’ running configs to NVRAM:
PxR1#copy running-config startup-config
PxR2#copy running-config startup-config
PxSW#copy running-config startup-config
Lab Complete
L6-16
© Global Knowledge Training LLC
Lab 6: Troubleshooting IP Connectivity
Completed Configuration
The resulting router and switch configurations for this lab are the same as the previous lab.
PC1 and PC2 now have Server in their local hosts file.
© Global Knowledge Training LLC
L6-17
Lab 6: Troubleshooting IP Connectivity
L6-18
© Global Knowledge Training LLC