Transcript
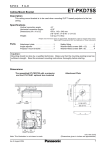
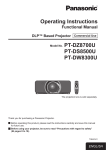
PT-D12000/PT-DZ12000
Operating Instructions
Additions and Corrections to the Operating Instructions
■ Installation in a downward vertical position
When installing the projector in a downward vertical position, please ensure to attach the supplied fittings to all lamp units.
Without the fittings, the lamp life may be shortened.
When installing the projector other than in a downward vertical position, remove the fittings.
1. Range of the downward vertical position
Downward vertical position range:
45° forward and backward from the
position perpendicular to the ceiling.
45°
45°
2. How to attach the fitting to the lamp unit
A Remove the lamp unit from the projector, following the “Procedure of lamp unit replacement” (Page 115) of
the Operating Instructions.
B Insert the fitting into the gap between the plastic holder and the wire mesh as shown in the figure below.
∗ Leave no gap between the fitting and the wire mesh.
Fitting
Plastic holder
Insert fitting between plastic
holder and wire mesh.
C Install the lamp unit into the projector, following the “Procedure of lamp unit replacement” (Page 115) of
the Operating Instructions.
■ Changes in the table in page 21 of the Operating Instructions
Lens
ET-D75LE1
ET-D75LE2
ET-D75LE3
ET-D75LE4
ET-D75LE5
ET-D75LE6
ET-D75LE8
Keystone correction only When using arc and keystone correction together
Horizontal
Vertical
Horizontal
Vertical
R2/L2
R3/L3
Keystone Keystone Keystone Keystone
Correction Correction Correction Correction minimum minimum
value
value
Angle α(°) Angle β(°) Angle α(°) Angle β(°)
±40
±15
±5
±5
±40
±15
±5
±5
±40
±15
±10
±10
±40
±15
±10
±15
±22
±15
±5
±5
±28
±10
±5
±5
±40
±15
±10
±15
∗ For DZ12000, the above value changes apply.
1.6
1.2
0.8
0.6
3.0
2.4
0.4
3.2
2.4
1.6
1.0
6.0
4.8
0.8
Arc correction only
R2/L2
minimum
value
R3/L3 minimum value
0.8
0.6
0.4
0.3
1.5
1.2
0.2
1.6
1.2
0.8
0.5
D12000
DZ12000
4.3
2.6
3.0
2.4
∗
∗
0.4
P0908-0A