1
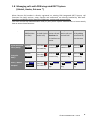
- User manual 1. Manage your calls .......................................... 3 1.1 1.2 1.3 1.4 1.5 1.6 1.7 1.8 Incoming calls......................................................................................... 3 Outgoing calls......................................................................................... 3 End a call ................................................................................................ 3 Basic call transfer with Partner TX Antennas system ............................ 4 Transfer a call to a 2nd call with Partner TX Antennas system ............... 4 Call conference with Partner TX Antennas system ................................ 5 Handling 2 calls: Hold, Retrieve, Swap with Partner TX system ............ 5 Managing calls with PBX integrated DECT System (Alcatel, Aastra, Ericsson *) ................................................................... 6 2. Common use .................................................. 7 2.1 2.2 2.3 2.4 2.5 2.6 2.7 2.8 2.9 2.10 Call log .................................................................................................... 7 Contact list /Phonebook ........................................................................ 7 Speed dial /One touch memory ............................................................. 7 Mute....................................................................................................... 7 Hands free .............................................................................................. 7 Headset .................................................................................................. 7 Volume setting ....................................................................................... 7 Auto Stand-by ........................................................................................ 7 Low Battery ............................................................................................ 8 Out of Range Alert ................................................................................. 8 © Henri DEPAEPE SAS - France 1 3. General settings menu 3.1 3.2 3.3 3.4 3.5 3.6 3.7 3.8 3.9 3.10 Time & date......................................................................................................... 8 Language ............................................................................................................. 8 LED Signal ............................................................................................................ 8 Security ............................................................................................................... 8 Handset name ..................................................................................................... 9 Reset settings ...................................................................................................... 9 Status .................................................................................................................. 9 Auto answer ........................................................................................................ 9 Silent charging..................................................................................................... 9 Do not disturb ................................................................................................... 10 4. Audio Settings menu 4.1 4.2 4.3 4.4 4.5 4.6 4.7 4.8 4.9 ...................................... 10 Ringer volume ................................................................................................... 10 Ringer melody ................................................................................................... 10 Alert volume ..................................................................................................... 10 Alert tone .......................................................................................................... 10 Vibrator ............................................................................................................. 10 Key sound .......................................................................................................... 10 Confirmation sound .......................................................................................... 10 Coverage warning ............................................................................................. 11 Charger warning................................................................................................ 11 5. Connectivity menu 5.1 5.2 5.3 ..................................... 8 ......................................... 11 Registration with Partner TX antennas system................................................. 11 Deregistration with Partner TX antennas system ............................................. 11 Registration with other PBX integrated DECT System (Alcatel, Aastra, Ericsson *) .............................................................................. 11 6. Useful informations .............................................. 12 6.1 6.2 6.3 6.4 Contents of Package: ........................................................................................ 12 Installing the Battery ......................................................................................... 12 Using the Charger ............................................................................................. 12 Handset features............................................................................................... 12 © Henri DEPAEPE SAS - France 2 1. Manage your calls 1.1 Incoming calls 1 - While ringing, the “incoming call screen” displays the caller ID (name and number). 2 - You may answer by pressing the Off-hook key. Incoming calls are stored in the call log. NOTE : If the feature “Auto answer” is enabled on the handset, then the incoming call is answered no matter of the handset is placed or removed from the charger. If “Auto answer” is disabled, then you have to press “Green-key” no matter of the handset is placed or removed from the charger. 1.2 Outgoing calls 1 - Starting with Idle mode, 2 - Simply pre-dial the phone number, it is also possible to select any numbers from the call log or from the phone book. Outgoing calls are stored in the call log. 3 - Then press the Off-hook key. 1.3 End a call Simply press the On-hook key to terminate any call. NOTE : If one call is active and another call is on hold, then the active one will be terminated when pressing “Red-Key” and the handsets automatically returns to the call on hold. The call on hold is now active, you have to press “Red-key” again to terminate this call. © Henri DEPAEPE SAS - France 3 1.4 Basic call transfer with Partner TX Antennas system 1 - While “Connected”, press the ”Hold” option soft key. 2 - The call session is on hold. 3 - Then, enter the transfer destination number and press the “Transfer” option soft key. The transfer process is not finished until the transfer target is reached, you can recover the call by pressing the “Retrieve” option soft key. 4 - While the call session is established with transfer destination number, the handset automatically returns to idle mode (On-hook). NOTE : Using basic transfer mode, transfer target’s contact informations are sent to the transferee. His handset use it to attempt to call target’s destination number. The provided contact can be used to make new calls in the future. 1.5 Transfer a call to a 2nd call with Partner TX Antennas system 1 - While “Connected”, press the “Hold” option soft key. 2 - The first call session is on hold as handset “line 1”. 3 - Then, enter the transfer destination number and press the Off-hook key. 4 - This establishes a second call session as handset “line 2”. 5 - While connected with “line 2”, you may press “Transfer” option soft key to transfer the first call hold on line 1 to the second call established on line 2. 6 - While “line 1” and “line 2” are bridged, handset returns to idle mode (On-hook). © Henri DEPAEPE SAS - France 4 1.6 Call conference with Partner TX Antennas system 1 - While “Connected”, press the “Hold” option soft key to put the call session on hold as handset “line 1”. 2 - Then, enter the transfer destination number and press the Off-hook key. 3 - This establishes a second call session as handset “line 2”. 4 - While connected with “line 2”, you may press “Conf.” option soft key to establish a conference call between all dialed parties. 5 - The conference is owned by the first call session as handset “line 1”. 1.7 Handling 2 calls: Hold, Retrieve, Swap with Partner TX system 1 - While “Connected”, you can make a second call by holding the first one. Press the “Hold” option soft key. 2 - The first call session is on hold as handset “line 1”. You can recover the call by pressing the “Retrieve” option soft key. 3 - Then, enter the transfer destination number and press the Off-hook key. 4 - This establishes a second call session as handset “line 2”. 5 - While connected with “line 2”, you may press “Swap” option soft key to automatically hold the second call and recover the first one. Press again to switch between lines 1 and 2. 6 – Ending the active call by pressing the On-hook key automatically recovers the call on hold as active. You have to press “Red-key” again to terminate this call. © Henri DEPAEPE SAS - France 5 1.8 Managing calls with PBX integrated DECT System (Alcatel, Aastra, Ericsson *) When Partner RX handset is directly registered on existing PBX integrated DECT System, call functions like hold, retrieve, swap, transfer and conference are directly handled by PBX itself. Functions availability highly depends of PBX type, settings and account rights. You shall consult PBX documentation and /or your phone system administrator to know exactly how to access these functions. For example : Make a 2nd Call (hold the first one) Transfer a call Terminate an Swap between on hold (to the active call and active call and active one) Retrieve the on hold call on hold one as active Conference call by adding on hold call to an active one Alcatel OmniPCX Dial the Office (OXO)* “number” Press the On-hook key Press the “2” numeric key. Press the “3” numeric key. Press the “4” numeric key. Alcatel OmniPCX Dial the Enterprise “number” (OXE)* Press the On-hook key Press the “2” numeric key. Press the “1” numeric key. Press the “3” numeric key. Aastra / Matra Nexspan* Press the On-hook key Press “Flash” + “1” numeric key. Press “Flash” Press “Flash” + “2” numeric + “3” numeric key. key. Press “Flash” + “number” © Henri DEPAEPE SAS - France 6 2. Common use 2.1 Call log The handset has a call log which is grouped in 4 lists, (All – incoming - outgoing - missed). Any list can be used for dialing. Access the call log by pressing the menu key and select the “Calls” menu . 2.2 Contact list /Phonebook Partner RX handset provide a local phonebook with 100 entries. Access the call log by pressing the menu key and select the “Contacts” menu . 2.3 Speed dial /One touch memory The speed dial feature allows you to assign a speed dial number (2 – 9) to a contact. So you can call a contact by making a single long key press (> 2 seconds) on one of the number keys (2 – 9). NOTE: The ‘1’ key is reserved for voicemail. Long key press on ‘0’ is used for starting a normal dial string with ‘+’. The first defined number of the contact will be dialed when the speed dial key is pressed. This means that if all numbers (Work, Mobile, Home & Other) for the contact is defined then the Work number will be dialed. If the Work number is not defined then the Mobile number is dialed etc. To assign speed dial number to a contact : 1. Go to the contact list > Move to the contact that you want to assign a speed dial number to. 2. Select “More” > Select “Speed dial” 3. Move to the speed dial number (2 – 9) that you want to assign the contact number to. 4. Select “Add”. The contact name is appended to the speed dial number. 2.4 Mute Press mute key on the left side of the handset during talk mode. The Mute icon will be turned on. Pressing mute key again will cancel mute condition. 2.5 Hands free The audio is routed to the speaker if the user press “Hands free key” Pressing “Hook off key” during call. will switch back to earpiece mode. 2.6 Headset The audio is routed to the headset if a headset is connected when initiating the call. The audio is routed to the headset if a headset is connected during call. The audio is routed to the speaker if the “Hands free speaker key” is pressed during headset mode. 2.7 Volume setting There are 3 individual volume settings : for earpiece mode - for speaker mode - for headset mode. The volume setting can be adjusted during call by pressing the volume keys + and – on the left side of the handset. The level of the audio is displayed graphically when pressing the keys and saved automatically after a timeout. 2.8 Auto Stand-by The handset automatically returns to standby when no user input is received within a given timeout. © Henri DEPAEPE SAS - France 7 2.9 Low Battery The Handset has visual and audible indicators to warn of low battery condition. The battery low alert tone will be emitted every 30 seconds. The Battery status Icon in the display will change to battery low - Battery Full 100 % - (…) - Battery Level 2 32 % to 44 % - Battery Level 1 20 % to 32 % - Battery Level low 10 % to 20 % - Battery empty 0% 2.10 Out of Range Alert The handset will display “Searching” when the handset is out of range. An audible warning will be given in the earpiece (If “Coverage warning” is enabled) during call when the user reaches the maximum range. The warning will be given in such a way, that you will have time enough to move back in range, before the call is terminated. 3. General settings menu 3.1 Time & date The time & date settings can be changed by selecting menu “Settings → Time & date”. In ”…→ “Time format” the preferred time format (24 or 12 hours) can be selected. In ”… → “Date format” the preferred date format (dd-mm-yyyy) can be selected. 3.2 Language The Language settings can be changed by selecting menu ”Settings → Language”. The current used language is displayed when highlighting the menu “Language”. 3.3 LED Signal The LED on the handset has 3 colors and the behavior of each color can be changed by selecting menu ”Settings → Led signal”. Each ”… → LED colors” (Green, Yellow & Red) can respectively be configured to indicate: ”… → Missed call”, ”… → Voice message”, ”… → Low battery” or it can be disabled by setting it to ”… → Off”. Note : the charger LED only indicates if the handset is connected to the charger. 3.4 Security The key lock feature can be set by selecting menu ”Settings →Automatic key lock”. The current used setting is displayed when highlighting the menu “Automatic key lock”. A list of selectable timeouts options from Off to 5 minutes is available. The keys will automatically be locked when the selected Key Lock Timeout has expired without any input. You have to unlock the keys by pressing and entering the PIN code. Only emergency numbers (e.g. 911 or 112) can be called without the user has to unlock the keys. In ”… →Change PIN” the handset security PIN code can be changed. © Henri DEPAEPE SAS - France 8 3.5 Handset name The handset name can be changed by selecting menu “Settings → Handset name”. An editor is displayed when entering the menu. The handset name is typed in by using the numeric keys and afterward saving the name. The handset name is displayed on the idle display. 3.6 Reset settings The handset name can be reset to default settings by selecting menu “Settings → Reset settings”. The base is not reset to default when selecting this feature. The handset is still registered after a reset. 3.7 Status The menu “Settings → Status” delivers some useful information to the end user. The displayed information’s are: Base station: Handset status: - Software version - Software version - Hardware version - Hardware version - IP address - DECT band - MAC address - Battery level - System name - IPEI 3.8 Auto answer The feature can be selected via menu “Settings → Auto answer”. “… → Normal” The user must always press “Green-key (Off-hook) to answer a call. The call is not answered by removing the handset from the cradle/charger. “… → Any Key” Pressing any key will answer an incoming call. The call is not answered by removing the handset from the cradle/charger. “… → Automatic” If the feature “Automatic” is enabled on the handset, then the incoming call is answered automatic after 5 seconds. 3.9 Silent charging The feature “Silent charging” can be set by selecting menu “Settings → Silent charging”. Handset must be placed in charger in order to work as mentioned below. The options of silent charging are: “… → Off” The handset is ringing when receiving incoming calls (audio alert and incoming call screen displayed). “… → Disconnect” The handset doesn’t react on incoming call (no audio alert and no incoming call screen displayed). “… → Silent” The handset reacts on incoming call but the handset doesn’t ring (no audio alert but the incoming call screen displayed). © Henri DEPAEPE SAS - France 9 3.10 Do not disturb The feature “Do not disturb” can be set by selecting menu ”Settings → Do not disturb”. When disabled the handset reacts on all incoming activity, when enabled the handset do not react. 4. Audio Settings menu 4.1 Ringer volume The ringer volume settings can be adjusted by selecting menu ”Audio settings → Ringer volume”. The current used level is displayed when entering the menu. The volume can be increased by pressing navigation key Up or Right. The volume can be decreased by pressing navigation key Down or Left. An audible indication (play back) is given when adjusting the ringer volume. The currently used ringer melody is used as play back when adjusting the volume. NOTE: The ringer is switched off when the lowest level is selected in menu “Audio settings→ Ringer volume”. The ringer OFF icon is displayed in the top bar. 4.2 Ringer melody The ringer melody can be changed by selecting menu ”Audio settings → Ringer melody”. A list of melodies is displayed when entering the menu. Each displayed melody on the list can be selected by pressing “Select” soft key. Each melody on the list can be played back by pressing “Play” soft key. This option changes to “Stop” during play back. 4.3 Alert volume The alert volume can be adjusted by selecting menu “Audio settings → Alert volume”. The current used level is displayed when entering the menu. The volume can be increased by pressing navigation key Up or Right. The volume can be decreased by pressing navigation key Down or Left. The currently used alert melody is used as play back when adjusting the volume. 4.4 Alert tone Different kind of Audio settings → Alert tones” can be selected. The alert tone is used when the alarm clock occur. Each melody on the list can be played back by selecting soft key “Play”. This option changes to “Stop” during play back. 4.5 Vibrator In “Audio settings → Vibrator” different options can be selected. The options are: “… → Off”, “… → Vibrate then ring”, “… → Vibrate only”, “… → Vibrate and ring”. 4.6 Key sound The ”Audio settings → Key sound” can be “… → Silent”, “… → Click” or “… → Tone”. A sound is generated on each key press when the key sound Click or Tone are selected. No key sound will be generated when pressing the keys during “key lock state” even though one of the key sounds is selected. 4.7 Confirmation sound When the feature ”Audio settings → Confirmation sound” is enabled (On), an audible indication is given when an event succeed or fail. Example: A positive confirmation sound is generated when a new setting is set or an entry is saved successfully in the phonebook. A negative confirmation sound is generated if the action fails. © Henri DEPAEPE SAS - France 10 4.8 Coverage warning When the feature ”Audio settings → Coverage warning” is enabled (On), an audible indication is given in the earpiece when the user is close to maximum range. 4.9 Charger warning When the feature Audio settings → Charger warning” is enabled (On), an audible indication will be given to confirm that the handset is correctly connected to the charger. 5. Connectivity menu 5.1 Registration with Partner TX antennas system The handset can be registered by selecting menu “Connectivity → Register”. The user will be prompted for an Access code (Base registration PIN) before the registration procedure is started. The Access code PIN is default “0000” and cannot be changed via the handset. The Access code PIN can only be change via the web interface on the base. 5.2 Deregistration with Partner TX antennas system The handset can be de-registered by selecting menu “Connectivity → Deregister”. You will be prompted for a PIN code (Base de-registration PIN), the PIN code is default “0000” and cannot be changed via the handset. Then the warning message “Delete registration?” will be displayed and you have to accept by pressing soft key “Yes”, or soft key “No” to cancel the operation. 5.3 Registration with other PBX integrated DECT System (Alcatel, Aastra, Ericsson *) Partner RX handset can be registered on the following system: ALCATEL OmniPCX* Office - Enterprise - 4400 (OXO/OXE/4400) AASTRA* DECT over IP * AASTRA Nexspan* SME VOIP (for SIP PBX like Asterisk*, 3CX* …) Press the menu key , select the connectivity menu . Go to “Connectivity → Select PBX”, you will be prompted for a PIN code, the default PIN code is “0000”. Then select a PBX system from the list displayed : The handset will reboot automatically… After reboot, go to “Connectivity → Register”, you will be prompted again for a PIN code (“0000” by default). Handset will register on the system. © Henri DEPAEPE SAS - France 11 6. Useful informations 6.1 Contents of Package: 2 x mounting screws and 2 x Anchors 1 x Handset hook 1 x A/C Adaptor 1 x Battery 1 x charger 1 x Handset Unit, 1 x Battery cover 6.2 Installing the Battery Never dispose battery in fires, otherwise it will explode. Never replace the batteries in potentially explosive environments, for e.g. close to inflammable liquids/ gases. ONLY use approved batteries and chargers from the vendor or operator. Do not disassemble, customize or short circuit the battery 6.3 Using the Charger Each handset is charged through the use of a handset charger. The charger is a compact desktop unit designed to charge and automatically maintains the correct battery charge levels and voltage. The charger Handset is powered by AC supply from 110-240VAC that supplies 5.5VDC at 600mA. When charging the battery for the first time, it is necessary to leave the handset in the charger for at least 10 hours before the battery is fully charged and the handset ready for use. For correct charging, ensure that the room temperature is between 0°C and 25°C (32°F and 77°F). Do not place the handset in direct sunlight. The battery has a built-in heat sensor which will stop charging if the battery temperature is too high. 6.4 Handset features Wideband Audio (G.722) 2’’ TFT display with graphical user interface 176 x 220 pixel 262K color Well-proven graphical MMI with wallpapers Polyphonic ringtones LED status indication Phonebook: 200 central and 100 local entries GAP and CAT-iq compliant Headset connector (3.5mm) SW upgrade over-the-air Wideband two-way speaker phone mode Vibrator Battery Talk time : >18 hours - Standby time : >200 hours HAC earpiece (*) All trademarks and brand names mentioned herein are the property of their respective owners. The listed brand names and model designations are intended only to show the compatibility of Partner RX DECT Handset with existing PBX. © Henri DEPAEPE SAS - France 12