1
Moxa Industrial Secure Router CLI
Command Set User’s Manual
First Edition, June 2014
www.moxa.com/product
© 2014 Moxa Inc. All rights reserved.
Moxa Industrial Secure Router CLI
Command Set User’s Manual
The software described in this manual is furnished under a license agreement and may be used only in accordance with
the terms of that agreement.
Copyright Notice
© 2014 Moxa Inc. All rights reserved.
Trademarks
The MOXA logo is a registered trademark of Moxa Inc.
All other trademarks or registered marks in this manual belong to their respective manufacturers.
Disclaimer
Information in this document is subject to change without notice and does not represent a commitment on the part of
Moxa.
Moxa provides this document as is, without warranty of any kind, either expressed or implied, including, but not limited
to, its particular purpose. Moxa reserves the right to make improvements and/or changes to this manual, or to the
products and/or the programs described in this manual, at any time.
Information provided in this manual is intended to be accurate and reliable. However, Moxa assumes no responsibility for
its use, or for any infringements on the rights of third parties that may result from its use.
This product might include unintentional technical or typographical errors. Changes are periodically made to the
information herein to correct such errors, and these changes are incorporated into new editions of the publication.
Technical Support Contact Information
www.moxa.com/support
Moxa Americas
Moxa China (Shanghai office)
Toll-free: 1-888-669-2872
Toll-free: 800-820-5036
Tel:
+1-714-528-6777
Tel:
+86-21-5258-9955
Fax:
+1-714-528-6778
Fax:
+86-21-5258-5505
Moxa Europe
Moxa Asia-Pacific
Tel:
+49-89-3 70 03 99-0
Tel:
+886-2-8919-1230
Fax:
+49-89-3 70 03 99-99
Fax:
+886-2-8919-1231
Moxa India
Tel:
+91-80-4172-9088
Fax:
+91-80-4132-1045
Table of Contents
1.
System Functions .............................................................................................................................. 1-1
Command Modes ................................................................................................................................ 1-2
Command Sets ................................................................................................................................... 1-3
Restart and Reload Factory Default ................................................................................................ 1-3
System Information ..................................................................................................................... 1-4
User Account .............................................................................................................................. 1-7
Date and Time ............................................................................................................................ 1-8
Syslog and Warning ................................................................................................................... 1-11
System Files ............................................................................................................................. 1-17
Security ................................................................................................................................... 1-18
Diagnostics ............................................................................................................................... 1-20
Network Services ...................................................................................................................... 1-23
2.
Interface and Routing Functions ....................................................................................................... 2-1
Command Modes ................................................................................................................................ 2-2
Command Sets ................................................................................................................................... 2-3
Interfaces................................................................................................................................... 2-3
Routing ...................................................................................................................................... 2-3
Multicast Routing......................................................................................................................... 2-5
3.
NAT, VPN, and Firewall Functions ..................................................................................................... 3-1
Command Modes ................................................................................................................................ 3-2
Command Sets ................................................................................................................................... 3-3
4.
Layer 2 Functions .............................................................................................................................. 4-1
Command Modes ................................................................................................................................ 4-2
Command Sets ................................................................................................................................... 4-3
Port ........................................................................................................................................... 4-3
Port Mirror .................................................................................................................................. 4-6
show port monitor ....................................................................................................................... 4-6
Redundant Protocols .................................................................................................................... 4-7
RSTP ......................................................................................................................................... 4-8
Turbo Ring V2 ........................................................................................................................... 4-13
Virtual LAN ............................................................................................................................... 4-18
Multicast .................................................................................................................................. 4-22
QoS and Rate Control ................................................................................................................ 4-27
MAC Address Table .................................................................................................................... 4-33
1
1.
System Functions
This chapter describes the commands of the system functions for Moxa industrial secure routers.
The following topics are covered in this chapter:
Command Modes
Command Sets
Restart and Reload Factory Default
System Information
User Account
Date and Time
Syslog and Warning
System Files
Security
Diagnostics
Network Services
CLI Command Set User's Manual
System Functions
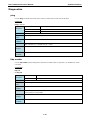
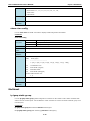
Command Modes
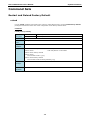
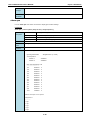
Refer to the following tables for the command mode descriptions.
Mode
Access Method
Prompt
Exit Method
About This Mode
User EXEC
Begin a session with
Router>
Enter logout or
Use this mode to
quit.
•
your router.
Change terminal
settings.
•
Perform basic tests.
•
Display system
information.
Privileged EXEC
While in user EXEC
Router#
mode, enter the
Enter disable to
Use this mode to verify
exit.
commands that you
enabled command.
have entered. Use a
password to protect
access to this mode.
Global configuration While in privileged
To exit to
Use this mode to
EXEC mode, enter the
router(config)#
privileged EXEC
configure parameters
configure command.
mode, enter exit that apply to the entire
or end, or press
Ctrl-Z.
1-2
router.
CLI Command Set User's Manual
System Functions
Command Sets
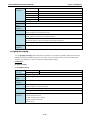
Restart and Reload Factory Default
reload
Use the reload privileged command on the router to restart Moxa Router. Use the reload factory-default
privileged command to restore the router configuration to the factory default values.
Command
reload [factory-default]
Syntax
Description
reload
Halt and perform a cold restart
factory-default
Halt and perform a cold restart with factory default
Defaults
N/A
Command
Privileged EXEC
Modes
Usage
N/A
Guidelines
Examples
router# reload factory-default
- Halt and perform a cold restart with factory default
router# reload
- Halt and perform a cold restart
router# reload factory-default
router# reload
Proceed with reload ? [Y/n]
router# reload factory-default
Proceed with reload to factory default? [Y/n]
Error
N/A
messages
Related
N/A
commands
1-3
CLI Command Set User's Manual
System Functions
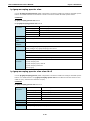
System Information
hostname
To specify or modify the host name for the network server, use the hostname global configuration command.
To return to the default, use the no form of this command.
Commands
hostname name
no hostname
Syntax
Description
hostname
Set system's network name (maximum 30 characters)
name
Router name string
Defaults
Name is the default router name with the serial number
Command
Global configuration
Modes
Usage
Maximum string tokens are 5.
Guidelines
Maximum router name length is 40 characters.
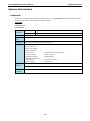
Examples
router(config)# hostname MOXA Ethernet Router EDR-810
router(config)# exit
router# show system
System Information
Error
System Name
: MOXA Ethernet Router EDR-810
System Location
: Router Location
System Description
: MOXA EDR-810
Maintainer Information
:
MAC Address
: 00:90:E8:1D:24:36
System Uptime
: 0d0h36m57s
Length of router hostname is too long
messages
Related
show system
commands
1-4
CLI Command Set User's Manual
System Functions
snmp-server contact
To set the system contact string, use the snmp-server contact global configuration command. To remove the
contact string, use the no form of this command.
Commands
snmp-server contact text
no snmp-server contact
Syntax
snmp-server contact
Configure router maintainer contact information
text
Maintainer contact information
Description
Defaults
N/A
Command
Global configuration
Modes
Usage
“text” parameter can be set as string separated by space.
Guidelines
Maximum string tokens are 5.
Maximum length of router maintainer contact info is 40.
Examples
router(config)# snmp-server contact
<STRING:token1>
- Maintainer contact information
router(config)# no snmp-server contact
Error
Length of maintainer info is too long
messages
Related
show snmp
commands
snmp-server description
To set the system description string, use the snmp-server description global configuration command. To
remove the description string, use the no form of this command.
Commands
snmp-server description text
no snmp-server description
Syntax
Description
snmp-server description
Configure router’s system description
text
Description string
Defaults
The default description is the model name.
Command
Global configuration
Modes
Usage
“text” parameter can be set as string separated by space.
Guidelines
Maximum string tokens are 5.
Maximum length of router maintainer contact info is 40.
Examples
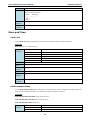
router(config)# snmp-server description MOXA PT Series
router(config)# exit
router# show system
System Information
System Name
: Managed Redundant Router 09458
System Location
: Xindian No. 135 6F Taiwan
System Description
: MOXA PT Series
Maintainer Information
: 8860289191230
MAC Address
: 00:90:E8:1D:24:36
System Uptime
: 0d0h6m46s
1-5
CLI Command Set User's Manual
Error
System Functions
Length of system description is too long
messages
Related
show snmp
commands
snmp-server location
To set the system location string, use the snmp-server location global configuration command. To remove
the location string, use the no form of this command.
Commands
snmp-server location text
no snmp-server location
Syntax
Description
snmp-server location
Configure router’s system location
text
Location string
Defaults
The default text is Router Location
Command
Global configuration
Modes
Usage
“text” parameter can be set as string separated by space.
Guidelines
Maximum string tokens are 5.
Maximum length of router location is 80.
Examples
router(config)# snmp-server location
<STRING:token1>
- Location string token 1
router(config)# no snmp-server location
Error
Length of location is too long
messages
Related
show snmp
commands
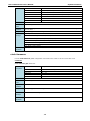
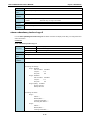
show system
Use show system command to display system identification settings.
Command
show system
Syntax
Description
show
Show running system information
system
System hardware and software status
Defaults
Command
Privileged EXEC/ User EXEC
Modes
Usage
N/A
Guidelines
Examples
router# show system
System Information
System Name
: Managed Redundant Router 09458
System Location
: Xidian No. 135 6F Taiwan
System Description
: MOXA PT Series
Maintainer Information
: 8860289191230
1-6
CLI Command Set User's Manual
Error
System Functions
MAC Address
: 00:90:E8:1D:24:36
System Uptime
: 0d0h6m46s
N/A
messages
Related
snmp-server description
commands
snmp-server contact
snmp-server location
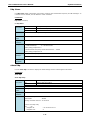
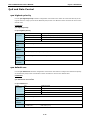
User Account
username
Use the username global configuration command on the router to set the username and password of the local
login user. Use the no form of this command to clear the password setting of the specified user.
Commands
username { admin | user } password string
no username { admin | user } password
Syntax
Description
username
Configuration for login account authentication
admin
Configure for account "admin"
user
Configure for account "user"
password
Specify the password
string
Password string
Defaults
There is no password for each user
Command
Global configuration
Modes
Usage
N/A
Guidelines
Examples
router(config)# username admin password moxa1234
router(config)# username user password moxa5678
Error
N/A
messages
Related
show users
commands
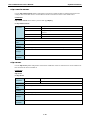
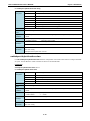
show users
Use the show users user EXEC command to display the username/password configuration.
Command
show users
Commands
users
Defaults
N/A
Display login user settings
Command
Privileged EXEC/ User EXEC
Modes
Usage
N/A
1-7
CLI Command Set User's Manual
System Functions
Guidelines
Examples
router# show users
Login account information:
Name
Password
----- ---------------admin
user
Error
N/A
messages
Related
username
commands
Date and Time
clock set
Use the clock set global configuration command on the router to set the current router time.
Command
clock set hh:mm:ss month day year
Syntax
Description
clock
Configure time-of-day clock
set
Adjust the clock
hh:mm:ss
hh:mm:ss
month
1 ~ 12
day
1 ~ 31
year
2000 ~ 2037
Defaults
N/A
Command
Global configuration
Modes
Usage
N/A
Guidelines
Examples
router(config)# clock set 11:11:11 1 1 2010
Error
Illegal parameters!
messages
Related
show clock
commands
clock summer-time
Use the clock summer-time global configuration command on the router to enable the day light saving time
offset and set the applied duration. Use the no form of this command to disable it.
Commands
clock summer-time start-date month week day hour
clock summer-time end-date month week day hour
clock summer-time offset offset-hour
Syntax
Description
clock
Configure time-of-day clock
summer-time
Configure Summer time parameter
start-date
The date when summer time offset start
1-8
CLI Command Set User's Manual
end-date
System Functions
The date when summer time offset end
month
From 'Jan', 'January' or '1' to 'Dec', 'December', or '12'
week
From '1st' or '1' to 'Last' or '6'
day
From 'Sun', 'Sunday' or '1' to 'Sat', 'Saturday' or '7'
hour
0 ~ 23
offset
Summer time offset
offset-hour
1 ~ 12
Defaults
N/A
Command
Global configuration
Modes
Usage
When configuring the summer time offset, the start-date and end-date must be configured
Guidelines
correctly first.
Examples
router(config)# clock timezon gmt -4
Error
Invalid parameter
messages
Month must be configured as 'Jan', 'January' or a numerical '1'.
Week must be configured as '1st', '2nd', '3rd', '4th', '5th' or 'Last'
Day must be configured as 'Sun', 'Sunday' or a numerical '1'.
Hour must be in the range from 0 to 23.
Please input the correct start/end date of the summer time first!
Hour offset is out of range.
Related
show clock
commands
clock timezone
Use the clock timezone global configuration command on the router to set the current time zone.
Command
clock timezone gmt offset-hour
Syntax
Description
clock
Configure time-of-day clock
timezone
Time zone hour shifting
gmt
Greenwich Mean Time
offset-hour
-12 ~ 12
Defaults
N/A
Command
Global configuration
Modes
Usage
N/A
Guidelines
Examples
router(config)# clock timezon gmt -4
Error
Hour offset is out of range
messages
Related
show clock
commands
1-9
CLI Command Set User's Manual
System Functions
ntp remote-server
Use the ntp remote-server global configuration command to enable the NTP or SNTP client function and
configure the remote NTP server. Use the no form of this command to return to the default value.
Commands
ntp remote-server server-addr-1 [server-addr-2] [simple]
no ntp remote-server
Syntax
Description
ntp
Configure Network Time Protocol
remote-server
Configure NTP/SNTP server for time query
simple
Configure Simple Network Time Protocol instead of Network Time
Protocol
server-addr-1
IP address or DNS name
server-addr-2
IP address or DNS name
Defaults
The default configuration contains one time server “time.nist.gov”.
Command
Global configuration
Modes
Usage
N/A
Guidelines
Examples
router(config)# ntp remote-server 192.168.127.1 time.stdtime.gov.tw
Error
N/A
messages
Related
show clock
commands
ntp server
Use the ntp server global configuration command to enable the router as an NTP server. Use the no form of
this command to return to disable it.
Commands
ntp server
no ntp server
Syntax
Description
ntp
Configure Network Time Protocol
server
Enable NTP server
Defaults
Default is disabled
Command
Global configuration
Modes
Usage
N/A
Guidelines
Examples
router(config)# ntp server
Error
N/A
messages
Related
show clock
commands
1-10
CLI Command Set User's Manual
System Functions
show clock
Use the show clock user EXEC command to display the time-related setting.
Command
show clock
Syntax
clock
Display the system clock
Description
Defaults
N/A
Command
Privileged EXEC/ User EXEC
Modes
Usage
N/A
Guidelines
Examples
router# show clock
Current Time
: Fri Jan 01 08:38:28 2010
Daylight Saving
Start Date
:
End Date
:
Offset
Error
:
Time Zone
: GMT-4:00
Time Server
:
Query Period
: 600 sec
NTP/SNTP Server
: Disabled
N/A
messages
Related
clock set
commands
clock summer-time
clock timezone
ntp refresh-time
ntp remote-server
ntp server
Syslog and Warning
warning-notification system-event
Use warning-notification system-event global configuration commands to enable the system warning
events trigger to email, relay, syslog or trap. Use the no form of this command to disable it.
Commands
warning-notification system-event { cold-start | warm-start | config-changed | pwr1-trans-on |
pwr2-trans-on | pwr1-trans-off | pwr2-trans-off | auth-fail | password-changed | tacacs-auth-fail
| radius-auth-fail | topology-changed | coupling-changed | master-changed | rstp-admin-changed
| rstp-topology-changed | turbo-ring-break | di1-trans-on|di1-trans-off } {action action-index |
severity severity-level | active}
no warning-notification system-event { cold-start | warm-start | config-changed | pwr1-trans-on
| pwr2-trans-on | pwr1-trans-off | pwr2-trans-off | auth-fail | password-changed |
tacacs-auth-fail | radius-auth-fail | topology-changed | coupling-changed | master-changed |
rstp-admin-changed | rstp-topology-changed | turbo-ring-break | di1-trans-on|di1-trans-off }
active}
1-11
CLI Command Set User's Manual
Syntax
Description
System Functions
warning-notification
Enable/disable warning notification with related events
system-event
Configure system event warning
cold-start
Enable/disable system cold start event
warm-start
Enable/disable system warm start event
config-changed
Enable/disable system configuration change event
pwr1-trans-on
Enable/disable power 1 on event
pwr2-trans-on
Enable/disable power 2 on event
pwr1-trans-off
Enable/disable power 1 off event
pwr2-trans-off
Enable/disable power 2 off event
auth-fail
Enable/disable authentication failure event
password-changed
Enable/disable password change event
tacacs-auth-fail
Enable/disable TACACS+ authentication failure event
radius-auth-fail
Enable/disable RADIUS authentication failure event
topology-changed
Enable/disable topology change event
coupling-changed
Enable/disable coupling change event
master-changed
Enable/disable Turbo Ring v2 master change event
rstp-admin-changed
Enable/disable RSTP root change event
rstp-topology-changed
Enable/disable RSTP RSTP topology change event
turbo-ring-break
Enable/disable Turbo Ring v2 break event
di1-trans-on
Enable/disable DI on event
di1-trans-off
Enable/disable DI off event
action
Configure actions of events
action-index
SNMP Trap, email, Syslog, or Relay 1
severity
Configure event severity
severity-level
Emergency(0), Alert(1), Critical(2), Error(3), Warning(4),
Notice(5), Information(6), Debug(7)
active
Defaults
N/A
Command
Global configuration
Activate event waring
Modes
Usage
action-index as follow,
Guidelines
Trap only(1), Email only(2), Trap+Email(3), Syslog only(4), Trap+Syslog(5),
Email+Syslog(6), Trap+Email+Syslog(7), Relay1 only(8), Trap+Relay1(9),
Email+Relay1(10), Trap+Email+Relay1(11), Syslog+Relay1(12), Trap+Syslog+Relay1(13),
Email+Syslog+Relay1(14), Trap+Email+Syslog+Relay1(15), Relay2 only(16),
Trap+Relay2(17), Email+Relay2(18), Trap+Email+Relay2(19), Syslog+Relay2(20),
Trap+Syslog+Relay2(21), Email+Syslog+Relay2(22), Trap+Email+Syslog+Relay2(23),
Relay1+Relay2(24), Trap+Relay1+Relay2(25), Syslog+Relay1+Realy2(28),
Email+Syslog+Relay1+Relay2(30), Trap+Email+Syslog+Relay1+Relay2(31), None(0)
severity-level as follow,
Emergency(0), Alert(1), Critical(2), Error(3), Warning(4), Notice(5), Information(6),
Debug(7)
Examples
N/A
1-12
CLI Command Set User's Manual
System Functions
Error messages N/A
Related
N/A
commands
warning-notification port-event
Use the warning-notification port-event interface configuration commands to enable the port warning
event trigger to email, relay, syslog or trap. Use the no form of this command to disable it.
Commands
warning-notification port-event {event { link-on | link-off | traffic-overload rx-threshold duration}
| action action-index |severity severity-level | active}
no warning-notification port-event {event { link-on | link-off | traffic-overload} | active}
Syntax
Description
warning-notification
Enable/disable warning notification with related events
port-event
Configure port event warning
event
Configure events
link-on
Enable/disable port link on event
link-off
Enable/disable port link off event
traffic-overload
Enable/disable port traffic overload event
rx-threshold
Enable/disable port RX threshold event
duration
Enable/disable port duration event
action
Configure actions for port events
action-index
SNMP Trap, email, Syslog, or Relay 1
severity
Configure severity of port events
severity-level
Emergency(0), Alert(1), Critical(2), Error(3), Warning(4),
Notice(5), Information(6), Debug(7)
active
Defaults
N/A
Command
Global configuration
Activate event warning
Modes
Usage
action-index as follow,
Guidelines
Trap only(1), Email only(2), Trap+Email(3), Syslog only(4), Trap+Syslog(5),
Email+Syslog(6), Trap+Email+Syslog(7), Relay1 only(8), Trap+Relay1(9),
Email+Relay1(10), Trap+Email+Relay1(11), Syslog+Relay1(12), Trap+Syslog+Relay1(13),
Email+Syslog+Relay1(14), Trap+Email+Syslog+Relay1(15), Relay2 only(16),
Trap+Relay2(17), Email+Relay2(18), Trap+Email+Relay2(19), Syslog+Relay2(20),
Trap+Syslog+Relay2(21), Email+Syslog+Relay2(22), Trap+Email+Syslog+Relay2(23),
Relay1+Relay2(24), Trap+Relay1+Relay2(25), Syslog+Relay1+Realy2(28),
Email+Syslog+Relay1+Relay2(30), Trap+Email+Syslog+Relay1+Relay2(31), None(0)
severity-level as follow,
Emergency(0), Alert(1), Critical(2), Error(3), Warning(4), Notice(5), Information(6),
Debug(7)
Examples
Error messages N/A
1-13
CLI Command Set User's Manual
System Functions
Related
commands
show relay-warning
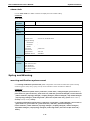
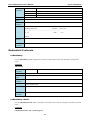
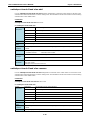
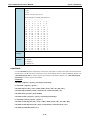
Use the show relay-warning command to display the settings of the relay warning.
Commands
show relay-warning config
show relay-warning status
Syntax
Description
show
Show running system information
relay-warning
Display relay warning configuration
config
Relay warning configuration
status
Current relay warning list
Defaults
N/A
Command
Privileged EXEC / User EXEC
Modes
Usage
N/A
Guidelines
Examples
router# show relay-warning config
System Events Setting
Override Relay Warning Settings
: Disable
Power Input 1 failure(On->Off)
: Disable
Power Input 2 failure(On->Off)
: Disable
Turbo Ring Break
: Disable
--More-Port Events Setting
Traffic
Port
Link
Overload
RX
Traffic
Threshold(%)
Duration(s)
------------ ---------------- ---------------- ---------------- -----------1-1
Ignore
Disable
1
1
1-2
Ignore
Disable
1
1
1-3
Ignore
Disable
1
1
1-4
Ignore
Disable
1
1
1-5
Ignore
Disable
1
1
1-6
Ignore
Disable
1
1
1-7
Ignore
Disable
1
1
1-8
Ignore
Disable
1
1
3-1
Ignore
Disable
1
1
3-2
Ignore
Disable
1
1
3-3
Ignore
Disable
1
1
3-4
Ignore
Disable
1
1
3-5
Ignore
Disable
1
1
3-6
Ignore
Disable
1
1
3-7
Ignore
Disable
1
1
3-8
Ignore
Disable
1
1
router#
Error
N/A
messages
Related
N/A
commands
1-14
CLI Command Set User's Manual
System Functions
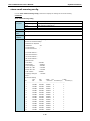
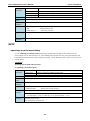
show email-warning config
Use the show email-warning config command to display the settings of the email warning.
Command
show email-warning config
Syntax
Description
show
Show running system information
email-warning
Display Email warning configuration
config
Email warning configuration
Defaults
N/A
Command
Privileged EXEC /User EXEC
Modes
Usage
N/A
Guidelines
Examples
router# show email-warning config
Mail Server and Email Setup
SMTP Server IP/Name :
SMTP Port
: 25
Account Name
:
Account Password
:
1st email address :
2nd email address :
3rd email address :
4th email address :
System Events
Cold Start
: Disable
Warm Start
: Disable
Conf. Changed
: Disable
Power On->Off
: Disable
Power Off->On
: Disable
Auth. Failure
Topology Changed
: Disable
: Disable
--More-Port Events Setting
Link
Port
ON
Link
Traffic
OFF
RX
Overload
Traffic
Threshold(%)
Duration(s)
------------ ---------- ---------- ---------- ---------------- -----------1-1
Disable
Disable
Disable
0
1
1-2
Disable
Disable
Disable
0
1
1-3
Disable
Disable
Disable
0
1
1-4
Disable
Disable
Disable
0
1
1-5
Disable
Disable
Disable
0
1
1-6
Disable
Disable
Disable
0
1
1-7
Disable
Disable
Disable
0
1
1-8
Disable
Disable
Disable
0
1
3-1
Disable
Disable
Disable
0
1
3-2
Disable
Disable
Disable
0
1
3-3
Disable
Disable
Disable
0
1
3-4
Disable
Disable
Disable
0
1
3-5
Disable
Disable
Disable
0
1
3-6
Disable
Disable
Disable
0
1
1-15
CLI Command Set User's Manual
System Functions
3-7
Disable
Disable
Disable
0
1
3-8
Disable
Disable
Disable
0
1
router#
Error
N/A
messages
Related
email-warning event
commands
email-warning account
email-warning server
email-warning mail-address
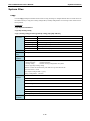
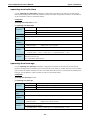
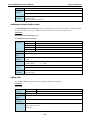
show logging
Use the show logging user EXEC command to display the setting of the IP filter feature.
Command
show logging [event-log]
Syntax
Description
logging
Display syslog information
event-log
Display system event logs
Defaults
N/A
Command
Privileged EXEC/ User EXEC
Modes
Usage
N/A
Guidelines
Examples
router# show logging
Syslog server #1:
Syslog server #2: 192.168.1.2, port: 514
Syslog server #3: 192.168.1.3, port: 514
router# show logging event-log
Idx Boot
Time or Uptime
Log
--- ---- ----------------------- --------------------------------------------
Error
1 337 2037/06/23, 20:46:08
192.168.127.1 admin Auth. ok
2 337 2037/06/23, 20:52:47
Authentication fail
3 338 2037/06/23, 21:51:59
Port 1-1(Trk1) link on
4 338 2037/06/23, 21:51:59
Port 1-2 link on
5 338 2037/06/23, 21:51:59
Port 1-5 link on
6 338 2037/06/23, 21:52:03
Port 1-5 link off
7 338 2037/06/23, 21:52:03
Warm start by Firmware Upgrade
8 338 2037/06/23, 21:52:04
Port 1-5 link on
9 338 2037/06/23, 22:03:43
192.168.127.1 admin Auth. ok
10 338 2037/06/23, 22:04:04
192.168.127.1 admin Auth. ok
11 338 2037/06/24, 00:02:47
Port 1-5 link off
12 338 2037/06/24, 00:02:48
Port 1-5 link on
N/A
messages
Related
logging
commands
1-16
CLI Command Set User's Manual
System Functions
System Files
copy
Use the copy privileged command on the router to copy an image or configuration file from a remote server to
the Flash memory or copy the running configuration, startup configuration or event log to the remote server
through TFTP.
Commands
copy tftp device-firmware
copy tftp running-config
copy {running-config|event-log|startup-config} tftp [tftp-address]
Syntax
Description
copy
Copy from one file to another
tftp
Remote server through TFTP
device-firmware
System firmware
running-config
Current running configuration of system
startup-config
System startup configuration
event-log
Event log file
tftp-address
TFTP address. Ex. tftp://192.168.127.1/abc.txt
Defaults
N/A
Command
Privileged EXEC
Modes
Usage
N/A
Guidelines
Examples
router# copy tftp
device-firmware
- System firmware
running-config
- Current running configuration of system
router# copy tftp running-config
Address or name of remote host [192.168.127.1]? 192.168.127.95
Source file name ? cli.ini
Save import config to flash ? [Y/n]
Saving configuration ...Success
Error
messages
Input error
Invalid TFTP Server IP/Name !!!
TFTP Configuration File Download Fail
Invalid Config Files Path and Name !!!
Invalid Firmware Files Path and Name !!!
TFTP Firmware Download Fail !!!
TFTP Configuration File Upload Fail !!!
TFTP Log File Upload Fail !!!
Related
N/A
commands
1-17
CLI Command Set User's Manual
System Functions
Security
ip http-server
Use the ip http-server global configuration commands on the router to enable the HTTP/HTTPs service. Use
the no form of this command to disable the HTTP/HTTPS service.
Commands
ip http-server
ip http-server secure
no ip http-sever
Syntax
Description
ip
Global IP configuration subcommands
http-server
Enable HTTP/HTTPS web service
secure
HTTPS support only
Defaults
HTTP service is enabled.
Command
Global configuration
Modes
Usage
N/A
Guidelines
Examples
router(config)# ip http-server
auto-logout
- Web auto-logout timer
secure
- HTTPS support only
router(config)# ip http-server secure
router(config)# ip http-server
router(config)# no ip http-server
Error
N/A
messages
Related
show ip http-server
commands
trusted-access
Use the trusted-access command to enable the trusted IP list for access.
Commands
trusted-access [ip-address netmask]
no trusted-access [ip-address netmask]
Syntax
Description
trusted-access
Enable the trusted IP list for access
ip-address
IP address
netmask
IP netmask
Defaults
The feature is disabled by default.
Command
VLAN configuration as management VLAN
Modes
Usage
This feature will take effect when the “trusted-access” command is executed.
Guidelines
Examples
router(config)# interface mgmt
1-18
CLI Command Set User's Manual
System Functions
router(config-vlan)# trusted-access 10.10.10.10 255.255.255.0
<IPV4ADDR:ipaddr>
- IP address
<IPV4ADDR:netmask>
- IP netmask
router (config-vlan)# trusted-access
Error
messages
Related
IP or netmask invalid
Access ip list full
show interface mgmt trusted-access
commands
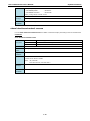
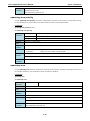
show interfaces trusted -access
Use the show interfaces trusted-access user EXEC command to display the settings of the accessible IP list.
Command
show interfaces trusted-access
Syntax
Description
show
Show running system information
interfaces
Interface status and configuration
trusted-access
Display trusted access IP list
Defaults
N/A
Command
Privileged EXEC / User EXEC
Modes
Usage
N/A
Guidelines
Examples
router# show interfaces trusted-access
Trusted Access IP List: Enable
Error
Index
IP / netmask
1
192.168.127.253 / 255.255.255.0
N/A
messages
Related
trusted-access
commands
1-19
CLI Command Set User's Manual
System Functions
Diagnostics
ping
Use the ping user EXEC command on the router to detect if the remote host is still alive.
Command
ping ip-address
Syntax
Description
ping
Send echo messages
ip-address
Ex. 192.168.127.1
Defaults
N/A
Command
Privileged
Modes
Usage
N/A
Guidelines
Examples
router# ping 192.168.127.1
PING 192.168.127.1, Send/Recv/Lost = 4/4/0
Error
N/A
messages
Related
N/A
commands
lldp enable
Use the lldp enable global configuration command to enable LLDP. To stop LLDP, use the no form of this
command.
Commands
lldp run
no lldp run
Syntax
Description
lldp
Configure LLDP parameters
run
Start up
Defaults
LLDP is enabled in factory default.
Command
Global configuration
Modes
Usage
N/A
Guidelines
Examples
router(config)# lldp enable
router(config)# no lldp enable
Error
N/A
messages
Related
show lldp
commands
1-20
CLI Command Set User's Manual
System Functions
lldp timer
Use lldp timer global configuration command to configure the transmission frequency of LLDP messages. To
reset the timer to default, use the no form of this command.
Commands
lldp timer transFreq
no lldp timer
Syntax
Description
lldp
Configure LLDP parameters
timer
Transmission frequency of LLDP updates
transFreq
5 ~ 32768 seconds
Defaults
Transmission frequency of LLDP updates is 30 seconds.
Command
Global configuration
Modes
Usage
N/A
Guidelines
Examples
router(config)# lldp timer
<UINT:transFreq>
- 5 ~ 32768 seconds
router(config)# lldp timer 4
% LLDP transmit frequency should be between 5 ~ 32768
router(config)# lldp timer 50
Error
LLDP transmit frequency should be between 5 ~ 32768
messages
Related
show lldp
commands
show lldp
Use the show lldp command to display the LLDP settings and the LLDP neighbor information.
Commands
show lldp
show lldp entry
Syntax
Description
show
Show running system information
lldp
Display LLDP information
entry
LLDP entries
Defaults
N/A
Command
Privileged EXEC / User EXEC
Modes
Usage
N/A
Guidelines
Examples
router# show lldp
LLDP Enable
: Enable
Message Transmit Interval : 30 seconds
router# show lldp entry
Port
: 23
Neighbor ID
: 00:90:e8:0a:0a:0a
Neighbor Port
:3
1-21
CLI Command Set User's Manual
Neighbor Port Descript
Neighbor System
Port
: 100TX,RJ45.
: Managed Redundant Router 00000
: 19
Neighbor ID
: 00:90:e8:0a:0a:0a
Neighbor Port
:2
Neighbor Port Descript
: 100TX,RJ45.
Neighbor System
Port
: Managed Redundant Router 00000
: 24
Neighbor ID
: 00:90:e8:0a:0a:0a
Neighbor Port
:1
Neighbor Port Descript
: 100TX,RJ45.
Neighbor System
Error
System Functions
: Managed Redundant Router 00000
N/A
messages
Related
lldp timer
commands
lldp run
1-22
CLI Command Set User's Manual
System Functions
Network Services
snmp-server version
To enable/disable the SNMP server and configure the SNMP version, use the snmp-server version global
configuration command.
Command
snmp-server version [v1-v2c-v3 | v1-v2c | v3]
Syntax
Description
snmp-server
Enable SNMP server
version
SNMP version setting
v1-v2c-v3
Version 1, 2C and 3 support
v1-v2c
Version 1 and 2C support
v3
Only version 3 support
Defaults
Default version is v1-v2c
Command
Global configuration
Modes
Usage
N/A
Guidelines
Examples
router(config)# snmp-server version
v1-v2c-v3
- Version 1, 2C and 3 support
v1-v2c
- Version 1 and 2C support
v3
- Only version 3 support
Error messages
N/A
Related
show snmp
commands
snmp-server community
To set up the community access string to permit access to the Simple Network Management Protocol (SNMP),
use the snmp-server community global configuration command.
Command
snmp-server community text mode
Syntax
Description
Defaults
snmp-server
Configure SNMP server
community
SNMP community setting
text
SNMP community string
mode
ro | rw
Public community is ro
Private community is rw
Command
Global configuration
Modes
Usage
Specifies read-only access. Authorized management stations are only able to retrieve MIB
Guidelines
objects.
Specifies read-write access. Authorized management stations are able to both retrieve and
modify MIB objects
Examples
router(config)# snmp-server community public ro
1-23
CLI Command Set User's Manual
Error messages
System Functions
SNMP community mode must be ( ro|rw )!!
The longest snmp community string length is 30!!
Related
show snmp
commands
snmp-server user
In the SNMPv3 application, to configure a user’s authentication type and password, use the snmp-server user
global configuration command.
Command
snmp-server user username auth auth-type password
Syntax
Description
snmp-server
Configure SNMP server
user
SNMP user setting
username
SNMP user name
auth
Specifies which authentication level should be used
auth-type
no-auth | md5 | sha
password
Password (maximum 30 characters)
Defaults
N/A
Command
Global configuration
Modes
Usage
username is only allowed to be set as “admin” or “user”
Guidelines
auth-type is only allowed to be set as “no-auth”, “md5” or “sha”
Examples
router(config)# snmp-server user admin auth md5 moxacli
Error messages
SNMP user must be ( admin | user )!!
SNMP authtype must be ( no-auth | md5 | sha )!!
Admin/User Password must be at least 8 bytes !!!
Admin/User Data Encryption must be at least 8 bytes !!!
Related
show snmp
commands
snmp-server trap-mode
To enable all Simple Network Management Protocol (SNMP) notifications (traps or informs) available on your
system, use the snmp-server trap-mode global configuration command. To disable all available SNMP
notifications, use no form of this command
Commands
snmp-server trap-mode trap
snmp-server trap-mode inform [retry times timeout seconds]
no snmp-server trap-mode
Syntax
Description
snmp-server
Configure the SNMP server
trap-mode
SNMP Trap/Inform mode setting
trap
SNMP Trap
inform
SNMP Inform
1-24
CLI Command Set User's Manual
System Functions
retry
Inform retries times
times
1 ~ 99
timeout
Timeout timer
seconds
1 ~ 300 seconds
Defaults
The default mode is “trap”
Command
Global configuration
Modes
Usage
N/A
Guidelines
Examples
router(config)# snmp-server trap-mode trap
router(config)# snmp-server trap-mode inform retry 3 timeout 10
router(config)# no snmp-server trap-mode
Error messages
Invalid inform retries value!!!
Invalid inform timeout value!!!
Related
show snmp
commands
Service dhcp
To enable the DHCP service, use the service dhcp dhcp-mode global configuration command. To disable the
DHCP service, use no form of this command
Commands
service dhcp
service dhcp auto-assign
no service dhcp
Syntax
service dhcp
Enable DHCP server service
auto-assign
Enable DHCP server mode as IP-port binding
Description
Defaults
N/A
Command
Global configuration
Modes
Usage
N/A
Guidelines
Examples
router(config)# service dhcp
router(config)# service dhcp auto-assign
Error messages
N/A
Related
N/A
commands
Dynamic DNS
To enable the DDNS service, use the ip ddns service [DDNS server] global configuration command. To
configure DDNS service, use ip ddns [username|password|domain] to disable DHCP service, use the no
form of this command.
Commands
ip ddns service
1-25
CLI Command Set User's Manual
System Functions
ip ddns service [DDNS server]
ip ddns service [username | password | domain]
Syntax
Description
Command
ip addns service
Configure SNMP server
username
Configure login username for DDNS service
password
Configure login password for DDNS service
domain
Configure domain name for DDNS service
DDNS server
Select DDNS service [freedns | 3322 | dyndns | no-ip]
Global configuration
Modes
Usage
N/A
Guidelines
Examples
router(config)# ip ddns service {freedns | 3322 | DynDns | NO-IP}
router(config)# ip ddns username user-name
router(config)# ip ddns password password
router(config)# ip ddns domain domain-name
router(config)# no ip ddns
Error messages
Related
router# show ip ddns
commands
1-26
2
2.
Interface and Routing Functions
This chapter describes the interface and routing functions of the Ethernet switches.
The following topics are covered in this chapter:
Command Modes
Command Sets
Interfaces
Routing
Multicast Routing
CLI Command Set User's Manual
Interface and Routing Functions
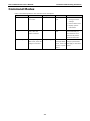
Command Modes
Refer to the following table for the command mode descriptions.
Mode
Access Method
Prompt
Exit Method
About This Mode
User EXEC
Begin a session with
Router>
Enter logout or
Use this mode to
quit.
•
your router.
Change terminal
settings.
•
Perform basic tests.
•
Display system
information.
Privileged EXEC
While in user EXEC
Router#
mode, enter the
Enter disable to
Use this mode to verify
exit.
commands that you
enable command.
have entered. Use a
password to protect
access to this mode.
Global configuration While in privileged
To exit to
Use this mode to
EXEC mode, enter the
Router(config)#
privileged EXEC
configure parameters
configure command.
mode, enter exit that apply to the entire
or end, or press
Ctrl-Z.
2-2
router.
CLI Command Set User's Manual
Interface and Routing Functions
Command Sets
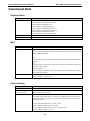
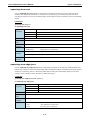
Interfaces
Category
Commands
Interface Configuration
router(config)# interface wan wanID
router(config)# interface lan
router(config-if)# mode {disable | enable | backup (for Wan2)}
router(config-if)# dmz (for Wan2)
router(config-if)# no dmz (for Wan2)
DNS Server
router(config-if)# name-server ip-address1 [ip-address2] [ip-address3] (for WAN)
router(config-if)# no name-server (for WAN)
LAN IP Setting
router(config-if)# ip address static ip-address subnet-mask
Display settings
router# show interface wan wanID
router(config-if)# no ip address
router# show interface lan
router# show interface bridge
WAN IP Setting
router(config-if)# type {static ip-address subnet-mask [gateway] | dhcp | pppoe
host-name user-name password}
PPTP Dialup
router(config-if)# pptp ip-address user-name password
router(config-if)# no pptp
Routing
Unicast Route
Category
Commands
Display settings
router# show ip route
router# show ip route static
Static route settings
router(config)# ip route static name ip-address netmask next-hop [distance]
router(config)# no ip route static name
router(config)# ip route static name {enable | disable}
RIP
Category
Commands
Enable/Disable
router(config)# ip route rip
Enter RIP mode
router(config)# no ip route rip
Add interface to RIP
router(config-RIP)# network {wan1 | wan2 | lan}
router(config-RIP)# no network {wan1 | wan2 | lan}
Version settings
router(config-RIP)# version {1 | 2}
Redistribute Static
router(config-RIP)# redistribute static
Routing
router(config-RIP)# no redistribute static
Display settings
router# show ip route rip
2-3
CLI Command Set User's Manual
Interface and Routing Functions
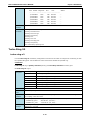
VRRP
Category
Commands
VRRP Global Settings
router(config)# vrrp enable
router(config)# no vrrp enable
VRRP Interface Settings
Note:
These settings are in interface configuration mode
router(config-if)# vrrp enable
router(config-if)# no vrrp enable
router(config-if)# vrrp virtual-ip ip-address
router(config-if)# vrrp vrid virtual-router-ID
router(config-if)# vrrp priority priority
router(config-if)# vrrp preemption
router(config-if)# no vrrp preemption
router(config-if)# vrrp track-interface {lan | wan1 | wan2}
router(config-if)# no vrrp track-interface {lan | wan1 | wan2}
Display settings
router# show vrrp
Traffic Prioritization
Category
Commands
Enable/Disable
router(config)# traffic priority interface {wan1 | wan2 | lan}
Priority settings
router(config-traffic-priority)# max-bw kbps
router(config-traffic-priority)# default-priority {0 | 1 | 2 | 3}
router(config-traffic-priority)# priority {0 | 1 | 2 | 3} max-bw kbps min-bw kbps
router(config)# no traffic priority interface {wan1 | wan2 | lan}
Create/Enter policy
Default: enable
configuration mode
router(config)# traffic policy {outgoing | incoming} index
Policy settings
Default:
The default value of priority is 0. The default value of mode is IP. The default values
of protocol, IP, port and interface are all. The policy enables by default.
router(config-traffic-policy)# priority {0 | 1 | 2 | 3}
router(config-traffic-policy)# mode {IP | MAC}
router(config-traffic-policy)# protocol {all | tcp | udp | icmp}
router(config-traffic-policy)# src-ip all
router(config-traffic-policy)# src-ip single ip-address
router(config-traffic-policy)# src-ip range ip-address1 ip-address2
router(config-traffic-policy)# dst-ip all
router(config-traffic-policy)# dst-ip single ip-address
router(config-traffic-policy)# dst-ip range ip-address1 ip-address2
router(config-traffic-policy)# src-port all
router(config-traffic-policy)# src-port single port
router(config-traffic-policy)# src-port range port1 port2
router(config-traffic-policy)# dst-port all
router(config-traffic-policy)# dst-port single port
router(config-traffic-policy)# dst-port range port1 port2
router(config-traffic-policy)# src-mac mac-address
router(config-traffic-policy)# interface {all | wan1 | wan2 | lan}
Enable/Disable/Delete
router(config)# traffic policy {outgoing | incoming} index {enable | disable}
policy
router(config)# no traffic policy {outgoing | incoming} index
2-4
CLI Command Set User's Manual
Display settings
Interface and Routing Functions
router# show traffic priority
router# show traffic policy {outgoing | incoming}
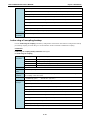
Multicast Routing
Global Configuration
Use the ip multicast-routing command to enable/disable the multicast routing function, and display to show
the multicast routing forwarding table.
Category
Commands
Multicast routing
router(config)#ip multicast-routing { static | dvmrp | pim-sm }
mode
router(config)#no ip multicast-routing
Display
router(config)#show ip mroute kernel
Static Multicast Route
Category
Enable/disable
Commands
router(config)#ip multicast-routing static
router(config)#no ip multicast-routing
Static Multicast routes
router(config)#ip mroute group MCADDR src IPADDR in IFNAME out IFNAME-LIST
add/delete
MCADDR: Multicast group address
IPADDR: Multicast source IP address
IFNAME: Inbound interface name
IFNAME-LIST: Outbound interface list
router(config)#no ip mroute group MCADDR src IPADDR
Display settings
router(config)#show ip mroute mode
mode: dvmrp | static | pimsm
DVMRP
Category
Enable/disable
Commands
router(config)#ip multicast-routing dvmrp
router(config)#no ip multicast-routing
Enable/disable DVMRP
Use this command to enable/disable DVMRP interface by interface. Go into interface
by interface
category for the settings first.
router(config)#interface IFNAME
IFNAME: Interface name
router(config-if)#ip dvmrp
router(config-if)#no ip dvmrp
Display DVMRP
router# show ip dvmrp
information in the
router# show ip dvmrp route
interface
router# show ip dvmrp neighbor
2-5
3
3.
NAT, VPN, and Firewall Functions
This chapter describes the commands for the NAT, VPN, and firewall function.
The following topics are covered in this chapter:
Command Modes
Command Sets
CLI Command Set User's Manual
NAT, VPN, and Firewall Functions
Command Modes
Refer to the following table for the command modes.
Mode
Access Method
Prompt
Exit Method
About This Mode
User EXEC
Begin a session with
Router>
Enter logout or
Use this mode to
quit.
•
your router.
Change terminal
settings.
•
Perform basic tests.
•
Display system
information.
Privileged EXEC
While in user EXEC
Router#
mode, enter the
Enter disable to
Use this mode to verify
exit.
commands that you
enable command.
have entered. Use a
password to protect
access to this mode.
Global configuration While in privileged
To exit to
Use this mode to
EXEC mode, enter the
Router(config)#
privileged EXEC
configure parameters
configure command.
mode, enter exit that apply to the entire
or end, or press
Ctrl-Z.
3-2
router.
CLI Command Set User's Manual
NAT, VPN, and Firewall Functions
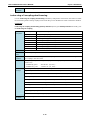
Command Sets
Setting Check
Category
Commands
Enable/Disable
router(config)# settingcheck firewall
router(config)# no settingcheck firewall
router(config)# settingcheck nat
router(config)# no settingcheck nat
router(config)# settingcheck access-ip
router(config)# no settingcheck access-ip
router(config)# settingcheck l2-filter
router(config)# no settingcheck l2-filter
Manual setting
router(config)# settingcheck timer seconds
Display settings
router# show settingcheck
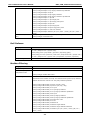
NAT
Category
Commands
Display settings
router# show ip nat
Rule settings
Default:
The new rule is appended to the last rule if the index field of command is not set,
and it enables by default.
1-1:
router(config)# ip nat static inside lan ip-address outside wan wanID ip-address
[index]
N-1:
router(config)# ip nat dynamic inside lan ip-address1 ip-address2 outside wan
{wanID | auto} [index]
Port Forwarding:
router(config)# ip nat static {all | tcp | udp} inside lan ip-address port outside
wan wanID port [index]
Enable/Disable/Delete rules router(config)# ip nat index {enable | disable}
router(config)# no ip nat index
Policy Setting
Category
Commands
Display settings
router# show firewall
Create/Enter policy
Default: enable
configuration mode
router(config)# firewall index
Policy settings
Default:
The default value of the action is “accept”. The default value of the mode is IP.
The default values of the protocol, IP, port and interface are all. The policy is
enabled by default.
router(config-firewall)# action {accept | drop}
router(config-firewall)# mode {IP | MAC}
router(config-firewall)# protocol {all | tcp | udp | icmp}
router(config-firewall)# src-ip all
3-3
CLI Command Set User's Manual
NAT, VPN, and Firewall Functions
router(config-firewall)# src-ip single ip-address
router(config-firewall)# src-ip range ip-address1 ip-address2
router(config-firewall)# dst-ip all
router(config-firewall)# dst-ip single ip-address
router(config-firewall)# dst-ip range ip-address1 ip-address2
router(config-firewall)# src-port all
router(config-firewall)# src-port single port
router(config-firewall)# src-port range port1 port2
router(config-firewall)# dst-port all
router(config-firewall)# dst-port single port
router(config-firewall)# dst-port range port1 port2
router(config-firewall)# src-mac mac-address
router(config-firewall)# interface {all | lan | wan1 | wan2} {all | lan | wan1 |
wan2}
Enable/Disable/Delete
router(config)# firewall index [enable | disable]
policy
router(config)# no firewall index
DoS Defense
Category
Commands
Enable/Disable
router(config)# dos {null-scan | xmas-scan | nmap-xmas-scan | syn/fin-scan |
fin–scan | nmap-id-scan | syn/rst–scan}
router(config)# dos {icmp-death | syn-flood | arp-flood} [pkts]
router(config)# no dos {null-scan | xmas-scan | nmap-xmas-scan | syn/fin-scan |
fin–scan | nmap-id-scan | syn/rst–scan | icmp-death | syn-flood | arp-flood }
Display settings
router# show dos
Modbus Filtering
Category
Commands
Display settings
router# show modbus-filter
Create/Enter policy
Default: enable
configuration mode
router(config)# modbus-filter index
Policy settings
Default:
The default value of action is accept. The default values of protocol, IP, interface,
address and function code are all. The policy enables by default.
router(config-modbus-filter)# action {accept | drop}
router(config-modbus-filter)# protocol {all | tcp | udp}
router(config-modbus-filter)# src-ip all
router(config-modbus-filter)# src-ip single ip-address
router(config-modbus-filter)# src-ip range ip-address1 ipaddress2
router(config-modbus-filter)# dst-ip all
router(config-modbus-filter)# dst-ip single ip-address
router(config-modbus-filter)# dst-ip range ip-address1 ipaddress2
router(config-modbus-filter)# function func-code
router(config-modbus-filter)# uid uid
router(config-modbus-filter)# address all
router(config-modbus-filter)# address single address
router(config-modbus-filter)# address range address1 address2
router(config-modbus-filter)# interface {all | lan | wan1 | wan2} {all | lan |
wan1 | wan2}
3-4
CLI Command Set User's Manual
NAT, VPN, and Firewall Functions
Enable/Disable/Delete
router(config)# modbus-filter index [enable | disable]
policy
router(config)# no modbus-filter index
Enable/Disable/Delete
router(config)# l2-filter index [enable | disable]
policy
router(config)# no l2-filter index
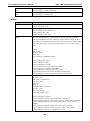
IPSec
Category
Commands
Display settings
router# show ipsec
router# show ipsec name
Global setting
router(config)# ipsec all-connect
router(config)# no ipsec all-connect
router(config)# ipsec nat-t
router(config)# no ipsec nat-t
Create connection /Tunnel
Quick Setting:
setting
The type, remote-gateway, network must be set in tunnel setting, and the
auth-mode should be set to pre-shared key mode in phase1 setting, all other
commands are the default values, then it can work as a standard-strength IPSec
connection. IPSec Name must begin with an alphabet, and it cannot contain a
space.
Default:
l2tp: disable
interface: wan1
mode: wait
The connection is disabled by default.
router(config)# ipsec name
router(config-ipsec)# l2tp
router(config-ipsec)# no l2tp
router(config-ipsec)# remote-gateway ip-address
router(config-ipsec)# interface wan wanID
router(config-ipsec)# startup-mode {start | wait}
router(config-ipsec)# local-network ip-address netmask [ID]
router(config-ipsec)# remote-network ip-address netmask [ID]
Phase1 setting
Default:
ike-mode: main
auth-mode: pre-shared key
encryption: 3des
hash: sha1
group: 2
negotiation-time: 0 (forever)
life-time: 1 hour
rekey-time: 9 mins
rekey-fuzz-percent: 100%
router(config-ipsec)# phase1
router(config-ipsec-phase1)# ike-mode {main | aggressive}
router(config-ipsec-phase1)# auth-mode {psk key | x509 local.crt remote.crt}
router(config-ipsec-phase1)# encryption {des | 3des | aes128 | aes192 |
aes256}
router(config-ipsec-phase1)# hash {any | md5 | sha1 | sha256}
router(config-ipsec-phase1)# dh-group {768 | 1024 | 1536 | 2048}
router(config-ipsec-phase1)# negotiation-time times
3-5
CLI Command Set User's Manual
NAT, VPN, and Firewall Functions
router(config-ipsec-phase1)# life-time hours
router(config-ipsec-phase1)# rekey-time minutes
router(config-ipsec-phase1)# rekey-fuzz-percent percentage
Phase2 setting
Default:
perfect-forward-secrecy: disable
encryption: 3des
hash: sha1
life-time: 480 mins
router(config-ipsec)# phase2
router(config-ipsec-phase2)# pfs
router(config-ipsec-phase2)# no pfs
router(config-ipsec-phase2)# encryption {des | 3des | aes128 | aes192 | aes256
| no}
router(config-ipsec-phase2)# hash {any | md5 | sha1 | sha256}
router(config-ipsec-phase2)# life-time minutes
Dead Peer Detection
Default:
action: hold
delay: 30 sec
timeout: 120 sec
router(config-ipsec)# dpd-action {hold | restart | clear | disable}
router(config-ipsec)# dpd-delay seconds
router(config-ipsec)# dpd-timeout seconds
Enable/Disable/Delete
router(config)# ipsec name [enable | disable]
connections
router(config)# no ipsec name
L2TP
Category
Commands
Display settings
router# show l2tp
L2TP setting
router(config)# l2tp interface wan wanID local-ip ip-address offer-ip ip-address1
ip-address2
router(config)# l2tp user name password password re-password
router(config)# no l2tp interface wan wanID
3-6
4
4.
Layer 2 Functions
This chapter describes the commands for the Layer 2 functions.
The following topics are covered in this chapter:
Command Modes
Command Sets
Port
Port Mirror
show port monitor
Redundant Protocols
RSTP
Turbo Ring V2
Virtual LAN
Multicast
QoS and Rate Control
MAC Address Table
CLI Command Set User's Manual
Layer 2 Functions
Command Modes
Refer to the following table for the command modes.
Mode
Access Method
Prompt
Exit Method
About This Mode
User EXEC
Begin a session with
Router>
Enter logout or
Use this mode to
quit.
•
your router.
Change terminal
settings.
•
Perform basic tests.
•
Display system
information.
Privileged EXEC
While in user EXEC
Router#
mode, enter the
Enter disable to
Use this mode to verify
exit.
commands that you
enable command.
have entered. Use a
password to protect
access to this mode.
Global configuration While in privileged
To exit to
Use this mode to
EXEC mode, enter the
Router(config)#
privileged EXEC
configure parameters
configure command.
mode, enter exit that apply to the entire
or end, or press
Ctrl-Z.
4-2
router.
CLI Command Set User's Manual
Layer 2 Functions
Command Sets
Port
shutdown
To disable an interface, use the shutdown interface configuration command. To restart a disabled interface,
use the no form of this command.
Commands
shutdown
no shutdown
Syntax
shutdown
Shutdown the selected interface
Description
Defaults
None
Command
Interface configuration
Modes
Usage
N/A
Guidelines
Examples
router(config-if)# shutdown
router(config-if)# no shutdown
Error messages
Cannot configure on trunk member port 1/1!
Related
show interfaces ethernet
commands
show interfaces trunk
name
Use the name interface configuration command to configure the interface name. To remove the configuration,
use the no form of this command.
Commands
name
no name
Syntax
name
Port name
Description
Defaults
None
Command
Interface configuration
Modes
Usage
Guidelines
Examples
router(config)# interface ethernet 1/1
router(config-if)# name interface1_port1
router(config-if)# no name
Error messages
The length of port name must between 1 and 63!
Cannot configure on trunk member port 1/1
Related
show interfaces ethernet
commands
show interfaces trunk
4-3
CLI Command Set User's Manual
Layer 2 Functions
speed-duplex
Use the speed-duplex interface configuration command to specify the speed of the interface and its duplex
mode. Use the no form of this command to return the interface to its default value.
Commands
speed-duplex {10M-Full | 10M-Half | 100M-Full| 100M-Half | 1G-Full | Auto}
no speed-duplex
Syntax
Description
speed-duplex
Configure speed and duplex operation
10M-Full
Speed 10M-full
10M-Half
Speed 10M-Half
100M-Full
Speed 100M-Full
100M-Half
Speed 100M-Half
1G-Full
Speed 1G-Full
Auto
Speed Auto
Defaults
The default is Auto
Command
Interface configuration
Modes
Usage
Guidelines
Examples
router(config)# interface ethernet 1/1
router(config-if)# speed-duplex 100M-Full
Error messages
Fiber port can not be set speed-duplex!!!
This port can not be set to 1G!!!
Parameter does not be defined!!!
Cannot configure on trunk member port 1/1
This setting cannot be applied on trunk port!
Related
show interfaces ethernet
commands
flowcontrol
To set the method of data flow control between the terminals or other devices, use the flowcontrol interface
configuration command. Use the no form of this command to disable flow control
Commands
flowcontrol
no flowcontrol
Syntax
flowcontrol
Configure flowcontrol
Description
Defaults
The default is disable
Command
Interface configuration
Modes
Usage
N/A
Guidelines
Examples
router(config)# interface ethernet 1/1
router(config-if)# flowcontrol
router(config-if)# no router(config-if)# flowcontrol
4-4
CLI Command Set User's Manual
Error messages
Layer 2 Functions
Fiber port can not be set flow control!!
Force speed can not be set flow control!!
Cannot configure on trunk member port 1/1!
This setting cannot be applied on trunk port!
Related
show interfaces ethernet
commands
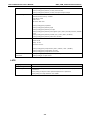
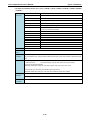
show interfaces ethernet
To check the status of the interfaces, use the show interfaces ethernet command.
Command
show interfaces ethernet [ module/port [config] ]
Commands
interfaces
Interface status and configuration
ethernet
IEEE 802.3/IEEE 802.3z
module/port
Port ID or list. Ex. 1/1,2,3,2/1-3,5,...
config
Show interface module/port settings
Defaults
Command
Privileged EXEC/ User EXEC
Modes
Usage
router# show interfaces ethernet
Guidelines
Port Link
Description
Speed
FDX Flow Ctrl MDI/MDIX
---- ------- ----------------------- --------- ------------- -------1-1 Down
100TX,RJ45.
--
--
--
1-2 Down
100TX,RJ45.
--
--
--
1-3 Down
100TX,RJ45.
--
--
--
1-4 Down
100TX,RJ45.
--
--
1-5
Up
100TX,RJ45.
--
100M-Full Off
MDI
1-6 Down
100TX,RJ45.
--
--
--
1-7 Down
100TX,RJ45.
--
--
--
1-8 Down
100TX,RJ45.
--
--
--
router# show interfaces ethernet 1/1-3 config
Port Enable Description
Speed
FDX Flow Ctrl MDI/MDIX
---- ------ ----------------------- --------- ------------- -------1-1
Yes
100FX,SC,Single,40.
100M-Full Disable
Auto
1-2
Yes
100FX,SC,Single,40.
100M-Full Disable
Auto
1-3
Yes
100TX,RJ45.
Auto
Auto
Examples
N/A
Error messages
N/A
Related
N/A
commands
4-5
Disable
CLI Command Set User's Manual
Layer 2 Functions
Port Mirror
monitor
Use monitor global configuration commands to enable the monitoring of data transmitted/received by a
specific port. Use no form of this command to disable the monitoring.
Commands
monitor source interface mod_port [direction]
no monitor source interface
monitor destination interface mod_port
no monitor destination interface
Syntax
Description
monitor
Configure Port mirror
source
Monitored port
interface
Port
destination
Mirror port
modPort
Port ID. Ex. 1/3, Trk2,...
direction
tx | rx | both
Defaults
N/A
Command
Global configuration
Modes
Usage
Traffic send/receive by a source port (Monitored port) will be mirrored to the destination port
Guidelines
(Mirror port)
Examples
router(config)# monitor source interface 3/1 both
Warning !!! Mirror Port don't set !
router(config)# monitor destination interface
<STRING:mirrorPort>
- Port ID. Ex. 1/3, 2/1,...
router(config)# monitor destination interface 3/1,2
% Invalid format
router(config)# monitor destination interface 3/1
% Monitored Port is the same with Mirror Port !!!
router(config)# monitor destination interface 3/2
router(config)# monitor source interface 1/1-2
Error
messages
Monitored Port is the same with Mirror Port !!!
Invalid parameter
Warning !!! Mirror Port don't set !
Warning !!! Monitored Port don't set !
Related
show port monitor
commands
show port monitor
Use the show port monitor EXEC command to display the setting of the port mirror.
Command
show port monitor
4-6
CLI Command Set User's Manual
Syntax
Description
Layer 2 Functions
show
Show running system information
port
Display Port configuration
monitor
Display Port mirror configuration
Defaults
N/A
Command
Privileged EXEC / User EXEC
Modes
Usage
N/A
Guidelines
Examples
router# show port monitor
Port Being Monitored
Direction
Mirror Port
---------------------------------------- ---------- --------------1-1 1-2
both
3-2
router#
Error
N/A
messages
Related
monitor
commands
Redundant Protocols
redundancy
Use the redundancy global configuration command on the switch to enter the redundancy configuration
mode.
Command
redundancy
Syntax
redundancy
Enter redundancy configuration mode
Description
Defaults
N/A
Command
Global configuration
Modes
Usage
N/A
Guidelines
Examples
router(config)# redundancy
router(config-rdnt)#
Error messages
N/A
Related
N/A
commands
redundancy mode
Use the redundancy mode global configuration command on the switch to change the redundancy protocol
mode.
Command
redundancy mode { rstp | turbo-ring-v2 }
4-7
CLI Command Set User's Manual
Syntax
Description
Layer 2 Functions
redundancy
Enter redundancy configuration mode
mode
Specify the redundancy protocol
rstp
Rapid Spanning Tree
turbo-ring-v2
Turbo ring version 2
Defaults
The default redundancy protocol mode is RSTP.
Command
Global configuration
Modes
Usage
N/A
Guidelines
Examples
router(config)# redundancy mode
rstp
- Rapid Spanning Tree
turbo-ring-v2
- Turbo ring version 2
Error messages N/A
Related
show redundancy mode
commands
RSTP
spanning-tree forward-delay
Use the spanning-tree forward-delay redundancy configuration command on the switch to set the
forward-delay time for the spanning-tree. The forwarding time specifies how long each of the listening and
learning states last before the interface begins forwarding. Use the no form of this command to return to the
default setting.
Commands
spanning-tree forward-delay seconds
no spanning-tree forward-delay
Syntax
Description
spanning-tree
Configure spanning tree
forward-delay
Configure spanning tree BPDU forward delay
seconds
Range from 4 to 30 seconds
Defaults
Forward delay = 15 secs
Command
Redundancy configuration
Modes
Usage
2*( hello-time + 1.0 sec) <= max-age <= 2*( forward-delay - 1.0 sec)
Guidelines
Examples
router(config-rdnt)# spanning-tree forward-delay
<UINT:seconds>
Error
messages
- Range from 4 to 30 seconds
The BPDU forward delay time must be in the range from 4 to 30 secs
The formula must be obeyed:
2 x (Hello Time + 1 sec) <= Max age <= 2 x (Forward Delay - 1 sec)
Related
spanning-tree hello-time
commands
spanning-tree max-age
show redundancy spanning-tree
4-8
CLI Command Set User's Manual
Layer 2 Functions
spanning-tree hello-time
Use the spanning-tree hello-time redundancy configuration command on the switch to set the interval
between hello bridge protocol data units (BPDUs) sent by root switch configuration messages. Use the no form
of this command to return to the default setting.
Commands
spanning-tree hello-time seconds
no spanning-tree hello-time
Syntax
Description
spanning-tree
Configure spanning tree
hello-time
Configure spanning tree BPDU hello time
seconds
Range from 1 to 2 seconds
Defaults
Hello time = 2 secs
Command
Redundancy configuration
Modes
Usage
2*( hello-time + 1.0 sec) <= max-age <= 2*( forward-delay - 1.0 sec)
Guidelines
Examples
router(config-rdnt)# spanning-tree hello-time
Error
BPDU hello time must be in the range from 1 to 2 secs
<UINT:seconds>
messages
- Range from 1 to 2 seconds
The formula must be obeyed:
2 x (Hello Time + 1 sec) <= Max age <= 2 x (Forward Delay - 1 sec)
Related
spanning-tree forward-delay
commands
spanning-tree max-age
show redundancy spanning-tree
spanning-tree max-age
Use the spanning-tree max-age redundancy configuration command on the switch to set the interval
between messages that the spanning tree receives from the root switch. If a switch does not receive a bridge
protocol data unit (BPDU) message from the root switch within this interval, it recomputes the spanning-tree
topology. Use the no form of this command to return to the default setting.
Commands
spanning-tree max-age seconds
no spanning-tree max-age
Syntax
Description
spanning-tree
Configure spanning tree
max-age
Configure spanning tree max age
seconds
Range from 6 to 40 seconds
Defaults
Forward delay = 20 secs
Command
Redundancy configuration
Modes
Usage
2*( hello-time + 1.0 sec) <= max-age <= 2*( forward-delay - 1.0 sec)
Guidelines
Examples
router(config-rdnt)# spanning-tree max-age
Error
The BPDU forward delay time must be in the range from 4 to 30 secs
<UINT:seconds>
messages
- Range from 6 to 40 seconds
The formula must be obeyed:
2 x (Hello Time + 1 sec) <= Max age <= 2 x (Forward Delay - 1 sec)
4-9
CLI Command Set User's Manual
Layer 2 Functions
Related
spanning-tree forward-delay
commands
spanning-tree max-age
show redundancy spanning-tree
spanning-tree priority
Use the spanning-tree priority redundancy configuration command on the switch to set the switch priority
for the spanning-tree. Use the no form of this command to return to the default setting.
Commands
spanning-tree priority priority
no spanning-tree priority
Syntax
Description
spanning-tree
Configure spanning tree
priority
Configure spanning tree bridge priority
priority
Range from 0 to 61440, and must be the multiples of 4096
Defaults
priority = 32768
Command
Redundancy configuration
Modes
Usage
0 <= priority <= 61440, and must be multiples of 4096.
Guidelines
Examples
router(config-rdnt)# spanning-tree priority
Error
The bridge priority must be in the range from 0 to 61440
<UINT:prio>
messages
Related
- Range from 0 to 61440, in steps of 4096
The bridge priority must be the multiples of 4096
show redundancy spanning-tree
commands
spanning-tree
Use the spanning-tree interface configuration command on the switch to enable the spanning-tree feature of
the specified interfaces. Use the no form of this command to disable it.
Commands
spanning-tree
no spanning-tree
Syntax
spanning-tree
Enable spanning tree
Description
Defaults
The default interface status of the spanning tree is disabled
Command
Interface configuration
Modes
Usage
N/A
Guidelines
Examples
router(config-if)# spanning-tree
Error messages Cannot configure on trunk member port 1/1!
Related
redundancy mode
commands
show redundancy spanning-tree
4-10
CLI Command Set User's Manual
Layer 2 Functions
spanning-tree cost
Use the spanning-tree cost interface configuration command on the switch to set the path cost for the
spanning-tree algorithms calculations. If a loop occurs, the spanning tree considers the path cost when
selecting an interface to put in the forwarding state. Use the no form of this command to return to the default
setting.
Commands
spanning-tree cost cost
no spanning-tree cost
Syntax
Description
spanning-tree
Enable spanning tree
cost
Configure port path cost
cost
Range from 1 to 200000000
Defaults
cost = 200000
Command
Interface configuration
Modes
Usage
1 <= Cost <= 200000000
Guidelines
Examples
router(config-if)# spanning-tree cost
Error
Cost value must be in the range 1 ~ 200000000
<UINT:cost>
messages
Related
- Range from 1 to 200000000
Cannot configure on trunk member port 1/1!
show redundancy spanning-tree
commands
spanning-tree edge-port
Use the spanning-tree edge-port interface configuration command on the switch to enable the Edge Port
feature on an interface in all its associated VLANs. When the Edge Port feature is enabled, the interface changes
directly from a blocking state to a forwarding state without making the intermediate spanning-tree state
changes. Use the no form of this command to disable the feature.
Commands
spanning-tree edge-port { auto | force }
no spanning-tree edge-port
Syntax
Description
spanning-tree
Enable spanning tree
edge-port
Configure as edge port
auto
Auto determine as edge port
force
Force the port as edge port
Defaults
port-fast = auto
Command
Interface configuration
Modes
Usage
N/A
Guidelines
Examples
router(config-if)# spanning-tree edge-port
auto
- Auto determine as edge port
force
- Force the port as edge port
4-11
CLI Command Set User's Manual
Layer 2 Functions
Error messages Cannot configure on trunk member port 1/1!
Related
show redundancy spanning-tree
commands
spanning-tree priority
Use the spanning-tree priority interface configuration command on the switch to set the interfaces priority
for the spanning-tree. Use the no form of this command to return to the default setting.
Commands
spanning-tree priority priority
no spanning-tree priority
Syntax
Description
spanning-tree
Enable spanning tree
priority
Configure port priority
priority
Range from 0 to 240, in steps of 16
Defaults
priority = 128
Command
interface configuration
Modes
Usage
0 <= priority <= 240, and must be multiples of 16.
Guidelines
Examples
router(config-rdnt)# spanning-tree priority
<UINT:prio>
Error
messages
Related
- Range from 0 to 61440, in steps of 4096
The bridge priority must be in the range from 0 to 240
The bridge priority must be multiples of 16
show redundancy spanning-tree
commands
show redundancy spanning-tree
Use the show redundancy spanning-tree user EXEC command to display the spanning-tree state
information
Command
show redundancy spanning-tree
Syntax
redundancy
Display redundancy protocol status
Description
spanning-tree
Display spanning tree settings
Defaults
N/A
Command
Privileged EXEC/ User EXEC
Modes
Usage
N/A
Guidelines
Examples
router# show redundant spanning-tree
Spanning tree status : Enabled
Role
Bridge priority
Hello time
: Root
: 32768
: 2 sec
Forwarding delay : 30 sec
Max age time
: 20 sec
4-12
CLI Command Set User's Manual
Layer 2 Functions
Int# Enable Edge Port
Prio
Cost
Status
---- -------- --------- -------- -------- ---------------
Error
1/1 Disabled
Auto
128
200000
---
1/2 Disabled
Auto
128
200000
---
1/3 Disabled
Auto
128
200000
---
1/4 Disabled
Auto
128
200000
---
1/5 Disabled
Auto
128
200000
---
1/6 Disabled
Auto
128
200000
---
N/A
messages
Related
spanning-tree forward-delay
commands
spanning-tree hello-time
spanning-tree max-age
spanning-tree priority
spanning-tree
spanning-tree cost
spanning-tree edge-port
spanning-tree priority
show redundancy spanning-tree
Turbo Ring V2
turbo-ring-v2
Use the turbo-ring-v2 redundancy configuration command on the switch to configure the Turbo Ring v2 with
the specified Ring ports. Use the no form of this command to disable the specified ring.
Commands
turbo-ring-v2 ring-id primary interface primary-port secondary interface secondary-port
no turbo-ring-v2 ring-id
Syntax
Description
turbo-ring-v2
Configure turbo ring v2
ring-id
Turbo ring v2 ring id
primary
Turbo ring v2 ring ports setting
interface
Turbo ring v2 ring ports setting
primary-port
Port ID. Ex. 1/3, 2/1,...
secondary
Turbo ring v2 ring ports setting
interface
Turbo ring v2 ring ports setting
secondary-port
Port ID. Ex. 1/3, 2/1,...
Defaults
Command
Redundancy configuration
Modes
Usage
At least enable one turbo-ring domain or coupling. But cannot enable two turbo-ring domains
Guidelines
and coupling in the same time.
Examples
router(config-rdnt)# turbo-ring-v2 1 primary interface 2/1 secondary interface 2/2
<STRING:pri_port>
<STRING:sec_port>
Error
messages
- Port ID. Ex. 1/3, Trk2,...
- Port ID. Ex. 1/3, Trk2,...
Turbo ring v2 only supports maximum 2 ring domains
Interface 2-1 not exist
4-13
CLI Command Set User's Manual
Layer 2 Functions
Ring1: One port couldn't be set as 1st and 2nd redundant port simultaneously!!!
Ring2: One port couldn't be set as Ring1 redundant port simultaneously!!!
Coupling: One port couldn't be set as 1st and 2nd redundant port simultaneously!!!
Primary port couldn't be set as Ring2 redundant port simultaneously!!!
Backup port couldn't be set as Ring2 redundant port simultaneously!!!
Coupling port couldn't be set as Ring2 redundant port simultaneously!!!
Please select at least one Ring!!!
Ring1, ring2, coupling couldn't be enabled simultaneously!!!
Please enable one Ring in "Ring Coupling" mode!!!
Related
show turbo-ring-v2
commands
turbo-ring-v2 coupling backup
Use the turbo-ring-v2 coupling redundancy configuration command on the switch to configure the backup
port of Ring coupling for Turbo Ring v2. Use the no form of this command to disable the coupling.
Commands
turbo-ring-v2 coupling backup interface backup-port
no turbo-ring-v2 coupling
Syntax
Description
turbo-ring-v2
Configure turbo ring v2
coupling
Configure ring coupling
backup
Configure ring coupling mode
interface
Turbo ring v2 coupling ports setting
backup-port
Port ID. Ex. 1/3, 2/1,...
Defaults
Command
Redundancy configuration
Modes
Usage
At least enable one turbo-ring domain or coupling. But cannot enable two turbo-ring domains
Guidelines
and coupling in the same time.
Examples
router(config-rdnt)# turbo-ring-v2 coupling backup interface 2/1
Error
Turbo ring v2 only supports maximum 2 ring domains
<STRING:pri_port>
messages
- Port ID. Ex. 1/3, Trk2,...
Ring1: One port couldn't be set as 1st and 2nd redundant port simultaneously!!!
Ring2: One port couldn't be set as Ring1 redundant port simultaneously!!!
Coupling: One port couldn't be set as 1st and 2nd redundant port simultaneously!!!
Primary port couldn't be set as Ring2 redundant port simultaneously!!!
Backup port couldn't be set as Ring2 redundant port simultaneously!!!
Coupling port couldn't be set as Ring2 redundant port simultaneously!!!
Please select at least one Ring!!!
Ring1, ring2, coupling couldn't be enabled simultaneously!!!
Please enable one Ring in "Ring Coupling" mode!!!
4-14
CLI Command Set User's Manual
Related
Layer 2 Functions
show turbo-ring-v2
commands
turbo-ring-v2 coupling dual-homing
Use the turbo-ring-v2 coupling dual-homing redundancy configuration command on the switch to enable
the dual homing feature of Ring coupling for the Turbo Ring v2. Use the no form of this command to disable it.
Commands
turbo-ring-v2 coupling dual-homing primary interface primary-port backup interface secondary-port
no turbo-ring-v2 coupling
Syntax
Description
turbo-ring-v2
Configure turbo ring v2
coupling
Configure ring coupling
dual-homing
Configure dual homing mode
primary
Turbo ring v2 ring ports setting
interface
Turbo ring v2 ring ports setting
primary-port
Port ID. Ex. 1/3, 2/1,...
backup
Turbo ring v2 ring ports setting
interface
Turbo ring v2 ring ports setting
secondary-port
Port ID. Ex. 1/3, 2/1,...
Defaults
Command
Redundancy configuration
Modes
Usage
At least enable one turbo-ring domain or coupling. But cannot enable two turbo-ring domains
Guidelines
and coupling in the same time.
Examples
router(config-rdnt)# turbo-ring-v2 coupling dual-homing
primary interface 2/1 secondary
interface 2/2
<STRING:pri_port>
<STRING:sec_port>
Error
messages
- Port ID. Ex. 1/3, Trk2,...
- Port ID. Ex. 1/3, Trk2,...
Turbo ring v2 only supports maximum 2 ring domains
Ring1: One port couldn't be set as 1st and 2nd redundant port simultaneously!!!
Ring2: One port couldn't be set as Ring1 redundant port simultaneously!!!
Coupling: One port couldn't be set as 1st and 2nd redundant port simultaneously!!!
Primary port couldn't be set as Ring2 redundant port simultaneously!!!
Backup port couldn't be set as Ring2 redundant port simultaneously!!!
Coupling port couldn't be set as Ring2 redundant port simultaneously!!!
Please select at least one Ring!!!
Ring1, ring2, coupling couldn't be enabled simultaneously!!!
Please enable one Ring in "Ring Coupling" mode!!!
Related
show turbo-ring-v2
commands
4-15
CLI Command Set User's Manual
Layer 2 Functions
turbo-ring-v2 coupling primary
Use the turbo-ring-v2 coupling primary redundancy configuration command on the switch to configure the
primary port of Ring coupling for Turbo Ring v2. Use the no form of this command to return to the default
setting.
Commands
turbo-ring-v2 coupling primary interface primary-port
no turbo-ring-v2 coupling
Syntax
Description
turbo-ring-v2
Configure turbo ring v2
coupling
Configure ring coupling
primary
Configure ring coupling mode
interface
Turbo ring v2 coupling ports setting
primary-port
Port ID. Ex. 1/3, 2/1,...
Defaults
Command
Redundancy configuration
Modes
Usage
At least enable one turbo-ring domain or coupling. But cannot enable two turbo-ring domains
Guidelines
and coupling in the same time.
Examples
router(config-rdnt)# turbo-ring-v2 coupling primary interface 2/1
Error
Turbo ring v2 only supports maximum 2 ring domains
<STRING:pri_port>
messages
- Port ID. Ex. 1/3, Trk2,...
Ring1: One port couldn't be set as 1st and 2nd redundant port simultaneously !!!
Ring2: One port couldn't be set as Ring1 redundant port simultaneously !!!
Coupling: One port couldn't be set as 1st and 2nd redundant port simultaneously !!!
Primary port couldn't be set as Ring2 redundant port simultaneously !!!
Backup port couldn't be set as Ring2 redundant port simultaneously !!!
Coupling port couldn't be set as Ring2 redundant port simultaneously !!!
Please select at least one Ring!!!
Ring1, ring2, coupling couldn't be enabled simultaneously!!!
Please enable one Ring in "Ring Coupling" mode!!!
Related
show turbo-ring-v2
commands
turbo-ring-v2 master
Use the turbo-ring-v2 master redundancy configuration command on the switch to configure the switch as
the Ring Master of specified ring for Turbo Ring v2. Use the no form of this command to configure the switch
as the normal member of specified ring for Turbo Ring v2.
Commands
turbo-ring-v2 ring-id master
no turbo-ring-v2 ring-id master
Syntax
Description
turbo-ring-v2
Configure turbo ring v2
ring-id
Turbo ring v2 ring id
master
Set turbo ring v2 ring id as master
4-16
CLI Command Set User's Manual
Layer 2 Functions
Defaults
Command
Redundancy configuration
Modes
Usage
Guidelines
Examples
router(config-rdnt)# turbo-ring-v2 1 master
master
Error
- Set turbo ring v2 ring id as master
Turbo ring v2 only supports maximum 2 ring domains
messages
Related
show turbo-ring-v2
commands
show redundancy turbo-ring-v2
Use the show spanning-tree turbo-ring-v2 user EXEC command to display Turbo Ring v2 configuration and
state information.
Command
show redundancy turbo-ring-v2
Syntax
Description
show
Show running system information
redundancy
Display redundancy protocol status
turbo-ring-v2
Display turbo ring v2 status
Defaults
N/A
Command
Privileged EXEC
Modes
Usage
N/A
Guidelines
Examples
router# show redundancy turbo-ring-v2
Turbo Ring V2 settings:
Ring 1: Enabled
Set as master: Disabled
1st port:
4-3
2nd port:
4-4
Ring 2: Disabled
Set as master: Disabled
1st port:
4-1
2nd port:
4-2
Ring Coupling: Disabled
Primary Port:4-1
Backup Port:4-2
Turbo Ring V2 status:
Ring 1:
Status:--Master/Slave:--1st Ring Port Status:--2nd Ring Port Status:--Ring 2:
Status:--Master/Slave:--1st Ring Port Status:---
4-17
CLI Command Set User's Manual
Layer 2 Functions
2nd Ring Port Status:---
Coupling:
Mode:--Coupling Port Status: --Error
N/A
messages
Related
turbo-ring-v2
commands
Virtual LAN
switchport access vlan
Use the switchport access vlan interface configuration command on the switch to configure the port as a
static-access or dynamic-access port. If the switchport mode is set to access, the port operates as a member
of the specified VLAN. If set to dynamic, the port starts discovery of VLAN assignment based on the incoming
packets it receives. Use the no form of this command to reset the access mode to the default VLAN for the
switch.
Commands
switchport access vlan vlan-id
no switchport access vlan
Syntax
Description
switchport
Set switching mode characteristics
access
Set access mode characteristics of the interface
vlan
Set (default) pvid in access mode
vlan-id
1 ~ 4094
Defaults
vlan-id = 1
Command
Interface configuration
Modes
Usage
You can only use this command mode for configuring normal-range VLANs, that is, VLAN IDs 1
Guidelines
to 4094.
Examples
router(config-if)# switchport access vlan 2
Error
vlan 4097 is invalid!! should be range from 1 to 4094
<UINT:vlanid>
- 1 ~ 4094
messages
Related
show vlan
commands
show vlan config
switchport hybrid fixed vlan add
Use the switchport hybrid fixed vlan add interface configuration command on the switch to add the trunk
hybrid characteristics when the interface is in the hybrid mode. Use the no form of this command to reset to the
default.
Commands
switchport hybrid fixed vlan add vlan-id-list tag
switchport hybrid fixed vlan add vlan-id-list untag
no switchport hybrid fixed vlan tag
4-18
CLI Command Set User's Manual
Layer 2 Functions
no switchport hybrid fixed vlan untag
Syntax
Description
switchport
Set switching mode characteristics
hybrid
Set hybrid mode characteristics of the interface
fixed
Set fixed VLAN characteristics
vlan
1 ~ 4094
add
Add VLANs to the current list
vlan-id-list
VLAN IDs of the VLANs
untag
Configure egress traffic as VLAN untagged traffic
tag
Configure egress traffic as VLAN tagged traffic
Defaults
Command
Interface configuration
Modes
Usage
You can only use this command mode for configuring normal-range VLANs, that is, VLAN IDs 1
Guidelines
to 4094.
Examples
router(config-if)# switchport hybrid fixed vlan add 1,3-5,7 tag
<STRING:vlanids>
Error
messages
- VLAN IDs of the VLANs
vlan 4097 is invalid!! should be range from 1 to 4094
vlan interfaces are full, total vlan interface is 64 !!
Related
show vlan
commands
show vlan config
switchport trunk hybrid vlan remove
switchport hybrid native vlan
Use the switchport hybrid native vlan interface configuration command on the switch to configure the PVID
of a port. Use the no form of this command to return to the default PVID.
Commands
switchport hybrid native vlan vlan-id
no switchport hybrid native vlan
Syntax
Description
switchport
Set switching mode characteristics
hybrid
Set hybrid mode characteristics of the interface
native
Set trunking native characteristics
vlan
Set pvid vlanid in hybrid mode
vlan-id
1 ~ 4094
Defaults
vlan-id = 1
Command
Interface configuration
Modes
Usage
You can only use this command mode for configuring normal-range VLANs, that is, VLAN IDs 1
Guidelines
to 4094.
Examples
router(config-if)# switchport hybrid native vlan 2
<UINT:vlanid>
Error
- 1 ~ 4094
vlan 4097 is invalid!! should be range from 1 to 4094
messages
Related
show vlan
commands
show vlan config
4-19
CLI Command Set User's Manual
Layer 2 Functions
switchport trunk fixed vlan add
Use the switchport trunk fixed vlan add interface configuration command on the switch to add the trunk
characteristics when the interface is in the trunking mode. Use the no form of this command to reset a trunking
characteristic to the default value.
Commands
switchport trunk fixed vlan add vlan-id-list
no switchport trunk fixed vlan
Syntax
Description
switchport
Set switching mode characteristics
trunk
Set trunking mode characteristics of the interface
fixed
Set fixed VLAN characteristics
vlan
1 ~ 4094
add
Add VLANs to the current list
vlan-id-list
VLAN IDs of the VLANs
Defaults
Command
Interface configuration
Modes
Usage
You can only use this command mode for configuring normal-range VLANs, that is, VLAN IDs 1
Guidelines
to 4094.
Examples
router(config-if)# switchport trunk fixed vlan add 1,3-5,7
<STRING:vlanids>
Error
messages
- VLAN IDs of the VLANs
vlan 4097 is invalid!! should be range from 1 to 4094
vlan interfaces are full, total vlan interface is 64 !!
Related
show vlan
commands
show vlan config
switchport trunk fixed vlan remove
switchport trunk fixed vlan remove
Use the switchport trunk fixed vlan add configuration command on the switch stack to remove the trunk
characteristics when the interface is in the trunking mode. Use the no form of this command to reset a trunking
characteristic to the default value.
Commands
switchport trunk fixed vlan remove vlan-id-list
no switchport trunk fixed vlan
Syntax
Description
switchport
Set switching mode characteristics
trunk
Set trunking mode characteristics of the interface
fixed
Set fixed VLAN characteristics
vlan
1 ~ 4094
remove
Remove VLANs from the current list
vlan-id-list
VLAN IDs of the VLANs
Defaults
Command
Interface configuration
Modes
Usage
You can only use this command mode for configuring normal-range VLANs, that is, VLAN IDs 1
Guidelines
to 4094.
Examples
router(config-if)# switchport trunk fixed vlan remove 1,3-5,7
4-20
CLI Command Set User's Manual
Layer 2 Functions
<STRING:vlanids>
Error
messages
- VLAN IDs of the VLANs
vlan 4097 is invalid!! should be range from 1 to 4094
vlan interfaces are full, total vlan interface is 64 !!
Related
show vlan
commands
show vlan config
switchport trunk fixed vlan add
switchport trunk native vlan
Use the switchport trunk native vlan interface configuration command on the switch to configure the PVID
of a port as a trunking port. Use the no form of this command to return to the default value.
Commands
switchport trunk native vlan vlan-id
no switchport trunk native vlan
Syntax
Description
switchport
Set switching mode characteristics
trunk
Set trunking mode characteristics of the interface
native
Set trunking native characteristics
vlan
Set pvid vlanid in trunk mode
vlan-id
1 ~ 4094
Defaults
vlan-id = 1
Command
Interface configuration
Modes
Usage
You can only use this command mode for configuring normal-range VLANs, that is, VLAN IDs 1
Guidelines
to 4094.
Examples
router(config-if)# switchport trunk native vlan 2
<UINT:vlanid>
Error
- 1 ~ 4094
vlan 4097 is invalid!! should be range from 1 to 4094
messages
Related
show vlan
commands
show vlan config
show vlan
Use the show vlan user EXEC command to display VLAN status information.
Command
show vlan
Syntax
Description
show
Show running system information
vlan
Display VLAN status
Defaults
Command
Privileged EXEC
Modes
Usage
Guidelines
Examples
router# show vlan
vlan mode: 802.1Q vlan
mgmt vlan: 1
4-21
CLI Command Set User's Manual
Layer 2 Functions
VLAN 1:
Access Ports: 1-1, 1-2, 1-3, 1-4, 1-5, 1-6, 1-7, 1-8,
Trunk Ports:
Hybrid Ports:
Error messages N/A
Related
N/A
commands
show vlan config
Use the show vlan user EXEC command to display VLAN configuration information.
Command
show vlan config
Syntax
Description
show
Show running system information
vlan
Display VLAN status
config
Display VLAN configuration
Defaults
N/A
Command
Privileged EXEC
Modes
Usage
N/A
Guidelines
Examples
vlan mode: 802.1Q vlan
VLAN
----1
Ports(Type)
------------------------------1-1(A), 1-2(A), 1-3(A), 1-4(A), 1-5(A), 1-6(A), 1-7(A), 1-8(A),
Port
Trunk Native vlan
Port
Fixed VLAN (Tagged)
Port
Forbidden VLAN
Port
Fixed VLAN (Untagged)
Current VLAN interface vid:
1, 2,
Error messages N/A
Related
interface vlan
commands
Multicast
ip igmp static-group
Use the ip igmp static-group global configuration command on the switch to add a static multicast MAC
address and its member ports. Use the no form of this command to remove the static multicast group or its
member ports.
Commands
ip igmp static-group MAC-address interface module/port
no ip igmp static-group [MAC-address] [ interface module/port]
4-22
CLI Command Set User's Manual
Syntax
Description
Layer 2 Functions
Ip
Global IP configuration subcommands
Igmp
IGMP
static-group
Add New Static Multicast MAC Address
Mac-address
MAC address XX:XX:XX:XX:XX:XX
Interface
Binding ports
Module/port
Port (Trunk) ID or list. Ex. 1/1,2,4-5,2/1,Trk1,Trk2-Trk
Defaults
N/A
Command
Global configuration
Modes
Usage
N/A
Guidelines
Examples
router(config)# ip igmp static-group 01:00:00:00:00:01 interface 1/2-3
router(config)# no ip igmp static-group
Error messages Add new static multicast MAC address Fail!!!
Please check the multicast mac address's type!!!
Add new static multicast MAC address Fail!!!
Not enough space to add a new static multicast MAC address!!!
The member port should not be GMRP-enabled port!!!
Related
show mac-address-table mcast
commands
ip igmp-snooping
Use the ip igmp-snooping global configuration command on the switch to globally enable Internet Group
Management Protocol (IGMP) snooping on the switch. Use the command with keywords to enable IGMP
snooping. Use the no form of this command to disable IGMP snooping.
Commands
ip igmp-snooping
no ip igmp-snooping
Syntax
Description
ip
Global IP configuration subcommands
igmp-snooping
IGMP snooping
Defaults
IGMP snooping is globally disabled.
Command
Global configuration
Modes
Usage
N/A
Guidelines
Examples
router(config)# ip igmp-snooping
router(config)# no ip igmp-snooping
Error messages
IGMP Function is only supported by 802.1Q VLAN mode!
Related
ip igmp-snooping vlan
commands
ip igmp-snooping querier
ip igmp-snooping query-interval
ip igmp-snooping enhanced
show ip igmp
4-23
CLI Command Set User's Manual
Layer 2 Functions
ip igmp-snooping querier vlan
Use the ip igmp-snooping querier global configuration command to enable and configure the IGMP querier
feature on a VLAN interface. Use the no form of this command to disable the IGMP querier feature.
Commands
ip igmp-snooping querier vlan vlan-id
no ip igmp-snooping querier vlan vlan-id
Syntax
Description
ip
Global IP configuration subcommands
igmp-snooping
IGMP snooping
querier
IGMP snooping query enable
vlan
VLAN parameters
vlan-id
1 ~ 4094
Defaults
The IGMP snooping querier feature is globally disabled on the switch
Command
Global configuration
Modes
Usage
The IGMP snooping function must be enabled first.
Guidelines
Examples
router(config)# ip igmp-snooping querier vlan 1
router(config)# no ip igmp-snooping querier vlan 1
Error messages
Vlan entry not found!!!
Vlan IGMP Function is Disabled!!!
IGMP Function is Disabled!!!
IGMP Function is only supported by 802.1Q VLAN mode!
Related
ip igmp-snooping
commands
ip igmp-snooping vlan
ip igmp-snooping query-interval
ip igmp-snooping enhanced
show ip igmp
ip igmp-snooping querier vlan vlan-id v3
Use the ip igmp-snooping querier global configuration command to enable and configure the IGMP querier
feature on a VLAN interface. Use ip igmp-snooping querier vlan vlan-id v3 can make the switch to send
IGMP V3 query, otherwise the default is V2 query.
Command
ip igmp-snooping querier vlan vlan-id v3
Syntax
Description
ip
Global IP configuration subcommands
igmp-snooping
IGMP snooping
querier
IGMP snooping qeury enable
vlan
VLAN parameters
vlan-id
1 ~ 4094
v3
IGMPv3 mode
Defaults
The IGMP snooping querier feature is globally disabled on the switch
Command Modes
Global configuration
Usage Guidelines
The IGMP snooping function must be enabled first.
Examples
router(config)# ip igmp-snooping querier vlan 1 v3
4-24
CLI Command Set User's Manual
Error messages
Layer 2 Functions
Vlan entry not found!!!
Vlan IGMP Function is Disabled !!!
IGMP Function is Disabled !!!
IGMP Function is only supported by 802.1Q VLAN mode!
Related
ip igmp-snooping
commands
ip igmp-snooping vlan
ip igmp-snooping query-interval
ip igmp-snooping query-interval
Use the ip igmp-snooping query-interval global configuration command on the switch to configure the
interval between IGMP queries. Use the no form of this command to return to the default.
Command
ip igmp-snooping query-interval interval
Syntax
Description
ip
Global IP configuration subcommands
igmp-snooping
IGMP snooping
query-interval
IGMP snooping query interval
interval
20 ~ 600 seconds
Defaults
Query interval default value is 125 seconds
Command
Global configuration
Modes
Usage
The IGMP snooping function must be enabled first.
Guidelines
Examples
router(config)# ip igmp-snooping query-interval 125
Error messages
The range of Quierier interval value should be between 20 and 600 !!!
IGMP Function is Disabled !!!
IGMP Function is only supported by 802.1Q VLAN mode!
Related
ip igmp-snooping
commands
ip igmp-snooping vlan
ip igmp-snooping querier
ip igmp-snooping enhanced
show ip igmp
ip igmp-snooping vlan
Use the ip igmp-snooping vlan global configuration command on the switch to globally enable Internet
Group Management Protocol (IGMP) snooping on a VLAN. Use the no form of this command to disable IGMP
snooping on a VLAN.
Commands
ip igmp-snooping vlan vlan-id [mrouter module/port]
no ip igmp-snooping vlan vlan-id [mrouter module/port]
Syntax
Description
ip
Global IP configuration subcommands
igmp-snooping
IGMP snooping
vlan
VLAN parameters
vlan-id
1 ~ 4094
mrouter
IGMP snooping query port enable
Module/port
Port(Trunk) ID or list. Ex. 1/1,2,4-5,2/1,Trk1,Trk2-Trk4
4-25
CLI Command Set User's Manual
Defaults
N/A
Command
Global configuration
Layer 2 Functions
Modes
Usage
The IGMP snooping must be enabled first.
Guidelines
Examples
router(config)# ip igmp-snooping vlan 1 mrouter 1/1
router(config)# no ip igmp-snooping vlan 1 mrouter 1/1
Error messages Vlan entry not found!!!
IGMP Function is Disabled !!!
IGMP Function is only supported by 802.1Q VLAN mode!
Related
ip igmp-snooping
commands
ip igmp-snooping querier
ip igmp-snooping query-interval
ip igmp-snooping enhanced
show ip igmp config
show ip igmp config
Use the show ip igmp user EXEC command to display the Internet Group Management Protocol (IGMP)
snooping configuration and the IGMP table of the switch.
Command
show ip igmp
Commands
ip
Display IP information
igmp
Show IGMP snooping settings
Defaults
N/A
Command
Privileged EXEC/ User EXEC
Modes
Usage
router# show ip igmp config
Guidelines
IGMP Snooping
:Enable
IGMP Snooping Enhanced Mode :Enable
Query Interval
VID |Static(S) / Learned(L)
:125(sec)
|
Active IGMP Groups
|Multicast Querier Port & |IP
|MAC
|Querier(Q) connected Port|
|
|Members Port
|
---------------------------------------------------------------------------1
Examples
N/A
Error
N/A
1-1(S)
224.1.1.8
messages
Related
ip igmp-snooping
commands
4-26
01-00-5E-01-01-08
1-1
239.255.255.250 01-00-5E-7F-FF-FA
1-1
CLI Command Set User's Manual
Layer 2 Functions
QoS and Rate Control
qos highest-priority
Use the qos highest-priority interface configuration command on the switch to set the Port Priority of the
ingress frames to “High” queues of the Ethernet ports/Trunks. Use no form of this command to return to the
default value.
Commands
qos highest-priority
no qos highest-priority
Syntax
Description
qos
Configure QoS
highest-priority
Enable port highest priority queue
Defaults
Command
Interface configuration
Modes
Usage
N/A
Guidelines
Examples
router(config-if)# qos highest-priority
Error
Cannot configure on trunk member port 1/1!
messages
Related
show qos
commands
qos default-cos
Use the qos default-cos interface configuration command on the switch to configure the default CoS priority
of the Ethernet ports/Trunks. Use no form of this command to return to the default value.
Commands
qos default-cos
cos-value
no qos default-cos
Syntax
Description
qos
Configure QoS
default-cos
Configure Default CoS of each port
cos-value
CoS value (0~7)
Defaults
Default CoS value is 3
Command
Interface configuration
Modes
Usage
N/A
Guidelines
Examples
router(config-if)# qos default-cos
<UINT:cos>
- CoS value (0~7)
4-27
CLI Command Set User's Manual
Error
Layer 2 Functions
Cannot configure on trunk member port 1/1!
messages
Related
show qos
commands
qos inspect
Use the qos inspect global/interface configuration command on the switch to enable the inspect criteria. Use
no form of this command to disable it.
Commands
qos inspect dscp module_id
no qos inspect dscp module_id
qos inspect cos
no qos inspect cos
Syntax
Description
qos
Configure QoS
Inspect
Configure inspection criteria
dscp
Enable DSCP inspection
module_id
Module ID from 1 to 4
cos
Enable CoS inpsection of each port
Defaults
N/A
Command
Global configuration
Modes
Interface configuration
Usage
In product with 88E6095, the “qos inspect dscp” command is configured in interface
Guidelines
configuration mode.
In product with BCM5650, the “qos inspect dscp” command is configured in global configuration
mode with module index.
Examples
router(config)# qos inspect
dscp
- Enable DSCP inspection
router(config-if)# qos inspect
cos
Error
- Enable CoS inpsection of each port
Cannot configure on trunk member port 1/1!
messages
Related
show qos
commands
qos mapping
Use the qos mapping global configuration command on the switch to configure the CoS and DSCP mappings.
Use no form of this command to return to the default value.
Commands
qos mapping cos-to-queue cos-value queue
no qos mapping cos-to-queue
qos mapping dscp-to-cos dscp-value cos-value
no qos mapping dscp-to-cos
qos mapping dscp-to-queue dscp-value queue
4-28
CLI Command Set User's Manual
Layer 2 Functions
no qos mapping dscp-to-queue
Syntax
Description
Defaults
qos
Configure QoS
mapping
Configure QoS mapping
cos-to-queue
CoS to traffic queue
cos-value
CoS value (0~7)
queue
Traffic queue
dscp-to-cos
DSCP to CoS mapping
dscp-value
DSCP value (0~63)
dscp-to-queue
DSCP to traffic queue
Cos (queue) : 0 (0), 1(0), 2(1), 3(1), 4(2), 5(2), 6(3), 7(3)
DSCP(Cos) : 0-7(0), 8-15(1), 16-23(2), 24-31(3), 32-39(4), 40-47(5), 48-55(6), 56-63(7)
Command
Global configuration
Modes
Usage
N/A
Guidelines
Examples
router(config)# qos mapping cos-to-queue 7
<UINT:queue>
- Traffic queue
router(config)# qos mapping cos-to-queue 7 3
router(config)# qos mapping dscp-to-cos 23
<UINT:cos>
- CoS value (0~7)
router(config)# qos mapping dscp-to-cos 23 7
Error
Invalid parameter. CoS value must be 0~7 and queue number must be 0~3
messages
Invalid parameter. CoS value must be 0~7 and DSCP value must be 0~63
Related
show qos
commands
qos mode
Use the qos mode global configuration command on the switch to configure the current QoS strategy. Use no
form of this command to return to the default.
Commands
qos mode { weighted-fair | strict }
no qos mode
Syntax
Description
qos
Configure QoS
mode
Configure queuing mechanism
weighted-fair
Weighted fair queuing
strict
Strict queuing
Defaults
Default QoS strategy is Weighted-fair queuing.
Command
Global configuration
Modes
Usage
N/A
Guidelines
Examples
router(config)# qos mode
weighted-fair
strict
- Weighted fair queuing
- Strict queuing
4-29
CLI Command Set User's Manual
Error
Layer 2 Functions
N/A
messages
Related
show qos
commands
show qos
Use the show qos user EXEC command to display QoS related settings.
Command
show qos [ cos-to-queue | dscp-to-cos | dscp-to-queue ]
Syntax
Description
qos
Display QoS configuration
cos-to-queue
CoS to traffic queue mappings
dscp-to-cos
DSCP to CoS mappings
dscp-to-queue
DSCP to traffic queue mappings
Defaults
N/A
Command
Privileged
Modes
Usage
N/A
Guidelines
Examples
router# show qos
Queuing Mechanism
: Weighted Fair (1:2:4:8)
Tos Inspection
Module 1
: Disabled
Module 3
: Disabled
Int# CoS Inspection CoS
---- -------------- --1/3
Enabled
3
1/4
Enabled
3
1/5
Enabled
3
1/6
Enabled
3
3/1
Enabled
3
3/2
Enabled
3
3/3
Enabled
3
3/4
Enabled
3
3/5
Enabled
3
3/6
Enabled
3
3/7
Enabled
3
3/8
Enabled
3
Trk1
Enabled
3
router# show qos cos-to-queue
CoS Queue #
--- ------0 Q0
1 Q0
2 Q1
3 Q1
4 Q2
4-30
CLI Command Set User's Manual
Layer 2 Functions
5 Q2
6 Q3
7 Q3
router# show qos dscp-to-cos
DSCP Cos DSCP Cos DSCP Cos DSCP Cos
---- --- ---- --- ---- --- ---- ---
Error
0
0
1
0
2
0
3
0
4
0
5
8
1
9
0
6
1
10
0
7
0
1
11
12
1
13
1
1
14
1
15
1
16
20
2
17
2
21
2
18
2
19
2
2
22
2
23
24
3
2
25
3
26
3
27
28
3
3
29
3
30
3
31
3
32
4
33
4
34
4
35
4
36
4
37
4
38
4
39
4
40
5
41
5
42
5
43
5
44
5
45
5
46
5
47
5
48
6
49
6
50
6
51
6
52
6
53
6
54
6
55
6
56
7
57
7
58
7
59
7
60
7
61
7
62
7
63
7
N/A
messages
Related
qos mode
commands
qos inspect
qos mapping
qos default-cos
rate-limit
Use the rate-limit interface configuration command on the switch to configure the traffic rate allowed for the
specified port. Use no form of this command to return to the default value. For Marvell 88E6095 chipsets, use
“rate-limit ingress rate” to set the ingress rate limiting; for Broadcom chipsets, use “rate-limit ingress
percentage” to set the ingress rate limiting.
Commands
rate-limit { ingress | egress } percentage percentage
no rate-limit { ingress | egress }
rate-limit ingress rate { none | 128k | 256k | 512k | 1M | 2M | 4M | 8M }
rate-limit ingress mode { bcast | bcast-mcast | bcast-mcast-dlf | all }
rate-limit mode {normal | port-disable}
rate-limit normal { ingress | egress } percentage percentage
no rate-limit normal { ingress | egress }
rate-limit normal ingress rate { none | 128k | 256k | 512k | 1M | 2M | 4M | 8M }
rate-limit normal ingress mode { bcast | bcast-mcast | bcast-mcast-dlf | all }
rate-limit port-disable period period
4-31
CLI Command Set User's Manual
Layer 2 Functions
rate-limit port-disable ingress rate { none | 44640 | 74410 | 148810 | 223220 | 372030 | 520840
| 744050 }
Syntax
Description
rate-limit
Rate limiting
normal
Rate limiting normal mode
port-disable
Rate limiting port-disable mode
ingress
Ingress rate limiting
egress
Egress rate limiting
percentage
Percentage correspond to current port speed
percentage
Limit percentage, and will take effect at the percentage
0/3/5/10/15/25/35/50/65/85
rate
Specify the rate
mode
Specify the mode
bcast
Limit broadcast frames
bcast-mcast
Limit broadcast and multicast frames
bcast-mcast-dlf
Limit broadcast, multicast and DLF frames
all
All traffic
period
Port disable period
period
Seconds
Defaults
0 or none means unlimiting.
Command
Interface configuration
Modes
Usage
The percentage will only take effect at the 0/3/5/10/15/25/35/50/65/85 %.
Guidelines
For port disable mode, the port will be disabled when the ingress rate reach the specified packet
rate.
Examples
router(config-if)# rate-limit percentage
<UINT:percent>
- Limit percentage, and will take effect at the percentage
0/3/5/10/15/25/35/50/65/85
EDS-408A-1M2S-SC(config-if)# rate-limit ingress rate none none none none
router(config-if)# rate-limit port-disable ingress period 30
EDS-408A-1M2S-SC(config-if)# rate-limit port-disable ingress rate 148810
Error
messages
Related
Cannot configure on trunk member port 1/1!
This setting cannot be applied on trunk port!
show interfaces rate-limit
commands
4-32
CLI Command Set User's Manual
Layer 2 Functions
MAC Address Table
show mac-address-table
Use the show mac-address-table user EXEC command to display the MAC addresses in the MAC address
table.
Commands
show mac-address-table [static | learned | mcast]
show mac-address-table [interface{ ethernet module/port | trunk trunk-id } ]
Syntax
Description
mac-address-table
Display MAC address forwarding table
static
Retrieve static MAC addresses
learned
Retrieve learned MAC addresses
mcast
Retrieve Multicast address
interface
Retrieve MAC address by interface
ethernet
Ethernet Port interface
module/port
Port ID. Ex. 1/3, 2/1,...
trunk
Trunk interface
trunk-id
Trunk ID. From 1 to 4
Defaults
N/A
Command
Privileged EXEC/ User EXEC
Modes
Usage
N/A
Guidelines
Examples
router# show mac-address-table
Line Swap Fast Recovery : Enabled
MAC
Type
VLAN
Port
----------------- -------- ---- --------------------------------------------00-40-F4-8D-0D-F7 ucast(l)
1 1/5
router# show mac-address-table learned
MAC
Type
VLAN
Port
----------------- -------- ---- --------------------------------------------00-40-F4-8D-0D-F7 ucast(l)
Error
1 1/5
N/A
messages
Related
N/A
commands
show mac-address-table aging-time
Use the show mac-address-table aging-time user EXEC command to display the aging time setting of the
MAC address table.
Command
show mac-address-table aging-time
Syntax
mac-address-table
Display MAC address forwarding table
4-33
CLI Command Set User's Manual
Layer 2 Functions
Description
aging-time
MAC entry aging time
Defaults
N/A
Command
Privileged EXEC/ User EXEC
Modes
Usage
N/A
Guidelines
Examples
router# show mac-address-table
aging-time
- MAC entry aging time
router# show mac-address-table aging-time
MAC address aging time: 300 sec
Error
N/A
messages
Related
mac-address-table aging-time
commands
4-34