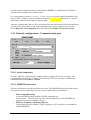
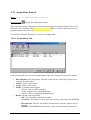
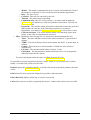
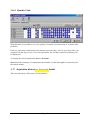
1
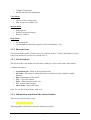
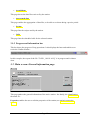
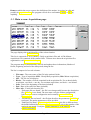
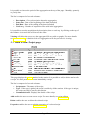
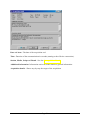
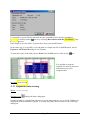
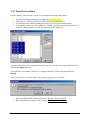
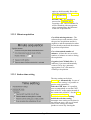
User manual
CimSta
Data acquisition and processing for
CIMEL weather station
Version 1.18
Author :
Printing date :
Revision :
Document reference :
Jean-Baptiste DEFOSSEZ
7 January 2013
REV0
CSTA/0107
Sommaire
1.
CIMSTA FOR WINDOWS ........................................................................................ 4
2.
GENERAL INFORMATION ...................................................................................... 6
2.1
Minimum requirements .....................................................................................................................................6
2.2
Contact CIMEL Electronique ...........................................................................................................................7
2.3
Bug Report ..........................................................................................................................................................7
2.4
Acquisition files storage organization ...............................................................................................................8
2.5 CimBase : The weather database ......................................................................................................................9
2.5.1
Presentation .................................................................................................................................................9
2.5.2
Applications general organization around the database. .............................................................................9
2.5.3
Sign of connection with Cimbase................................................................................................................9
3.
SOFTWARE DESCRIPTION.................................................................................. 10
3.1 Main screen .......................................................................................................................................................10
3.1.1
Main Menu ................................................................................................................................................10
3.1.2
Shortcut icons............................................................................................................................................11
3.1.3
List of stations ...........................................................................................................................................11
3.1.4
Information and data of the selected station..............................................................................................11
3.1.5
Progress and information bar ....................................................................................................................12
3.2
Main screen: General information page .........................................................................................................12
3.3
Main screen: Acquisitions page .......................................................................................................................13
3.4
Main screen : Aggregated data page...............................................................................................................14
3.5
Main screen: Scripts page ................................................................................................................................15
3.6
Main screen : Calls page ..................................................................................................................................16
3.7
Station properties edition .................................................................................................................................18
3.8
Station properties edition : General page .......................................................................................................18
3.9
Station properties edition : CimBase Page .....................................................................................................19
3.10
Station properties edition : Miscellaneous Page........................................................................................20
3.11
General configuration..................................................................................................................................22
3.12
General configuration : General Part ........................................................................................................22
3.13
General configuration: Files part ...............................................................................................................23
3.14
General configuration : Communication part...........................................................................................24
3.14.1
Serial connection .......................................................................................................................................24
3.14.2
MODEM connection .................................................................................................................................24
3.15
General configuration : Exportations part ................................................................................................25
3.15.1
Configuration of the text files conversion .................................................................................................26
3.15.2
Configuration of the spreadsheet export....................................................................................................26
3.16
Acquisitions historic.....................................................................................................................................28
3.16.1
Acquisitions List .......................................................................................................................................28
3.16.2
Monthly Table...........................................................................................................................................30
3.17
Acquisition historic details ..........................................................................................................................30
3.18
Monthly files reorganization .......................................................................................................................32
3.19
Data viewing .................................................................................................................................................33
3.19.1
Main menu ................................................................................................................................................33
Page 2
3.19.2
3.19.3
3.19.4
Shortcut icons............................................................................................................................................34
Data viewing .............................................................................................................................................34
Information about the file..........................................................................................................................34
3.20
Table data viewing .......................................................................................................................................34
3.21
Graphical data viewing................................................................................................................................35
3.22
Data blocks edition.......................................................................................................................................37
3.23
Scripts commands ........................................................................................................................................38
3.23.1
Hourly / Daily acquisition .........................................................................................................................38
3.23.2
Minute acquisition.....................................................................................................................................39
3.23.3
Station time setting....................................................................................................................................39
3.23.4
Instantaneous values acquisition ...............................................................................................................40
3.23.5
Station parameters edition .........................................................................................................................40
3.23.6
Minitel mode interrogation........................................................................................................................40
3.23.7
Execution of a program .............................................................................................................................41
3.24
Manual time setting .....................................................................................................................................41
3.24.1
Time setting...............................................................................................................................................41
3.24.2
Soft time correction...................................................................................................................................42
3.24.3
Permanent time-lag ...................................................................................................................................42
3.25
Instantaneous values acquisition ................................................................................................................42
3.26
Station's parameters edition........................................................................................................................43
3.27
Minitel Mode ................................................................................................................................................45
3.28
Call edition....................................................................................................................................................46
3.29
Script edition ................................................................................................................................................46
3.30
Executing a script on several stations.........................................................................................................47
4.
REFERENCES ....................................................................................................... 49
4.1 Tips.....................................................................................................................................................................49
4.1.1
PC Time ....................................................................................................................................................49
4.1.2
During the time setting or the parameters settings, the station seems to hang up .....................................49
4.2 CimSta glossary ................................................................................................................................................50
4.2.1
Call ............................................................................................................................................................50
4.2.2
Stations family ..........................................................................................................................................50
4.2.3
Acquisition files ........................................................................................................................................50
4.2.4
REF files....................................................................................................................................................50
4.2.5
PAR files ...................................................................................................................................................50
4.2.6
Data files aggregation................................................................................................................................51
4.2.7
Station identification .................................................................................................................................51
4.2.8
Station parameters .....................................................................................................................................51
4.2.9
Script .........................................................................................................................................................51
Page 3
1. CimSta for Windows
CimSta enables you to retrieve data from CIMEL Electronique weather stations with a
standard serial port or a modem. If you face any errors while using CimSta, check the
minimum requirements or send us a Bug report.
General information
1.1.1.1 General information
Minimum requirements
CIMEL Electronique and Bug report
Organization of acquisition files storage
CimBase : the weather database
Software description
1.1.1.2 Main screen
1.1.1.4 Viewing and editing data
Main screen
Main screen
General information - Acquisitions - Aggregated data - Viewing data using tables - Viewing data using graphs
Scripts - Calls
- Monthly files reorganization - Data blocks edition
1.1.1.3 Acquisitions
1.1.1.5 Configuration
Manual station time setting
Instantaneous values
Minitel Mode
Acquisition historic
General configuration
Details of the acquisitions historic
Tools
General - Files -MODEM & RS-232 - Exportation
Station's properties edition
General - Database - Misc.
Script edition
Script commands
Call edition
Executing a script on several stations
References
Tips
CimSta glossary
Page 4
CimSta help - (c)2001 CIMEL Electronique, Revision 0, last modification the July, 5th 2001
Page 5
2. General information
2.1 Minimum requirements
Operating System Windows 2000 Service Pack 3 or higher (until Windows 7)
Internet browser Internet Explorer 7 or higher (essential for online help)
Any ; A more powerful processor will accelerate the loading and the
Processor
aggregation of files
Memory
512Mo RAM memory; Better performance with more memory
Graphical
1024*768
Resolution
Communication
A free COM port or USB
port
MODEM
MODEM Hayes recognized by Windows (9600 bauds minimum).
Page 6
2.2 Contact CIMEL Electronique
172, rue de Charonne
75011 PARIS
Tel: (+33) 1 43 48 79 33
Fax: (+33) 1 43 48 62 61
E-mail: [email protected]
Website : www.cimel.fr
2.3 Bug Report
If you face any error using this software, send us:
•
•
The version of the software (help -> about)
• The name of the menu or of the module that caused the error
Its description : (problem, how to reproduce the bug, description of the PC…)
• If available, the data file inducing the error
• The presumed cause of the error
Send all information to [email protected] or fax it to CIMEL.
Do not hesitate to write us in case you need any improvement
Page 7
2.4 Acquisition files storage organization
All data are organized in the data folder (see the general configuration). By default , this
folder is located in C:\CimMet32\AcqData. In this base folder, a folder tree is created
with a specific folder for each station. The folder name is simply the short name of the station.
A typical station folder contains the following files :
•
•
•
•
.ACQ data files
The ACQ extension stands for ACQuisition. Those files contains daily and hourly
data.
.ACM data files
The extension ACM stands for Minute ACquisition. Those files contains minutely
data.
AcqInfo.LST
A binary file used internally by the program to maintain the statistics about the data
files.
SupInfo.DAT
Text files (.INI type) containing extra information about the station.
See also Monthly files reorganization
Page 8
2.5 CimBase : The weather database
2.5.1 Presentation
CimBase is the database system used to centralize :
•
•
•
•
The acquisition units management
The sites management
The data (normal measurements and virtual measurements)
Data processing
This system enables CimBase applications to work with the weather data coming from
different software in an accurate way.
CimBase is an application based on the Microsoft COM/DCOM technologie. CimSta runs
automatically CimBase and get connected to it. In the same manner, all CimBase software get
connected to the database of Cimbase.
To add data to the base, the user must connect the station to Cimbase. See also the database
connection in the station's properties edition.
2.5.2 Applications general organization around the database.
2.5.3 Sign of connection with Cimbase
This icon appears in the Windows task bar :
It shows that Cimbase is currently working. A click on this icon will enables the user to setup
CimBase.
Page 9
3. Software description
3.1 Main screen
The screen is composed of different parts. This is a screen example, click on a zone to get
more information :
3.1.1 Main Menu
File Menu
•
•
•
•
•
Calls activation
Viewing of current communication processes
Acquisitions historic
Data files importation
Exit the software
Configuration Menu
Page 10
•
•
CimBase Exportation
Modify the general configuration
View Menu
•
•
Choice of the viewing panel
Hide or show the stations list
Station Menu
•
•
•
Add a station
Station's properties edition
Remove a station
Help Menu
•
•
See this help file
Get information about this program (Version information , etc.)
3.1.2 Shortcut icons
The shortcut icons enable a faster access to a particular feature. To know the function of each
icon, keep the mouse cursor a few seconds over it.
3.1.3 List of stations
This list describes each station, the selection is made by a click on the name of the station.
Columns description :
•
•
•
•
•
•
•
Acquisition unit : Name of the acquisition unit
Site name : Site name to which the station is attached to in the Cimbase weather
database
Dep : Department of the station
City : City of the station
Num. : Station number in the city
Tel : Station phone number
Short name : Station ID Name
Note: To sort the list by column, click on it.
3.1.4 Information and data of the selected station
This screen is divided into 5 parts :
•
General information
This page gathers information about the station's properties.
Page 11
•
Acquisitions
This page shows the data files retrieved by the station.
•
Aggregated data
This page enables the aggregation of data files, to be able to see them during a precise period.
•
Scripts
This page lists the scripts used by the station.
•
Calls
This page lists the scheduled calls for the selected station.
3.1.5 Progress and information bar
This bar shows the progress of long operations. It also displays the hour and enables us to
resize the CimSta window :
In this exemple, the export of the file "334231_199911.ACQ" is in progress and is almost
done.
3.2 Main screen: General information page
This page gathers the general information of the active station : the family, the identification,
the name etc...
Properties enables the user to edit the properties of the station (see station's properties
edition).
Page 12
Remove enables the user to remove the definition of the station, its scripts, its calls and
possibly its acquisition files. The program will ask for a confirmation before removing
anything.
3.3 Main screen: Acquisitions page
The page displays the acquisition files of the selected station.
This list is composed of .ACQ (Hourly / Daily acquisition) files and .ACM (Minute
acquisition) files contained in the station folder. To know more about the acquisition files
organization, read the associated chapter.
The program analyses automatically each file and updates these information (Number of
blocks, beginning and end of the data period) along the list.
The list is composed of several columns:
•
•
•
•
•
•
•
File name : The exact name of the file in the station's folder.
Type : Type of acquisition (H/D : Hourly/Daily acquisition, Min: Minute acquisition)
Size : The file size in kilobytes
Blocks : The number of blocks contained in the acquisition file. For an hourly/daily
acquisition , one block = one day. For a minute acquisition, one block = one minute.
Start : Date of the beginning of the data (included)
End : Date of the end of the data (included)
Misc. info : Varied info about the file
o "Reference file not found" : the file is not interpretable because the description
file (REF file) is not found. The user must verify the folders configuration,
look for any incorrect configuration and eventually contact CIMEL
Electronique.
o "Parameters file not found" : the file that describes the parameters (PAR file) is
not found. The station parameters will be invisible.
o "Bad Dep/City/Num" : The station's identification of the file is different from
the defined station identification. The department, the city or the number of the
station do not match. Verify the internal parameters of the station also the
station's properties.
Page 13
View enables the user to see the acquisition file with a table or a graph. For more details see
the data viewing.. A double click on the file will cause it's viewing.
Delete enables the user to remove one or more acquisition file(s). Warning, the acquisition is
definitely removed from the hard disk.
Export the database to CimBase is essential in case you would like to use other software of
the CimBase suite. By clicking, the selected files will be automatically exported to the
CimBase database.
It is possible to sort the acquisitions by name, type, size etc. by clicking on the top of the
column. A second click will inverse the order.
By clicking on the right bottom, a contextual menu will appear.
View : Same effect as the view button
Delete : Same effect as Delete button
Export CimBase : Same effect as Export button
Refresh the list : the software will make a complete
analysis of the files
3.4 Main screen : Aggregated data page
The aggregated data page will allow the user to see a precise period by aggregating different
acquisition files of the acquisition page.
The aggregation is done automatically on the fly, the creation time of this file is proportional
to the size of the period requested and the number of files used.
Page 14
It it possible to choose the period of the aggregation at the top of the page : Monthly, quarterly
or yearly data.
The list is composed of several columns :
•
•
•
•
Description : Gives a description about the aggregation
Start date : Date of the beginning of the data (included)
End Date : Date of the ending of the data (included)
Used Acq. : Number of acquisition files used in the aggregation
It is possible to sort the acquisitions by description, date or used acq. by clicking on the top of
the column. A second click will inverse the order.
Viewing will allow the user to see the aggregated file as a table or graphs. For more details
see the data viewing. A double-click on a aggregation will also provoke it's viewing.
3.5 Main screen: Scripts page
This page displays the scripts attached to the station. It is possible to add, to delete and to edit
a script. It is also possible to execute immediatly a script.
The list is composed of several columns:
•
•
•
Script name : The name of the script
Type : If the type is global, the script is usable by all the stations. if the type is unique,
the script can only be used by this station.
Commands detail : Displays the details of the script.
Add enables the user to create a new script. For more details, see script edition.
Delete enables the user to delete the selected script
Properties enables the user to edit the properties of a selected script.
Page 15
Execute allows to run immediatly the script. A double click on the script will also provoke its
execution.
By clicking on the right button, this contextual menu will appear :
Execute : Same effet as Execute menu
Add : Same effet as Add menu
Delete : Same effet as Delete menu
Properties : Same effect as Properties menu
3.6 Main screen : Calls page
This page displays the calls schedule for the station. It is possible to add , to delete or to edit a
call.
The list is composed of several columns :
•
•
•
Name of the script to call : the name of the script that will be called during the next
launching
Date of the next launch : gives the date of the next programmed launching
Periodicity : describe the call period
Add enables the user to plan a new call. For more details, see call edition.
Delete enables the user to delete the schedule of the selected call.
Properties enables the user to edit the call's properties selected. A double click on the call
allows also its edition.
By clicking the right button, a contextual menu will appear
Add : same effect as Add menu
Delete : same effect as Delete menu
Properties : same effect as Properties menu
Page 16
Page 17
3.7 Station properties edition
The station properties edition is divided into several tabs :
•
The General page ( General Tab )
In this page the user defines the most important station parameters : its family, its
name, its identification, phone number, etc.
•
The Database page ( Database Tab )
This page defines the connection with CimBase.
•
The Misc. Page ( Misc. Tab)
This page gathers information or parameters less important.
3.8 Station properties edition : General page
The general page is so far the most important page, this is an example:
In this page we will define the most important parameters
Station family defines the station's family. For more information, see the stations family list.
It possible to change the station's family only when you're creating a new station.
Short name defines the unique identification of the station. This identification is very
important for the acquisition files storage organization because it defines the folder of the
Page 18
station. It is not recommended to change the station's identification after its creation because
CimSta will not find the old acquisition files.
Long name defines a more complete station description.
Connection support defines the communication support through which the connection is
done.
Phone number for a distant connection, indicate the station phone number.
Department, City and Number gives the station identification. Those three numbers are very
important in a station network, because they allow the identification of the station. Warning, if
the department, city and number are not the same between the station and the station
definition, the connection will fail (Error message : Incorrect password, see bellow).
Key gives the key access to the station (zero by default). A calculation is automatically done
during a connection to determine the station code on three characters (Example: 8BA), this
calculation is made with the department, the city and the key numbers. This connection code
is displayed on the Misc. page.
3.9 Station properties edition : CimBase Page
The Database page defines the connection with CimBase :
Site indicates the site in which the station is defined . The CimBase database is organized by
site. In each site, there is one or several acquisition units. Using CimSta, it is extremely rare to
define in one site more than one acquisition unit : In general, one site = one station.
Page 19
Site ID number displays the unique number of the site. In CimBase, each site is defined by
one unique number that can not be modified.
Acquisition unit name in the Database It's the name of the acquisition unit in the site, this
name can be similar to the name of the site, like in this example.
Identifying number in the site displays the unique number of the acquisition unit in the site.
In CimBase, each AU (Acquisition Unit) is defined in its site by a unique number that can not
be modified.
Create allows the user to create the acquisition unit in the chosen site. Caution, after the
creation of the AU it is impossible to cancel the modification in the station definition.
3.10 Station properties edition : Miscellaneous Page
The Misc. page gathers less important information and parameters
Change Icon It is possible to change the icon representing the station by clicking on this
button and by choosing among the list of available icons
CIMEL Password indicate, for information purpose, the password that will be sent to the
station at the beginning of a connection. For more information, see the Key in the General
page
Minitel password it is possible to secure the Minitel mode access (by modifying a parameter
in the station's parameters). At the connection using this mode, you will be asked for this
password.
Page 20
MeteoPro ID This 4 characters text is used in the export to the MétéoPro software (ACTA
Informatique). To know more about it, see MétéoPro export in the general configuration.
Page 21
3.11 General configuration
Menu : Configuration -> General Configuration
Shortcut icons:
Display the general configuration
The general configuration is divided in several tabs :
•
•
•
•
Tab "General" : Folder locations and miscellaneous parameters
Tab "Files" : Monthly files organization and file related options
Tab "MODEM & RS-232" : Communication configuration
Tab "Export" : Exports setting (Spreadsheet, text and other exports)
3.12 General configuration : General Part
The Directories indicate the file locations (usually the user does not have to modify these two
folders)
•
•
Configuration folder : contains all the CimSta configuration (REF file, PAR files ,
tables files, station descriptions...). Caution, be very careful when modifying this
directory !
Data folder : base directory containing all acquisition files. See also the acquisition
files storage organization. Caution, be very careful when modifying this directory !
The setup of the size of Historic files allows the user to set the size of the acquisitions
historic file. This size is proportional to the amplitude of the historic. Bigger the file size,
longer will be historic. But nevertheless the process time will be longer and more memory
will be used.
Page 22
Here is the corresponding table of the file size :
•
•
•
•
Very small size: 128 kb
Small size: 256 kb
Big size : 512 kb
Very big size: 1024 kb
The option "Always put the communication dialogs in the foreground" will display all the
communication dialogs in the foreground.
Check the option "Minimize the communication dialogs" to hide all the communication
dialogs.
3.13 General configuration: Files part
The reorganization of the H/D data files allows the user to set the generic name of the
monthly files (see also monthly files reorganization). Check Data in monthly files to activate
the creation of monthly acquisitions files.
Then the user must define the generic name of the file (The composition of the file name) :
The name can be composed by the user. The only restriction is that the name must have the
month and the year of the data. Those are few examples :
Type name
Example 1 *
Example 2 **
%YEAR%%MONTH%
199912.ACQ
200101.ACQ
%ID%_%YEAR%%MONTH%
STAT_199912.ACQ
LILLE_200101.ACQ
%YEAR%%MONTH%-%IDNUM%
199912-750011.ACQ
199912-598003.ACQ
* In the first example, The station name is STAT, its identification is"75/001/1". The date of
the monthly file is December 1999.
Page 23
**In the second example, the name of the station is LILLE, its identification is"59/800/3".
The date of the monthly file is January 2001.
It is a convention to use the %IDNUM%_%YEAR%%MONTH% generic name that produces files
named 750011_200002.ACQ for a station having the identification department 75, city 001
and number 1 and for the month of February 2000.
After the reorganization, the raw files (this means files that came directly from an acquisition)
are less useful. It's possible to delete them automatically, just keeping the n newest ones.
Check Delete the raw acquisitions files and indicate the number of raw files to keep.
3.14 General configuration : Communication part
3.14.1 Serial connection
To make a RS-232 connection, the computer must be equipped by a free serial port. The
communication mode is in V23 mode (75/1200 bauds). The user just have to indicate the
communication port (COM1 to COM4).
3.14.2 MODEM connection
The user can choose to use the modem in two ways. The MODEM should work with the two
ways, but it can be possible that one way is more efficient with your hardware :
•
•
Hayes compatible dialog
A direct MODEM dialog with the HAYES commands set.
Inconvenience : The user must know the internal parameters of the MODEM, the
program don't use the Windows drivers.
Windows Telephony API dialog (WIN32)
The program uses the Windows TAPI (Telephony A.P.I.) interface to communicate
with the MODEM.
Page 24
Advantage : Using the Windows drivers, there should be less connection failures (with
a good driver).
Inconvenience : The MODEM driver must be well written. Do not hesitate to install or
update the driver for better performance.
3.14.2.1 MODEM Configuration
Dialing prefix : This prefix is added to the phone number. If the computer is inside an
internal telephone network, then add to the station number the number that must be dialed to
go to the external phone network. A coma means a pause. A lot of internal telephone
networks will use "0," as dialing prefix.
3.14.2.2 MODEM Hayes setup
Port : If the installed modem is an internal card, the right setup may be COM3 or COM 4.
Check if the board hardware configuration corresponds to the chosen port. If it is an external
MODEM, usually it is installed on the COM1 or COM2 port.
Dialing : Indicates the dialing type. Pulse dialing will work in most of the times, but it is
slower. Tone dialing is better, and must be chosen if available.
V23 initialization : Enter the AT command to initialize the MODEM in V23 mode. The &F
command load the modem factory . This factory settings can not be modified, and this will
allow to run the MODEM always from the same state. Then the user must add the commands
to change to V23 mode. The most common command is 'ATB2'. If you have problem to find
this string visit the technical support at our CIMEL website.
3.14.2.3 TAPI MODEM setup
MODEM choice : TAPI modems are defined in the windows configuration window. Choose
the MODEM that you would like to use to communicate with the stations.
Activate the overlapped mode dialog : The mode 'Overlapped' is the default mode, it is the
only mode that will work under Windows NT. Under windows 98/95 it is possible to
deactivate this mode on MODEM that can not handle it.
3.15 General configuration : Exportations part
This screen allow the configuration of the export: :
Page 25
Select an export to configure by clicking on its image, several exports are available :
•
•
•
•
•
Text files: Data ASCII files conversion
Spreadsheet : send the data to the table
MétéoPro : Specific French software created by ACTA Informatique
S files : Specific file format used by the French INRA insitute
ITCF DBase : Specific file format used by the French ITCF insitute
3.15.1 Configuration of the text files conversion
it is possible to add a header of description at the begining of each created text file. This
header writes information about the station at the begining of the file : the long name, the
short name, the department number, the city number and the station number.
3.15.2 Configuration of the spreadsheet export
Spreadsheet location : Indicates the place of Excel or Lotus 123 or other. Indicate the
complete way to the executable file of the spreadsheet software or click on browse to localize
the file.
Data organization : It is possible to choose the data organization of the exported file.
In rows
Page 26
In Columns
Similar to the conversion to text files, it is possible add a description header at the begining
of each created text file.
Page 27
3.16 Acquisitions historic
Menu : File -> Acquisitions historic
Short cut icon:
Display the acquisitions historic
The acquisitions historic displays the information log of the old communications; The size of
the history file is defined in the General configuration. When it reach its maximum size, the
program removes the oldest acquisitions.
It is possible to display the history as a list or a monthly table.
3.16.1 Acquisitions List
Each element of the list is an old communication. This list is composed of several columns :
•
•
•
•
•
Date and time of the acquisition. This date is the effective end of the script process
(and not the planed date).
Station : Name of the station
Script : Name of the script
Media : Communication support.
o RS-232 : Direct serial connection
o TAPI : Windows driver MODEM mode
o HAYES : Hayes compatible MODEM mode
Result : Result of the acquisition
o OK : The acquisition ended successfully
o No.carrier : No dialtone, is the phone line correctly connected to the MODEM
?
o Disconnected : The line was brutally disconnected. Is the line quality correct
enough ?
o Bad init. : Bad MODEM initialization. Check the cables and the parameters.
Page 28
Media! : The media (communication device) wasn't well initialized. Check if
the modem is connected or if it's not already used by another application.
o Busy : The line is busy.
o Canceled : The call was canceled by the user.
o Timeout : The station stops responding.
o Unplanned calls (Only for calling stations) : A station with an unknown
identification has called or no script was planed for that station. The call was
ended by CimSta.
o Password! : The weather station refused the connection because the password
didn't match. At least one of the following properties are erroneous :
Department, City and Key. Edit the station properties to correct these values.
o Calls not activated : The calls activation menu is not checked (in the main
menu), so the calls are systematically canceled.
Misc.: Enables the fast viewing of a few important information about the call.
o Time! : The time difference between the station and the PC is greater than 5
minutes
o TIME! : The time difference between the station and the PC is greater than 10
minutes
o Comm! : There has been a certain number of failed tries (See details of
acquisitions)
o Low Bat! : The internal station battery is below 5 volts.
o Checksum! : The transmission contains Checksum errors. It's an important
indication about the line quality.
o
•
For more information about the time, see Hints about the PC time
It is possible to sort the acquisitions by date, station, script etc. by clicking on the column
header. A second click will inverse the order.
Details displays the acquisition details . A double click on the acquisition produces the same
action.
Print allows the user to print the displayed log (with or without details)
Filter (Date/All) displays all the log or only the current day
Clear allows the user to delete completely the historic. Caution, this action is not reversible.
Page 29
3.16.2 Monthly Table
With this table it is possible to see very quickly if a station is not answering or to detect other
problems.
Each row represents a station and each columns represent a day. An icon is present if there an
acquisition in the day (In case of several acquisitions, the one that caused less problems will
be displayed).
To change the current month click Next or Previous.
Stats shows the summary of communications (number of calls and length of connections) for
the chosen month..
3.17 Acquisition historicacq_historic.html details
This screen displays a full report of an acquisition
Page 30
Date and hour : The date of the acquisition end.
Time : Duration of the communication in seconds (starting at the effective connection).
Station, Media, Script and Result : See also the acquisition historic.
Additional information: Information retrieved on the station or general information.
Acquisition details : Shows step by step the stages of the acquisition.
Page 31
3.18 Monthly files reorganization
Menu : Data -> Reorganize in monthly files
After the monthly files reorganization setup, it is possible to rebuild the monthly files by
choosing this menu. The program creates a file per month using all correct acquisition files.
It is possible to remove the raw acquisition files after the reorganization.
Monthly files are not built (for security purpose) with :
•
•
•
Files containing errors
Files with a bad station identification
Files with a different station firmware
Page 32
3.19 Data viewing
To view an acquisition file or a aggregated file, click on the button View in the acquisitions
page or in the aggregated data page.
The screen is composed of several parts. This is an example of a screen, click on a zone to get
more information :
3.19.1 Main menu
File menu
•
•
•
Save file
Export to a text file
Print table or graph
Processing menu
•
•
Edit data blocks
Export to tables
View menu
•
•
Change view type of the data (table or graph)
Display the station's parameters
Page 33
Tools menu
•
General configuration edition
3.19.2 Shortcut icons
Shortcut icons enables a faster access to a particular function. To know quickly the function
of each image, keep the cursor a few seconds on it.
3.19.3 Data viewing
The data viewing can be in :
•
•
Table format
Graph format
3.19.4 Information about the file
This table groups information on the viewed station and on the acquisition file. It is also
possible in this panel to modify the period or the selected graph.
3.20 Table data viewing
Menu : View->Table
Shortcut icon:
Display the data with a table
Posting the data in a table allows the user to see precisely the values of all the acquisition file
data. The user must choose the period to display in the information table on the right panel :
Data are refreshed automatically after the modification of the
period.
Using the selective sensors display, it is possible to show or to
hide the data of selected sensors.
By double clicking on a table element, the details of the data will be displayed.
Page 34
It is possible to export directly the table into the spreadsheet (See also the spreadsheet
location) by clicking on the icon or by choosing Data edition with the spreadsheet in the
Processing menu.
Don't forget to save the table, if you decide to keep your modifications !
In the same way, it is possible to save the data in a simple text file in the File menu, choose
Export to ASCII text file and give it a filename.
To print all or part of the table, choose Print from the File menu or click on the
icon.
It is possible to print the
selected area (use the mouse to
define this area) or the
complete table.
See also: Data viewing
3.21 Graphical data viewing
Menu : View->Graph
Shortcut icon:
Display the data with graphs
Posting the data in a graph allows the user to see the data tendency over a period. CimSta can
display an unlimited amount of graph. To modify the graph, the user must use the following
dialog box.
Page 35
Add : Add graph to the page. The user must pick a graph from
the list of the available base graphs.
Props : Edit the selected graph properties.
Suppr. : Remove the selected graph.
The selected graph is displayed in the list above (in the
example: Relative humidity %)
It's possible to change the visible period by modifying the
start and end text boxes. Using the blue arrows, the chosen
period will be shifted on the graph (from 1 minute to 7 days).
By checking Link all the graphs, a modification of a graph
scale provokes the same modification on all other graphs.
The user can control the graphs using the graphs menu from the
main menu.
Add, Properties and Delete have the same effect as Add, Props
and Suppr.
Copy in the Clipboard : Copy the selected graph into the
clipboard. Later on, it's possible to paste it in other applications like
Word or Excel.
Graphs layout : Change the layout of the displayed graphs.
This an example of a graph quickly done by adding three base graphs.
Page 36
3.22 Data blocks edition
Edit the Hourly / Daily blocks of a file is an operation that can be done due to :
•
•
•
•
A problem during transmission producing bad acquisition file
The import of a bad acquisition file (Bad format, impossible date...)
A problem on the station requiring the removal of one or several data blocks
A bad dating of the year (for example in a CIMEL cartridge, the year of the data is not
included, which can lead to a bad interpretation by the software)
To remove data blocks from an acquisition file, you have to select one or several blocks and
click on the Suppress menu.
To modify the year of the 1st block, it is enough to modify it on the right side and click
Modify.
After removing one or several blocks, the program suggests two solutions :
•
•
Removing DEFINITIVELY the file blocks. The file will be modified
Removing the blocks only for the viewing. The file won't be modified
Page 37
3.23 Scripts commands
A script is composed of one or several commands : Hourly/daily Acquisition, Minute data
acquisition, Time setting of the station, instantaneous values acquisition, Station parameters
edition, Minitel mode interrogation and Execution of a program.
Here is a detailed description of the commands:
3.23.1 Hourly / Daily acquisition
This is the most common type of acquisition for a standard station. An acquisition file will be
created at the end of each acquisition. Those files can be later reorganized in monthly files.
Number of days : The user must
indicate the number of days to
download during the
communication. It's also possible to
download only the missing days.
Download the current day : The
user can indicate if the unfinished
current day must be included or not
in the transfer.
Export the data to CimBase : It is
possible to transfer automatically the
data to CimBase at the end of the
acquisition. For a correct export, the
connection must be effective (See
the CimBase connection).
Build automatically : Check this
Page 38
option to build monthly files at the
end of the acquisition (see monthly
files reorganization)
Execute a file : It is possible to
process the acquisition file by
executing a file. The executable file
will be launched with an argument,
on its command line, the full name
of the raw acquisition file.
3.23.2 Minute acquisition
Get all the missing minutes : The
software keeps some statistics from
the previous acquisitions and he is
capable to end the transmission when
he has already transferred the minutes
in previous acquisitions.
Get a determined number of
minutes : Allows the user to set the
number of minutes to retrieve during
the acquisition.
Organize in ACM daily files : It
indicates if you must automatically
create a file by day (automatic
aggregation) or if a file must be
created per acquisition.
3.23.3 Station time setting
The time setting can be done
manually or automatically. In case of
a manual time setting, it is possible to
precise some parameters :
Take the GMT time : It is possible
(not recommended) to sent the GMT
time of the PC to the station instead of
the current time of the PC. See the PC
time recommendations.
Forbid the brutal time setting,
forbid the soft time setting:
Automatic time setting can be done in
two different ways, one way is brutal
(direct time setting, the station
produce to a new day loosing the
Page 39
current day), the other way is soft
(successive short time settings).
Do an accurate time setting : It is
possible to synchronize accurately the
time of the station with the time of the
PC (the precision is about one second)
but this operation can take up to 40
seconds.
Caution : IN CASE OF AN
AUTOMATIC TIME SETTING,
MAKE SURE THAT THE PC TIME IS
CORRECT
3.23.4 Instantaneous values acquisition
It possible to settle the following
parameters for an instantaneous
values acquisition.
Save data into a text file : The data
can be saved in a simple text file for
later use. Indicates the complete way
of File name .Warning : the file will
be overwritten every new acquisition.
Limitation of the number of
acquisition: It is possible to stop
retrieving the instantaneous values
after a certain number of acquisition.
Limitation of frequency of
acquisition : enables the reduction of
the acquisition frequency to a given
value (in acquisition per minute). The
maximum frequency depends on the
station (almost one acquisition per
second)
Data dating : The data dating can be
done either with the station time or
with the PC time.
See also instantaneous values
acquisition
3.23.5 Station parameters edition
See the station's parameters edition.
3.23.6 Minitel mode interrogation
See Minitel Mode.
Page 40
3.23.7 Execution of a program
To run an application (can be planned
with the scripts calls) indicate its
complete file name (Use the
Browse... button to select the file
from "My Computer").
Wait the end of the process stops
CimSta until the launched application
ends.
3.24 Manual time setting
It is possible to set the time of the station manually. Caution, this kind of time setting will
create a new day and provoke the loss of the PATAC data (contrarily to the soft time setting
in automatic mode).
It also possible to modify the permanent time-lag and to recover a short time period.
3.24.1 Time setting
To set the time, it is enough to insert the desired time for the station and click on Send to the
station. Note that the software will ignore the seconds digit since it will be automatically set
to zero when the time will be send.
Page 41
3.24.2 Soft time correction
A soft recovery allows the user to recover only a few seconds. This is less efficient and slower
than a precise automatic time setting (see also scripts commands). Soft recovery is not
available on old stations (before 1994).
3.24.3 Permanent time-lag
A permanent recovery enables the user to correct an eventual systematic time-lag of the
station's clock. The permanent time-lag is not available in old stations (before 1994).
3.25 Instantaneous values acquisition
This screen displays the instantaneous values acquisitions. To set the instantaneous values
acquisition see script edition and the scripts commands list
Page 42
To view the graph (last received hour) of one data type, click over its symbol on the left
panel.
The top of the window displays information about the transmission : the Stat. name (station
name), the status of the transmission (the green led blink when bytes are received or sent),
the number of acquisition and the actual status of the acquisition.
The left panel lists the available data types and respectively the last received value for this
data type.
Suspend allows the user to pause the acquisition. Caution, the station will hang up after one
minute of inactivity.
OK ends the acquisition.
3.26 Station's parameters edition
This screen allows the user to view and edit the station parameters. Caution, this operation can
affect the data. The parameters changes should be done by the manager of the station or by an
authorized person.
The icons Send and Refresh are only available during the parameters edition, that's to say
during a communication with the weather station.
Page 43
Save the station parameters in a text file
Print the station parameters
Send the new parameters to the station
Download the station's parameters
To modify a parameter, double click on it (or press enter) :
Page 44
3.27 Minitel Mode
Station can be connected by Minitel (Minitel is a French Videotex terminal that uses RTC).
This allow the user to connect to the station and view data and information about it.
It is possible to navigate through the screens with the buttons Summary, Back, Next and
Send or by clicking directly on a word on the screen.
The IN and OUT led gives an indication on the incoming and outgoing bytes flow.
OK ends the connection
Note : In a script, the Minitel command must end the script because it is not possible to put a
command after it.
See also: Script commands.
Page 45
3.28 Call edition
This screen allows the user to add or to change a call to a script.
You must choose the script to be executed (on the top of the screen) and plan its future
execution.
The periodicity can vary from one call per minute to one call a year.
The description part display the script details.
CimSta must be launched if you want to use planned execution.
3.29 Script edition
This screen allows the user to add or to modify a script.
Page 46
Name The name of the script. This name identify the script (it must be unique).
Applicable to is used to define the scope of the script : the user can choose to do a script for
one or all the stations. A script which is applicable on all stations will be available in script
list of each station while a script defined for only one station, for example "Lille Station", will
only be available in the scripts list of "Lille Station".
Commands list This list displays the commands that will done during the script execution .
•
•
•
•
Add enables the user to add a new command in the script. For more information see,
see Scripts commands.
Suppress enables the user to remove the selected command.
Upper place the the selected command to higher position(therefore the command will
be executed before)
Lower place the selected command to a lower position (therefore the command will
be executed later)
3.30 Executing a script on several stations
Menu : Tools -> Script execution
This wizard will enable to execute a script on several stations . This could be helpful to do for
example:
•
•
•
•
Accurate time setting for a part of the stations collection
The unusual execution of an acquisition script
Redo the interrogations of the day in case of a problem
...
Page 47
The wizard is composed of three screens :
•
•
•
The first screen is the Script choice where you choose the script to execute.
The second screen is the Stations choice where you choose the stations in which you
would like to execute the script.
The last one set the Launch planning. It is possible to execute the script on the spot
or to adjourn the execution to another time in the day.
Note : to plan automatically daily calls, the user must use the calls (see call edition).
Page 48
4. References
4.1 Tips
4.1.1 PC Time
It is highly recommended to set the PC time according to the solar time (same time as the
weather stations). Contrarily, the systematic verification of the difference between the PC
time and the station time will be more difficult and won't be automated in the historic
acquisition.
See also Acquisition historic
4.1.2 During the time setting or the parameters settings, the station seems
to hang up
That's true. In fact, if there is a long period of non activity (more than one minute) in a station,
it will hang up.
Page 49
4.2 CimSta glossary
4.2.1 Call
A call plans the date and the periodicity of the execution of a specific script.
See also Call editionedit_scripts.html, Calls page
4.2.2 Stations family
For the moment, there is two famimys of stations in CimSta :
•
•
CIMEL Standard Station (404-407 et 411) : All non-GSM ENERCO weather
station.
CIMEL GSM Station : Those are calling stations : Instead of calling them, the user
must wait their call to be able to execute a script. Those stations are equipped with a
GSM MODEM with a SIM Data card.
4.2.3 Acquisition files
An acquisition file contains the result of a communication or the result of an aggregation.
•
•
Files with ACQ extension : The ACQ extension stands for ACQuisition. Those are
files containing hourly and daily data.
Files with ACM extension : The ACM extension stands for ACquisition Minute.
Those are files containing minutely data
The files can be aggregated and can be exported to the CimBase database.
See also Acquisitions pageedit_calls.htmledit_scripts.html, main_screen_pagecalls.htmlData
viewing
4.2.4 REF files
The REF file (reference file) is a very important file used to decode the acquisition files. This
file varies from one station type to another (407, 404, 411, etc.). The .REF files are stored in
the CimMet configuration folder. Without this file, it is impossible to view the data.
See also Data viewing
4.2.5 PAR files
The PAR file (Parameters file ) is used to decode the station's parameter. Like the REF file,
this file varies from one station to another. Without this file, the weather station's parameters
will not be visible nor editable.
See also Station's parameters edition
Page 50
4.2.6 Data files aggregation
It is possible to concatenate the data of several acquisition files in one file. This operation is
called the files aggregation. The files aggregation can only be done with files containing no
errors.
See also Aggregated data pageedit_scripts.html, Monthly files reorganization
4.2.7 Station identification
A station is identified by the software thanks to the following parameters : Department
number, City number and the city station number. Those three important parameters are
stored inside the station parameters. It is crucial to look after their exactness and any
modification after their initialization is not recommended.
See also Station's parameters editionedit_scripts.html, scripts commands, Station properties edition.
4.2.8 Station parameters
In every station, there is a parameters zone. It contains for example the identification of the
stations, information about the sensor presence, the calibration constants of the humidity
sensitive element, etc. This zone is included in all data files (.ACQ and ACM).
See also Station's parameters edition
4.2.9 Script
Each script is a list of commands. Those commands provoke actions on the weather stations
(data download, parameters, miscellaneous acquisitions ...). It is possible to plan the execution
of script using a call.
See also Script edition, script commands, scripts page.
Page 51