1
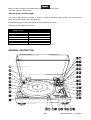
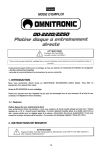
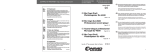
BEDIENUNGSANLEITUNG
USER'S MANUAL
MODE D'’EMPLOI
DD-4220/DD-4250
EXTREME HIGH TORQUE Turntable
Für weiteren Gebrauch aufbewahren!
Keep this manual for future needs!
Gardez ce mode d’emploi pour des
utilisations ultérieures!
Guarde este manual para posteriores usos.
© Copyright
Nachdruck verboten!
Reproduction prohibited!
Réproduction interdit!
Prohibida toda reproducción.
MULTI-LANGUAGE-INSTRUCTIONS
Inhaltsverzeichnis
Table of contents
Sommaire
EINFÜHRUNG................................................................................................................................................... 3
SICHERHEITSHINWEISE................................................................................................................................. 4
BESTIMMUNGSGEMÄSSE VERWENDUNG .................................................................................................. 5
INBETRIEBNAHME .......................................................................................................................................... 5
BESCHREIBUNG DER TEILE.......................................................................................................................... 7
ANSCHLÜSSE .................................................................................................................................................. 7
EINSTELLUNGEN ............................................................................................................................................ 8
BEDIENUNG ..................................................................................................................................................... 8
REINIGUNG UND WARTUNG.......................................................................................................................... 9
TECHNISCHE DATEN ...................................................................................................................................... 9
INTRODUCTION ............................................................................................................................................. 10
SAFETY INSTRUCTIONS .............................................................................................................................. 11
OPERATING DETERMINATIONS.................................................................................................................. 11
INSTALLATION .............................................................................................................................................. 12
GENERAL DESCRIPTION ............................................................................................................................. 13
CONNECTIONS .............................................................................................................................................. 14
ADJUSTING .................................................................................................................................................... 14
OPERATION ................................................................................................................................................... 15
CLEANING AND MAINTENANCE ................................................................................................................. 15
TECHNICAL SPECIFICATIONS..................................................................................................................... 16
INTRODUCTION ............................................................................................................................................. 17
INSTRUCTIONS DE SÉCURITÉ .................................................................................................................... 18
EMPLOI SELON LES PRÉSCRIPTIONS ....................................................................................................... 19
MISE EN SERVICE ......................................................................................................................................... 19
DESCRIPTION ................................................................................................................................................ 21
CONNEXIONS................................................................................................................................................. 21
AJUSTMENT................................................................................................................................................... 22
MANIEMENT ................................................................................................................................................... 22
NETTOYAGE ET MAINTENANCE ................................................................................................................. 23
CARACTÉRISTIQUES TECHNIQUES ........................................................................................................... 23
Das neueste Update dieser Bedienungsanleitung finden Sie im Internet unter:
You can find the latest update of this user manual in the Internet under:
Vous pouvez trouvez la dernière version de ce mode d'emploi dans l'Internet sous:
www.omnitronic.com
BEDIENUNGSANLEITUNG
DD-4220/DD-4250
EXTREME HIGH TORQUE-Plattenspieler
Lesen Sie vor der ersten Inbetriebnahme zur eigenen Sicherheit diese Bedienungsanleitung
sorgfältig durch!
Alle Personen, die mit der Aufstellung, Inbetriebnahme, Bedienung, Wartung und Instandhaltung dieses
Gerätes zu tun haben, müssen
- entsprechend qualifiziert sein
- diese Bedienungsanleitung genau beachten
- die Bedienungsanleitung als Teil des Produkts betrachten
- die Bedienungsanleitung während der Lebensdauer des Produkts behalten
- die Bedienungsanleitung an jeden nachfolgenden Besitzer oder Benutzer des Produkts weitergeben
- sicherstellen, dass gegebenenfalls jede erhaltene Ergänzung in die Anleitung einzuführen ist
EINFÜHRUNG
Wir freuen uns, dass Sie sich für einen OMNITRONIC DD-4220/DD-4250 Plattenspieler entschieden haben.
Wenn Sie nachfolgende Hinweise beachten, sind wir sicher, dass Sie lange Zeit Freude an Ihrem Kauf
haben werden.
Nehmen Sie den OMNITRONIC DD-4220/DD-4250 aus der Verpackung.
Bitte überprüfen Sie vor der ersten Inbetriebnahme, ob kein offensichtlicher Transportschaden vorliegt.
Sollten Sie Schäden an der Netzleitung oder am Gehäuse entdecken, nehmen Sie das Gerät nicht in Betrieb
und setzen sich bitte mit Ihrem Fachhändler in Verbindung.
Features
Extreme High Torque-Plattenspieler
Direktantrieb mit extrem hohen Drehmoment • Für professionelle Anwendungen • Hochwertige
Tonarmlagerung • Höhenverstellbarer Tonarm • Mit Reverse-Funktion zum Einstellen der Rotationsrichtung •
Quarzgesteuert für höchste Drehzahlpräzision • Quartz Lock-Taste zur Justierung der voreingestellten
Standardgeschwindigkeit • Drei voreingestellte Geschwindigkeiten (33 1/3, 45 und 78 U/Min.) • Regelbare
Geschwindigkeit umschaltbar von +/- 10 % auf +/- 20 % • Netzschalter gegen versehentliches Abschalten
gesichert (Drehschalter) • Lieferung ohne Tonabnehmersystem • Großer Start-/Stop-Taster • FernstartFunktion über Klinkenstecker-Anschluss auf der Rückseite • Strobe-Beleuchtung für exakte
Geschwindigkeitseinstellung • Separate Nadelbeleuchtung (versenkbar) • Lieferung inklusive abnehmbarer
Acryl-Staubschutzhaube • Einstellbares Anti-Skating • Schockabsorbierende Stellfüße
3
SICHERHEITSHINWEISE
ACHTUNG!
Seien Sie besonders vorsichtig beim Umgang mit gefährlicher Netzspannung. Bei dieser Spannung können Sie einen lebensgefährlichen elektrischen Schlag erhalten!
Dieses Gerät hat das Werk in sicherheitstechnisch einwandfreiem Zustand verlassen. Um diesen Zustand zu
erhalten und einen gefahrlosen Betrieb sicherzustellen, muss der Anwender unbedingt die Sicherheitshinweise und die Warnvermerke beachten, die in dieser Gebrauchsanweisung enthalten sind.
Unbedingt lesen:
Bei Schäden, die durch Nichtbeachtung dieser Bedienungsanleitung verursacht werden, erlischt der
Garantieanspruch. Für daraus resultierende Folgeschäden übernimmt der Hersteller keine Haftung.
Den Netzstecker immer als letztes einstecken. Vergewissern Sie sich, dass der Netzschalter auf „OFF“ steht,
wenn Sie das Gerät ans Netz anschließen.
Halten Sie das Gerät von Hitzequellen wie Heizkörpern oder Heizlüftern fern.
Das Gerät darf nicht in Betrieb genommen werden, nachdem es von einem kalten in einen warmen Raum
gebracht wurde. Das dabei entstehende Kondenswasser kann unter Umständen Ihr Gerät zerstören. Lassen
Sie das Gerät solange uneingeschaltet, bis es Zimmertemperatur erreicht hat!
Stellen Sie keine Flüssigkeitsbehälter, die leicht umfallen können, auf dem Gerät oder in dessen Nähe ab.
Falls doch einmal Flüssigkeit in das Geräteinnere gelangen sollte, sofort Netzstecker ziehen. Lassen Sie das
Gerät von einem qualifizierten Servicetechniker prüfen, bevor es erneut benutzt wird. Beschädigungen, die
durch Flüssigkeiten im Gerät hervorgerufen wurden, sind von der Garantie ausgeschlossen.
Der Aufbau entspricht der Schutzklasse II. Das Gerät ist schutzisoliert.
Lassen Sie die Netzleitung nicht mit anderen Kabeln in Kontakt kommen! Seien Sie vorsichtig beim Umgang
mit Netzleitungen und -anschlüssen. Fassen Sie diese Teile nie mit nassen Händen an!
Vergewissern Sie sich, dass die anzuschließende Netzspannung nicht höher ist als auf dem Spannungswahlschalter eingestellt.
Achten Sie darauf, dass die Netzleitung nicht gequetscht oder durch scharfe Kanten beschädigt werden
kann. Überprüfen Sie das Gerät und die Netzleitung in regelmäßigen Abständen auf Beschädigungen.
Gerät bei Nichtbenutzung und vor jeder Reinigung vom Netz trennen! Fassen Sie dazu den Netzstecker an
der Griffläche an und ziehen Sie niemals an der Netzleitung!
ACHTUNG: Endstufen immer zuletzt einschalten und zuerst ausschalten!
Beachten Sie bitte, dass Schäden, die durch manuelle Veränderungen an diesem Gerät verursacht werden,
nicht unter den Garantieanspruch fallen.
Kinder und Laien vom Gerät fern halten!
ACHTUNG: Zu hohe Lautstärken können das Gehör schädigen!
Im Geräteinneren befinden sich keine zu wartenden Teile. Eventuelle Servicearbeiten sind ausschließlich
dem autorisierten Fachhandel vorbehalten!
4
BESTIMMUNGSGEMÄSSE VERWENDUNG
Bei diesem Gerät handelt es sich um einen professionelles Plattenspieler, mit dem sich Standard LPs und
Singles abspielen lassen. Dieses Produkt ist für den Anschluss an 115/230 V, 50/60 Hz Wechselspannung
zugelassen und wurde ausschließlich zur Verwendung in Innenräumen konzipiert.
Vermeiden Sie Erschütterungen und jegliche Gewaltanwendung bei der Installierung oder Inbetriebnahme
des Gerätes.
Achten Sie bei der Wahl des Installationsortes darauf, dass das Gerät nicht zu großer Hitze, Feuchtigkeit
und Staub ausgesetzt wird. Vergewissern Sie sich, dass keine Kabel frei herumliegen. Sie gefährden Ihre
eigene und die Sicherheit Dritter!
Betreiben Sie das Gerät nicht in extrem heißen (über 35° C) oder extrem kalten (unter 5° C) Umgebungen.
Halten Sie das Gerät von direkter Sonneneinstrahlung (auch beim Transport in geschlossenen Wägen) und
Heizkörpern fern.
Nehmen Sie das Gerät erst in Betrieb, nachdem Sie sich mit seinen Funktionen vertraut gemacht haben.
Lassen Sie das Gerät nicht von Personen bedienen, die sich nicht mit dem Gerät auskennen. Wenn Geräte
nicht mehr korrekt funktionieren, ist das meist das Ergebnis von unsachgemäßer Bedienung!
Reinigen Sie das Gerät niemals mit Lösungsmitteln oder scharfen Reinigungsmitteln, sondern verwenden
Sie ein weiches und angefeuchtetes Tuch.
Soll das Gerät transportiert werden, verwenden Sie bitte die Originalverpackung, um Transportschäden zu
vermeiden.
Der Serienbarcode darf niemals vom Gerät entfernt werden, da ansonsten der Garantieanspruch erlischt.
Wird das Gerät anders verwendet als in dieser Bedienungsanleitung beschrieben, kann dies zu Schäden am
Produkt führen und der Garantieanspruch erlischt. Außerdem ist jede andere Verwendung mit Gefahren, wie
z. B. Kurzschluss, Brand, elektrischem Schlag, etc. verbunden.
INBETRIEBNAHME
Stellen Sie den Plattenspieler auf eine horizontale, stabile Unterlage.
Legen Sie den Plattenteller auf der dafür vorgesehenen Halterung auf. Bitte beachten Sie, daß der
Plattenteller mittels eines extrem starken Magneten auf der Halterung fixiert wird. Legen Sie die Gummimatte
auf den Plattenteller auf.
Entnehmen Sie die Scharniere aus der Unterseite des Styropors. Stecken Sie die Schutzhaube auf die 2
Scharniere auf.
Nehmen Sie die Headshell aus dem Systemhalter und installieren Sie Ihr System.
Installation des Tonabnehmersystems
Lesen Sie die Bedienungsanleitung des neuen Tonabnehmersystems durch.
Setzen Sie den Nadelschutz auf, damit die Nadel nicht beschädigt werden kann.
Verbinden Sie die Anschlußdrähte der Headshell mit den Anschlußstiften des Tonabnehmersystems und
achten Sie darauf, daß die Belegung der Drähte übereinstimmt.
Die verschiedenen Farben bedeuten:
Farbe:
Weiß (L+)
Blau (L-)
Rot (R+)
Kanal und Polung
Links, Plus-Pol
Links, Minus-Pol
Rechts, Plus-Pol
5
Grün (L-)
Rechts, Minus-Pol
Ziehen Sie die Befestigungsschrauben an der Headshell fest.
Einstellen des Überhangs
Der Überhang ist der Abstand zwischen der Nadel und dem Stift in der Mitte des Plattentellers.
Der Überhang sollte für ein optimales Abtasten auf 20 mm eingestellt werden.
Lösen Sie die Schrauben an der Headshell und rutschen Sie das System nach vorne bzw. hinten, bis es im
korrekten Abstand auf der Headshell sitzt.
Vergewissern Sie sich, daß Sie die Schrauben wieder fest angezogen haben.
Schrauben Sie das Tontragersystem am Tonarm fest.
Einstellen der Tonarmhöhe
Die Tonarmhöhe variiert von System zu System. Um eine optimale Abtastung zu gewährleisten, empfehlen
wir Ihnen, die Tonarmhöhe mittels des Justierrings einzustellen.
Vor dem Einstellen der Tonarmhöhe lösen Sie bitte die Arretierung des Justierrings.
Justieren Sie die Tonarmhöhe laut nachstehender Tabelle:
Höhe des Tonabnehmersystems in mm
15
16
17
18
19
20
21
Einstellung des Justierrings
0
1
2
3
4
5
6
Nach Justieren der Tonarmhöhe drehen Sie bitte die Arretierung des Justierrings fest.
6
BESCHREIBUNG DER TEILE
1.
2.
3.
4.
5.
6.
7.
Staubschutzhaube
Scharnier
Puck
Plattenteller
Stift
Gummimatte
Spannungswahlschalter
(unter dem Plattenteller)
8. Netzschalter
mit
Strobelampe
9. START/STOP-Taster
10.Geschwindigkeitsschalter
11.Nadellampe
12.Lampenschalter
13.Headshell
14.+/- 10 % Taste
15.+/- 20 % Taste
16.QUARTZ LOCK-Taste
17.Pitchfader
18.Richtungstaste
ANSCHLÜSSE
7
19.Tonarm
20.Justierring zur Einstellung
der Tonarmhöhe
21.Tonarmstütze
22.Tonarmklammer
23.Tonarmlift
24.Anti-Skating-Rad
25.Gegengewichtskala
26.Gegengewicht
27.Systemhalter
Verbinden Sie die Cinch-Kabel (weiß=linker Kanal, rot=rechter Kanal) mit den PHONO-Eingangsbuchsen
Ihres Verstärkers bzw. Mischpultes. Verbinden Sie das Massekabel mit der Erdungsklemme des Verstärkers
bzw. Mischpultes.
An die REMOTE START/STOP-Buchse lässt sich ein Fußschalter anschließen.
An die PITCH OUTPUT-Buchse lässt sich ein Beatcounter anschließen.
Schließen Sie den Plattenspieler ans Netz an.
EINSTELLUNGEN
A) Einstellen des Tonarmgegengewichts:
• Entfernen Sie den Nadelschutz.
• Stellen Sie den ANTI-SKATE Drehknopf auf "0".
• Stellen Sie den Tonarmlift in die AB Position
• Lösen Sie die Tonarmklammer und bewegen Sie den Tonarm bis kurz vor den Plattenteller. Achten Sie
darauf, dass Sie die Nadel nicht beschädigen.
• Halten Sie den Tonarm vorsichtig fest und stellen Sie das Gegengewicht ein, indem Sie es im bzw. gegen
den Uhrzeigersinn drehen. Der Tonarm sollte parallel zur Platte ausbalanciert sein, d.h. er darf nicht in
Richtung Gewicht oder Tonkopf kippen.
• Bewegen Sie den Tonarm wieder zurück in die Armstütze und befestigen Sie die Armklemme.
• Stellen Sie die Skala am Gegengewicht ein, bis die Position 0 über der Markierungslinie des
Tonarmschafts liegt.
• Drehen Sie das Gegengewicht so lange im Uhrzeigersinn, bis die Skala den Wert anzeigt, der der
Nadelauflagekraft des verwendeten Tonabnehmersystems entspricht. Bitte beachten Sie die Hinweise des
Tonabnehmerherstellers.
B) Einstellen des Anti-Skating-Rades:
Stellen Sie das Anti-Skating-Rad so ein, dass der Wert dem der Nadelauflagekraft des verwendeten
Tonabnehmersystems entspricht. Bitte beachten Sie die Hinweise des Tonabnehmerherstellers.
C) Einstellen der Abspielgeschwindigkeit:
• Drücken Sie den Startknopf, der Plattenteller beginnt sich zu drehen.
• Die Abspielgeschwindigkeit lässt sich um bis zu 20 % verändern. Wenn Sie die Geschwindigkeit um +/10% verändern möchten, drücken Sie die +/- 10 % Taste. Wenn Sie die Geschwindigkeit um +/- 20 %
verändern möchten, drücken Sie die +/- 20 % Taste. Wenn Sie die die genaue Abspielgeschwindigkeit mit
0 % Veränderung einstellen möchten, drücken Sie die QUARTZ LOCK-Taste.
Bei gedrückter +/- 10 % Taste:
• Beobachten Sie die Punktelinien am Plattentellerrand. Die Zahlen neben der Stroboskoplampe entsprechen der am Pitchfader eingestellten Abspielgeschwindigkeit.
Wenn die Punkte der obersten Linie stehenzubleiben scheinen, beträgt die Abspielgeschwindigkeit +7,2 %,
wenn die Punkte der zweiten Linie stehenzubleiben scheinen, beträgt die Abspielgeschwindigkeit +3,3 %,
wenn die Punkte der dritten Linie stehenzubleiben scheinen, beträgt die Abspielgeschwindigkeit 0 %,
wenn die Punkte der untersten Linie stehenzubleiben scheinen, beträgt die Abspielgeschwindigkeit -3,3 %.
• Wenn Sie die Geschwindigkeit "45" einstellen möchten, drücken Sie die 45-Taste. Wenn Sie die
Geschwindigkeit "78" einstellen möchten, drücken Sie die 33-Taste und 45-Taste gleichzeitig.
D) Einstellen der Rotationsrichtung:
Nach dem Einschalten bewegt sich der Plattenteller vorwärts und die grüne LED leuchtet. Durch Drücken
der Direction-Taste können Sie die Rotationsrichtung umkehren (rote LED leuchtet).
BEDIENUNG
• Wählen Sie die Geschwindigkeit, die Sie für die abzuspielende Schallplatte benötigen.
• Legen Sie die Schallplatte auf. Falls nötig, verwenden Sie den Puck (z.B. bei Singles).
• Entfernen Sie den Nadelschutz und lösen Sie die Tonarmklemme.
• Drücken Sie den Startknopf, der Plattenteller beginnt sich zu drehen. Stellen Sie den Tonarmlift in die
"AUF" Position und bewegen Sie den Arm über die Schallplatte. Unter schlechten Lichtverhältnissen können
Sie die Nadellampe einschalten, um die gewünschte Startposition exakt anfahren zu können.
• Richten Sie den Tonarm über der ersten Rille der Schallplatte aus und stellen Sie den Tonarmlift in die
"AB" Position. Der Tonarm senkt sich langsam auf die Schallplatte.
• Falls Sie den Plattenteller anhalten wollen, ohne den Tonarm von der Schallplatte zu nehmen, drücken Sie
einfach den START/STOP-Taster. Durch die Elektro-Bremse wird die Rotation sofort gestoppt.
• Wenn Sie das Abspielen der Schallplatte kurz unterbrechen wollen, stellen Sie den Tonarmlift in die "AUF"
Position. Wenn Sie die Schallplatte weiter abspielen lassen wollen, stellen Sie den Tonarmlift einfach wieder
in die "AB" Position.
8/23
10603009X99NXS_V_2_0.DOC
• Wenn Sie den Tonarmlift nicht benötigen, lassen Sie ihn in der "AB" Position.
REINIGUNG UND WARTUNG
LEBENSGEFAHR!
Vor Wartungsarbeiten unbedingt allpolig vom Netz trennen!
Das Gerät sollte regelmäßig von Verunreinigungen wie Staub usw. gereinigt werden. Verwenden Sie zur
Reinigung ein fusselfreies, angefeuchtetes Tuch. Auf keinen Fall Alkohol oder irgendwelche Lösungsmittel
zur Reinigung verwenden!
Im Geräteinneren befinden sich keine zu wartenden Teile. Wartungs- und Servicearbeiten sind ausschließlich dem autorisierten Fachhandel vorbehalten!
Sollten einmal Ersatzteile benötigt werden, verwenden Sie bitte nur Originalersatzteile.
Sollten Sie noch weitere Fragen haben, steht Ihnen Ihr Fachhändler jederzeit gerne zur Verfügung.
TECHNISCHE DATEN
Typ:
Antriebsart:
Motor:
Drehzahl:
Drehzahlübergang:
Manueller Plattenspieler mit 3 Geschwindigkeiten
Quarzgesteuerter Direktantrieb
Bürstenloser 18 V Gleichstrommotor
33 1/3 U/Min, 45 U/Min und 78 U/Min
33 <-> 45 U/Min in < 1 Sek.
33 <-> 78 U/Min in < 1,5 Sek.
45 <-> 33 U/Min in < 1 Sek.
45 <-> 78 U/Min in < 1,5 Sek.
Rotationsrichtung:
Vorwärts/rückwärts
Geschwindigkeitsregelung:
± 10 % oder ± 20 % über Schieberegler
Anlaufmoment:
> 2,1 kg/cm
Gleichlaufschwankungen:
< 0,15 % WRMS
Startzeit:
< 1 Sek.
Bremszeit:
1,2 Sek. (1/4 Umdrehung)
Rumpeln:
50 dB DIN B
Plattenteller:
Außendurchmesser 320 mm
Gewicht 782 g
Tonarm:
S-förmig mit Kardanaufhängung
Tonarmlänge:
234 mm
Einstellung der Tonarmhöhe:
15-21 mm
Überhang:
20 mm
Einstellbare Nadelauflagekraft: 0-4 g
Anti-Skating-Bereich:
0-7 g
Spannungsversorgung:
230 V/50 Hz
115 V/60 Hz
Gesamtanschlusswert:
13 W
Anschlussbuchsen:
1 Cinch-Ausgangsbuchse für Beatcounter
1 Klinken-Fernstartbuchse
Maße:
450 x 352 x 148 mm
Gewicht:
13 kg
Bitte beachten Sie: Technische Änderungen ohne vorherige Ankündigung und Irrtum vorbehalten.
21.05.2003 ©
9/23
10603009X99NXS_V_2_0.DOC
OPERATING INSTRUCTIONS
DD-4220/DD-4250
EXTREME HIGH TORQUE-turntable
CAUTION!
Keep this device away from rain and moisture!
Unplug mains lead before opening the housing!
For your own safety, please read this user manual carefully
before you initial start-up.
Every person involved with the installation, operation and maintenance of this device has to
- be qualilfied
- follow the instructions of this manual
- consider this manual to be part of the total product
- keep this manual for the entire service life of the product
- pass this manual on to every further owner or user of the product
- include every supplementay update with the original manual
INTRODUCTION
Thank you for having chosen an OMNITRONIC DD-4220/DD-4250. If you follow the instructions given in this
manual, we can assure you that you will enjoy this device for many years.
Unpack your OMNITRONIC DD-4220/DD-4250.
Please make sure that there are no obvious transport damages. Should you notice any damages on the A/C
connection cable or on the casing, do not take the device into operation and immediately consult your local
dealer.
Features
Extreme High Torque-turntable
Direct drive with an extremely high torque • For professional use • High-quality tonearm bearing • Tonearm
height adjustable • With Reverse-function for adjusting the rotation-direction • Quartz-controlled for highest
precision • Quartz Lock-button for adjusting the preset standard speed • Three preset speeds (33 1/3, 45 and
78 RPM) • Speed-control switchable from +/- 10 % to +/- 20 % • Power-switch protected against accidentally
switching off (rotary switch) • Delivery without pick-up system • Large Start/Stop-button • Remote start
possible via ¼"-connection on the rear panel • Strobe lamp for exact speed adjustment • Target lamp •
Delivery includes removable dustcover • Adjustable anti-skating • Shock-absorbing feet
10/23
10603009X99NXS_V_2_0.DOC
SAFETY INSTRUCTIONS
CAUTION!
Be careful with your operations. With a dangerous voltage you can suffer a dangerous
electric shock when touching the wires!
This device has left our premises in absolutely perfect condition. In order to maintain this condition and to
ensure a safe operation, it is absolutely necessary for the user to follow the safety instructions and warning
notes written in this user manual.
Important:
Damages caused by the disregard of this user manual are not subject to warranty. The dealer will
not accept liability for any resulting defects or problems.
Always plug in the power plug least. Make sure that the power-switch is set to OFF position before you
connect the device to the mains.
Keep away from heaters and other heating sources!
If the device has been exposed to drastic temperature fluctuation (e.g. after transportation), do not switch it
on immediately. The arising condensation water might damage your device. Leave the device switched off
until it has reached room temperature.
Never put any liquids on the device or close to it. Should any liquid enter the device nevertheless, disconnect
from mains immediately. Please let the device be checked by a qualified service technician before you
operate it again. Any damages caused by liquids having entered the device are not subject to warranty!
This device falls under protection-class II and features a protective insulation.
Never let the power-cord come into contact with other cables! Handle the power-cord and all connections
with the mains with particular caution!
Make sure that the available voltage is not higher than stated on the AC voltage selector.
Make sure that the power-cord is never crimped or damaged by sharp edges. Check the device and the
power-cord from time to time.
Always disconnect from the mains, when the device is not in use or before cleaning it. Only handle the
power-cord by the plug. Never pull out the plug by tugging the power-cord.
CAUTION: Turn the amplifier on last and off first!
Please note that damages caused by manual modifications on the device or unauthorized operation by
unqualified persons are not subject to warranty.
Keep away children and amateurs!
CAUTION: High volumes can cause hearing damage!
There are no serviceable parts inside the device. Maintenance and service operations are only to be carried
out by authorized dealers.
OPERATING DETERMINATIONS
This device is a professional turntable for playing standard LPs or Singles. This product is allowed to be
operated with an alternating current of 115/230 V, 50/60 Hz and was designed for indoor use only.
11/23
10603009X99NXS_V_2_0.DOC
Do not shake the device. Avoid brute force when installing or operating the device.
When choosing the installation-spot, please make sure that the device is not exposed to extreme heat,
moisture or dust. There should not be any cables lying around. You endanger your own and the safety of
others!
Do not operate the device in extremely hot (more than 30° C) or extremely cold (less than 5° C)
surroundings. Keep away from direct insulation (particularly in cars) and heaters.
Operate the device only after having familiarized with its functions. Do not permit operation by persons not
qualified for operating the device. Most damages are the result of unprofessional operation!
Never use solvents or aggressive detergents in order to clean the device! Rather use a soft and damp cloth.
Please use the original packaging if the device is to be transported.
Never remove the serial barcode from the device as this would make the guarantee void.
If this device will be operated in any way different to the one described in this manual, the product may suffer
damages and the guarantee becomes void. Furthermore, any other operation may lead to dangers like shortcircuit, burns, electric shock, etc.
INSTALLATION
Install the turntable on a plane, stable ground.
Place the platter on the holder. Please note that the platter is fixed on the holder via an extremely powerful
magnet. Place the rubber mat on the platter.
Remove the hinges from the bottom side of the styrofoam. Install the dust-cover on the two hinges.
Remove the headshell from the cartridge holder and install your pick-up system.
Installing the pick-up system
Read the user manual of the pick-up system.
Put the stylus cover on the stylus.
Connect the Headshell's connection cables with the terminals of the pickup-system and make sure that the
occupation of the cables is correct.
The different colours mean:
Used colour:
White (L+)
Blue (L-)
Red (R+)
Green (L-)
Channel and poles:
Left, plus-pole
Left, minus-pole
Right, plus-pole
Right, minus-pole
Tighten the screws on the Headshell.
Adjusting the overhang
The overhang is the distance between the stylus and the center of the turntable.
For optimized pick-up, the overhang should be set to 20 mm.
Loosen the tightening screws on the headshell and move the system forwards or backwards until you reach
the desired position.
12/23
10603009X99NXS_V_2_0.DOC
Make sure that you tighten the screws before you operate the device again.
Screw the system on the tonearm.
Adjusting the tonearm-height
The tonarm-height varies from system to system. In order to guarantee perfect pick-up, we recommend to
adjust the tonearm-height via the adjusting-ring.
Before adjusting the tonarm-height please unlock the adjusting-ring lock.
Adjust the tonarm-height via as follows:
Height of pick-up
Adjusting-ring
system in mm
15
0
16
1
17
2
18
3
19
4
20
5
21
6
After adjusting the tonarm-height please lock the adjusting-ring lock.
GENERAL DESCRIPTION
13/23
10603009X99NXS_V_2_0.DOC
1.
2.
3.
4.
5.
6.
7.
Dustcover
Hinge
45 RPM adaptor
Platter
Center
Rubber mat
Voltage selector (underneath
the platter)
8. Power switch with strobelamp
9. START/STOP-button
10.Speed-selector
11.Target light
12.Lamp switch
13.Headshell
14.+/- 10 % button
15.+/- 20 % button
16.QUARTZ LOCK-button
17.Pitchfader
18.Direction-button
19.Tonearm
20.Adjusting-ring for adjusting
the tonearm-height
21.Armrest
22.Tonearm-clamp
23.Tonarm-lift
24.Anti-Skating-wheel
25.Counterweight-scale
26.Counterweight
27.Cartridge holder
CONNECTIONS
Connect the RCA-cables (white=left channel, red=right channel) with the PHONO IN-sockets of your
amplifier or mixer. Connect the ground lead with the ground terminal of your amplifier or mixer.
You can connect a footswitch etc. with the REMOTE START/STOP socket.
You can connect a beatcounter etc. with the PITCH OUTPUT-socket.
Connect the turntable to the mains.
ADJUSTING
A) Adjusting the counterweight
• Remove the stylus cover.
• Set the Anti-skating-wheel to the 0 position.
• Set the tonearm lift to the down position
• Release the tonearm from the armrest and move it to a position between the turntable and the armrest.
Make sure that you do not damage the stylus.
• Carefully hold the tonearm and adjust the counterweight by turning it clockwise or anti-clockwise
respectively. The tonearm should be balanced to a horizontal position.
• Move the tonearm back to the armrest and clamp it.
• Set the scale on the counterweight to the 0 position without turning the counterweight.
• Turn the counterweight clockwise until the scale shows the value corresponding to the pressure of the used
stylus. Please follow the pick-up system manufacturer's instructions.
B) Adjusting the tracking force
Set the Anti-skating-wheel to the value equivalent to the pressure of the used stylus. Please follow the pickup system manufacturer's instructions.
C) Adjusting the playback-speed
• Press the START/STOP-button and the turntable begins to rotate.
• You can adjust the playback-speed by up to 20 %. If you wish to adjust the playback-speed by +/- 10 %
press the +/- 10 % button. If you wish to adjust the playback-speed by +/- 20 % press the +/- 20 % button. If
you wish to have the exact playback-speed with 0 % adjustment, press the QUARTZ LOCK-button.
If the +/- 10 % button is pressed:
14/23
10603009X99NXS_V_2_0.DOC
• Watch the dotted lines on the platter's edge. The numbers next to the strobe-lamp correspond to the playback-speed adjusted via the Pitchfader.
Should the dots of the upper line seem to be standing still, the playback-speed is +7,2 %,
should the dots of the second line seem to be standing still, the playback-speed is +3,3 %,
should the dots of the third line seem to be standing still, the playback-speed is 0 %,
should the dots of the lowest line seem to be standing still, the playback-speed is -3,3 %,.
• If you wish to set the speed to 45 RPM, press the 45-button. If you wish to set the speed to 78 RPM,
simultaneously press the 33-button and the 45-button.
D) Adjusting the rotation-direction:
After turning the unit on, the platter moves forwards and the green LED is illuminated. You can reverse the
rotation-direction by pressing the Direction-button (red LED is illuminated).
OPERATION
• Select the speed required for the record you want to play.
• Put the record on the platter. Use the 45 RPM adaptor if needed (e.g. for singles).
• Remove the the stylus cover and release the tonearm.
• Press the START/STOP-button and the turntable begins to rotate.
• Set the tonearm lift to the up position and move the tonearm to the desired starting position. Under
insufficient lighting conditions use the target light for spotting the exact starting position.
• Set the tonearm lift to the down position and the tonearm slowly lowers to the record.
• Should you desire to stop the turntable without removing the tonearm from the record, simply press the
START/STOP-button. The electro-brake will immediately stop the rotation.
• Should you desire to interrupt playback for a short period, set the tonearm lift to the up position. When you
wish to continue playback, set the tonearm lift back to the down position.
• When you do not need the tonearm lift at all, leave it in the down positon.
CLEANING AND MAINTENANCE
DANGER TO LIFE!
Disconnect from mains before starting maintenance operation!
We recommend a frequent cleaning of the device. Please use a soft lint-free and moistened cloth. Never use
alcohol or solvents!
There are no servicable parts inside the device. Maintenance and service operations are only to be carried
out by authorized dealers.
Should you need any spare parts, please use genuine parts.
Should you have further questions, please contact your dealer.
15/23
10603009X99NXS_V_2_0.DOC
TECHNICAL SPECIFICATIONS
Type:
Drive-method:
Motor:
Speed:
Change-time between the speeds:
Rotation-direction:
Pitch adjustment:
Initial torque:
Wow & Flutter:
Start time:
Stop time:
Rumble:
Platter:
Tonearm:
Tonearm-length:
Adjusting the tonearm-height:
Overhang:
Adjustable stylus-pressure
Anti-Skating-range:
Power supply:
Power consumption:
Connectors:
Dimensions:
Weight:
3-speed full manual turntable
Quartz-controlled direct-drive
Brushless 18 V DC-motor
33 1/3 RPM, 45 RPM and 78 RPM
33 <-> 45 RPM in < 1 sec.
33 <-> 78 RPM in < 1.5 sec.
45 <-> 33 RPM in < 1 sec.
45 <-> 78 RPM in < 1.5 sec.
Forwards/backwards
± 10 % or ± 20 % via fader
> 2.1 kg/cm
< 0.15 % WRMS
< 1 sec.
1.2 sec. (¼ rotation)
50 dB DIN B
Outer diameter 320 mm
Weight 782 g
S-shape with Cardan's suspension
234 mm
15-21 mm
20 mm
0-4 g
0-7 g
230 V/50 Hz
115 V/60 Hz
13 W
1 RCA output-socket for Beatcounter
One 6.3-mm-remote-start-socket
450 x 352 x 148 mm
13 kg
Please note: Every information is subject to change without prior notice. 21.05.2003 ©
16/23
10603009X99NXS_V_2_0.DOC
MODE D'EMPLOI
DD-4220/DD-4250
Platine disque EXTREME HIGH TORQUE
ATTENTION!
Protéger de l'humidité.
Débrancher avant d’ouvrier le boîtier!
Pour votre propre sécurité, veuillez lire ce mode d'emploi avec attention avant la première mise en
service.
Toute personne ayant à faire avec le montage. la mise en marche. le maniement et l’entretien de cet
appareil doit
- être suffisamment qualifiée
- suivre strictement les instructions de service suivantes.
- considérer ce mode d'emploi comme faisant partie de l'appareil
- conserver le mode d'emploi pendant la durée de vie de l'article
- transmettre le mode d'emploi à un éventuel acheteur ou utilisateur de l'appareil
- s'assurer qu'en cas de besoin, chaque modification obtenue soit ajoutée au mode d'emploi.
INTRODUCTION
Nous vous remercions d'avoir choisi un OMNITRONIC DD-4220/DD-4250. Si vous respectez les instructions
de service suivantes, vous allez profiter longtemps de votre achat.
Sortez le OMNITRONIC DD-4220/DD-4250 de son emballage.
Avant tout, assurez-vous que l'appareil n'a pas subi de dommages lors de son transport. Si tel était le cas,
contactez immédiatement votre revendeur.
Features
Platine disque Extreme High Torque
Entraînement direct avec un couple de rotation extrêmement haut • Pour des utilisations professionnelles •
Bras de lecture avec suspension de haute valeur • Bras de lecture ajustable en hauteur • Avec fonction
"Reverse" pour ajuster la direction de rotation • Entraînement direct par quartz pour la précision la plus
élevée • Touche Quartz Lock pour ajuster la vitesse standard préajustée • Trois vitesses préajustées (33 1/3,
45 et 78 T/min) • Vitesse réglable commutable de +/-10 à +/-20 % • Commutateur principal protégé contre
déactivation sans intention (commutateur rotatif) • Livré sans système pick-up • Grand bouton Start/Stop •
Fonction téléstart grâce à la douille jack 6,35 au dos • Lampe strobo pour un réglage exact de la vitesse •
Lumière cible séparée (escamotable) • Livré avec couvercle acrylique anti-poussière amovible • Commande
anti-dérapage réglable • Pieds anti-chocs
17/23
10603009X99NXS_V_2_0.DOC
INSTRUCTIONS DE SECURITE
ATTENTION!
Soyez prudent, lors de manipulations électriques avec une tension dangereuse vous
êtes soumis à des risques d'électrocution!
Cet appareil a quitté les ateliers dans un état irréprochable. Pour assurer cet état et un bon fonctionnement
sans danger, l'utilisateur doit suivre les instructions de sécurité et les notes d'avertissement contenues dans
ce mode d'emploi.
Attention:
Tout dommage occasionné par la non observation de ce mode d'emploi annulle la garantie. Le
fabricant n'assume pas de responsabilité pour des dommages qui en résultent.
La fiche de secteur doit toujours être branchée en dernier lieu. Assurez-vous que l'interrupteur secteur est en
position «OFF» avant de brancher l'appareil au secteur.
Tenez l'appareil éloigné de toute source de chaleur comme des éléments de chauffage ou des radiateurs
souflants.
Ne mettez pas l'appareil en service, lorsqu'il est transporté d'un endroit froid à un endroit chaud. Il se forme
de la condensation susceptible d'endommager votre appareil. Ne pas mettez l'appareil sous tension avant
qu'il ait atteint la température ambiante!
Ne déposez jamais de récipient contenant un liquide qui pourrait tomber sur le dessus de l'appareil ou à
proximité immédiate de celui-ci. Si toutefois, du liquide devait s'infiltrer dans l'appareil, le débrancher
immédiatement, puis le faire vérifier par un technicien de service compétent avant de le réutiliser. Les
dommages causés par l'infiltration de liquides dans l’appareil ne sont pas couverts par la garantie.
La construction de l'appareil est conforme aux normes de sécurité de catégorie II. Cet appareil dispose d'une
double isolation.
Ne laissez pas les câbles d'alimentation entrer en contact avec d'autres câbles! Soyez prudent lorsque vous
manipulez les câbles et les connexions! Ne manipulez jamais ces parts avec les mains mouillées!
Assurez-vous que la tension électrique à brancher ne soit pas supérieure à celle ajustée sur le sélecteur de
tension.
Prenez garde de ne pas coincer ou abimer le câble secteur par des arêtes trachantes. Contrôlez l'appareil et
les câbles secteur régulièrement pour des dommages.
Débranchez l'appareil du secteur lorsque vous ne l'utilisez pas et chaque fois avant de le nettoyer! Dans ce
but, utilisez les surfaces de maintien sur la fiche et ne tirez jamais sur le câble secteur!
ATTENTION: Allumez toujours l'amplificateur en dèrnier lieu et éteignez-le en premier!
Tenez compte du fait que tout dommage résultant d'une modification manuelle sur cet appareil n'est pas
couvert par la garantie.
Tenir les enfants et les novices éloignés de l'appareil.
ATTENTION: Un volume d'écoute trop élevé peut causer des troubles auditifs!
L'intérieur de l'appareil ne contient pas de parts nécessitant un entretien. L'entretien et les réparations
doivent être effectuées uniquement par du personnel de service compétent!
18/23
10603009X99NXS_V_2_0.DOC
EMPLOI SELON LES PRÉSCRIPTIONS
Cet appareil est une platine disque pour jouer des platines standards et singles. Cet appareil doit être
connecté avec une tension alternative de 115/230 V, 50/60 Hz et a été conçu pour un usage dans des
locaux clos.
Evitez les secousses et tout emploi de force lors de l’installation ou l'utilisation de l'appareil.
Quant à la choix de la place d'installation, évitez toutefois les endroits trop chauds, humides ou poussiéreux.
Assurez-vous que les câbles ne traînent pas au sol. Il en va de votre propre sécurité et de celle d'autrui!
N’utilisez pas l'appareil, lorsque la température ambiante est supérieure à 35° C ou inférieure à 5° C.
N’exposez pas l'appareil directement aux rayons solaires (lors d'un transport dans un véhicule fermé par
exemple) et aux éléments de chauffage.
N'utilisez l'appareil qu'après avoir pris connaissance de ses fonctions. Ne laissez pas des personnes
incompétentes utiliser cet appareil. La plupart des pannes survenant sur cet appareil sont dues à une
utilisation inappropriée par des personnes incompétentes!
Ne nettoyez jamais l'appareil avec des produits de nettoyage trop puissants ou abrasifs, mais utilisez un
chiffon doux, humide.
Si vous deviez transporter l'appareil, utilisez l'emballage d'origine pour éviter tout dommage de transport.
Ne jamais retirez le code barre de l'appareil, puisque ceci annullerait toute garantie.
Si l'appareil est utilisé autrement que décrit dans ce mode d'emploi, ceci peut causer des dommages au
produit et la garantie est annullée alors. Par ailleurs, chaque autre utilisation est liée à des dangers, comme
par ex. court circuit, incendie, électrocution, etc.
MISE EN SERVICE
Placez la platine disque sur une surface horizontale plane et stable.
Mettez en place le plateau sur la fixation. Veuillez noter que le plateau est fixé avec un aimant extrèmement
fort. Mettez en place le le tapis en caoutchouc sur le plateau.
Rémovez les charnières du styropor. Mettez en place le couvercle de protection à l'aide des deux charnières
Rémovez le Headshell du porteur de système et installez votre système.
Installer le systeme
Veuillez lire le mode d'emploi du système.
Installez la protection du diamant.
Connectez les câbles de connection du Headshell avec les points de connection du nouveau systèm et
assurez-vous que l'occupation des câbles est correcte.
Le couleurs diffèrents indiquent:
Couleur:
Blanc (L+)
Bleu (L-)
Roug (R+)
Vert (L-)
Canal et pôle
Gauche, pôle +
Gauche, pôle Droite, pôle +
Droite, pôle -
Vissez les vis de fixation du Headshell.
19/23
10603009X99NXS_V_2_0.DOC
Ajuster la saillie
La saillie est la distance entre le diamant et l’axe central.
Il est nécéssaire que vous ajustez la saillie à 20 mm.
Désserrer les vis de fixation du Headshell et positionner comment vous désirez.
Assurez-vous que les vis de fixation sont bien serrés avant l’operation du table-tournant.
Vissez le système au bras de lecture.
Ajuster l'hauteur du bras de lecture
L'hauteur du bras de lecture varie de système à système. Pour une lecture optimale, nous recommendons
d'ajuster l'hauteur du bras de lecture grâce au bague d'ajustage.
Avant d'ajuster l'hauteur du bras de lecture veuillez desserrer le dispositif de blocage.
Ajustez l'hauteur du bras de lecture de la manière suivante:
Hauteur du système
en mm
15
16
17
18
19
20
21
Ajustage
0
1
2
3
4
5
6
Après avoir ajusté l'hauteur du bras de lecture veuillez serrer le dispositif de blocage.
20/23
10603009X99NXS_V_2_0.DOC
DESCRIPTION
1.
2.
3.
4.
5.
6.
7.
Couvercle anti-poussière
Charnière
Adapteur 45 T/min
Plateau
Axe central
Tapis en caoutchouc
Sélecteur de tension
(au-dessus du plateau)
8. Interrupteur ON/OFF avec
lampe strobo
9. Commutateur START/STOP
10.Selecteur de la vitesse
11.Lumière cible
12.Interruptuer lumière cible
13.Headshell
14.Touche +/- 10 %
15.Touche +/- 20 %
16.Touche QUARTZ LOCK
17.Pitchfader
18.Touche de direction
19.Bras de lecture
20.Bague d'ajustage pour
ajuster l'hauteur du bras
21.Porte-bras
22.Clip de retenue
23.Levier de commande
24.Régulateur Anti-Skating
25.Bague du contrepoids
26.Contrepoids
27.Porteur du système
CONNEXIONS
Connecter les câbles cinch avec les douilles PHONO IN de votre amplificateur ou tâble de mixage.
Connecter le câble masse à la borne masse de votre amplificateur ou tâble de mixage.
21/23
10603009X99NXS_V_2_0.DOC
Vous pouvez connecter une commande à pedale à la douille REMOTE START/STOP.
Vous pouvez connecter un Beatcounter à la douille PITCH OUTPUT.
Branchez l'appareil.
AJUSTMENT
A) Ajustment du contrepoids
• Enlever le capot de protection du diamant.
• Mettre la commande anti-derapage à la position 0.
• Pousser le levier de commande vers la position "DOWN" (Bas).
• Libérez le bras de lecture du porte-bras et positionner le bras de lecture entre Platine disque et porte-bras.
Assurez-vous que vous ne détériorez pas le diamant.
• L'avancement dans le sens horaire du CONTREPOIDS produira la descente du côté cartouche du BRAS
DE LECTURE. L'avancement dans le sens antihoraire produira l'oppose. Tournez le CONTREPOIDS dans
le sens horaire ou antihoraire selon le besoin, jusqu'a ce que le BRAS DE LECTURE soit equilibré
horizontalement.
Ce moment se produit, et vous le verrez facilement, lorsque le BRAS DE LECTURE "flotte" librement.
• Placez le BRAS DE LECTURE sur le PORTE-BRAS bloquez-le en place avec le SERRE-BRAS.
• Le BRAS DE LECTURE etant bloqué sur le PORTE-BRAS, tenez le CONTREPOIDS sans bouger dans la
main tout en tournant la BAGUE DE PRESSION DU DIAMANT jusqu'a ce que le chiffre "0" sur la bague
s'aligne avec la ligne mediane sur l'arbre arriere du BRAS DE LECTURE. Maintenant, I'equilibre zero (0)
horizontal est accompli.
• Mettez le CONTREPOIDS à la même valeur que celle de la pression du diamant. Veuillez suivre les
instructions du fabricante du système.
B) Réglage de la commande Anti-Skating
Mettez la COMMANDE ANTI-SKATING à la même valeur que celle de la pression du diamant. Veuillez
suivre les instructions du fabricante du système.
C) Ajustment de la vitesse
• Presser le commutateur START/STOP et le plateau commence à tourner.
• Vous pouvez ajuster la vitesse jusqu'à 20 %. Si vous désirez d'ajuster la vitesse par +/- 10 %, pressez la
touche +/- 10 %. Si vous désirez d'ajuster la vitesse par +/- 20 %, pressez la touche +/- 20 %. Si vous
désirez d'avoir la vitesse exacte avec un ajustement de 0 %, pressez la touche QUARTZ LOCK.
Si la touche +/- 10 % est pressée:
• Observer les bandes indicatrices T/min. Les bandes indiquent la vitesse ajustée avec le Pitchfader.
Si les points de la bande en haut semblent à avoir arrêttés, la vitesse ajustée est +7,2 %,
si les points de la deuxième bande semblent à avoir arrêttés, la vitesse ajustée est +3,3 %,
si les points de la troisième bande semblent à avoir arrêttés, la vitesse ajustée est 0 %,
si les points de la bande au-dessus semblent à avoir arrêttés, la vitesse ajustée est-3,3 %.
• Si vous voulez mettre la vitesse à 45 T/min, pressez la touche 45. Si vous voulez mettre la vitesse à 78
T/min, pressez la touche 33 et 45 ensemble.
D) Ajustment de la direction de rotation:
Après de mettre l'appareil en service, le plateau tourne en avant et la DEL verte est allumée. Vous pouvez
inverser la direction de rotation en pressant la touche de direction (DEL rouge allumée).
MANIEMENT
• Choisissez la vitesse désirée.
• Placez un disque sur le plateau.
• Enlevez la protection du diamant.
• Appuyez sur le commutateur START/STOP. Le plateau du platine disque commencera a tourner.
• Poussez le levier de commande vers la position „UP“ (haut). Positionnez le bras de lecture au-dessus du
sillon desiré du disque. S’il n’y a pas de lumière suffisant, veuillez allumer la pointe du diamant avec la
lumière cible.
• Poussez le levier de commande vers la position "DOWN" (Bas). Le bras de lecture descendra lentement et
deposera le diamant sur le disque; en ce moment, vous entendrez l'enregistrement.
• Si vous désirez d’arrêter la rotation du table-tournant, pressez le commutateur START/STOP. Le frein
électrique arrête la rotation toute suite.
22/23
10603009X99NXS_V_2_0.DOC
• Si vous désirez de interromper la lecture pour une periode courte, poussez le levier de commande vers la
position „UP“ (haut). Quand vous désirez de continuer la lecture, poussez le levier de commande vers la
position „DOWN“ (bas).
• Quand vous n’avez pas besoin du levier de commande, restez-le à la position „DOWN“ (bas).
NETTOYAGE ET MAINTENANCE
DANGER DE MORT!
Toujours débrancher avant de proceder à l'entretien!
L'appareil doit être nettoyé régulièrement de contaminations comme de la poussière etc. Pour le nettoyage,
utilisez un torchon non pelucheux humide. Ne pas utiliser un aucun cas de l’alcool ou des détergents pour le
nettoyage.
L'intérieur de l'appareil ne contient pas de parts nécessitant un entretien. L'entretien et les réparations
doivent être effectués uniquement par du personnel de service compétent!
Si des pièces de rechange sont nécéssaires, toujours utiliser des pièces d'origine.
Pour tout renseignement complémentaire, votre revendeur se tient à votre entière disposition.
CARACTERISTIQUES TECHNIQUES
Type:
Méthode d'entraînement:
Moteur:
Vitesse:
Transition de vitesse:
Direction de rotation:
Vitesse réglable:
Couple de démarrage:
Pleurage et scintillement:
Temps de départ:
Temps d'arrêt:
Ronflement:
Plateau:
Bras de lecture:
Longeur du bras de lecture:
Ajustage d'hauteur du bras de lecture:
Saillie:
Réglage de la pression d'aiguille:
Réglage de la commande anti-dérapage:
Alimentation:
Puissance de rendement:
Douilles de connexion:
Dimensions:
Poids:
Platine disque manuel avec 3 vitesses
Transmission directe contrôlée par quartz
Moteur cc 18 V sans balais
33 1/3 T/min, 45 T/min et 78 T/min
33 <-> 45 T/min en < 1 sec.
33 <-> 78 T/min en < 1,5 sec.
45 <-> 33 T/min en < 1 sec.
45 <-> 78 T/min en < 1,5 sec.
En avant/en retour
± 10 % ou ± 20 % via fader
> 2,1 kg/cm
< 0,15 % WRMS
< 1 sec.
1,2 Sek. (1/4 rotation)
50 dB DIN B
Diamètre extérieur 320 mm
Poids 782 g
en forme de S avec suspension à Cardan
234 mm
15-21 mm
20 mm
0-4 g
0-7 g
230 V/50 Hz
115 V/60 Hz
13 W
1 douille cinch de sortie pour Beatcounter
1 douille jack 6,3 mm de téléstart
450 x 352 x 148 mm
13 kg
Attention! Les donnés imprimée dans ce mode d’emploi sont susceptibles d’être modifiées sans
préavis. 21.05.2003 ©
23/23
10603009X99NXS_V_2_0.DOC