1
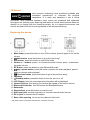
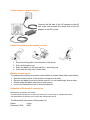
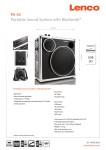
BT-4304 3D SOUND SPEAKER WITH BLUETOOTH® User manual www.lenco.eu V1.0 Table of contents What is in the box? ..................................................................................................... 3 3D Sound ................................................................................................................... 4 Exploring the device ................................................................................................... 4 Exploring the remote control ....................................................................................... 5 Getting started............................................................................................................ 5 Where to install ....................................................................................................... 5 Connecting to a power source ................................................................................. 6 Battery maintenance ............................................................................................... 6 Establish a Bluetooth® connection .......................................................................... 6 Basic operation .......................................................................................................... 7 Bluetooth® .............................................................................................................. 7 AUX ........................................................................................................................ 8 Sleep timer .............................................................................................................. 8 Reset ...................................................................................................................... 8 System settings .......................................................................................................... 8 Setting the display backlight level ........................................................................... 8 Setting the clock ...................................................................................................... 8 Troubleshooting ......................................................................................................... 8 Specifications ............................................................................................................. 9 Safety instructions .................................................................................................... 10 Declaration of Conformity ......................................................................................... 11 Do not distribute copyright-protected material .......................................................... 12 Keep your personal and important data safe ............................................................ 12 Disclaimer ................................................................................................................ 12 Service and support ................................................................................................. 13 End of life ................................................................................................................. 14 Dear customer, Thank you for buying this Lenco product. Quality and usability is our top priority. In order to let you fully enjoy this tablet, we have manufactured this product using high quality standards, materials, components, and care. Please read all safety instructions and national restrictions, before you use this product. Note: This user manual was printed prior to the development of this product. When operability or other functions needed improvement, priority went to the product specification itself, and not to this manual. In such instances, the instruction manual may not entirely match all the functions of the actual product. Therefore, the actual product and packaging, as well as the name and illustration, may differ from the manual. The screen shown as an example in this manual may differ from the actual screen display. Lenco is not liable for any consequential damage. What is in the box? This device has been assembled with the utmost care. If, however, an accessory is missing, please contact your local dealer immediately. Checking the accessories supplied: 3D Sound sonic emotion technology uses wavefield synthesis and soundfield reproduction to eliminate the physical dimensions of a room and transform it into a virtual soundfield. With wavefield synthesis sonic waves are produced and dispersed throughout the listening room ensuring localization of virtual sound sources does not depend on or change with the listener's position. As in a natural environment real sounds are heard from all around regardless of the device positioning. Exploring the device 1. Mute button, press this button to turn off the volume, press it again to turn on the volume 2. Next button, press this button to go to the next song¹ 3. AUX button, press this button to enter AUX mode 4. Volume + / - buttons, press + to increase the audio volume, press - to decrease the audio volume 5. BT Button, press this button to enter Bluetooth® mode 6. play / pause button, press this button to pause the audio playback, press it again to resume audio playback¹ 7. Previous button, press this button to go to the previous song¹ 8. Speakers 9. Standby button, press this button to turn the unit on or off 10. LCD Display, here the most important information will be displayed 11. Infrared receiver, this sensor is to receive the signals of the remote control 12. Bluetooth® indicator, this LED shows the Bluetooth® status 13. Subwoofer 14. Reset button, press this button to reset the unit 15. AUX input jack, use this connection to connect external audio devices 16. DC in jack, to connect the AC adaptor 17. Bass reflex opening, do not put any objects in this hole! ¹ This feature does not function with devices connected via AUX. Exploring the remote control 1. Infrared transmitter, this LED sends the remote control commands to the main unit 2. Display button, when the unit is on press this button to display the clock 3. Standby button, press this button to turn the unit on or off 4. Dimmer button, press this button to set the display backlight level 5. AUX button, press this button to enter AUX mode 6. Next button, press this button to go to the next song¹ 7. 12 / 24 hour button, press this button to switch between a 12 (AM / PM) or 24 hours clock format. 8. Volume + / - buttons, press + to increase the audio volume, press - to decrease the audio volume 9. Mute button, press this button to turn off the volume, press it again to turn on the volume 10. Sleep button, press here to set the sleep timer 11. BT Button, press this button to enter Bluetooth® mode 12. play / pause button, press this button to pause the audio playback, press it again to resume audio playback¹ 13. Previous button, press this button to go to the previous song¹ 14. HR button, use this button to adjust the time (hours) 15. MIN button, use this button to adjust the time (minutes) 16. Set clock button, press this button to enter time set mode 17. Battery compartment, open to insert or replace the battery ¹ This feature does not function with devices connected via AUX. Getting started Where to install Never place this device in direct sunlight. For comfortable viewing, we recommend a soft light. Place it on a sturdy platform of which the surface should be flat and steady, so the product can’t fall or hit by any objects. Make sure the product is placed in such a manner that nothing can fall on top of it, as pressure will damage or break the product. Prevent insertion of objects into the ventilation slots, or openings in the cabinet at all time. Connecting to a power source Connect the flat side of the AC adaptor to the AC wall outlet and connect the round side of the AC adaptor to the DC in jack. Install the battery in the remote control 1. 2. 3. 4. Press the locking tab in the direction of the arrow. Pull out the battery tray. Place the battery in the tray with the + side facing up Push pack the tray until it clicks back. Battery maintenance To maximize the battery and remote control lifetime, please follow these instructions: Use the remote control of the product at least once a week. Remove the battery from the remote control if it is not used longer than a week. Always keep the tablet away from a heat source. Lenco recommends the use of A-brand batteries. Establish a Bluetooth® connection Bluetooth® LED indicator information: The Bluetooth® LED will burn continuously if the device is searching for a Bluetooth® device. The Bluetooth® LED will blink if it is paired with a Bluetooth® device. The Bluetooth® information of this product is: Name: Lenco Password / PIN: 0000 Before you start the configuration, make sure that the Bluetooth® connection on your Smartphone or tablet is turned on. Important note: Some Bluetooth® devices may not be compatible with this device. 1. Turn on the device by pressing the standby button on the remote control or main unit. 2. Go to Bluetooth® mode by pressing the BT button. 3. Wait until the Bluetooth® indicator LED burns continuously. 4. Search for Lenco on your Smartphone or tablet and connect with it. 5. If the pairing is successful the Bluetooth® indicator LED starts blinking. Auto-pairing / connection: When the Bluetooth® connection gets interrupted or lost switch to AUX mode by pressing the AUX button on the remote control or main unit and switch back to Bluetooth® mode by pressing the BT button on the remote control or main unit. The device with now automatically reconnect with the last paired Smartphone or tablet. You can also turn the device off and on to reconnect. Manual pairing / connection: In the case you would like to pair/connect other Smartphone's or tablets, press the BT button to enter Bluetooth® mode, at the first 30 seconds, the device will search for the last paired Bluetooth® device. If the device cannot find it after 30 seconds than you can follow about steps 3 to 5 to pair another Smartphone or tablet. Note: If the unit cannot find any Bluetooth® mobile device for pairing around an hour, the unit will go into standby mode automatically. Basic operation Use the standby button on the main unit or remote control to turn the unit on and off. Volume + / - buttons on the main unit or remote control, press + to increase the audio volume, press - to decrease the audio volume. Mute button on the main unit or remote control, press this button to turn off the volume, press it again to turn on the volume. Press the clock button on the remote control to display the clock. Bluetooth® All of below functions only work if you are in Bluetooth® mode and if a Smartphone or tablet is paired. Play your music Press the play button on the main unit or remote control to start or pause the music playback. Next button, press this button on the main unit or remote control to go to the next song. Previous button, press this button on the main unit or remote control to go to the previous song. Volume + / - buttons, press + to increase the audio volume, press - to decrease the audio volume. Mute button, press this button to turn off the volume, press it again to turn on the volume. AUX Use the AUX connection to connect an external audio source. Press AUX on the main unit or on the remote control to enter AUX mode. When AUX mode is active you can only use the volume controls of the Lenco device all other functions need to be operated from the device that send the signal to the Lenco device. Sleep timer This feature will turn off the device after a preset amount of time (Up to 90 minutes). To activate the sleep timer mode press the button on the remote control repeatedly until the desired time is reached. You can choose out of 15, 30, 45, 60 and 90 minutes. Take note that the sleep timer doesn't turn off the external audio device. Reset If the device does not respond to the control buttons anymore, press the reset button to reset the device. The reset clears the system memory so all settings will be erased. System settings Setting the display backlight level Press the dimmer button on the remote control to adjust the backlight intensity. The intensity can be set low or high. Setting the clock 1. Press the 12 / 24 hour button on the remote control to set the desired clock format. 2. Press the set clock button on the remote control to enter time set mode. 3. Press the HR button on the remote control to set the hours. 4. Press the MIN button on the remote control to set the minutes. Troubleshooting Problem Unit does not turn on No sound Remote control does not function Unit does not respond Answer Check if the adaptor is connected correctly Did you select the right source (Bluetooth® of AUX) Is the external audio source set correct? Is the Bluetooth® device paired? Press mute Press volume + Are you within the operating area? In strong light (outdoor) the remote control may not work properly. Maybe the battery is empty? Reset the unit. Specifications Power supply External AC/DC adaptor Input AC ~ 100-240V, 50/60Hz Output DC 18V 3000mA Standby <1W Operation 55 W (max) Temperature -10~+35°C Humidity 5%~90% Power Consumption Operating conditions Speakers 6 X 13 W RMS Subwoofer 40 W RMS Power output Output Frequency response ±1,5dB 20Hz~20kHz S/N >80dB @ 1kHz THD + Noise ≤-60dB @ 1kHz L/R Channel output Real 3D sound Equalizer No DC in Jack Connections External audio input AUX 3,5mm Information display color Blue Dimmer function Display Yes Viewing angle Clock 90° Yes Multi language OSD Other features Sleep timer Low / High 12 / 24 Hour No Off, 15, 30, 45, 60, 90 (minutes) 5m Operating range Remote control 30° Angle Battery 1x CR2025 Main unit 200 x 200 x 195 mm Remote control 40 x 86 x 6 mm Dimensions, length, width, height Main unit 2,6 KG Remote control 14 Grams Weight Housing material Plastic Certificates CE, RoHs Safety instructions IMPORTANT SAFETY INSTRUCTIONS - READ CAREFULLY BEFORE USE. CAUTION RISK OF ELECTRICAL SHOCK DO NOT OPEN CAUTION: TO PREVENT AN ELECTRICAL SHOCK, DO NOT REMOVE ANY COVER SCREWS. THERE ARE NO USER SERVICEABLE PARTS INSIDE. REQUEST A QUALIFIED SERVICE PERSON TO PERFORM SERVICING. This symbol indicates that there are important operating maintenance instructions in the user manual accompanying this device. This symbol indicates that dangerous voltage is present within this device, constituting a risk of electric shock or personal injury. Keep these instructions in mind: Do not use this device near water. Clean only with a slightly damp cloth. Do not cover or block any ventilation opening. When placing the device on a shelf, leave 5 cm (2”) free space around the whole device. Install in accordance with the supplied user manual. Don’t step on or pinch the power cord. Be very careful, particularly near the plugs and the cable’s exit point. Do not place heavy items on the power cord, which may damage it. Keep the entire device out of children’s reach! When playing with the power cable, they can seriously injure themselves. Unplug this device during lightning storms or when unused for a long period. Keep the device away from heat sources such as radiators, heaters, stoves, candles and other heat-generating products. Avoid using the device near strong magnetic fields. WARNING! NEVER INSERT AN OBJECT INTO THE PRODUCT THROUGH THE VENTS OR OPENINGS. HIGH VOLTAGE FLOWS THRU THE PRODUCT AND INSERTING AN OBJECT CAN CAUSE ELECTRIC SHOCK AND/OR SHORT CIRCUIT INTERNAL PARTS. FOR THE SAME REASON, DO NOT SPILL WATER OR LIQUID ON THE PRODUCT. Do NOT use in wet or moist areas such as bathrooms, steamy kitchens or near swimming pools. Safety instructions - continued Do not use this device when condensation may occur. This device is produced according to all current safety regulations. The following safety tips should safeguard users against careless use and dangers involved with such use. Although this device is manufactured with the utmost care and checked several times before leaving the factory, it is still possible that problems may occur, as with all electrical appliances. If you notice smoke, an excessive build-up of heat or any other unexpected phenomena, you should disconnect the plug from the main power socket immediately. This device must be well ventilated at all time! This device must operate on a power source as specified on the specification label. If you are not sure of the type of power supply used in your home, consult your dealer or local power company. The socket outlet must be installed near the equipment and must be easily accessible. Do not overload AC outlets or extension cords. Overloading can cause fire or electric shock. Devices with a Class II adaptor do not need a earthed connection. Keep away from rodents. Rodents enjoy biting on power cords. Always hold the plug when pulling it out of the main supply socket. Do not pull the power cord. This can cause a short circuit. The screen is made of plastic and can break when damaged. When broken, be careful with sharp edged plastic splinters to avoid injury. Avoid placing the device on any surfaces that may be subject to vibrations or shocks. To protect the device during a thunderstorm, unplug the AC power cable. When the device is not in use for long periods, unplug the AC power cable for safety reasons. Do NOT knock on, press, hit or shake the screen as you may damage the internal circuits. To clean the device, use a soft dry cloth. Do NOT use solvents or petrol based fluids. To remove severe stains, you may use a damp cloth with dilute detergent. Lenco is not responsible for damage or lost data caused by malfunction, misuse, modification of the device. WARNING: Long-term exposure to loud sounds may lead to temporary or permanent hearing impairment. Declaration of Conformity Products with the CE marking comply with the EMC Directive (2004/108/EC) and the Low Voltage Directive (2006/95/EC) issued by the Commission of the European Community. Do not distribute copyright-protected material Do not distribute copyright-protected material without the permission of the content owners. Doing this may violate copyright laws. The manufacturer is not liable for any legal issues caused by the user’s illegal use of copyrighted material. Keep your personal and important data safe When you want to dispose of your device reset your device to prevent misuse of your personal information. Disclaimer Some content and services accessible through this device belong to third parties and are protected by copyright, patent-, trademark- and/or other intellectual property laws. Such content and services are solely provided for your personal and non-commercial use. You may not use any content or services in a manner that has not been authorized by the content owner or service provider. Without limiting the foregoing, unless expressly authorized by the applicable content owner or service provider, you may not modify, copy, republish, upload, post, transmit, translate, sell, or create derivative works, exploit, or distribute in any manner or medium any content or services displayed through this device. “THIRD PARTY CONTENT AND SERVICES ARE PROVIDED ‘AS IS.’ LENCO DOES NOT WARRANT CONTENT OR SERVICES SO PROVIDED, NEITHER EXPRESSLY NOR IMPLIED, FOR ANY PURPOSE. LENCO EXPRESSLY DISCLAIMS ANY IMPLIED WARRANTIES, INCLUDING BUT NOT LIMITED TO, WARRANTIES OF MERCHANTABILITY OR FITNESS FOR A PARTICULAR PURPOSE. LENCO DOES NOT GUARANTEE THE ACCURACY, VALIDITY, TIMELINESS, LEGALITY, OR COMPLETENESS OF ANY CONTENT OR SERVICE MADE AVAILABLE THROUGH THIS DEVICE. UNDER NO CIRCUMSTANCES, INCLUDING NEGLIGENCE, SHALL LENCO BE LIABLE. NEITHER IN CONTRACT, NOR TORT, FOR ANY DIRECT, INDIRECT, INCIDENTAL, SPECIAL OR CONSEQUENTIAL DAMAGES, ATTORNEY FEES, EXPENSES, OR ANY OTHER DAMAGES ARISING OUT OF, OR IN CONNECTION WITH, ANY INFORMATION CONTAINED IN, OR AS A RESULT OF THE USE OF ANY CONTENT OR SERVICE BY YOU OR ANY THIRD PARTY, EVEN IF ADVISED OF THE POSSIBILITY OF SUCH DAMAGES.” Third party services may be terminated or interrupted at any time, and Lenco makes no representation or warranty that any content or service will remain available for any period. Content and services are transmitted by third parties by means of networks and transmission facilities over which Lenco has no control. Without limiting the generality of this disclaimer, Lenco expressly disclaims any responsibility or liability for any interruption or suspension of any content or service made available through this device. Lenco is neither responsible nor liable for customer service related to the content and services. Any question or request for service relating to the content or services should be made directly to the respective content and service providers. sonic emotion and are registered trademarks of sonic emotion ag. Service and support For information and support: www.lenco.eu Lenco helpdesk: Germany The Netherlands Belgium France 0900-1520530 0900-23553626 02-6200115 0170480005 (Local charges) (Local charges + 1ct P/min) (Local charges) (Local charges) The helpdesk is accessible from Monday to Friday from 9 AM till 6 PM. In case your device needs repair, our helpdesk will redirect you to your local dealer. Lenco offers service and warranty in accordance to European law, which means that in case of repair (both during and after the warranty period), you should contact your local dealer. Please note: It is not possible to send products to directly Lenco for repair. Important note: If this device will be opened, or accessed in any way by a nonofficial service center, the warranty expires immediately. End of life This symbol indicates that the relevant electrical product or battery can’t be disposed as general household waste in Europe. To ensure the correct waste treatment of this device and the battery, please dispose them in accordance to any applicable local laws of requirement for disposal of electrical equipment and batteries. In doing so, you will help to conserve natural resources and improve standards of environmental protection in treatment and disposal of electrical waste (Waste Electrical and Electronic Equipment Directive). When you see a crossed-out wheeled waste container on the product, it means that the product falls under the EU directive 2002/96/EC. Lenco 2012, all rights reserved.