1
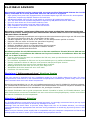
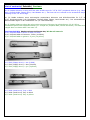
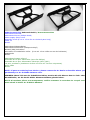
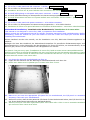
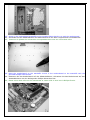
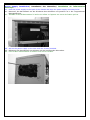
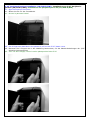
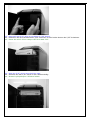
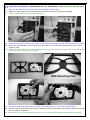
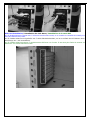
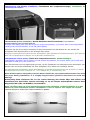
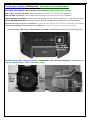
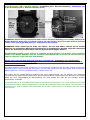
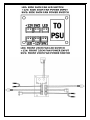
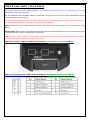
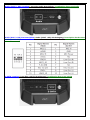
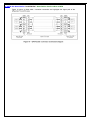
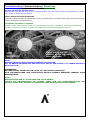
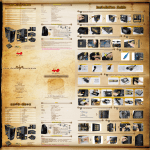
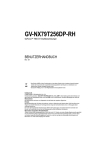
EL-DIABLO ADVANCE
USER MANUAL
Bedienungsanleitung
Manuel d’utilisation
EL-DIABLO ADVANCE
New special, optimised cooling system with an enormous blue illuminated 330 mm fan in side
panel, a 250 mm fan in front panel and also twin 18 cm fan in top panel
• High quality front panel with integrated blue illuminated Aplus-logo and 250 mm fan with separate
adjustment respectively ON/OFF switches for both fans
• Variable adjustable 330 mm fan in side panel to cool down all components perfectly
• Twin 180 mm fans with separate adjustment respectively ON/OFF switches for both fans
• Up to 12 disk drives can be mounted inside the case
• Easy drive mounting with screw less rails & HDD trays
• Easy installation of the PCI cards with tool-less screws
• In accordance with RoHS
Neuartiges spezielles, optimiertes Kühlsystem mit einem großen blau beleuchteten 330 mm
Lüfter an der Seite, einem großen blau beleuchteten 250 mm Lüfter in der Front und doppelten
180 mm Lüftern im Deckel
• Qualitativ hochwertige Frontblende mit integriertem blau beleuchtetem Aplus-Logo und 250 mm Lüfter
mit getrennter Regelung bzw. Ein-/ Ausschalter beider Lüfter
• Variabel regelbarer 330 cm Lüfter in der Seite, um alle Komponenten perfekt zu kühlen
• Doppelte 180 mm Lüfter im Deckel mit getrennter Regelung
• Bis zu 12 Laufwerke können eingebaut werden
• Einfache Installation durch ein schraubenloses Schienensystem
• PCI Karten können einfach mit Clipsystem installiert werden
• Schadstofffrei gemäß RoHS Richtlinien
Excellent système de refroidissement avec un énorme ventilateur illuminé bleu de 330 mm sur
la porte latérale, un ventilateur de 250 mm sur la porte frontale et 2 ventilateurs bleus de 180
mm sur le haut du boitier
• Logo A+ illuminé en bleu avec un ventilateur de 250 mm, ainsi que des boutons marche/arrêt distinct
pour chaque ventilateur.
• Un ventilateur ajustable de 330 mm sur la porte latérale pour un parfait refroidissement.
• Double ventilateurs bleus de 180 mm avec boutons marche/arrêt pour chacun.
• Jusqu’à 12 disques durs peuvent être installés dans le boîtier.
• Montage facile avec rails sans vis et tiroir pour disque dur.
• Installation facile des cartes PCI avec vis à main.
• Conforme à la norme RoHS.
Disclaimer/ Haftungsausschluss/ Mentions légales
This user manual is intended only as a installation guide for A+ EL-Diablo Advance PC case. For more
comprehensive instructions on the motherboard and peripherals installations, please kindly refer to the
user’s manuals that come with those components.
Dieses Benutzerhandbuch ist nur als ein Installationsanleitung für das EL DIABLO PC-Gehäuse gedacht.
Für umfassendere Instruktionen zur Installation des Motherboards und weiterer Peripherie beziehen Sie
sich bitte freundlicherweise auf die Handbücher der jeweiligen Hersteller.
Ce manuel d'utilisation est un guide uniquement destiné à installer le boiter A+ El-Diablo Advance. Pour
plus d’informations concernant l’installation de votre carte mère et des périphériques, veuillez vous référer
au manuel d’utilisation de ces composants.
Attention/ Achtung/ Attention
A+ EL Diablo Advance comes with multi-functional top panel; it is strongly recommend not to put any liquid
related objects on the top panel to avoid any damage to the case.
Although care has been taken to prevent sharp edges with the A+ EL-Diablo Advance, we strongly
recommend taking the appropriate time and care during installation to avoid any physical injuries or case
damage.
Make sure you choose a power supply that is compatible with your computer components and has a long
enough power harness to reach your motherboard and peripheral devices.
A+ EL Diablo Advance wird geliefert mit einer multifunktionalen Oberseite; es wird deshalb dringend
geraten, keine Objekte auf die obere Abdeckung zu stellen, aus denen Flüssigkeiten auslaufen könnten,
um Beschädigungen des Gehäuses zu vermeiden.
Obwohl EL Diablo Advance mit großer Sorgfalt produziert wurde, um scharfkantige Ecken zu verhindern,
empfehlen wir Ihnen, die Installation mit genügend Zeit und Sorgfalt durchzuführen, um irgendwelche
Verletzungen zu vermeiden.
Stellen Sie sicher, dass Sie ein Netzteil wählen, das mit Ihren Computerbestandteilen kompatibel ist und
ausreichend lange Kabel hat, um Ihr Motherboard und die Peripheriegeräte zu erreichen.
Le boitier A+ El Diablo Advance se présente avec un panneau multi fonction. Il est fortement conseillé de
ne pas poser d’objet contenant des liquides sur le dessus du boitier afin d’éviter tout dommage a celui-ci.
Un soin particulier a été apporté à l’A+ El Diablo Advance afin d’éviter tout angles trop saillants. Nous vous
conseillons de prendre le temps nécessaire pour l’installation afin d’éviter toutes blessures ou
endommagements du boitier.
Veillez à bien choisir une alimentation qui soit compatible avec vos composants informatiques et possédant
des câbles suffisamment longs pour atteindre ceux-ci.
NOTE: Design owned by A+ with copyright protection.
All information and specification details are subject to change without notification.
HINWEIS: Das Design ist im Besitz von A+ mit urheberrechtlichen Schutz.
Alle Informationen und Spezifikationen können ohne vorherige Mitteilung geändert werden.
NOTE : Design conçu par A+ et protégé par le copyright.
Toutes les informations et caractéristiques sont sujettes à changement sans notification
préalable.
Case specification/ Gehäuse-Spezifikation/ Caractéristiques du boîtier
Type/ Typ/ Type
Super tower/ Super Tower/ Super tour
Fully Black High Gloss Finish + Titanium bezel/
Colour/ Farbe/ Couleur
Schwarze Hochglanzoberfläche mit Titanium-Blende/
Noir brillant Gloss + revetement Titanium
Chassis/ Gehäuse/ Châssis: 1.0mm SECC ;
Case material/
Front panel/ Frontblende/ Façade avant: ABS Plastic/ Kunststoff/
Gehäusematerial/ Matériaux
Plastique ABS
With power supply/ mit
No/ Nein/ Non
Netzteil/ avec alimentation
Motherboard compatibility/
Motherboard-Kompatibilität/ Micro ATX, Standard ATX, MP Dual CPU(12'x13')
Compatibilité carte mère
With mesh grill side panel/
mit Gitternetz-Seitenblende/ Yes/ Ja/ Oui
Avec grille à Mesh
With E-SATA/ mit E-SATA/
Yes/ Ja/ Oui
avec E-SATA
With temp. LCD/ mit
Yes/ Ja/ Oui
Temperaturanzeige/ avec
indication de température
Expansion/ Erweiterung/ Expansion
External 5.25" Drive Bays/
Externe 5,25”
5
Laufwerksschächte/
Baies 5,25" externe
External 3.5" Drive Bays/
Externe 3,5”
1
Laufwerksschächte/
Baies 3,5" externe
Internal 3.5" Drive Bays/
Interne 3,5”
7
Laufwerksschächte/
Baies 3,5" interne
Expansion Slots/
7
Erweiterungseinschübe/
Slots expansion
Top Ports/ Obere Anschlüsse/ Ports en hauteur
Top Ports/ Obere
Anschlüsse/ Ports en
USB 2.0 + Audio (AC97 + HD audio) + E-SATA
hauteur
Cooling System/ Kühlsystem/ Système de refroidissement
25 cm * 1x (with VR fan speed control & ON/OFF switch) (mit VR
Chassis/ Gehäuse/ Châssis – Lüftergeschwindigkeits-Kontrolle und Ein/ Aus-Schalter) (avec VR
Front/ Vorderseite/ Façade contrôle de la vitesse du ventilateur et bouton marche/arrêt)
33 cm * 1x (with VR fan speed control & ON/OFF switch) (mit VR
Chassis/ Gehäuse/ Châssis –
Lüftergeschwindigkeits-Kontrolle und Ein/ Aus-Schalter) (avec VR
Side/ Seite / Latérale
contrôle de la vitesse du ventilateur et bouton marche/arrêt)
Chassis/ Gehäuse/ Châssis –
12 cm * 1x or 8cm * 1x (Optional) (otional) (optionnel)
Rear/ Rückseite/ Arrière
18 cm * 2x (with fan speed control) (mit
Chassis/ Gehäuse/ Châssis –
Lüftergeschwindigkeits-Kontrolle) (avec contrôle de la vitesse du
Top/ Oberseite/ Haut
ventilateur et bouton marche/arrêt)
Physical Specification/ Physische Spezifikation/ Spécifications matérielles
Dimensions/ Abmessungen/
570 x 205 x 541mm (D*W*H) (L*B*H) (L*H*P)
Dimensions
Features/ Merkmale/ Caractéristiques
Enormous 250mm fans (front)/ Enormer 250 mm Lüfter (Front)/
Enorme ventilateur de 250 mm (en façade)
Enormous 330mm fans (side)/ Enormer 330 mm Lüfter (Seite)/
Enorme ventilateur de 330 mm (sur le panneau latéral)
Twin 180mm fans (top)/ Doppelter 180 mm Lüfter (Deckel)/
ventilateur de 180 mm (en hauteur)
Double
VR fan speed control (top & front & side)/ VR-Lüftergeschwindigkeitskontrolle (oben & Front & Seite)/ VR contrôle de la vitesse des
ventilateurs (hauteur & façade & latéral)
Features/ Merkmale/
Caractéristiques
ON/OFF switch button (front & side)/ Ein/ Aus-Schalter (Front & Seite)/
Boutons marche/arrêt (façade & latéral)
Blue LED illumination/ Blaue LED-Beleuchtung/ Illumination avec Led
bleue
1.0mm SECC/100% ABS plastic parts/ Kunststoffteile/ Pièces en
Plastique ABS.
Excellent cooling solution/ Exzellentes Kühlsystem/ Excellent système de
refroidissement
Tool-less rails & HDD trays for easy installation/ Alle Laufwerksschächte
mit werkzeuglos montierbaren Schienen und Einschüben/ Installation
facile sans vis et avec tiroirs pour DD
USB 2.0 + Audio (AC97 + HD audio) + E-SATA
Product specifications are subject to change without notice.
Produkt-Spezifikationen können ohne vorherige Mitteilung geändert werden.
Les caractéristiques du produit sont sujettes à changement sans préavis.
List of contents/ Zubehör/ Contenu
A+ EL Diablo Advance is using tool-less rails & HDD trays for 3.5” & 5.25” peripheral devices (e.g. Hard
Disk, CD/DVD ROM, Floppy Drive, Card Reader etc.). Tool-less rail kit is stored in the accessories trays
locating in the 3.5” drive cage.
A+ EL Diablo Advance nutzt werkzeuglos montierbare Schienen und HDD-Einschübe für 3,5“ &
5,25“ Peripheriegeräte (z.B. Festplatten, CD/DVD ROM, Floppy, Card Reader etc.). Der schraubenlose
Schienensatz lagert in der Zubehörbox im 3,5“ Laufwerkskäfig.
A+ EL Diablo Advance utilise des rails et des tiroirs pour DD pour les périphériques 3.5 & 5.25 ne
nécessitant pas d’outils supplémentaires (ex : disque dur, CD/DVD Rom, lecteur de cartes). Ces rails sont
rangés dans une boite dans l’une baie 3.5.
Tool-less Rail Kit/ Werkzeugloses Schienen-Set/ Kit de rail sans vis
5.25” CD/DVD ROM or Writer: 5 sets (10 PCS)
5,25” CD/DVD ROM od. Brenner: 5 Sets (10 Stück)
5,25” CD/DVD ROM ou graveur: 5 jeux (10 pièces)
3.5” FDD (Floppy Drive): 1 set (2 PCS)
3,5” FDD (Floppy Drive): 1 Set (2 Stück)
3,5” FDD (Floppy Drive): 1 jeu (2 pièces)
3.5” HDD (Hard Drive) Tray: 6 PCS
3,5” HDD (Hard Drive) Tray: 6 Stück
3,5” HDD (Hard Drive) Tray: 6 pièces
Other Accessories/ Anderes Zubehör/ Autres accessoires
Motherboard standoff
Motherboard Screw (Phillips-Head)
Power supply (PSU) screw
Retail fan screw (8 cm or 12 cm fan on the back panel only)
Cable Tie
Buzzer
Motherboard Abstandhalter
Motherboard Schrauben (Phillips mit Kopf)
Netzteil (PSU) Schrauben
Schrauben für zusätzlische Lüfter (8 cm od. 12 cm Lüfter nur an der Rückseite)
Kabelbinder
Buzzer
Motherboard espace réservé
Ensemble de vis pour Carte Mère (avec tête Phillips)
Ensemble de vis pour Alimentation électrique (PSU) (PSU)
vis pour ventilateur (Ventilateur de 8cm ou 12cm sur l’arrière uniquement)
Serre Câble
Buzzer
NOTE: If parts are missing from the box, please contact the A+ Dealer or Reseller where you
purchased your A+ EL Diablo Advance case.
HINWEIS: Wenn Teile aus der Zubehörbox fehlen, wenden Sie sich bitte an den A+-Fach- oder
Einzelhändler, wo Sie das EL Diablo Advance-Gehäuse gekauft haben.
NOTE: Si certaines pièces sont manquantes, veuillez contacter le revendeur A+ auquel vous
avez acheté le boitier A+ El Diablo Advance.
Installation/ Installation/ Installation
Open side panel/ Öffnen des Seitenteils/ Ouvert panneau latéral
01. Place the case upright on a flat, stable surface so that the rear panel (power supply and expansion
slots) is facing you.
01. Stellen Sie das Gehäuse aufrecht auf eine flache, stabile Oberfläche, so dass Sie auf die Rückseite
(Netzteil und Erweiterungs-Einschübe) schauen.
01. Placez le boîtier sur une surface plane et stable de façon à ce que la façade arrière (côté alimentation
et slot PCI) soit face à vous.
02. Remove tool-less thumb screws from rear panel of the case, turn sidepanel outward and un-plug the
33 cm fan power connector before remove the side panel.
02. Entfernen Sie zuerst die Rändelschrauben der Rückseitenverkleidung. Nun können Sie die Seitentür
vorsichtig zur Seite bewegen. Ziehen Sie den Stecker des 36 cm Lüfters ab, bevor Sie die Tür beiseite
stellen.
02. Enlevez les vis à main à l’arrière du boîtier. Tournez lentement le panneau latéral, et débranchez le
connecteur électrique du ventilateur de 33cm avant de retirer complètement le panneau.
WARNING!!
You have to disconnect below 3 connectors before open the sidepanel to avoid any damage.
WARNUNG!!
Sie müssen unten 3 Steckverbindungen lösen, bevor Sie die Seitenblende öffnen, um
Beschädigungen zu vermeiden!!
ATTENTION!!
Vous devez débrancher les 3 connecteurs ci-dessous avant de retirer le panneau latéral afin
d’éviter tout dommage.
01. 33 cm fan in side panel with VR connector > sticker: VR (33 CM FAN)
01. 33 cm Lüfter im Seitenpaneel mit VR-Stecker > Aufkle er: VR (33 CM FAN)
01. Ventilateur de 33cm sur la porte latérale avec connecteur VR> sticker VR (33 CM FAN)
02. A+CASE LED lighting in side panel with power connector > sticker: TO LED 2
02. A+CASE LED Beleuchtung im Seitenpaneel mit Stromversorgungsstecker > Aufkleber: TO LED 2
02. A+CASE Illumination Led bleu sur la porte latérale avec connecteur d'alimentation > patch:
TO LED 2
03. 33 cm fan in side panel with power connector > 4 Pin Molex connector
03. 33 cm Lüfter im Seitenpaneel mit Stromversorgungsstecker > 4 Pin Molex Stecker
03. Ventilateur de 33cm sur la porte latérale avec connecteur d'alimentation > connecteur 4 broches Molex
Motherboard Installation/ Installation des Motherboards/ Installation de la carte mère
This manual is not designed to cover CPU, RAM, or expansion card installation.
Please consult the motherboard manual for specific mounting instructions and troubleshooting. Before
proceeding, check the manual for your CPU cooler to find out if there are steps you must do before
installing the motherboard.
Dieses Handbuch wurde nicht erstellt, um die Installation von CPU, RAM oder Erweiterungskarten zu
erklären.
Befragen Sie bitte das Handbuch der Motherboard-Herstellers für spezifische Einbauanweisungen und
Fehlerbeseitigung. Vorher überprüfen Sie das Handbuch für Ihren CPU-Kühler, um herauszufinden, ob es
Schritte gibt, die Sie vor der Installation der Hauptplatine tun müssen.
Ce manuel n’est pas conçu pour l’installation de votre CPU, RAM et toutes autres cartes additionnelles.
Veuillez vous référer au manuel d’installation de votre carte mère pour de plus amples informations. Avant
de commencer, veuillez vérifier le manuel de votre ventirad CPU afin de voir s’il y a la moindre installation
à faire avant de monter votre carte mère.
01. Lay down the case with motherboard tray face up.
01. Legen Sie das Gehäuse mit der Öffnung für das Motherboard nach oben hin.
01. Posez votre boitier avec le plateau pour la carte mère face à vous.
02. Make sure you have the appropriate I/O panel for the motherboard, the I/O panel is a standard
accessory come with your motherboard.
02. Stellen Sie sicher, dass Sie das passende I/O-Panel für das Motherboard haben, das I/O-Panel ist ein
mit Ihrem Motherboard gekommenes Standardzubehör.
02. Assurez-vous que vous avez le panneau I/O de votre carte mère. Celui-ci est un accessoire standard
qui est fournis avec votre carté mère.
03. Screw in the motherboard standoffs to the threaded holes that line up with the motherboard.
03. Schrauben Sie die Abstandshalter des Motherboards in die dafür vorgesehenen Gewindelöcher.
03. Vissez sur le plateau les entretoises correspondant aux trous sur votre carte mère.
04. Place the motherboard on the standoffs. Screw in the motherboard to the standoffs with the
provided Phillips-head screws.
04. Platzieren Sie das Motherboard auf den Abstandshaltern. Schrauben Sie das Motherboard auf den
Abstandshaltern mit den beiliegenden Phillips-Schrauben fest.
04. Placez votre carte mère sur les entretoises et vissez celle-ci avec les vis Phillips fournis.
Power Supply Installation/ Installation des Netzteiles/ Installation de l’alimentation
électrique
01. Push the power supply to the back of the chassis and align the power supply mounting holes.
01. Montieren Sie das Netzteil auf der Rückseite des Gehäuses und justieren es in der vorgesehenen
Montageöffnung.
01. Installez le bloc d'alimentation à l'arrière du boîtier et l'ajuster aux trous de fixation prévus.
02. Secure the power supply to the case with the screws provided.
02. Befestigen Sie das Netzteil am Gehäuse mit den beiliegenden Schrauben.
02. Fixez le bloc d'alimentation au boîtier avec les vis fournies.
5.25” Peripheral Devices Installation (CD/DVD R/RW)/ Installation von 5,25” Peripheriegeräten (CD/DVD R/RW)/ Installation des périphériques 5.25 (CD/DVD R/RW)
01. Open front panel’s front door
01. Öffnen Sie die Tür der Frontblende
01. Ouvrez le panneau frontal
02. Use 2 fingers as described in the photos to pull out the 5.25” plastic cover
02. Benutzen Sie 2 Fingers wie in der Abbildung beschrieben, um die Plastik-Abdeckungen der 5,25”
Schächte herauszuziehen
02. Avec vos deux doigts, retirez le cache plastique des baies 5.25.
03. Place tool-less 5.25" rails on two sides of 5.25” device.
03. Platzieren Sie die schraubenlosen 5,25” Schienen an den beiden Seiten des 5,25“-Schachtes.
03. Placez les rails 5.25 sur chaque côté de la baie 5.25.
04. Slide the 5.25” device into the drive cage.
04. Schieben Sie das 5,25” Gerät in den Laufwerkskäfig.
04. Glissez le périphérique 5.25 dans la baie.
3.5” Hard Drive Installation/ Installation der 3,5” Festplatten/ Installation des disques durs
3.5
01. Slide out the HDD tray from the Smart HDD modular system cage.
01. Ziehen Sie den HDD-Einschub aus dem durchdachten modularen HDD Systemkäfig.
01. Tirez le plateau pour DD de sa cage modulaire
02. Insert the hard drive into the tray, make sure the HDD connector sockets is face outside the chassis.
02. Legen Sie die Festplatte in den Einschub, prüfen Sie, ob die HDD-Anschlussbuchsen nach außen
gerichtet sind
02. Insérez le disque dur dans son tiroir. Veillez à être sur que les connecteurs du disque soient mis du bon
côté (face vers l’extérieure de la cage)
03. Insert the HDD trays with hard drive back to the cage, then you can plug in HDD cables.
03. Schieben Sie den HDD-Einschub mit der Festplatte zurück in den Käfig, dann können Sie die Festplatte
mit den Kabeln verbinden.
03. Remettez le tiroir avec le disque dur dans la cage. Vous pouvez maintenant brancher les câbles.
PCI Card Installation/ Installation der PCI-Karte/ Installation de la carte PCI
A+ EL Diablo Advance comes with 7 PCS tool-less thumb screws, so it is easier to install & de-install your
PCI card without any tools.
A+ EL Diablo Advance wird geliefert mit 7 Stück Rändelschrauben, so ist es einfach die PCI-Karten ohne
Werkzeuge ein- und auszubauen.
A+ EL Diablo Advance propose 7 emplacements PCI avec vis à main. Il est ainsi plus facile de monter et
démonter vos cartes PCI sans outils.
Temperature LCD display installation/ Installation der Temperaturanzeige/ Installation de
l’affichage thermique
Thermometer power connector/ Strom-Anschluss des Thermometer/ Connecteur
d’alimentation pour la température
Connect 4 Pin Molex with your PSU to power up the thermometer; you will be able to see temperature
reading from the thermometer in the top panel display.
Schließen Sie den 4 Pin Molex-Anschluss für das Thermometer an das Netzteil an; Sie werden die
Temperatur des Thermometers in der Anzeige oben sehen.
Branchez la prise Molex 4 broches à votre alimentation, afin d’alimenter la sonde thermique. Vous pourrez
ainsi voir la température s’afficher sur le panneau multifonctions.
Temperature sensor probe/ Fühler des Temperatursensors/ Sonde thermique
Thermometer generally use for detect internal chassis temperature, the sensor probe can be affix with
sellotape to Hard drive, CPU cooler etc..
Das Thermometer wird im Allgemeinen genutzt, um die Temperatur im Gehäuseinneren anzuzeigen; der
Sensor kann mit einem Klebeband auf einer Festplatte, CPU, Kühler etc. befestigt werden.
Les affichages de température utilise généralement les sondes thermiques internes au boiter. La sonde
thermique peut être fixée n’importe où : sur le disque dur, le ventirad CPU, etc…
Note: Please remove the probe protector before initial use, also please take extreme care with
the probe during installation, it is a highly fragile sensor; please do not bend it to avoid any
damage.
Anmerkung: Bitte entfernen Sie vor der ersten Nutzung den Schutz über dem Fühler und
installieren Sie den Fühler extrem vorsichtig, es ist ein höchst zerbrechlicher Sensor; bitte
biegen Sie ihn nicht, um Schäden zu vermeiden.
Note: Veuillez retirer la sonde thermique avant toute utilisation. Veillez également à ne pas
abimer la sonde thermique pendant l’installation. C’est un capteur très fragile. Ne la pliez
surtout pas pour éviter que celle-ci tombe en panne.
Cooling fan system/ Kühlsystem/ Système de refroidissement
Adjusting Instructions/ Anweisung zur Einstellung/ Instruction pour réglage
Fan power switch (ON/OFF): Push the button to switch on or off the fan completely.
Fan VR RPM controller: Low to high RPM adjusting by turning the VR knob or wheels.
Lüfter-Schalter (Ein/Aus): Drücken Sie den Knopg, um den Lüfter komplett ein- oder auszuschalten.
Lüfter VR RPM Kontrolle: Niedrige bis hohe RPM ist regelbar durch Drehen des VR-Drehknopfes.
Bouton marche/arrêt pour ventilateur : Appuyez sur le bouton pour allumer ou éteindre le ventilateur.
Molette de réglage de la vitesse du ventilateur : Ajustez la vitesse en tournant le bouton.
Top Panel Fan (VR only)/ Obere Lüfter (nur VR)/ Ventilateurs du haut (uniquement VR)
Side Panel Fan (VR + ON/OFF switch)/ Seitenlüfter (VR + Ein/Aus-Schalter)/ Ventilateur sur
la porte latérale (VR + boutons marche/arrêt)
Front Panel Fan (VR + ON/OFF switch)/ Frontlüfter (VR + Ein/Aus-Schalter)/ Ventilateur sur
la porte frontale (VR + boutons marche/arrêt)
WARNING: Please do not remove the CPU cooler’s fan when building your system; although EL
Diablo Advance does offer excellent cooling, we still need to warn you that without the CPU
cooler’s fan, you might damage your components and system.
WARNUNG: Bitte entfernen Sie nicht den Lüfter, der die CPU kühlt; obwohl der EL Diablo
Advance ein exzellentes Kühlsystem anbietet ist es notwendig zu warnen, dass Sie ohne diese
Lüfter die einzelnen Komponenten und das System beschädigen können.
ATTENTION! Veuillez ne pas enlever le ventirad du CPU lorsque vous montez votre système.
Même si l’El Diablo Advance offer un excellent refroidissement, nous devons vous avertir que
sans le ventirad, votre CPU sera endommagé.
Smart Fan controller PCB Installation & Pins Assignment/ Installation der intelligenten
Lüfterkontrolle PCB & Pin-Belegung/ Installation du contrôle intelligent des ventilateurs &
connexion des broches
EL Diablo Advance cooling fans operate by a control PCB pre-installed inside the case chassis. Please take
extra care when open & close the side panel, you will find cables with pin description sticker attached,
please make sure correct connection before system power on.
Die Lüfter des EL Diablo Advance arbeiten mit einer PCB-Kontrolle, die im Inneren des Gehäuses
vorinstalliert ist. Bitte seien Sie besonders vorsichtig beim Öffnen und Schließen der Seitentür; Sie finden
Kabel mit einer aufgeklebten Pin-Beschreibung vor, bitte prüfen Sie, dass Sie die richtigen Stecker
miteinander verbinden.
Le refroidissement de l’El Diablo Advance par les ventilateurs se fait grâce à un circuit imprimé pré-installé
à l’intérieur du boitier. Faites très attention en ouvrant et en fermant le panneau latéral, vous trouverez les
câbles avec un sticker attaché autour décrivant les broches. Veillez à bien les brancher avant de mettre
sous tension.
USB 2.0, Audio (AC97 + HD) & E-SATA
On the top panel of the EL Diablo Advance, you will find the I/O ports, you can use I/O ports for any
compatible external peripherals.
An der Oberseite des EL Diablo Advance finden Sie die I/O-Ports, die Sie für jedes kompatible externe
Peripheriegerät nutzen können.
Sur le panneau multifunction de l’’El Diablo Advance, vous trouverez différents ports. Vous pouvez utiliser
ces différents ports afin de connecter le périphérique adéquate.
Note: Please check the motherboard manual for the I/O pin layout and make sure it matches the table
below.
Anmerkung: Bitte prüfen Sie die Bedienungsanleitung Ihres Motherboards auf die I/O Pin-Belegung und
verbinden Sie die richtigen Anschlüsse miteinander.
Note: Veuillez verifier le manuel de la carte mère pour brancher correctement les différents ports. Vérifier
toutefois que cela correspond à l’image ci-dessous.
USB 2.0 Location/ Lage der USB 2.0-Anschlüsse/ Localisation des ports USB 2.0
USB 2.0 Pin Description/ USB 2.0 Pin-Belegung/ Description des broches USB 2.0
Audio (AC97 + HD) Location/ Lage der Audio-Anschlüsse/ Localisation des ports Audio
Audio (AC97 + HD) Pin Description/ Audio (AC97 + HD) Pin-Belegung/ Description des broches
Audio (AC97+HD)
e-SATA Location/ Lage des e-SATA-Anschlusses/ Localisation des ports eSATA
e-SATA Pin Description/e-SATA Pin/ Description des broches eSATA
Troubleshooting/ Fehlerbeseitigung/ Dépannage
Cooling fan making clicking noise
Please make sure all LED are not touch with fan blades, you can easily adjust the LED position by using
your finger to move the LED gently.
Lüfter macht klickende Geräusche
Prüfen Sie, dass die LEDs die Lamellen der Lüfter nicht berühren; Sie können die LEDs vorsichtig mit Ihren
Fingern bewegen und positionieren.
Ventilateur emettant un cliquetis
Veuillez vérifier que toutes les Leds ne touchent pas les pales du ventilateur. Vous pouvez facilement
ajuster la position des leds en utilisant vos doigts pour délicatement déplacer celles-ci.
NOTE:
DESIGN OWNED BY APLUS WITH COPYRIGHT PROTECTION.
ALL OF ABOVE INFORMATION AND FAN SPEC. DETAIL ARE SUBJECT TO CHANGE WITHOUT
NOTIFICATION
ANMERKUNG:
DAS DESIGN IST EIGENTUM VON APLUS, MIT COPYRIGHT GESCHÜTZT.
ALLE INFORMATIONEN UND SPEZIFISCHE DETAILS KÖNNEN GEÄNDERT WERDEN OHNE
BEKANNTGABE.
NOTE:
DESIGN CONÇU PAR A+ ET PROTEGE PAR LE COPYRIGHT.
TOUTES LES INFORMATIONS AU DESSUS AINSI QUE LES CARACTERISTIQUES
VENTILATEURS SONT SUJETS A CHANGEMENT SANS NOTIFICATIONS PREALABLES.
DES