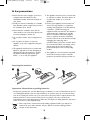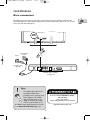
1
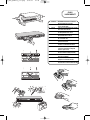
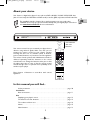
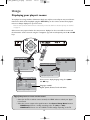
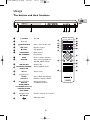
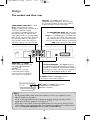
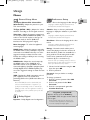
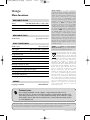
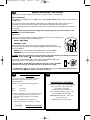
00_MUS_DTH270_cov.qxp
9/03/07
13:48
Page 1
DVD
DTH 270
Simplified user manual
00_MUS_DTH270_cov.qxp
9/03/07
13:48
Page 2
CLASS 1
LASER PRODUCT
PLAY
OPEN/CLOSE
DIGITAL
STOP
AL TV TUNNER
TERRESTRI
DTH370E
ON/STANDBY
SE
OPEN/CLO
PLAY
FR
ATTENTION
- RAYONNEMENT LASER EN CAS D'OUVERTURE.
NE PAS REGARDER DANS LE FAISCEAU.
EN
CAUTION
- LASER RADIATION WHEN OPEN.
DO NOT STARE INTO BEAM.
DE
VORSICHT
- LASERSTRAHLUNG,WENN ABDECKUNG GEÖFFNET.
NICHT IN DEN STRAHL BLICKEN.
ES
PRECAUCIÓN
IT
ATTENZIONE
PT
ATENÇÃO
- RADIACIÓN LÁSER CUANDO ESTA ABIERTO.
NO MIRAR FIJAMENTE AL RAYO DE LUZ.
- QUANDO E' APERTO EMETTE RADIAZIONI LASER.
NON GUARDARE DENTRO IL FASCIO.
- EMISSÃO DE RAIO LASER EM CASO DE ABERTURA.
NÃO OLHAR PARA O RAIO.
NL
OPGELET
- LASERSTRALING ALS U DE BEHUIZING OPENT.
KIJK NOOIT IN DE STRAAL.
SW
OBS!
- LASERSTRÅLNING VID ÖPPNING.
UNDVIK ALL ÖGONKONTAKT MED STRÅLEN.
RU
ВНИМАНИЕ
- ОПАСНОСТЬ ЛАЗЕРНОГО ИЗЛУЧЕНИЯ ПРИ
ОТКРЫТИИ. ОСТЕРЕГАЙТЕСЬ ПОПАДАНИЯ
ЛАЗЕРНОГО ЛУЧА В ГЛАЗА.
PL
UWAGA
- PROMIENIOWANIE LASEROWE PRZY OTWARCIU.
NIE WOLNO PATRZEĆ NA WIĄZKĘ LASEROWĄ.
HU
FIGYELEM
- LÉZERSUGÁRZÁS HA KINYITJA.
NE ÁLLJON A SUGÁRZÁSBA.
CZ
POZOR
- NEBEZPEČÍ LASEROVÉHO ZÁŘENÍ PŘI OTEVŘENÍ.
NEDÍVEJTE SE DO LASEROVÉHO PAPRSKU.
EL
PQOROVG
- AJSIMOBOKIA KEIFEQ, RE PEQIPSXRG POT
AMOINESE LGM JOISAFESE SGM DERLG AJSIMXM.
STOP
DIGITAL TERRES
DTH 210
CD / CD PLAYER
DVD / VIDEO
BY
ON/STAND
R
TRIAL TV TUNNE
DTH370E
DTH370E
OPEN/CLOSE
ON/STANDBY
PLAY
STOP
DIGITAL TERRESTRIAL TV TUNNER
DTH370E
ON/STANDBY
OPEN/CLOSE
PLAY
STOP
DIGITAL TERRESTRIAL TV TUNNER
DTH370E
ON/STANDBY
OPEN/CLOSE
PLAY
STOP
DIGITAL TERRESTRIAL TV TUNNER
02_MUS_DTH270_en.qxp
9/03/07
13:50
Page 9
About your device
Your device is a digital video player. It can read most DVD +R/+RW / -R/-RW / VCD/S-VCD discs
(8 and 12 cm except for DVD Ram and DVD audio) as well as JPEG, mp3, wma and DivX ultra files.
This simplified manual is designed for a quick integration into your audio video
installation and to help you get started immediately with your digital player. Consult our
site www.thomsonlink.com for more information.
DTH270E
OPEN/CLOSE
PLAY
STOP
8 m maximum
with new
batteries.
Your remote control lets you command your player from a
distance using infrared signals. Make sure that you are
pointing the remote control at your player’s window,
ensuring that there are no obstacles (chest of drawers,
person, animal, furniture, etc.) between it and the appliance.
The remote control operates with 2 AA batteries which are
delivered separately. Install the batteries in the remote
control before use. Change the batteries when you see that
the player takes time to react or that the remote control
must be brought closer or pointed more specifically at the
window of your player.
ZOOM
OPEN •
CLOSE
ANGLE
PROGRAM RANDOM
REVERSE FORWARD
PAUSE
ON • OFF
REPEAT
A-B
HDMI
SKIP
PLAY
STOP
DISC
MENU
CLEAR
OK
SET UP
PREVIEW
1
2
3
4
5
6
AUDIO
7
8
9
SUBTITLE
DVD/USB
0
CD>>mp3
TITLE
MENU
DISPLAY
Please dispose of batteries in accordance with current
legislation.
RCT195D 1
In this manual you will find...
A few precautions . . . . . . . . . . . . . . . . . . . . . . . . . . . . . . . . . . . . . . . . . . . . . . . page 10
Installation
Basic connections . . . . . . . . . . . . . . . . . . . . . . . . . . . . . . . . . . . . . . . . . . . . . . . . page 11
Use
Displaying your player’s menus . . . . . . . . . . . . . . . . . . . . . . . . . . . . . . . . . . . . . page 12
The buttons and their functions . . . . . . . . . . . . . . . . . . . . . . . . . . . . . . . . . . . . page 13
The sockets and their uses . . . . . . . . . . . . . . . . . . . . . . . . . . . . . . . . . . . . . . . . page 14
Menus . . . . . . . . . . . . . . . . . . . . . . . . . . . . . . . . . . . . . . . . . . . . . . . . . . . . . . . . . page 15
Main functions . . . . . . . . . . . . . . . . . . . . . . . . . . . . . . . . . . . . . . . . . . . . . . . . . . page 16
9
EN
02_MUS_DTH270_en.qxp
9/03/07
13:50
Page 10
A few precautions
✓ Ensure that the mains supply in your house
complies with that indicated on the
identification sticker located at the back of
your device.
✓ The appliance should not be in contact with
or exposed to a flame. Therefore, please do
not place any candles on or near the
appliance.
✓ Install your device horizontally, on a suitable
base (furniture), with enough space around it
for ventilation (7 to 10 cm)
✓ Protect your appliance from moisture and
excess heat (e.g. fireplace) or equipment
creating strong magnetic or electric fields (i.
e. speakers…). Before moving your
equipment, make sure that the disc drawer is
empty. Setting the equipment to standby
does not cut off the electricity supply. In
order to separate the device completely
from the mains, it has to be disconnected by
unplugging the mains plug; this is
recommended if you haven’t used the device
for a certain time.When connecting, ensure
that the plugs of the various cables are
pushed securely into their corresponding
sockets.
✓ Ensure that the ventilation slots, and the
device itself, are not covered by objects such
as a mat, newspapers, curtain, etc.
✓ Do not place another item of equipment on
top.
✓ Do not place the device on top of an
amplifier or any other equipment that gives
off heat
✓ The appliance should not be in contact with
liquids or exposed to the risk of dripping or
splashing.Therefore be careful not to place
any object containing a liquid (vase, glass,
bottle, …) on or near your appliance
✓ Your appliance is not intended for industrial
use but for domestic purposes only.This
product is intended for purely personal use.
Inserting the batteries
1
2
3
Important information regarding batteries
• Respect the polarities. Do not mix different types of batteries or new and old batteries. Do not
use rechargeable batteries. Do not expose batteries to excessive heat, do not incinerate them
and do not recharge them. Do not try to open them as they may leak or explode. Remove the
batteries from the remote control unit if you are not going to use it for several weeks.
Immediately remove any leaking batteries. Take care in doing this, as leaking batteries may cause
burns to the skin or other physical injury.
• Please respect the environment and prevailing regulations! Before you dispose of
batteries ask your dealer whether they are subject to special recycling and if he
accepts to take them back.
10
02_MUS_DTH270_en.qxp
9/03/07
13:50
Page 11
Installation
Basic connections
By following, the instructions in this page you will avoid any setup problems related to the
interaction between several devices. If you have any other audio video devices, do not connect
them now; add them afterwards.
HDMI
INPUT
HDMI
United Kingdom
Ireland
Europe
AC 220 V / 240 V
50/60 Hz
Y
VIDEO
PR
L
AC~
PB
HDMI
R
COAXIAL
S-VIDEO
AUDIO
OPTICAL
AV CONNECTOR (RGB)-TV
Details of the sockets
on page 14
Tip(s)
The HDMI cable replaces the
scart/péritel cable that is
generally used to connect audio
video appliances.The HDMI
cable transmits pictures and
digital sound from your player
to a TV set. Remember to set
the HDMI output signals (images and sound)
in the General Setup Menu (page 15).
You can contact THOMSON by dialling:
0871 500 0520
(call to this number
will be charged at 10 pence per minute)
http://www.thomsonlink.com
11
EN
02_MUS_DTH270_en.qxp
9/03/07
13:50
Page 12
Usage
Displaying your player’s menus
Your player has a large numbre of functions which can only be accessed by its menus and from a
main menu which can be displayed using the SET UP key on the remote control.Your player’s
menus are always displayed on your TV screen.
Note: the main functions which cannot be accessed by menus but which are accessed by keys are detailed
on page 13.
Other menus are proposed when the main menu is displayed on the screen. All the menus and
their functions can be accessed using the 5 navigation jeys and most frequently via the ▼ and OK
keys.
DISC
MENU
CLEAR
DTH270E
OPEN/CLOSE
PLAY
STOP
OK
SET UP
PREVIEW
ZOOM
ANGL
PROG
REVE
PAUS
RAM
RSE
RAND
OM
E
OPEN
CLOS •
E
REPE
A-B AT
FORW
ARD
ON
HDM
• OFF
I
SKIP
E
PLAY
CLEA
R
STOP
DISC
MENU
OK
PRE
VIEW
SET
1
UP
2
3
4
DISP
5
6
7
AUD
8
DVD
9
/USB
0
Dolby
CD>>
mp3
SUB
LAY
IO
TITL
E
TITL
MEN E
U
Dolby
General Setup Menu
RCT1
95D
TV Display
TV Type
Video Out
Menu Language
HDMI Setup
HDMI Audio
VOD
- - Preferences Setup - -
1
PS
PAL
Dolby
ENG
OFF
PCM
VOD
- - Dolby Digital - -
Audio
Subtitle
Disc Menu
Ratings
Password
ENG
OFF
ENG
Dynamic
General Setup Menu, Press OK
Preferences Setup, Press OK.
Dolby Digital Setup, Press OK.
Dolby
General Setup Menu
TV Display
TV Type
Video Out
Menu Language
HDMI Setup
HDMI Audio
VOD
Select a menu display language using the CB▼▲
and OK keys.
PS
PAL
ENG
OFF
PCM
VOD
English
Español
Deutsch
Français
Italiano
Languages available:
English, Spanish, German, French and Italian.
Set Menu Language To English
Tip(s): No picture or menu on the screen?
• Select (on the TV or with its remote control) the HDMI socket to which your player
is connected.
• Select the correct output video signal format in the General Setup Menu, function:
- HDMI Setup: Choose a setting according to the TV (480p to 1080i).
- HDMI Audio: Choose one of te SPDIF or PCM settings depending on the TV.
12
02_MUS_DTH270_en.qxp
9/03/07
13:50
Page 13
Usage
The buttons and their functions
EN
DTH270E
OPEN/CLOSE
1
1
2
2
B ON/OFF
#
O OPEN/CLOSE
4
KB PLAY
5
L STOP
Stop playback
6
CC REVERSE
BB FORWARD
Quick reverse
Fast forward
7
8
HDMI
DVD/USB
0
PROGRAM, RANDOM,
REPEAT A-B
!
SET UP
@
Play functions
AUDIO
SUBTITLE
#
Other functions
DISPLAY
ZOOM, ANGLE,
TITLE MENU, CD>>mp3,
PREVIEW, CLEAR,
DISC MENU
$
%
Navigation keys
OK ▼▲CB
%
3
On / Off
3
ICC BBI SKIP
PLAY
3 4 5
Disc tray
9
STOP
Open / close the disc tray
Play Disc / Pause
0
6
4
#
ZOOM
ANGLE
PROGRAM RANDOM
OPEN •
CLOSE
ON • OFF
REPEAT
A-B
HDMI
REVERSE FORWARD
PAUSE
SKIP
PLAY
STOP
$
8
Access menus
!
#
Access playback modes
1
2
3
DISPLAY
4
5
6
AUDIO
7
8
9
SUBTITLE
0
CD>>mp3
TITLE
MENU
DVD/USB
Select a DVD disc language
DVD disc subtitle selection
Display information
or playback functions
Function selection in the menus
USB input socket
13
5
SET UP
PREVIEW
Chapter skip
7
9
DISC
MENU
CLEAR
OK
Source selection: selection
of the connected appliances
(AV, USB, HDMI sockets)
1
RCT195D 1
#
@
#
02_MUS_DTH270_en.qxp
9/03/07
13:50
Page 14
Usage
The sockets and their uses
OUTPUT - The analog sound★ and the
composite images (CVBS)★ of a disc being player
are permanently available on the 2 audio sockets L
and R and the video socket of your player.
COMPONENT VIDEO OUT - The Y,
Pb, Pr sockets deliver an optimum
image★★★ quality thanks to the separation
of the video signal into 3 signals
(comparable to the RGB separation in the
Peritel (Scart) cable).To obtain the best
image quality possible, use very high quality
cables for the connections.Your dealer will
have YUV cables which are sold together
and respect the colour code (red, green
and blue) for this type of socket and cable.
Y
PR
AV CONNECTOR (RGB)-TV - This socket
allows you to transfer Audio and Video
(images★★★ and sound★★) from your DVD player
to a television set or other device (flat screen,
audio-video amplifier, etc.) that is fitted with the
same type of socket.This transfer is performed in
RGB which ensures good image quality.
VIDEO
L
AC~
PB
HDMI
R
COAXIAL
HDMI OUT - The HDMI
socket permanently delivers very
high quality digital sound and
pictures★★★★★.
This connection is strongly
recommended with a digital
television which is fitted with the
same socket and is compatible.
S-VIDEO
AUDIO
OPTICAL
AV CONNECTOR (RGB)-TV
OPTICAL/COAXIAL - The digital sound★★★★
dof a DVD Video disk when played is permanently
available on the OPTICAL and COAXIAL sockets on
your player. Use these sockets by connecting them to
a decoder or Dolby Digital amplifier or DTS.
S-VIDEO socket -to playimages★★ from a
camcorder or other S-Vidéo appliance.
SE
PLAY
STOP
USB socket - The USB socket is used to
play pictures★★★★ and sound★★★★
(JPEG, MP3 or AVI files).
Tip(s)
- Use high quality cables and/or known brand cables to connect your appliances via the
different sockets on your player.
The ★ on this page inform you of the quality of the video (images) and audio (sound)
signals, from the lowest quality (★) to the highest (★★★★★)
- Depending on the sockets used and the appliances that are connected to them, you must
set the sockets’ output signals according to the appliances’ possibilities.The settings must be
made in the General Setup Menu (accessed with the SET UP key).
14
02_MUS_DTH270_en.qxp
9/03/07
13:50
Page 15
Usage
Menus
General Setup Menu
Preferences Setup
TV Display (Normal/PS - Normal/LB Wide Screen) - Adapts the pictures to your
TV’s screen format.
Audio - Choose the language for film dialogue.
TV Type (NTSC - PAL) - Adapts the “colour
standard” according to the TV signals received.
Subtitle - Stop or choose a preferential
language to display the subtitles on your DVD
discs.
Languages available: English, Spanish, German,
French, Italian, Swedish and Portuguese.
Video Out - Adapts the pictures output from
the scart/péritel AV CONNECTOR (RGB) – TV
socket or the Y, Pr, Pb sockets to the type of
connection made to the TV (RGB,YUV
interleaved or YUV progressive signal).
Languages available: English, Spanish, German,
French, Italian, Swedish and Portuguese.
Disc Menu - Choose the language for the disc
menus.
Languages available: English, Spanish, German,
French, Italian, Swedish and Portuguese.
Menu Language - To select the appliance’s
menu languages.
Ratings - Parental control enables you to
control the playing of a disc the contents of
which have been certified as unsuitable for a
young audience.The 8 setting levels enable
control to be optimised, from the most
restrictive (8) to no restrictions (1).
HDMI Setup - Adapts the pictures output by
the HDMI socket to the possibilities of your TV
connected via an HDMI socket.Try one of the
suggested settings to obtain the best result.
Position this setting to Off if you are not using
the HDMI socket.
Note: the code for restricting access per scene is
determined by the disc editor. In Europe, very few
discs offer restricted levels of access.
HDMI Audio - Adapts the sound output by
the HDMI socket or the COAXIAL and
OPTICAL sockets to the possibilities of the
connected appliance (amplifier equippmed with
a Dolby Digital, DTS or MPEG amplifier).Try
one of the suggested settings to obtain the best
result.
1. Select a level of restriction using the ▼▲
keys, then press OK.
2. Enter a password.
Password - Lets you define or modify a
password.
VOD - Displays the DivX registration code of
your equipment.This code is vital when
purchasing VOD on line (VOD means Video on
Demand).
To change a password:
1. Enter the current password after Old
Password.
2. Enter a new password after New
Password.
3. Enter the new password again after
Confirm Password.
Note: DivX VOD files can be downloaded from
various commercial websites on payment of a
fee. Before downloading a video on demand file
(VOD), you must enter the registration number of
your DVD player on the purchase form of the site
in question.
Forgotten your password?
Dolby
Open the disc tray; press the CLEAR key;
type 0 0 0 0 1. Switch the player off then switch it
back on again.
All the settings made since the first time you
commissioned the appliance are cancelled; the
menus are displayed in English again.
Dolby Digital
Dynamic - Dolby Digital sound configuration.
15
EN
02_MUS_DTH270_en.qxp
9/03/07
13:50
Page 16
Usage
Main functions
READABLE DISCS
Video
DVD-RW/-R/+R/+RW + S-VCD / VCD
Audio
Multisession CD + CD-R/-RW
DVD video disc (region code)
2
Disc dimensions
8 / 12 cm
READABLE FILES
Audio/Video
jpeg, mp3, wma, divx
PLAY FUNCTIONS
DVD repeat
CD repeat
Disc / Title / A-B
Disc / Track / A-B / Programme
mp3 repeat
Track / Folder
Programmed play
Random play
Parental control
Zoom
DVD / jpeg
Memory recovery (1 disc)
Introscan (CD)
Play the last scene again (Scene again)
Scan jpeg photos (diaporama)
Scan Kodak CD photos
mp3/jpeg simultaneous play
mp3 during slideshow
MENUS
Languages available:
FR/EN/DE/ES/IT
Dolby Digital is a sound compression
technique developed by Dolby for multi-channel
digital audio signals. The Dolby Digital system
enables any audio channel configuration, from a
stereo sound (2 channels) up to the digital
“surround” sound 5.1. Manufactured under
license from Dolby Laboratories. “Dolby” and the
double-D symbol are trademarks of Dolby
Laboratories. • DTS is a digital sound
compression technique developed by Digital
Theater Sound Systems for digital audio
multichannel signals.“DTS” and “DTS Digital Out”
are registered trademarks of Digital Theater
Systems inc • PCM - If the device connected to
the DIGITAL AUDIO OUT sockets does not
support Dolby, DTS or MPEG signals, your DVD
player will deliver PCM (Pulse Code Modulation)
signals. In this case neither Dolby Digital, DTS nor
MPEG should be selected. Linear PCM is an
uncompressed audio recording format used for
CDs. The CDs are recorded in 44.1kHz /16bits.
DVDs are recorded in 48kHz / 16 bits, or even up
to 96kHz / 24 bits.
HDMI - the HDMI and High Definition
Multimedia Interface logos are commercial trade
marks registered by HDMI Licencing LLC.
This symbol indicates that your unusable
electronic appliance must be collected
separately and not thrown away with
household waste.Therefore, the European
Union has created a specific collection
and recycling system for which producers are
responsible. This appliance is designed and
manufactured with high quality materials and
components which can be recycled and reused.The
electrical and electronic appliances are likely to
contain elements which, although vital for the
system to operate, may be dangerous for health
and the environment if they are handled or
eliminated incorrectly. Please take care therefore
not to dispose of unwanted equipment with your
household rubbish. If you own the appliance, you
must leave it at the appropriate local collection
point or hand it back to your retailer in exchange for
a new product. If you are a professional user, please
refer to your supplier’s instructions. If you rent the
appliance or it is deposited to you, contact your
service provider. Please help us to protect the
environment we live in!
Technical data
Power supply: 220V/240V - 50 Hz • Weight : 1,2 kg• Dimensions (W x H x L):
430 x 220 x 44 mm • Power consumed: In operation = 15 W max, On standby < 1 W
• Operating temperature: +5°C to + 35°C• Ambient humidity : 80 % maximum • 2 laser
diode playback system: 655 / 780 nm, CLASS 2 laser • Infrared Remotecontrol: 33 Khz 2 x 1.5 V (AA) batteries
Nominal Specification - THOMSON reserves the right to change the specifications without notice. Product characteristics and appearance
are subject to change without notice. The colour and aspect of the product may differ from that represented in this manual.
Thomson waives its responsibility if the recorder is used in any way which does not conform to this document.
16
DTH 270 / EN - RST - AWS / 03-2007
00_MUS_DTH270_cov.qxp
9/03/07
EN
13:48
Page 3
Safety information - UK socket
Equipment for the UK is supplied with a mains cable fitted with a moulded plug.
Mains connection
This appliance is suitable for use on A.C. mains supply, 230 V - 50 Hz only. It must not be connected
to D.C. mains.
Note:The mains lead of the appliance is fitted with a moulded plug. If the mains sockets are not
compatible or if for any reason the plug is removed please follow the directions below.
The moulded plug cannot be rewired and if removed must be disposed of safely. Remove the fuse to
make it safer.
Do NOT under any circumstances plug the severed plug into any mains socket as this
could result in an electric shock.
Important!
If the plug is removed, rewire new plug as follows:The wires in the mains plug are
E
coloured in accordance with the following code:
L
BLUE - NEUTRAL
3A
N
BROWN - LIVE
As the colours of the wires in the mains lead of this apparatus may not
correspond with the coloured markings identifying the terminals in your plug,
proceed as follows:
BLUE wire to the terminal coded N (Neutral) or coloured black.
BROWN
BLUE
BROWN wire to the terminal coded L (Live) or coloured red.
Do NOT make any connection to the terminal in the plug which is marked by the letter E
or by the safety symbol l or coloured green and yellow.
A fused plug must be fitted with a 3A fuse approved by ASTA or BSI to BS
1362 and fuse covers must always be securely replaced.
If the fuse blows, check the mains cable for damage or call a qualified
technician. Do not try to bridge the fuse or increase its rating!
3A
3A
OFF button B on the remote control and appliance does not completely disconnect the unit
! The
from the mains supply, but switches operating on and off.
ES
DECLARATION DE CONFORMIDAD
CON NORMAS
El que suscribe, en nombre y representación de Thomson
multimedia (Dongguan) Ltd. declara bajo su propia
responsabilidad que el:
Fabricado por: Thomson multimedia (Dongguan) Ltd.
En:
P.R.C.
Marca:
Ver portada
Modelo:
Ver portada
objeto de esta declaración, cumple con la normativa siguiente:
- Artículo 9.2 del Reglamento Técnico del Servicio de
Difusión de Televisión aprobado en el Real Decreto
1160/89.
- Anexo V del Reglamento sobre perturbaciones
radioeléctricas aprobado en el Real Decreto 138/89.
Quality Assurance Manager
IT
DICHIARAZIONE DI CONFORMITA
Si dichiara che l’apparecchio DVD RECORDER,
(la cui marca ed il codice commerciale
sono indicati in copertina)
risponde alle prescrizioni dell’art. 2
comma 1 del D.M. 28 Agosto 1995 n° 548.
Fatto a MILANO, il 01/03/2007.
THOMSON Multimedia Sales - Italy S.p.A.
Via L. Da Vinci, 43
20090 Trezzano sul Naviglio (MI).
00_MUS_DTH270_cov.qxp
9/03/07
13:48
Page 4
Model and serial number
DTH 270
THOMSON Sales Europe
46, quai A. Le Gallo
92648 Boulogne Cedex
FRANCE
322 019 464 RCS NANTERRE
www.thomsonlink.com
36251210 © Copyright THOMSON 2007
Dealer's address