1
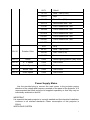
USER MANUAL 200W LED MOVING HEAD SPOT Model: MHLED 200D Please read over this manual before operation the light ATTENTION Thank you so much to choosing our light! This is powerful in functions with “CE” Standard. It has been tested through frequent practice in deferent cases, and well recognized by professional designers in the filed of stage light. It fully shows the modern times light characteristic with good performance, it can be used in all kinds of scenes with need high quality lighting. Please read this manual carefully before powering or installing the fixture, follow the safety precautions listed below and observe all warnings in this manual. Warning: Always disconnect from mains supply before replacing the lamp, or not, it will burn the light. 1. Disconnect the fixture from AC power before removing or installing the lamp, fuses, or any part, and when not in using 2. Always make the fixture connected to the ground electrically. 3. Please stop using when it is very hard to use, and check the problem with our agent or factory. 4. If lamp on/off by controller please pays attention to the voltage depressed when open a lot of light in one time. 5. Using Electromagnetic ballast, the second time to open the light should be after 15minite from the first time.( electronic ballast have hot start-up function) 6. Don’t expose the fixture to rain or moisture. Technical parameters Voltage / frequency::100-240V AC,50/60Hz Consume Power:280W LAMP:200W RGBW 4IN1 Multi-Color LED Lamp LED COLOR WHEEL: 13Color + White, rainbow effect Fixed Gobo wheel::6 gobo+White,flowing Effect from slow to fast。 Rotation Fixed Gobo wheel::6 gobo+White,Double-directional variable speed rotation 3 Prism:Speed and direction adjustable 3-facet prism Dimmer/Strobe:Dimmer,1-20times/sec. 1 Dimmer: Electronic IRIS:2-100% IRIS Rotation Angle:X 540°,Y 270°. Control signal: DMX512/RS232 compatible 25CH Modes of operation: stand-alone, DMX512, master / slave. Weight: 16.2 kg Lamp size: 340 * 260 * 555mm Packing size: 500 * 440 * 440mm Panel Instructions Mode 1: A001 factory default setting, this mode is DMX512 signal control, press ENTER to enter the address code, Press UP or DOWN to change the address number, press ENTER, to save. 2 MANU MAP DISPLAY MAN Address001 DMX512 Enter AUTO1 AUTO2 Enter RUN SOUND Use up or down CUSTOM SLAVE Enter TEST Address 512 001 CH 25 Person Enter GENERA CUSTOM 3 NORMAL PAN INVERT GENERA REVERSAL NORMAL TILT REVERSAL LCD. Disp NORMAL Dimmer REVERSAL SOUND 0~255 YES DEFAULT NO YES BLAC NO Enter SAVE Dmx Err SPECIAL BLACK SREIAL 000300DC 044A82 FACTORY PASSWARD 00000 DMX CH LIST CH DMX Value Function CH1 General Dimmer 0-255 General Dimmer,from dart to light CH2 R 0-255 Dimmer,from dart to light CH3 G 0-255 Dimmer,from dart to light CH4 B 0-255 Dimmer,from dart to light CH5 W 0-255 Dimmer,from dart to light CH 6 Color 000-002 R 4 CH7 Strobe 003-004 RW 005-007 RG 008-009 RGW 010-012 G 013-014 GW 015-017 GB 018-019 GBW 020-022 B 023-024 BW 025-027 RB 028-029 RBW 030-039 W 40-150 Slow - Fast (CCW) 151-255 Fast - Slow (CW) 0-3 White 4-225 Strobe 226-255 CH 8 CH 9 Dimmer 0-255 Dark Dark - Light 0-9 White 10-19 Gobo1 20-29 Gobo2 30-39 Gobo3 40-49 Gobo4 50-59 Gobo5 60-71 Gobo6 72-113 Slow - Fast (CCW) 114-117 Stop 118-159 Fast - Slow (CW) 160-173 White shake slow - fast 174-187 Color1 shake slow - fast Gobo 1 5 CH 10 CH 11 188-200 Color2 shake slow - fast 201-214 Color3 shake slow - fast 215-227 Color4 shake slow - fast 228-241 Color5 shake slow - fast 242-255 Color6 shake slow - fast 0-127 White 128-255 Prism Prism Prism Rotation 0-20 Angle 0 21-41 Angle90 42-62 Angle180 63-83 Angle270 84-104 Angle360 105-127 Angle450 128-190 Fast rotate to Slow rotate (CW) 191-192 Stop 193-255 Slow rotate to fast rotate (CCW) 0-127 CH12 Big to Small IRIS 128-255 Auto move slow - fast CH 13 Frost 0-255 0-100% Frost CH 14 Focus 0-255 0-100% Focus CH 15 PAN 0-255 540° angle) CH 16 PAN Fine 0-255 1.8° CH 17 TILT 0-255 270° CH 18 TILT Fine 0-255 1.8° 0-9 white CH 19 10-19 Gobo1 20-29 Gobo2 30-39 Gobo3 40-49 Gobo4 50-59 Gobo5 (630° when set as 630° Gobo 1 6 60-71 Gobo6 72-113 Slow - Fast (CCW) 114-117 Stop 118-159 Fast - Slow (CW) 160-173 White shake slow - fast 174-187 Color1 shake slow - fast 188-200 Color2 shake slow - fast 201-214 Color3 shake slow - fast 215-227 Color4 shake slow - fast 228-241 Color5 shake slow - fast 242-255 Color6 shake slow - fast 0-63 CH 20 Stop 64-127 Slow - Fast (CCW) 128-191 Fast - Slow (CW) 192-255 Atuo. Rotation Gobo CH 21 Reset 0-255 Reset Lighting position (stay 3Sec) CH 22 X、Y Speed 0-255 Fast to slow CH 23 Color Speed 0-255 Fast to slow CH 24 BEAM TIME 0-255 Fast to slow CH 25 Gobo Speed 0-255 Fast to slow Power Supply Mains Use the provided plug to connect the main power to the projector paying attention to the voltage and frequency marked on the panel of the projector. It is recommended that each projector be supplied separately so that they may be individually switched on and off. IMPORTANT It is essential that each projector is correctly earthed and that electrical installation conforms to all relevant standards. Power consumption of this projector is 200VA. WATCHDOG SYSTEM 7 When the projector is switched on the electronics performing a reset, this function moves the head to an extreme limit point and rotates the internal color and gobo wheels thus allowing the microprocessor control system to register the positions of all motor under its control. When the lamp strikes and fires up it can create some noise within the projector that has the potential to disturb the microprocessors. This projector is fitted with an electronic watchdog system that monitors the microprocessor and will initiate a reset if the functioning of the microprocessor has been disturbed. This system ensures that the reset is performed successfully and once completed the projector is ready to receive control instruction and operate without problem. DMX+ 3 33 3 DMX- 1 2 2 1 GND Connecting DMX512 digital signal, Please using high quality screen line to connect it, for fear interfering. GND 333 3 DIGITAL SIGNAL 1 2 2 1 Rigging(Optional) This equipment can be positioned and fixed by clamp in every direction of the stage. Locking system makes it easy to fasten to the bracket. Attention! Two clamps is needed to fix the equipment. Every clamp is locked by fastener of 1/4 kind. Fastener can only be locked clockwise. Attention! Fasten a safety string to the additional hole of side aluminum piece. The secondary accessory can not hang on the delivery handle. Nip the equipment on bracket. 1, Check if rigging clamp (not including the one inside) damaged or not? If stand ten times weight as the equipment. Make sure the architecture can stand ten times weight as all the equipments, clamps, wirings and other additional fixtures. 2, Screws for clamping must be fixed firmly. Take one M12 screw (Grade 8.8 or higher) to 8 clamp bracket, and then screw the nuts. 3, Level the two hanging points at the bottom of clamp. Insert fastener to the bottom, lock the two levers by 1/4 rotating clockwise; then install another clamp. 4 Install on safety string which stands at least ten times weight as equipment. Terminal of the accessory is designed for clamps. 5 Make sure pan/tilt lock unlocked or not. Keep the distance more than 1M from equipment to flammable material or lighting source. Maintenance Install and replace lamp,the attentions are as follows: HMI MSI lamp’s average life is 750 hours, please check if it works out before replace it. Draw out the line of power supply. Cool the bulb for 10-15 minutes after it blacks out, and then tweak the four screws. Open the cover, get the old bulb out and insert the new one. Cleaning of lens system Wash exterior and interior optical mirrors to enhance the brightness in regular time, especially when equipment used in messy surroundings. Use mirror cleanser (or alcohol) to wash exterior mirrors in every 15/20 days, 40/60 days for interior focusing prism/reflector. Safety information Do not separate the light personally. Prevent liquid, water and metal into the equipment. The equipment not fit for cases below: ◆ Relative humidity is too high. Shake and hit Room temperature is above 40 degree or below 0 degree. Relative temperature is below 30 degree or above 80 degree. Alarm: Replace the housing, lens and ultraviolet radiation when visible damage takes place, such as cracks. Replace the lamp when damage happens to it or its maximum life is used up. Shut off the power supply when replace lamp, safety box, and any other accessories and when it does not work. Keep the ground switch connected to ground. Power supply must meet the local standard on architecture and electric signal with overload protection and connect to earth. Do not make light beam shine on skin, do not look at the light source directly. Prevent short circuit happening to temperature control switch and safety box. When 9 replace defective fuse, choose approved new fuse of the same type. Keep the distance more than 1 M from equipment to flammable material (such as cloth, wood, paper). Keep the distance 0.1 M from fan to vent. When housing of equipment feels very hot, cool it for 15 minutes before operation. Advise you to choose accessories produced by us when install and replace. Whenever install or move equipment, set an alarm to prevent others entering job site. Do not put your hand between side arm and light structure when light working. (shown in picture 1 by arrow) Keep the optical system clean. Make the maintenance according to this manual when use in messy and dusty environment Luminous flux will decrease once the mirror gets covered by fatness or dust. Solutions to problems Phenomenon Of power supply Lamp does not light, motor does not work itself. When reset, indicator light of On/Off does not light. ◆ Lamp lights, reset, but one of the protocols out of control. Lamp not in stable control for lighting. Light spot not bright enough. Lamp lights, then black out, and lights again in a while. Causes: Power supply not in normal state, not well connected, the fuse breaks up. Control line not connected, or connected not to the right address code, please check the address code. Voltage is too low, lamp close to using up ◆ Lamp close to using up, optical mirror not clean. Over heat protection, please check if cooling system is blocked or not. 10