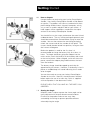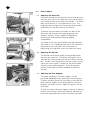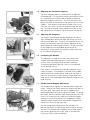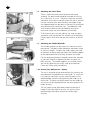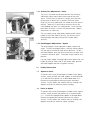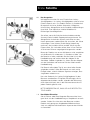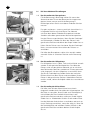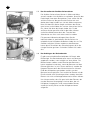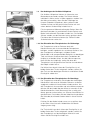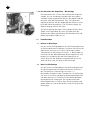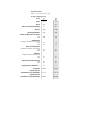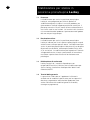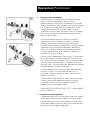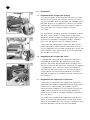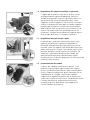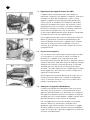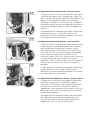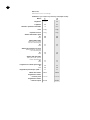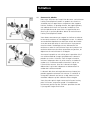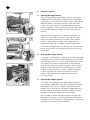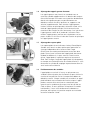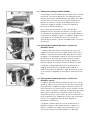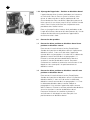
1
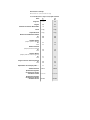
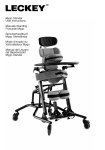
Leckey Prone/Supine Stander
Leckey Schrägliegebrett
Stabilizzatore per statica in
posizione prona/supina Leckey
Le verticalisateur Leckey
Prone/Supine Stander
USER MANUAL
GEBRAUCHSANLEITUNG
U S E R GUIDA D'USO
GUIDE DE L’UTILISATEUR
GB
Leckey Prone/Supine Stander
0.1
Preface
The Leckey Prone/Supine Stander has been designed to
offer the option of Supine and Prone Standing in one whilst
providing an unrivalled level of positional support. This
manual shows you how you can quickly and easily make
use of all of the functions. The instructions on the safety
and maintenance of the product will ensure that you will
enjoy the use of this product for a long time.
0.2
Intended Use
The Leckey Prone/Supine stander, as indicated, is for use in
prone and supine standing but may also be used for upright
standing. The Leckey Prone/Supine Stander is intended for
children with disabilities such as cerebral palsy from age
4-18 years. Standing can help the normal development of
the hips, it will help promote muscle formation, and can
help provide psychological well being.
0.3
Declaration of Conformity
James Leckey Design Ltd., as manufacturer with sole
responsibility, declares that the Leckey Prone/Supine
Stander conforms to the requirements of the 93/42/EEC
Guidelines.
0.4
Terms of Warranty
The Warranty applies only when the product is used
according to the specified conditions and for the intended
purposes, following all manufacturer’s recommendations
(also see our general terms of sales, delivery and payment).
Getting Started
1.0
1.0
How to Unpack
Congratulations on purchasing your Leckey Prone/Supine
Stander. Your Leckey Prone/Supine Stander will be boxed
on a pallet. The product will come as standard with chest
pad including flexible laterals, hip pad, knee pads, activity
tray as well as sandals and pelvic belt of your choice. A
head support will be supplied as standard for the supine
version of the Leckey Prone/Supine Stander
a
You should first cut the straps and remove the outer lid and
cardboard sleeve. The tray will be packaged separately and
should be removed from the box before trying to move the
stander. You can then remove the remaining packaging,
unlock the castors and roll the stander off the pallet. The
castors should then be locked into position, facing out from
the frame at 45 degrees
1.1
Before the product is used for the first time it is
recommended to charge the battery fully for at least 12
hours. To charge the battery, plug the adaptor into the
mains socket, attach the lead (a) to the handset and switch
on the mains power. When charged, switch off the mains
power, remove the adaptor plug and disconnect the lead
from the handset.
The battery charge should be topped up each day for
approximately 30 minutes. However, if the battery is low in
power an audible bleep will sound indicating that it needs
to be charged.
You are then ready to set up your Leckey Prone/Supine
Stander for the user. Some of the adjustments outlined
below require the use of an allen key, which is supplied
with each product in the documents wallet.
PLEASE CHECK THAT YOU HAVE ALL THE PARTS YOU
ORDERED.
1.1
Setting the Angle
Whether used in supine or prone the frame angle can be
easily adjusted with the push button control handset.
Ensure that the product and user are away from
surrounding furnishings to prevent possible collisions
when adjusting the angle.
GB
2.1
2.0
2.1
How to Adjust
Adjusting the Chest Pad
For prone standing you should firstly measure the distance
from the users feet to just under their arms and for supine
you should measure to the top of the shoulder. This is best
done, were practical, in a lying position on a mat. The
height between the top of the chest pad and the sandals
should be set to the equivalent of this distance.
To position the pad, loosen the knob at the back of the
spine and slide the pad to the required position and
retighten securely. Always support the pad before
loosening the knob to prevent the pad slipping
unexpectedly.
2.2
The height of the chest pad should not be adjusted when
the stander is in an upright position and in use. Maximum
adjustment of the chest pad is 40 cm/16 inches as
displayed on the calibration strip at the side of the spine.
2.2
2.3
b
a
2.3
a
b
Adjusting the Hip Pad
The hip pad can be height, depth and angle adjusted for
optimum pelvic position. The height of the pad is set to
the equivalent distance between the user’s pelvis and their
feet. To adjust the hip pad loosen the four knobs on either
side of the central spine at the back of the pad and slide
the pad into the required position. Once the required
position is obtained, the knobs should be re-tightened
securely.
Adjusting the Knee Supports
The height and depth of the knee supports can be
positioned independently by adjusting the mounting plate.
To adjust the plate, loosen the two knobs (a) and slide the
plate and knee support to the required position and then
retighten the knobs securely. Repeat the process for the
other plate.
To alter the width of the knee supports and also, if required,
achieve some rotation, loosen the knobs (b) and slide the
pad to the required position and then retighten the knobs.
2.4
2.4
Adjusting the Front Knee Supports
The knee supports come as standard with an additional
contoured pad. This should always be used when the user
is in supine but can also be used for prone standing for
additional support and security. To fasten the pad, insert
the plastic clip into the buckle on the side of the main knee
support. Then grab the straps ends and pull firmly away
from the user, which will secure the pad around the user’s
leg. To remove the pad, simply squeeze the tabs on the
top and bottom of the plastic clip and the pad will pop off.
2.5
Adjusting the Footplates
The Leckey Prone/Supine Stander footplates are split to
allow independent height and angle adjustment for exact
positioning of both feet. To adjust the footplate height, first
loosen the allen bolts and then slide the footplate to the
required position and retighten securely. To alter the angle
of the footplate to accommodate plantarflexion or
dorsiflexion, simply rotate the coupling cylinder clockwise
or anti clockwise respectively.
2.5
2.6
Positioning the Sandals
The footplate is hinged at the front which allows the
sandals to be adjusted more easily and can facilitate
transfer from a seating position to prone standing.
To avoid any possible finger nip issues lift the footplate
at the notched area (a).
2.6
a
Each sandal is attached to the individual footplate with a
single fixing bolt. The footplate is covered with a rubber
pad to ensure the sandals do not slide when secured. If
you wish to rotate the sandal laterally, simply loosen the
knob, place in the required position and then re-tighten the
knob securely.
2.7
2.7
a
b
Flexible Lateral Support Adjustment
The flexible lateral supports can be adjusted in height and
width. To adjust the width, loosen the knob on the back of
the chest pad. Then adjust the lateral support to the
required position and finally re-tighten the knob. To change
the height, loosen as before, slide the bracket out fully and
insert in an alternative slot, replace the knob and tighten
securely. As the lateral brackets are staggered in height,
additional height range can be achieved by swapping the
lateral from the left to the right side.
For finer height positioning loosen the allen bolts (a),
position the lateral as required and then re-tighten the bolt
securely. The flexible lateral supports are secured around
the user by tightening the safety strap (a) into position.
Fasten the safety strap immediately.
GB
2.8
2.8
To ensure that you can easily identify the strap that goes
around the user and the one that attaches to the hip pad, a
Leckey label is sewn onto the one that attaches to the hip
pad.
2.9
2.9
a
b
Attaching the Flexible Hip Pads
The flexible hip pads can be used as an alternative to the
pelvic band. The pads can be individually adjusted in width
as well as in height. To adjust the width, loosen the knob
on the back of the hip pad, then adjust the flexible supports
to the required position and finally re-tighten the knobs.
2.10
b
Attaching the Pelvic Band
There is a different pelvic band for prone and supine
standing. The pelvic band should be attached to the user
first, if practical, on a mat. The pelvic straps are attached
around the user’s pelvis and then when the user is secured
into the frame (by their feet and chest) the longer straps
are slipped through the belt bars on the back of the hip pad
and secured firmly around the user. The additional strap
with the plastic buckle and clip should be secured to
ensure the straps are not accidentally unfastened.
For the height positioning of the pads, loosen the allen bolt
(a), position the pad as required and then re-tighten the
bolts securely. The flexible supports are secured around
the user by tightening the safety strap (b) into position.
Fasten the safety strap immediately.
2.10 Activity Tray Adjustment – Supine
a
c
The tray is attached to and removed from the frame by the
metal brackets located below the chest pad. To attach the
tray, slide the metal bars into the receiving tubes to the
required depth and secure by tightening the knobs (a) on
either side. To adjust the height loosen the four knobs (b),
set the tray to the required position and then retighten the
knobs securely.
The tray angle can be adjusted by loosening the plastic
handle (c) on either side of the tray, set the tray to the
required angle and tighten the plastic handles again
securely.
2.11
2.11 Activity Tray Adjustment – Prone
The tray is attached to and removed from the frame by
sliding the square metal tube into the top of the main
spine. To lock the tray and set its height, push the over
centre lever (a) down until it touches the metal spine.
After use this may need to be fine tuned to ensure secure
locking. To do this lift up the lever and turn the nut (b)
while holding the lever in a fixed position. Push the lever
back down to check if it locks the tube securely. Repeat
the process as necessary.
c
a
b
The tray angle can be adjusted by loosening the ratchet
handle (c) on either side of the tray, set the tray to the
required angle and tighten the plastic handles again
securely.
2.12
b
2.12 Head Support Adjustment – Supine
b
The head support can be adjusted in depth, height and
angle. To attach and height adjust, slide the square tubing
into the top of the central spine on the backrest. To lock
the head support, push the over centre lever (a) down until
it touches the metal spine. To remove simply reverse this
process.
a
For fine height, depth and angle adjustment loosen the two
knobs (b), one on either side of the square tube, position
the head support and then re-tighten securely.
3.0
3.1
Product Conversion
Supine to Prone
To convert the Leckey Prone/Supine Stander to the prone
version, simply remove the head support as outlined under
2.12 and attach the prone tray as described under 2.11.
Remove the supine pelvic band and attach the prone
version. Finally, loosen the sandals and turn through 180
degrees and you are ready for prone standing.
3.2
Prone to Supine
To convert the Leckey Prone/Supine Stander to the supine
version, simply remove the prone tray as outlined under
2.11. Attach the required head support as defined above.
Remove the prone pelvic band and attach the supine
version. Finally, loosen the sandals and turn through 180
degrees and you are ready for supine standing.
GB
Safety Instructions
How to Maintain
1.
The maximum user weight limit on the size
one Leckey Prone/Supine Stander is 50kg
(110lbs) and the size two is 80kg (176lbs).
1.
2.
We would recommend that users are never
transferred straight from seating to standing
without preparation and stretching. This is
best done in lying position whilst on a mat
but can be carried out in a wheelchair or
seating system if required.
Allowing the charge on the battery to rundown will shorten its life. It is advisable to
charge the battery for at least 30 minutes
everyday. However, if the powered actuator
is not operating and you have checked that
the handset is connected correctly, you
should stop using the product immediately
and contact your local dealer.
2.
Lock the castors with the brake lever facing
out from the base. Please do not use your
hands.
At least once a week, check that all fixings
and fastenings including the castors are in
good condition.
3.
The Leckey Prone/Supine Stander is
manufactured from nylon coated metal, ABS
plastic and plywood. When cleaning the
frame we would recommend that you use
warm water and a non-abrasive detergent.
4.
When any parts of or accessories are not in
use, we would advise that you store them
together in a safe place for future use.
5.
If you are in any doubt as to the safe use of
your Leckey Prone/Supine Stander please
cease from using the product and contact
your local dealer as soon as possible.
3.
4.
We would recommend that the castor brakes
be locked at all times when the frame is in
use, being adjusted or even just stored.
5.
Although mobility is an important feature of
the Leckey Prone/Supine Stander, we do not
recommend that children be moved over
uneven surfaces whilst in the equipment.
6.
When adjusting the angle of the Leckey
Prone/Supine Stander ensure that the user
and all parts of the product are well clear of
surrounding furnishings to avoid potential
collisions.
7.
It is not recommended to adjust the height of
the back pad whilst the frame is in use and in
vertical position. Other fine positional
adjustments may be carried out safely when
the user is in the frame. It is important to
support all pads when adjusting them while
the user is in the product.
8.
When placing the user into the standing
frame, for safety reasons, always secure the
user’s feet and the chest straps first. Then
the hip and knee straps should be fastened.
9.
When used in the supine position it is
important to ensure the knee cup contoured
front pad is fastened securely. Always check
the clips are fully engaged.
10.
We recommend that children should not be
left unattended at any time whilst using
Leckey equipment.
Re-issuing Leckey Products
1.
Most Leckey products have been assessed
and ordered to meet individual needs
therefore, we recommend that before a
product is being re-issued, a compatibility
check has been carried out.
2.
Ensure that the product has been cleaned
thoroughly.
3.
A complete safety check of the product must
be carried out prior to re-issusing, this must
include the following checks:
4.
a.
Check that all locking mechanisms are
functioning properly.
b.
Check castors are moving freely and are
in good condition.
c.
Check that all locking bolts are working
properly and in place.
Where possible, please ensure that a copy of
the relevant instruction manual is kept with
the product and passed onto the new user.
Technical Data
Dimensions in (cm) and Weights in (kg)
Leckey Prone/Supine Stander
1
2
Length
113.5
128
Width
58
64
Height in Horizontal Position
78
80.5
Size
Weight
41kg
47kg
Load Capacity
50kg
80kg
User Standing Height
Min
Max
100
140
140
180
Shoulder Height
(Footplate to top of pad)
Min
Max
82
115
100
145
Hip Pad Height
(footplate to top of pad)
Min
Max
45
75
75
96
Knee Height
(footplate to middle of pad)
Min
Max
25
45
55
40
Width between Chest Laterals
Min
Max
20
30
24
38
Footplate Adjustment +/-
10º
10º
Tray Size
42x44
52x59
Tray Angle Adjustment
Prone Version
0º to 40º
0º to 40º
Tray Angle Adjustment
Supine Version
20º/30º
20º/30º
DE
Leckey Schrägliegebrett
0.1
Vorwort
Das Leckey Schrägliegebrett wurde entwickelt, um die
Möglichkeit des Liegens auf dem Rücken und in der
Schräge in einem anzubieten und zugleich ein
unvergleichliches Niveau an Haltungsstütze zu bieten.
Diese Gebrauchsanleitung zeigt Ihnen, wie Sie einfach und
schnell Gebrauch von diesen Funktionen machen können.
Die Anleitungen zur Sicherheit und zur Instandhaltung
dieses Artikels werden sicherstellen, dass Sie sich an dem
Gebrauch dieses Artikels eine lange Zeit erfreuen können.
0.2
Verwendungszweck
Das Leckey Schrägliegebrett ist, wie bereits angedeutet,
für das Liegen auf dem Rücken und in der Schräge
gedacht, kann aber auch für das aufrechte Stehen benutzt
werden. Das Leckey Schrägliegebrett ist für Kinder mit
Behinderungen, wie zerebrale Lähmung im Alter von 4 bis
18 Jahren geeignet. Stehen kann der normalen Entwicklung
der Hüften helfen, es wird helfen, die Muskelbildung zu
begünstigen, und es kann psychologisches Wohlbefinden
schaffen.
0.3
Konformitätserklärung
James Leckey Design Ltd. erklärt als Hersteller in alleiniger
Verantwortung, dass das Leckey Schrägliegebrett mit den
Anforderungen der Richtlinie 93 /42 /EWG für
Medizinprodukte übereinstimmt.
0.4
Garantiebedingungen
Eine Gewährleistung kann nur übernommen werden, wenn
das Produkt unter den vorgegebenen Bedingungen und zu
den vorgesehenen Zwecken eingesetzt wird (siehe auch
unsere allgemeinen Verkaufs-, Liefer- und
Zahlungsbedingungen).
Erste Schritte
1.0
1.0
Das Auspacken
Wir beglückwünschen Sie zum Erwerb Ihres Leckey
Schrägliegebrett.. Ihr Leckey Schrägliegebrett wird auf einer
Palette verpackt sein. Das Produkt kommt als Standard mit
Brustpolster inklusive flexibler Seitenteile, Hüftpolster,
Knieschützer, Ablagefläche sowie Sandalen und Beckengurt
Ihrer Wahl. Eine Kopfstütze wird bei Modellen für
Rückenlage Standard geliefert.
a
Sie sollten zuerst die Schnüre durchschneiden und den
äusseren Deckel und die Pappverpackung entfernen. Die
Ablagefläche wird einzeln verpackt und sollte aus dem
Karton genommen werden bevor Sie versuchen, die Stütze
zu bewegen. Dann können Sie die übrige Verpackung
entfernen, die Laufrollen öffnen und die Stütze von der
Palette rollen. Die Laufrollen sollten dann in ihrer Position
45 Grad vom Rahmen wegzeigend festgemacht werden.
1.1
Bevor das Produkt zum ersten Mal benutzt wird, empfehlen
wir die Batterie für mindestens 12 Stunden zu laden. Um
die Batterie zu laden, verbinden Sie das Kabel (a) mit der
Handbedienung und stecken dann den Adapter in die
Steckdose. Sobald sie geladen ist, ziehen Sie den Adapter
aus der Steckdose und entfernen Sie das Kabel von der
Handbedienung.
Die Batterie sollte jeden Tag für etwa eine halbe Stunde
aufgeladen werden. Sollte die Batterie nur noch wenig
Energie haben, wird ein hörbarer Signalton anzeigen, dass
sie geladen werden muss.
Nun sind Sie bereit, Ihr Leckey Schrägliegebrett für den
Benutzer vorzubereiten. Einige der Einstellungen, die im
folgenden beschrieben werden, erfordern die Benutzung
eines Inbusschlüssels, der in der Dokumententasche mit
jedem Produkt geliefert wird.
BITTE ÜBERPRÜFEN SIE, DASS SIE ALLE BESTELLTEN
TEILE HABEN.
1.1
Den Winkel Einstellen
Ob als Rücken- oder Bauchliege der Rahmenwinkel kann
ganz leicht mit der Handbedienung auf Knopfdruck verstellt
werden. Stellen Sie sicher, dass der Benutzer und das
Produkt weit genug von umgebenden Möbeln entfernt
sind, um mögliche Kollisionen beim Anpassen des Winkels
zu vermeiden.
DE
2.1
2.0
2.1
Die Verschiedenen Einstellungen
Das Verstellen des Brustpolsters
Für die Benutzung in Bauchlage sollten Sie zuerst den
Abstand von den Füssen des Benutzers bis knapp unter
dessen Armen messen und für die Benutzung in
Rückenlage sollten Sie bis zum oberen Ende der Schulter
messen.
Das geht am besten – wenn es praktisch einzurichten ist –
in liegender Position auf einer Matte. Der Abstand
zwischen dem oberen Ende des Brustpolsters und den
Sandalen sollte dem gemessenen Abstand entsprechen.
2.2
Um das Polster zu positionieren, lösen Sie den Drehknopf
am Rückenende, schieben Sie dann das Polster in die
gewünschte Position und drehen den Knopf wieder fest zu.
Halten Sie das Polster stets fest bevor Sie den Drehknopf
lösen, um unerwartetes Verrutschen des Polsters zu
vermeiden.
Die Höhe des Brustpolsters sollte nicht verstellt werden,
wenn die Stütze in aufrechter Position und in Benutzung
ist.
2.2
Das Hüftpolster kann in Höhe, Tiefe und im Winkel verstellt
werden für die optimale Beckenposition. Die Höhe des
Polsters wird auf den gleichen Abstand, wie er zwischen
dem Becken des Benutzers und dessen Füssen gemessen
wird, eingestellt. Um das Hüftpolster zu verstellen, lösen
Sie die vier Drehknöpfe auf beiden Seiten der zentralen
Rückensäule hinter dem Polster und verschieben Sie das
Polster in die gewünschte Position. Sobald diese Position
erreicht wurde, sollten die Knöpfe wieder fest verschlossen
werden.
2.3
b
Das Verstellen des Hüftpolsters
a
a
b
2.3
Das Verstellen der Knieschützer
Die Höhe und Tiefe der Knieschützer kann einzeln
eingestellt werden durch Verstellen der Aufspannplatte. Um
die Platte zu verstellen, lösen Sie die zwei Drehknöpfe (a)
und schieben die Platte und die Knieschützer in die
gewünschte Position und dann schliessen Sie die Knöpfe
wieder fest zu. Wiederholen Sie dies für die andere Platte.
Um die Weite der Knieschützer zu verändern und auch um
etwas Drehung zu erreichen, wenn dies nötig ist, lösen Sie
die Drehknöpfe (b) und schieben Sie den Schützer in die
gewünschte Postition und dann drehen Sie die Knöpfe
fest zu.
2.4
2.4
Das Verstellen der Vorderen Knieschützer
Die Knieschützer kommen als Standard mit einem
zusätzlichen Konturenpolster. Dies sollte immer benutzt
werden, wenn der Benutzer sich in Rückenlage befindet,
kann aber auch für die Bauchlage als zusätzliche
Unterstützung und Sicherheit verwendet werden.
Um das Polster festzuschnallen, stecken Sie den Plastikclip
in die Schnalle an der Seite des Hauptknieschützers. Dann
nehmen Sie die Gurtenden und ziehen Sie sie kräftig vom
Benutzer weg, was das Polster um das Bein des Benutzers
herum sichert. Um das Polster zu entfernen, drücken Sie
einfach die Enden an der oberen und unteren Seite des
Plastikclips und das Polster wird aufgehen.
2.5
2.5
Das Verstellen der Fussplatten
Die Leckey Schrägliegebrett Fussplatten sind geteilt, um
individuelle Höhen- und Winkeleinstellungen für das genaue
Positionieren beider Füsse zu ermöglichen. Um die Höhe
der Fussplatte einzustellen, lösen Sie zuerst alle
Inbusschrauben und schieben dann die Fussplatte in die
gewünschte Position und ziehen sie wieder fest.
Um den Winkel der Fussplatte zu verstellen und damit
Plantarflexion oder Dorsalflexion entgegenzukommen
drehen Sie einfach den verbindenden Zylinder je nach
Bedarf im Uhrzeigersinn oder entgegen dem Uhrzeigersinn.
2.6
a
2.6
Das Positionieren der Sandalen
Die Fussplatte ist an der Vorderseite aufgehängt, was es
erlaubt, die Sandalen einfacher zu verstellen und es kann
für den Übergang von sitzender Position zu Bauchstützlage
hilfreich sein. Jede Sandale ist an der entsprechenden
Fussplatte mit einem einzelnen Bolzen festgemacht. Die
Fussplatte ist mit einem Gummiüberzug bedeckt, um sicher
zu stellen, dass die Sandalen nicht verrutschen, wenn sie
festgestellt sind. Wenn Sie die Sandalen seitlich drehen
möchten, lösen Sie einfach den Plastikknopf, plazieren Sie
sie in die gewünschte Position und dann ziehen Sie den
Bolzen wieder fest.
DE
2.7
2.7
Das Verstellen der flexiblen Seitenstützen
Die flexiblen Seitenstützen können in Höhe und Weite
verstellt werden. Um die Weite zu verändern, lösen Sie den
Drehnknopf hinter dem Brustpolster. Dann stellen Sie die
seitliche Stütze auf die gewünschte Position ein und
drehen den Knopf wieder fest. Um die Höhe anzupassen,
lösen Sie ebenfalls diesen Knopf und ziehen den Halter
ganz heraus und schieben ihn in einen alternativen Schlitz
ein, ziehen Sie dann den Knopf wieder fest. Da die
seitlichen Halter gestaffelt sind für die Höhe, können
zusätzliche Höhenwerte durch das Tauschen der
Seitenhalter von links nach rechts erreicht werden.
a
b
Für genauere Höheneinstellungen lösen Sie die
Inbusschrauben (a), positionieren Sie die Seiten wie
erforderlich und schrauben die Bolzen wieder fest zu. Die
flexiblen seitlichen Stützen werden um den Benutzer
herum durch Festziehen des Sicherheitsgurtes (b) in die
richtige Position gesichert. Schnallen Sie den Gurt sofort
fest.
2.8
2.8
Das Anbringen des Beckenbandes
Es gibt unterschiedliche Beckenbänder für Bauch- oder
Rückenlage. Das Beckenband sollte zuerst am Benutzer
angebracht werden, wenn möglich auf einer Matte. Die
Beckenriemen werden um das Becken des Benutzers
herum angebracht und dann, wenn der Benutzer auf dem
Rahmen gesichert ist (mit Füssen und Brust), werden die
längeren Riemen durch die Gürtelschlaufen am hinteren
Ende des Hüftpolsters geschoben und fest um den
Benutzer herum gesichert. Der zusätzliche Riemen mit der
Plastikschnalle und Clip sollte gesichert werden, damit die
Riemen sich nicht unvorhergesehenerweise öffnen können.
Um sicherzustellen, dass Sie ganz leicht den Riemen, der
um den Benutzer herumgelegt wird von dem, der am
Hüftpolster festgemacht wird, unterscheiden können,
wurde ein Leckey-Etikett auf den Hüftpolsterriemen
aufgenäht.
2.9
Das Anbringen der flexiblen Hüftpolster
Die flexiblen Hüftpolster können als Alternative zum
Beckenband verwendet werden. Die Polster können
individuell in Weite sowie in Höhe angepasst werden. Um
die Weite einzustellen, lösen Sie den Drehknopf am
hinteren Ende des Hüftpolsters, dann stellen Sie die
flexiblen Stützen auf die gewünschte Position ein und
zuletzt drehen Sie den Knopf wieder fest zu.
a
b
2.9
2.10
b
Für eine genauere Höheneinstellung der Polster lösen Sie
die Inbusschrauben (a), positionieren Sie das Polster nach
Bedarf und stellen die Schrauben wieder fest. Die flexiblen
Stützen werden um den Benutzer herum gesichert durch
Festziehen des Sicherheitsriemens (b). Ziehen Sie den
Sicherheitsriemen sofort fest.
2.10 Das Einstellen des Therapietisches für Rückenlage
a
c
2.11
Der Therapietisch wird am Rahmen durch die
Metallklammern, die sich unterhalb des Brustpolsters
befinden, sowohl angebracht als auch davon entfernt. Um
den Therapietisch anzubringen, schieben Sie die
Metallstäbe in die entsprechenden Rohre bis zur benötigten
Tiefe und sichern Sie diese dann durch Festdrehen der
Knöpfe (a) auf beiden Seiten. Um die Höhe anzupassen,
lösen Sie die vier Knöpfe (b), stellen Sie dann den
Therapietisch auf die gewünschte Position ein und drehen
die Knöpfe wieder fest zu.
Der Winkel kann durch Lösen des Plastikgriffes (c) auf
beiden Seiten des Tisches eingestellt werden, stellen Sie
den Tisch auf den benötigten Winkel ein und ziehen Sie die
Plastikgriffe wieder fest.
c
a
b
2.11 Das Einstellen des Therapietisches für Bauchlage
Der Therapietisch wird durch Einschieben der viereckigen
Metallröhre in die zentrale Säule des Rahmens an diesen
angebracht und durch Herausziehen wieder entfernt. Um
den Therapietisch festzustellen und seine Höhe anzupassen
drücken Sie den Hebel über der Mitte (a) runter bis er die
Metallsäule berührt. Nach Benutzung kann es nötig sein,
dieses genauer nachzustellen, um sicheres Verschließen zu
gewährleisten. Dazu heben Sie den Hebel hoch und drehen
die Schraube (b) während Sie den Hebel in fester Position
halten.
Drücken Sie den Hebel wieder runter, um zu prüfen, dass
er das Rohr sicher feststellt. Wiederholen Sie diesen
Vorgang wenn nötig.
Der Tischwinkel kann durch Lösen der Plastikgriffe (c) auf
beiden Seiten des Tisches eingestellt werden, stellen Sie
den Therapietisch auf den benötigten Winkel ein und
ziehen Sie die Plastikgriffe wieder fest.
DE
2.12
2.12 Das Einstellen der Kopfstütze – Rückenlage
Die Kopfstütze kann in Tiefe, Höhe und Winkel eingestellt
werden. Um sie anzubringen und die Höhe einzustellen,
schieben Sie die quadratische Röhre in das obere Ende der
zentralen Säule der Rückenlehne. Zum Feststellen der
Kopfstütze drücken Sie den Hebel über der Mitte (a) runter
bis er die Metallsäule berührt. Zum Entfernen folgen Sie
diesem Vorgang einfach rückwärts.
b
b
a
Zur Feineinstellung der Höhe, Tiefe und des Winkels lösen
Sie die zwei Drehknöpfe (b), einen auf jeder Seite des
quadratischen Röhre, positionieren Sie die Kopfstütze und
drehen die Knöpfe wieder fest zu.
3.0
3.1
Produktumbau
Rücken-zu Bauchlage
Um das Leckey Schrägliegebrett von der Rückenlageversion
zur Bauchlageversion umzubauen, entfernen Sie einfach die
Kopfstützen wie unter 2.12 erklärt und bringen Sie den
Therapietisch für Bauchlage wie unter 2.11 beschrieben an.
Entfernen Sie das Beckenband der Rückenlageversion und
bringen Sie stattdessen das der Bauchlageversion an.
Zuletzt lösen Sie die Sandalen und drehen diese um 180
Grad und damit sind Sie fertig für die Bauchlage.
3.2
Bauch-zu Rückenlage
Um das Leckey Schrägliegebrett von der Bauchlageversion
zur Rückenlageversion umzubauen,entfernen Sie einfach
den Therapietisch für Bauchlage wie unter 2.11
beschrieben. Bringen Sie den Therapietisch für Rückenlage
wie unter 2.10 erklärt und ebenso die benötigte Kopfstütze
wie oben definiert an. Entfernen Sie das Beckenband der
Bauchlageversion und bringen Sie stattdessen das der
Rückenlageversion an. Zuletzt lösen Sie die Sandalen und
drehen diese um 180 Grad und damit sind Sie fertig für die
Rückenlage.
Sicherheitshinweise
1
Das Maximalgewicht des Benutzers für
Grösse Eins ist 50 kg und für Grösse Zwei
80 kg.
9
Wir empfehlen, dass Kinder zu keiner Zeit
unbeaufsichtigt bleiben, während sie sich auf
der Leckey Ausrüstung befinden.
2
Wir empfehlen, die Benutzer niemals direkt
vom Sitzen zum Stehen zu bringen ohne
Vorbereitung und Dehnung. Das wird am
besten im Liegen auf einer Matte getan, kann
aber auch in einem Rollstuhl oder Sitzsystem
durchgeführt werden, wenn nötig.
10
Falls irgendwelche Teile oder Zubehör nicht in
Benutzung sind, raten wir, dieses zusammen
an einem sicheren Ort aufzubewahren für
zukünftige Benutzung.
11
Sollten Sie irgendwelche Zweifel an der
sicheren Benutzung des
Bauchschrägliegebrettes haben, hören Sie
auf, das Produkt zu benutzen und
kontaktieren Sie Ihren Händler so schnell
wie möglich.
3
Blockieren Sie die Rollen mit dem
Bremshebel von der Basis wegzeigend.
Benutzen Sie bitte nicht Ihre Hände.
4
Wir empfehlen, die Rollenbremsen jederzeit
geschlossen zu halten wenn der Rahmen in
Benutzung oder in Aufbewahrung ist.
5
Auch wenn Beweglichkeit ein wichtiger
Aspekt des Bauchschrägliegebrettes ist,
empfehlen wir nicht, dass Kinder darin über
unebene Oberflächen gefahren werden
während sie auf dem Gerät sind.
6
Beim Einstellen des Winkels des
Bauchschrägliegebrettes vergewissern Sie
sich bitte, dass der Benutzer und alle Teile
des Produktes weit genug von umgebenden
Möbeln entfernt sind, um mögliche
Kollisionen zu vermeiden.
7
Beim Plazieren des Benutzers auf den
stehenden Rahmen, schnallen Sie aus
Sicherheitsgründen die Füsse des Benutzers
und die Brustgurte zuerst fest. Dann sollten
die Hüft- und Kniegurte festgemacht werden.
8
Wird die Rückenvariante benutzt, ist es
wichtig zu prüfen, dass das
Kniescheibenpolster sicher festgemacht
wurde. Prüfen Sie immer, dass die Clips ganz
eingerastet sind.
DE
Instandhaltung und Pflege
Wiedereinsatz
1.
1.
Die meisten Reha-Produkte werden speziell
auf die Bedürfnisse einer Person ausgewählt
und angepasst. Deshalb empfehlen wir vor
dem Wiedereinsatz die Durchführung einer
Kompatibilitätsprüfung.
2.
Stellen Sie vor dem Wiedereinsatz eine
gründliche Reinigung sicher.
3.
Eine komplette Sicherheitsüberprüfung vor
dem Wiedereinsatz des Produktes sollte die
folgenden Punkte beinhalten:
2.
3
Die Batterie vollständig zu entleeren, verkürzt
deren Lebenszeit. Es ist ratsam, die Batterie
jeden Tag für mindestens 30 Minuten
aufzuladen. Sollte jedoch der elektrische
Antrieb nicht funktionieren und Sie sind
sicher, dass der Handapparat korrekt
angeschlossen ist, dann sollten Sie sofort
aufhören das Gerät zu benutzen und Ihren
Händler kontaktieren.
Es wird nicht empfohlen, die Höhe des
Rückenpolsters zu verstellen, wenn der
Rahmen in Benutzung und in senkrechter
Position ist. Andere kleinere Verstellungen
können sicher ausgeführt werden, während
der Benutzer auf dem Rahmen ist. Es ist
wichtig, alle Polster beim Verstellen
abzustützen während der Benutzer sich auf
dem Gerät befindet.
Mindestens einmal pro Woche sollten Sie
prüfen, dass alle Verbindungen und Gurte
einschliesslich der Rollen in gutem Zustand
sind.
4
Das Leckey Bauchschrägliege brett wird aus
Metall mit Nylonbeschichtung, ABS Plastik
und Sperrholz hergestellt. Für das Säubern
des Rahmens empfehlen wir warmes Wasser
und ein nicht scheuerndes Reinigungsmittel
zu verwenden.
5
Sollten Sie irgendwelche Zweifel an der
sicheren Benutzung Ihres Leckey
Bauchschrägliegebrettes haben, hören Sie
auf, das Produkt zu benutzen und
kontaktieren Sie Ihren Händler so schnell wie
möglich.
4.
a.
Überprüfen Sie alle Verschluss- und
Rastmechanismen
b.
Prüfen Sie die Lauf- und
Dreheigenschaften der Rollen und die
Funktionsfähigkeit der Bremsen.
c.
Überprüfen Sie alle
Schraubverbindungen
Das Produkt sollte beim Wiedereinsatz mit
einer aktuellen Bedienungsanleitung
ausgestattet werden.
(Informationen erhalten Sie von Otto Bock)
Technische Daten
Maße in (cm) und Gewicht in (kg)
Leckey Schrägliegebrett
Größe
1
2
Länge
113.5
128
Breite
58
64
Höhe in horizontaler Stellung
78
80.5
Gewicht
41kg
47kg
Belastungsfähigkeit
50kg
80kg
Größe des Benutzers im Stehen
Min
Max
100
140
140
180
Schulterhöhe
(Fußplatte bis Beginn des Polsters)
Min
Max
82
115
100
145
Höhe des Hüftpolsters
(Fußplatte bis Beginn des Polsters)
Min
Max
45
75
75
96
Kniehöhe
(Fußplatte bis Mitte des Polsters)
Min
Max
25
45
55
40
Breite zwischen Brustplatten
Min
Max
20
30
24
38
Regulierung der Fußplatte +/-
10º
10º
42x44
52x59
Regulierung des
Tischwinkels in der Schräglage
0º to 40º
0º to 40º
Regulierung des
Tischwinkels in der Rückenlage
20º/30º
20º/30º
Tischgröße
ITL
Stabilizzatore per statica in
posizione prona/supina Leckey
0.1
Premessa
Lo Stabilizzatore per statica in posizione prona/supina
Leckey é stato progettato per offrire le opzioni di
stabilizzazione prona e supina in un unico prodotto, pur
garantendo un livello di supporto posizionale senza pari. Il
presente manuale vi illustra come utilizzare velocemente e
con facilità tutte le sue funzioni. Le istruzioni sulla sicurezza
e la manutenzione del prodotto vi permetteranno di godere
del suo uso per lungo tempo.
0.2
Destinazione d’uso
Lo Stabilizzatore per statica in posizione prona/supina
Leckey é indicato per l’uso in postura prona/supina ma puó
anche essere usato per postura eretta. Lo Stabilizzatore per
statica in posizione prona/supina é destinato all’uso da parte
di persone con disabilità, ad esempio Cerebral Palsy, dai 4
ai 18 anni di età. La stabilizzazione puó agevolare il normale
sviluppo delle anche, aiuterà a promuovere la formazione
muscolare e puó essere d’aiuto nel fornire benessere
psicologico.
0.3
Dichiarazione di conformità
Leckey Design Ltd., in qualità di produttore con
responsabilità esclusiva, dichiara che lo Stabilizzatore per
Statica Leckey é conforme alle disposizioni delle Linee
Guida 93/42/EEC.
0.4
Termini della garanzia
La garanzia é valida solo se il prodotto é utilizzato in
accordo con le condizioni specificate e per lo scopo cui é
destinato, seguendo le indicazioni del produttore (fare
anche riferimento alle condizioni generali di vendita,
consegna e pagamento).
Operazioni Preliminari
1.0
1.0
Rimozione dell’imballaggio
Complimenti per l’acquisto del vostro Stabilizzatore per
statica in postura supina/prona Leckey. Il vostro
stabilizzatore per statica Leckey è imballato in una scatola
su di una piattaforma. Con il prodotto sono inclusi sostegno
per il torace con flessibili laterali, sostegno per le anche,
sostegni per le ginocchia, vassoio di lavoro, insieme ai
sandali ed alla cintura pelvica di vostra scelta. Un supporto
per la testa è incluso con ogni stabilizzatore per statica in
postura supina Leckey.
a
Innanzitutto, dovete tagliare le cinghie e rimuovere il
coperchio esterno e la sezione in cartone. Il vassoio è
imballato separatamente e deve essere rimosso dalla
scatola prima di muovere lo stabilizzatore. Solo allora potete
rimuovere ciò che rimane dell'imballaggio, sbloccare le
ruote e far scivolare lo stabilizzatore giù dalla piattaforma.
Le ruote, quindi, devono essere bloccate in posizione,
orientate a 45° verso l'esterno.
1.1
Prima di usare il prodotto per la prima volta, si raccomanda
di caricare la batteria completamente per almeno 12 ore.
Per caricare la batteria, collegate il cavo (a) al telecomando
e inserite la spina dell'adattatore in una presa di corrente.
Una volta carica, staccate l'adattatore dalla presa di corrente
e disconnettete il cavo dal telecomando.
La carica della batteria va ripristinata ogni giorno per circa
30 minuti. Tuttavia, se la carica della batteria si sta
esaurendo si udirà un segnale acustico, indicante che la
batteria va ricaricata.
Tutto è pronto ora per allestire lo stabilizzatore Leckey per
l'utente. Alcune delle regolazioni indicate nel seguito
richiedono l'uso di una chiave esagonale, fornita col
prodotto nella tasca portadocumenti.
ASSICURATEVI DI AVER RICEVUTO TUTTI I COMPONENTI
DA VOI ORDINATI
1.1
Regolazione dell’angolazione
L'angolazione del telaio, sia nella postura prona sia in quella
supina, può essere facilmente regolata con i pulsanti del
telecomando. Assicuratevi che il prodotto e l'utente siano
lontani dalla mobilia circostante, per evitare la possibilità di
collisioni quando si regola l'angolazione.
ITL
2.1
2.0
2.1
Regolazioni
Regolazione del sostegno per il torace
Per la postura prona, misurate prima la distanza tra i piedi
dell'utente e le ascelle; per la postura supina va misurato
fino alla cima della spalla. Se possibile, ciò andrebbe fatto in
posizione distesa su un tappetino. La distanza tra il bordo
superiore del sostegno del torace ed i sandali va regolata
fino a coincidere con la distanza appena misurata
sull'utente.
Per posizionare il sostegno, allentate la manopola sul dorso
del telaio e fate scorrere il sostegno fino alla posizione
desiderata, quindi stringete la manopola fermamente. Prima
di allentare la manopola, sorreggete sempre il sostegno,
per evitare che questo scivoli via inaspettatamente.
2.2
L'elevazione del sostegno per il torace non deve essere
regolata quando lo stabilizzatore è in posizione eretta e in
uso. La regolazione massima del sostegno per il torace é di
40cm/16 pollici, come indicato dalla striscia di calibrazione
sul lato dell’asse centrale.
2.2
2.3
b
Regolazione del sostegno per l’anca
Il sostegno per l'anca può essere regolato in elevazione,
profondità ed angolazione, per ottimizzare la posizione
pelvica. L'elevazione del sostegno deve coincidere con la
distanza tra il bacino dell'utente ed i suoi piedi. Per regolare
il sostegno per l'anca, allentare le quattro manopole su
entrambi i lati dell'asse centrale, sul retro del sostegno, e
fatelo scorrere fino alla posizione desiderata. Quando la
posizione è raggiunta, le manopole vanno di nuovo serrate
con fermezza.
a
a
b
2.3
Regolazione dei supporti per le ginocchia
L'elevazione e la profondità dei supporti per le ginocchia
possono essere regolate indipendentemente, aggiustando
la placca su cui sono montati. Per regolare la placca,
allentate le due manopole (a) e fate scorrere la placca con i
supporti per le ginocchia fino alla posizione desiderata,
quindi serrate a fondo le manopole. Ripetete la procedura
per l'altra placca.
Per modificare la larghezza dei supporti per le ginocchia e
anche, se necessario, per permettere un po' di rotazione
allentate le manopole (b) e fate scorrere il sostegno fino alla
posizione desiderata, quindi riserrate le manopole.
2.4
2.5
2.4
Regolazione dei supporti frontali per le ginocchia
I supporti per le ginocchia sono forniti, di serie, con un
sostegno imbottito sagomato addizionale. Questo va
sempre usato quando l'utente è in posizione supina, ma
può essere usato anche nella posizione prona, come
supporto e sicurezza aggiuntivi. Per allacciare il sostegno
inserite la clip di plastica nella fibbia sul lato del supporto
principale per le ginocchia. Quindi afferrate le estremità
delle cinghie e tirate con fermezza verso l’esterno, il che
serrerà il sostegno attorno alla gamba dell'utente. Per
rimuovere il sostegno, basta premere le linguette sopra e
sotto la fibbia di plastica e il sostegno si sgancerà.
2.5
Regolazione delle placche per i piedi
Le placche per i piedi dello Stabilizzatore Leckey sono
separate, per permettere regolazioni indipendenti in
elevazione ed angolazione per la posizionatura esatta di
entrambi i piedi. Per regolare l'elevazione della placca per il
piede, allentate prima i bulloni, fate scorrere la placca nella
posizione desiderata, quindi riserrate con fermezza. Per
modificare l'angolazione della placca per il piede, per
permettere plantaflessione e dorsiflessione, ruotate
semplicemente il cilindro di collegamento in senso orario od
antiorario rispettivamente.
2.6
a
2.6
Posizionamento dei sandali
La placca per il piede è incernierata sul davanti, il che
permette un più semplice aggiustamento dei sandali e
facilita il trasferimento dalla postura seduta a quella prona.
Ciascun sandalo è collegato alla placca individuale con un
singolo bullone di fissaggio. La placca per il piede è
ricoperta da un tappetino di gomma, per assicurare che i
sandali non scivolino una volta fissati. Se desiderate ruotare
il sandalo lateralmente, semplicemente allentate la
manopola di plastica, posizionate come opportuno e
riserrate il bullone fermamente.
ITL
2.7
2.7
a
b
Per un aggiustamento più accurato in elevazione, allentate i
bulloni (a), posizionate il laterale come desiderato e poi
riserrate il bullone fermamente. I supporti laterali flessibili
sono serrati attorno all'utente stringendo la striscia di
sicurezza (b) in posizione. Allacciate la cinghia di sicurezza
immediatamente.
2.8
2.8
Fissare la fascia pelvica
C'è una diversa fascia pelvica per la postura prona e supina.
La fascia pelvica va assicurata all'utente in anticipo, se
possibile su un tappetino. Le cinghie pelviche sono
assicurate attorno al bacino dell'utente e, quando l'utente è
fissato al telaio (con i piedi ed il torace) le cinghie più lunghe
vengono fatte scorrere tra le barre del telaio sul retro del
sostegno per l'anca ed assicurate fermamente attorno
all'utente. La cinghia aggiuntiva con la fibbia di plastica deve
essere agganciata, per essere sicuri che le cinghie non si
sgancino inavvertitamente.
2.9
b
Regolazione del supporto laterale flessibile
I supporti laterali flessibili possono essere regolati in
elevazione e larghezza. Per regolare la larghezza, allentate la
manopola sul dorso del sostegno per il torace. Quindi
regolate il supporto laterale nella posizione desiderata e,
infine, riserrate la manopola. Per modificare l'elevazione,
allentate la manopola come sopra, fate scorrere la staffa
completamente fuori e inseritela in una diversa fenditura,
reinserite la manopola e riserrate fermamente. Mentre le
staffe laterali hanno posizioni fisse in elevazione,
un'escursione addizionale può essere ottenuta scambiando
il laterale dal fianco sinistro a quello destro.
a
Affinché possiate facilmente identificare la cinghia che va
attorno all'utente e quella che si collega al sostegno per
l'anca, un'etichetta Leckey è stata cucita su quella che si
collega al sostegno per l'anca.
2.9
Collegare i sostegni flessibili dell’anca
I sostegni flessibili dell'anca possono essere usati come
alternativa alla fascia pelvica. I sostegni possono essere
aggiustati individualmente sia in elevazione sia in larghezza.
Per regolare la larghezza allentate la manopola sul retro del
sostegno per l'anca, quindi regolate i supporti flessibili nella
posizione desiderata, infine riserrate le manopole.
Per una regolazione accurata dei sostegni in elevazione,
allentate i bulloni (a), posizionate il sostegno come
desiderate e poi riserrate i bulloni con fermezza. I supporti
flessibili vengono assicurati attorno all'utente stringendo la
cinghia di sicurezza (b) in posizione. Agganciate la cinghia di
sicurezza immediatamente.
2.10
b
a
c
2.11
2.10 Regolazione del vassoio di lavoro – Postura supina
Il vassoio si unisce e si rimuove dal telaio per mezzo delle
staffe metalliche poste sotto il sostegno per il torace. Per
unire il vassoio fate scorrere le barre metalliche dentro i tubi
appositi fino alla profondità desiderata e assicuratelo
stringendo le manopole (a) su entrambi i lati. Per regolare
l'elevazione allentate le quattro manopole (b), posizionate il
vassoio come desiderate e poi riserrate le manopole con
fermezza.
L'angolazione del vassoio può essere regolata allentando la
maniglia di plastica (c) su entrambi i lati del vassoio,
posizionate il vassoio all'angolazione desiderata e riserrate
le maniglie di plastica con fermezza.
2.11 Regolazione del vassoio di lavoro – Postura prona
c
a
b
2.12
b
Il vassoio si unisce e si rimuove dal telaio facendo scorrere
il tubo metallico a sezione quadrata nella parte superiore
dell'asse principale. Per bloccare il vassoio e fissarne
l'elevazione premete la leva eccentrica (a) verso il basso
fino a farla toccare l'asse metallico. Dopo l'uso potrebbe
essere necessario riaggiustarla accuratamente, per
assicurare il blocco. Per far ciò, muovete la leva verso l'alto
e ruotate il bullone (b), mentre tenete la leva ferma.
Ripremete la leva verso il basso per assicurarvi che questa
stringa il tubo con fermezza. Se necessario, ripetete la
procedura.
L'angolazione del vassoio può essere regolata allentando la
maniglia di blocco (c) su entrambi i lati del vassoio,
posizionate il vassoio all'angolazione desiderata e riserrate
le maniglie di plastica con fermezza.
b
a
2.12 Regolazione del supporto per la testa – Postura supina
Il supporto per la testa può essere regolato in profondità,
elevazione e angolazione. Per collegarlo e regolarne
l'elevazione, fate scorrere il tubo a sezione quadrata nella
cima dell'asse centrale sullo schienale. Per bloccare il
supporto per la testa premete la leva eccentrica (a) verso il
basso fino a farla toccare l'asse metallico. Per rimuovere
invertite questa procedura.
Per l'aggiustamento fine dell'elevazione, della profondità e
dell'angolazione allentate le due manopole (b), una su
ciascun lato del tubo a sezione quadrata, posizionate il
supporto per la testa e riserrate con fermezza.
ITL
3.0
3.1
Conversione del prodotto
Da postura supina a prona
Per convertire lo Stabilizzatore Leckey in postura supina
nella versione prona, semplicemente rimuovete il supporto
per la testa come indicato nella sezione 2.12 ed unite il
vassoio per la postura prona come descritto al punto 2.11.
Rimuovete la fascia pelvica per la posizione supina e
collegate la versione prona. Infine, allentate i sandali e
ruotateli di 180°. Siete ora pronti per la postura prona.
3.2
Da postura prona a supina
Per convertire lo Stabilizzatore Horizon in postura prona
nella versione supina, semplicemente rimuovete il vassoio
per la postura prona come indicato nella sezione 2.11. Unite
il supporto per la testa da utilizzare come descritto sopra.
Rimuovete la fascia pelvica per la posizione prona e
collegate la versione supina. Infine, allentate i sandali e
ruotateli di 180°. Siete ora pronti per la postura supina.
Istruzioni di sicurezza
1.
Il limite massimo di peso dell'utente è di 50kg
(110 libbre) per lo Stabilizzatore Leckey di
misura Uno, 80kg (176 libbre) per lo
Stabilizzatore Leckey di misura Due.
2.
Vi consigliamo di non trasferire mai gli utenti
direttamente dalla postura seduta a quella
estesa senza preparazione e allungamenti. È
preferibile far ciò mentre si è distesi su un
tappetino, ma è possibile anche su una sedia
a rotelle o su un'attrezzatura per sedersi, se
necessario.
3.
Bloccate le ruote con la leva del freno
orientata verso l'esterno della base. Non
fatelo con le mani.
4.
Vi consigliamo di mantenere le ruote sempre
bloccate quando il telaio è usato, quando
viene regolato o anche soltanto messo da
parte.
5.
Sebbene la mobilità è un'importante
caratteristica dello Stabilizzatore Leckey, non
è consigliabile che bambini vengano fatti
muovere su superfici irregolari mentre
utilizzano l'apparecchiatura.
6.
Quando si regola l'angolazione dello
Stabilizzatore Leckey, assicuratevi che l'utente
e tutte le componenti del prodotto siano
lontani dalla mobilia circostante, per evitare la
possibilità di collisioni.
7.
Si consiglia di non regolare l'elevazione del
sostegno posteriore mentre il telaio è in uso e
in posizione verticale. Le altre regolazioni di
posizione fini si possono effettuare senza
rischi quando l'utente è nel telaio. È
importante sorreggere tutti i sostegni che si
vogliono regolare mentre l'utente è nel
prodotto.
8.
Quando si posiziona l'utente nel telaio, per
motivi di sicurezza è necessario sempre
fissare prima le cinghie dei piedi e del torace.
Poi vanno allacciate le cinghie dell’anca e
delle ginocchia.
9.
Quando si usa in posizione supina, è
importante assicurarsi che il sostegno frontale
della ginocchiera sia allacciata saldamente.
Controllate sempre che le fibbie siano
completamente inserite.
10.
Si raccomanda di non lasciare mai soli i
bambini durante l'uso dell'attrezzatura Leckey.
ITL
Dati tecnici
Dimensioni in (cm) e Pesi in (kg)
Stabilizzatore per statica in posizione prona/supina Leckey
1
2
Lunghezza
113.5
128
Larghezza
58
64
Altezza in posizione orizzontale
78
80.5
Peso
41kg
47kg
Misura
Capacità di carico
50kg
80kg
Altezza dell’utente in piedi
Min
Max
100
140
140
180
Altezza della spalla
(dalla placca per i piedi
alla cima del sostegno)
Min
Max
82
115
100
145
Altezza del sostegno per l’anca
(dalla placca per i piedi alla
cima del sostegno)
Min
Max
45
75
75
96
Altezza delle ginocchia
(dalla placca per i piedi al
centro del sostegno)
Min
Max
25
45
55
40
Larghezza tra i laterali per il torace
Min
Max
20
30
24
38
Regolazione placche per i piedi +/-
10º
10º
42x44
52x59
Angolazione vassoio
– versione prona
0º to 40º
0º to 40º
Angolazione vassoio
– versione supina
20º/30º
20º/30º
Misure del vassoio
FR
Le verticalisateur Leckey
Prone/Supine Stander
0.1
Préface
Le verticalisateur Leckey Prone/Supine Stander a été conçu
pour proposer au choix l’appui dorsal ou ventral, avec un
niveau inégalé d’adaptabilité et de maintien. Ce manuel
vous montre comment rapidement et facilement utiliser
toutes ses fonctions. Les instructions de sûreté et
d’entretien assureront que vous bénéficierez de ce produit
pendant longtemps.
0.2
Utilisation Prévue
Le verticalisateur Leckey Prone/Supine Stander est prévu
pour être utilisé en position debout, soit en décubitus
ventral, soit en décubitus dorsal. Le verticalisateur Leckey
Prone/Supine Stander est prévu pour des personnes de
tous âges à partir de 4ans et de moins de 80Kg . Se tenir
debout peut être bénéfique pour le bon développement des
hanches, promouvoir le développement musculaire, et peut
aider au bien-être psychologique.
0.3
Déclaration de Conformité
Leckey Design Ltd en tant que fabricant avec unique
responsabilité déclare que le verticalisateur Leckey
Prone/Supine Stander est conforme aux exigences de la
Directive 93/42/EEC.
0.4
Termes de Garantie
La garantie n’est applicable que lorsque le produit est utilisé
dans les conditions spécifiées et pour l’utilisation prévue,
suivant les recommandations du fabricant (voir également
nos conditions de vente, livraison et paiement).
Initiation
1.0
1.0
a
1.1
Comment le déballer
Nous vous félicitons de l’acquisition de votre verticalisateur
Leckey Prone/Supine Stander. Le produit sera fourni en
standard avec un appui-thorax comprenant des supports
latéraux flexibles, un protège-hanche, des appuis-genoux,
une tablette d’activités ainsi que des sandales et une
ceinture pelvienne de votre choix. Un appuie-tête sera
fourni avec la version décubitus dorsal du verticalisateur
Leckey Prone/Supine Stander.
Vous devez commencer par couper les lanières et enlever
le couvercle extérieur et l’enveloppe en carton. La tablette
sera emballée séparément et doit être retirée de la boîte
avant de tenter de retirer le verticalisateur. Vous pouvez
ensuite enlever l’emballage restant, déverrouiller les
roulettes et rouler le verticalisateur hors de la palette. Les
roulettes doivent ensuite être verrouillées en position, en
dépassant du verticalisateur à 45 degrés.
Avant que le produit ne soit utilisé pour la première fois, il
est recommandé de charger complètement la batterie
pendant au moins 12 heures. Pour charger la batterie,
enfichez l’adaptateur dans la prise secteur, raccordez le
cordon (a) à la télécommande et branchez la prise sur
l’alimentation secteur. Une fois la batterie chargée,
débranchez la prise de l’adaptateur et déconnectez le
cordon de la télécommande.
La batterie doit être rechargée de nouveau chaque jour
pendant approximativement 30 minutes. Si toutefois la
charge de la batterie est basse, un bip sonore se fera
entendre indiquant qu’elle a besoin d’être chargée.
Vous être alors prêt à régler votre verticalisateur Leckey
pour l’utilisateur, en prenant garde à l’ameublement
environnant pour éviter des collisions possibles lors de
l’ajustage de l’angle d’inclinaison.
FR
2.1
2.0
2.1
Comment l’ajuster
Ajustage de l’appui-thorax
Pour un verticalisateur en décubitus ventral, vous devez
d’abord mesurer la distance comprise entre les pieds de
l’utilisateur et juste sous les aisselles et pour la position en
décubitus dorsal, vous devez mesurer la distance allant
jusqu’au haut de l’épaule. Il est préférable de le faire en
position allongée. La hauteur entre le haut de l’appui-thorax
et les sandales doit être réglée sur l’équivalent de cette
distance.
Pour positionner l’appui-thorax, desserrez le bouton se
trouvant à l’arrière de l’axe central, faites glisser l’appuithorax à la position requise et resserrez à fond. Mettez
toujours l’appui-thorax en appui avant de desserrer le
bouton pour éviter qu’il ne glisse de façon imprévisible.
2.2
La hauteur de l’appui-thorax ne doit pas être ajustée tandis
que le verticalisateur est en position verticale et en cours
d’utilisation.
2.2
2.3
b
Ajustage du protège-hanche
La hauteur, la profondeur et l’angle d’inclinaison du protègehanche peuvent être ajustés pour l’obtention d’une position
optimale pour le bassin. La hauteur du protège-hanche doit
être réglée sur la distance équivalente à celle comprise
entre le bassin de l’utilisateur et ses pieds. Pour ajuster le
protège-hanche, desserrez les quatre boutons situés de
chaque côté de l’axe central situé à l’arrière du protègehanche et glissez-le à la position requise. Une fois la
position requise obtenue, les boutons doivent être
resserrés à fond.
a
a
b
2.3
Ajustage des appuis-genoux
La hauteur et la profondeur des appuis-genoux peuvent
être ajustées indépendamment par le réglage de la plaque
de montage. Pour ajuster la plaque, desserrez les deux
boutons (a) et faites glisser la plaque et l’appui-genoux à la
position requise et resserrez ensuite les boutons à fond.
Répétez la même procédure pour l’autre plaque.
Pour changer la largeur des appuis-genoux et également
pour obtenir, au besoin, un certain pivotement, desserrez
les boutons (b) et faites glisser l’appui-genoux à la position
requise et resserrez ensuite les boutons.
2.4
2.4
Ajustage des appuis-genoux frontaux
Les appuis-genoux sont fournis en standard avec un
coussinet courbé supplémentaire. Ce dernier doit toujours
être utilisé lorsque l’utilisateur est en position de décubitus
dorsal mais également pour un positionnement en
décubitus ventral afin de lui procurer un support et une
sécurité supplémentaire. Pour attacher l’appui-genoux,
insérez l’attache en plastique dans la boucle située sur le
côté de l’appui-genoux principal. Saisissez ensuite les
extrémités des sangles et tirez fermement. Ceci sécurisera
l’appui-genoux autour de la jambe de l’utilisateur. Pour
enlever l’appui-genoux, pressez tout simplement sur les
pattes situées sur le haut et le bas de l’attache en plastique
et l’appui-genoux sautera.
2.5
2.5
Ajustage des repose-pieds
Les repose-pieds du verticalisateur Leckey Prone/Supine
Stander sont fournis en deux parties pour permettre un
ajustage indépendant de la hauteur et de l’angle
d’inclinaison en vue du positionnement exact des deux
pieds. Pour ajuster la hauteur de l’appui-pieds, desserrez
d’abord les boulons à six pans creux et faites ensuite
glisser l’appui-pieds à la position requise et resserrez à
fond. Pour changer l’angle de l’appui-pieds afin de prendre
en compte une flexion plantaire ou une dorsiflexion, il suffit
de tourner le cylindre de couplage respectivement dans le
sens horaire ou antihoraire.
2.6
a
2.6
Positionnement des sandales
L’appui-pieds est articulé à l’avant, ce qui permet aux
sandales d’être ajustées plus facilement et peut faciliter le
transfert d’une position assise à une position debout en
décubitus ventral. Chaque sandale est attachée à un appuipied individuel avec un boulon de fixation unique. L’appuipied est couvert d’un coussinet en caoutchouc pour
garantir que la sandale ne glisse pas une fois qu’elle est
fixée en place. Si vous souhaitez faire pivoter la sandale
latéralement, il vous suffit de desserrer le bouton en
plastique, de le placer à la position requise et ensuite de
resserrer le boulon à fond.
FR
2.7
2.7
Ajustage des supports latéraux flexibles
Les supports latéraux flexibles peuvent être ajustés en
hauteur et en largeur. Pour ajuster la largeur, desserrez le
bouton se trouvant à l’arrière de l’appui-thorax. Ajustez
ensuite le support latéral en fonction de la position requise
et resserrez finalement le bouton. Pour changer la hauteur,
desserrez comme vous l’avez fait auparavant, faites glisser
le support complètement vers l’extérieur et insérez-le dans
une autre fente, remettez le bouton en place et serrez-le à
fond. Étant donné que les supports latéraux ne sont pas
réglables en hauteur, un ajustement est possible en
échangeant les supports gauche et droit.
a
b
Pour un positionnement plus fin de la hauteur, desserrez
les boulons à six pans creux (a), positionnez le support
latéral à l’emplacement requis et resserrez ensuite le
boulon à fond. Les supports latéraux flexibles sont fixés
autour de l’utilisateur en serrant la ceinture de sécurité (b)
en position. Fermez immédiatement la ceinture de sécurité.
2.8
2.8
Attache de la ceinture pelvienne
Il est fourni une ceinture pelvienne différente pour la
position en décubitus ventral et dorsal. La ceinture
pelvienne doit être attachée à l’utilisateur, de préférence
allongé. Les ceintures pelviennes sont attachées autour du
bassin de l’utilisateur et ensuite au verticalisateur, une fois
que l’utilisateur est maintenu (par les pieds et par le thorax).
Les ceintures plus longues sont glissées dans les barres
pour ceinture situées à l’arrière de l’appui-hanche et sont
attachées fermement autour de l’utilisateur. La ceinture
supplémentaire dotée de la boucle et de l’attache en
plastique doit être fermée.
Pour garantir l’identification aisée de la ceinture qui passe
autour de l’utilisateur et de celle qui s’attache au protègehanche, une étiquette Leckey a été cousue sur celle qui
s’attache au protège-hanche.
2.9
Attache des protèges-hanche flexibles
Les protèges-hanche flexibles peuvent être utilisés comme
alternative à la ceinture pelvienne. Les protèges-hanche
peuvent être ajustés individuellement en largeur aussi bien
qu’en hauteur. Pour les ajuster en largeur, desserrez le
bouton se trouvant à l’arrière du protège-hanche, puis
ajustez les supports flexibles à la position requise et
resserrez finalement le bouton.
a
b
2.9
2.10
b
Pour un positionnement plus fin de la hauteur des
protèges-hanche, desserrez les boulons à six pans creux
(a), positionnez le protège-hanche en fonction des besoins
et resserrez les boulons à fond. Les supports flexibles sont
fixés autour de l’utilisateur en serrant la ceinture de
sécurité (b) en position. Fermez immédiatement la ceinture
de sécurité.
2.10 Ajustage de la tablette d’activités – Position en
décubitus dorsal
La tablette doit être fixée et enlevée du châssis par les
supports en métal situés sous l’appui-thorax. Pour fixer la
tablette, faites glisser les barres de métal dans les tubes
récepteurs à la profondeur requise et fixez-les en serrant
les boutons (a) de l’autre côté. Pour ajuster la hauteur,
desserrez les quatre boutons (b), placez la tablette à la
position requise et resserrez ensuite les boutons à fond.
a
c
2.11
L’angle de la tablette peut être ajusté en desserrant la
poignée en plastique (c) située de chaque côté de la
tablette, en plaçant la tablette à l’angle d’inclinaison requis
et en serrant les poignées en plastique à fond une fois de
plus.
c
a
b
2.11 Ajustage de la tablette d’activités – Position en
décubitus ventral
La tablette doit être fixée et enlevée du châssis en faisant
glisser le tube carré en métal vers le haut de l’axe principal.
Pour verrouiller la tablette et régler sa hauteur, poussez le
levier central (a) vers le bas jusqu’à ce qu’il touche l’axe de
métal. Après l’utilisation, ce dernier aura besoin d’être réglé
pour vous assurer qu’il est verrouillé à fond. À cet effet,
soulevez le levier et vissez l’écrou (b) tout en maintenant le
levier en position fixe. Repoussez le levier vers le bas pour
vérifier s’il s’engage bien dans le tube. Répétez la
procédure si nécessaire.
L’angle de la tablette peut être ajusté en desserrant la
poignée à cliquet (c) de chaque côté de la tablette, en
réglant la tablette sur l’angle d’inclinaison requis et en
serrant de nouveau à fond les poignées en plastique.
FR
2.12
2.12 Ajustage de l’appui-tête – Position en décubitus dorsal
L’appui-tête peut être ajusté en profondeur, en hauteur et
en inclinaison. Pour le fixer et ajuster la hauteur, faites
glisser le tube carré dans la partie supérieure de l’axe
central du dossier. Pour verrouiller l’appui-tête, poussez le
levier central (a) vers le bas jusqu’à ce qu’il touche l’axe de
métal. Pour le retirer, effectuez tout simplement cette
procédure dans l’ordre inverse.
b
b
a
Pour un ajustage fin de la hauteur, de la profondeur et de
l’angle d’inclinaison, desserrez les deux boutons (b), l’un de
chaque côté du tube carré, positionnez l’appui-tête et
resserrez ensuite à fond.
3.0
Conversion des produits
3.1
Conversion d’une position en décubitus dorsal à une
position en décubitus ventral
Pour convertir le verticalisateur Leckey Prone/Supine
Stander de la position en décubitus dorsal à la position en
décubitus ventral, il vous suffit de retirer l’appui-tête
comme décrit au paragraphe 2.12 et de fixer la tablette de
décubitus ventral comme décrit au paragraphe 2.11.
Enlevez la ceinture pelvienne de décubitus dorsal et
attachez la version de décubitus ventral. Desserrez
finalement les sandales et tournez le verticalisateur à 180
degrés et vous serez prêt à un positionnement en
décubitus ventral.
3.2
Conversion d’une position en décubitus ventral à une
position en décubitus dorsal
Pour convertir le verticalisateur Leckey Prone/Supine
Stander de la position en décubitus ventral à la position en
décubitus dorsal, il vous suffit de retirer la tablette de
décubitus ventral comme décrit au paragraphe 2.11. Fixez
la tablette de décubitus dorsal comme indiqué au
paragraphe 2.10 et attachez l’appui-tête requis comme
défini ci-dessus. Enlevez la ceinture pelvienne de décubitus
ventral et attachez la version de décubitus dorsal.
Desserrez finalement les sandales et pivotez le
verticalisateur à 180 degrés et vous êtes prêt à un
positionnement en décubitus dorsal.
Instructions de Sûreté
1.
La limite de poids utilisateur maximale sur le
verticalisateur Leckey Prone/Supine Stander
de taille un est de 50 kg (110 livres) et de
taille deux de 80 kg (176 livres).
2.
Nous recommandons que les utilisateurs ne
soient jamais transférés directement d’une
position assise à une position de bout sans
préparation et sans étirement. La meilleure
façon de le faire est de les allonger, mais ceci
peut également être réalisé dans un fauteuil
roulant ou un système de siège, si
nécessaire.
3.
Verrouillez les roulettes avec le levier du frein
se trouvant face à vous sur la base. Veillez à
ne pas utiliser les mains.
4.
Nous recommandons que les freins des
roulettes soient verrouillés à tout moment
lorsque le verticalisateur est utilisé, qu’il est
ajusté ou tout simplement rangé.5
5.
Bien que la mobilité soit une caractéristique
importante du verticalisateur, nous ne
recommandons pas que les utilisateurs soient
déplacés sur des surfaces inégales tandis
qu’ils se trouvent dans l’équipement.
6.
Lors de l’ajustage de l’angle de l’appareil de
station, assurez-vous que toutes les pièces du
produit sont à bonne distance de
l’ameublement environnant pour éviter des
collisions potentielles.
7.
Il n’est pas recommandé d’ajuster la hauteur
du coussinet du dossier tandis que l’appareil
est en cours d’utilisation et en position
verticale. D’autres ajustages de position plus
fins peuvent être réalisés sans risque alors
que l’utilisateur se trouve dans le châssis. Il
est important de mettre tous les coussinets
en appui lors de leur ajustage tandis que
l’utilisateur se trouve dans l’équipement.
8.
Lorsque vous placez l’utilisateur dans le
verticalisateur debout, pour des raisons de
sécurité, veillez à toujours attacher les
sangles des pieds et thoraciques et ce qui est
le plus important, la ceinture de sécurité
d’abord. Les sangles des hanches et des
genoux doivent ensuite être attachées.
9.
Lorsque le verticalisateur est utilisé en
position de décubitus dorsal, il est important
de s’assurer que le coussinet avant de
l’appui-genoux est bien attaché. Vérifiez
toujours que les attaches sont complètement
engagées.
10.
Nous recommandons de ne laisser à aucun
moment les enfants sans surveillance tandis
qu’ils utilisent un équipement Leckey.
11.
Lorsque des pièces ou des accessoires du
produit ne sont pas utilisés, nous vous
conseillons de les ranger ensemble en lieu
sûr.
12.
Si vous avez des doutes concernant la
sécurité d’utilisation de votre verticalisateur
Leckey Prone/Supine Stander, veuillez cesser
de l’utiliser et contactez votre distributeur
local.
FR
Comment Entretenir
Réutilisation des Produits Leckey
1.
1.
La plupart des produits Leckey ont été
conçus et commandés pour répondre aux
besoins individuels, nous recommandons
donc qu’un contrôle de compatibilité soit
effectué avant la réutilisation de tout produit.
2.
Assurez-vous que le produit à été nettoyé
minutieusement.
3.
Une vérification complète du produit doit être
effectuée avant la réutilisation, cette
vérification doit inclure les points suivants:
2.
Le fait de laisser la charge de la batterie
s’épuiser raccourcira sa durée d’utilisation. Il
est conseillé de charger la batterie pendant au
moins 30 minutes chaque jour. Si l’actionneur
de puissance ne fonctionne pas et que vous
avez vérifié que la télécommande est
connectée correctement, vous devez cesser
d’utiliser le produit immédiatement et
contactez votre distributeur local.
Il n’est pas recommandé d’ajuster la hauteur
du coussinet du dossier tandis que l’appareil
de station est en cours d’utilisation et en
position verticale. D’autres ajustages de
position plus fins peuvent être réalisés sans
risque alors que l’utilisateur se trouve dans le
châssis. Il est important de mettre tous les
coussinets en appui lors de leur ajustage
tandis que l’utilisateur se trouve dans
l’équipement.
4.
3.
Vérifiez au moins une fois par semaine que
toutes les garnitures et fermoirs, y compris
les roulettes, sont en bonne condition.
4.
Le verticalisateur Leckey Prone/Supine
Stander est fabriqué en métal enduit de
nylon, en plastique ABS et en stratifié. Nous
recommandons que vous utilisiez de l’eau
tiède et un détergent non abrasif pour
nettoyer le châssis.
5.
Si vous avez des doutes concernant la
sécurité d’utilisation de votre verticalisateur
Leckey Prone/Supine Stander, veuillez cesser
de l’utiliser et contactez votre distributeur
local.
a.
Vérifier le bon fonctionnement de tous
les mécanismes de fermeture
b.
Vérifier que les roulettes fonctionnent et
sont en bon état.
c.
Vérifier que les boulons de fermeture
fonctionnent et sont en place.
Dans la mesure du possible, assurez-vous
qu’une copie du manuel d’instruction soit
gardé avec le produit et fournie au nouvel
utilisateur.
Information Technique
Dimensions en (cm) et Poids en (kg)
Le verticalisateur Leckey Prone/Supine Stander
Taille
Longueur
1
2
113.5
128
Largeur
58
64
Hauteur en Position Horizontale
78
80.5
Poids
41kg
47kg
Capacité Poids
50kg
80kg
Hauteur de l’Utilisateur Debout
Min
Max
100
140
140
180
Hauteur Epaule
(Plaque-pieds à l’épaule)
Min
Max
82
115
100
145
Hauteur Hanche
(Plaque-pieds à la hanche)
Min
Max
45
75
75
96
Hauteur Genou
(Plaque-pieds au milieu du genou)
Min
Max
25
45
55
40
Largeur entre les latéraux poitrine
Min
Max
20
30
24
38
Ajustement de la Plaque-pieds +/-
10º
10º
42x44
52x59
Ajustement angulaire
du plateau en version
décubitus ventral
0º to 40º
0º to 40º
Ajustement angulaire
du plateau en version
décubitus dorsal
20º/30º
20º/30º
Taille du Plateau
James Leckey Design Ltd
Kilwee Business Park
Dunmurry
BT17 0HD
Northern Ireland
United Kingdom
T: +44 (0) 28 9060 2277
F: +44 (0) 28 9060 0795
E: [email protected]
W: www.leckey.com
Your local dealer - Ihr Händler - Rivenditore di zona - Votre revendear
distributed by:
Vertrieben durch:
Distribuito da:
distribué par:
LS144-01
Otto Bock HealthCare GmbH
Max-Näder-Straße 15 · 37115 Duderstadt/Germany
National: Telefon (0 55 27) 848 1461/1462/1463 · Fax (0 55 27) 848 14 60
International: Phone +49-5527-848-1304/1562/1590/1594/3663 · Fax +49-5527-848-1676
e-mail: [email protected] · Internet: http://www.ottobock.com