1
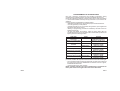
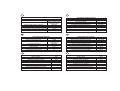
CERTIFICATO DI INSTALLAZIONE
Il sottoscritto,installatore,certifica di aver eseguito personalmente l'installazione del
dispositivo di allarme del veicolo descritto qui di seguito, secondo le istruzioni del
fabbricante.
INSTALLATION CERTIFICATE
The undersigned,qualified installer,attests to have personally fitted the here
described Vehicle Security sistem following the manufacturer instructions.
CERTIFICAT D' INSTALLATION
Je soussigné,installateur,certifie d'avoir fait personnellement l'installation du
dispositif d'alarme du véhicule ci décrit,conforme aux instructions du constructeur.
EINBAUBESCHEINIGUNG
Der Installateur bestätigt mit seiner Unterschrift, dass die Alarmanlage in dem
genannten Fahrzeug nach Vorgaben Des Herstellers eingebaut wurde.
CERTIFICADO DE INSTALACION
El que suscribe, instalador certifica el haber personalmente la instalación del
dispositivo de alarma del vehículo descrito a continuación, de acuerdo con las
instucciones del fabricante.
CERTIFICADO DE INSTALAÇÃO
O abaixo assinado, instalador, certica que executou pessoalmente a instalação do
dispositivo de alarme do veículo descrito a seguir, conforme as instruçoes do
fabricante.
By :
Da :
Par
Von:
Por :
De:
Venduto il :
Sold on :
Vendu le :
Verkauft am:
Vendido el :
Vendido em:
Auto
Car
Véhicule
Fahrzeug
Veículo
...................................
Tipo di prodotto :
Type of product :
Type de dispositif:
Produktartikel:
Dispositivo ciclo:
Tipo de dispositivo:
7590
End user manual
Manuale utente
Manual usuario
...........................................................
Firma, Signature, Unterschrift, Assinatura
..........................................................................................
by GEMINI Technologies S.p.A.
Via Luigi Galvani 12 - 21020 Bodio Lomnago (VA) - Italia
Tel. +39 0332 943211 - Fax +39 0332 948080
Web site: www.gemini-alarm.com - e-mail: [email protected]
For all EU countries
AC 2594 rev. 01-09/05
UK
INTRODUCTION
The 7590 system is a alarm control unit with built-in sensors and can be
installed on cars having a 12-volt battery with the negative pole earthed.
GENERAL NOTE FOR INSTALLATION
Dear installer, this manual has been conceived and written keeping in
mind the complete system. Therefore some functions, electrical
connection and other can be present in one alarm version and lack to
another.
In order to avoid useless repetitions in the manual, before installing the
available alarm, you are kindly requested to verify its version and then
follow the suitable instructions.
Furthermore, in order to carry out correctly the various procedures
required, we remind you to make and to verify very carefully all electrical
connections, IN PARTICULAR THE BASIC CONNECTIONS:
!Device power supply (positive and earth)
!Positive under key (+15/54)
!Door switch
!Bonnet or Trunk switch
FUNCTIONS
!Arming and disarming of the alarm system with transmitters having
random rolling code.
!Electrical engine immobilizer by passive arming.
!Double engine immobilizer.
!Blinker.
!Sirene sound intermittent or continuous (programmable).
!Perimetric protection.
!Volumetric protection (combined with an ultrasonic or hyperfrequency
module, excludable from arming).
!Control for CDL, electrical widows and sun roof (vehicles equipped with
the system “Pack-comfort”).
!Alarm memory indicated by optic/acousticl signals.
!“PANIC” or “BOOT OPENING” function (programmable).
!Current absorption sensor (programmable).
!Anti distraction function (programmable).
!Control for self-powered siren or supplementary siren.
!Emergency disarming by PIN-CODE.
!Garage function.
PAG. 2
TOTAL ALARM ARMING
The alarm can be activated by pressing key 1 on the remote or by inserting the
electronic key into the appropriate socket.
The operation is confirmed by an acoustic signal and a visual signal consisting
of one flash of the turn indicators lasting approximately one second.
During the flash, the following functions are enabled:
a-Module output (PINK wire, +A).
b-Led output.
c-Engine immobilizer.
d-Activation of door-locking control (with the timing selected in programming
phase).
If the electronic key is used, all the functions described under points a), b) and
c) will be activated, whereas d) ACTIVATION OF DOOR-LOCKING CONTROL
will not occur (enabling the user to get out of the vehicle).
Moreover, by using the electronic key, a car entry time of approximately 10
seconds will be generated to allow the user to get into the car and deactivate
the alarm system with the electronic key without creating a false alarm.
While the user gets into the car, entry time is indicated by the continuous light of
the LED.
NEUTRAL TIME, SENSOR EXCLUSION , STOPPING WINDOW
UPWARD TRAVEL AND COMFORT FUNCTION
Neutral activation time lasts approx. 35” and it is indicated by the continuous
light of the LED. This time interval allows the user to get out of the vehicle
without causing false alarm conditions. During the first 25” of the neutral time, it
is possible to cut out the external sensors and stop the windows' upward travel
by pressing key no. 2 on the remote (Note: the stop window function requires
the installation of a special module see art. 2344 or the existence of the
COMFORT function in the car).
The activation of said functions (Cutting out the external sensors / stopping
window upward travel / comfort) is indicated by a brief flash of the turn
indicators.
NOTE: sensor cutout is limited to a single alarm activation cycle.
ARMING WITH SIREN SOUND EXCLUSION
This function allows the user to arm the alarm system, excluding the siren
sound in case of a theft attempt.
To exclude the siren, proceed as follows:
!Turn the ignition key to “ON” position
!The status will stay on for 0,5 seconds. During this time, push the button
N°2 of the transmitter.
!Go away from the vehicle and push the button N°1 of the transmitter.
!The alarm will be armed with the optical and acoustic signals, which, as
previously described, will be not activated in case of a theft attempt.
NOTE: the siren sound exclusion is bound to the single arming cycle.
PAG. 3
NEUTRAL TIME
At the end of each alarm cycle there is a neutral time period, lasting up to
approx. 5”, during which there will be no reaction to the causes of alarm. During
the neutral time between successive alarms, the LED will emit a continuous
light. Normal flashing will be resumed at the end of the neutral time.
SYSTEM ARMED AFTER NEUTRAL TIME
At the end of the neutral time (approx. 45”), the security system is completely
armed and ready to intervene in cases of attempted theft or sabotage.
Completely armed status is indicated by the flashing of the LED, which will wok
according to the following timing scheme in order to minimise power
consumption:
LED ON :
200mS
LED OFF :
2”
EVENTS THAT CAN GENERATE AN ALARM CONDITION
!System wire cutting by means of the self-powered siren
!Attempt to start the engine.
!Power drained. This function is active only if enabled in the accessory
function programming phase and can be used only in countries where the
law does not prohibit the use of this sensor.
!Attempt to open the doors.
!Attempt to open boot.
!Attempt to open engine bonnet.
!Intrusion detected by internal ultrasound volume sensor.
!Intrusion detected by external sensors (option,also by radio).
!Panic alarm by pressing key no. 2 on the remote (this function is active
only if enabled in the accessory function programming phase and it can be
used only in countries where the law permits this type of alarm activation
not available in product version for the dutch market).
NOTE: In order to filter noise and/or undesired signals, the POSITIVE UNDER
KEY, DOORS and BOOT PUSH-BUTTON inputs have a DEBOUNCE time of
200mS. Therefore these inputs will cause the generation of an alarm cycle only
if the signals coming in last longer than 200mS.
For every input and every arming cycle, the alarm causes are limited to 10
cycles of 30 seconds each. The only alarm causes having no limits, is starting
attempt (positive under key +15/54).
ALARM DISARMING
The alarm system can be deactivated by pressing key 1 on the remote, by
inserting the electronic key into the appropriate receptacle or by means of the
emergency PIN CODE procedure.
Disarming is indicated by three turn signal flashes and three acoustic signals.
If an alarm condition has occurred, it will be signalled by five turn signal flashes
and five acoustic signals (if these functions have not been excluded in
programming stage).
See next paragraph for all signalling.
PAG. 4
ALARM MEMORY
When disarming the alarm, if five turn signal flashes and five beep signals
occur, it is possible to identify the cause generating the alarm condition.
To do this, turn the ignition key to “ON” position and look at the vehicle installed
LED.
The LED will be blink, shown the last alarm condition.
The cause of the alarm will indicate for 5 times, and this indication can be
interrupted by turning the ignition key to “OFF” position.
The possible alarm signalling are indicated in the table below.
LED SIGNAL
LED OFF (2 seconds)
NUMBERS OF
ALARM CYCLES
Volumetric sensor
5
Doors/boot switches
5
Positive under key (+15/54)
Infinite
Bonnet switch and
5
volumetric sensors
Absorption sensor
5
External magnetic contact
5
CAUSE OF THE ALARM
LED ON (400mS)
NOTE: the cause of alar of CUT WIRE does not enabled the alarm memory
because it is managed by the external self-powered sirene.
SUPPLEMENTARY SIREN OPERATION
Continuous audible signal for the entire duration of the alarm signal cycle.
ORIGINAL HORN OPERATION
Intermittent sound 2” ON 2” OFF for the entire duration of the alarm signal
cycle.
If the user has cut out the siren, the alarm condition will be indicated solely by
the flashing of the turn indicators for a maximum time period of 30”.
NOTE: While the alarm signal is given out, the LED will emit a continuous light.
You can cut off the alarm cycle without deactivating the system, by pressing
key no. 2 on the remote. As you do so, the audible/visible alarm signals will be
immediately cut off, and the system will switch to the condition of NEUTRAL
TIME BETWEEN SUCCESSIVE ALARMS.
To minimise acoustic pollution, the DOORS PUSHBUTTON, BOOT
PUSHBUTTON, BONNET PUSHBUTTON, ELECTRICAL INPUT SENSOR,
INTERNAL VOLUME SENSOR and EXTERNAL SENSORS inputs are
subject to a limitation of up to five alarm cycles per system activation period.
The count is reset upon the next deactivation of the alarm system or if an alarm
for POSITIVE POLE UNDER KEY intervenes during the same activation
cycle.
PAG. 5
ELECTRICAL CONNECTIONS
!Implement the electrical engine blocks by working on the fuel pump and
the starter motor.
!Connect the supply power positive of the 7590T alarm system to the
vehicle battery or to one of its derivations.
!Connect the supply power negative of the 7590T alarm system to the
vehicle's metallic frame (all 2 BLACK wires marked M).
!Connect ALWAYS one of the GREEN/BROWN wires of the alarm wiring
harness to the doors switch.
!Connect (if necessary) the other GREEN/BROWN wire of the alarm wiring
harness to the doors switch.
!Connect ALWAYS the BLACK wire marked V of the alarm wiring harness
to the bonnet switch.
!Before programming the system, make all the electrical connection.
!For the CDL connections see at the diagram in the next pages.
NOTE: (available) diagrams for every specific car, must be required to
the zone dealer.
The index reported below refers to the electrical scheme of alarm cable in the
next page.
Before effecting all electrical connections, disconnect the NEGATIVE
BATTERY POLE and connect again when mounting as terminated.
FUNCTION
WIRE COLOUR
Negative
Positive
Engine immobilization 1
Engine immobilization 1
Positive under key
Door pin switches
Bonnet/boot switches
Positive alarm ON
External sensor input
Negative control for supplementary siren
Self powered siren
Turn signals
Negative output for electically controlled
boot opening
N°2 BLACK marked M
BLACK marked R
N°2 BLACK marked H
N°2 BLACK marked B
BLACK marked G
N°2 GREEN/BROWN
N°2 BLACK marked V
PINK
GREEN/BLACK
YELLOW/BLACK
BLUE
N°2 ORANGES
CDL (see diagram)
GREY-BLACK
YELLOW/BLUE RED/BLUE
YELLOW/BROWN RED/BROWN
YELLOW/GREY RED/GREY
NOTE: The BLACK two pin connectors of the alarm wiring harness are
for the electronic key and led connections.
PAG. 6
WIRING DIAGRAM
ART.7590
AERIAL. Do not tamper!
ELECTRONIC KEY
R
ALARM SYSTEMS
W
US calibration
7590
RX
Made in Italy
TX
Push-button 2
Push-button 1
Red
Black
Green
Brown
YELLOW-BLUE
RED-BLUE
YELLOW-GREY
RED-GREY
YELLOW-BROWN
RED-BROWN
15A
BLACK marked R +
Battery
12 VOLT
BLACK marked M
EARTH
BLACK marked M
EARTH
See locks diagrams
GREY-BLACK
GREEN-BROWN
Negative output for electrically
controlled boot opening
GREEN-BROWN
Doors push buttons
BLACK marked V
5A
ORANGE
5A
ORANGE
Direction Indicator Ligths
Bonnet push button
BLACK marked H
BLACK marked V
BLACK marked H
8A
MAX !
Boot push button
Engine immobilisation 1
GREEN-BLACK
External sensors input
BLACK marked B
BLACK marked B
8A
MAX !
BLUE
Engine immobilisation 2
Self-powered siren output
+30
BLACK marked G
YELLOW-BLACK
Negative control for
supplementary siren
PINK
Ignition Key
Positive to alarm
activated (700mA max.)
PAG. 7
PROGRAMMING THE ALARM SYSTEM
Has been previously programmed with standard configuration during
manufacturing procedure by Gemini, and can be modified in any moment
During the programming phases, press the radio control (rough) push-button
n.1, for function activation and the (smooth) push-button n.2, for function deactivation.
For the programming modification proceed as follows:
!With alarm being disarmed, open and keep it open the driver side door.
!Turn the ignition key to "ON" position.
!The status led stay on for 0,5 seconds; during this time, push together the
two buttons of the remote control.
!Starting of programming procedure is indicated by two flash of the turn
signals and of the led.
!To able and disable the functions, follow the below table, take into
consideration that every time the push button of transmitter is pressed, the
system goes to the following function.
FUNCTION
STATE
BUTTON
Coninuous or intermittent
siren sound
Setting of centralized lock
times (0,5 - 6 sec)
25 seconds comfort closure
command
Continuous
0,5” selected
Panic alarm or “car finder”
Enabled panic
Disabled
Current absorption sensor
Disabled
Button N°1- Intermittent
Button N°2- Continuous
Button N°1- Enable panic
Button N°2- Enable car-finder
Button N°1- Enable
Button N°2- Disable
Button N°1- Enable
Button N°2- Disable
Button N°1- Enable
Button N°2- Disable
Button N°1- Enable 6”
Button N°2- Enable 0,5”
Button N°1- Enable
Button N°2- Disable
Button N°1- Abilita
Button N°2- Disable
Anti-distraction, automatic
door locking function
Panic/boot opening function
Nction/boot opening function
Disabled
Disabled
Disabled
Panic function
enabled
NOTE: by turning the ignition key to “OFF”, in any moment of the programming
procedure, the latter will stop and successive functions will remain unchanged.
!Once the last function has been programmed, the alarm will confirm that
the programming has been disabled with two flashes of the turn signals,
fand two flashes of the LED.
!Turn the ignition key to “OFF” position.
NOTE: automatic activation of engine immobilisation is enabled at the
factory and cannot be changed in the version for the UK market.
PAG. 8
PAG. 9
PROGRAMMABLE FUNCTIONS
ACOUSTIC SIGNALS
This function allows the user to permanently exclude all acoustic signals. See
the relative paragraph for programming.
PANIC ALARM OR CAR-FINDER
If enabled, the PANIC ALARM function allows the user to activate the visual
and audio alarm signals deliberately by pressing key 2 on the remote.
This function works regardless of whether the alarm system is “ON” or “OFF”.
The alarm signal lasts up to approx. 30”. However, you can silence it at any
time by pressing key 2 on the remote again
While the alarm signal is emitted the LED emits a continuous light.
If during the programming phase, the PANIC function has been disabled, the
CAR FINDER function will be activated.
When the alarm is activated, the CAR FINDER function allows you to obtain a
short optic/acoustic signal by pressing button N°2 on the remote.
TThis function can be useful to look for the car in a parking lot or parking silo
without creating useless alarm condition.
The brief optic/acoustic signal consists of a low beep and the simultaneous
flashing of the turn indicators.
NOTE: the emission of the audio signals is subordinate to their being enabled
when programming the accessory functions.
CURRENT ABSORPTION SENSOR
ATTENTION: before activating of the absorption sensor, it is suggested
to consult the specific rules being in force in your country (noise
pollution).
When the absorption sensor is activated, a signal will be sent out at any
minimal tension variation in the vehicle's electrical circuit (for example lamp
switching on).
ANTI-DISTRACTION FUNCTION AND DOOR LOCKING
This function determines the automatic activation of the system if this has been
disarmed and no voluntary actions are performed by the user (e.g. Door
opening).
The function prevents the vehicle from being left unprotected in cases where,
after the arming of the system, this is turned OFF accidentally by pressing the
button N°1 of the remote control.
The self rearming is confirmed by the alarm with visual/acoustic signalling (one
flash by the turn signals and one acoustic signal) .
The anti-distraction function activates the CDL control.
Therefore, in order to prevent involuntary activations of the system, it's
MANDATORY to connect the door pin switch to the system input
(BROWN/GREN wire of the alarm wiring harness).
NOTE: after disarming, a door opening will stop the function.
Together with the previously described function, the automatic door locking of
the vehicle is done when running.
PAG. 10
Being closed all the doors of the vehicle, turn the ignition key to “ON”; after 20”,
all doors will be locked.
By turning the ignition key to “OFF”, all doors of the vehicle will be automatically
unlocked.
To prevent this function from being activated accidentally, the system
continuously monitors the status of the ignition key and the input line of the
DOOR AND BOOT PUSHBUTTONS and therefore does not allow operation of
the locks if the DOORS and BOOT are opened manually while starting the
engine or during the 20” after starting it.
PASSIVE ARMING
Automatic arming allows to have the alarm system active, 45 seconds after the
engine switching “OFF”.
After programming, this function is obtained simply by turning the ignition key
to “OFF”.
The alarm will indicate the passive arming activation by a long flash of the turn
signals, two flash of the status led and two acoustic signals.
When opening a vehicle's door during passive arming, the arming time count
will be set to zero and the led will be permanently illuminated; when the door is
closed the 45” counting will restart.
LOCKING TIME
The standard locking time of the alarm is set to 0,5”.
In case the vehicle needs a locking time of 6”, you can vary this parameter
during the programming phase.
NOTE: When the comfort function has been activated, let the locking time set
to 0,5”.
In fact, if the locking time is set to 6”, when the alarm is disarmed, the windows
of the vehicle will open.
COMFORT CONTROL
The comfort control allows the automatic regulation of window closing, when
the alarm is armed.
In fact, after this function has been activated, at any alarm arming, the window
winder motor/control unit will receive a 25” command, to close the windows.
CDL DOUBLE OPENING PULSE
By enabling this function you will obtain, upon deactivation of the system, a
double control pulse on the door-unlocking line (about 0,5 second each).
This allows the opening of the centralized door locks on vehicles having the
diversified door opening (first pulse driver side door opening, second pulse
other doors opening).
This function is active only if the opening/closing time of 0,5” is selected, while
setting the opening/closing timo of 6” will automatically disabled the double
pulse.
PAG. 11
LEARNING OF NEW CONTROL DEVICES
DELETION OF PROGRAMMED CONTROL DEVICES
ATTENTION: in order to carry out successfully the operation, it is
necessary to make the required electrical connections (door switch,
bonnet switch and positive under key).
The alarm can save to memory a maximum number of 12 control devices,
either radio controlled, or electronic keys, TAG cards or magnetic contact (the
later as a protection device).
Proceed as follows:
!With the alarm being disarmed, open and keep open the bonnet and the
driver side door.
!Turn the ignition key to “ON”.
ATTENTION: the following operations must be carried out within four
seconds, otherwise the new device memorizing procedure will be
invalidated.
!Turn the ignition key to “OFF”.
Re-turn the ignition key to “ON” for three consecutive times (ignition key to
“ON” and “OFF”), within the maximum time of four seconds, as mentioned
before.
After the third commutation, let the ignition key to “ON”.
!The alarm will indicate the procedure starting of new control device or
magnetic contact learning, by two long turn signal flashes and two acoustic
signals, one acute tone and the other loud tone.
ATTENTION: do not modify the bonnet position, otherwise instead of
saving to memory new devices, deletion of existing ones in the alarm´s
memory will take place.
!Now the alarm is waiting for receiving the device code.
!Press the radio control push-button 1, introduce the electronic key in the
specific receptacle, press the TAG card button or make the magnetic
contact to transmit (bring near and then take away contact and magnet),
according to the device to be saved to memory.
In all four cases, the alarm will indicate the new device learning, by one turn
signal flashing and one acute tone signal.
!Repeat the procedure to save to memory other devices.
!Turn the ignition key to “OFF”.
!The procedure completion will be indicated by one long turn signal flashing
and one loud tone signal.
ATTENTION: in order to carry out successfully the operation, it is
necessary to make the required electrical connections (door switch,
bonnet switch and positive under key).
The alarm is equipped with a deletion procedure of new control devices, either
radio controlled, or electronic keys, TAG cards or magnetic contact (the later as
a protection device).
Proceed as follows:
!With the alarm being disarmed, open and keep open the bonnet and the
driver side door.
!Turn the ignition key to “ON”.
ATTENTION: the following operations must be carried out within four
seconds, otherwise the new device deletion procedure will be
invalidated.
!Turn the ignition key to “OFF”.
!Re-turn the ignition key to “ON” for three consecutive times (ignition key to
“ON” and “OFF”), within the maximum time of four seconds, as mentioned
before.
After the third commutation, let the ignition key to “ON”.
!The alarm will indicate the procedure starting of new control device or
magnetic or magnetic contact deletion, by two long turn signal flashes and
two acoustic signals, one acute tone and the other loud tone.
!Close the bonnet.
!The led will be illuminated constantly.
!Keep the bonnet close till the moment, the complete deletion of devices
via radio, will take place (after about four seconds).
NOTE: keeping the bonnet close for less than four seconds, the device
deletion via radio will be unsuccessful.
!The procedure completion will be indicated by led´s turning off, by one
long turn signal flashing and one loud tone signal.
!Turn the ignition key to “OFF”.
NOTE: the control device deletion does not imply any modification of
TECHNICAL DATA
Nominal tension
Nominal supply voltage range
Current absorption @ 12Vdc
Turn signal contact rating
Engine block contact rating
Alarm triggering
Max positive current with system armed (+A)
Sirene output current capacity
PAG. 12
12 Vdc
9¸15Vdc
< 2mA with systme armed
and flashing led
10A a 20°C
8A a 20°C
30 sec.
700 mA
3A
PAG. 13
I
D
TECHNISCHE EIGENSCHAFTEN
CARATTERISTICHE TECNICHE
Tensione nominale
Range tensione di alimentazione abilitato
Assorbimento di corrente @ 12Vdc
12 Vdc
Nennspannung
Bereich der Nenn-Versorgungsspannung
Max. Stromverbrauch
Kapazität Kontakt Blinker
Kapazität Kontakte Relais Motorsperre
Dauer eines Alarmzyklus
Max. Strom positiv bei eingeschaltetem Alarm (+A)
Max. Strom Komfort-Schaltung positiv
Max. Strom Komfort-Schaltung negativ
9¸15Vdc
< 2mA con allarme inserito
e led lampeggiante
Portata contatto indicatori di direzione
Portata contatti relè blocco motore
Durata di un ciclo d’allarme
Corrente massima positivo ad allarme inserito (+A)
Portata in corrente uscita sirena
10A a 20°C
8A a 20°C
30 sec.
700 mA
3A
12 Vdc
10,5¸15Vdc
10mA
8A bei 20°C
8A bei 20°C
30 Sekunden
700 mA
500 mA
500 mA
E
UK
CARATTERISTICHE TECNICHE
Nominal tension
Nominal supply voltage range
Current absorption @ 12Vdc
CARACTERISTICAS TECNICAS
12 Vdc
Tensión nominal
Rango tensión de alimentación nominal
Absorbimiento máximo de corriente
Portada contacto indicadores de direccíon
Portada contactos relè bloqueo motor
Duración de un ciclo de alarma
Corriente max positivo de alarma activada (+A)
Corriente max mando confort Positivo
Corriente max mando confort Negativo
9¸15Vdc
< 2mA with systme armed
and flashing led
Turn signal contact rating
Engine block contact rating
Alarm triggering
Max positive current with system armed (+A)
Sirene output current capacity
10A a 20°C
8A a 20°C
30 sec.
700 mA
3A
12 Vdc
10,5¸15Vdc
10mA
8A a 20°C
8A a 20°C
30 sec.
700 mA
500 mA
500 mA
P
F
CARACTERÍSTICAS TÉCNICAS
CARACTÉRISTIQUES TECHNIQUES
Tension nominale
Plage tension d'alimentation nominale
Absorption maximale de courant
Portée contact feux de direction
Portée contacts relais verrouillage moteur
Durée d'un cycle d'alerte
Courant maxi positif alarme activée (+A)
Courant maxi commande confort Positif
Courant maxi commande confort Négatif
12 Vdc
10,5¸15Vdc
10mA
8A a 20°C
8A a 20°C
30 sec.
700 mA
500 mA
500 mA
Tensão nominal
Range tensão de alimentação nominal
Absorção máxima de corrente
Capacidade de contacto dos indicadores de direcção
Capacidade de contacto do relé de travamento do motor
Duração de um ciclo de alarme
Corrente máxima - positivo com alarme activado (+A)
Corrente máxima de comando conforto Positivo
Corrente máxima de comando conforto Negativo
12 Vdc
10,5¸15Vdc
10mA
8A a 20°C
8A a 20°C
30 sec.
700 mA
500 mA
500 mA