1
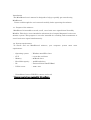
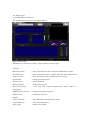
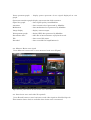
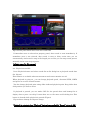
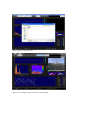
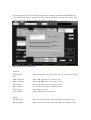
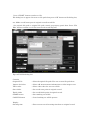
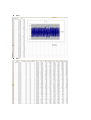
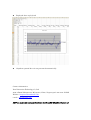
Brain Wave record system For NeuroSky MindSet MindWave user’s manual Introduction The MindRecord user’s manual is designed to help you quickly get started using MindRecord. Please read through the user’s manual carefully before operating the software. 1-1. Purpose of the software MindRecord is intended to record, recall , store brain wave signals from NeuroSky MindSet. This device is not intended to substitute for a hospital diagnostic brain wave monitor system. This program is not also intended for recording and transmission of user’s brain wave signal simultaneously. 1-2. System requirements To install and use MindRecord software, your computer system must meet requirement. ・ Operating system : Windows 2000/XP or later ・ CPU : core 2 duo and above ・ Memory : 2GB and above ・ Hard disk capacity : 160GB and above ・ IO : Universal Serial Bus(USB2.0) ・ DPI of screen : 1024 x 768 ・ DirectShow Camera (USB Web camera and so on) * Camera is not always required for this software. 1-3 Software installation instruction The following instructions will guide you through installing the MindRecord sftoware. 1. Open “setup.exe” at MindRecord installer. 2. The dialog box of installer will appear. Follow the on-screen instruction to complete installation. 1-4. The other preparation Before execute MindRecord software, install neuroSky MindSet driver and then check hardware operating. If you want to record Video , install camera driver and then check hardware operating. For Windows Vista/7 If a program that you are trying to run is giving you a Access Denied or No Permission type error, then running it as an administrator can usually give the program the permission it needs to run properly. The way to set “Run a program as an administrator” 1.Right click on the program shortcut or program .exe file, then click on Properties, and on the Compatibility tab. 2.Right click the program icon and select the option to "Run as administrator" See screen shot below. About Video codec Microsoft Windows Media Video 9 VMC is recommended. It is tested that it has good image quality and reasonable compression. If you don’t have Windows Media Video 9 VMC on your PC, you can download free form Microsoft web site. Please refer Microsoft web site in detail. Software operations 2-1. MindSet start Press the power button of MindSet then Bluetooth on. *If you are using MindWave and set MindWave USB adapter to PC, BlueTooth is not reqired but select MindWave sensor here. 2-2. Main Panel Start MindRecord software. The main panel of software will appear.(fig2-1) Fig.2-1 main panel If MindSet is connected normally, sensor indicator turns bright. Controls Measure button : start and stop brain wave signal from MindSet monitor. Record button : start and stop brainwave signal and video (if needed) record. Replay button : start and stop stored record playback to screen. Speed slider : change playback speed. Pause button : pause playback. Reverse button : backward playback. Start Cam button : start and stop camera monitor.(only when camera is connected) TEST/Property button : change front panel function. STOP button : finish this software. Display sensor indicator : show MindSet communication status. record indicator : show recording status. Raw graph : display raw signal. Power spectrum graph : display power spectrum of raw signal displayed on raw graph. Spectrum transition graph: display spectrum time shift transiton. Signal bar graph : show signal quality from MindSet. Attention : show attention level generated by MindSet. Meditation : show meditation level generated by MindSet. Image display : display camera output. Delta-gamma graph : display EEG data generated by MindSet. Record time date : time date of measurement or playback record. File : show record file name. Recorded : show recorded file length(minutes). 2-3. Measure Brain wave signal Press Measure button once to start measure brain wave.(Fig2-2) Fig.2-2 main panel when monior brain wave and video 2-4. Store brain wave and video (If required) Press Record button to store brain wave and video signal to disk files.(fig.2-3) This function (store data) is available when brain wave is measured. Fig.2-3 main panel when store brain wave and video If immediate start is selected on property panel, data record is start immediately. If immediate start is not selected, data record is start at delay action time you set automatically. And record is stop at file length you set. But you can stop record process manually before auto stop sequence. *all data stored to file are raw! 2-5. Playback stored file Press Playback button and select stored file on file dialog box to playback stored data file. (fig.2-4) This function is available when measurement and camera monitor are off. When playback is going on , you can change playback speed , direction (FWD , BWD) and pause to set each control buttons. You also change playback point using slider indicated playback point. Drug slider then slide position you want to move. If playback is paused, you can make CSV file for spread sheet and bitmap file of display data to press “save disp” button then set csv file name on file dialog box. This button is showed while playback is paused. (Fig.2-5) Fig.2-6 shows bitmap saved pause image. *Playback is not start when “Playback” button is pressed while “Pause” button is ON ! Fig.2-3 playback stored file Fig.2-5 save display data to CSV file and bitmap Fig.2-6 bitmap image saved when playback is paused 2-6. Measurement property Select property button on main panel , you can set measurement property .(Fig2-7) Fig.2-7 property panel Controls Filter : Select band pass filter is effective or not effective for display. Low : Set low cut frequency of band pass filter. High : Set high cut frequency of band pass filter. Median filter : Select median filter is effective or not effective. Record file : Set file name to store brain wave signal. Video file (avi) name is same as record file (csv) name except file extension. Reference button displayed right side is useful to set new file name. Video record : Select store video signal with brain wave signal or not. Video codec : Select video codec for avi file. *displayed codec are installed codec in your computer, But not all codec are available. Please verify codec you want to use before store long record. Start Button : Check available Video record time for setting record length. About 10 second after pushing start button, the available video record time is displayed. *The available Video record time is standard. This time length vary each time even if you select same codec. Difference is cased by captured image type. Start check box : Select start immediate or start at delay time you set. Delayed action : Set delayed action time. Record length : Set record length in minutes. * If record length is zero, record is not stop until you stop manually. Camera property : Set camera and image property you use. Y axis scale : Set graph Y axis minimum and maximum. When auto is selected , These minimum and maximum values are ignored. EEG display coefficient : Set slope and offset for display scale. Original file path : Set original file name to make csv file and cut off file. File convert button : Make csv file from stored RAW file. File edit button : Make new cut off data file from original RAW file. Sensor selection : Select sensor you use before check new com port. COM : Set COM port manually. Check button : Check selected COM port is available or not. 2-7 Stored record to csv (text format for the other software like Microsoft EXCEL) file Set original file path to original file path control on property panel then Press “File convert” button to make csv file from stored record.(Fig.2-8) Fig.2-8 File convert dialog box Controls Original File : Selected original file path. You can set another file path here. RAW check box : Select add raw data as csv item or not. EEG check box : Select add EEG data as csv item or not. Start slider : Set cut off start point of original record. Finish slider : Set cut off finish point of original record. Start button : Start making csv file. Cancel button : Cancel making csv file process. Display Starting time : Show current cut off starting time date on original record. Finishing time : Show current cut off finishing time date on original record. Press “START” button to make csv file. File dialog box is appear. Set new csv file path then press “OK” button on file dialog box, 2-8. Make cut off (some part of original record) record file Set original file path to original file path control on property panel then Press “File Edit” button to make cut off file from stored record.(Fig.2-9) Fig.2-9 File Edit dialog box Controls Original File : Selected original file path. You can set new file path here. Impose check box : Select add measurement information to video image or not. Video codec : Select video codec for new cut off file. Start slider : Set cut off start point of original record. Finish slider : Set cut off finish point of original record. START button : Start making cut off file. CANCEL button : Cancel making cut off file process. Display Starting time : Show current cut off starting time date on original record. Finishing time : Show current cut off finishing time date on original record. Press “Start” button to make cut off file. File dialog box appear. Then set new file path then press “OK” button on file dialog box, Generated new video file(avi) superimposed some measurement information may be able to use as independent analysis record because avi file using some codec can playback on the other software like media player. Appendix 3-1.Generated csv file samples RAW + EEG RAW EEG Displayed data at playback Graphs on spread sheet is not generated automatically. Contact information New Dimension Technology Co.,Ltd 4079-4 D202 Nakagawara, Miyagawa, Chino, Nagano-pref. 391-0013 JAPAN Website : http://www.newdtech.com e-mail : [email protected] NDT can make full customized software for NeuroSky MindSet. Contact us!