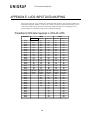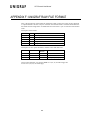
1
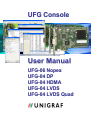
U F G C o ns ol e User Manual U F G -0 6 N o p e a U F G -0 4 D P U F G -0 4 H D M A U F G -0 4 L V D S U F G -0 4 L V D S Q u ad UFG Console User Manual Copyright This manual © Unigraf Oy. All rights reserved Reproduction of this manual in whole or in part is prohibited without a written permission of Unigraf Oy. PLX API Library Copyright ® 2000 PLX Technology, Inc. Notice The information given in this manual is verified in the correctness with best efforts base on the date of issue. The authors reserve the rights to make any changes to this product and to revise the information about the products contained in this manual without an obligation to notify any persons about such revisions or changes. Edition UFG Console User Manual, Version 11 Document identifier: KH062741 Date: 20 September 2012 Company Information Unigraf Oy Ruukintie 3 FI-02330 ESPOO Finland Tel. +358 9 859 550 Fax. +358 9 802 6699 mailto:[email protected] http://www.unigraf.fi 2. UFG Console User Manual Trademarks Unigraf, UFG and UFG Console are trademarks of Unigraf Oy. Windows® XP, Windows® 7, Windows® are trademarks of Microsoft Inc, HDMI, the HDMI Logo and High-Definition Multimedia Interface are trademarks or registered trademarks of HDMI Licensing LLC, DisplayPort™ is a trademark of Video Electronics Standards Association (VESA), HDCP™ is a trademark of Digital Content Protection, LLC. All other trademarks are properties of their respective owners. Limited Warranty Unigraf warrants its hardware products to be free from defects in workmanship and materials, under normal use and service, for twelve (12) months from the date of purchase from Unigraf or its authorized dealer. If the product proves defective within the warranty period, Unigraf will provide repair or replacement of the product. Unigraf shall have the whole discretion whether to repair or replace, and replacement product may be new or reconditioned. Replacement product shall be of equivalent or better specifications, relative to the defective product, but need not to be identical. Any product or part repaired by Unigraf pursuant to this warranty shall have a warranty period of not less than 90 days, from the date of such repair, irrespective of any earlier expiration of original warranty period. When Unigraf provides replacement, then the defective product becomes the property of Unigraf. Warranty service may be obtained by contacting Unigraf within the warranty period. Unigraf will provide instructions for returning the defective product. CE Mark The UFG-04 and UFG-06 Series Frame Grabbers meet the essential health and safety requirements, is in conformity with and the CE marking has been applied according to the relevant EU Directives using the relevant section of the corresponding standards and other normative documents. Warning This is a class A product. In a domestic environment this product may cause radio interference in which case the user may be required to take adequate measures 3. UFG Console User Manual Table of Contents QUICK START GUIDE ..................................................................................................... 6 1. About this Manual ............................................................................................ 7 2. Purpose ........................................................................................................... 7 Product and Driver Version .............................................................................. 7 Notes ............................................................................................................... 7 Introduction ...................................................................................................... 8 3. UFG Console ................................................................................................... 8 UFG-04 and UFG-06 Nopea Test Frame Grabbers ......................................... 8 UFG-06 Nopea HDDP ..................................................................................... 9 UFG-04 DP .................................................................................................... 10 UFG-04 HDMA .............................................................................................. 11 UFG-04 LVDS UFG-04 LVDS Quad .............................................................. 12 Version Information ........................................................................................ 13 Installation...................................................................................................... 14 4. Unpacking ...................................................................................................... 14 Contents of the Installation CD ...................................................................... 14 Uninstalling the Previous Version .................................................................. 15 Installation of the UFG Console and API ....................................................... 15 Installation with Windows 7 ............................................................................ 16 Previously installed version ................................................................ 16 Driver Installation ................................................................................ 17 Installation with Windows XP ......................................................................... 18 UFG License Manager ................................................................................... 19 Adding Licenses ................................................................................. 19 Migrating Licenses.............................................................................. 20 Detecting new boards ......................................................................... 20 Functional Description ................................................................................... 21 UFG-06 Nopea HDDP Frame Grabber ............................................... 21 UFG-04 DP Frame Grabber ............................................................... 21 UFG-04 HDMA Frame Grabber .......................................................... 21 UFG-04 LVDS and UFG-04 LVDS Quad Frame Grabbers ................ 22 Extended Frame Buffer ...................................................................... 23 On Board CRC Calculation ................................................................. 23 EDID ................................................................................................... 23 Status Log .......................................................................................... 24 HDCP ................................................................................................. 24 Licenses ............................................................................................. 24 4. UFG Console User Manual 5. Using UFG Console ....................................................................................... 25 Firmware Update ........................................................................................... 26 Update of UFG-04 DP Receiver Chip Firmware ............................................ 27 UFG Console Main Window........................................................................... 28 Video Status ....................................................................................... 28 HDCP Status ...................................................................................... 29 Controls Window – Main Tab ......................................................................... 31 Capturing and Storing Single Frames ................................................. 32 Capturing and Storing a Sequence of Frames.................................... 34 Capturing Audio .................................................................................. 36 Controls Window – Frame Compare Tab ...................................................... 37 Color Mask ......................................................................................... 38 Compare to Previous Frame............................................................... 39 Comparing to Reference: ................................................................... 39 Compare Results ................................................................................ 40 Previewing the Pixel Compare Results ............................................... 41 Controls Window – LVDS Tab ....................................................................... 43 Pin Mapping........................................................................................ 44 Link Status ..................................................................................................... 45 Event Log....................................................................................................... 46 EDID Editor .................................................................................................... 48 The Main Window ............................................................................... 48 Command buttons .............................................................................. 48 HPD Pulse .......................................................................................... 48 EDID Editor Features ......................................................................... 49 Editing tips .......................................................................................... 49 Setting User Preferences ............................................................................... 50 Appendix A. Product SpecificationS ............................................................................... 51 Operating Conditions .......................................................................... 51 UFG-04 DP ......................................................................................... 51 UFG-04 HDMA ................................................................................... 51 UFG-04 LVDS and UFG-04 LVDS Quad ............................................ 51 UFG-04 Common ............................................................................... 52 UFG-06 Nopea HDDP ........................................................................ 52 Software ............................................................................................. 52 Appendix B. UFG-04 Diagnostic LED Indicators ............................................................ 53 Appendix C. UFG-06 Nopea HDDP Diagnostic LED Indicators ...................................... 54 Appendix D: Connector PIN DESCRIPTIONS ................................................................ 55 Pin-out of DP Input Connector ............................................................ 55 Pin-out of RS-232 connector of UFG-04 DP ....................................... 55 Pin-out of the HDMI Input Connector Type A ..................................... 56 Pin-out of LVDS Input Connector CH 1 in UFG-04 LVDS .................. 57 Pin-out of LVDS Input Connector CH 2 in UFG-04 LVDS .................. 57 Appendix E. LVDS Input Data Mapping .......................................................................... 58 Predefined LVDS data mappings in UFG-04 LVDS............................ 58 Appendix F: Unigraf RAW File Format............................................................................ 60 5. UFG Console User Manual QUICK START GUIDE This is a reduced version of the UFG Console configuration instructions. If you feel quite confident with installing new hardware and software in your PC you can attempt this procedure. The instructions are the same for installing all UFG board types. Uninstall any previous version of UFG Software Power off your PC Insert your UFG board in a vacant PCI Express slot in your PC. Boot the Windows system and log in. Administrator's privilege is required for performing the installation. Run UFG Setup application on the CD. It will install needed software and drivers. Note Please note that you must install the UFG board device drivers in the UFG Setup. Start the UFG Console application and select your board. The software will verify that the firmware in your UFG board matches the version of the UFG Console. If you need to update the firmware please follow the instructions in the dialog and select the firmware file that matches your UFG board type. After that in the dialog select the UFG board and the used video input. For controlling the board and using the advanced function of the tool, please refer to chapter Using UFG Console later in this document. 6. UFG Console User Manual 1. ABOUT THIS MANUAL Purpose This guide is the User Manual of UFG Console user interface for use with UFG-06 Nopea, UFG-04 DP, UFG-04 HDMA, UFG-04 LVDS and UFG-04 LVDS Quad capture boards in a PC with Windows XP or Windows 7 Operating System. Give an overview of the product and its features. Give instruction for the user on how to install the board. Give instructions for the user on how to install the related software drivers in a PC. Assist the user in configuring the capturing process with the user interface. Give instructions for the user how to capture images. Product and Driver Version This manual explains in the following versions the product and the related software: Version Issued UFG-04 Setup 3.2 27.03.2012 UFG-06 Setup 1.3 20.09.2012 Notes On certain sections of the manual, when important information or notification is given, text is formatted as follows. Please read these notes carefully. Note This text is an important note 7. UFG Console User Manual 2. INTRODUCTION UFG Console UFG Console is a source analysis and debugging utility for use with UFG-04 and UFG-06 Series frame grabber boards. UFG Console API functionality is based on the API included UFG SDK. All functions (Except HDCP enabling functions) found in the UFG Console API can be implemented by a custom utility by using the UFG SDK. Each UFG capture board has their individual device drivers and set of custom functionality. Most of the functions, however, are common to all UFG boards. UFG-04 and UFG-06 Nopea Test Frame Grabbers UFG family frame grabbers are PCI Express (PCIe) bus compatible boards. The functionality is based on the combination of the driver SW in the PC and a dedicated hardware with a receiver chip and an advanced FPGA design. The FPGA controls the data stream from the receiver to the on board buffer memory and to the PC over the PCIe bus. All UFG-04 family boards share the same basic design architecture and performance. The main differences are based on the capabilities of the video interface in question. The common features for all UFG boards are the following: UFG-06 Nopea HDDP UFG-04 DP UFG-04 HDMA UFG-04 LVDS UFG-04 LVDS Quad 2 x HDMI 1 x DP 1 x Display Port 1 x RS-232 for CTS tools 1 x HDMI 1 x DVI 2 x LVDS (single or dual channel LVDS) 4 x LVDS (single dual or quad channel LVDS) Max timing 1920x1080p60 1920x1200p60 RB 2560x1600p60 RB 1920x1080p60 1920x1200p60 RB 1920x1080p60 1920x1200p60 RB 2560x1600p60(RB) 1920x1080p120 Max color depth HDMI: 12 bits / color DP: 10 bits / color 10 bits / color 12 bits / color 10 bits / color 10 bits / color Yes Yes Yes No No Frame packing (p/i), Side-by-Side (h/f), Top-and-Bottom Bottom. L + Depth for UFG-06 Nopea only No No No (TBA) Yes Yes No No 2 or 4 GBytes 2 or 4 GBytes 2 or 4 GBytes 2 or 4 GBytes 2 x 2 or 2 x 4 GBytes Programmable EDID Yes Yes Yes No No On board CRC calculation Yes Yes Yes Yes Yes Timing measurement Yes Yes Yes Yes Yes HDMI 1.4 Full featured DP Reference Sink HDMI 1.3 Deep Color Programmable LVDS data mapping Programmable LVDS data mapping Inputs HDCP 3D Audio capture On-board frame buffer Other 8. UFG Console User Manual UFG-06 Nopea HDDP The UFG-06 Nopea HDDP has three connectors in its front panel: Two HDMI A Type connectors (top 2) One DisplayPort™ connector One input can be selected at a time. The functionality of the two HDMI inputs is equal. Serial number (back side) HDMI input 1 HDMI input 2 DP input 9. UFG Console User Manual UFG-04 DP Frame Buffer (DDR2 RAM) Reset Switch DP Interface GM68020 DisplayPort Receiver FPGA RS-232 Interface PCI-Express Bridge to host PC The UFG-04 DP has two connectors in its front panel: DisplayPort™ connector (upper) D-Sub 9 RS-232 connector used for CTS testing (lower) Please refer to the illustration below for location of the connectors. Serial # (back side) Reset switch DisplayPort input RS-232 Interface 10. UFG Console User Manual UFG-04 HDMA The UFG-04 HDMA has two connectors in its front panel: One HDMI A Type connector (top) One DVI-D connector Both connectors input HDMI input stream and their functionality is equal. The DVI-D connector is provided mainly for its better mechanical properties in industrial environment. HDMI input Serial number (back side) DVI-D input 11. UFG Console User Manual UFG-04 LVDS UFG-04 LVDS Quad (* GPIO (General purpose I/O lines) is used for synchronizing the master and the slave boards in a multi-board capturing configuration. The UFG-04 LVDS board has two MDR-26 connectors in its front panel. The LVDS channel configurations are explained in the following table. LVDS Channel CH1 CH2 Single Channel Dual Channel Quad Channel (Master and board) LVDS CH1 LVDS CH1 Master LVDS CH1 LVDS CH2 Master LVDS CH2 CH3 Slave LVDS CH1 CH4 Slave LVDS CH2 Quad channel mode uses LVDS Mode 2. 12. Slave UFG Console User Manual Version Information The Serial Number Label gives information about the assembly version of the unit and the versions of the factory configured programmable devices on the unit. This information and the version information of the software are available in Help > About box of the UFG Console software. Note Whenever contacting Unigraf for information or advice; please have this information available along with the version information of the software package used. You can copy & paste this information to e.g. an email. 13. UFG Console User Manual 3. INSTALLATION Unpacking The UFG Console product shipment contains Warning The UFG board in an anti-static bag The UFG Frame Grabbers Installation CD containing the Console software, the SDK and the device drivers for Windows operating system. An electronic copy of this User Manual is included. The UFG board is a highly dedicated electronic device that contains ESD sensitive components. Before opening the anti-static bag and always before touching the board, please be sure to ground yourself. You can do the grounding by wearing a special grounding strap or simply touching a grounded metal surface. Contents of the Installation CD UFG Console SW can be used either with UFG-04 or UFG-06 frame grabber boards. The user interface is the same but the device drivers and the installation package is different. UFG-04 Installation package contains the following items: UFG-04 Setup utility for installing the software Windows device drivers for all UFG-04 boards UFG SDK for all UFG-04 board types with documentation and example source code FPGA firmware files individually for all UFG-04 board types User Manuals including this document Special Stress Pattern bitmaps for testing different features of the source DUT UFG-06 Installation package contains the following items: UFG-06 Setup utility for installing the software Windows device drivers LVCA SDK with documentation and example source code FPGA firmware embedded in the software User Manuals including this document 14. UFG Console User Manual Uninstalling the Previous Version You can uninstall UFG Console and the device drivers by using the link in the Start Menu. In the Start Menu select Unigraf > UFG > Un-install The uninstall utility will ask you which components you would like to have uninstalled. It will also ask you if you would like the device drivers to be uninstalled. If you are updating the software to a new version, you do not need to remove the license data. It will be valid for your new version too. Note Before installing version 3.X of the UFG Console it highly recommended that you uninstall the 2.X version software and drivers from your computer. Installation of the UFG Console and API The software setup utility will install all software needed to use the UFG-04 and UFG-06 series frame grabbers. UFG device drivers UFG Console Graphical User Interface (GUI) UFG SDK in case of UFG-04 setup UFG LVCA SDK in case of UFG-06 setup The UFG Console and the UFG04 SDK are common to all UFG-04 boards, UFG LVCA SDK is used with UFG-06 boards. UFG Console will detect the board and provide the user the features applicable to that board type. The 3.X series software package supports x32 and x64 editions of Windows 7, Windows Vista and Windows XP. It is recommended to use a PC with at least a dual-core CPU. Note: Administrator's privilege is required for performing the installation. For installing the UFG Console software perform the following steps: Run the UFG Setup application from a CD or from your hard disk. 15. UFG Console User Manual Installation with Windows 7 Before UFG04 Installation Wizard will start in Windows Vista or Windows 7 you may see a warning dialog. Click Yes to continue. Previously installed version UFG Software Package installer will check if there is a previous version installed. It is highly recommended that you uninstall all previously installed UFG Software packages from the PC prior to installing a new version. To do this, click Yes to uninstall the old package and to proceed into the installation wizard. Once the installer has started a welcome page is displayed. The welcome page shows UFG Software package release version. Click Next to continue. In the next dialogs you will able to define which software components are installed. UFG Console can be used to capture frames and to analyze the input video stream in several ways. UFG SDK and UFG LVCA SDK are used to create software utilizing UFG frame grabbers. UFG Drivers option will install the latest device drivers for UFG series frame grabbers. If this is the first time a 3.x release is installed on the computer, this option should be checked. The next two dialogs will allow you to define the Start Menu folder used, the location in your PC where UFG SDK will be installed where the executable software will be installed. When you are ready with the selections, click Install to start the installation. Note In previous releases, it has been possible to install the drivers manually. In this release, this is no longer possible. If Device Driver installation was selected at the component selection page, the driver installation wizard will appear at some point. Otherwise, wait for the installation to complete and click Finish to exit the installation wizard. 16. UFG Console User Manual Driver Installation The driver installation wizard is started by the Software Package Installation program, if device drivers were selected in the component selection page. Click Next to continue. Click Continue anyway, or Install this driver software anyway depending on the given warning type. Once the drivers are successfully installed, the completion page will appear. Click Finish to exit driver installation wizard. If the wizard suggests that a reboot is required, select Restart Later to allow the UFG Software Package installer to complete the installation. Once the UFG Software package installation is complete, a finish page is shown. If device drivers were installed, it is necessary to restart the system in order to complete the device driver installation. Click Finish to exit installation wizard. 17. UFG Console User Manual Installation with Windows XP It is highly recommend that you uninstall all previous versions of the UFG04 Software package without installing a new version. Click Next in the UFG software package Setup Wizard welcome page. In the Choose Components page you can select which software components will be installed. Note Please note that the device drivers can installed only with UFG Setup. In the following three pages you can define the locations for the program shortcut, and the destination folder where the SDK and the Console will be installed. You can either type in the folder name or select it by clicking the Browse… button. Click Install to install the selected options. Click Install Anyway to the Software Installation and Hardware Installation pop-up windows. Click Finish to exit the Device Driver Installation Wizard. Reboot your PC to start using the newly installed drivers. 18. UFG Console User Manual UFG License Manager Starting from version 3.X of UFG Software Package UFG License Manager is now introduced as a separate tool. The purpose is to provide simple means to enter and save license keys for use in all software based on the UFG API. The UFG API users do not have to add a license manager in their applications, and simplifies the licensing on the API level. The License Manager is automatically installed by the UFG Software Package installer. Note The user needs administrator rights to use the License Manager. In Windows Vista and Windows 7 this means that UAC dialogs may appear when LCM is started. Click Yes to continue. Note Please note that in order to the License Manager properly access the UFG board, the board Firmware needs to be updated to match the version of the UFG Software Package. Please refer to Firmware Update in Chapter 5 of this document. The License manager shortcuts are created in the start-menu at All programs / Unigraf / UFG / Licensing /. This folder will contain the following shortcuts: Manage launches UFG License Manager dialog. You can view the currently installed license keys, add new licenses or to remove old licenses. Migrate licenses allows you to copy license data from installations of older version of UFG Software Package the UFG Console over to the new licensing system. Scan hardware to scan for newly installed hardware, and request licenses as necessary. Adding Licenses To add a new license for an existing device, first select the device for which to add a license. The License Manager will first open the device for license key verification. This will take a few seconds. Once the device is open, click the Add new... button. This will open the license key entry dialog. Make sure that the serial number and the seed number in your license sticker matches the information displayed in this dialog. Enter the license key exactly as printed on the license key sticker. Once the key is entered, click Accept. 19. UFG Console User Manual The license key is verified at this point. If the verification succeeds, the new license key is added into the license list of the selected device. If the verification fails, you will be asked to check spelling and try again. Note The older license stickers don't show device serial numbers. In the case the serial number is not shown, please verify that the Seed number shown in the sticker matches the Seed number shown in the dialog. To remove a license, first select the device from which to remove the license. Once the license list appears, select the license key you wish to remove, and click Remove selected. To save the changes in the license key data click Save and Close in License Manager main dialog. Cancel will exit the License manager without saving. Migrating Licenses Migrate licenses allows you to copy license data from installations of older version of UFG Software Package the UFG Console over to the new licensing system. The tool will migrate all existing license codes saved by previous versions of UFG Software package (UFG Console). The old license data will not be deleted in the process. Migrating licenses requires that the UFG-04 boards where the licenses are attached are installed in the system. Migration can be repeated after swapping boards if necessary. Migration is mostly a silent operation. Once the migration is completed, a results dialog is shown. Note Please note that in order to the License Manager properly access the UFG board, the board Firmware needs to be updated to match the version of the UFG Software Package. Please refer to Firmware Update in Chapter 5 of this document. Detecting new boards Scan hardware shortcut of the tool will scan for newly installed UFG-04 or UFG-06 boards and to provide a possibility to enter licenses for any new boards found. Note Once a device is once found in scan mode, it will not be found with successive scans. Note UFG-04 LVDS boards do not feature licensed features and therefore do not include a Seed number in the license entry dialog. 20. UFG Console User Manual 4. FUNCTIONAL DESCRIPTION UFG-06 Nopea HDDP Frame Grabber UFG-06 Nopea HDDP frame grabber board is based on Silicon Image Sil9233A HDMI receiver chip. The board features full HDMI 1.4 functionality with HDCP support. The DisplayPort™ input is converted to HDMI using Parade Technologies PS161 chip. HDMI and DP streams up to VESA 1920x1200@60 (RB) and CEA 1080p60 can be captured. HDCP encrypted streams will be previewed in a HDCP compliant PC. Please refer to the full specifications in Appendix A. UFG-04 DP Frame Grabber UFG-04 DP is based on STMicroelectronics GM68020 DisplayPort™ receiver chip. The board features full DisplayPort™ Reference Sink functionality. The receiver chip automatically communicates with the DP Source device and assigns the input resolution and the other parameters of the display data. Please refer to the full specifications in Appendix A. With proper software and firmware the user can capture individual display frames received from the source device. Additionally by using the DP LL CTS software that communicates directly with the receiver chip, the user can perform Display Port Link Layer Conformance Test steps. The link LL CTS software communicates with the chip with the RS-232 serial interface. UFG-04 HDMA Frame Grabber UFG-04 HDMA frame grabber board is based on Silicon Image Sil9135 HDMI receiver chip. The board features full HDMI 1.3 Deep Color functionality with HDCP support. HDMI streams up to VESA 1920x1200@60 (RB) and CEA 1080p60 can be captured. Please refer to the full specifications in Appendix A. 21. UFG Console User Manual UFG-04 LVDS and UFG-04 LVDS Quad Frame Grabbers UFG-04 LVDS frame grabber features a 10 bits/color high speed LVDS receiver / de-serializer (DS90C3202) that is capable of receiving 7-bit serialized LVDS data in single or two channel mode. Additionally, a two board combination enables receiving LVDS data in four channel mode. Please refer to the full specifications in Appendix A. In single pixel mode only LVDS CH 1, the lower input connector is used. In two channel mode even pixels (pixels 0, 2, 4 …) are connected to LVDS CH 1, the lower input connector, and odd pixels (pixels 1,3,5 …) are connected to LVDS CH 2, the upper connector. Please refer to Introduction earlier in this document for details. The LVDS input connectors are 26 pin Mini D Ribbon (MDR-26) compatible. The pin configuration is compliant with DISM 1.0 standard. Please find the description of the pin-out in Appendix C of this document. The maximum pixel clock of each input channel is 135 MHz. This enables a capturing speed of 135 Mpix/s in single channel mode and 270 Mpix/s in dual channel mode. Please note that the maximum capturing speed of the UFG-04 LV models is 165Mpix/s. The 270 Mpix/s capturing speed enables the capture of e.g. VESA 2560x1600p60 (RB) timing and 165 Mpix/s e.g. VESA 1600x1200p60 timing. Two specially configured UFG-04 LVDS boards can be coupled together to enable four channel mode capturing. The master and slave boards are connected together with a synchronizing cable. The maximum capturing speed in four channel mode is 540 Mpix/s enabling the capture of 1080p @ 120 Hz. The Master and Slave boards have to be connected together with a special synchronization cable provided by Unigraf. The synchronization will enable that the two boards are capturing their portions of exactly the same input frame. The mapping of the pixel data into LVDS data varies from one data source to another. In order to provide flexibility for the user UFG-04 LVDS features an internal data matrix for multiplexing the LVDS data to the input color bits. The multiplexer enables any pixel data combination to be used. It also enables the use of selectable pixel color depths. The setting of the multiplexer is identical for both input channels. The UFG Console has pre-set standard mappings based on JEITA and VESA standards. For non standard mappings the user can change the mapping by editing the mapping table. Please refer to chapter LVDS Pin Mapping later in this document. 22. UFG Console User Manual Extended Frame Buffer UFG-04 and UFG-06 frame grabber boards include an on-board frame buffer that can store up to 4 Gigabytes of input video data at maximum speed and full 12 bit color depth without any frames lost. The frame buffer is a circular first in – first out memory. Frames can be captured to the PC simultaneously when new input frames are written to the buffer. When the buffer becomes full, the capture will be stopped and the user notified about the buffer overflow. The storage allocation of the frame buffer is based on the size of the stored frames. The maximum number of frames that can be captured during Sequence Capture feature is dependent on both the capabilities of the PC and the bitmap type used for storing. Please refer to chapter Capturing and Storing a Sequence of Frames later in this manual. On Board CRC Calculation The on-board FPGA of the UFG-04 and UFG-06 boards is able to calculate the CRC of the input video frames. The CRC is calculated from the R, G and B 16 bit color components taking into account color depth setting and the compare bit masks set. The CRC calculation is a very effective way of detecting differences in the frames. One color bit error in a single pixel will clearly be seen as a difference in the CRC. The CRC calculation is used to implement the CRC Compare function in Compare utility. The CRC Compare can be used either to compare the current frame to the previous input frame or to a reference frame in the PC. EDID The EDID (Extended Display Identification Data) content of UFG-04 DP, UFG-04 HDMA and UFG-06 Nopea HDDP boards can be re-programmed by the user for emulation of various monitor types. This is a valuable feature while testing the performance of Source devices. Please refer to chapter EDID Editor later in this manual 23. UFG Console User Manual Status Log UFG-04 HDMA, UFG-04 DP and UFG-06 Nopea HDDP include a link status log feature. The Status Log detects all status, video, audio and InfoFrame related events from the HDMI link. With the time stamped list the user is reliably able to monitor the behavior of the Source device. Each message is parsed to easy to comprehend clear text. Specially combining the EDID and Status Log features provides the user a powerful tool for testing the compatibility of Source devices with different kinds of Sink devices. For UFG-04 users the Status Log is included in the optional Power Tools software package. Link Status is an optional feature available in the basic UFG Console software. HDCP The UFG-04 DP, UFG-04 HDMA and UFG-06 Nopea HDDP are HDCP (High-bandwidth Digital Content Protection) compliant sink devices. They will enable the preview and analysis of the image content and the corresponding metadata of HDCP protected material in a PC where both the display adapter and monitor are HDCP compliant. The storage of the HDCP protected material is inhibited. Note Only applications provided by Unigraf can enable the HDCP protected content. Licenses Product licensing is slightly different between UFG-04 and UFG-06 boards. For UFG-06 Nopea HDDP you will need the license key for using all features of the UFG Console and UFG API. For UFG-04 boards only certain features of the UFG Console and UFG04 API require you to provide a License Key. You can enter the key in the License Manager utility. For instructions, please refer to chapter License Manager later in this document. A special license key is used with the UFG-04 DP, UFG-04 HDMA and UFG-06 Nopea HDDP boards for enabling the HDCP encrypted content. The HDCP Unlock License key is provided with each board. This key is used for making sure that the application requesting the HDCP encrypted content is provided by Unigraf. 24. UFG Console User Manual 5. USING UFG CONSOLE UFG Console is a video capture and source analysis application for Unigraf Test and Measurement frame grabber boards. UFG Console is based on UFG API software application interface which is a powerful tool for users who want to write their own application for test automation. UFG Console uses several techniques in order to offer the full performance of the PC, including multi-threading and MMX Assembler optimization. When launched, UFG Console will open the UFG Console – Controls window that will list all UFG-04 and UFG-06 frame grabbers found in the PC. Note: Please, select the desired board and input and click Open. A Video preview window is opened showing the captured data from the selected input. If the Open button is grayed out, it means that the firmware version on the board is not compatible with the version of the UFG Console software. Please refer to Firmware Update chapter below. After a device is opened, UFG Console opens the UFG Console Main window. This window is used to show the live preview of the input video captured from the selected input and any snapshot or processed image contents. The UFG Console - Controls is a separate window providing a set of control tabs depending on the type of the frame grabber being accessed. By default Controls window is minimized if the UFG Console window is selected. The full size is returned when the Controls window is selected. Please find the introduction of the UFG Console - Controls window later in this manual. 25. UFG Console User Manual Firmware Update When UFG Console software is launched, the compatibility of the firmware on the UFG board to the UFG Console version is verified. In case there is a mismatch, the Open button on the Start-Up menu is not enabled. The firmware update procedure for UFG-04 and UFG-06 board is different. UFG-04 HDMA, UFG-04 DP and UFG-04 LVDS In the device menu select the board that you want to update and click Update button. A firmware update dialog is opened. It informs the current firmware version on the board, and suggests the user the firmware file matching the current UFG Console software version. If the firmware file matching the software release is not found, the dialog suggests downloading the file from Unigraf website. The user can alternatively select the file manually by clicking the ellipsis (...) button next to the edit-box to open a file selector and select a firmware file. When the requested firmware file is selected click the Update button and Yes to start the update process. Selecting incorrect firmware file for a board type will cause an error message to appear – It is not possible to load by accident a firmware version that is not suitable for the installed board. Note: UFG-06 Nopea HDDP Open UFG-06 Control Center from Start > All Programs > Unigraf. In the Configuration Items under the UFG-06 board that you want to update select Firmware Update The firmware file is embedded in the tool. Click Update Firmware (to Vx.x.xx). Restart the PC 26. UFG Console User Manual Update of UFG-04 DP Receiver Chip Firmware The firmware of the DP receiver chip of UFG-04 DP board has to be done separately with the DP specific tools. You can use either DP RefSink CTS Tool or DP Sink Console for that. Please refer to the documentation in the DP Tools CD for details. 27. UFG Console User Manual UFG Console Main Window The UFG Console window shows the captured and processed image contents. The functionality shown on the UFG Console window reflects the tasks performed on the Control window. Several preview dialogs are layered in the Preview window by using tabs and selections. Please refer to the description the functionalities of the UFG Console for explanation of the data found in the UFG Console window. To preview the captured image in whole, select Fit to window. To preview the captured bitmap with original pixel size, unselect it. To keep the aspect ratio of the captured image, select Lock Aspect ratio. Video Status On the status panel in the bottom of the UFG Console window, the user can see the status of the captured video. The LIVE text and the blinking green arrow indicate that a valid live video signal is detected and captured. In case no signal is detected in the selected input, the preview screen turns red with a text No Signal. Please see the image on the previous page. To the right of the live indicator the status panel indicates the captured video resolution, vertical frequency (frame rate) and pixel bit depth. UFG Console preview function supports RGB and YCbCr input color formats. YCbCr 4:2:2 input color format is up-sampled to YCbCr 4:4:4. The next indicator in the center of the bottom panel indicates the contents of the screen. In the case of the Live Preview it indicates the current preview rate fps (frames per second) 28. UFG Console User Manual HDCP Status When using UFG-04 DP, UFG-04 HDMA or UFG-06 Nopea HDDP board, UFG Console enables the user to preview and compare HDCP encrypted material in a HDCP compliant PC. UFG Console indicates its HDCP state on the left hand corner of the status bar in the bottom of the UFG Console - Controls window. If the HDCP indicator is gray, it means that the input video is not HDCP protected If the HDCP indicator is green, it means that the input video is HDCP protected and is displayed on a HDCP protected display If the HDCP indicator is red, it means that the HDCP Unlock License is not set for this board. Please refer to chapter License Manager below for instructions on how to set the license 29. UFG Console User Manual If the HDCP indicator is green but the HDCP letters are crossed over, it means that the HDCP protected video can't be displayed. This can happen because one or more components in the PC are not HDCP compliant and HDCP cannot be enabled. The preview window is filled with a warning text 30. UFG Console User Manual Controls Window – Main Tab The UFG Console - Controls window provides a set of control tabs depending on the type of the UFG frame grabber model being used. Common control tabs for all board types are Main and Frame compare. The Main tab contains a dialog for storing captured frames and the Frame compare tab contains a dialog for testing and analyzing the captured frames. The top of the Controls window indicates the current board and interface selected. In order to change the used board or interface click the red button on the top right of the Controls window. The main tab of the Controls window allows the user to save the captured contents. 31. UFG Console User Manual Capturing and Storing Single Frames Click Snapshot to capture a single frame from the selected input. The captured frame will be shown on a new tab of the UFG Console window called Snap_xxx. “xxx” indicates the sequence number of the captured frame since the start of the preview or the latest change in the video mode. Note: You can take more snapshots even while viewing other snapshots. Note: Snapshots captured from HDCP encrypted content cannot be saved. Note: Please note that UFG Console preview and storage converts YCbCr 4:2:2 input color format to YCbCr 4:4:4 with up-sampling. The bottom status line of the UFG Console window shows the color mode, the resolution and the pixel bit depth of the captured frame. You can save the captured frame as a bitmap file on the disk by clicking the Save as … button. When the frame is saved the tab indicates the bitmap file name. 32. UFG Console User Manual The possible save formats are listed in the table below. Color format RGB Bit depth 24 bpp Possible save formats JPEG (.JPG), Portable Pixel map (.PPM), Portable Network Graphics (.PNG), Windows bitmap (.BMP), RAW Data (.RAW), and ASCII (.ASC) (PPM), Portable Network Graphics (PNG), RAW Data (.RAW), and ASCII (.ASC) JPEG (.JPG), RAW Data (RAW), and ASCII (ASC) UYVY 4:2:2 (.YUV, decimated), IYU2 4:4:4 (.IYU) RAW Data (.RAW), and ASCII (.ASC) 30 or 36 bpp YUV 24 bpp 30 or 36 bpp The possible save formats are listed in the table below. The ASCII format is very practical for reading the actual pixel values in Hex. Please refer to http://www.fourcc.org/ for detailed description of the save formats You can close the tabs by clicking the red round button on the top right hand corner of the tab. Note: Please note that the snapshots are not automatically saved to the disk. Please use the Save as … button to save the bitmaps. 33. UFG Console User Manual Capturing and Storing a Sequence of Frames You can utilize the large on-board frame buffer of the UFG-04 or UFG-06 board and capture a sequence of frames without losing any of them. The frames are buffered locally in the on board frame buffer in real time and the PC stores them at a slower pace to the hard disk. The PC storage speed depends on the capabilities of the PC and the compression method used. You can select the desired capture frame rate by using the selector. 1/1 means that every frame is stored, ½ means that every 2nd frame is stored, 1/3 that every third frame is stored (2 frames are skipped) etc. Enter the destination folder in Save frames to folder field. By adding the “#” character to the folder name, UFG Console will create a new folder for each recording session and replaces the “#” in the folder name with the session number. E.g. when using name “test_#” will create folders test_1, test_2 etc. Select the bitmap file type of the stored frames in Frame format. The possible save formats are the same ones as when saving snapshots. Please refer to the table on the previous page. Select the File name. You need to include character “#” at least once in the file name. “#” will be replaced by a frame number starting from 0 (zero) for each sequence. If you want to store only a limited amount of frames, please select Limit # of recorded frames check box and specify the number of frames that you would need to capture. Please note that if the number of frames specified here is larger than the amount that the board can capture without losing frames, the capturing is stopped when frames will be lost. Note The Record button is not enabled if the file name or the folder names are not valid or if the input content is HDCP encrypted. 34. UFG Console User Manual In Tools > Preferences dialog you can define compression rate for PNG and JPEG images. Higher compression level will enable faster storage time and more frames to be captured. The recorded time span will be dependent on the Frame rate divisor and the file type. For speed, choose JPG – Or for lossless images, choose BMP or RAW. When the recording ends UFG Console opens by default the folder where the bitmap files have been stored in a file browser window. This feature makes it easy for the user to locate the stored files. You can disable this feature in Tools > Preferences … dialog. When the board starts storing frames into the on-board frame buffer the GUI starts reading frames and emptying the buffer. The effect of this is that you are able to capture more consecutive frames than the board could store in the frame buffer at one time. When the buffer is full, UFG Console stops recording and displays a message Recording stopped because of buffer overflow on grabber. Note: The record is interrupted if the frame-buffer located on the frame-grabber becomes full, or if the input video size changes during recording. 35. UFG Console User Manual Capturing Audio When using UFG-04 DP and UFG-04 HDMA boards you can capture audio with the frames by selecting Enable Audio Capture in the Main tab of the UFG Console – Controls. UFG Console stores the audio data in LPCM audio format with 8 channels. The raw data of the compressed audio formats can also be captured and stored. The user needs to apply third party software for their playback. Audio can be stored either as a Multichannel Wav or RAW Data file. Please select the audio file in File name: field. 36. UFG Console User Manual Controls Window – Frame Compare Tab Frame compare feature of the UFG-04 and UFG-06 frame grabbers is a tool for verifying the fidelity of the output of video source device. There are two compare modes available Frame Compare Pixel Compare. When using the Frame Compare, the on board firmware hardware calculates a checksum (CRC32) of each R, G and B color component of pixel of the incoming video frames. The calculated CRC values can then be compared to the CRC value of either the previous frame, or reference CRC values calculated from a reference image in the PC. The advantage of the CRC Analysis is that it can verify 100% of the frames. In Pixel Compare the video frames are captured to the PC memory and compared to a reference image. Although Pixel Compare is not able to verify all frames its advantage is that errors in the image can be detected and highlighted on a pixel-by-pixel basis. Click Start to start the frame comparison, and Stop to stop it. A new Frame compare errors window will open. The data shown on the Errors panel reflects the compare mode used. Note: If the input video timing changes the comparison will be stopped automatically. Note: For interlaced timings the Frame Compare function cannot be used. 37. UFG Console User Manual Color Mask Before comparison you can apply a Color mask. With the mask you can enable only part of the color bits to be taken into account in the comparison. This enables you to e.g. concentrate to certain color channels or limit the color depth of the comparison. You can either set one of the Color mask presets or select <Custom…> and define the bit pattern freely. Each bit set to “1” is included in comparison, while “0” bits are not compared. The tool verifies that the entered binary mask is valid before enabling the comparison. Note Please note that you should not define a higher color depth in the Compare Mask than the color depth your input signal. 38. UFG Console User Manual Compare to Previous Frame In this mode the only compare method available is CRC Compare. Input video data up to 36 bpp bit depth can be compared. Note This mode is selected by clicking Compare to Previous Frame radio button. When using the Compare to Previous Frame function first time after changing the input content the compare will find one error in all three color channels. With consecutive tests with the same input no error will be found. Comparing to Reference: In this mode you can use both Frame Compare and Pixel Compare. This mode is selected by clicking the Compare to Reference radio button You can select a reference frame either from an existing snapshot, or load a reference image from disk. Click the Reference field to select one of the snapshots from the drop-down list or the Ellipsis (…) button for selecting a bitmap file as reference Once the reference is selected, you can select what type of compare function you wish to perform. Frame Compare is done by default. Select Perform pixel-by pixel analysis checkbox for the more thorough pixel compare. Note: Please be careful when using disk files as a reference. You need to make sure that the source device is not modifying the original content with dithering or using CEA limited color range. 39. UFG Console User Manual Compare Results The Frame compare errors window shows the status during the compare process. The upper part of the window Frame compare results lists the number of frames where the On-board CRC has found failures in the Red/Cr, Green/Y Blue/Cb sub-pixels respectively. It also lists the total number of failed frames during the session and the total number of frames compared. The lower part of the window Pixel compare results lists the number of frames and the number of pixels where the Pixel Compare by the software in the PC has found failures in the Red/Cr, Green/Y Blue/Cb sub-pixels respectively. The Bit Pattern column indicates the color bits failed. The lower part also lists the total number of failed frames during the session and the total number of frames compared. Note: Please note that values in Frame compare results (On-board CRC) fields indicate compare performed to all input frames. The values in Pixel compare results fields reflect the Pixel compare results performed for the frames captured and analyzed in the PC. The number of frames tested with Pixel compare is usually smaller than with Frame compare. You can save the numerical results in a text file, CSV (comma Separated Values) format for later analysis Click Save for saving the numerical results in a file. 40. UFG Console User Manual Previewing the Pixel Compare Results During Pixel Compare UFG Console window provides three monitoring modes. You can select between the modes by selecting the corresponding radio button. Select Live Video, for monitoring the captured image Select Pixel Analysis, for monitoring the mismatch found in the latest captured frame. Select Accumulated Errors, showing cumulative mismatches found during the compare session In the Pixel Compare mode each pixel mismatch is shown on a black background. The color of the mismatch pixel indicates the failing colors. Black color indicates a match. By selecting Highlight Errors check box in the Controls window, you can enhance the visibility of each pixel mismatch with a small cross sign (+). At the end of the session UFG Console takes a snapshot of the Accumulated Errors and shows it on an ErrorCumulation_x tab where x is the number of the test during the session. 41. UFG Console User Manual By selecting Snapshot frames with errors check box in the Controls window, the software takes a snapshot of each frame where errors were found in the pixel by pixel compare. 5 mismatch snapshots are saved to tabs but the Compare function will continue until it is manually stopped. 42. UFG Console User Manual Controls Window – LVDS Tab When using UFG-04 LVDS or UFG-04 LVDS Quad boards, a third tab appears in the UFG Console – Controls window. The LVDS tab allows the user to control the way the LVDS input is interpreted as image data. The LVDS Acquisition Mode is selected when opening the board. You can select between Single link and Dual link mode with a single board, and between Single link, Dual link and Quad link mode with two boards. The special Dual link (2 boards) mode uses Dual link mode to speed up the transfer of the captured frames to the PC. The Sync Source defines which synchronizing is used. If Data Enable (DE) is selected, Bit 6 in Lane C (DE) is used to indicate the location of the visible frame. If HSync/VSync (HS/VS) is selected, Bit 4 (HS) and Bit 5 (VS) in Lane C are used as Horizontal Sync and Vertical Sync. 43. UFG Console User Manual Pin Mapping The mapping of the pixel data into LVDS data varies from one data source to another. In order to provide flexibility for the user UFG-04 LVDS board FPGA includes a data matrix for multiplexing the LVDS data to the input color bits. From Control window’s LVDS tab you can select between 5 predefined pin mappings or a custom mapping. The predefined mappings are 6, 8 and 10 bit JEITA/JEIDA mappings and 8 and 10 bit VESA mappings. Please find the Data / Color mapping table of the preset settings in Appendix D of this manual. Click Apply to use the selected mapping. By selecting the (Custom …) you can define a custom mapping in the matrix. Please note that the mapping of DE, VS and HS to bits 4 to 6 in lane C (RXC) cannot be changed. Custom Color depth field allows you to select between 6, 8 or 10 bit depth of color components. Note You can save a custom mapping to a file by clicking Save or recall a mapping by clicking Load. Click Apply to use the changed mapping. The setting of the multiplexer is identical for both input channels. 44. UFG Console User Manual Link Status UFG Console provides two ways for monitoring the link status and the metadata provided by the Source device. The basic version of the UFG Console features the possibility of monitoring the current Link Status. Select Tools > Link Status … from the pull down menu of the UFG Console Controls window to open the Link Status dialog. Please click Update to re-read the status. The dialog indicates the current status or latest received metadata of the following items. AVI IF: SPD IF: Audio IF: MPEG IF: ACS: Video status: Sync details: Audio status: Auxiliary Video InfoFrame Source Product Description InfoFrame Audio InfoFrame MPEG InfoFrame Audio Control Status Resolution, frame rate, Color format, color component bit depth and pixel clock frequency Video Identification Code (VIC), Horizontal sync and timing details, Vertical sync and timing details Sampling frequency, nr of audio channels, audio data bit depth 45. UFG Console User Manual Event Log The Power Tools software package for UFG-04 DP and UFG-04 HDMA boards and UFG Console for UFG-06 Nopea includes an Event Log function that collects events, video and audio status, Metadata from input stream. Select Tools > Event Log … from the pull down menu of the UFG Console Controls window to open the Event Log dialog. The Event Log dialog is divided into two sections. The leftmost part is the tile log list with time stamp, data type description and actual data received. The rightmost panel shows the parsed clear text description of the information included in the selected log item. Click Start event capture to start collecting data. While UFG Console is collecting the data you can scroll the list and examine the already collected items. Select the item of interest, the details of that item will be parsed in the Details panel. 46. UFG Console User Manual The following table lists the items shown in the log. You can select which items are shown on the log list by selecting or de-selecting the applicable filter check box. Event Type AVI Info Frame SPD Info Frame Audio Info Frame MPEG Info Frame Vendor Specific Info Frame Audio Status AVMUTE Video Status ACS (Audio Channel Status) ACP (Audio content protection packet) No AVI InfoFrame Sync Status EXT (Extension Packet) VB-ID (Vertical Blanking ID) MSA (Main Stream Attributes) No ACP Others/Unknown: Boards HDDP, HDMA, DP HDDP, HDMA, DP HDDP, HDMA, DP HDDP, HDMA, DP HDDP, HDMA, DP HDDP, HDMA, DP HDDP, HDMA HDDP, HDMA, DP HDDP, HDMA, DP HDDP, HDMA HDDP, HDMA HDDP, HDMA DP DP DP HDDP Applicable filter Info Frames Info Frames Info Frames Info Frames Info Frames A/V Status A/V Status A/V Status A/V Status Generic Generic Generic Generic Generic Generic Generic Generic You can select the view options for the log list by right clicking on top of it. The options are: Timestamp: Enable / disable timestamp Show time from start of event capture / from previous event Show time as milliseconds / minutes: seconds: micro-seconds Type: Enable / Disable display of Type information Data: Enable / Disable display of data Show RAW data only / Show decoded data when available Click Stop event capture to end the logging Click Save … to store the events in your PC in three alternative formats Unigraf Event Log file format Comma separated values Text file *.EVL *.CSV *.TXT Can be loaded back to UFG Console Can be imported to e.g. to spreadsheets Universal UFG Console allows you to select if you would like to apply the used filter to store only part of the data. The image below shows events saved in CSV format. Note Please note that when evaluating the input video timing the firmware considers a timing to be Stable after there have been no changes in the input timing during 32 consecutive horizontal periods. Therefore the timestamp of the Video Status arrives 32 frame intervals late. A corrected timestamp is indicated in parsed data on the Details panel of the Video State event. 47. UFG Console User Manual EDID Editor When using UFG-04 DP, UFG-04 HDMA or UFG-06 Nopea boards, you can update the EDID information of the input. This means that you can change the performance information that the connected source device reads from the board. To open the EDID dialog select Settings > EDID Editor …. The Main Window The EDID Editor main window is divided into three logical areas. The bottom part of the window contains the command buttons, and the log view. The top-left portion shows the currently edited E-EDID blocks in a tree-form, and the top-right portion shows an edit control for the currently selected item, possibly a list of sub-keys and their names (The list is not shown for all values) and the HEX-view of the block collection. Notice that there are two moveable splitters to customize the window layout. One is just above the Log-view, and the second is between the top-left and top-right window areas. Command buttons Load: Load an EDID block collection file from disk. Save: Save the current block collection to a disk file. Show Hex: Show or Hide the HEX view. Show Log: Show or Hide the Log view. Write EDID: Program the EDID block collection to the UFG-04 board. Read EDID: Read the EDID block collection from the UFG-04 board Generate HPD: Generate a Hot Plug Detect pulse HPD Pulse By default UFG-04 HDMA and UFG-06 Nopea HDDP boards generate a Hot Plug Detect pulse when you are reading or writing the EDID contents. By unselecting the Automatically generate HPD checkbox you can prevent this. You can also set the length of the pulse. 48. UFG Console User Manual EDID Editor Features The EDID Editor currently supports VESA E-EDID block versions 1.3 and 1.4. As the standard defines, the versions 1.0, 1.1 and 1.2 are supposed to be backward compatible, and therefore the VESA E-EDID decoder will also show their contents. However, in these cases it should be noted that the error checking is not compliant with restrictions given in these older versions of the standard. In addition to VESA E-EDID block, the CEA-861 versions 1, 2 and 3 EDID blocks are also fully supported as well as the VESA Block Map Extension blocks. Practically unlimited number of extension blocks may exist in a single collection. The number of blocks is limited by VESA Specifications and possibly by available system resources. Most EDID blocks contain a structure that is very similar to a tree-structure. The EDID Editor decodes each block into a tree-view of the block. The tree-view then contains all values contained within the EDID block. The contents can then be easily browsed, using only a few mouse clicks. The EDID Editor has a support for automatic variables, such as the block checksum. When the user changes a value in an EDID block, the tool will update the checksum accordingly. The automatic variables appear as read only values for the user. A log print will be made when an automatic variable is updated by the editor. HEX View: An optional HEX data display of all blocks in the collection. The view also shows the latest changes highlighted. LOG View: An optional LOG view, which will contain log prints generated by the editor. Mostly it will list values that have been automatically updated due to edits. Note The editing feature of EDID Editor is available with Power Tools License of the UFG Console only. The Read, Write, Load and Save features are available without the license. Editing tips Editing an EDID block is very straightforward, but there are some special cases where the user must know how to accomplish certain types of tasks. Note Enter key will apply text-edit values and combo-box selection. To apply new setting to binary values (ones that show a check-box), please click the Set button. When you see a Quick Config button appear below an editor, you can access a configuration menu that allows you to quickly select one of multiple pre-defined setup options. In CEA-861 blocks, you can add and remove 18-byte descriptors and CEA data blocks by setting the values “18-byte Descriptors in this block” and “CEA Data block count”. Unfortunately re-arranging the descriptors and CEA data blocks is not supported yet, so you need to be careful when editing these. Enter hex values with prefix “0x” or “$”, no prefix means a decimal value. You can always enter HEX or DEC, even if the value is presented as HEX, and/or value range is given in HEX. Floating point values must be given with period “.” as decimal separator, even if your localization setting defines decimal separator as comma (or other). Remember to click Set after changing a bit-value presented as a single check-box if you want the new value applied. It is recommended that you backup the un-edited EDID contents to a file before editing and writing it to the board. 49. UFG Console User Manual Setting User Preferences The user can control some of the features of the UFG Console to match personal preferences. On the pull down menu of UFG Console – Controls window select Tools > Preferences … You can select the visual clues, i.e. the color of the field to indicate if the value entered is valid. Select Use Visual clues on input fields check box to enable the feature and from the buttons select the color you want to use. Select Automatically minimize Controls window if you are using a low resolution display or if you otherwise prefer to be able to see as much of the captured image as possible. Select Use Tooltips to enable the view of tooltips when the mouse cursor is on top of tools. The current release of UFG Console does not support tooltips. Select Automatically open file browser after recording if you prefer that after recording a sequence of frames the folder where the frames are stored is opened in Windows file browser. Image saving option allows you to set the desired compression level for the captured and saved bitmap files when using PNG or JPEG file type. Memory resources enable you to control the amount of system RAM used for UFG Console. The default value 300 Mbytes for snapshot enables you to take about 25 1920x1080 resolution snapshots with 36 bpp color depth and about 50 with 24 bpp color depth. The memory for the frame queue is used to queue frames with Record function. Increasing the value will enable you to store more consecutive frames specially when the storage media is the bottleneck. Please be careful not to increase the value too much. It might have effects in the performance of other tasks in the PC. 50. UFG Console User Manual APPENDIX A. PRODUCT SPECIFICATIONS Operating Conditions Operating temperature 0 – 40 °C Storage temperature 0 – 40 °C Humidity 0 – 95%, Non condensing UFG-04 DP DisplayPort™ input DisplayPort™ connector STMicroelectronics GM 68020 receiver Link bandwidth Up to 10.8 Gbps over 4 lanes Pixel Depth 18, 24 or 30 or bits per pixel Image size Up to 2560 x 1600 pixels Audio Capture LPCM data in RAW or WAV format UFG-04 HDMA HDMI input HDMI Type A connector Silicon Image Sil9135 HDMI receiver HDMI 1.3, HDCP 1.1, and DVI 1.0 compliant Receiver, Integrated TMDS core running at 25 – 225 MHz Maximum video clock 165 MHz Color modes 36-bit RGB / YCbCr 4:4:4 16 / 20 / 24-bit YCbCr 4:2:2 (supported only in the SDK) Captured images can be stored in RGB 4:4:4 3D formats Frame packing (Progressive, Interlaced), Side-by-Side (Half), Top-and-Bottom Audio PCM 2/8 audio, Dolby Digital, Dolby Digital +, DTS, DTS96/24, DTS HD, Dolby TrueHD Sampling is max 192 kHz and audio bit resolution is 24 bits UFG-04 LVDS and UFG-04 LVDS Quad Connectors 2 x MDR-26 DISM 1.0 compliant LVDS Input Dual FPD-Link Receiver (DS90C3202) Pixel Frequency 1-channel 2-channel 4-channel 135 Mpix/s max UFG-04 HLV 270 Mpix/s max UFG-04 LV 165 Mpix/s max 540 Mpix/s max Input Pixel Depth 8 or 10 bits per color Color Mapping JEITA/JEIDA, VESA or custom Output Color Depth 8, 10 or 16 bits per color 51. UFG Console User Manual UFG-04 Common Video Frame Buffer 2 or 4 GBytes. Image size 8 Mpixels max Data Interface PCI Express 1 lane (1.0) Bus master. Sustained transfer rate up to 125 MBytes/s. EDID User programmable HDCP HDCP decryption engine for receiving protected audio and video content. Built in HDCP BIST. Preview of HDCP encrypted contents in a compatible PC. Module Size 107 x 168 mm Power Consumption +12 Vdc 620 mA, 7.5 W maximum +3.3 Vdc 520 mA 1.7 W maximum UFG-06 Nopea HDDP Inputs Selectable between 2 HDMI and 1 DP HDMI inputs Input 2 x HDMI Type A connectors Silicon Image SiI9233A receiver 225 MHz max TMDS clock DisplayPort Input 1 x DP connector Parade Technologies PS161 DisplayPort™ to HDMI converter up to 165 Mpps Maximum video clock 165 MHz Color modes RGB, YCbCr and xvYCC Capture pixel depth 18, 24 and 30 bpp. 36 bpp, Deep Color with HDMI 3D formats Frame packing (p/i), Side-by-Side (h/f), Top-and-Bottom, L + Depth Audio Available through UFG LVCA API Module Size 107 x 190 mm Power Consumption 10.0 W Operating Systems Windows 7, XP or Vista (32/64 bit) SW Interface UFG API for UFG-04 boards, UFG LVCA API for UFG-06 board. C/C++ library with functions for accessing the configuration parameters and capturing the image. Multi-board Support Software properties Preview, preview HDCP contents Store video frames. Store audio Compare input frame to previous, Compare captured frame to a reference, highlight difference, save difference Firmware update via software Software 52. UFG Console User Manual APPENDIX B. UFG-04 DIAGNOSTIC LED INDICATORS The UFG-04 frame grabber boards include a set of LED indicators. They are reflecting status of various hardware functions of the board. They are serving a helpful debugging tool. The functions of the LEDs are listed in the table below. Name Preferred State PWR Power OK (Board) Should be on LED 1 Power OK (PCI Express) Should be on LED 2 FPGA operational Should be flashing LED 3 Pixel clock detected Should be on LED 4 Video syncs detected Should be on LED 5 Input signal stable Should be on LED 6 Reserved LED 7 Reserved LED 8 PCI Express link is on LED 9 Reserved Should be on 53. UFG Console User Manual APPENDIX C. UFG-06 NOPEA HDDP DIAGNOSTIC LED INDICATORS The UFG-06 Nopea HDDP frame grabber boards include a set of LED indicators. They are reflecting status of various hardware functions of the board. They are serving a helpful debugging tool. The functions of the LEDs are listed in the table below. Name Preferred State PWR Power OK (Board) Should be on LED 1 FPGA operational Should be flashing LED 2 Video clock detected Should be on LED 3 Video syncs detected Should be on LED 4 Input signal stable Should be on LED 5 Reserved LED 6 Reserved LED 7 Reserved 54. UFG Console User Manual APPENDIX D: CONNECTOR PIN DESCRIPTIONS Pin-out of DP Input Connector Pin 1 2 3 4 5 6 7 8 9 10 11 12 13 14 15 16 17 18 19 20 Signal Type Input Signal Name ML_Lane 3 (n) GND Input ML_Lane 3 (p) Input ML_Lane 2 (n) GND Input ML_Lane 2 (p) Input ML_Lane 1 (n) GND Input ML_Lane 1 (p) Input ML_Lane 0 (n) GND Input ML_Lane 0 (p) GND GND Input / Output AUX CH (p) GND Input / Output AUX CH (n) Output Hot Plug Detect Power Return Power Output DP_PWR (not connected) Pin-out of RS-232 connector of UFG-04 DP Pin Signal Name 1 2 3 4 5 6 7 8 9 n/c TXD RXD n/c GND n/c n/c n/c n/c 55. UFG Console User Manual Pin-out of the HDMI Input Connector Type A Pin Signal Name Description 1 TMDS Data2+ T.M.D.S Diff lane 2+ 2 TMDS Data2 Shield Lane 2 shield 3 TMDS Data2– T.M.D.S Diff lane 2- 4 TMDS Data1+ T.M.D.S Diff lane 1+ 5 TMDS Data1 Shield Lane 1 shield 6 TMDS Data1– T.M.D.S Diff lane 1- 7 TMDS Data0+ T.M.D.S Diff lane 0+ 8 TMDS Data0 Shield Lane 0 shield 9 TMDS Data0– T.M.D.S Diff lane 0- 10 TMDS Clock+ T.M.D.S Diff lane clock+ 11 TMDS Clock Shield Clock shield 12 TMDS Clock– T.M.D.S Diff lane clock- 13 CEC Consumer Electronics Control, a control method developed from the European Scart standard. 14 Reserved (N.C. on device) 15 SCL DDC I2C Clock 16 SDA DDC I2C data 17 DDC/CEC Ground DDC ground 18 +5 V Power (max 50 mA) DDC +5V 19 Hot Plug Detect Hot plug detect 56. UFG Console User Manual Pin-out of LVDS Input Connector CH 1 in UFG-04 LVDS Signal GND RXD_GND SENS(** RXCLK+ RXCLKRXE+ RXERXC_GND Reserved RXB_GND GND RXA+ RXA- Pin n. 1 2 3 4 5 6 7 8 9 10 11 12 13 Pin n. 14 15 16 17 18 19 20 21 22 23 24 25 26 Signal RXD+ RXDN.C. RXCLK_GND Reserved RXE_GND RXC+ RXCRXB+ RXBReserved RXA_GND GND 1 14 13 26 Pin-out of LVDS Input Connector CH 2 in UFG-04 LVDS Signal GND RXD_GND SENS(** N.C N.C RXE+ RXERXC_GND Reserved RXB_GND GND RXA+ RXA- Pin n. 1 2 3 4 5 6 7 8 9 10 11 12 13 Pin n. 14 15 16 17 18 19 20 21 22 23 24 25 26 Signal RXD+ RXDN.C. RXCLK_GND Reserved RXE_GND RXC+ RXCRXB+ RXBReserved RXA_GND GND ** SENS = +5V input. Can be left unconnected Reserved = please leave unconnected N.C. = not connected on the UFG-04 board 57. UFG Console User Manual APPENDIX E. LVDS INPUT DATA MAPPING UFG Console allows you to modify the LVDS input data mapping. The selection includes five predefined mappings: JEIDA 6, 8 and 10 bit, VESA 8 and 10 bit. Other data mappings can be created and saved by using the UFG Console. By default the VESA 10 bit mapping is used. Please find below a table describing the five predefined mappings. Predefined LVDS data mappings in UFG-04 LVDS LVDS data RXA0 RXA1 RXA2 RXA3 RXA4 RXA5 RXA6 RXB0 RXB1 RXB2 RXB3 RXB4 RXB5 RXB6 RXC0 RXC1 RXC2 RXC3 RXC4 RXC5 RXC6 RXD0 RXD1 RXD2 RXD3 RXD4 RXD5 RXD6 RXE0 RXE1 RXE2 RXE3 RXE4 RXE5 RXE6 JEIDA 6 bit/color R0 R1 R2 R3 R4 R5 G0 G1 G2 G3 G4 G5 B0 B1 B2 B3 B4 B5 HSYNC VSYNC DE VESA 8 bit/color 10 bit/color 8 bit/color 10 bit/color R2 R4 R0 R0 R3 R5 R1 R1 R4 R6 R2 R2 R5 R7 R3 R3 R6 R8 R4 R4 R7 R9 R5 R5 G2 G4 G0 G0 G3 G5 G1 G1 G4 G6 G2 G2 G5 G7 G3 G3 G6 G8 G4 G4 G7 G9 G5 G5 B2 B4 B0 B0 B3 B5 B1 B1 B4 B6 B2 B2 B5 B7 B3 B3 B6 B8 B4 B4 B7 B9 B5 B5 HSYNC HSYNC HSYNC HSYNC VSYNC VSYNC VSYNC VSYNC DE DE DE DE R0 R2 R6 R6 R1 R3 R7 R7 G0 G2 G6 G6 G1 G3 G7 G7 B0 B2 B6 B6 B1 B3 B7 B7 N/A N/A N/A N/A R0 R8 R1 R9 G0 G8 G1 G9 B0 B8 B1 B9 N/A N/A 58. UFG Console User Manual 59. UFG Console User Manual APPENDIX F: UNIGRAF RAW FILE FORMAT This is the description of the RAW file format that UFG Console uses when saving snapshots or captured frames. The first 12 bytes of the file form the file header. The tables below describe the header and the image data. All fields that have more than 1 byte are stored in little-endian order. Description of the header: Offset 0 1 2 4 8 Size 1 1 2 4 4 Description Color depth per channel. Either 8 or 16 Color space identifier. See below Reserved, must be zero Image width, in pixels Image height, in lines Description of color space identifiers, channel counts and data order: Identifier Color mode 0 1 2 RGB 4:4:4 YCbCr 4:4:4 YCbCr 4:2:2 Nr. of channels 3 3 4 Channel data order Red, Green, Blue Cr, Y, Cb Cb, Y(Even), Cr, Y(Odd) UFG Console (Release 2.5) supports RGB 4:4:4 (18, 24, 30 and 36 bpp) and YCbCr 4:4:4 (18, 24, 30 and 36 bpp) 60.