1
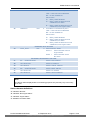
SCMM System Control and Monitoring Module for EPON with OCMR Product User Manual Offices: China, Beijing : tel. +86-10-5791-0655 Americas, Florida : tel. +1-703-579-6777 AsiaPac, Melbourne : tel. +61-3-9780-5100 Australia, Melbourne : tel. +61-3-9780-5100 EMEA, Netherlands : tel. +31-36-536-8011 [email protected] www.pbnglobal.com © 2011 Pacific Broadband Networks. All rights reserved. Downloaded 12.10.2011 by [email protected]. Reproduction without consent is prohibited. SCMM Product User Manual SCMM System Control and Monitoring Module for EPON with OCMR Product User Manual Last update 21 September 2011 Document version 3d Document reference PBN.SCMM - Manual V3d - Released 21 Sep 11 Document status Released Prepared by Pacific Broadband Networks Prepared for Product Users Page 2 of 36 21 September 2011 Pacific Broadband Networks Downloaded 12.10.2011 by [email protected]. Reproduction without consent is prohibited. SCMM Product User Manual Contents 1 Precautions ...................................................................................................................................... 5 2 Introduction ....................................................................................................................................... 6 3 4 2.1 Overview .................................................................................................................................. 6 2.2 Features ................................................................................................................................... 6 2.3 Models and Options ................................................................................................................. 6 Installation ........................................................................................................................................ 7 3.1 Equipment Inventory ................................................................................................................ 7 3.2 Packaging and Transportation................................................................................................. 7 3.3 Power and Cooling Requirements ........................................................................................... 7 3.4 Module Installation and Adjustment ........................................................................................ 8 3.4.1 SCMM in OCMR Chassis .................................................................................................... 8 3.4.2 OCMR, SCMM and QOLTM Connections ........................................................................... 8 3.5 SCMM First Time Configuration ............................................................................................ 10 3.6 Using the Command Line Interface ....................................................................................... 12 3.7 Common tasks using the CLI ................................................................................................ 12 3.7.1 Displaying all connected OLT / ONU devices ................................................................... 12 3.7.2 Displaying specific OLT / ONU device information ............................................................ 13 3.7.3 Viewing the SCMM Log ..................................................................................................... 13 3.7.4 Setting 4100 bandwidth limits ............................................................................................ 13 3.7.5 Setting 4100 port-based VLAN .......................................................................................... 14 3.7.6 Setting GEPON-1000 bandwidth limits ............................................................................. 14 3.7.7 Setting GEPON-1000 port-based VLAN ........................................................................... 14 3.8 Front Panel Description ......................................................................................................... 15 3.9 Rear Panel Description .......................................................................................................... 16 3.10 Application Examples ............................................................................................................ 17 Technical Description ..................................................................................................................... 18 4.1 Overview ................................................................................................................................ 18 4.2 SNMP Agent .......................................................................................................................... 19 4.3 Management Software .......................................................................................................... 19 4.3.1 NMS3 Netcraft ................................................................................................................... 19 4.3.2 NMS3 Enterprise II ............................................................................................................ 19 4.3.3 NMS3 EPSM...................................................................................................................... 19 4.3.4 3 Party Management Software ........................................................................................ 19 4.4 5 rd Link Status Monitoring and Alarms ........................................................................................ 20 Software Description – Operation .................................................................................................. 21 5.1 SCMM – OCM Interface ........................................................................................................ 21 5.1.1 Factory Defaults................................................................................................................. 21 5.1.2 OCM Program Structure .................................................................................................... 22 Pacific Broadband Networks 21 September 2011 Downloaded 12.10.2011 by [email protected]. Reproduction without consent is prohibited. Page 3 of 36 SCMM Product User Manual 5.2 OCM User Interface Lock for Control Variable Access ......................................................... 23 5.2.1 Unlock access to CONTROL variables ............................................................................. 23 5.2.2 Lock access to CONTROL variables ................................................................................. 23 5.3 OCM Programming Sequence for the SCMM ....................................................................... 24 5.3.1 Select the SCMM and view its parameters ....................................................................... 24 5.3.2 Turn on/off link monitoring ................................................................................................. 25 5.4 5.4.1 SCMM - EPON Interface ....................................................................................................... 26 Factory Defaults................................................................................................................. 26 5.5 SCMM Command Line Interface ........................................................................................... 27 5.6 SNMP Management .............................................................................................................. 27 5.6.1 MIB Table .......................................................................................................................... 27 5.7 SCMM, OLT and ONU Field Upgrade ................................................................................... 28 5.8 Forgot the SCMM PORT1 IP Address Settings? .................................................................. 28 5.9 SCMM Parameter List and Alarm Limits ............................................................................... 30 6 Specifications ................................................................................................................................. 32 7 Product Warranty ........................................................................................................................... 33 8 Declaration of Conformity ............................................................................................................... 34 9 Notes .............................................................................................................................................. 35 Page 4 of 36 21 September 2011 Pacific Broadband Networks Downloaded 12.10.2011 by [email protected]. Reproduction without consent is prohibited. SCMM Product User Manual 1 Precautions WARNING! This equipment is intended for indoor applications. To prevent fire or electrical shock, or permanent damage to the product, do not expose units to water or moisture. Ensure adequate cooling and ventilation as specified. The product user manual should be read and understood before units are put into use. Do not operate the unit without all covers and panels properly installed. Cleaning Use only a damp cloth for cleaning the front panel. Do not use spray cleaner of any kind. Overloading Overloading wall outlets and extension cords can result in a risk of fire or electric shock. Use approved electrical cords. Damage requiring service Unplug unit and refer servicing to Pacific Broadband Networks qualified service personnel only. Servicing Do not attempt to service this unit yourself. Refer all servicing to Pacific Broadband Networks qualified service personnel only. Pacific Broadband Networks 21 September 2011 Downloaded 12.10.2011 by [email protected]. Reproduction without consent is prohibited. Page 5 of 36 SCMM Product User Manual 2 Introduction 2.1 Overview The PBN System Control and Monitoring Module (SCMM) for OCM/EPON can manage up to 32 Optical Line Terminal ports. The total number of ONUs managed is 2,048 with 64 ONUs per Optical Line Terminal port, or 1,024 with 32 ONUs per Optical Line Terminal port. Multiple modules can be networked for larger deployments. The SCMM allows remote control, monitoring and provisioning via SNMP, making provisioning services easy for external billing/provisioning systems and/or a Network Operating Centre (NOC). Sophisticated diagnostics services are available for easy fault-finding and for automated network audits. Setting up of guaranteed bandwidth and VLANs in an EPON system is straightforward using the SCMM module. 2.2 Features Sophisticated EPON system controller module. Auto-configuration of OLT and ONU using stored templates. Auto-configuration of replacement OLT modules in the same OCMR slot. Supports remote configuration and diagnostics of EPON equipment. Supports 3 party provisioning and billing systems with SNMP. Powerful processor with solid-state data storage. Dual 10/100 Mbps network ports. Powered from the OCMR system. Remote software upgrade. 2.3 rd Models and Options Model code: SCMM System Control and Monitoring Module for EPON with OCMR Page 6 of 36 21 September 2011 Pacific Broadband Networks Downloaded 12.10.2011 by [email protected]. Reproduction without consent is prohibited. SCMM Product User Manual 3 Installation 3.1 Equipment Inventory On receiving your new SCMM, you should carefully unpack and examine the contents for loss or damage that may have occurred during shipping. Refer to warranty registration if loss or damage has occurred. The SCMM will consist of the following: Qty 1 1 SCMM module Product User Manual (includes individual Certificate of Performance) Warranty registration certificate 1 Utility CD 1 3.2 Description Packaging and Transportation Keep all packing boxes and packaging of the SCMM for future transport. Use only the original packaging of the SCMM when transporting. This packaging has been specifically designed to protect the equipment. 3.3 Power and Cooling Requirements The power required by the SCMM is supplied by the OCM. The SCMM and its corresponding OCM chassis should be located in an environment not exceeding a temperature range from 0 to 45 °C with the OCM fans running. If the internal module temperature (parameter P06) exceeds 70 °C, the module will activate an urgent alarm through the system. Should the temperature exceed the above limits then the OCM should be relocated in the equipment rack where the ambient temperature will be less than 45 °C. The OCM chassis should have adequate ventilation clearance as required. See the installation and operating instructions for your OCM chassis. Pacific Broadband Networks 21 September 2011 Downloaded 12.10.2011 by [email protected]. Reproduction without consent is prohibited. Page 7 of 36 SCMM Product User Manual 3.4 Module Installation and Adjustment 3.4.1 SCMM in OCMR Chassis Installing the SCMM Hold the module upright and aligned to the OCM slide rails and slowly insert the module until it is properly seated in the chassis. Do not use excessive force when inserting module. CAUTION: If excessive force is required to insert the module, then it may not be correctly seated in the slide rails. Tip: When inserting the module into the guide rails, vertically tilt the module slightly to check that the guides are properly seated on the rails. Once the module is fully seated within the chassis, screw in the two front panel screws, finger-tight only, to secure the module to the chassis. When the SCMM is powered on, the front-panel POWER / ALARM LED indicator should remain green. 3.4.2 OCMR, SCMM and QOLTM Connections Connect: OCMR RJ-45 Ethernet Port (see Rear Panel Layout in OCMR Manual) SCMM PORT1 Ethernet Port (see Front Panel Description section) to a subnet used for network management such as NetCraft, NMS3 Enterprise, NMS3 EPSM and 3rd Party Management Software. Multiple SCMM PORT1 Ethernet Ports from different OCMR chassis can be connected to the same subnet, provided proper IP address configuration has been carried out on port 1. Connect: SCMM PORT2 Ethernet Port (see Front Panel Description section) QOLTM CRAFT Ethernet Port (see Rear Panel Layout in QOLTM Manual) to a local Network Switch not connected to any other management subnet. This connection is only used locally by SCMM and QOLTM in the same OCMR chassis. CAUTION: The SCMM PORT2 Ethernet Port has a DHCP Server running on subnet 192.168.254.0 / 24 by default. Therefore, it is not possible to connect multiple SCMM PORT2 Ethernet Ports from a different OCMR chassis to the same Network Switch. Page 8 of 36 21 September 2011 Pacific Broadband Networks Downloaded 12.10.2011 by [email protected]. Reproduction without consent is prohibited. SCMM Product User Manual Refer to the OCMR, SCMM and QOLTM Network Connection diagram below. The SCMM needs to be configured for the first time before it can be operated. Refer to Section 3.5 – SCMM First Time Configuration. Notes: The SCMM PORT1 IP Address has to be a static IP address. It does not support a DHCP Client. The SCMM PORT2 has a DHCP Server running. Its default configuration can be found in Section 5.4.1 – Factory Defaults for SCMM – EPON Interface. It is not necessary to reconfigure the DHCP Server as it is only used internally by the SCMM for managing connected QOLTMs. Only EPON devices local to the OCM should have a connection to this subnet e.g. SCMM, QOLTM, OLTM. It is a requirement that the SCMM has to be notified to which OCMR it belongs. See Section 3.5 – SCMM First Time Configuration. The suggested OCMR setting is to use a static IP address to prevent invalid configuration of the SCMM, as a result of DHCP requests changing the IP address. Refer to the OCMR Manual for information on how to change the setting to use a static IP address. OCMR, SCMM and QOLTM Network Connection Diagram The following diagram illustrates the connection between more than one OCMR, SCMM, QOLTMs and the Network Management Software: Pacific Broadband Networks 21 September 2011 Downloaded 12.10.2011 by [email protected]. Reproduction without consent is prohibited. Page 9 of 36 SCMM Product User Manual 3.5 SCMM First Time Configuration Before the SCMM can be operated successfully, it needs to be configured for the first time. The following steps are necessary to configure the SCMM: 1. Switch on the power to the OCMR chassis. 2. Insert the SCMM into the OCMR to power it up. It is recommended that you insert the SCMM into slot 1 of the OCMR chassis. 3. On the LCD panel, select the slot where the SCMM resides. See Section 5.3.1 for information on how to select the SCMM and view its operating parameters. 4. Once the SCMM is selected, scroll to parameters P28 and P29. See Section 5.9 – SCMM Parameter List and Alarm Limits. 5. Take note of both parameters, as their values will be used later. P28 should display the IP address of SCMM PORT1 and P29 should display the Subnet address of SCMM PORT1. Note: If either P28 or P29 are not showing the IP/Subnet address, allow up to two minutes for the SCMM to boot up completely. 6. Prepare a PC/Laptop with a configurable LAN IP address. 7. Configure the LAN IP address to be in the same subnet as SCMM PORT1. The factory default IP address of SCMM PORT1 is 192.168.35.254 and its subnet is 192.168.35.0. 8. Connect the PC/Laptop ETH PORT to SCMM PORT1 either via a switch or cross-over cable. 9. Open up a Telnet application and telnet into port 23 of SCMM PORT1 IP Address. On Windows XP, C:\Windows\System32\telnet, HyperTerminal or CMD is sufficient. 10. Access SCMM PORT1 via its IP address (as seen from parameter P28). The example below shows this by using the Command Prompt on Windows XP. Microsoft Windows XP [Version 5.1.2600] (C) Copyright 1985-2001 Microsoft Corp. C:\>telnet 192.168.35.254 11. Enter admin for both the User Name and Password when prompted. Page 10 of 36 21 September 2011 Pacific Broadband Networks Downloaded 12.10.2011 by [email protected]. Reproduction without consent is prohibited. SCMM Product User Manual 12. Once the telnet application has accessed the SCMM, type systemShow. This displays the current settings in the SCMM. Below are the factory default settings. PBN>>systemShow System Description : PBN EPON System System ObjectID : 1.3.6.1.4.1.11606.20.2.0 System Contact : [email protected] System Name : linux System Location : pbn Calendar Time : 00:29:20 1970-01-01 TFTP IP : 192.168.35.1 IP Address : 192.168.35.254 IP Mask : 255.255.255.0 Gateway : 192.168.35.1 OCMR IP : 0.0.0.0 OCMR Community Name : public 13. You need to enter the following commands. Replace the command arguments, described in parentheses ( ), to suit your system. PBN>> PBN>> PBN>> PBN>> PBN>> systemModify systemModify systemModify systemModify systemModify contact (new contact) contact (new contact) name (new name) name (new (new name) location location) PBN>> PBN>> PBN>> PBN>> systemModify systemModify systemModify systemModify location (new (current location) calendarTime date/time: HHMMSSYYYYMMDD) calendarTime (current time date: HHMMSSYYYYMMDD) tftpIp (new TFTP server IP / address: aaa.bbb.ccc.ddd) PBN>> PBN>> PBN>> PBN>> systemModify systemModify systemModify systemModify tftpIp (new TFTP ETH server IP IP address: aaa.bbb.ccc.ddd) ipAddress (SCMM PORT1 Address: aaa.bbb.ccc.ddd) ipAddress (SCMM ETH PORT1 IP Address: aaa.bbb.ccc.ddd) ipMask (SCMM ETH PORT1 Subnet Mask: aaa.bbb.ccc.ddd) PBN>> PBN>> PBN>> PBN>> systemModify systemModify systemModify systemModify ipMask ETH PORT1 Subnet Mask: aaa.bbb.ccc.ddd) gateway(SCMM (gateway Address: aaa.bbb.ccc.ddd) gateway (gateway Address: aaa.bbb.ccc.ddd) ocmrIp (OCMR IP Address this SCMM resides: aaa.bbb.ccc.ddd) PBN>> (OCMR IP Address resides: PBN>> systemModify systemModify ocmrIp ocmrCommunity (OCMR SNMPthis Get SCMM Community thisaaa.bbb.ccc.ddd) SCMM resides) PBN>> systemModify ocmrCommunity (OCMR SNMP Get Community this SCMM resides) Notes: The OCMR IP Address can be retrieved via the LCD Panel by selecting M0 (Module 0) and then selecting parameter P5. The OCMR SNMP Get Community can be retrieved via http request to the web server in the OCMR e.g. http://192.168.254.40 (this example shows the OCMR has an IP address of 192.168.254.40). The OCMR IP address and SNMP Get Community are very important settings. Ensure to get/set the OCMR IP address and SNMP Get Community correctly. Failure to do so will render the SCMM inoperative. 14. Reboot the SCMM by typing reboot and then y to confirm. PBN>>reboot Reboot? [y/n]: y 15. For further SCMM settings, the PC/Laptop LAN IP address needs to be configured to be in the same subnet as the newly configured SCMM. Pacific Broadband Networks 21 September 2011 Downloaded 12.10.2011 by [email protected]. Reproduction without consent is prohibited. Page 11 of 36 SCMM Product User Manual 3.6 Using the Command Line Interface The full list of available commands can be found in the PBN SCMM Command Line Interface manual. The following tips can be used to efficiently manage your time and effort when using the command lines. Note: Command Line Interface will now be abbreviated to „CLI‟. When there is more than one page of information to display, the CLI will pause and wait for you to press SPACE to continue (the prompt will appear as a colon „:‟). You can return to the command prompt by pressing „q‟. By typing part of a command and pressing TAB, the CLI will complete the rest of the command for you or, if there are more options, will show the available options. Typing an incomplete command and pressing enter will display advice on how to complete the command. Commands are not case-sensitive. 3.7 Common tasks using the CLI Using the CLI you can: Display all connected OLT / ONU devices Display specific OLT / ONU device information View the SCMM log Set 4100 bandwidth limits Set 4100 port-based VLAN Set GEPON-1000 bandwidth limits Set GEPON-1000 port-based VLAN Note: Refer to the PBN SCMM CLI manual for information regarding command usage. 3.7.1 Displaying all connected OLT / ONU devices Provided the physical network is set up correctly, the SCMM will automatically detect and connect to all OLTM and QOLTM devices on the network. This can be verified using one of the following commands: boardshow all oltShow systemInfo all oltShow configInfo all The same method applies to ONU devices. Use the following command: onuShow configInfo all ONU devices are indexed by SLOT No. / PON No. / ONU INDEX No. and can be mapped to their MAC addresses using this table. All SCMM commands use this X/X/X index, rather than the MAC address, to identify a unit. Page 12 of 36 21 September 2011 Pacific Broadband Networks Downloaded 12.10.2011 by [email protected]. Reproduction without consent is prohibited. SCMM Product User Manual 3.7.2 Displaying specific OLT / ONU device information Use the OLT/ONU index to display information about a specific device: oltShow systemInfo display <X/X> oltShow configInfo display <X/X> (Refer to page 29 of the PBN SCMM CLI manual.) onuShow configInfo display <X/X/X> onuShow chipInfo display <X/X/X> 3.7.3 Viewing the SCMM Log The log file is another good way to check the connection of an OLT or ONU device. Use the following command: logShow all If there are multiple pages to the log entry, press SPACE to show the next page of the log. Press „q‟ to return to the command line. 3.7.4 Setting 4100 bandwidth limits This can become very complex, depending on whether you want to set link-based or port-based bandwidth policies. Adjusting link policies will set the optical line speed etc. to the ONU. Below are the basic instructions for port-based bandwidth policies: You will need to add another level to the index, so that it addresses the specific port of the ONU: SLOT No. / PON No. / ONU INDEX No. / PORT No. <X/X/X/X> Downstream: onuPortPolicyModify egressMaxRate <X/X/X/X> <rate> dbsave Upstream: onuPortPolicyModify ingressMaxRate <X/X/X/X> <rate> dbsave The rate in both cases is in kbps. To show the port bandwidth policies are in place: onuPortPolicyShow all onuPortPolicyShow display <X/X/X/X> Pacific Broadband Networks 21 September 2011 Downloaded 12.10.2011 by [email protected]. Reproduction without consent is prohibited. Page 13 of 36 SCMM Product User Manual 3.7.5 Setting 4100 port-based VLAN To assign a VLAN ID to a specific port, use the following command: portVlanModify <pvid> <X/X/X/X> dbsave <pvid> is any numeric value between 1 and 4094. To view the VLAN settings: portVlanShow all portVlanShow display <X/X/X/X> 3.7.6 Setting GEPON-1000 bandwidth limits Similar to the 4100 series PORT based settings; the GEPON unit has its SLA configured at a LINK level. The following is a brief list of commands to alter the upstream and downstream bandwidth settings for the user ports on the GEPON-1000, as well as a command to display the current settings. To set link upstream bandwidth: linkSlaModify upMaxShaper maxAllowedBw <X/X/X/X/X> <rate> dbSave linkShow sla display <X/X/X/X/X> To set link downstream bandwidth: linkSlaModify downMaxShaper maxAllowedBw <X/X/X/X/X> <rate> dbSave linkShow sla display <X/X/X/X/X> 3.7.7 Setting GEPON-1000 port-based VLAN There are no port-based commands for setting VLANs at the GEPON-1000 port level. The settings have to be done at the link. The following is a short list of commands used when creating link-based VLANs on the GEPON-1000. linkVlanModify bridgeMode <X/X/X/1/X> sharedVlan svlanCreate <X/X> <vlan-id> svlanMemberAdd <X/X> <vlan-id> <X/X/X/1/X> dbSave Notes: 1. Use 'svlanCreate' only if the VLAN does not already exist. 2. GEPON-1000 port will pass only the specified <vlan-id>. Page 14 of 36 21 September 2011 Pacific Broadband Networks Downloaded 12.10.2011 by [email protected]. Reproduction without consent is prohibited. SCMM Product User Manual 3.8 Front Panel Description Item Description 1 POWER / ALARM DC power and summary alarm LED 2 PORT 1 10/100BaseTX – RJ45 connector (for non-EPON device management network) 3 ACT 1 LED indicator OFF when no activity on port LED indicator flashing when active data transmission 4 LINK 1 5 PORT 2 6 ACT 2 LED indicator OFF when no connection on port LED indicator GREEN when connected to 100 Mbps network LED indicator AMBER when connected to 10 Mbps network 10/100BaseTX – RJ45 connector (for EPON device management network) LED indicator OFF when no activity on port LED indicator flashing when active data transmission 7 LINK 2 8 USB LED indicator OFF when no connection on port LED indicator GREEN when connected to 100 Mbps network LED indicator AMBER when connected to 10 Mbps network Universal Serial Bus port (currently not supported) 9 SCREWS Front panel screws to fix SCMM to OCM Pacific Broadband Networks 21 September 2011 Downloaded 12.10.2011 by [email protected]. Reproduction without consent is prohibited. Page 15 of 36 SCMM Product User Manual 3.9 Rear Panel Description Item 1 Description PROG. DE9 programming port for upgrade of unit software Notes: 2 Page 16 of 36 POWER / DATA BUS requires null modem cable normal software upgrade is via PORT 1 Power and data connection to OCMR 21 September 2011 Pacific Broadband Networks Downloaded 12.10.2011 by [email protected]. Reproduction without consent is prohibited. SCMM Product User Manual 3.10 Application Examples Pacific Broadband Networks 21 September 2011 Downloaded 12.10.2011 by [email protected]. Reproduction without consent is prohibited. Page 17 of 36 SCMM Product User Manual 4 Technical Description 4.1 Overview The SCMM is designed to provide ease of provisioning and management of a Passive Optical Network (PON). It allows remote control, monitoring and provisioning via SNMP. rd The SCMM also provides an API for 3 party management software for external billing/provisioning and/or network operating centre (NOC). SCMM Application Diagram Page 18 of 36 21 September 2011 Pacific Broadband Networks Downloaded 12.10.2011 by [email protected]. Reproduction without consent is prohibited. SCMM Product User Manual 4.2 SNMP Agent The SCMM is supplied as standard with SNMP Agent servicing requests via LAN from management software. It supports full featured remote provisioning and monitoring of EPON devices connected to SCMM. The SNMP Agent includes MIB Tables and is compatible with standard SNMP based management rd packages which allow 3 party software to interact with SCMM whether it is for monitoring, provisioning or billing purposes. The MIB Tables can be found on the Utility CD provided. 4.3 Management Software 4.3.1 NMS3 Netcraft The OCMR front panel displays the internal features of the SCMM, such as its temperature, voltages, alarms and so on. NMS3 Netcraft is a free tool to monitor the SCMM from a remote location via the OCMR. 4.3.2 NMS3 Enterprise II The NMS3 Enterprise II management system enables the operator to configure all individual elements of the network, with network tree view for easy navigation and fault-finding. Parameters of the SCMM can be monitored and changed via the Netcraft interface, and individual ONUs configured using the EPON-EMS interface included with the NMS3 Enterprise II package. 4.3.3 NMS3 EPSM NMS3 EPSM (EPON Provisioning System Management) allows the operator to provision ONUs in batches. This software package communicates with the connected SCMMs via SNMP, which can then relay commands to the ONU hardware. Parameters of the SCMM can be monitored and changed via the Netcraft interface, and individual ONUs configured using the NMS3 EPSM package. 4.3.4 3rd Party Management Software rd 3 Party Management Software for billing and/or provisioning can be integrated into the system and communicates with SCMM via SNMP. MIB tables are provided and can be found on the Utility CD that was supplied with this manual. Pacific Broadband Networks 21 September 2011 Downloaded 12.10.2011 by [email protected]. Reproduction without consent is prohibited. Page 19 of 36 SCMM Product User Manual 4.4 Link Status Monitoring and Alarms The SCMM constantly monitors the parameters of unit temperature and link status. The user can configure the SCMM to monitor the link status using the basic control functions of the OCM system. See Section 5 for more information. The SCMM has the following alarm conditions: Urgent alarm: POWER LED RED An urgent alarm will be triggered under any of the following conditions: Internal temperature of the module has reached 70 ºC. Internal voltage rail has exceeded safe limits. The PON Controller is not operational (i.e. CTRL_STAT is OFF). See Section 5.9 for parameter details. The SCMM raises an urgent alarm condition to the OCM user interface, causing the LCD to flash (at menu item “PBN STATUS”). Non-urgent alarm: POWER LED AMBER A non-urgent alarm will be triggered when there is no connection to a network while link monitoring is enabled. See Section 5.9 for parameter details. Page 20 of 36 21 September 2011 Pacific Broadband Networks Downloaded 12.10.2011 by [email protected]. Reproduction without consent is prohibited. SCMM Product User Manual 5 Software Description – Operation 5.1 SCMM – OCM Interface The basic control functions are similar to all plug-in modules for the OCM. Each module has its own specific parameters and menu item control functions. This section refers specifically to the SCMM. The SCMM software is fully automatic and constantly monitors parameters as outlined in Section 5.9. These parameters are stored in the module‟s EEPROM. Some may be changed via external communications. The program reports any conditions outside pre-set limits by operating the module‟s front-panel alarm LED and also signalling the OCM user interface via the common alarm line. It also receives manual control commands from the OCM keypad, e.g. enable or disable monitoring of network connections. 5.1.1 Factory Defaults The factory default settings are as follows: Setting Value P19: MON_LINKS NO See Section 5.9 - SCMM Parameter List and Alarm Limits for parameter lists and details. Pacific Broadband Networks 21 September 2011 Downloaded 12.10.2011 by [email protected]. Reproduction without consent is prohibited. Page 21 of 36 SCMM Product User Manual 5.1.2 OCM Program Structure Example shows SCMM module in slot 9. ENTER PBN STATUS NO URGENT ALARM ALARM M9 P01 NO ALARMS KEYPAD on OCM ALARM M9 P00 NO ALARMS ALARM M9 P32 NO ALARMS MODULE M9 P01 SCMM MODULE M9 P01 SCMM CONTROL1 M9 T MON_LINKS NO Z CONTROL2 M9 T NOT_USED A CONTROL1 M9 T MON_LINKS NO Z MODULE M9 P32 192.168.250.0 CONTROL1 M9 T MON_LINKS YES Z CONTROL2 M9 T NOT_USED A CONTROL3 M9 T NOT_USED A CONTROL2 M9 T NOT_USED A CONTROL3 M9 T NOT_USED A LCD on OCM CONTROL3 M9 T NOT_USED A Page 22 of 36 21 September 2011 Pacific Broadband Networks Downloaded 12.10.2011 by [email protected]. Reproduction without consent is prohibited. SCMM Product User Manual 5.2 OCM User Interface Lock for Control Variable Access OCM software version 4.0 and above has a keypad lock and unlock feature for accessing the control variables. This is so that only the trained technician has the ability to change any of the CONTROL variables, restricts an unauthorised person from modifying the control variables, and prevents tampering. The OCM user interface will require the keypad unlock sequence to be input by the user if they intend to access any of the CONTROL variables for any given module. This includes the LCD‟s CONTRAST level. With the keypad locked, the user has access to the following menu items only: PBN STATUS, ALARMS and MODULES. When the keypad is unlocked, access to CONTROL1, CONTROL2 and CONTROL3 becomes available. 5.2.1 Unlock access to CONTROL variables 1. Ensure that the display is at the home screen with PBN STATUS displayed. If you are not sure of your location in the menu, press ENTER twice to go to the home screen. 2. Press the right arrow key four times. 3. Press ENTER once. You now have full access to the CONTROL menu items. The interface is in its unlocked condition. The user has access to six menu items. They are: PBN STATUS, ALARMS, MODULES, CONTROL1, CONTROL2 and CONTROL3. 5.2.2 Lock access to CONTROL variables There are three ways to lock access to CONTROL variables: Resetting the power Automatic time-out Manual operation By resetting the power, the interface will start up in the locked condition by default. Automatic time-out happens when there has been no activity (key pressing) for 15 minutes. This will also bring the display back to the PBN STATUS menu. Manual Operation 1. Ensure that the display is at the home screen with PBN STATUS displayed. If you are not sure of your location in the menu, press ENTER twice to go to the home screen. 2. Press the left arrow key once. 3. Press ENTER once. You have now locked access to the CONTROL menu items. Pacific Broadband Networks 21 September 2011 Downloaded 12.10.2011 by [email protected]. Reproduction without consent is prohibited. Page 23 of 36 SCMM Product User Manual 5.3 OCM Programming Sequence for the SCMM The user has the ability to perform the following functions on the SCMM switching module via the OCM user interface: Select the SCMM and view its parameters; Turn on/off link monitoring. 5.3.1 Select the SCMM and view its parameters For a full list and explanation of the parameters used in the module refer to Section 5.9 - Parameter List and Alarm Limits. Module number Parameter number Menu item ENTER MODULE SCMM Parameter displayed at P01 M9 P01 Scroll down to menu item MODULE using the Place the cursor at MX using the key, where X represents the slot number on the chassis, into which the module is inserted. Select the module number you want using the select M9. Move the cursor to PXX using the Press the or key. or keys, e.g. if SCMM is in slot 9, key, where XX represents a parameter from 01 to 32. keys to scroll through the parameter list and values. Note: The OCMR has four lines of text on its LCD; therefore more information may be displayed than shown in the image above. For more information please refer to the OCMR manual. Page 24 of 36 21 September 2011 Pacific Broadband Networks Downloaded 12.10.2011 by [email protected]. Reproduction without consent is prohibited. SCMM Product User Manual 5.3.2 Turn on/off link monitoring Link monitoring will be in the default state of NO (OFF) when the SCMM is first powered up. To toggle this setting, follow these steps: Module number TOGGLE “T”, toggles YES or NO Menu item ENTER CONTROL1 M9 T MON_LINKS NO Z Link Monitor, set to YES or NO Scroll down to menu item CONTROL1 using the Place the cursor at T using the Press the MON_LINKS will change accordingly. Switch to YES to turn link monitoring ON. Switch to NO to turn link monitoring OFF. or Pacific Broadband Networks key. key. key to toggle between YES and NO. 21 September 2011 Downloaded 12.10.2011 by [email protected]. Reproduction without consent is prohibited. Page 25 of 36 SCMM Product User Manual 5.4 SCMM - EPON Interface SCMM-EPON management has a separate engine from SCMM-OCM. The SCMM-EPON engine provides monitoring and provisioning of EPON related matter and is accessible via: Command Line Interface (CLI) SNMP Agent using MIB Tables provided on the Utility CD 5.4.1 Factory Defaults The factory default settings are as follows: Setting Factory Default General User Name: admin Password: admin System Information System Description: PBN EPON System System ObjectID: .1.3.6.1.4.1.11606.20.2.0 System Contact: [email protected] System Name: linux System Location: pbn OCMR Information (inside SCMM) OCMR IP: 0.0.0.0 OCMR Community Name: public TFTP TFTP IP: 192.168.35.1 ETH PORT1 IP Address: 192.168.35.254 Subnet Mask: 255.255.255.0 Configuration Mode: Static IP address (only for non-EPON device management networks) ETH PORT2 IP Address: 192.168.254.50 Subnet Mask: 255.255.255.0 Configuration Mode: Running DHCP server (only for EPON device management networks) DHCP Server Configuration: Start IP: 192.168.254.100 End IP : 192.168.254.200 SNMP SCMM Get Community Name: public SCMM Set Community Name: private Page 26 of 36 21 September 2011 Pacific Broadband Networks Downloaded 12.10.2011 by [email protected]. Reproduction without consent is prohibited. SCMM Product User Manual 5.5 SCMM Command Line Interface The CLI is accessible via any telnet application such as Putty, TeraTerm, HyperTerminal or even the command line telnet usually found in C:\Windows\System32\telnet in Windows XP. The default telnet port to access CLI is 23. To gain access to CLI, a telnet into the SCMM PORT1 IP address is required. The following shows an example of how to access the CLI of the SCMM with an IP address of 192.168.35.254: For the complete CLI manual, please refer to the Utility CD provided, in folder \Command. 5.6 SNMP Management Please refer to Section 3.5 – SCMM First Time Configuration to establish connection with the SCMM. 5.6.1 MIB Table Please refer to the Utility CD provided, in folder \MIB. Pacific Broadband Networks 21 September 2011 Downloaded 12.10.2011 by [email protected]. Reproduction without consent is prohibited. Page 27 of 36 SCMM Product User Manual 5.7 SCMM, OLT and ONU Field Upgrade The SCMM includes a feature to perform application upgrades remotely, whether it is for the SCMM itself, an OLT or ONU. This functionality requires a TFTP server hosting the latest application binary. To upgrade the application using CLI: 1. You will be given an application update as a binary file, named: scmm_app for SCMM oltXXX.tkf for OLT onuXXX.tkf for ONU 2. Copy the file into the TFTP base directory. 3. Ensure the SCMM has been configured to use the correct TFTP server. Refer to the “systemShow” and “systemModify” commands in the CLI manual for more information. 4. Enter: “download firmware” to upgrade the SCMM application. “download oltXXX.tkf” then “upgrade X oltXXX.tkf” to upgrade the OLT(s) in a particular QOLTM. Note: There are two OLTs in QOLTM-4 and only one OLT in the QOLTM-2 model. “download onuXXX.tkf” then “upgrade X/X/X onuXXX.tkf” to upgrade a particular ONU. Refer to the CLI manual for more information on the “download” and “upgrade” commands. 5.8 Forgot the SCMM PORT1 IP Address Settings? There may be a situation when the SCMM PORT1 IP address record is lost and prevents any access to the SCMM. If this happens, there are various methods you can use to retrieve the lost SCMM PORT1 IP address. Option 1: Use the OCMR‟s keypad and LCD to select the SCMM and show parameters P28 and P29 (PORT1 IP address and PORT1 subnet address respectively). Parameters P31 and P32 (PORT2 IP address and PORT2 subnet address respectively) can also be shown. For information on how to use the OCMR keypad and LCD, refer to Section 5.3.1. Option 2: Use the HTTP web interface of the OCMR to view the SCMM module‟s parameters. Refer to the OCMR Product User Manual for details. Option 3: Use PBN‟s NMS3-Netcraft software to view the SCMM module‟s parameters. Refer to the NMS3Netcraft Product User Manual for details. Page 28 of 36 21 September 2011 Pacific Broadband Networks Downloaded 12.10.2011 by [email protected]. Reproduction without consent is prohibited. SCMM Product User Manual Option 4: 1. Connect a Laptop/PC to SCMM PORT2 either via a switch or cross-over cable. 2. Let the ETH PORT of the Laptop/PC retrieve the IP address via DHCP request. 3. SCMM PORT2 runs DHCP Server by default. If it has not been turned off before, or is using factory default settings, your Laptop/PC will be assigned an IP address in the range of 192.168.254.100 – 192.168.254.200. 4. Telnet into 192.168.254.50. This is the IP address of SCMM PORT2. You can then log in and retrieve the SCMM PORT1 IP address setting via the command “systemShow”. If your Laptop/PC is assigned an IP but not in the range of 192.168.254.100 – 192.168.254.200 (due to previous configuration done on DHCP Server): 5. Disconnect other devices except your Laptop/PC on the same subnet as SCMM PORT2. 6. Ping all IP addresses in the subnet assigned to your Laptop/PC. If there is any reply to the ping command, it is safe to assume it is SCMM PORT2 IP address. 7. Go to step 4 above and replace the IP address mentioned with the discovered IP address. If your Laptop/PC fails to retrieve an IP address, try Option 2 below. Option 5: This option requires a null modem cable to be used. Null modem cables are widely available in many stores. Ensure correct male/female connectors to suit the SCMM PROG. PORT (on rear panel) and your Laptop/PC‟s COM PORT. 1. Connect one end of the null modem cable to the SCMM PROG. PORT and the other end to your Laptop/PC‟s COM PORT. 2. Open HyperTerminal (Windows XP) or your favourite terminal application running on the COM PORT. 3. Set the following COM PORT settings to: 4. Baudrate: 115200 Data buts: 8 Parity: none Stop bits: 1 Flow Control: none Click “Connect” and press “ENTER” This should display the same command prompt, just as if you were accessing it through the telnet application. You can then log in and retrieve the SCMM PORT1 IP address setting via the command “systemShow”. Pacific Broadband Networks 21 September 2011 Downloaded 12.10.2011 by [email protected]. Reproduction without consent is prohibited. Page 29 of 36 SCMM Product User Manual 5.9 SCMM Parameter List and Alarm Limits Parameter Display (examples) Description 01 SCMM Model Number of unit 02 S/N 0101218 Serial Number of unit 03 S06854 04 A01477 05 SLOT_NUM 5 06 MOD_TEMP 25.0C V1.00 Firmware version installed in unit PBN‟s part number of Module O Slot number of unit inside chassis. Set by bus plane of OCM Temperature inside module, O= ok (0 – 70 °C) or 07 RL26V5 32.6V O U = urgent alarm (>70 °C) Voltage level of 26.5V rail O = ok (20 – 38Vdc) or 08 RL5V0 18.5V O U = urgent alarm (>38 Vdc) or (<20 Vdc) Voltage of 5.0V rail O = ok (4.5 – 5.5Vdc) or 09 DC_SPLY 5.0V O U = urgent alarm (>5.5 Vdc) or (<4.5 Vdc) Voltage level of 5.0Vdc Supply O = ok (4.5 – 5.5Vdc) or U = urgent alarm (>5.5 Vdc) or (<4.5 Vdc) Parameters 10 to 14 are not used 15 ALM_R 16 ALM_G 17 COM_ALM 18 MON_STAT 19 MON_LINKS Page 30 of 36 OFF Z Summary alarm LED, red indicator OFF – No alarm ON – urgent if P16 is OFF ON – non-urgent if P16 is ON ON Z Summary alarm LED, green indicator ON – No alarm if P15 is OFF ON – non-urgent if P15 is ON OFF – urgent if P15 is ON NO Z Common urgent alarm NO = No alarm ALM = Alarm NO Z Setting for link monitoring (read only – controlled by Parameter 19) NO = link monitoring disabled YES = link monitoring enabled NO Z Setting for link monitoring. Enables alarms on Parameters 21 and 22. NO = link monitoring disabled YES = link monitoring enabled Parameter 20 is not used 21 September 2011 Pacific Broadband Networks Downloaded 12.10.2011 by [email protected]. Reproduction without consent is prohibited. SCMM Product User Manual 21 LINKACT1 22 LINKACT2 24 CTRL_STAT 27 M1 28 192.168.35.254 PORT1 IP address 29 192.168.35.0 PORT1 Subnet address 30 M2 PORT 2 MAC address 31 192.168.254.50 PORT 2 IP address 32 192.168.254.0 PORT 2 Subnet address YES Z Link status on the Ethernet port 1 YES = a link has been established NO = no link established Alarm status: Z = MON_LINKS disabled O = MON_LINKS enabled and link established, No Alarm. N = MON_LINKS enabled and no link established, Non-Urgent Alarm YES Z Link status on the Ethernet port 2 YES = a link has been established NO = no link established Alarm status: Z = MON_LINKS disabled O = MON_LINKS enabled and link established, No Alarm. N = MON_LINKS enabled and no link established, Non-Urgent Alarm Parameter 23 is not used OFF U PON Controller Status OFF/U = PON Controller Inactive Urgent Alarm ON/O = PON Controller Active No Alarm Parameters 25 and 26 are not used 0000FFFF99AB 0000FFFF99AB PORT1 MAC address Note: The above values displayed are for monitoring purposes only and may vary in accuracy up to 10%. Status character definitions “O” indicates “Normal” “N” indicates “Non-urgent Alarm” “U” indicates “Urgent Alarm” “Z” indicates “No Alarm State” Pacific Broadband Networks 21 September 2011 Downloaded 12.10.2011 by [email protected]. Reproduction without consent is prohibited. Page 31 of 36 SCMM Product User Manual 6 Specifications General Power: From OCMR chassis Power consumption: 20 W Temperature range Operating: 0 C to +45 C Storage: -20 C to +60 C Software Standards IEEE802.3ah DOT3-EPON-MIB DOT3-OAM-MIB RFC 1157 SNMPv1 RFC 1213 MIB II RFC 1215 Traps RFC 1493 Bridge RFC 1643 Ether-like MIB RFC 1901 SNMPv2 RFC 2233 IF-MIB RFC 2236 IGMP v2 RFC 2274 SNMP v3 RFC 2674 P-BRIDGE-MIB RFC 2674 Q-BRIDGE-MIB RFC 4133 ENTITY-MIB Interface Network interface 2 x 10/100BaseTX RJ45 Serial interface 1 x RS232 programming port 1 x USB port OLT Support OLTM Optical Line Terminal Module (1 x GEPON port) QOLTM-2 Dual Optical Line Terminal Module (2 x GEPON ports) QOLTM-4 Quad Optical Line Terminal Module (4 x GEPON ports) ONU Support 4100 Series FTTH CPE - 4100, 4100T, 4100V, 4100VT EPON-ONU FTTH CPE - 0-0, 0-V, TV-0, TV-V GEPON-1000 FTTB Terminal - 0, TV, MDU MAU with EPON FTTB Terminal – 1E, 2E Mechanical Dimensions 160 x 44 x 360 mm (H x W x D) Ship size 280 x 70 x 570 mm Weight 1 kg Ship Weight 1.5 kg Page 32 of 36 21 September 2011 Pacific Broadband Networks Downloaded 12.10.2011 by [email protected]. Reproduction without consent is prohibited. SCMM Product User Manual 7 Product Warranty Pacific Broadband Networks warrants its equipment to be free of manufacturing defects in material and workmanship for a period of one year from date of shipment, provided it is installed and operated in accordance with factory recommendations. The liability of Pacific Broadband Networks under this warranty is solely limited to repairing; replacing or issuing credit provided that: 1. The warranty registration has been completed and received by Pacific Broadband Networks. 2. Pacific Broadband Networks‟ helpdesk is promptly notified in writing or by telephone that a failure or defect has occurred. 3. A return authorisation number is obtained from Pacific Broadband Networks‟ helpdesk and clearly marked on the outside of the shipping container and all documents. 4. Customer is responsible for all shipping and handling charges. C.O.D. and freight collect will not be accepted without prior approval from Pacific Broadband Networks‟ helpdesk. 5. The equipment (in PBN‟s sole discretion) has not been abused, misused or operated under conditions outside manufacturer‟s specifications. The warranty does not cover the following: 1. Products purchased from someone other than an authorised Pacific Broadband Networks dealer. 2. Damage caused by accident, negligence, misuse, abuse, improper operation or failure to operate the equipment within the manufacturer‟s specifications. 3. Damage caused by fluctuation in electrical current, lightning, power surges, etc. 4. Damage resulting from overhaul, repair or attempt to repair caused by someone other than Pacific Broadband Networks‟ qualified service personnel. 5. Any product, in which the serial number has been defaced, modified or removed. 6. Any product that has been opened or modified without prior written permission from PBN. 7. Replacement of parts necessitated by normal wear and tear. 8. Any consequential or implied damages. Pacific Broadband Networks 21 September 2011 Downloaded 12.10.2011 by [email protected]. Reproduction without consent is prohibited. Page 33 of 36 SCMM Product User Manual 8 Declaration of Conformity According to ISO/IEC Guide 22 and EN45014 Manufacturer's Name: Pacific Broadband Networks Manufacturer’s Address: 8-10 Keith Campbell Court, Scoresby, Victoria 3179, Australia Declares, that the product Product Name: SCMM – System Control and Monitoring Module for EPON with OCMR Conforms to the following standards: Safety: EN 80083-1, EN 60950, IEC 950, AS/NZS 3260:1993, EN-60825-1, IEC 825-1, AS/NZS 2211.1 Laser Safety EMC: EN 50083-2, EN-55022:1994, IEC/CISPR 22:1993, AS/NZS CISPR 22:2006 CATV/HFC: EN-50083 Supplementary Information: CE This is a class A product. In a domestic environment, this product may cause radio interference in which case the user may be required to take adequate measures. The product herewith complies with the requirements of the following directives and carries the CE-marking accordingly: The EMC Directive 89/336/EEC The Low Voltage Directive 73/23/EEC The product was tested in a typical configuration with Pacific Broadband Networks. FCC WARNING This equipment has been tested and found to comply with the limits for class A device, pursuant to Part 15 of FCC rules. These limits are designed to provide reasonable protection against harmful interference in a commercial installation. This equipment generates uses and can radiate radio frequency and, if not installed in and used in accordance with the instructions, may cause harmful interference to radio communication. Operation of this equipment in a residential area is likely to cause harmful interference, in which case, the user will be required to correct the interference at the user‟s own expense. For Compliance Information ONLY, contact: Australia: Pacific Broadband Networks 8-10 Keith Campbell Court, Scoresby, Victoria 3179, Australia Phone:+61-3-9780-5100, Fax +61-3-9763-5522 Email: [email protected] Europe: Pacific Broadband Networks Phone: +31-36-536-8011, Fax: +31-36-536-4367 Email: [email protected] China: Pacific Broadband Networks Phone: +86-10-5791-0655, Fax: +86-10-5791-0855 Email: [email protected] Americas: Pacific Broadband Networks Americas LLC Phone: +1-703-579-6777 x 567, Fax: +1-703-935-4506 Email: [email protected] Page 34 of 36 21 September 2011 Pacific Broadband Networks Downloaded 12.10.2011 by [email protected]. Reproduction without consent is prohibited. SCMM Product User Manual 9 Notes Pacific Broadband Networks 21 September 2011 Downloaded 12.10.2011 by [email protected]. Reproduction without consent is prohibited. Page 35 of 36 Offices: China, Beijing : tel. +86-10-5791-0655 Americas, Florida : tel. +1-703-579-6777 AsiaPac, Melbourne : tel. +61-3-9780-5100 Australia, Melbourne : tel. +61-3-9780-5100 EMEA, Netherlands : tel. +31-36-536-8011 [email protected] www.pbnglobal.com © 2011 Pacific Broadband Networks. All rights reserved. Downloaded 12.10.2011 by [email protected]. Reproduction without consent is prohibited.