1
Octopus F
IVM V3.0
User Manual
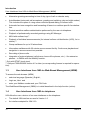
===============!"§===
Nur für den internen Gebrauch
BKTOC.FM
Content
Content
0
1 Introduction . . . . . . . . . . . . . . . . . . . . . . . . . . . . . . . . . . . . . . . . . . . . . . . . . . . . . . . . . . .
1.1 Target Group . . . . . . . . . . . . . . . . . . . . . . . . . . . . . . . . . . . . . . . . . . . . . . . . . . . . . . . . .
1.2 Functions Description/Overview . . . . . . . . . . . . . . . . . . . . . . . . . . . . . . . . . . . . . . . . . .
1.3 User Interfaces from IVM via Web-Based Management (WBM) . . . . . . . . . . . . . . . . . .
1.4 User Interfaces from IVM via telephone. . . . . . . . . . . . . . . . . . . . . . . . . . . . . . . . . . . . .
1.5 Signaling Incoming Messages . . . . . . . . . . . . . . . . . . . . . . . . . . . . . . . . . . . . . . . . . . . .
1.5.1 Visual or Acoustic Signaling . . . . . . . . . . . . . . . . . . . . . . . . . . . . . . . . . . . . . . . . . .
1.5.2 E-mail Signaling . . . . . . . . . . . . . . . . . . . . . . . . . . . . . . . . . . . . . . . . . . . . . . . . . . .
1.6 Integrating Mobile Terminals (Mobility) . . . . . . . . . . . . . . . . . . . . . . . . . . . . . . . . . . . . .
1.6.1 Basic Functions . . . . . . . . . . . . . . . . . . . . . . . . . . . . . . . . . . . . . . . . . . . . . . . . . . . .
1.6.2 Outbound Calls . . . . . . . . . . . . . . . . . . . . . . . . . . . . . . . . . . . . . . . . . . . . . . . . . . . .
11
11
11
12
12
13
13
13
14
14
15
2 General Information on Mailboxes . . . . . . . . . . . . . . . . . . . . . . . . . . . . . . . . . . . . . . . .
2.1 Mailbox Classes. . . . . . . . . . . . . . . . . . . . . . . . . . . . . . . . . . . . . . . . . . . . . . . . . . . . . . .
2.2 Functions Available to Callers . . . . . . . . . . . . . . . . . . . . . . . . . . . . . . . . . . . . . . . . . . . .
2.3 Information Mailboxes . . . . . . . . . . . . . . . . . . . . . . . . . . . . . . . . . . . . . . . . . . . . . . . . . .
2.4 Switchboard / Auto-Attendant Mailbox. . . . . . . . . . . . . . . . . . . . . . . . . . . . . . . . . . . . . .
2.5 Group Mailbox . . . . . . . . . . . . . . . . . . . . . . . . . . . . . . . . . . . . . . . . . . . . . . . . . . . . . . . .
2.6 Distribution of Voice Messages According to Distribution Lists . . . . . . . . . . . . . . . . . . .
2.7 Distribution of Messages to All Mailbox Users. . . . . . . . . . . . . . . . . . . . . . . . . . . . . . . .
2.8 Order of Message Inquiry . . . . . . . . . . . . . . . . . . . . . . . . . . . . . . . . . . . . . . . . . . . . . . .
2.9 Mobility. . . . . . . . . . . . . . . . . . . . . . . . . . . . . . . . . . . . . . . . . . . . . . . . . . . . . . . . . . . . . .
17
17
19
20
21
22
23
23
23
24
3 Mailbox Use and Operation . . . . . . . . . . . . . . . . . . . . . . . . . . . . . . . . . . . . . . . . . . . . . .
3.1 IVM User Interfaces . . . . . . . . . . . . . . . . . . . . . . . . . . . . . . . . . . . . . . . . . . . . . . . . . . . .
3.2 Mailbox Access/Code Numbers . . . . . . . . . . . . . . . . . . . . . . . . . . . . . . . . . . . . . . . . . .
3.3 Navigating through the Mailbox . . . . . . . . . . . . . . . . . . . . . . . . . . . . . . . . . . . . . . . . . . .
3.4 Individual Mailbox Functions . . . . . . . . . . . . . . . . . . . . . . . . . . . . . . . . . . . . . . . . . . . . .
3.4.1 Querying Mailbox Messages . . . . . . . . . . . . . . . . . . . . . . . . . . . . . . . . . . . . . . . . . .
3.4.2 Recording and Selecting Greetings. . . . . . . . . . . . . . . . . . . . . . . . . . . . . . . . . . . . .
3.4.3 Recording a Private Message . . . . . . . . . . . . . . . . . . . . . . . . . . . . . . . . . . . . . . . . .
3.4.4 Setting Control Parameters for Greetings . . . . . . . . . . . . . . . . . . . . . . . . . . . . . . . .
3.4.5 Activating and Deactivating Message Recording . . . . . . . . . . . . . . . . . . . . . . . . . .
3.4.6 Changing the Mailbox Code Number . . . . . . . . . . . . . . . . . . . . . . . . . . . . . . . . . . .
3.4.7 Changing the Code Number for Private Message. . . . . . . . . . . . . . . . . . . . . . . . . .
3.4.8 Notification Call . . . . . . . . . . . . . . . . . . . . . . . . . . . . . . . . . . . . . . . . . . . . . . . . . . . .
3.4.8.1 Activating and Deactivating the Notification Call . . . . . . . . . . . . . . . . . . . . . . .
3.4.8.2 Entering and Selecting Notification Call Number . . . . . . . . . . . . . . . . . . . . . . .
3.4.9 Substitute Function . . . . . . . . . . . . . . . . . . . . . . . . . . . . . . . . . . . . . . . . . . . . . . . . .
3.4.9.1 Activating / Deactivating the Substitute Function . . . . . . . . . . . . . . . . . . . . . . .
3.4.9.2 Selecting and Entering the Substitute’s Extension Number . . . . . . . . . . . . . . .
25
25
25
26
28
28
31
32
33
34
34
34
35
35
35
36
36
37
User Guide
3
BKTOC.FM
Content
Nur für den internen Gebrauch
3.4.10 Setting Up Auto-Attendant Speed-Dialing Destination Numbers . . . . . . . . . . . . .
3.4.11 Selecting a Language for User Prompts. . . . . . . . . . . . . . . . . . . . . . . . . . . . . . . .
3.4.12 Changing a User Name . . . . . . . . . . . . . . . . . . . . . . . . . . . . . . . . . . . . . . . . . . . .
3.5 Mobility . . . . . . . . . . . . . . . . . . . . . . . . . . . . . . . . . . . . . . . . . . . . . . . . . . . . . . . . . . . . .
3.5.1 Basic Functions . . . . . . . . . . . . . . . . . . . . . . . . . . . . . . . . . . . . . . . . . . . . . . . . . . .
3.5.2 Inbound Calls . . . . . . . . . . . . . . . . . . . . . . . . . . . . . . . . . . . . . . . . . . . . . . . . . . . . .
3.5.3 Outbound Calls. . . . . . . . . . . . . . . . . . . . . . . . . . . . . . . . . . . . . . . . . . . . . . . . . . . .
3.5.4 Main Menu . . . . . . . . . . . . . . . . . . . . . . . . . . . . . . . . . . . . . . . . . . . . . . . . . . . . . . .
3.5.4.1 Dial Number . . . . . . . . . . . . . . . . . . . . . . . . . . . . . . . . . . . . . . . . . . . . . . . . . .
3.5.4.2 Redial Number . . . . . . . . . . . . . . . . . . . . . . . . . . . . . . . . . . . . . . . . . . . . . . . . .
3.5.4.3 Personal Phone book (Speed Dial Destination Directory) . . . . . . . . . . . . . . . .
3.5.4.4 Dialing from the personal Phone book (Speed Dial Destination Directory) . . .
3.5.4.5 User settings . . . . . . . . . . . . . . . . . . . . . . . . . . . . . . . . . . . . . . . . . . . . . . . . . .
3.5.4.6 Set alternative destination for ’busy’ . . . . . . . . . . . . . . . . . . . . . . . . . . . . . . . .
3.5.4.7 Set alternative destination for ’unavailable’ . . . . . . . . . . . . . . . . . . . . . . . . . . .
3.5.4.8 Set e-mail delivery . . . . . . . . . . . . . . . . . . . . . . . . . . . . . . . . . . . . . . . . . . . . . .
3.5.4.9 Automatic greeting . . . . . . . . . . . . . . . . . . . . . . . . . . . . . . . . . . . . . . . . . . . . . .
3.5.4.10 Recording of your own spoken notices . . . . . . . . . . . . . . . . . . . . . . . . . . . . .
3.5.5 Mailbox Access. . . . . . . . . . . . . . . . . . . . . . . . . . . . . . . . . . . . . . . . . . . . . . . . . . . .
3.5.6 Function Calls. . . . . . . . . . . . . . . . . . . . . . . . . . . . . . . . . . . . . . . . . . . . . . . . . . . . .
3.5.7 Functions Available During a Call. . . . . . . . . . . . . . . . . . . . . . . . . . . . . . . . . . . . . .
3.5.7.1 Consultation . . . . . . . . . . . . . . . . . . . . . . . . . . . . . . . . . . . . . . . . . . . . . . . . . . .
3.5.7.2 Toggle . . . . . . . . . . . . . . . . . . . . . . . . . . . . . . . . . . . . . . . . . . . . . . . . . . . . . . .
3.5.7.3 Setting Up a Conference . . . . . . . . . . . . . . . . . . . . . . . . . . . . . . . . . . . . . . . . .
3.5.7.4 Recording (Mobility) . . . . . . . . . . . . . . . . . . . . . . . . . . . . . . . . . . . . . . . . . . . . .
3.5.7.5 Picking Up Calls/Taking Over Calls . . . . . . . . . . . . . . . . . . . . . . . . . . . . . . . . .
38
38
39
40
40
40
40
40
41
41
42
42
43
44
45
45
46
47
48
49
50
50
51
51
52
53
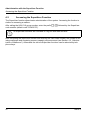
4 Administration with the SuperUser Function . . . . . . . . . . . . . . . . . . . . . . . . . . . . . . .
4.1 Overview . . . . . . . . . . . . . . . . . . . . . . . . . . . . . . . . . . . . . . . . . . . . . . . . . . . . . . . . . . . .
4.2 Accessing the SuperUser Function. . . . . . . . . . . . . . . . . . . . . . . . . . . . . . . . . . . . . . . .
4.3 Administration of Mailboxes . . . . . . . . . . . . . . . . . . . . . . . . . . . . . . . . . . . . . . . . . . . . .
4.3.1 Setting up a Mailbox . . . . . . . . . . . . . . . . . . . . . . . . . . . . . . . . . . . . . . . . . . . . . . . .
4.3.2 Deleting a Mailbox . . . . . . . . . . . . . . . . . . . . . . . . . . . . . . . . . . . . . . . . . . . . . . . . .
4.3.3 Querying the Status of a Mailbox . . . . . . . . . . . . . . . . . . . . . . . . . . . . . . . . . . . . . .
4.4 Test the Internet connection . . . . . . . . . . . . . . . . . . . . . . . . . . . . . . . . . . . . . . . . . . . . .
4.5 System Software Upgrade . . . . . . . . . . . . . . . . . . . . . . . . . . . . . . . . . . . . . . . . . . . . . .
4.6 Changing the Code Number for the SuperUser Function . . . . . . . . . . . . . . . . . . . . . . .
4.7 Changing the Language for System Announcements. . . . . . . . . . . . . . . . . . . . . . . . . .
55
55
56
58
58
59
59
59
60
60
61
5 Recording (Call Live Recording) . . . . . . . . . . . . . . . . . . . . . . . . . . . . . . . . . . . . . . . . . 63
6 Audio Conferences . . . . . . . . . . . . . . . . . . . . . . . . . . . . . . . . . . . . . . . . . . . . . . . . . . . .
6.1 Overview . . . . . . . . . . . . . . . . . . . . . . . . . . . . . . . . . . . . . . . . . . . . . . . . . . . . . . . . . . . .
6.2 Opening a conference. . . . . . . . . . . . . . . . . . . . . . . . . . . . . . . . . . . . . . . . . . . . . . . . . .
6.2.1 Opening a conference via telephone . . . . . . . . . . . . . . . . . . . . . . . . . . . . . . . . . . .
6.2.2 Opening a conference via web browser . . . . . . . . . . . . . . . . . . . . . . . . . . . . . . . . .
4
65
65
66
66
67
IVM V3.0
BKTOC.FM
Nur für den internen Gebrauch
Content
6.3 Conference control . . . . . . . . . . . . . . . . . . . . . . . . . . . . . . . . . . . . . . . . . . . . . . . . . . . .
6.3.1 Conference control via telephone . . . . . . . . . . . . . . . . . . . . . . . . . . . . . . . . . . . . . .
6.3.1.1 Overview. . . . . . . . . . . . . . . . . . . . . . . . . . . . . . . . . . . . . . . . . . . . . . . . . . . . . .
6.3.1.2 Start recording . . . . . . . . . . . . . . . . . . . . . . . . . . . . . . . . . . . . . . . . . . . . . . . . .
6.3.1.3 Stop recording . . . . . . . . . . . . . . . . . . . . . . . . . . . . . . . . . . . . . . . . . . . . . . . . .
6.3.1.4 Disconnect . . . . . . . . . . . . . . . . . . . . . . . . . . . . . . . . . . . . . . . . . . . . . . . . . . . .
6.3.1.5 Hold (Alternate / Add participant / Transfer of a conference) . . . . . . . . . . . . . .
6.3.2 Conference control via web browser . . . . . . . . . . . . . . . . . . . . . . . . . . . . . . . . . . . .
6.4 Joining a conference as a participant . . . . . . . . . . . . . . . . . . . . . . . . . . . . . . . . . . . . . .
6.5 End a conference. . . . . . . . . . . . . . . . . . . . . . . . . . . . . . . . . . . . . . . . . . . . . . . . . . . . . .
6.5.1 End a conference via telephone . . . . . . . . . . . . . . . . . . . . . . . . . . . . . . . . . . . . . . .
6.5.1.1 End a conference totally . . . . . . . . . . . . . . . . . . . . . . . . . . . . . . . . . . . . . . . . . .
6.5.1.2 Temporarily continuation without conference leader . . . . . . . . . . . . . . . . . . . .
6.5.1.3 End of one conference - starting another . . . . . . . . . . . . . . . . . . . . . . . . . . . . .
6.5.2 End a conference via web browser . . . . . . . . . . . . . . . . . . . . . . . . . . . . . . . . . . . . .
67
67
67
68
68
68
68
69
69
70
70
70
70
70
70
Index . . . . . . . . . . . . . . . . . . . . . . . . . . . . . . . . . . . . . . . . . . . . . . . . . . . . . . . . . . . . . . . . . . 71
User Guide
5
BKTOC.FM
Content
6
Nur für den internen Gebrauch
IVM V3.0
Nur für den internen Gebrauch
Figures
Figure 3-1
Figure 3-2
Figure 4-1
User Guide
BKLOF.FM
Figures
0
Mailbox Functions . . . . . . . . . . . . . . . . . . . . . . . . . . . . . . . . . . . . . . . . . . . . 27
Arrangement of Messages in the Input and Storage Areas . . . . . . . . . . . . 29
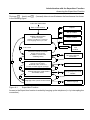
SuperUser Function . . . . . . . . . . . . . . . . . . . . . . . . . . . . . . . . . . . . . . . . . . 57
7
BKLOF.FM
Figures
8
Nur für den internen Gebrauch
IVM V3.0
Nur für den internen Gebrauch
BKLOT.FM
Tables
Tables
Table 2-1
Table 3-1
Table 3-2
Table 3-3
Table 3-4
Table 3-5
Table 3-6
Table 3-7
Table 3-8
Table 3-9
Table 3-10
Table 3-11
Table 3-12
Table 3-13
Table 3-14
Table 3-15
Table 3-16
Table 3-17
Table 3-18
Table 3-19
Table 3-20
Table 3-21
Table 4-1
Table 4-2
Table 4-3
Table 4-4
User Guide
0
Caller Control Options for Announcement Playback . . . . . . . . . . . . . . . . . .
Possible Mailbox Functions (depending on mailbox class) . . . . . . . . . . . . .
Greetings Overview. . . . . . . . . . . . . . . . . . . . . . . . . . . . . . . . . . . . . . . . . . .
Setting Up and Recording Greetings. . . . . . . . . . . . . . . . . . . . . . . . . . . . . .
Recording a Private Message . . . . . . . . . . . . . . . . . . . . . . . . . . . . . . . . . . .
Setting Control Parameters for Greetings . . . . . . . . . . . . . . . . . . . . . . . . . .
Activating and Deactivating Message Recording . . . . . . . . . . . . . . . . . . . .
Changing the Mailbox Code Number . . . . . . . . . . . . . . . . . . . . . . . . . . . . .
Changing the Code Number for Private Message. . . . . . . . . . . . . . . . . . . .
Activating and Deactivating the Notification Call . . . . . . . . . . . . . . . . . . . . .
Entering and Selecting Notification Call Number . . . . . . . . . . . . . . . . . . . .
Activating/Deactivating the Substitute Function . . . . . . . . . . . . . . . . . . . . .
Creating and Making Selections from the Substitute List . . . . . . . . . . . . . .
Setting Up Auto-Attendant Speed-Dialing Destination Numbers . . . . . . . .
System Messages Language . . . . . . . . . . . . . . . . . . . . . . . . . . . . . . . . . . .
Recording and Changing the User Name . . . . . . . . . . . . . . . . . . . . . . . . . .
User settings menu . . . . . . . . . . . . . . . . . . . . . . . . . . . . . . . . . . . . . . . . . . .
"Alternative destination for ’busy’" menu . . . . . . . . . . . . . . . . . . . . . . . . . . .
"Alternative destination for ’unavailable’" menu . . . . . . . . . . . . . . . . . . . . .
"Set e-mail delivery" menu . . . . . . . . . . . . . . . . . . . . . . . . . . . . . . . . . . . . .
"Automatic greeting" menu . . . . . . . . . . . . . . . . . . . . . . . . . . . . . . . . . . . . .
Functions available during a call . . . . . . . . . . . . . . . . . . . . . . . . . . . . . . . . .
Accessing Mailbox Administration Functions (see also Figure 4-1) . . . . . .
Test the Internet connection . . . . . . . . . . . . . . . . . . . . . . . . . . . . . . . . . . . .
Changing the Code Number . . . . . . . . . . . . . . . . . . . . . . . . . . . . . . . . . . . .
Changing the Language for System Announcements. . . . . . . . . . . . . . . . .
21
30
31
32
32
33
34
34
34
35
36
37
37
38
39
39
43
44
45
46
46
50
58
60
60
61
9
BKLOT.FM
Tables
10
Nur für den internen Gebrauch
IVM V3.0
Nur für den internen Gebrauch
1
Introduction
1.1
Target Group
Ivmc01.fm
Introduction
Target Group
This manual is intended for users and system administrators of IVM.
1.2
Functions Description/Overview
IVM V3.0 is a is a system for operating voice mailboxes with various feature sets, including the
AutoAttendant function (menu-prompted call transfer). The system is designed for use as an
add-on module in Octopus F communication systems. System management is performed via
Kundenmanager or KC-Manager.
IVM V3.0 offers the following functions:
●
●
●
●
●
●
Depending on the type of the system and product variant of IVM V3.0 up to 8 and 24 ports
respectively, i.e. up to 8 and 24 processing of parallel forwarding calls or processing of parallel answering respectively.
100 hours voice recording capacity
Two user interfaces (telephone user interface), the standard interface is the same interface
used in Version 1.0. The IVM interface has been added; it allows keys to be adapted for
IVM V3.0 (same key for the same function).
Supports Octopus F multiple customer functionality (in innovation centers with common
telephone systems, for example).
Maximum message/greeting length per voice mailbox:
–
3 minutes for standard/preferred/exclusive mailboxes
–
20 minutes for information mailboxes
–
8 minutes for AutoAttendant mailboxes
–
20 minutes for MOH/announcement mailboxes
Timed notification call when a voice message is received
either as a phone call, pager message* or Short Message Service* (SMS)
●
Messages, answers and comments classified as private, urgent or normal.
●
Date and time specified for each message.
●
Messages distributed to all mailboxes (broadcast) or to distribution lists.
●
Option to call back callers who have left messages (this requires the CLIP service).
●
Old voice messages deleted automatically according to age.
User Guide
11
Ivmc01.fm
Introduction
User Interfaces from IVM via Web-Based Management (WBM)
●
●
●
Nur für den internen Gebrauch
Alternative greetings according to time of day, type of call or calendar entry.
AutoAttendant (automatic call acceptance, greeting and switching, day and night modes).
This includes the option of using name-controlled speed dialing to forward calls.
Automatic fax tone recognition and forwarding of faxes to a mailbox-specific fax destination.
●
Context-sensitive mailbox administration performed by the user via telephone.
●
Playback of professionally recorded greetings using KC-Manager.
●
MOH with endless loop**.
●
●
●
●
●
Playback of individual announcements (for internal uniform call distribution (UCD), for instance)**.
Group mailboxes for up to 20 subscribers.
Information mailboxes with 20-minute announcement facility. Continuous playback and
navigation in announcement text possible.
Recording of phone calls.
Integration of external phones (cell phones, home office phones, etc.) – like extension
phones – in PABXs with the Mobility function.
* Only with DTMF (touch-tone)
** Octopus F200/400/650 Version 4.5 or later (a corresponding license is required for operation).
1.3
User Interfaces from IVM via Web-Based Management (WBM)
To access the web browser (WBM)
●
select as language (Sprache) „English“,
●
Login as „User“ and
●
enter your Mailbox number and your PIN Code.
The Web-Based Management (WBM) is in detail described in the help function (online).
1.4
User Interfaces from IVM via telephone
IVM offers the user a choice of two user interfaces on the telephone:
●
The default IVM interface as used in Version 1.0
●
An interface adapted for IVM V3.0.
12
IVM V3.0
Ivmc01.fm
Nur für den internen Gebrauch
Introduction
Signaling Incoming Messages
The active interface is enabled by system support and applies throughout the system to all
mailboxes. The user interfaces feature different key assignments. The voice announcements
for user prompts are as similar as possible in both interfaces.
In this documentation, all references to the standard interface are marked with "(STD)" and all
references to the IVM V3.0 interface with "(XP)". No information is entered in parenthesis if key
input applies to both interfaces.
>
Note:
A system telephone (such as Octophon F) or analog telephone with DTMF dialing is
required for IVM.
The "Record" feature is started and stopped via the programmed recording button (see the
Octopus F200/400/650 service manual) on a system telephone (such as Octophon F) or via a
feature procedure on a non-system telephone.
1.5
Signaling Incoming Messages
1.5.1
Visual or Acoustic Signaling
When a new message arrives, the message LED (Message Waiting Indication)* automatically
illuminates on the assigned Octopus F station. A special dial tone* is used on devices that do
not have an MWI LED.
With software version HE200V.03.202 and Octopus F system software V5.0 (SMR5) or later,
the number of new messages is shown on the system telephone display.
Signaling starts when the first message arrives and is automatically stopped after the last message has been retrieved.
If a notification call is set up and activated for a particular mailbox, this is performed in addition
to the message being signaled on the phone.
* Depends on Octopus F200/400/650 configuration
1.5.2
E-mail Signaling
With software version HE200V.03.202 and Octopus F system software V5.0 (SMR5) or later,
new messages in a mailbox can also be signaled via e-mail. Up to three e-mail addresses can
be entered with an optional WAV file attachment for each address.
There are three methods of deleting voicemail:
●
Manually:
Voicemail can only be deleted manually via the TUI.
User Guide
13
Ivmc01.fm
Introduction
Integrating Mobile Terminals (Mobility)
Nur für den internen Gebrauch
Automatically once notified:
Voicemail is automatically deleted once a notification has been sent.
●
Automatically after set time:
Voicemail is deleted once a set time period has elapsed (see "Automatic deletion of messages after a set time"). Only voicemail that has already been retrieved is deleted.
●
This feature can only be configured using KC-Manager.
1.6
Integrating Mobile Terminals (Mobility)
1.6.1
Basic Functions
The IVM Mobility function integrates external telephones (cell phones, home office phones,
etc.) – like extension phones – in PABXs.
Basic fixed-network functions, such as, consultation, toggle, transfer, and conference setup,
can thus be extended to external connections (your cell phone, for instance).
IVM also picks up calls if the line called was busy or if the caller did not reach the answering
machine.
Furthermore the recording of your own spoken notes or calls executed via mobility is possible.
These records will be stored in the appropriate mailbox.
Inbound calls
With IVM, callers can reach you with the same number either at your workstation and when you
are on the move.
As a user, you choose the forwarding destination where inbound calls for your extension are
forwarded. You can activate one of up to three forwarding destinations available (cell phone,
home office phone, for instance). Alternatively you can activate message recording. If you cannot be reached at the active forwarding destination or if it is busy, alternative options are available.
You can activate or deactivate all user-defined forwarding destinations when on the move.
As an additional service, you can address callers with a standardized or personal greeting
("Please hold", for instance). The caller hears the greeting before call acceptance at the forwarding destination.
>
14
IVM Mobility displays the caller’s number on the forwarding destination.
If the caller suppressed call number display, the user number is shown instead.
IVM V3.0
Ivmc01.fm
Nur für den internen Gebrauch
1.6.2
Introduction
Integrating Mobile Terminals (Mobility)
Outbound Calls
IVM Mobility recognizes the forwarding destinations defined as registered phone numbers/devices. You can use Mobility to set up phone calls from all registered phones (cell phone, home
office phone, for instance).
A number of general functions are also available to you:
●
Callback
●
Redial Number
●
Phone book
>
User Guide
If your cell phone supports twin cards, you can also use Mobility with the twin card.
Prerequisite: This number must also be entered in your user settings.
15
Ivmc01.fm
Introduction
Integrating Mobile Terminals (Mobility)
16
Nur für den internen Gebrauch
IVM V3.0
Nur für den internen Gebrauch
Ivmc02.fm
General Information on Mailboxes
Mailbox Classes
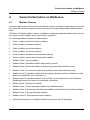
2
General Information on Mailboxes
2.1
Mailbox Classes
Features and functions of the individual mailboxes can be configured. Depending on the mailbox class, the number of features varies, as does the corresponding mailbox administration
menu.
IVM offers 17 defined mailbox classes. In addition to assigning a defined mailbox class, the feature scope of each mailbox can be individually configured.
The following mailbox classes are differentiated:
●
Class 1 mailbox (basic/information mailbox)
●
Class 2 mailbox (standard mailbox)
●
Class 3 mailbox (preferred mailbox)
●
Class 4 mailbox (exclusive mailbox)
●
Class 5 mailbox (standard auto-attendant mailbox)
●
Class 6 mailbox (preferred auto-attendant mailbox)
●
Mailbox Class 7 (group mailbox)
●
Mailbox Class 8 (standard mailbox with greeting control)
●
Mailbox Class 9 (preferred mailbox with greeting control and distribution lists)
●
Mailbox Class 10 (exclusive mailbox with greeting control and distribution lists)
●
●
Mailbox Class 11 (standard mailbox with 4 greetings, greeting control and distribution lists,
without the possibility of an external line)
Mailbox class 12 (standard mailbox such as COS 11, plus distribution to all mailboxes
(Broadcast) without the option of an external connection)
●
Mailbox Class 13 (premium mailbox)
●
Mailbox Class 14 (auto-attendant mailbox with distribution lists)
●
Mailbox Class 15 (preferred auto-attendant mailbox with distribution lists and broadcast)
●
Mailbox Class 16 (preferred group mailbox)
●
Mailbox class 17 (MOH/announcement mailbox)
●
Individual configuration of mailbox features (set up only with KC-Manager)
User Guide
17
Ivmc02.fm
General Information on Mailboxes
Mailbox Classes
>
Nur für den internen Gebrauch
Note:
You can determine which options are included by accessing your mailbox. All available functions are announced via internal system messages.
Mailbox Class
1
Record / retrieve messages
X X X X X X X X X X X X X X X X -
Save messages
-
X X X X X X X X X X X X X X X -
Record and send messages
-
X X X X X X X X X X X X X X X -
Message forwarding
-
X X X X X X X X X X X X X X X -
Call back caller
-
-
X X X X X X X X -
-
X X X X -
Number of possible greetings 1
3
3
3
3
4
4
4
Greeting control
-
-
-
-
-
X -
X X X X X X X X X -
Information mailbox
X -
-
-
-
-
-
-
-
-
-
-
-
-
Private message
-
-
X X X X -
-
-
X X X X -
-
-
-
Record user name
-
X X X X X X X X X X X X X X X -
Notification call
-
-
X X X X -
-
X X -
-
X -
Substitute function
-
-
-
X X X -
-
-
-
X X X -
Language selection
-
-
-
X X X X X X X X X X X X X 4
Speed dialing /
AutoAttendant
-
-
-
-
X X -
Group mailbox
-
-
-
-
-
Distribution list
-
-
-
-
Broadcast
-
-
-
Fax intercept target
-
-
Speed dial destinations for
four periods of a day
-
2
3
4
5
6
7
3
8
3
9
3
10 11 12 13 14 15 16 17
3
4
-
X -
-
-
4
4
4
4
X X -
-
-
-
-
-
-
X X -
-
X -
-
-
-
-
-
-
-
-
-
-
X X X X X X X X -
-
-
-
-
-
-
-
-
X X X X X X X X X X X X -
-
-
-
-
-
-
-
-
-
-
-
-
-
-
-
-
“Deactivation of direct dialing” -
-
-
-
-
-
-
-
-
-
-
-
-
-
-
-
-
Mailbox AutoAttendant
-
-
-
-
-
-
-
-
-
-
-
-
-
-
-
-
-
E-mail notification
-
-
-
-
-
-
-
-
-
-
-
-
-
-
-
-
-
>
18
-
-
X X -
-
-
X -
X -
-
Note:
The amount of features for the individual mailbox class is configured separately for
each mailbox.
IVM V3.0
Ivmc02.fm
Nur für den internen Gebrauch
2.2
General Information on Mailboxes
Functions Available to Callers
Functions Available to Callers
The Voicemail system provides callers with the following functions:
●
The classic dialing of a mailbox
Most callers reach the mailbox when the person being called is away from his or her desk
(rerouting for "overflow") or because the person being called is already on the phone (rerouting when "busy"). In both cases, the caller hears the current mailbox greeting. Usually,
the caller can leave a message afterwards (the message recording function must be activated).
●
Direct dialing of a mailbox in order to leave a message
By calling the IVM number and then dialing # and the mailbox number, the caller reaches
the desired mailbox directly. If a caller transfers a call to this mailbox, the greeting text of
the box is repeated.
Example:
The switchboard receives a call for a user who is not in the building. The caller would like
to leave this user a mailbox message. In this case, the operator can dial the mailbox of the
user directly. The caller immediately hears the greeting text and can leave a message afterwards.
Important! --> The message recording function must be activated.
●
Interrupting the greeting
The caller can interrupt the greeting of the mailbox user using # (STD) / * (XP) at any
time; if message recording is enabled, he can start recording the message directly after the
tone.
●
Call transfer to a substitute
If the caller presses the 0 key during the greeting, the system immediately switches to
the substitute (referral extension).
>
●
Note:
The substitute (referral extension) function for normal mailboxes needs to be activated by the mailbox owner and message recording needs to be enabled.
Ending a message
The caller can end a message in one of three ways:
1.
By hanging up. The recorded message will be assigned the priority "normal".
2.
By pressing the # key. Afterwards, the caller can post process the message, i.e.,
change the priority.
User Guide
19
Ivmc02.fm
General Information on Mailboxes
Information Mailboxes
3.
●
Nur für den internen Gebrauch
By pressing 0. The caller will then be transferred to a previously selected substitute.
The recording will be saved, if it is long enough and the message recording function
of the mailbox has been switched on.
Auto-attendant mailboxes
Auto-attendant mailboxes offer, in addition to the standard mailbox, the possibility for callers to transfer their own calls with the help of speed-dialing / abbreviated numbers (digits
0 to 9). Also possible is name selection and the direct dialing of a system extension by dialing the extension number during the greeting. See a detailed description in
Section 3.4.10, “Setting Up Auto-Attendant Speed-Dialing Destination Numbers”, on page
3-38.
●
Direct dialing of an IVM Mailbox via auto-attendant
By pressing the key * twice and entering the desired mailbox number right after that, the
greeting of the mailbox will be played after a short announcement that the call is being
transferred. The caller can begin speaking the message after the signal tone.
Important! --> The message recording function must be activated.
●
Switching to the administration mode
During the greeting text, the caller can switch to the mailbox administration mode. To do
this, the caller enters *, followed by his or her personal mailbox code.
●
Listening to a private message
If the caller activates the * key during the greeting message and then immediately enters
an agreed upon numeric code, the private message is played back.
>
2.3
Note
The mailbox owner must inform the caller of the "private" access code in
advance.
Information Mailboxes
All class 1 mailboxes can be configured to have a 20 minute greeting announcement (e.g., a
movie program). Callers can "navigate" within the announcement (see Table 2-1).
Messages can also be recorded for information mailboxes. However, the message recording
function should be deactivated if the mailbox is used purely for informative announcement services.
When the end of the announcement has been reached, the information mailbox can automatically end the call (configuration via KC-Manager).
20
IVM V3.0
Ivmc02.fm
Nur für den internen Gebrauch
General Information on Mailboxes
Switchboard / Auto-Attendant Mailbox
Functions available to the caller (DTMF dialing required!)
Key
(STD)
Key
(XP)
Replay greeting
2
73
Rewind greeting by five seconds
4
78
Pause
5
*
Fast-forward greeting by five seconds
6
98
Table 2-1
>
2.4
Caller Control Options for Announcement Playback
Note:
The caller should be informed of control options available for information mailboxes
at the start of the announcement.
Switchboard / Auto-Attendant Mailbox
All switchboard / auto-attendant mailboxes additionally offer the following features:
●
A greeting length of eight minutes
If the caller does not react, the greeting message will be repeated automatically.
>
●
Note:
The caller should be informed of all control options available for the auto-attendant mailbox at the start of the announcement.
Call transfer by speed-dialing / abbreviated dialing (digits 0 to 9)
If a single digit has been assigned a target number, a caller can transfer his or her own call
by pressing the appropriate number key. Setting up the speed-dialing is described in
Section 3.4.10, “Setting Up Auto-Attendant Speed-Dialing Destination Numbers”, on page
3-38.
Speed-dialing targets can be internal / external phone numbers or mailboxes (also autoattendant boxes). Complex customer demands can be realized by selection of further autoattendant mailboxes.
>
User Guide
Note:
If the caller is transferred to a further mailbox, he or she hears the new mailbox
greeting.
21
Ivmc02.fm
General Information on Mailboxes
Group Mailbox
Nur für den internen Gebrauch
Transferring calls to internal extensions
●
If the caller dials a known extension number during the mailbox greeting, he or she will be
transferred directly to the extension.
>
Note:
There can only be a maximum of 2.5 seconds between digits while entering the
extension number.
Name selection
●
By entering the keys * # followed by up to three letters of the name of the mailbox (listing via KC-/Kundenmanager), the caller can reach an internal user. Callers enter the number using the keys (characters) of the telephone.
A selection of users beeing considered is provided. The selection the of the relevant user
is carried out with *. The selection is supported with context-sensitive system help messages.
>
2.5
Note:
The mailbox owner must record his or her mailbox name to enable call transfer
according to name selection.
Group Mailbox
Group mailboxes can have up to 20 equally entitled members. All group mailbox members can
hear messages and take over the administration of the group mailbox. Parallel accessing of
several group members is not possible. Members of a group mailbox can also have a personal
mailbox.
>
Note:
If a group member has a personal mailbox, the access code numbers for the personal mailbox and the group mailbox should be different. If both codes are identical,
the mailbox number must be entered as well as the mailbox code.
Incoming messages are shown to all group members simultaneously, the message waiting
lamp (MWI) is deleted when the last group mailbox message has been heard.
Users for a group mailbox are set up and maintained by system administration.
22
IVM V3.0
Ivmc02.fm
Nur für den internen Gebrauch
2.6
General Information on Mailboxes
Distribution of Voice Messages According to Distribution Lists
Distribution of Voice Messages According to Distribution Lists
Entitled mailbox users can send voice messages to other mailboxes in distribution lists. Up to
20 such lists can be set up system-wide via KC-Manager. Each list may include up to 20 entries.
The entitled mailbox user is automatically offered the use of a distribution list as an option when
sending a voice message. The list is selected by entering a list number.
2.7
Distribution of Messages to All Mailbox Users
Entitled mailbox owners can send voice message to all mailbox owners ("Broadcast").
The entitled mailbox user is automatically offered the use of broadcast distribution as an option
when sending a voice message.
>
2.8
Note:
The incoming message is signalized to the recipients at intervals of one second.
Order of Message Inquiry
Voice messages can be stored according to the First-In-First-Out (default) or the Last-In-FirstOut principle. The active storage method applies for all mailboxes.
●
FIFO principle (the oldest message first):
Even if the mailbox queue is configured according to the FIFO principle, the most recent
unheard message is played first. Once it has been heard, however, the message is sent to
the back of the queue and sorted according to the FIFO principle (the oldest message at
the front of the queue).
●
LIFO principle (the newest message first)
If the LIFO method has been chosen, the new messages are played first in the opposite
order in which they came into the mailbox (the newest first). Afterwards, heard, but not yet
deleted, old messages are played.
To prevent an "overflow" of the mailbox, old messages can be automatically deleted. The
adjustable period (1 to 90 days) is configured by your system administrator via KC-Manager and applies system-wide.
>
User Guide
Note:
Stored messages are not deleted (see Section 3.4.1, “Querying Mailbox Messages”, on page 3-28).
23
Ivmc02.fm
General Information on Mailboxes
Mobility
2.9
Nur für den internen Gebrauch
Mobility
When Mobility is activated, a diverted call is immediately routed to the active forwarding destination. The answering machine only activates if the forwarding destination is busy or cannot be
reached.
24
IVM V3.0
Nur für den internen Gebrauch
3
Mailbox Use and Operation
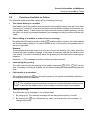
3.1
IVM User Interfaces
Ivmc03.fm
Mailbox Use and Operation
IVM User Interfaces
IVM offers the user a choice of two user interfaces on the telephone:
●
the standard IVM interface which was available in Version 1.0, and
●
new in Version 2.0, an interface which has been adapted to IVM V3.0.
The active interface is activated by system administration and is valid system-wide for all mailboxes. The user interfaces are different with regard to key use, however, the system voice
prompts are largely identical.
In this documentation, references to the standard interface are marked "(STD)", key commands
referring to IVM V3.0 are marked "(XP)". There is no indication if the key command in question
is valid for both interfaces.
3.2
Mailbox Access/Code Numbers
Each mailbox is assigned to a specific extension within the telephone system.
A mailbox owner accesses his or her own mailbox by calling the IVM number. A distinction is
made between
●
internal calls from the mailbox owner's extension and
●
external calls, or calls from other internal extensions.
If an internal call is placed from the mailbox owner's extension, the system asks the caller
to enter his or her code number. The mailbox can be accessed after the valid code number has
been entered.
If an external call, or an internal call from another extension is placed, the system also
asks the caller to enter his code number. However, after the code number has been entered,
the system asks the caller to enter the mailbox number. If the code number and the mailbox
number match, the mailbox can be accessed.
Mailbox access is also possible while the caller is listening to his or her own mailbox greeting
after being switched to the mailbox. The caller must first press the * key, and then enter the
code number for the mailbox. If the valid mailbox code is entered, the mailbox can be accessed.
Otherwise, the system asks the caller to enter a mailbox number. If this mailbox number matches the entered code number, the corresponding mailbox can be accessed.
If the code number and the mailbox number do not match, a corresponding announcement indicating this is made by the system.
User Guide
25
Ivmc03.fm
Mailbox Use and Operation
Navigating through the Mailbox
>
3.3
Nur für den internen Gebrauch
Note:
Immediately after setting up the mailbox, the default code number is usually “1234”.
If you cannot gain access with this default code number, contact your system administration.
Change the code number when you access your mailbox for the first time!
Navigating through the Mailbox
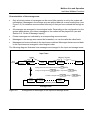
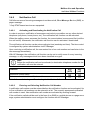
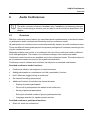
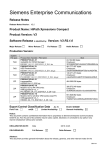
After gaining access to the mailbox, the first function which is always made available after announcement of the system status (see above) is the message querying function. The other
mailbox functions cannot be accessed until all current messages have been played back or
skipped (see Figure 3-1).
An active mailbox connection can be ended at any time by hanging up.
Navigation through the mailbox is controlled via the keypad on your telephone.
The most important functions include “scroll forward” 3 (STD); 2 (XP) and “scroll back” 1
(STD); 7 2 (XP).
Each mailbox function begins with a system help announcement which informs users about the
valid keys and their meaning. The user can implement the current function or skip to the next /
previous function.
The available functions are different depending on the selected mailbox class.
Details on the individual functions are presented in the following chapters.
>
26
Note:
Only one user at a time can access a mailbox, either for querying messages or for
administrative functions.
New messages can be recorded during querying / administration.
IVM V3.0
Ivmc03.fm
Mailbox Use and Operation
Navigating through the Mailbox
Nur für den internen Gebrauch
Call to the IVM number from owner’s extension
Enter a code number
(Mailbox status announcement)
*#
3/2
Mobility main menu
Play mailbox/administrate messages
1 / 72
1/#
3/2
3/8
1 / 72
Record greetings
1/#
Record a private message
3/8
3/8
3/8
3/8
3/8
3/8
3/8
3/8
3/8
3/8
3/8
3/8
1/#
Set greeting control
1/#
Message recording on/off
1/#
Change the mailbox code number
1/#
Change the code number for private messages
1/#
Notification on/off
1/#
Enter/select the message call number
1/#
Substitute function on/off
1/#
Enter/select the agent’s number
1/#
Call forwarding with speed dialing
1/#
Change the mailbox language
1/#
Record a user name
Figure 3-1
>
User Guide
Mailbox Functions
Note:
The size of the menu offered depends on the assigned mailbox authorizations.
27
Ivmc03.fm
Mailbox Use and Operation
Individual Mailbox Functions
3.4
Individual Mailbox Functions
3.4.1
Querying Mailbox Messages
Nur für den internen Gebrauch
Each mailbox is equipped with an area allocated for messages received (input area) and an
area for stored messages (storage area). Exception: The basic/information mailbox only includes an input area and is incapable of storing messages.
All messages in the storage area are maintained in chronological order. Whether the newest
message is positioned at the beginning or end is configured in the IVM. Whichever order has
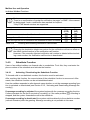
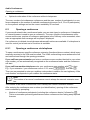
been chosen is valid for all mailboxes (see Section 2.8, “Order of Message Inquiry”).Characteristics of the input area:
The messages in the input area can be classified as urgent, standard, or private. Messages in
the storage area, which stores messages which have already been heard, are classified as either normal or private.
Characteristics of the input area:
●
●
●
●
●
●
●
●
28
Unlimited number of messages until memory capacity is fully occupied
Each message is classified as either urgent, private or standard (classification can only be
assigned by the sender/caller).
Urgent messages are played back first in chronological order when the mailbox is queried
(see Figure 3-2). Standard and private messages are then played back (ungrouped), also
in chronological order.
Messages classified as "urgent" are reclassified as "normal" after they have been heard in
their entirety. The priority change does not occur until after the messages have been heard.
Each message is provided with a date and time-stamp, which is announced at the end of
the message. The caller's number can also be played back, provided it was transmitted
with the call (this feature must be switched on during set up).
Messages in the input area that are identified as private cannot be forwarded.
All normal and private messages can be moved from the input area to the storage are
(saved), and vice versa. Urgent messages cannot be moved until they have received the
priority "normal" after being played entirely.
New messages are always placed in the input area.
IVM V3.0
Ivmc03.fm
Mailbox Use and Operation
Individual Mailbox Functions
Nur für den internen Gebrauch
Characteristics of the storage area:
●
●
Only a limited number of messages can be saved (the capacity is set by the system administration). Messages in the storage area are played back as a never-ending loop (see
Figure 3-2). An advance announcement informs you that you have entered the storage area.
All messages are arranged in chronological order. Depending on the configuration by the
system administrator, the oldest messages-or the newest will be played first (see also
Section 2.8, “Order of Message Inquiry”).
●
Private messages are indicated by a corresponding announcement.
●
Messages in the storage area cannot be forwarded, nor can the caller be called back.
●
Messages can be moved back to the input area or deleted. Messages that are moved back
to the input area are arranged in chronological order.
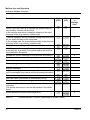
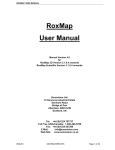
The following diagram illustrates how messages are arranged in the input and storage areas:
Input Area
Urgent
Start
Playback
oldest /
newest
2nd oldest /
2nd newest
Normal / Private
newest /
oldest
oldest /
newest
2nd oldest /
2nd newest
newest /
oldest
Change back and forth between ranges with #(STD)
Change to storage aerea #4(XP) to input aerea #3(XP)
Transfer messages with # #(STD)
oldest /
newest
2nd oldest /
2nd newest
/ 44(XP)
newest/
oldest
normal / privat
Storage Area
Figure 3-2
User Guide
Arrangement of Messages in the Input and Storage Areas
29
Ivmc03.fm
Mailbox Use and Operation
Individual Mailbox Functions
Function
Nur für den internen Gebrauch
Key
(STD)
Key
(XP)
Possible
in
Storage
Area
When in the input area all messages are played back the
next mailbox function will be active.
In the storage area there is always a skipping to the next
message in the ring memory (infinite loop).
Previous message; the first message is played back as soon
as you reach the start of the input area.
In the storage area, the system always skips to the previous
message in the ring memory (endless loop).
3
2
X
1
72
X
Replay the last message listened to;
2
73
X
Interrupt playback for up to five seconds (pause);
press any key to proceed; the system replays the last five
seconds before the pause.
5
*
X
Rewind the current message by five seconds and replay it
4
78
X
Fast-forward the current message by five seconds
6
98
X
00
6
X
Save message/move message to another location
#
#
41
44
X
Skip all messages
*
79
Reply to message (record a message in the caller’s mailbox);
only for messages from internal users with a personal mailbox.
8
31
Forward message
9
9
Delete message
Call back caller; connection is automatically set up;
Record and send a new message
*8 70
7
1
Switch to a different mailbox: enter a code number, enter an * # # 0
extension.
The system continues to use the old mailbox if the switch
failed.
Switch between the input and storage area
Table 3-1
30
#
#3
#4
X
Possible Mailbox Functions (depending on mailbox class)
IVM V3.0
Ivmc03.fm
Mailbox Use and Operation
Individual Mailbox Functions
Nur für den internen Gebrauch
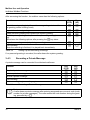
3.4.2
Recording and Selecting Greetings
The owner of a mailbox can use his or her telephone to record all available greetings. Depending on the mailbox class, up to 4 greetings are available:
Greeting
Mailbox Class 1
Mailbox Classes 2 - 5
and Classes 7 - 10
Mailbox Class 6
manual selection
1st Greeting
X
X
X
2nd Greeting
-
X
X
3rd Greeting
-
X
X
4th
-
-
X
Greeting
Table 3-2
Greetings Overview
There are different mechanisms available for selection of each greeting (see also
Section 3.4.4, “Setting Control Parameters for Greetings”).
Depending on the mailbox classes, the following mechanisms are available:
●
Manual
●
Day/Night*-dependent
●
Depending on the type of call
●
Calendar controlled
* The day / night control is configured with Octopus F.
In addition to recording greetings with the telephone handset, IVM also supports the use of professionally recorded greetings.
Professionally recorded greetings are especially recommendable for company greetings.
>
User Guide
Note:
The input of professionally recorded greetings occurs via KC-Manager/Kundenmanager. Please see your system administration about this.
31
Ivmc03.fm
Mailbox Use and Operation
Individual Mailbox Functions
Nur für den internen Gebrauch
After accessing the function, the mailbox owner has the following options:
Function
Key
(STD)
Key
(XP)
Select the next greeting (only if more than one greeting exists and the manual greeting control is being used)
8
4
Repeat the selected greeting.
2
3
Delete personal greeting and replace with system greeting.
0
6
Disable system greeting and replace with a personal greeting (new recording).
Users have the following options after pressing the 0 key twice:
0
1
Begin the recording anew (only during recording)
0
(no key)
End recording.
When the recording is finished, it is played back immediately.
#
*
Table 3-3
Setting Up and Recording Greetings
If no personal greeting is recorded, the caller hears the system greeting.
3.4.3
Recording a Private Message
A private message can be recorded for authorized mailboxes.
Function
Key
(STD)
Key
(XP)
Play back private message
2
3
Delete a private message
0
6
Record a private message
0
1
End recording
#
*
While recording, begin recording again
0
-
Table 3-4
>
32
Recording a Private Message
Note:
A caller hears a private message after entering an agreed upon numeric code (code
number for private messages). The caller enters the code number during the greeting, preceded by a *.
IVM V3.0
Ivmc03.fm
Nur für den internen Gebrauch
3.4.4
Mailbox Use and Operation
Individual Mailbox Functions
Setting Control Parameters for Greetings
After accessing this function, the status is announced.
Mailbox greetings are controlled by pressing the 8 key (STD) or the 1 key (XP). The following options are available:
●
●
Manual greeting control:
One of the 3 or 4 greetings (depending on the mailbox class) is selected manually and
used.
Automatic greeting control:
The type of greeting control must be selected accordingly.
The following control types are available:
1.
Day / night control dependent on the current setting of the Octopus F
(Greeting 1 = day greeting, greeting 2 = night greeting)
2.
Greeting selection depending on the type of call
Forwarded calls internal line free --> Greeting 1
Forwarded calls internal busy --> Greeting 2
Forwarded calls external line free --> Greeting 3
Forwarded calls external busy --> Greeting 4
3.
Calendar-controlled greeting control
Day greeting --> Greeting 1
Night greeting --> Greeting 2
Lunch greeting --> Greeting 3
Special greeting --> Greeting 4
Important: The calendar is administrated via the KC-Manager!
Function
Key
(STD)
Key
(XP)
Announce current status
2
3
Select and simultaneously change status
8
1
Table 3-5
User Guide
Setting Control Parameters for Greetings
33
Ivmc03.fm
Mailbox Use and Operation
Individual Mailbox Functions
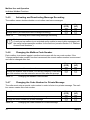
3.4.5
Nur für den internen Gebrauch
Activating and Deactivating Message Recording
The mailbox owner decides whether or not callers can leave messages.
Function
Key
(STD)
Key
(XP)
Announce status
2
3
Change status (activate/deactivate message recording)
0
1
Table 3-6
>
Activating and Deactivating Message Recording
Note:
A newly set up mailbox is not activated and is unable to record caller messages until
the owner has accessed the mailbox for the first time (see also Section 3.2, “Mailbox
Access/Code Numbers”).
3.4.6
Changing the Mailbox Code Number
Each mailbox is protected against unauthorized access with its own code number. If the
"change mailbox code number" function is accessed, the current mailbox number is announced
and can be changed after that.
Function
Key
(STD)
Key
(XP)
Announce current mailbox code number
2
3
Change the mailbox code number. For security reasons, a new mailbox code number must be entered a second time after the prompt.
0
1
Table 3-7
3.4.7
Changing the Mailbox Code Number
Changing the Code Number for Private Message
The caller must enter a special code number in order to listen to a private message. The mailbox owner creates this code number.
Function
Key
(STD)
Key
(XP)
Announce current code number for private message
2
3
Change the code number for private message
0
1
Table 3-8
34
Changing the Code Number for Private Message
IVM V3.0
Ivmc03.fm
Nur für den internen Gebrauch
3.4.8
Mailbox Use and Operation
Individual Mailbox Functions
Notification Call
IVM informs users of incoming messages via out-bound call, Short Message Service (SMS), or
pager message.
* Only DTMF based services are supported.
3.4.8.1
Activating and Deactivating the Notification Call
In order to receive a notification of messages received at your mailbox on any other desired
telephone (cell phone, home phone, etc.), the notification call function can be activated.
When the mailbox owner accesses the function, the current status is announced first (notification call on/off). Afterwards, the notification call function can be activated / deactivated.
The notification call function can be set according to time (weekday and time). The time control
is configured by system administration via KC-Manager.
Upon receiving a notification call, the user enters his or her code number and can listen to the
new message immediately.
With KC-Manager, the notification call function can be set to notify users of every incoming
message, or only messages which have been classified as urgent.
>
Note:
Before the notification call can be activated, a destination telephone number for the
notification call must be entered.
Function
Key
(STD)
Key
(XP)
Announce current status
2
3
Activate or deactivate the notification call
0
1
Table 3-9
3.4.8.2
Activating and Deactivating the Notification Call
Entering and Selecting Notification Call Number
A notification call number must be entered before the notification function can be activated. Up
to five notification call numbers can be entered in a list. The currently announced notification
call number is used. New notification call number are activated by scrolling forward.
If the notification call should be sent in the form of an SMS to a mobile phone or a pager message, system administration must configure the function with KC-Manager.
User Guide
35
Ivmc03.fm
Mailbox Use and Operation
Individual Mailbox Functions
>
Nur für den internen Gebrauch
Note:
There is no confirmation of receipt for notification via pager* or SMS*. It thus cannot
be determined if such a notification has reached its recipient.
*Only DTMF-based services are supported.
Function
Key
(STD)
Key
(XP)
Announce current status of notification call number
2
3
Change the notification call number
0
1
Scroll through the list of notification call numbers to select a number.
8
2
Table 3-10
>
3.4.9
Entering and Selecting Notification Call Number
Note:
Changing the destination telephone number for the notification call has no effect on
the status (active/inactive) of the notification call function.
However, if the currently selected notification call number is deleted without selecting a new number, the notification call function is deactivated.
Substitute Function
Users of an entitled mailbox can forward calls to a substitute. To do this, they must enter the
phone number of the substitute and activate the function.
3.4.9.1
Activating / Deactivating the Substitute Function
To forward calls to a substitute's number, this function must be activated.
After reaching this function, the current status of the substitute function is announced. Afterwards, the substitute function can be activated/deactivated.
How the mailbox responds to calls depends upon whether or not the message recording function is activated or deactivated (see Section 3.4.5, “Activating and Deactivating Message Recording”).
If message recording is activated, the system begins with the message recording function.
If silence persists for the first 5 seconds of recording, or if the caller presses 0, recording is
stopped, and the system forwards the call to the substitute.
If message recording is deactivated, the system switches directly to the substitute number
(referral extension) after the greeting. Message recording is not possible in this case.
36
IVM V3.0
Ivmc03.fm
Nur für den internen Gebrauch
>
Mailbox Use and Operation
Individual Mailbox Functions
Note:
The substitute’s telephone number must be entered and possibly selected before
call forwarding can be activated.
Function
Key
(STD)
Key
(XP)
Announce substitute status
2
3
Change status (activate or deactivate)
0
1
Table 3-11
3.4.9.2
Activating/Deactivating the Substitute Function
Selecting and Entering the Substitute’s Extension Number
The personal substitute function can only be activated after entering the substitute's phone
number. Phone numbers for up to 5 substitutes can be entered in a list, allowing for the assignment of different substitutes if required. Any desired telephone numbers can be entered. The
currently announced substitute number is used.
After activating this dialog, the current substitute number is announced. Afterwards, the number
can be changed, or reselected.
Function
Key
(STD)
Key
(XP)
Announce phone number of currently selected substitute
2
3
Scroll though the entries in the list
8
4
Change an entry
0
1
Table 3-12
>
User Guide
Creating and Making Selections from the Substitute List
Note:
Changing a substitute phone number has no effect on the current status (active/inactive) of the substitute function.
However, if the currently selected substitute number is deleted without selecting a
new number, the substitute function is deactivated.
37
Ivmc03.fm
Mailbox Use and Operation
Individual Mailbox Functions
3.4.10
Nur für den internen Gebrauch
Setting Up Auto-Attendant Speed-Dialing Destination Numbers
If a caller selects a speed-dialing destination number which has not been set up, the call is handled as follows:
1.
The call is forwarded to a mailbox-specific number
2.
The call is forwarded to a mailbox-specific operator
3.
The call is forwarded to a system-wide operator
4.
The call is forwarded to a system mailbox
If none of the above mentioned destination numbers have been set up, the connection is interrupted.
All auto-attendant mailboxes can have speed-dial numbers. The caller can select another user
(internal or external) or another mailbox during the announcement by pressing the appropriate
number key on his or her telephone. The caller must be informed of the available options by
the announcement.
On accessing the function to change speed-dial numbers, the last selected speed-dial number
or the speed-dial list is announced. The speed dial numbers occupy the range 0 – 9 and can
be linked to an internal destination number, an external destination number or a mailbox.
Function
Key
(STD)
Key
(XP)
Announce currently selected speed-dial number / speed-dial list
2
3
Scroll forward speed-dial list
8
9
Scroll backward speed-dial list
5
7
Delete or change the destination number
0
1
Table 3-13
3.4.11
Setting Up Auto-Attendant Speed-Dialing Destination Numbers
Selecting a Language for User Prompts
The language used for system messages can be changed if required.
After initializing the function by scrolling, the currently selected language is announced. Afterwards, one of three system languages can be selected.
>
38
Note:
The three languages are determined by system administration.
IVM V3.0
Ivmc03.fm
Nur für den internen Gebrauch
Function
Mailbox Use and Operation
Individual Mailbox Functions
Key
(STD)
Key
(XP)
Announce current language
2
3
Select any one of the available languages
8
1
Table 3-14
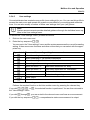
3.4.12
System Messages Language
Changing a User Name
The user name is used as a label for internal functions such as the transmission of messages.
If no user name has been recorded, the corresponding mailbox number is announced instead.
After accessing the function, the current status of the user name is announced. Afterwards, the
name can be changed / deleted.
>
Note:
Users are advised to record their names for this function, since this improves transparency and simplifies use of the IVM V3.0 system for all users.
Function
Key
(STD)
Key
(XP)
Announce current user name
2
3
Change user name
0
-
Record user name
-
1
Delete user name
-
6
Table 3-15
>
User Guide
Recording and Changing the User Name
Note:
A user name must be recorded to use vanity dialing.
39
Ivmc03.fm
Mailbox Use and Operation
Mobility
3.5
Mobility
3.5.1
Basic Functions
Nur für den internen Gebrauch
The Mobility function lets you integrate external telephones (cell phones, home office phones,
etc.) – like extension phones – in PABXs.
Basic PABX functions, such as, consultation, toggle, and conference setup, can thus be extended to external connections (your cell phone, for instance).
The recording of your own spoken notices (see Section 3.5.4.10 on page 3-47) or calls executed via Mobility (see Section 3.5.7.4, “Recording (Mobility)”, on page 3-52) is possible. These
records will be stored in the appropriate mailbox.
3.5.2
Inbound Calls
Callers can reach you with the same number either at your workstation and when you are on
the move. As a user, you choose the forwarding destination where inbound calls for your extension are forwarded. You can activate one of up to three forwarding destinations available
(cell phone, home office phone, for instance). If in your mailbox administration the checkbox
„Mobility activated“ is set, your calls are routed to the mailbox. If you cannot be reached at the
active forwarding destination or if it is busy, alternative options are available.
If you answer the call a short gentle signal is played signalizing that your Mobility functionality
(consultation call, toggle, conference, etc.) are available.
You can activate or deactivate all user-defined forwarding destinations when on the move.
As an additional service, you can inform callers with a standardized or personal greeting
("Please hold", for instance). The caller hears the greeting before call acceptance at the forwarding destination.
3.5.3
Outbound Calls
The forwarding destinations defined are recognized as registered phone numbers/phones.
From each registered phone (cell phone, home office phone, for instance), you can use the Mobility function to set up phone connections and then use the basic functions listed above.
3.5.4
Main Menu
Functions in the main menu:
●
Dial Number
●
Redial Number
40
IVM V3.0
Ivmc03.fm
Nur für den internen Gebrauch
●
Mailbox Use and Operation
Mobility
Personal phone book (speed dial destinations 1 – 9 or 1 - 99, depending on the system
setting)
●
Change User Settings
●
Recording of your own spoken notices
>
3.5.4.1
The access to the main menu is described in Section 3.5.5, “Mailbox Access”, on
page 3-48.
Dial Number
You can set up phone connections from the main menu.
Dial the number (where applicable, with trunk access and area code) of the relevant user followed by #.
The telephone connection is established.
You can clear down the connection with the key sequence * 8. You are then returned to
the main menu where you can use other functions.
... from the cell phone directory
Cell phones from certain manufacturers support voice dialing for entries in the cell phone’s
phone book. The number is then received by IVM and dialed a few seconds later.
>
3.5.4.2
Note:
You can completely program dial-in to IVM + dialing to a specific number in your cell
phone’s phonebook.
Prerequisite: You can insert pauses (with the "+" character, for instance).
Programming example (may vary depending on the cell phone manufacturer):
Enter the access number for IVM, "+" for pause and (trunk access) number.
Redial Number
IVM saves the last five numbers dialed and lets you dial them directly with the Redial Number
feature.
Just dial #.
The system announces the last number dialed and prompts you to dial it with #, cancel the
operation with * or delete the number with 0. If you delete the number, the system offers
the next-to-last number dialed, etc. In total, the last five consecutive numbers dialed are available.
User Guide
41
Ivmc03.fm
Mailbox Use and Operation
Mobility
Nur für den internen Gebrauch
You are returned to the main menu if you cancel the redial operation for one of the numbers
announced or if you delete all of the numbers consecutively announced.
3.5.4.3
Personal Phone book (Speed Dial Destination Directory)
You can create a personal phone book with speed dial destination numbers from 1 through 9
or 1 through 99, depending on the system setting. This makes it quicker and easier to dial frequently used numbers.
Creating a Phone book (Speed Dial Destination Directory)
To create your personal phone book, proceed as follows:
1.
Enter a speed dial number (1 – 9 or 1 - 99, depending on the system setting) followed by
# in the main menu.
2.
When prompted, enter a phone number followed by #.
3.
Correct with 0 or confirm with #.
4.
Record the relevant name after the prompt and click #. Confirm with #.
You hear a message, stating that speed dialing is configured and you can now perform direct dialing with #, reprogram the speed dial destination with 0 or cancel the operation
with *.
You are returned to the main menu if you cancel the operation.
3.5.4.4
Dialing from the personal Phone book (Speed Dial Destination Directory)
To dial the number of a speed dial destination, proceed as follows:
1.
Enter the relevant speed dial number in the main menu followed by #.
IVM announces the associated name and prompts you to dial it with #, reprogram the
speed dial destination with 0 or cancel the operation with *.
2.
To dial, press #.
The telephone connection is established.
You are returned to the main menu if you cancel the operation.
To delete a speed dial destination, proceed as follows:
1.
First dial the speed dial number followed by #.
2.
Then dial 0 followed by *.
This deletes the speed dial destination.
42
IVM V3.0
Ivmc03.fm
Mailbox Use and Operation
Mobility
Nur für den internen Gebrauch
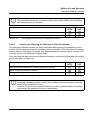
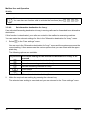
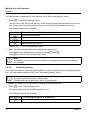
3.5.4.5
User settings
Your administrator has created a user profile (user settings) for you. You can use this profile to
access the main menu and operate the system as permitted by your settings and authorizations. You can also modify a number of these user settings from your (cell) phone.
>
Note:
System announcements provide detailed guidance through the individual menu options in the User settings menu.
To access the "User settings" menu, proceed as follows:
1.
Dial into the main menu and
2.
Enter the key sequence * 3.
You are now in the "User settings" menu and the system announces the current forwarding
setting. It then announces functions and other menus that you can select with the appropriate key.
Key selected The current forwarding setting is announced
1
Select forwarding to the cell phone
2
Select forwarding to 1st alternate destination
3
Select forwarding to 2st alternate destination
5
Forwarding to the answering machine
6
Opens the menu -->
Alternative destination for ’busy’
7
Opens the menu -->
Alternative destination for ’unavailable’
8
Opens the menu -->
Set e-mail delivery
9
Opens the menu -->
Set automatic greeting
**
#
Table 3-16
Check status
Return to the main menu
User settings menu
Perform the required function or dial into another menu by pressing the relevant key.
If you dial 1, 2, 3, or 5, the selected function is performed. You are then returned to
the "User settings" menu.
If you dial 6 through9, you are routed to the relevant menu and hear an announcement.
If you dial the key sequence * *, a comprehensive status announcement is output.
User Guide
43
Ivmc03.fm
Mailbox Use and Operation
Mobility
>
3.5.4.6
Nur für den internen Gebrauch
Note:
You can also use function calls to activate the functions (keys 1, 2, 3, 5).
Set alternative destination for ’busy’
If an activated forwarding destination is busy, incoming calls can be forwarded to an alternative
destination.
If this function is deactivated, your calls are routed to the mailbox’s answering machine.
You can make the relevant settings for this in the "Alternative destination for ’busy’" menu.
1.
Select 6 in the "User settings" menu.
You are now in the "Alternative destination for ’busy’" menu and the system announces the
current setting. It then announces the various options that you can select with the appropriate key.
The following options are available:
Key selected The current setting for the alternative destination on ’busy’ is announced
1
Activate alternative destination for ’busy’
3
Alternative answering machine for ’busy’
4
Activate answering machine for ’busy’
**
#
Table 3-17
2.
Check status
Return to the main menu
"Alternative destination for ’busy’" menu
Make the required user setting by pressing the relevant key.
The selected user setting is executed and you are returned to the "User settings" menu.
44
IVM V3.0
Ivmc03.fm
Nur für den internen Gebrauch
3.5.4.7
Mailbox Use and Operation
Mobility
Set alternative destination for ’unavailable’
If an activated forwarding destination cannot be reached (call is not answered after a set period
of time), incoming calls can be forwarded to an alternative destination.
If this function is deactivated, your calls are routed to the mailbox’s answering machine.
You can make the relevant settings for this in the "Alternative destination for ’unavailable’"
menu.
1.
Select 7 in the "User settings" menu.
You are now in the "Set alternative destination for ’unavailable’" menu and the system announces the current setting. It then announces the various options that you can select with
the appropriate key.
The following options are available:
Key selected The current setting for the alternative destination on ’unavailable’ is
announced
1
Activate alternative destination for ’unavailable’
3
Activate answering machine for ’unavailable’
4
Change alternative destination for ’unavailable’
5
Timeout before a call should be forwarded to the alternative destination
for unavailable
**
#
Table 3-18
2.
Check status
Return to the main menu
"Alternative destination for ’unavailable’" menu
Make the required user setting by pressing the relevant key.
The selected user setting is executed and you are returned to the "User settings" menu.
3.5.4.8
Set e-mail delivery
As the owner of a Mobility mailbox, you can also use the answering machine function. Your
calls are forwarded to the answering machine in the following cases:
●
Mobility is deactivated.
●
The forwarding destination is busy and the alternative destination for busy is deactivated.
●
The forwarding destination does not respond and the alternative destination for unavailable is deactivated.
Depending on the user settings, recordings are delivered either to the mailbox and/or as a
WAV file to your e-mail address.
User Guide
45
Ivmc03.fm
Mailbox Use and Operation
Mobility
Nur für den internen Gebrauch
You can activate or deactivate e-mail delivery in the "Set e-mail delivery" menu.
1.
Select 8 in the "User settings" menu.
You are now in the "Set e-mail delivery" menu and the system announces the current setting. It then announces the functions that you can select with the appropriate key.
The following options are available:
Key selected The current message delivery setting is announced
3
Activate e-mail delivery
5
Deactivate e-mail delivery
**
#
Table 3-19
2.
Check status
Return to the main menu
"Set e-mail delivery" menu
Make the required user setting by pressing the relevant key.
The relevant user settings are executed by dialing 3 and 5.
Click # to return to the "User settings" menu.
>
3.5.4.9
Note:
The settings in this menu are only effective if message recording is deactivated in
your mailbox.
Automatic greeting
Your caller can hear an automatic greeting before a call is accepted at the forwarding destination. You can make settings for this in the "Automatic greeting" menu.
>
Note:
The greeting set ex-works is: "Please hold."
The start time for the greeting is set to seven seconds.
To change the settings for the automatic greeting, proceed as follows:
1.
Press 9 in the "User settings" menu.
You are brought to the "Automatic greeting" menu.
The following options are available:
Key selected The current greeting set is announced
1
Table 3-20
46
Activate automatic greeting
"Automatic greeting" menu
IVM V3.0
Ivmc03.fm
Nur für den internen Gebrauch
Mailbox Use and Operation
Mobility
Key selected The current greeting set is announced
2
Deactivate automatic greeting
3
Edit greeting
4
Timeout before the greeting should be announced.
**
#
Return to the main menu
Table 3-20
2.
Check status
"Automatic greeting" menu
Make the required user setting by pressing the relevant key.
The automatic greeting is activated or deactivated by dialing 1 or 2.
You can record the greeting again by pressing 3 . You remain in the "Automatic greeting"
menu.
You can enter the time when the automatic greeting should start by pressing 4. You remain in the "Automatic greeting" menu.
Click # to return to the "User settings" menu.
3.5.4.10
Recording of your own spoken notices
To record your own spoken message:
●
Access the main menu (Section 3.5.5, “Mailbox Access”, on page 3-48),
●
press *6.
Depending on the system setting you will hear an announcement or a short notification tone
(see Chapter 5, “Recording (Call Live Recording)”..
>
During a recording it is not possible to dial another number.
>
Settings for recording (see Chapter 5, “Recording (Call Live Recording)”):
●
●
Announcement before recording (Voice Prompt / Beep / none).
Maximum recording duration (1 - 60 minutes), valid also for „Recording
(Mobility)“.
To end the recording, press *.
The recording will also be stopped:
●
When the maximum time for recording duration has been reached,
User Guide
47
Ivmc03.fm
Mailbox Use and Operation
Mobility
●
Nur für den internen Gebrauch
when you stop the conversation by hanging up.
The end of the recording will be acoustically indicated. This signaling depends on the setting
„Recording announcement“:
●
„Voice Prompt“: a corresponding text will be played back
●
„Beep“: a particular tone will be replayed
●
„None“: no acoustical signaling
This system-wide setting can be configured by the administrator.
Directly after the recording has been stopped, the spoken notification will be delivered as a
massage to the mobility-mailbox. Your mailbox number will be stored as caller's number on
the massage file.
3.5.5
Mailbox Access
To reach the Mobility main menu, you must call the IVM hunt group from a registered phone/
cell phone. The subsequent procedure depends on the system-wide "Security level" parameter:
"Normal" security
If your number is entered in a Mobility mailbox, you can access the Mobility main menu
without entering a password.
If your number is entered in multiple mailboxes, you are prompted to enter the mailbox
number. You are routed to the Mobility main menu after you enter a suitable mailbox number.
If you did not enter the mailbox number correctly you are prompted again to enter the mailbox number.
If you accessed the Mobility main menu with the mailbox number, you are only prompted
to enter the password when you switch to the message block (with *#).
If your Mobility mailbox is a member of one or more group mailboxes, this is taken into account during password verification.
●
>
●
48
Exception:
If your extension is registered at a Mobility mailbox and a dedicated mailbox exists
for your extension, you are prompted to enter this mailbox number followed by the
password when you call the IVM hunt group from your extension. In this case you
are immediately routed to your mailbox’s message block.
Press 1 to switch to the Mobility main menu.
"High" security
You are immediately prompted to enter the mailbox password here.
If your Mobility mailbox is a member of one or more group mailboxes, this is taken into account during password verification, that is, you can access a group mailbox without further
verification if the Mobility mailbox is one of your members.
IVM V3.0
Ivmc03.fm
Nur für den internen Gebrauch
Mailbox Use and Operation
Mobility
If the system is able to uniquely identify a mailbox on the basis of the password entered,
you are routed to the Mailbox main menu (in a Mobility box) or the message block. Otherwise, you are prompted to enter the mailbox number. If the entries (password and mailbox
number) are correct, you are routed to the Mobility main menu or the message block. If the
entries are not correct, you are given a second chance to enter the password and the mailbox number.
If you accessed the Mobility main menu with these credentials, you are not prompted to
enter a password when you switch to the message block.
You can also access the Mobility main menu if the mailbox is locked, provided it is not password-protected.
3.5.6
Function Calls
System-wide function numbers can be configured to simplify the administration of Mobility mailboxes from a registered phone/cell phone.
These numbers are configured by the administrator and are not assigned to any user, but rather
to a function.
You can use function numbers to:
●
request a callback
●
activate forwarding to a specific alternative destination
●
completely deactivate forwarding
●
activate/deactivate e-mail delivery
You can check the function numbers configured in your system at any time over the IVM Web
interface.
You can execute an action by simply calling the relevant function number from a registered
phone/cell phone. This call is answered by IVM and then immediately cleared down.
In the case of a callback, you are called back by IVM.
If the number of your phone/cell phone is registered at several Mobility mailboxes, you are
prompted to enter the mailbox number.
If the security level is set to "High" in your system, IVM will prompt you to enter the mailbox
password in the event of a callback. A password is not needed for other function calls.
User Guide
49
Ivmc03.fm
Mailbox Use and Operation
Mobility
3.5.7
Nur für den internen Gebrauch
Functions Available During a Call
A number of keys have special functions during calls set up via the IVM Mobility function:
Keys
Function
*7
Consultation: set up a consultation call or
toggle back and forth between two parties
*5
Conference: set up a conference with a party/extend a conference
*8
Disconnect: clear down the connection to
the current party
*6
Call recording or recording of an own notice
*
Finish a recording of a call/own spoken notice or dial interruption
Table 3-21
3.5.7.1
Functions available during a call
Consultation
You can set up a connection while a call is in progress without losing the connection to the first
party. This is called a "consultation".
●
●
●
Dial * 7 (consultation).
The first connection is placed on hold. The first party now hears music on hold.
Music on hold is not played if you are already in a teleconference with multiple participants
(see Section 3.5.7.3, “Setting Up a Conference”, on page 3-51). This allows conference
participants to continue their conversation.
Now dial the new number followed by #.
If you have created a personal phone book [see Section 3.5.4.3, “Creating a Phone book
(Speed Dial Destination Directory)”, on page 3-42], you can also enter a speed dial number
(see Section 3.5.4.4, “Dialing from the personal Phone book (Speed Dial Destination Directory)”, on page 3-42).
To end the consultation call, press * 8 (disconnect).
The connection to the consultation party is cleared down and you are returned to the first
party.
If you are at the time when you hang up in consultation, the partners can be connected or disconnected. This is defined by the parameter „Conversation on hold allowed“ in the system.
50
IVM V3.0
Ivmc03.fm
Nur für den internen Gebrauch
3.5.7.2
Mailbox Use and Operation
Mobility
Toggle
Once you have set up a consultation connection (see Section 3.5.7.1, “Consultation”, on page
3-50), you can switch back and forth between both parties as often as required. This is called
"toggling".
The "Toggle" function is also available if you set up a consultation connection while involved in
a teleconference (see Section 3.5.7.3, “Setting Up a Conference”, on page 3-51). You can then
switch between the conference and the consultation party.
To toggle, press * 7. You can do this as often as necessary.
To completely clear down the connection to the current party and revert to the other waiting party, press * 8 (disconnect).
Replacing the handset disconnects all other parties.
3.5.7.3
Setting Up a Conference
When using the Toggle feature (see above), the two other parties have no contact with each
other; however, you can join them so that you can talk to each other in a three-way conversation. This is called a "conference".
The maximum number of participants in a conference is 12.
To set up a conference:
●
●
●
First, set up a phone connection to one party.
Set up a consultation connection (see Section 3.5.7.1, “Consultation”, on page 3-50) to another party.
Press * 5 (conference).
The two other parties can now speak to each other.
Repeat the procedure to add more users to the conference.
Repeat this procedure until all the parties you want are added to the conference.
Once a conference is set up, you cannot disconnect individual parties, only the entire conference.
The parties themselves, however, can exit the conference individually by hanging up. Once the
last user has hung up, you hear an acoustic signal indicating that there are no more parties connected. How you then proceed depends on how this conference was set up:
●
●
If the first conference participant was forwarded to you (see Section 3.5.2, “Inbound Calls”,
on page 3-40), your connection is cleared down.
If you called the first participant from the Mobility main menu (see Section 3.5.4, “Main
Menu”, on page 3-40), you are returned to the main menu.
User Guide
51
Ivmc03.fm
Mailbox Use and Operation
Mobility
Nur für den internen Gebrauch
Press * 8 to clear down all connections to the participants and return to the Mobility
main menu.
●
If you hang up during a conference, the participants can be connected or disconnected. This is
defined by the parameter „Conversation on hold allowed“ in the system.
3.5.7.4
Recording (Mobility)
>
To use this function an authorization for Recording (Mobility) is necessary. This authorization has to be given for your mobility-mailbox by the administrator.
To start a recording:
●
Access the main menu (Section 3.5.5, “Mailbox Access”, on page 3-48),
●
press *6.
Depending on the system setting you will hear an announcement or a short notification tone
(see Chapter 5, “Recording (Call Live Recording)”).
>
During the recording of a telephone call it is not possible to add more participants to
the conference (consultation connection and dialing another number).
>
Settings for recording (see Chapter 5, “Recording (Call Live Recording)”):
●
●
Announcement before recording (Voice Prompt / Beep / none).
Maximum recording duration (1 - 60 minutes), valid also for „Recording of
your own spoken notices“.
To end the recording, press *.
The recording will also be stopped:
●
When the maximum time for recording duration has been reached,
●
when you hang up,
●
when the last participant of a conference hangs up.
The end of the recording will be acoustically indicated. This signaling depends on the setting
„Recording announcement“:
52
●
„Voice Prompt“: „End of recording“ is played back for all participants,
●
„Beep“: a particular tone will be replayed to all participants,
●
„None“: no acoustical signaling.
IVM V3.0
Ivmc03.fm
Nur für den internen Gebrauch
Mailbox Use and Operation
Mobility
Directly after the recording has been stopped, it will be delivered as a massage to your mobilitymailbox.
If a conversation with only one partner was recorded the telephone number of this partner (if
transmitted) will be stored on the massage file.
If a conference was recorded a system information will indicate, that the message you listen to
is a conference recording.
>
3.5.7.5
When Recording (Mobility) it is irrelevant whether the message recording for your
mailbox has been activated or not (same as Call Live Recording).
Picking Up Calls/Taking Over Calls
Changing telephones is possible during a current call. It is unimportant whether you have
been called or if you have made the call yourself via Mobility.
Taking over a current call at another telephone is very easy.
Dial into the Mobility main menu from the desired registered telephone (see Section 3.5.5,
“Mailbox Access”, on page 3-48).
The system recognizes you as a user and immediately switches the current call to this telephone.
User Guide
53
Ivmc03.fm
Mailbox Use and Operation
Mobility
54
Nur für den internen Gebrauch
IVM V3.0
Nur für den internen Gebrauch
4
Ivmc04.fm
Administration with the SuperUser Function
Overview
Administration with the SuperUser Function
This chapter is intended for the system administrator, more precisely for users with special administration rights (so-called „SuperUser“).
IVM V3.0 can be administered via telephone (SuperUser function), via Internet Browser or via
KC-/Kundenmanager.
Basic administration of the system is possible with the SuperUser function. The full administration of all mailbox parameters is possible either with the KC-Manager or via the Internet Browser! The online program offers a description of administration with KC-/Kundenmanager.
>
4.1
This manual only describes SuperUser administration via telephone. Access via
WBM is described in the Administration Manual and in the online help-function respectively.
Overview
In order to administer the system, the administrator must first access the SuperUser function
and identify him or herself with a code number. After successfully logging on to the system, the
following functions are made available to the administration:
●
Set up a mailbox by entering the appropriate extension number and a mailbox class
●
Delete a mailbox permanently
●
Query a mailbox status
●
Test the connection to the Internet
●
Installation of available software upgrade packages
●
Change of the SuperUser code number
●
Changing the Language for System Announcements
All of these functions are initiated via entries at the telephone keypad. The system includes a
user interface consisting of corresponding voice announcements.
>
User Guide
Note:
When using IVM in a IP-Netpackage environment, the entire administration must occur via the KC-/Kundenmanager. The "SuperUser function" is automatically deactivated in this case.
55
Ivmc04.fm
Administration with the SuperUser Function
Accessing the SuperUser Function
4.2
Nur für den internen Gebrauch
Accessing the SuperUser Function
The SuperUser function allows basic administration of the system. Accessing the function is
similar to accessing a mailbox:
After calling the IVM V3.0 group number, enter the prefix * # followed by the SuperUser
code number (default code "12345678").
>
All SuperUser activities are recorded in a log file with date and time.
After accessing the SuperUser function and entering the valid code number, the number of existing mailboxes and remaining memory capacity are announced (see Section 4.3, “Administration of Mailboxes”). Afterwards the various SuperUser functions can be selected by telephone keys.
56
IVM V3.0
Ivmc04.fm
Administration with the SuperUser Function
Accessing the SuperUser Function
Nur für den internen Gebrauch
The keys 1 (back) and 3
in the following figure:
(forward) allows to scroll between the functions as it is shown
Call to the IVM number
Enter a code number
Mailbox administration
System messages:
Number of mailboxes configured
Free language memory: hr., min.
3
Repeat
5
Set up mailbox
6
Delete mailbox
4
Check mailbox status
*#<code no.>
1
scroll forward
2
Switch to
user
mailbox
Test of the Internet connection
System announcement:
IP address, network mask
standard gateway
3
3
Test of the Internet
connection
1 scroll back
Software Upgrade
3
System announcement:
Download active, versions of
possibly available upgrade packages
4
Update the software
0
Change SuperUser code
number
1
Change SuperUser code number
for remote access
3
1 scroll back
language of the system announcement
Figure 4-1
4
8
Select language
SuperUser Function
Access to the SuperUser function is ended by hanging up the telephone (i.e. by interrupting the
connection).
User Guide
57
Ivmc04.fm
Administration with the SuperUser Function
Administration of Mailboxes
4.3
Nur für den internen Gebrauch
Administration of Mailboxes
After a successful dial-in as SuperUser first the mailbox administration is made available. The
status announcement informs about the number of existing mailboxes and the remaining memory capacity.
>
Note:
This announcement is repeated if the system administrator returns to the mailbox
administration function by scrolling forward or back.
The following functions are available to the system administrator:
Function
Key
Set up a mailbox
5
Delete a mailbox
6
Query the status of a mailbox
4
Table 4-1
>
4.3.1
Accessing Mailbox Administration Functions (see also Figure 4-1)
Note:
The SuperUser can also access the administration mode of an individual mailbox by
entering * # followed by the code number of the mailbox.
Setting up a Mailbox
After a successful dial-in as SuperUser a new mailbox can be set up by pressing 5 (see
Figure 4-1). The administrator is guided through the corresponding procedure via appropriate
system announcements.
To set up a new mailbox, a mailbox number must be entered. The system checks to make sure
the entered number is valid or has been previously assigned. A system message will help guide
the SuperUser if needed.
If the entered number is valid and has not been previously assigned, the system asks for a mailbox class for the new mailbox. After the class has been entered, the mailbox is installed automatically by the system.
>
58
Note:
The user can now access his or her newly set up mailbox by using the standard
code. The mailbox does not become active and is unable to record messages until
its owner has accessed the mailbox for the first time. The owner must therefore be
informed this his or her mailbox has been set up.
The KC-Manager enables the individual configuration of all features for a new mailbox.
IVM V3.0
Ivmc04.fm
Nur für den internen Gebrauch
4.3.2
Administration with the SuperUser Function
Test the Internet connection
Deleting a Mailbox
After a successful dial-in as SuperUser it is possible to delete a mailbox permanently by pressing 6 (see Figure 4-1). The administrator is guided through the corresponding procedure via
appropriate system announcements.
The system administrator enters the number of the mailbox to be deleted. The system checks
to see whether or not the mailbox number is valid, if the mailbox is empty, and if it is currently
being used. If all of the preconditions for deletion have been fulfilled, the mailbox is permanently
deleted. If any of these preconditions have not been met, the SuperUser receives a corresponding system announcement.
4.3.3
Querying the Status of a Mailbox
After a successful dial-in as SuperUser a query of the status of any existing mailbox can be
made. However, the administrator cannot listen to the messages left in the mailbox. The user
is supported by system messages.
After pressing 4 (see Figure 4-1), the system administrator must enter the mailbox number
(extension number of the mailbox owner). The mailbox class, the number of received messages, the number of stored messages and the length of the messages, as well as other additional
information, are then announced.
The system administrator now has the following options:
Function
Key
Repeat announcement
2
Select another mailbox
0
Abort query
#
Querying Mailbox Status
4.4
Test the Internet connection
After a successful dial-in as SuperUser and after the selection of the function „Connection to
the Internet“ (scrolling backwards or forwards by pressing the keys 1 or 3), the Internet
connection can be tested if necessary.
After having selected the function (see Section 4.2, “SuperUser Function”, on page 4-57) the
system announcement will guide through the process. Firstly the IP address, the network mask
and the standard gateway will be announced.
Function
Key
Repeat the announcement
2
User Guide
59
Ivmc04.fm
Administration with the SuperUser Function
System Software Upgrade
Nur für den internen Gebrauch
Function
Key
Start the test of the Internet connection
4
Table 4-2
Test the Internet connection
4.5
System Software Upgrade
After a successful dial-in as SuperUser and after selection of the function „Upgrade“ (scrolling
backwards or forwards by pressing the keys 1
or 3), the system software can be
upgrades to the newest version. The system announcement will guide through the process.
Firstly the announcement informs whether any software packages are available and if actually
a download of software packages is in process. These downloaded packages are afterwards
available to upgrade the system software.
Function
Key
Repeat the announcement
2
Start the Upgrade of available software packages to the system
4
4.6
Changing the Code Number for the SuperUser Function
The SuperUser function is protected against unauthorized access by a code number.
After the system administrator has accessed the SuperUser function and entered the valid
code number, the code number can be changed if necessary. On accessing this function (see
Figure 4-1), the system administrator is guided through the corresponding procedure via appropriate system announcements.
>
Note:
The * and # characters are not part of the code number, but a control prefix
required by the system.
Function
Key
Announce current code number
2
Change the code number. New code numbers must be entered twice for security reasons.
0
Table 4-3
60
Changing the Code Number
IVM V3.0
Ivmc04.fm
Nur für den internen Gebrauch
4.7
Administration with the SuperUser Function
Changing the Language for System Announcements
Changing the Language for System Announcements
After the system administrator has accessed the SuperUser function and entered the valid
code number, the language for SuperUser system announcements can be changed if required.
On accessing this function (see Figure 4-1), the SuperUser is guided through the corresponding procedure via appropriate system announcements.
Function
Key
Announce current language
2
Scroll through available languages and select one
8
Table 4-4
User Guide
Changing the Language for System Announcements
61
Ivmc04.fm
Administration with the SuperUser Function
Changing the Language for System Announcements
62
Nur für den internen Gebrauch
IVM V3.0
Nur für den internen Gebrauch
5
Ivmc05.fm
Recording (Call Live Recording)
Recording (Call Live Recording)
During a telephone call the record function can be activated by pressing the programmed
record key or with a key sequence. Deactivation results either when the programmed record
key is pressed again or when the conversation is ended. The current status is displayed in the
system telephone display. The recording is delivered as a normal message and is stored in the
input area. It is not specifically identified as a recording.
This feature is only configurable with the KC-Manager. According to the configuration (and independent of legal requirements), one of the following audio information messages is played
back:
●
Notification that the conversation is being recorded.
●
A short notification tone.
●
No acoustic notification.
>
The end of recording is never signaled acoustically.
Recording may be automatically stopped or not started in the following situations:
●
When the maximum storage capacity has been reached,
●
message recording is deactivated
User Guide
63
Ivmc05.fm
Recording (Call Live Recording)
64
Nur für den internen Gebrauch
IVM V3.0
Nur für den internen Gebrauch
6
IVMC06.FM
Audio Conferences
Overview
Audio Conferences
>
6.1
Note:
The audio conference feature is available only if enabled by conferencing licenses.
Only if conferencing is licensed, you are able to use the functions described in this
chapter.
Overview
With this conference server feature you can initiate audio conferences as a conference leader
or participate in audio conferences initiated by another conference leader.
All participants of a conference are connected acoustically equal in an audio conference room.
There are different tone signals played to the present participants if someone is entering or leaving the conference room.
Regarding initiation and control of a conference the role of the conference leader is different
from other participants. The initiator of a conference always is the conference leader.
Conference control functions are available only to the conference leader. The authorization to
be a conference leader can be set in the system administration.
Conferences can be initiated and controlled via telephone or standard web browser.
Provided conference leader functions:
●
Conference initiation via telephone or internet browser
●
Adding participants to a conference via Hold (consultation) function
●
Hold / Alternate (toggle) during a conference
●
On demand recording (announced)
●
Additional functions if controlled via internet browser:
–
Display of present participants
–
Direct call of participants to be added to the conference
–
Muting of particular participants
–
Saving an unlimited number of groups (participants lists)
–
Language selection for spoken system advices
Provided conference participant functions:
●
Dial-in for meet me conferences
User Guide
65
IVMC06.FM
Audio Conferences
Opening a conference
Nur für den internen Gebrauch
Optional continuation of the conference without chairperson
●
The max. number of simultaneous conferences and the max. number of participants in a conference depend on the number of available conferencing licenses (for 6, 12 or 18 participants),
on the system's settings and on the current availability of free lines.
6.2
Opening a conference
If you are authorized to be a conference leader, you can start (open) a conference. A telephone
or internet browser is used to open a conference. The max. number of simultaneous conferences and the max. number of conference participants in the IVM may not be exceeded, otherwise an appropriate fault message will be played / displayed.
If a conference is initiated via web browser advanced functions are available. If a telephone is
used for control just a basic set of functions is available.
6.2.1
Opening a conference via telephone
To open a conference a specific conference extension (functional phone number) which is permanently rerouted to the IVM must be called. The IVM's conferencing server answers the call
and advices lead through the opening procedure.
If you call from your extension and enter a conference room number identical to your extension number, you are automatically recognized as the conference leader and the conference
will start.
If you call from another telephone enter your conference room number with * in front.
E.g.: If you extension / your conference room is '123', enter *123. End with #.
Then you are prompted to enter your mailbox code number in addition for user legitimacy. If the
code number corresponds to your mailbox the conference starts..
>
Note:
The number of an owner's conference room is always the owner's extension number.
The number of an owner's conference room is always the owner's extension number.
After entering the conference room number (and identification), opening of the conference
room continues by prompting:
●
66
Number of conference participants (including the conference leader), followed by #.
This is a reservation preventing simultaneous other conferences from taking away required
licenses.
IVM V3.0
IVMC06.FM
Nur für den internen Gebrauch
Audio Conferences
Conference control
Conference room code, terminated by # (to skip entry, just press #).
An arbitrary code number which is the access code for this conference. This number must
before be given to those who are invited to dial into the conference themselves. The length
of the conference room code number equals the length of the mailbox code number.
●
6.2.2
Opening a conference via web browser
To access the web browser
●
select as language (Sprache) „English“,
●
Login as „User“ and
●
enter your Mailbox number and your PIN Code.
A click on the menu „Conference room“ (on the left side under ’Mailbox administration’) opens
the entry mask of the conference server.
How to control the conference server via web browser is in detail described in the help function
(online).
6.3
Conference control
Depending on the control unit, the telephone or web browser, several control functions are provided to the conference leader.
6.3.1
>
Conference control via telephone
Note:
At any time during a conference initiated via telephone the conference leader can
switch over to web browser control (see Section 6.3.2 on page 6-69). There a list of
present participants is displayed and control of the conference can be continued via
the web browser.
6.3.1.1
Overview
Control functions provided to the conference leader:
Function
Key(s)
Start recording
*M respectively *6
Stop recording
*
Disconnect
*T respectively *8
Hold [consultation] (including Toggle, Add participants,
Transfer of the conference)
*R respectively *7
User Guide
67
IVMC06.FM
Audio Conferences
Conference control
6.3.1.2
Nur für den internen Gebrauch
Start recording
*M respectively *6 starts a recording on demand. All participants get an announcement..
>
6.3.1.3
Note:
While recording is active no other functions (described in Section 6.3.1.1 on page
6-67) except stop of recording (key *) are available.
Stop recording
The key * stops recording..
>
Note:
A recording automatically is terminated if the conference leader hangs up
The record file is send to the conference leader's mailbox after end of recording. If mailbox
messages are received as E-mails also the record file is send as an E-mail.
6.3.1.4
Disconnect
*T or *8 is disconnecting all participants except the conference leader himself from
the conference room. The conference leader can stay in the room for another conference using
the same initiation parameters.
6.3.1.5
Hold (Alternate / Add participant / Transfer of a conference)
*R or *7 puts a conference on hold and the conference leader can call another single
person beside the conference for consultation. Advices inform about available control functions
in this state.
Provided functions in this state
●
●
●
68
"Alternate (Toggle)
The conference leader can repeatedly toggle between both parties by pressing *R or
*7 . The party the conference leader is not talking to is put on hold any time.
Add participants
With *K or *5 the conference leader and the single person both enter the conference. This ends the hold status of the conference.
Disconnect
*T or *8 disconnects the party the conference leader it currently talking to.
If he is talking to the single person, this connection is discontinued and the conference lea-
IVM V3.0
IVMC06.FM
Nur für den internen Gebrauch
Audio Conferences
Joining a conference as a participant
der returns to the conference.
If he is talking to the conference, the whole conference is terminated and the conference
leader talks just to the single person.
Transfer of a conference
To transfer the conference to the single person the conference leader just hangs up. The
single person then is taken into the conference and is it's leader.
●
>
6.3.2
Note:
This function allows a secretary to build up a conference and transfer it to a boss.
Conference control via web browser
How to control the conference server via web browser is in detail described in the help function
(online), see Section 6.2.2 on page 6-67.
6.4
Joining a conference as a participant
To join a conference guest participants first call the conference servers phone number and
enter the conference leader's room number.
If this conference room has not been opened yet, this is announced and music is played. If the
opening is not made in time (system-setting), the caller will be disconnected.
As soon as the conference leader opens the conference room the participants will get in after
an announcement.
If the conference leader has defined a conference room code, the callers must enter this code
also to get in.
Any participant entering a conference room is signaled to already present participants by a tone
signal.
A participant who left a conference (e.g. disconnection by unstable cellular network) can reenter (if conferencing licenses are not occupied in the meantime).
Dialing-in is not possible in a continued conference after the conference leader has left (see
Section 6.5.1.2 on page 6-70).
User Guide
69
IVMC06.FM
Audio Conferences
End a conference
6.5
Nur für den internen Gebrauch
End a conference
There are three methods to end a conference as a leader:
–
End of conference totally with immediate disconnection of all lines.
–
Temporarily continued conference without conference leader.
–
Disconnection of participants, but remaining in the conference room for another conference.
6.5.1
End a conference via telephone
6.5.1.1
End a conference totally
A conference is terminated and all lines are disconnected as soon as the conference leader
hangs up. If the system setting 'Continue the conference without leader' is enabled, the conference leader should use the 'Disconnect' function '* T' or '* 8' before hanging up, to make sure
the conference is terminated.
6.5.1.2
Temporarily continuation without conference leader
If 'Continue the conference without leader' is enabled in the system settings, the conference
can continue for a limited time (defined by the system administration) after the conference leader has hanged up.
The conference leader can return at any time within the continuation by just dialing into the conference room. A conference room code is not needed then.
30 seconds before automatic disconnection of all participants, the end of the conference is announced. The remaining time gives a chance to say goodbye.
6.5.1.3
End of one conference - starting another
Conferences are terminated without closing the conference room, if just the conference leader
stays in the conference room, e.g.:
●
after the last guest participant hangs up
●
the conference leader disconnects all participants by pressing *T or *8.
Now the conference leader can build up another conference using the same initiation parameters.
6.5.2
End a conference via web browser
Look at the online help of the WBM for description.
70
IVM V3.0
Nur für den internen Gebrauch
Index
BKIX.FM
Index
Z
A
Activating the personal assistant 36
Add participants to the telephone conference 68
Audio Conference
Overview 65
Audio Conferences 65
Auto-attendant mailbox with distribution lists 17
B
Basic mailbox 17
C
Caller callback 30
Caller’s number 28
Changing a user name 39
Changing the language for super-user system announcements 61
Changing the super-user password 60
Conference control 67
via telephone 67
conference participants
number of 66
Conference room code 67
D
Date stamp 28
Delete message 30
Distribution lists 23
E
End a conference 70
via telephone 70
Exclusive mailbox 17
F
Fast-forward message 30
Forward message 30
Functions description, overview 11
G
Greetings
Changing the password for the private message 34
User Guide
71
BKIX.FM
Index
Nur für den internen Gebrauch
Controlling greetings 33
Manual selection 31
Overview 31
Recording and selection 31
Setting up and recording greetings 32
Group mailbox 17
I
Information mailbox 17
Input range 28, 30
Interruption for five seconds (pause) 30
J
Joining a conference
as a participant 69
K
KC-/Kundenmanager 55
L
Language selection
"Normal" mailbox owner 38
M
Mailbox
Auto-attendant mailbox with distribution lists 17
Basic mailbox 17
Changing the mailbox password 34
Classes 17
Delete 59
Exclusive mailbox 17
Functions overview 30
General information 17
Group mailbox 17
Information mailbox 17
Navigatiion 26
Preferred auto-attendant mailbox 17
Preferred auto-attendant mailbox with distribution lists and broadcast 17
Preferred group mailbox 17
Preferred mailbox 17
Preferred mailbox with greeting control and distribution lists 17
Premium mailbox 17
Query status 59
Setup 58
Standard auto-attendant mailbox 17
72
IVM V3.0
BKIX.FM
Nur für den internen Gebrauch
Index
Standard mailbox 17
Standard mailbox with 4 greetings 17
Standard mailbox with greeting control 17
Use and operation 25
Mailbox access/code numbers 25
Mailbox password 26
Message
Private message 28
Recording a private message 32
Urgent message 28
Messages to all mailbox users 23
MWI 13
N
Notification call
Activating/deactivating 35
Notification call number
Enter/select 36
number of an owner's conference room 66
O
Opening a conference 66
Opening a conference via telephone 66
Out-bound call 35
Overview 11
P
Pager message 35
Preferred auto-attendant mailbox 17
Preferred auto-attendant mailbox with distribution lists and broadcast 17
Preferred group mailbox 17
Preferred mailbox 17
Preferred mailbox with greeting control and distribution lists 17
Premium mailbox 17
Previous message 30
Private message 28
Q
Query status 59
Querying mailbox messages 28
R
Record and send a new message 30
Recording 63
Recording (conference) 68
User Guide
73
BKIX.FM
Index
Nur für den internen Gebrauch
Recording a private message 32
Replay message 30
Reply to message 30
Rewind message 30
S
Save/move message 30
Scroll back 26
Scroll forward 26
Signaling incoming messages 13
Skip messages 30
SMS 35
Speed dialing for call forwarding 38
Standard auto-attendant mailbox 17
Standard mailbox 17
Standard mailbox with 4 greetings 17
Standard mailbox with greeting control 17
Standard password 26
Storage range 28, 30
Substitute
Selecting a substitute 37
Substitute function
Activating/deactivating 36
Super user
Changing the language for super-user system announcements 61
Changing the super-user password 60
Superuser administration 55
Super-user function
Access 56
End 57
Overview 55
Switch mailbox 30
Switchboard / Auto-Attendant mailbox 21
T
Target group 11
Time stamp 28
Transfer of a conference 69
U
Urgent message 28
User instruction language 38
User instruction messages 38
User name
Changing a user name 39
74
IVM V3.0
BKIX.FM
Nur für den internen Gebrauch
Index
V
Voice announcements 55
W
WBM 55
User Guide
75
Important telephone numbers
For problems:
For questions regarding sales:
Upon delivery of the equipment, please enter
telephone numbers!
Issued by:
Deutsche Telekom AG
Right of modification reserved.
Reference number: A31003-E8400-X915-8-7619
Softwarestand: 3.0
Stand: 02/2009
Printed on environmentally compatible
recycled paper.