1
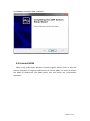
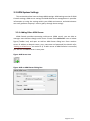
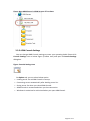
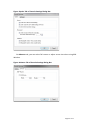
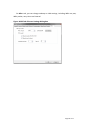
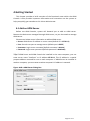
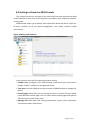
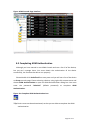
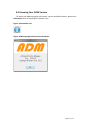
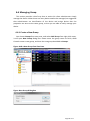
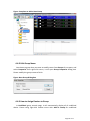
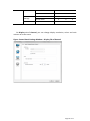
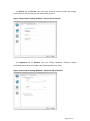
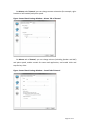
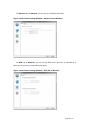
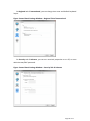
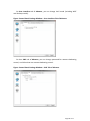
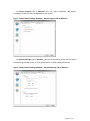
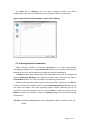
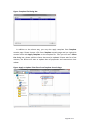
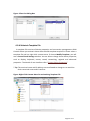
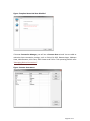
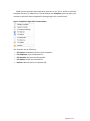
Advanced Device Manager (ADM) v 4.0 Administrator Guide Issue Date: 04. 09, 2013 Rev: 002 Astec Technology CO., LTD 13F-7., No.79, Sec. 1, Xintai 5th Rd., Xizhi Dist., New Taipei City 221, Taiwan Tel: +886-2-8698-3077 Fax: +886-2-8698-3058 Copyright Notices © 2013, Astec Technology Co., Ltd. All rights reserved. This manual and the software and firmware described in it are copyrighted. You may not reproduce, transmit, transcribe, store in a retrieval system, or translate into any language or computer language, in any form or by any means, electronic, mechanical, magnetic, optical, chemical, manual or otherwise, any part of this publication without express written permission. Trademarks The Astec and ADM logos are trademarks of Astec Technology Co., Ltd. Other product names mentioned herein are for identification purposes only and may be trademarks and/or registered trademarks of their respective companies. Specifications subject to change without notice. Page 2 of 71 Table of Contents 1 Introduction ...................................................................................................................... 4 1-1 System Architecture ........................................................................................................................... 4 1-2 About This Guide ................................................................................................................................. 5 1-3 Finding the Information You Need in this Guide .................................................................... 5 2 Preparing for Installation ............................................................................................ 6 2-1 Before Installation............................................................................................................................... 6 2-2 Hardware Requirements .................................................................................................................. 7 2-3 Software Requirements .................................................................................................................... 7 2-4 Communication Port Requirements ............................................................................................ 8 2-5 Supported Client Firmware ............................................................................................................. 8 3. Installation ADM system .............................................................................................. 9 3-1 ADM Installation Procedure............................................................................................................ 9 3-2 Uninstall ADM ..................................................................................................................................... 12 3-3 ADM System Settings ....................................................................................................................... 13 4 Getting Started .............................................................................................................. 21 4-1 Add an ADM Server........................................................................................................................... 21 4-2 Getting to Know the ADM Console ............................................................................................. 22 4-3 Completing ADM Authentication ................................................................................................ 23 4-4 Using Right-Click Context Menu ..................................................................................................25 4-5 Knowing Your ADM Version ..........................................................................................................27 4-6 Managing Group ................................................................................................................................. 28 4-7 Managing Device ................................................................................................................................ 31 4-8 Managing Firmware ......................................................................................................................... 51 4-9 Managing Template .......................................................................................................................... 56 4-10 Managing Update ............................................................................................................................64 4-11 Managing Schedule Task .............................................................................................................. 68 Page 3 of 71 1 Introduction Advanced Device Manager (ADM) is the next generation management tool to replace of previous version of Advanced Management Software (AMS). It delivers centrally monitoring & control, software distribution, update management, asset management, grouping and remote assistance to your network while providing superior security, performance, mobilization and TCO. This release has several new functions and features which includes the ability to perform operations on groups and/or individually selected devices providing a simple, time-saving method for configuring and updating multiple devices. With new search function, you can discover a specified client by IP or MAC address. It also allows to managing multiple servers & subnets via one console in a large network. ADM is ideal for small, mid-size businesses and large enterprises looking to reduce the cost and complexity associated with individual desktop installations. With this software, SMBs and enterprises can provide fast, secure and centrally managed access to any application for authorized users in their organization. ADM comes bundled with all thin clients. It provides comprehensive management control for smaller installations as well as scales up to hundreds of thousands of clients. 1-1 System Architecture The Advanced Device Manager (ADM) consists of ADM server, console and client’s agent. The following illustration shows how the ADM server, console and client’s agent interactive and communicate between each other. Page 4 of 71 1-2 About This Guide This guide provides the step-by-step instructions you need to install and configure an ADM environment. It also includes the requirements you must address before you begin the installation procedures. This guide is intended for experienced network administrators and Information Technology members who have installed and configured ADM on Windows server. 1-3 Finding the Information You Need in this Guide You can use either the Search window or Find toolbar to locate a word, series of words, or partial word in an active PDF document. For detailed information on using these features, refer to the Help in your PDF reader. Page 5 of 71 2 Preparing for Installation 2-1 Before Installation Obtain and configure all hardware and software, as necessary (see "Hardware Requirements" and "Software Requirements" in page 7). CAUTION: It is required that you do not install ADM on any server which is currently dedicated to other tasks (such as a Domain Controller, Backup Controller, Mail Server, Production Web Server, DHCP Server, MSMQ Server, Application Server, and so on). It is highly recommended that ADM be installed on a server that is dedicated to ADM services. Install a supported operating system on the machine to which ADM will be installed. Be sure that all systems are up-to-date with current Microsoft service packs, patches and updates (see "Software Requirements"). Ensure that no other applications requiring IIS and FTP are running on the machine to which ADM is installed. Ensure that all required communications ports are available and open for proper communication between servers, routers, and switches (see "Communication Port Requirements"). Ensure you have access to your operating system CD-ROM and your Microsoft Windows System files for use during your installation. NOTE: During ADM installation ADM checks the system to determine if all required software is present. If required software is not present, ADM indicates which software is missing. Some required third-party software is included with the ADM software, while other software is available from your operating system CD-ROM or from the network location for Microsoft Windows system files (usually the i386 folder). Uninstall the AMS console and server (if any) to ensure your devices are discovered by new ADM. Page 6 of 71 2-2 Hardware Requirements Depending on your operating system, be sure the machine(s) to which you will install ADM meets or exceeds the minimum system requirements for 32-bit operating systems or for 64-bit operating systems (as these are general guidelines, be sure to refer to your operating system documentation for details on hardware requirements). 2.4 GHz 32-bit or 64-bit processor 4 GB of system memory 40GB hard drive with at least 15 GB of available space IMPORTANT: The actual free space required depends on the number and size of the packages you register, as well as number of devices you will be managing (the image size of the firmware). The minimum free space shown assumes the image size of the firmware and packages require that amount of space. 2-3 Software Requirements ADM supports the English versions of software enclosed Windows Server 2003 (32-bit) Windows Server 2008 R2 (32-bit) Windows Server 2008 R2 (64-bit) Windows 7 (32-bit) Windows 7 (64-bit) By default, ADM installs Microsoft .NET Framework 3.5.1 or above is highly recommended. The ADM server will use Web and FTP services, please ensure that Disable Internet Information Services (IIS) if it is active. Disable FTP service if it is active. You must perform a custom setting in according to your server platform. Page 7 of 71 2-4 Communication Port Requirements To perform ADM full range of management functions, it requires open certain ports on your servers, routers, switches and virus protection software. Below lists the ports ADM uses and describes the respective communication protocols and their function (ensure that these ports are open for proper communication between servers). Role Protocol/Service Port Function Console TCP 8635 Communicate with the server FTP 21 Send files to the server HTTP 8080 Communicate with the client TCP 8635 Communicate with the console UDP 8634 Broadcast to the client Server 8636 Client FTP 21 Receive files from the client HTTP 8080 Communicate with the server UDP 8634 Broadcast to the server 8636 FTP 21 Send files to the server 2-5 Supported Client Firmware Depending on the thin client operating system, be sure the device(s) to which you will connect to ADM meets the system requirements below. WEC 7 – v7.0.013 or above WES 2009 - v1.15.1 or above WES 7 - v2.x7 or above Linux 2.0 - v2.2.1 or above Page 8 of 71 3. Installation ADM system This section walks you through the process before install the ADM software that to allow Administrator easy to set up the ADM system in their environment. Caution: Be sure you have completed all pre-installation requirements as described in "Preparing for Installation" before you begin installing ADM system. ADM system installs the following ADM roles on a single server: ADM Server – Control the client action like power control, remote access, group auto-configuration. ADM Console – Advanced user interface for configuring and monitoring the system. 3-1 ADM Installation Procedure Double-click the ADM4.0.00x.msi file to begin the ADM installation. Click Next to continue the ADM system Setup. Page 9 of 71 Follow the instruction to continue the installation. Select the way you want to install, and then click Next. Page 10 of 71 Click Install to begin the installation. Installing ADM system, please wait a few seconds. Page 11 of 71 Click Finish to complete ADM installation. 3-2 Uninstall ADM When using a Microsoft Windows remove program feature (such as Add and Remove Programs or Programs and Features) to remove ADM, it is easier to remove the ADM by double-click the ADM System icon and launch the uninstallation procedure. Page 12 of 71 3-3 ADM System Settings This section describes how to change ADM settings. ADM settings consist of ADM Console settings, ADM server settings and Add ADM server management. It provides information on using the settings within your ADM environment, and administrator can easily perform company’s security policy through these settings. 3-3-1 Adding Other ADM Server ADM Console provides connecting multi-server (ADM server), you are able to manager more devices though multi-server. Please click Add Server icon as below figure (Toolbar icon) and open an Add an ADM Server dialog box. Enter another server IP address or domain name, port, username and password (the details refer “Adding an ADM Server” on section 4-1). If add a server to ADM Console is successful, you will see new ADM server in tree pane. Figure: Add Server Icon Figure: Add an ADM Server Dialog Box Page 13 of 71 Figure: New ADM Server in ADM Servers of Tree Pane 3-3-2 ADM Console Settings You can change AMD Console settings to meet your operating habit. Please click Console Settings icon as below figure (Toolbar icon) and open a Console Settings dialog box. Figure: Console Settings Icon On Option tab, you can select below option Loading server list at ADM Console is startup. Connecting server automatically after loading server list. Saving server list when you close ADM Console. ADM Console is reconnected when you lost connection. Windows is maximized or minimized when you open ADM Consol. Page 14 of 71 Figure: Option Tab of Console Settings Dialog Box On Advance tab, you can select full screen or adjust screen size when using RDP Window. Figure: Advance Tab of Console Settings Dialog Box Page 15 of 71 3-3-3 ADM Server Settings If default system value don’t meet security policy, ADM Console provide settings for ADM server, you can adjust these settings to perform to perform company’s security policy. Please select an ADM server from tree pane and click Server Settings icon as below figure (Toolbar icon), and then open a Server Settings dialog box. Figure: Server Settings Icon On General tab, you can set up server connection settings, including server use TCP/UDP port, FTP use TCP port, FTP default password and other options. For system, can set up numbers of threads and save data broadcast interval. Figure: General Tab of Server Settings Dialog Box On Console tab, you can set up ADM Server listen TCP port, ADM Console will be connect to ADM Server through this TCP port. Also limit ADM Console IP address or bind ADM Server IP address. Besides, you can allow ADM Console find ADM Server through using broadcast. Page 16 of 71 Figure: Console Tab of Server Settings Dialog Box On Client Control tab, you can set up device connection settings, including client use TCP/UDP port, retry maximize times (including connect/action fail retry) and command send/receive timeout. For system, can set up broadcast interval and save data broadcast interval. Figure: Client Control Tab of Server Settings Dialog Box Page 17 of 71 On Network tab, you can maintain managed subnet or IP address to manage the device that IP address is specific range. Figure: Network Tab of Server Settings Dialog Box On Communication tab, you can set up timeout (including connections timeout, no transfer timeout and login timeout) and buffer size (including internal transfer buffer size and socket buffer size). When enter 0 seconds in timeout settings, it is not timeout. Figure: Communication Tab of Server Settings Dialog Box Page 18 of 71 On Speed Limit tab, you can adjust download speed limit and upload speed limit for FTP file. Figure: Speed Limit Tab of Server Settings Dialog Box On Security tab, you can change the password that account is “Admin” when need to login ADM server (for example, add a server From ADM Console). Minimum length is 6 characters, the password is removed if leave empty. Figure: Security Tab of Server Settings Dialog Box Page 19 of 71 On Misc. tab, you can change wakeup on LAN settings, including WOL use port, WOL packet, retry times and interval. Figure: MISC Tab of Server Settings Dialog Box Page 20 of 71 4 Getting Started This chapter provides a brief overview of the functional areas within the ADM Console. It also provides important information and instructions on the system to help you quickly get started as a thin client administrator. 4-1 Add an ADM Server Before use ADM Console, system will demand you to add an ADM server. Because the device was managed through ADM server, so you also need to manage ADM server. Please enter below server information to add an ADM server. Server: ADM Server IP address or server name (default IP is 127.0.0.1) Port: Console use port to manage server (default port is 8635) Username: Login server username (default username is Admin) Password: Login server password (default password is Admin#1) *Tip: If ADM Server and ADM Console be installed in the same computer, you can enter server name “localhost” or IP address 127.0.0.1. This IP address is a special purpose address reserved for use on each computer. If ADM Server be installed in another computer, you must enter another computer’s IP address in network. Figure: Add a ADM Server Dialog Box Page 21 of 71 4-2 Getting to Know the ADM Console This section contains an overview of the areas and tools that comprise the ADM Console (details on each item in the console are provided in their respective chapters of this guide). ADM Console allows you to quickly view information about the device, helps you to easily perform all of the device-management, and simply maintains ADM environment. Figure: ADM Console Interface In this console, there are four operating areas as below: Toolbar Icon: Configure your ADM Console preferences and environment designs so that it meets your management needs. Tree pane: List each ADM server and functions of ADM Console to manage the device. Console page: Show that you are running functions, and each function would create different console page. You can switch these console pages and operate these functions quickly at any time. Message list: Show each task running information, system event information and communication information. Page 22 of 71 Figure: ADM Console Page Interface 4-3 Completing ADM Authentication Although you have started to use ADM Console and see a list all of the device, but you can’t manage them. You must obtain the authorization of the device successfully, the functions be able to run properly. Please double-click Undefined from tree pane and you will see a list of the device on Group console page. Please selecting a device, using right-click context menu and choose ADM Authentication to open an ADM Authentication dialog box. You must enter the password “Admin#1” (default password) to complete ADM Authentication. Figure: Un-Complete ADM Authentication Icon *Tip: Device must not be authenticated, so that you are able to complete the ADM authentication. Page 23 of 71 Figure: Using Right-Click Context Menu for completing ADM Authorization Figure: ADM Authentication Dialog Box Figure: Complete ADM Authentication Status Page 24 of 71 4-4 Using Right-Click Context Menu ADM provide friendly interface, and assist you can easily manage your device. When you have completed ADM Authentication, then you are able to use right-click context menu on each device from Group console page. Figure: Right-Click Context Menu for the Device Right-click context menu consist of device manager, firmware manager, template manager and list management. For list management, you are able to usefully manage the list all of device through right-click context menu. The main functions are as following (as for other functions, please refer related chapter): Add to Group: Assign the device to different group. Remove From List: Remove the device from list. Select All: Select all of device. Unselect All: Cancel all of device been selected. Refresh: Refresh information of the list and research the device. Page 25 of 71 On ADM Servers of tree pane, you are able to use right-click context menu to add an ADM server. Figure: Right-Click Context Menu for ADM Servers of Tree Pane On server name of tree pane, you are able to use right-click context menu to manage an ADM server. The functions are as following: Disconnect: Disconnect this server. Add Group: Add a Group in this ADM server. Remove Server: Remove this server from ADM Console. Properties: Set up ADM server properties. Figure: Right-Click Context Menu for Server Name of Tree Pane On Groups of tree pane, you are able to use right-click context menu to add a new group. The new group will be added to Groups. Figure: Right-Click Context Menu for Groups of Tree Pane On Template, Firmware, Component and Schedule Task of tree pane, you are able to use right-click context menu to manage console page. The functions are as following: View Detail: Open related console page. Refresh: Refresh the data of related console page. Figure: Right-Click Context Menu for Template, Firmware, Component and Schedule Task of Tree Pane Page 26 of 71 4-5 Knowing Your ADM Version To display the ADM copyright information, version and build number, please click Information icon as below figure (Toolbar icon). Figure: Information Icon Figure: ADM Copyright and Version Information Page 27 of 71 4-6 Managing Group This section provides a brief way that to assist thin client administrator simply manage the device. When there are many device need to be managed, we suggested that administrator set classification of the device and assign device that the properties are same to the same group, so that you are able to easily manage your device. 4-6-1 Create a New Group You choose Groups from tree pane, and select Add Group from right-click menu, it will open New Group dialog box. Please enter the group name to finish, ADM Console create a new group, and then the new group be added to Groups. Figure: Add a New Group from Tree Pane Figure: New Group Dialog Box Page 28 of 71 Figure: Complete to Add a New Group 4-6-2 Edit Group Name You choose a group that you want to modify name from Groups of tree pane, and select Properties from right-click menu, it will open Group Properties dialog box. Please modify the group name to finish. Figure: New Group Dialog Box 4-6-3 How to Assign Devices to Group In Undefined group console page, it will automatically display all of undefined device. Please using right-click context menu with Add To Group for undefined Page 29 of 71 device, you must select an option from Add to Group dialog box, and then assign device to finish. Figure: Use Add To Group from Right-Client Context Menu Figure: Add To Group Dialog Box Figure: Assign Device to New Group Page 30 of 71 4-7 Managing Device This chapter describes how to perform routine device management tasks using the ADM Console. It provides information on managing the devices within your ADM environment. 4-7-1 View Device Details and Status Administrator can quickly view information of each device from Group console page, it is clear at a glance to help you to manage them usefully. The information is including device model, terminal name, mac address, IP address, ram size, flash size, operating system platform, firmware version and device status. Figure: View Details of Each Device Administrator can view current status of each device through below icons, and you are able to click on some of the icons to run the functions. The meanings are as follow: : Device is off-line. : Device is unauthorized. Page 31 of 71 : Device is on-line. : Click it to shut down the device. : Click it to wake the device on LAN. : Device’s EWF is disabled. : Device’s EWF is enabled. : Click it to load device’s control panel settings. 4-7-2 Use Remote Control to Manage Device If you need to troubleshoot device problems, ADM Console provide remote control (such as Wake on LAN, Reboot, Power off, EWF Control and Reset Default) to assist administrator mange the devices. In Groups of tree pane, double-click a group name. Select the single device you want to control, choose a function from right-click context menu, and then this function will be run immediately. *Caution: EWF Control is only supported on WES 7 and WES 2009 clients. Reset Default is only supported on WEC 7 and Astec Linux 2.0 clients. Figure: Right-Click Context Menu for Remote Control Page 32 of 71 Figure: Right-Click Context Menu for EWF 4-7-3 Remote Shadowing Devices It is very useful, administrator can view and control a device remotely (shadowing a device) to help a user with a particular application and to troubleshoot device problems. In Group console page, please select the single device you want to view and choose VNC Viewer from right-click context menu. Enter session password “Admin#1” (default password) then see a VNC View Window. Figure: VNC Authentication Dialog Box Figure: VNC View Window Page 33 of 71 4-7-4 Change Device Properties Device properties consist of general, network, regional and advanced properties. ADM Console allows administrator can change these properties by using Control Panel Settings. You can easily maintain the properties of each device, and the device will apply the settings immediately. In Group console page, please select the single device you want and choose Control Panel Settings from right-click context menu. Then you will open a Control Panel Settings window, it is a user interface for maintaining properties. In side bar, there are four items. Each item also contains several of tabs. Depending on different thin client operating system, the properties that you want to change are not the same. Please refer table as following, it list all of operating system support device properties. Table: List all of Operating System Support Device Properties Items Tabs Display Device General Keyboard Mouse Sound Network Network DNS International Regional Security Advance Details WES 2009/ Astec WEC 7 WES 7 Linux 2.0 Resolution X X Colors X X Screen Saver X X X X Terminal Name/Group X Terminal Description X Character repeat X X Initial State X X Mouse Orientation X X Pointer Speed X X Volume X X Other Option X IP Address X X DNS Server X X Wins Server X X Time Zone X X Keyboard Layout X X Terminal Properties X X X X X Administrator Password X User Interface Shell Mode VNC Allow and Password X X USB HID Device X X USB Mass Storage X X Device Support X Page 34 of 71 Device USB Printer X X Remote Manage Connect X X X Screen Saver X X X Citrix VDI Connect X On Display tab of General, you can change display resolution, colors and wait minutes of screen saver. Figure: Control Panel Settings Window – Display Tab of General Page 35 of 71 On Device tab of General, you can reset terminal name by MAC and change terminal name, terminal group and terminal description. Figure: Control Panel Settings Window – Device Tab of General On Keyboard tab of General, you can change keyboard character repeat (including repeat delay and repeat rate) and keyboard initial state. Figure: Control Panel Settings Window – Keyboard Tab of General Page 36 of 71 On Mouse tab of General, you can change mouse orientation (for example, righthanded or left-handed) and point speed. Figure: Control Panel Settings Window – Mouse Tab of General On Mouse tab of General, you can change volume (including Speaker and MIC) and point speed, enable sounds for events and application, and enable clicks and taps for key clicks. Figure: Control Panel Settings Window – Sound Tab of General Page 37 of 71 On Network tab of Network, you can set up IP address manually. Figure: Control Panel Settings Window – Network Tab of Network On DNS tab of Network, you can set up DNS server (primary or secondary) or Wins server (primary or secondary) manually. Figure: Control Panel Settings Window – DNS Tab of Network Page 38 of 71 On Regional tab of International, you can change time zone and default keyboard layout. Figure: Control Panel Settings Window – Regional Tab of International On Security tab of Advance, you can turn terminal properties on or off, or reset administrator/EWF password. Figure: Control Panel Settings Window – Security Tab of Advance Page 39 of 71 On User Interface tab of Advance, you can change shell mode (including WBT and Desktop mode). Figure: Control Panel Settings Window – User Interface Tab of Advance On User VNC tab of Advance, you can change password for remote shadowing control, and allow that use remote shadowing control. Figure: Control Panel Settings Window – VNC Tab of Advance Page 40 of 71 On Device Support tab of Advance, you can select supported USB device, including HID device, mass storage device and printer. Figure: Control Panel Settings Window – Device Support Tab of Advance On Remote Manage tab of Advance, you can set up polling server for the device broadcasting to ADM server, or reset password for remote manage authorize. Figure: Control Panel Settings Window – Remote Manage Tab of Advance Page 41 of 71 On Citrix tab of Advance, you can select whether connect the device automatically for Citrix virtual desktop is running when a device is connected. Figure: Control Panel Settings Window – Citrix Tab of Advance 4-7-5 Manage Device Connections ADM Console provides Connection Management to assist administrator managing the device’s VDI. Using Connect Host wizard, you can quickly maintain the settings of each VDI, and the device will apply the settings immediately. In Group console page, please select the single device you want to manage and choose Connection Manager from right-click context menu. Then you will open a Connect Host wizard, it is a user interface for maintaining connections. ADM Console provides several types of the connections. When you use Add to create new connection, ADM Console will open New Connection dialog box and you can select one option. Thin client operating system support different type of the connections (see table Support List). You also use Edit to modify this setting or use Delete to remove a connection. Finally, use Update to apply the connection settings to the device. *Caution: Connection Management is only supported on WEC 7 and Astec Linux 2.0 clients. Page 42 of 71 Figure: Connect Host Wizard Figure: New Connection Dialog Box Table: List all of OS Support Connection Type Connection Type WEC 7 Astec Linux 2.0 Citrix ICA Client X X Microsoft Remote Desktop Client X X Microsoft Remote Apps X VMware View X Web Browser X X X11 Client X VNC Viewer X Telnet X Page 43 of 71 If you choose Citrix ICA Client, please enter connection name and XenApp sever URL in dialog box. To continue with select a connecting type, if choose server, enter server name else enter command-line and working directory. On Login Setting frame, you are able to enter user name and domain. Figure: Connection Settings Dialog Box for Citrix ICA Client If you choose Microsoft Remote Desktop Client (RDP), please enter connection name and sever IP address/domain name in dialog box. You can use Advance to open advanced settings, the Login tab display about login settings, you are able to enter user name, password and domain, and select whether auto-login system after connecting server. Page 44 of 71 Figure: Connection Settings Dialog Box for RDP – Login Tab The Display tab display about screen settings, you are able to select whether use full screen system after login system. Figure: Connection Settings Dialog Box for RDP – Display Tab Page 45 of 71 The USB tab display about USB settings, you are able to select whether use USB device redirection after login system. Figure: Connection Settings Dialog Box for RDP – USB Tab If you choose Microsoft Remote Apps (Remote Apps), please enter connection name and sever IP address/domain name in dialog box. The Logon Setting tab display about login settings, you are able to enter user name, password and domain. Figure: Connection Settings Dialog Box for Remote Apps – Logon Setting Tab Page 46 of 71 The Application tab display about application settings, you must enter alias (“||” + executable file name of application) and command-line arguments (if the application requires arguments). Figure: Connection Settings Dialog Box for Remote Apps – Application Tab If you choose VMware View, please enter connection name and sever IP address/domain name in dialog box. You can use Advance to open advanced settings, the Login tab display about login settings, you are able to enter user name, password and domain, and select whether auto-login system after connecting server. Figure: Connection Settings Dialog Box for VMware View – Login Tab Page 47 of 71 The Display tab display about screen settings, you are able to select whether use full screen system after login system. Figure: Connection Settings Dialog Box for VMware View – Display Tab The USB tab display about USB settings, you are able to select whether use USB device redirection after login system. Figure: Connection Settings Dialog Box for VMware View – USB Tab Page 48 of 71 If you choose Web Browser, please enter connection name and start page URL in dialog box. Figure: Connection Settings Dialog Box for Web Browser If you choose X11 Client, please enter connection name and VNC server IP address, select a XDM Mode in dialog box. Figure: Connection Settings Dialog Box for X 11 Clients If you choose VNC Viewer, please enter connection name and VNC server IP address/domain name in dialog box. Figure: Connection Settings Dialog Box for VNC Viewer Page 49 of 71 If you choose Telnet, please enter connection name, server IP address/domain name and user name in dialog box. Figure: Connection Settings Dialog Box for Telnet Page 50 of 71 4-8 Managing Firmware This chapter describes how to clone and update firmware image for the device. Firmware Manager is a powerful function for backup firmware image of the device, it provide simple operating steps and assist administrator to complete the task of saving and restoring firmware image. It is sometimes also clone a firmware to another device to resolve system problem, or upgrade your system from a new firmware image. 4-8-1 Create a Firmware File from Thin Client ADM Console provides a way of cloning firmware from each device, and allows you upload firmware to ADM server from right-click context menu with Firmware Clone. Then you will see a Firmware Clone dialog box, please modify the file name. Please wait for a few minutes, the device will reboot and start to create firmware image file. Creating image file time is different according to the different thin client operating system. Figure: Clone Firmware from Thin Client Page 51 of 71 Figure: Firmware Clone Dialog Box 4-8-2 Import a Firmware File from Local computer If you already have a firmware image file (.afw), also directly import file to ADM server from local computer. Please double-click Firmware from tree pane and use right-click context menu with File Upload on console page. Then you will see an Import an Image File dialog box, please choose a file (.afw). When you have finished that import a firmware image file, while the list of Firmware console page will display it. Figure: Import Firmware from Local Computer Page 52 of 71 Figure: Import an Image File Dialog Box Figure: Import Firmware Image File to Finish Page 53 of 71 4-8-3 Update Firmware of Thin Client You are ready to the firmware image file in ADM server, and start to update or restore the device. Please choose a device from Group console page and use right-click context menu with Firmware Update. Then you will see a Firmware Image File dialog box, please choose a file (.afw). Please wait for a few minutes, the device will reboot and start to restore procedure. Restore time is different according to the different thin client operating system. * Tip: If you want to restore another device through non-owned image file, you must select option “Reset SID” in order to avoid the device SSID (Terminal name) is conflict. Figure: Restore Firmware to Thin Client Page 54 of 71 Figure: Firmware Image File Dialog Box 4-8-4 Maintain Firmware File ADM Console provides basic operating function of the file in order to maintain firmware image file easily in ADM server. Please double-click Firmware from tree pane, you are able to maintain these firmware image file through right-click context menu. Figure: Firmware’s Right-Click Context Menu The functions are as following: File Export: Download the file to local computer. File Duplicate: Copy a duplicate file. File Rename: Rename the selected file. File Delete: Delete the selected file. Refresh: Refresh the list of firmware image file. Page 55 of 71 4-9 Managing Template This chapter describes how to assist administrator to easily perform company’s policy and manage the device though using Template Manager. The Template Manager allows you build a template file from the device and deploy it to other device. ADM Console also provide a way that administrator easily maintain template file, and assist administrator to build template file of different policy. 4-9-1 Create a Template File from Thin Client First you must obtain a template file as sample file from the device. ADM Console allows you upload template file to ADM server from right-click context menu with Get Template from Client. Then you will see a Template File dialog box, please enter file name. Please wait for a few minutes, ADM will start to capture device data and create template file. Figure: Get Template File from Thin Client Page 56 of 71 Figure: Template File Dialog Box 4-9-2 Import a Template File from Local Computer If you already have a template file (.aft), also directly import file to ADM server from local computer. Please double-click Template from tree pane and use right-click context menu with File Upload on console page. Then you will see an Upload a Template File dialog box, please choose a file (.aft). When you have finished that import a template file, while the list of Template console page will display it. Figure: Import Template File from Local Computer Page 57 of 71 Figure: Upload an Template File Dialog Box Figure: Import Template File to Finish Page 58 of 71 4-9-3 How to Apply Template for Thin Client You are ready to the template file in ADM server, and start to update the device. Please choose a device from Group Name of tree pane and use right-click context menu with Apply Template. Then you will see a Firmware Image File dialog box and choose a file (.aft). Please wait for a few minutes, the device will start to update data of properties and connections then reboot. * Tip: We suggest that different thin client operating system use own template file in order to avoid the settings is exceptional. * Tip: The device must be on-line before it updates data. Figure: Apply to Update Thin Client Page 59 of 71 Figure: Template File Dialog Box In addition to the above way, you may also apply template from Template console page. Please choose a file from Template console page and use right-click context menu with Apply Template on the template file. Then you will see a Client List dialog box, please add the clients that want be updated. Please wait for a few minutes, the device will start to update data of properties and connections then reboot. Figure: Apply to Update Thin Client from Template Console Page Page 60 of 71 Figure: Client List Dialog Box 4-9-4 Maintain Template File A template file consists of device properties and connection management. ADM Console allows you maintain these data to build template sample file. Please select a template file and use right-click context menu. If choose Modify Template, you will see a Control Panel Settings window. You are able to change these device properties, such as display, keyboard, mouse, sound, networking, regional and advanced properties. The details of user Interface refer “Change Device Properties”. * Tip: The terminal name and IP address are not allowed to change as to avoid the device terminal name and IP conflicts. Figure: Right-Click Context Menu for maintaining Template File Page 61 of 71 Figure: Template Name Had Been Disabled If choose Connection Manager, you will see a Connect Host wizard. You are able to maintain these connection settings, such as Citrix ICA, RDP, Remote Apps, VMware View, Web Browser, X11 Client, VNC Viewer and Telnet. The operating details refer “Managing Device Connections”. Figure: Connect Host Wizard Page 62 of 71 ADM Console provides basic operating function of the file in order to maintain template file easily in ADM server. Please double-click Template from tree pane, you are able to maintain these template file through right-click context menu. Figure: Template’s Right-Click Context Menu The functions are as following: File Export: Download the file to local computer. File Duplicate: Copy a duplicate file. File Rename: Rename the selected file. File Delete: Delete the selected file. Refresh: Refresh the list of template file. Page 63 of 71 4-10 Managing Update This chapter describes how to update file of the device. Update Manager is a convenient function for Windows operating system, it can directly install program (for example, patch file) on the device and assist administrator to resolve problem. * Caution: Update feature is only supported on WES 7 and WES 2009 clients. 4-10-1 Import a Component File from Local Computer Please you prepare a file (.msi or .exe) and directly import file to ADM server from local computer. Please double-click Component from tree pane and use right-click context menu with File Upload on console page. Then you will see an Upload a Component File dialog box, please choose a file (.msi or .exe). When you have finished that upload a component file, while the list of Component console page will display it. Figure: Import Component from Local Computer Page 64 of 71 Figure: Upload an Component File Dialog Box Figure: Import Component File to Finish Page 65 of 71 4-10-2 How to Update Component for Thin Client If you are ready to the component file in ADM server, and then start to update the device. Please choose a file from Component console page and use right-click context menu with Update Component on the component file. Then you will see a Client List dialog box, please add the clients that want be updated. Please wait for a few minutes, the device will start installation procedure. Figure: Thin Client Update Component Figure: Client List Dialog Box Page 66 of 71 4-10-3 Maintain Component File ADM Console provides basic operating function of the file in order to maintain component file easily in ADM server. Please double-click Component from tree pane, you are able to maintain these component file through right-click context menu. Figure: Component’s Right-Click Context Menu The functions are as following: File Export: Download the file to local computer. File Duplicate: Copy a duplicate file. File Rename: Rename the selected file. File Delete: Delete the selected file. Refresh: Refresh the list of component file. Page 67 of 71 4-11 Managing Schedule Task This chapter describes how to assist administrator to easily perform company’s policy and maintain the device though using Schedule Manager The Schedule Manager allows you schedule any time to maintain the device. You maybe need to implement regular rule, it provides simple configuration steps and assist administrator to build task of different policy. 4-11-1 Create a Schedule Task Please double-click Schedule Task from tree pane and use right-click context menu with New a Schedule Task on Schedule Task console page. Then you will see a Schedule dialog box, please set up about information. ADM Console provides four actions, such as Wakeup on LAN, Reboot, Shutdown and Update (restore device from firmware). When you choose Update, must select a firmware image file in the same time. * Tip: In Clients list, it will display all of device have been authenticated. Figure: Create a New Schedule Task Page 68 of 71 Figure: Schedule Dialog Box Figure: File Dialog Box Page 69 of 71 4-11-2 Modify Your Schedule Task Please double-click Schedule Task from tree pane and use right-click context menu with Edit a Schedule Task on a task. Then you will see a Schedule dialog box, and please modify about information. Figure: Edit a Schedule Task 4-11-3 How to Manage Schedule Task ADM Console provides basic operating function of the task in order to manage the task easily. Please double-click Schedule Task from tree pane, you can directly view task status and run actions of the task through right-click context menu. Page 70 of 71 Figure: View Schedule Task Status Figure: Schedule Task’s Right-Click Context Menu The functions are as following: Pending: Hold down the task. Resume: Restart the task. Delete: Delete the task. Execute: Execute the task immediately. Refresh: Refresh the task list. Page 71 of 71