1
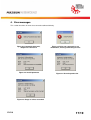
User Manual
MotorMonitor
Software for parameter
setting, control and
monitoring
Imprint
© GEFEG-NECKAR Antriebssysteme GmbH, 2011
Industriestraße 25-27
D-78559 Gosheim
Tel. +49 (0) 74 26 / 608-0
Fax: +49 (0) 74 26 / 608-410
www.gefeg-neckar.de
[email protected]
Important information
Please read this manual carefully before start-up of the software.
This user manual was prepared with great care. Nevertheless, the editor can give no guarantee and
cannot be held liable for its correctness. In particular, descriptions and technical data are not
guaranteed properties in the legal sense. All current standards and regulations, even if they are not
mentioned here explicitly, must be observed. MS-Windows 2000/XP/Vista/7 are registered trademarks
of the Microsoft Corporation.
The company reserves the right to make modifications to the products without prior notice.
For any suggestions and proposals for improvement, please contact the above address or write an email to: [email protected]
E-V2.0
2/19
Table of Contents
1.
2.
Introduction ...................................................................................................................................................4
Installation .....................................................................................................................................................5
2 .1 .
Versions / revisions overview ............................................................................................................... 5
2 .2 .
System requirements............................................................................................................................ 5
2 .3 .
Installation sequence ............................................................................................................................ 5
3.
User interface ................................................................................................................................................6
3 .1 .
"CAN bus" tab....................................................................................................................................... 6
3 .2 .
"Parameters" tab .................................................................................................................................. 9
3 .3 .
"File" tab ............................................................................................................................................. 11
3 .4 .
"State Machine " tab ........................................................................................................................... 14
3 .5 .
"Monitor" tab ....................................................................................................................................... 16
4.
Error messages ...........................................................................................................................................17
5.
LICENSE AGREEMENT ..............................................................................................................................18
E-V2.0
3/19
1. Introduction
The company GEFEG-NECKAR Antriebssysteme GmbH based in Gosheim emerged in 2004 from the
merger of the motor manufacturer GEFEG established in 1948 in Augsburg and of the motor
manufacturer NECKAR Kleinstmotoren established in 1967 in Deißlingen. As a pioneer in its sector,
NECKAR Kleinstmotoren started in 1995, as part of a customer project, with the development of the
integrated electronics used in brushless small motors. Only one year later, the complete MH series of
brushless DC motors was established. Today the company uses a modern electronic platform for
universal use in many electronically controlled drives and in external electronic units. It is based on
powerful hardware components, has a CAN interface and guarantees a high degree of flexibility,
functionality and user comfort.
The same electronic platform is used in the brushless motors of the MC series, brushed motors of the
PC series and in the external electronic units of the MCE, UCE and PCE series. This allows the users
to control the different drives always in the same way.
The parameter setting of the electronic platform is done via a CAN interface (CANopen® protocol with
Drive Profile DSP-402). Users who do not yet use a CAN bus system can also operate the drive by
means of analog and/or digital signals. The integrated CAN interface offers the advantage of simple
parameter setting, start-up and monitoring.
The powerful commissioning software "MotorMonitor", together with a suitable CAN/USB adapter and
a PC allow the user to communicate with the drive at any time. This software not only recognizes the
electronic platform, but also adjusts it such that only the parameters implemented in the concrete
product are displayed. The software allows the user to change parameters, control the drive or monitor
important data such as temperature, velocity and power consumption.
E-V2.0
4/19
2. Installation
2.1. Versions / revisions overview
Version:
Available from:
Revision:
1.1
01.12.2010
Search function for determining the baud rate and node address
implemented
2.0
01.03.2011
Compatibility with firmware version 2.0
2.2. System requirements
•
MS-Windows 2000 / XP / Vista / Windows 7
•
Microsoft .NET Framework 3.5 or higher
•
Unused USB port on your PC or notebook
•
CAN USB adapter (GEFEG-NECKAR Art. No.: 819000003)
•
120Ω terminating resistor
2.3. Installation sequence
Step:
E-V2.0
Description:
1
Start the installation procedure by double-click on the "Setup_MotorMonitor.msi" file
2
Follow the installation instructions of the setup program.
3
If the driver for the CAN USB adapter was not yet installed, a note is displayed when loading
the "MotorMonitor", and the drive will be installed.
5/19
3. User interface
3.1. "CAN bus" tab
1
2
3
4
Figure 1: "CAN bus" tab
E-V2.0
6/19
1
CAN interface
The software will detect the internal and external
electronics only if the required communication parameters
(baud rate and node address) were set correctly. The
"CAN interface" gives the user the option to set the node
address (Node ID) and the baud rate of the desired CAN
user. If this data is unknown, the user can have it
determined by means of the search function ("Search"
button). The window opening upon a successful search
(Figure 2) shows the values determined by the search
Figure 2: Determination of the CAN
user
function. These values are copied automatically to the system.
2
Bus communication
Communication between the PC and the drive can be
started or stopped at any time. If communication has
been established successfully, the green "OK" display will
Figure 3: Communication started
light up (see Figure 3), and, if it has not been established,
the red "Error" display will light up (see Figure 4).
Possible causes of error for not establishing communication include:
- wrong communication parameters
Figure 4: Start failed
- drive not connected or not switched on
- missing terminating resistor
E-V2.0
7/19
3
Error display
All errors (excluding communication errors) are displayed in
a separate display window that is only visible when an error
occurs (see Figure 5). This panel also allows the error to
be deleted (deleted by pressing Reset).
4
Figure 3: Error display
Info window
The Info window (see Figure 6) is used to display important
device information. As standard, the article number, test
number, test date and firmware version are displayed here.
E-V2.0
Figure 4: Info window
8/19
3.2. "Parameters" tab
1
4
2
3
Figure 5: "Parameters" tab
1
CANopen objects
In this panel (see Figure 8), all implemented
CANopen objects are displayed. An object is
selected by simply clicking it. The string of
numbers in front of the object name (e.g. 6046
in front of Velocity Min Max) corresponds to the
object, and the one in front of the subindex
Figure 6: CANopen objects
name (e.g. 01 in front of Minimum) to the
subindex of the object.
E-V2.0
9/19
2
Object data
The data of an object or of its subindex are displayed in the boxes intended for this purpose (see
Figure 9) as soon as they have been selected. The "Index" box shows the index of the selected object,
and the "Subindex" box shows its subindex. These values are displayed in hexadecimal form. The
"Description" box shows the name, the "Contents" box the current parameter value of the object.
These values are displayed in hexadecimal and decimal or text form.
Figure 7: Parameter data
3
Changing, transmitting and restoring
parameter values
The user can change the parameter value of an object, if he
has the required access rights, by means of the "New
contents" text box (see Figure 10). The desired parameter
value can be entered in decimal, hexadecimal or text form.
Figure 8: "New contents" text box
To accept the parameter value, press the "ENTER" key or
the "Transmit" key. Changes can be undone by pressing the
"Undo" button. However, this will only work if they were not
previously saved (see function 4). A help window can be
opened by pressing the "Help" button (see Figure 11), whose
contents give information on the parameter values. A total of
max. 5 help windows can be displayed simultaneously.
Figure 9: Help window
E-V2.0
10/19
4
Save & Reset
This panel containing a warning (see Figure 12) appears after an object was
changed. Upon pressing the "Save" button, all changes will be permanently
saved in the non-volatile memory of the electronics. The saved parameter
values are retained even in case of power failure. Pressing the "Reset"
button undoes all changes that were not saved.
Figure 10: Save & Reset
3.3. "File" tab
1
5
4
2
3
Figure 11: "File" tab
The "File" tab (Figure 13) allows parameters to be saved to a file. Likewise, previously saved
parameters can be retrieved from a file. The parameters can be edited, before saving them or after
retrieving them.
E-V2.0
11/19
1
CANopen objects
CANopen objects are displayed in this tab in the same way as in the "Parameters" tab (see section
3.2). However, only parameters that can be changed with customer rights will be displayed here. If the
parameters displayed in the panel are the same as those of the connected electronics, the colour of
the panel is "turquoise". If they differ, either due to editing or retrieval of a different parameter, the
colour of the panel is "pink". In addition, a warning appears: "Deviation from parameter set in motor"
(see Figure 14).
Figure 14: Edited parameter set
2
Object data
The object data is displayed in the same way as in the "Parameters" tab (see section 3.2).
Caution!!!
The displayed objects are only in the computer memory and may differ from current motor
parameters. In this case, the panel is displayed reddish.
E-V2.0
12/19
3
Changing parameters
Here you can change objects in a similar way as in the "Parameters" panel (see section 3.2).
However, in contrast to the latter one, here only a copy saved in the computer is edited. This copy can
then be saved as a file or sent back to the motor.
4
Retrieving a parameter set from the motor / writing it to the motor
The current parameter set (all settings) of a drive can be retrieved by pressing the "Read motor"
button (see Figure 15). An already open and edited or unedited parameter set can be written by
pressing the "Write to motor" button.
Caution!!!
Writing a parameter set previously saved to a file may not function if the firmware version and
parameter structure of the current electronics do not coincide with the parameter set saved to the
file.
Figure 12: Reading /writing a parameter set
5
Loading /saving a file
The "MotorMonitor" program gives the user the option to save the current
parameter set, i.e., all customer settings, to a file or loading again a saved one
(see Figure 16). The current settings can be loaded by pressing the "Load file"
button and saved by pressing the "Save file" button. Attention: Loaded
parameter sets are not automatically copied to the motor. The parameter values
can be transmitted separately. (See function 4: Write to motor).
Figure 13: Loading
/saving a file
E-V2.0
13/19
3.4. "State Machine " tab
1
2
3
Figure 14: "State Machine" tab
1
Activating / deactivating a drive
If a drive is in the CANopen control mode, it can only be controlled by the
software via the state machine (defined according to CANopen DSP 402).
The drive is activated by simple clicking. This switches the drive, as shown
in Figure "18", from the "Switch-on disabled" to the "Operation enabled"
state. Deactivation takes place in the same way, but in reverse order.
Figure 15: Activating a
drive
E-V2.0
14/19
2
Activating / deactivating the braking function
The braking function of the device becomes active as soon as
the drive is switched by a click from the "Operation enabled" to
the "Quick stop" state (see Figure 19). The deactivation of the
braking function takes place in the same way, but in reverse
order. If necessary, the drive can also be switched directly from
Figure 16: Braking a drive
3
the "Quick stop" state to the "Switch-on disabled" state.
Error display
If an error occurs (excluding communication errors), the
cause of the error is displayed in the "Fault" area (see
Figure 20) of the state machine. To delete the error or reset
the electronics, the state machine must be switched from the
"Fault" to the "Switch-on disabled" state. This switch can be
done by simply clicking on the "Switch-on disabled" button.
Figure 17: Error display
E-V2.0
15/19
3.5. "Monitor" tab
Figure 18: "Monitor" tab
The "Monitor" tab is solely used for monitoring. Primarily, it shows all important active objects. In case
of a regulation, this allows, for example, the speed nominal value, the P and I components of the
control and the idling speed and, in case of a control, the actual and nominal PWM factors to be
displayed (see Figure 21).
E-V2.0
16/19
4. Error messages
This section describes all errors that cannot be attributed directly.
Figure 20: Communication fault,
adapter not connected
Figure 22: Invalid parameter
Figure 19: Drive not connected or not
switched on, missing terminating resistor
Figure 21: No write permission
Figure 23: Range of values exceeded
E-V2.0
17/19
5. LICENSE AGREEMENT
Updated: 20.01.11
Please carefully read the following agreement. With the installation of the software, you expressly agree to be bound to the regulations of this
agreement. If you disagree with the regulations, you are not allowed to use the software.
§ 1 Subject Matter
1)
The subject matter of the agreement are the "MotorMonitor" computer program (hereinafter "software") and the operating manual.
2)
This agreement is a legally valid agreement between the user ("licensee") and the GEFEG-NECKAR Antriebssysteme GmbH
("licensor").
§2 Copyrights
The software product is protected by copyright. The licensor is entitled to all rights resulting from copyright. The copyright comprises in
particular the program code, the documentation and the appearance of the software.
§3 Rights of Use
1)
The licensor grants the user the simple, but not exclusive, right to install and use the software free of charge.
2)
The licensee is allowed to make backup copies of the software.
3)
The licensee is allowed to copy the complete software, in order to pass it on to third parties free of charge, while maintaining the
trademark, logo, copyright notice and the conditions of use.
4)
The licensee is not allowed to modify, reverse engineer, decompile or disassemble the software.
5)
In particular, the licensee is not allowed to pass the software or copies thereof to third parties at a charge, to loan it, to lease it or to
exploit it commercially in any other form.
6)
The licensor can revoke or limit the right of use for good cause.
§ 4 Warranty Disclaimer
1)
The rights of use of this software are granted to the licensee free of charge. Hence, the licensee has no claims for warranty
whatsoever.
2)
Error descriptions or suggestions for improvement are gladly accepted. We will do our best to quickly examine such information.
However, we cannot guarantee that this will result in adequate modifications.
§ 5 Liability
1)
The programs and documentations delivered by the licensor were prepared, checked and tested with great care. However, as a
general rule, no software is error-free and the number of errors increases with the complexity of the software. This is why the licensor
can give no guarantee nor be held liable that the software will run error-free on any computer and in any environment.
2)
We cannot assume any liability that the software is suitable for the purposes of the user. In particular, descriptions and technical data
are not guaranteed properties in the legal sense.
3)
Thus, any liability for direct or indirect damage is excluded, as far as this is legally admissible. The licensor cannot be held liable for
any claims for compensation, in particular compensation for consequential damage, lost profits, interruption in operation or other
financial losses produced as a result of the use or unsuitability of the software.
4)
It is expressly pointed out to the licensee that the software may not be used in a hazardous environment, requiring faultless operation,
such as the operation in nuclear power installations, weapons systems or life-sustaining machines.
§6 Choice of Law
Solely the Law of the Federal Republic of Germany shall apply to this agreement. The place of jurisdiction is Rottweil.
§ 7 Final Clause
If any provision of this Agreement is or becomes invalid or unenforceable, then this Agreement, including all of the remaining terms, will
remain in full force and effect. The invalid or unenforceable provision must be replaced, if possible, by an admissible one that comes as
close as possible to the purpose of the license agreement.
E-V2.0
18/19
E-V2.0
19/19