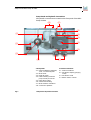
1
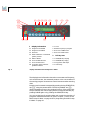
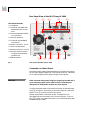
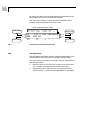
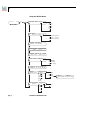
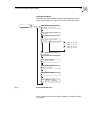
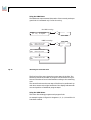
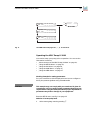
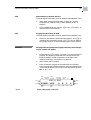
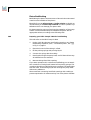
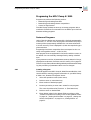
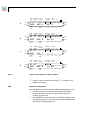
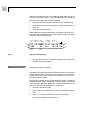
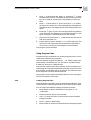
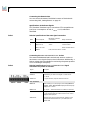
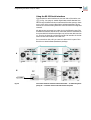
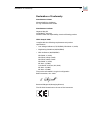
Musterexemplar
WellChrom
Preparative HPLC Pump K-1800
User Manual
V 11/98
Table of Contents
SOPs in this Manual
3
General Description
4
Using this Manual
4
Setup of the HPLC Pump K–1800
Unpacking
Packing List
Identifying installed Pump Heads
Front View of the HPLC Pump K–1800
Pump Heads and Hydraulic Connections
Rear Panel View of the HPLC Pump K–1800
Connection to Mains Power
5
5
5
5
6
8
9
9
Control of the HPLC Pump K–1800
Power On and Selftest
Features of the User Interface of the HPLC Pump K–1800
Appearance of the Cursor
Menu structure of the HPLC Pump K–1800
Using the Arrow keys in the SETUP Menu
Using the SETUP Menu
Using the GLP Menu
Using the LINK Menu
Using the VIEW Menu
Operating the HPLC Pump K–1800
Working Example for setting parameters
Using the High Pressure Gradient Mode
Direct Control of the Pump
Piston Backflushing
10
10
10
10
10
12
13
16
17
17
18
18
19
20
23
Programing the HPLC Pump K–1800
Features of Programs
Using Program Links
24
24
28
Connecting the HPLC Pump K–1800 to Other Instruments
Hydraulic Connections
Single Connection
250 ml Head
1000 ml Head
Electrical Connections
Using the EVENT and ANALOG/ERROR/START Sockets
Connecting Plug Strips
Connecting the Event Socket
Specifications of the Event Signals
Connecting the ANALOG/ERROR/START Socket
Using the RS-232 Serial Interfaces
30
30
30
30
30
31
31
32
33
33
33
34
Easy Maintenance
Changing and Cleaning the Pump Head
35
35
List of Error Codes
40
List of Spare Parts and Accessories
41
Declaration of Conformity
42
Guarantee Statement
43
Service Department and Hotline
43
SOPs in this manual
SOPs in this Manual
The Standard Operating Procedures provided with this manual offer a convenient way of structuring complex tasks in the operation of your HPLC
pump. They include step-by-step instructions that lead the user through all
routine tasks during operation. They can be used for documentation purposes and be copied, applied, signed and filed in order to document the
performance of the instrument.
IMPORTANT
Please operate the instrument and all accessories according to
instructions and SOPs in this manual. This ensures proper results and
longevity of your equipment.
Selecting Menus
11
Entering Data
12
Selecting a Gradient Mode
14
Setting the Maximum Pressure
20
Setting the Flow Rate
20
Setting the Solvent Composition
20
Setting Events
21
Start and Stop of Solvent Delivery
22
Purging the HPLC Pump K–1800
22
Preparing your HPLC Pump K–1800 for back flushing
23
Creating a Program
24
Execution of Programs
25
Modifying and Deleting Programs
26
Using a Wake Up-Program
26
Creating Program Links
28
Executing Program Links
29
Connecting Plug Strips
32
Removing the Pump Head
35
Removing and Checking Piston Rods
35
Disassembling the Pump Head
36
Assembling the Pump Head
38
Installing the Pump Head
39
Cleaning and Replacing Check Valves
39
General Description
4
General Description
The HPLC Pump K–1800 features a double-piston design with active
pulsation dampening. It is capable of delivering solvents with very
low residual pulsation. It can be configured with two different pump
heads to meet a broad range of requirements of flow ranges:
• 250 ml pump head (0.1–250ml/min), stainless steel
• 1000 ml pump head (0.1–999.9ml/min), stainless steel
Pump heads can be interchanged by loosening only four screws.
Experienced users can disassemble the heads for simple maintenance
tasks like cleaning, changing piston seals, etc.
The easy-to-learn user interface of the HPLC Pump K–1800 provides
access to the integrated software. It supports quaternary high pressure gradient systems via a master/slave configuration, where up to
three additional K–1800 pumps can be controlled.
Most KNAUER Software Packages, like EuroChrom® 2000, allow for
digital remote control of any configuration of KNAUER solvent delivery systems, enabling full and transparent integration of the HPLC
Pump K–1800 pump into a wide range of chromatographic systems.
Using this Manual
The captions in this manual referring to individual items in figures are
identified with by format like see Pos. ^6` in Fig. 1 on page 6, which
identifies the pump head.
Outlined arrows like
used in block diagrams, indicate an automatic program run and change to the next line without any need of
manual input.
Arrows like:
, used in block diagrams indicate that the
user is asked to press the corresponding arrow keys. Functions of
arrow keys are defined straightforward:
Up arrow
T
Left arrow
Z
V Right arrow
X
Down arrow
5
Setup of the HPLC Pump K–1800
Unpacking
Unpack the instrument and check pump and accessories for any
damage due to shipping. Place any claims referring to damage at the
transportation company responsible for shipping.
Please check that the HPLC Pump K–1800 is complete, use section
„Packing List“. Should, in spite of our thorough control procedures,
something be missing, please contact our service department, see
chapter „Service Department and Hotline“ on page 43.
Packing List
Pump, including:
1
Power supply cable (M1642)
1
User manual
1 Set
Tools
1
RS232 cable (M1703)
1 Set
Plug strips with connectors (A1402 & A1404)
1
Glass syringe with connectors for piston backflushing
1
Pump head, 250ml or 1000ml
2738 Schraube M1057 Fitting)
Please fill out the registration card for guarantee and return it immediately. Please remove the transparent, protective foil from the pump
outlet and the display.
For the complete list of spare parts please refer to chapter „List of
Spare Parts and Accessories“ on page 41.
Identifying installed Pump Heads
Maximum flow rate, 250 or 1000 ml/min, is indicated on a label on the
front of the pump head
Setup of the HPLC Pump K–1800
6
Front View of the HPLC Pump K–1800
Fig. 1 shows the front view of the HPLC Pump K–1800.
^4`
Front Panel Elements
1 Display information
^5`
2 Foil key area
3 Pump head
4 Pressure transducer
5 ON/OFF switch
^6`
^7`
^8`
Fig. 1
Front Panel of the HPLC Pump K–1800
For additional information on connecting the pump head see section
„Connecting the HPLC Pump K–1800 to Other Instruments“ on
page 30 and Figure 18 „Pump heads: Hydraulic connections“ on
page 31.
7
^4145`
^419`
^414` ^415` ^416` ^417` ^418`
^41:`
^41;`
^4144`
^4143`
^41<`
^514` ^515`
^516`
1
Fig. 2
Display Information
^517`
1.9 Time
1.1 Program to be loaded
1.10 Status of pump or program
1.2 Program to be edited
1.11 Go to the VIEW menu
1.3 Flow rate
1.12 Go to the LINK menu
1.4 Preset maximum or measured
system pressure
2
1.5 State of Events
2.1 START/STOP pumping
1.6 Go to the SETUP menu
2.2 START/STOP purging
1.7 Go to the GLP menu
2.3 Key pad for data input
1.8 % Solvent mixing ratios for
gradient mixtures
2.4 Arrow keys
Foil Key Area
Display information and foil key area in detail
The display shows information about the current status of the pump,
such as the flow rate, the measured pressure or the current status of
the running program. It serves as a control instrument when entering
data.
Pumping can be started or stopped by pressing the key START/STOP,
see ^514`, using the preset values. The foil key PURGE, see ^515`,
allows immediate access to the purging function of the pump with
the pre-selected flow rate. Purging has to be stopped manually by
pressing PURGE again or by pressing the START/STOP key.
You can use the keys for entering data and control the execution of
programs. Detailed information is given in chapter „Control of the
HPLC Pump K–1800“ on page 10 and „Programing the HPLC Pump
K–1800“ on page 24.
Setup of the HPLC Pump K–1800
8
Pump Heads and Hydraulic Connections
All hydraulic connections are located on the front panel of the HPLC
Pump K–1800.
^61;`
^614`
^61:`
^714`
^619`
^616`
^617`
^715`
^618`
^716`
^717`
^615`
3 Pump Head
3.1 Piston backflushing capillaries,
1/16“, connected by tube
3.2 Eluent inlets
3.3 Head set screws
3.4 Label indicating maximum
pump volume per minute
3.5 Inlets valve housing
3.6 Outlets valve housing
3.7 Eluent outlets to transducer
3.8 Connection capillaries
Fig. 3
Pump head and pressure transducer
4 Pressure Transducer
4.1 Inlets to transducer
4.2 De-aeration capillary (purging
outlet)
4.3 De-aeration screw
4.4 Eluent outlet to column
9
Rear Panel View of the HPLC Pump K–1800
^814`
^815`
^816`
^817`
^818`
Rear Panel Elements
5.1 Ventilator
5.2 Terminal strip ANALOG/
ERROR/START connections
5.3 Socket prepared for Ethernet connection
5.4 RS-232 interfaces
5.5 Terminal strip EVENTS
connections
5.6 Power connector - line in
5.7 Fuse compartments
5.8 Power connector - line out
5.9 Plug for interconnection
of optional low pressure
gradient unit
5.10Serial number
Fig. 4
^8143`
^81<`
^81;`
^81:`
^819`
Rear Panel of the HPLC Pump K–1800
Connection to Mains Power
The HPLC Pump K–1800 is equipped with an universal power supply
for two input voltage ranges: 90 - 130 Volts AC and 170 - 260 Volts
AC. A manual setting of the supply voltage is not required.
CAUTION
Make sure that mains power supply is properly grounded and a
correct three-pronged power cable is used. Connecting the
instrument to faulty power sockets can cause injuries.
Connect the power cable to the socket on the rear of the instrument,
see ^819` in Figure 4, and switch on the device with the „ON/OFF
switch“, Pos. ^8` at the front side of the device.
Further devices with a maximum power consumption up to
500 Watts may be connected to the „Power connector - line out“,
Pos. ^81;` in Fig. 4 and will be switched on or off simultaneously with
the HPLC Pump K–1800.
Control of the HPLC Pump K–1800
10
Control of the HPLC Pump K–1800
Power On and Selftest
On power on the instrument displays HPLC PUMP MACRO-STAR,
and the VERSION of the software, e.g. 1.0X, see ^4` in Fig. 1 on
page 6. The instrument performs a self test, including firmware validation and tests of RAM and motor unit. After completion the message SYSTEMTEST OK indicates that the pump is ready for operation
and the ID of the last active program is displayed.
CAUTION
Never run the HPLC Pump K–1800 without liquid in the pump
head or in the piston backflushing compartment. For piston
backflushing, follow the instructions given in chapter „Piston
Backflushing“ on page 23. Operating the pump without solvents
will lead to damage of the pump heads.
Features of the User Interface of the HPLC Pump
K–1800
Appearance of the Cursor
You can use the yellow arrow keys on the foil keypad for positioning
the blinking cursor at any position of the menu screen.
The cursor appears as underscore character while you can enter data,
see Figure 5. Use „Key pad for data input“, Pos. ^516` in Fig. 2, and
Fig. 5
• Blinking Cursor
• Cursor waiting for next data input
refer to SOP „Entering Data“ on page 12.
Menu structure of the HPLC Pump K–1800
The display of the HPLC Pump K–1800 uses one main screen with
status information of the instrument. From the main screen you can
access four additional screens for display of parameters.
11
By default, the HPLC Pump K–1800 displays the parameters of the
first program line of the currently active program.
The center part of Figure 6 „Menu structure of the HPLC Pump
K–1800“ shows an example of the main screen.
Main Screen/Operation Screen
LINK Menu
Load
Prog
Link
View
VIEW Menu
Edit Prog
Clear 0
Flow
[ml/min]
Pressure
[0.1 MPa]
Events:
off 0
on 1
01 -- 100.0 000 00000000
OFF 000.00
Hold 0
Run 1
Time
[min]
%A
%B
%C
Fig. 6
Menu structure of the HPLC Pump K–1800
SOP
Selecting Menus
SETUP Menu
2
%D
Setup
GLP
GLP Menu
This SOP applies to the HPLC Pump K–1800 Firmware Revision 1.0X.
Use this SOP for selecting menus in your HPLC Pump K–1800.
You can access the four menus of the HPLC Pump K–1800 with the
following procedure:
1
Place the cursor in one of the four corners of the main screen,
e. g. on OFF in the lower left corner of the main menu
2
Select either right or left arrow key. In the example above
selection of key Z will activate the VIEW MENU on the display.
Control of the HPLC Pump K–1800
3
12
Select the rhombus
in the lower left corner of the display if
you want to access additional pages of the selected menu. You
can access all menu pages by scrolling using the up T or down
arrow keys X, respectively.
Load
Prog
Flow
[ml/min]
Pressure
[0.1 MPa]
Events:
off 0
on 1
2
Links:
21 __ __ __ __
(21..29) __ __ __ __
Link
View
Hold 0
Run 1
Rhombus
Fig. 7
Edit Prog
Clear 0
Time
[min]
%A
%B
%C
Setup
GLP
%D
Example for a multi-page menu: VIEW menu
Menus without rhombus are single page menus.
SOP
Entering Data
This SOP applies to the HPLC Pump K–1800 Firmware Revision 1.0X.
Use this SOP for entering parameters and program steps in your
HPLC Pump K–1800.
1
Place the cursor at the desired position of the main screen.
2
Press a numeric key to start data input. The appearance of the
cursor changes to a underline character, see Fig. 5 on page 10.
3
Press numeric keys for entering desired numeric values.
4
Confirm value by pressing any of the arrow keys. This finishes
data entry mode and moves the cursor according to the arrow
key direction.
5
You can modify and delete data according to SOP „Modifying
and Deleting Programs“ on page 26.
Using the Arrow keys in the SETUP Menu
Figure 8 „Structure of the SETUP menu“ on page 13 gives a complete
overview of the SETUP Menu.
• You can use V for accessing menus.
• You can use T and X for scrolling through the list of parameters
of any individual menu item.
13
Using the SETUP Menu
Setup
GRADIENT MODE: none
GLP
HPG
HPG
HPG
HPG
LPG
Main Menu
D
C
B
A
PUMP HEAD:
250 ml, steel
reserved option
1000 ml, steel
reserved option
PRESSURE AUTOZERO
Offset: 00.28 MPa
FLOW: Adjust
5000
Correction
19.5%
PRESSURE LIMITS [0.1 MPa]
min: 000
max: 150
START INPUT: ENABLED
DISABLED
STOP Pump
START Pump
DATE:28.10.98 dd.mm.yy
TIME:08.31.10 hh.mm.ss
CONTROL:
Baud rate:
KNAUER NET
9600
4800
38400
19200
RS-485
RS-232
ANALOG
ANALOG OUTPUT: Pressure
Range:
1 V
Slave B
10 V
5 V
2 V
Fig. 8
Structure of the SETUP menu
CONTROL:
ANALOG
Offs:00mV Flow:220.0ml
Control of the HPLC Pump K–1800
14
The SETUP menu of the HPLC Pump K–1800 enables access to the
following features and functions:
GRADIENT MODE: The HPLC Pump K–1800 is capable of isocratic
(none), high pressure gradient (HPG) and low pressure gradient
(LPG) operation.
You can choose the mode of operation:
SOP
Selecting a Gradient Mode
This SOP applies to the HPLC Pump K–1800 Firmware Revision 1.0X.
Use this SOP for choosing a solvent composition.
1
Select „GRADIENT MODE“ in the SETUP Menu
2
Select the desired mode of operation.
3
If you select either high or low pressure gradient (i. e. HPG or
LPG) you need to specify the channels of used solvents:
Low Pressure Gradients: You can choose valves A to D
High Pressure Gradients: You can choose pump names A to D
Fig. 12 on page 19 gives a detailed example for gradient mode
selection.
PUMP HEAD: You can select the type of pump head installed in your
pump. Selection of any pump head sets specific flow rate calculating
data as well as maximum system pressures with respect to its specifications. The according maximum pressure applies to all modes of
operation and can never be exceeded.
PRESSURE AUTOZERO: You can choose an offset correction for the
pressure display. Make sure that purge valve is open. Select menu
with V and start autozero routine by pressing T or X for automatic correction.
FLOW: You can enter a correction constant for the selected flow rate
in the range ]4000…6000[. This correction changes the number of
pump cycles at a selected flow rate. This option allows for balancing
different compressibility of solvents. Only trained users should
change that setting.
Select menu with V, position cursor on desired numeric field and
adjust values with T or X. You have no access to the correction
parameters, see Fig. 8. These can be accessed by authorized maintenance personnel only.
PRESSURE LIMITS: Preset for the minimum and maximum system
pressure. The pump will switch off automatically if the system pressure exceeds limits. If minimum pressure is set to 0, no check of the
minimum pressure is carried out.
The specified maximum pressure applies to all modes of operation
and can never be exceeded. Units: 0.1 MPa
15
START INPUT: If the START INPUT is set to ENABLED, a program
can be started by an external digital signal from the START INPUT on
the rear side of the pump, see chapter „Connecting the ANALOG/
ERROR/START Socket“ on page 33. In the setting STOP Pump an
external digital signal from the START INPUT will stop the pump, if it
is pumping with the preselected flow rate. The setting START Pump
will start pumping on picking up the external signal.
Having set START INPUT to START Pump or STOP Pump, no program
run will be started, and control by network is inactivated.
DATE/TIME: You can use this menu for setting the system date and
time of your HPLC Pump K–1800.
CONTROL: The instrument can be set to different external control
modes. Options are KNAUER-NET, where the baud rate is currently
limited to 9600, RS-232, RS-485 and ANALOG.
Having selected ANALOG, the current flow rate will be indicated, and
you can put in an offset correction or do an input signal scaling,
respectively.
Move cursor to Offs and press X, then move to Flow and put in the
flow rate which is corresponding to the input voltage signal. Selecting 0 (zero) will reactivate the standard setting. The available ranges
comprise:
250 ml head: from 2.5 ml/min per 1 Volt, resulting in a working
range of 0 - 25 ml/min, to 37.5 ml/min per 1 Volt, resulting in a
working range of 0 - 250 ml/min (*).
1000 ml head: from 10 ml/min per 1 Volt, resulting in a working
range of 0 - 100 ml/min, to 150 ml/min per 1 Volt, resulting in a
working range of 0 - 1000 ml/min (*).
(*) limited by maximum flow rate
ANALOG OUTPUT: On activation of PRESSURE, the output
ANALOG OUT is delivering the pressure signal for external monitoring or controlling. On activting SLAVE B, a second pump can be controlled via this analogue output. In this case the control signal
(voltage) is representing the percentage amount % B , where % A
will be delivered automatically by the K-1800 itself.
The of voltage range can be set as 0-1 V, 0-2 V, 0-5 V as well as
0-10 Volts. The maximum value is corresponding to 100 % B or
40 MPa, respectively.
Control of the HPLC Pump K–1800
16
Using the GLP Menu
The GLP menu reports statistical data for vital parameters of the
HPLC Pump K–1800. Fig. 9 gives an overview of the GLP menu.
Setup
GLP
Main Menu
GLP: Total working time
000003 h 02 m 09 s
GLP: Total pump cycles
210952
GLP: Last error codes
12 13
ERR
12
Date 13.11.98
Time 16.21.33
ERR
13
Date 04.11.98
Time 09.58.52
GLP: Installation date
15.06.98
GLP: Last service
00.00.00 code: 0
GLP: Power index
00007.8 MPah
GLP: Total volume
1.2 l
GLP: VERSION: 1.0X
Ser.No. 12345678
Fig. 9
Overview of the GLP menu
For an overview of error codes refer to chapter „List of Error Codes“
on page 40.
17
Using the LINK Menu
The LINK menu reports status information of the currently active program links. It is activated only if a link is running.
No LINK running:
LINKS:
(21..29)
P:program
R:repeat
Link
View
Main Menu
LINK is running:
L1 -- No01 P01 R-05
RUN
No02 P13 R10
Main Menu
Link
View
L1 -- No02 P13 R-09
RUN
No03 P01 R10
L1 -- No03 P01 R-02
RUN
Fig. 10
Block diagram of the LINK menu
The first line of the menu gives the current status of the links. The
field R-xx shows the number of program runs that have to be performed. The value of R-xx is decreased according to the remaining
runs.
The second line shows the next step of the link to be performed. Up
and down arrows at the right hand side of the display indicate existence and position of additional program steps.
Using the VIEW Menu
This menu lists existing programs and program links.
An example is given in Figure 11: Programs 1, 2, 3, 4, 11 and link 21
have been created.
Control of the HPLC Pump K–1800
18
Programs: 01 02 03 04 __
(01..10) __ __ __ __ __
Link
View
Main Menu
Programs: 11 __ __ __ __
(11..20) __ __ __ __ __
Links
: 21 __ __ __ __
(21..29) __ __ __ __ __
Fig. 11
The VIEW menu with programs 1, …, 4, 11 and link 21
Operating the HPLC Pump K–1800
You need to setup your pump prior to operation. You can use the
information in sections
•
•
•
•
•
„Menu structure of the HPLC Pump K–1800“ on page 10,
„Using the SETUP Menu“ on page 13,
„Using the GLP Menu“ on page 16,
„Using the LINK Menu“ on page 17,
„Using the VIEW Menu“ on page 17.
Working Example for setting parameters
For your convenience, this example points out how to configure a
binary low pressure gradient using valves A and B.
CAUTION
This example may not comply with your needs and is given for
convenience only. You need to select parameters that meet your
requirements. Using this example without proper adjustment of
parameters may lead to damage of your equipment.
Enter the SETUP menu, see Fig. 8 on page 13.
Selection of correct pump head:
1
Select menu pump head by pressing X
19
2
Use V and T to scroll through the list of pump heads until
the installed type of pump appears, e.g. 250 ml, steel.
Selection of a pump head automatically adjusts proper
maximum system pressure for the selection.
3
Press Z#to confirm selection and return to the rhombus.
Selection of operation mode:
1
Return to page GRADIENT MODE by pressing T .
2
Press V and then T to scroll through the gradient mode
options until LPG appears.
3
Use V to position cursor in the second line.
4
Select ON or -- (off) at positions A, B, C and D for the solvent
channels in either mode you wish to use. The number of ONs
selected refers to all programs in the pumps memory.
5
At any position you can use T or X to select ON .
6
Position cursor on next position, e. g. B by pressing V.
7
Select three times V to position cursor at the rhombus.
The display should appear as shown in Fig. 12 on page 19.
8
Leave this menu page with
Load
Prog
Link
View
Flow
[ml/min]
Pressure
[0.1 MPa]
Events:
off 0
on 1
2
GRADIENT MODE: LPG
ON ON -- -Hold 0
Run 1
Fig. 12
Edit Prog
Clear 0
Z to return to the main menu.
Time
[min]
%A
%B
%C
Setup
GLP
%D
Example for setting up gradient modes with two solvent channels in all programs
Using the High Pressure Gradient Mode
If you want to control up to three additional HPLC Pumps K–1800 for
a high pressure gradient, you can connect the appropriate number
of pumps using the serial RS-232 interfaces according to „Using the
RS-232 Serial Interfaces“ on page 34.
Activate „GRADIENT MODE“ in the SETUP menu, see „Using the
SETUP Menu“ on page 13 and select individual, unique names from
A to D for all pumps connected. Each pump can take control over all
pumps connected, if execution of a program is launched on that
pump.
Control of the HPLC Pump K–1800
20
Direct Control of the Pump
If you want to use the Direct Control Mode you need to specify:
• Maximum system pressure
• Flow Rate and
• Solvent composition if working in LPG or HPG gradient mode
SOP
Setting the Maximum Pressure
In addition to the maximum pressure specified in the SETUP menu,
see „Using the SETUP Menu“ on page 13 by either the pump head
or the global pressure limit, you can specify a maximum system pressure for the currently active mode of operation or the currently active
program.
This SOP applies to the HPLC Pump K–1800 Firmware Revision 1.0X.
SOP
1
Move the cursor to the parameter PRESSURE, see ^417` in Fig. 2
on page 7.
2
Type in the desired setting for maximum system pressure. The
selected value is marked with two vertical lines which indicate
that this is a programed instead of a measured value.
3
Press any arrow key for confirmation and new selection.
Setting the Flow Rate
This SOP applies to the HPLC Pump K–1800 Firmware Revision 1.0X.
Use this SOP for setting the correct flow rate.
SOP
1
Position cursor on field FLOW, see ^416` in Fig. 2 on page 7.
2
Press any numeric key to select desired flow rate. You can use
information given in section „Appearance of the Cursor“ on
page 10 and SOP „Entering Data“ on page 12.
3
Press any arrow key for confirmation and new selection.
Setting the Solvent Composition
This SOP applies to the HPLC Pump K–1800 Firmware Revision 1.0X.
1
Move the cursor to the field %A, see ^41;` in Fig. 2 on page 7.
2
Type in the desired mixing ratio of eluent from channel A given
as percentage by volume.
The value in the right hand adjacent field next to your input
complements your value to give a total of 100%.
3
Press any arrow key for confirmation and new selection.
21
SOP
Setting Events
Events are defined as states or changes of states of the electrical contacts of the EVENTS socket of the instrument. You can either open
or close any of the contacts or use a 500ms puls. You may want to
control the events manually e. g. for testing your system. For connection of cables use sections „Electrical Connections“ on page 31,
„Connecting Plug Strips“ on page 32 and „Connecting the ANALOG/ERROR/START Socket“ on page 33.
This SOP applies to the HPLC Pump K–1800 Firmware Revision 1.0X.
1
Position the cursor at the desired event field.
2
Select 0, 1, 2 or 3 from the following table:
0 — Off
1 — On
2 — Pulse
3 — No change with respect to previous status
Load
Prog
Link
View
Flow
[ml/min]
Pressure
[0.1 MPa]
Events:
off 0
on 1
2
01 -- 100.0 150 010000 0
OFF 000.0
Hold 0
Run 1
Fig. 13
Edit Prog
Clear 0
Time
[min]
%A
%B
%C
%D
Relations between event programing and event terminal strip
Setup
GLP
Control of the HPLC Pump K–1800
SOP
22
Start and Stop of Solvent Delivery
This SOP applies to the HPLC Pump K–1800 Firmware Revision 1.0X.
SOP
1
Apply SOPs „Setting the Flow Rate“ on page 20, „Solvent
composition if working in LPG or HPG gradient mode“ on
page 20.
2
Use the START/STOP Key, see Pos. ^514` in Fig. 2 on page 7, to
start and stop solvent delivery.
Purging the HPLC Pump K–1800
This SOP applies to the HPLC Pump K–1800 Firmware Revision 1.0X.
1
CAUTION
Open the „De-aeration capillary (purging outlet)“, Pos. ^715` by
loosening the „De-aeration screw“, Pos. ^716` prior to starting
the purging function to avoid damaging your column system.
Purging without opening the purging outlet may cause damage
to your column and system.
2
Press purge key ^515`, see Fig. 2 on page 7, for start and stop of
purging. The pump is purged with the currently active Low
Pressure Gradient solvent composition according to SOP
„Setting the Solvent Composition“ on page 20.
3
Select a flow rate for purging.
4
If LPG is selected, purging can be performed in mode MIX,
using the programed solvent gradient. Select the desired mode
or source by positioning the cursor on the appropriate position
MIX, A, B, C or D.
Load
Prog
Link
View
Flow
[ml/min]
Pressure
[0.1 MPa]
Events:
off 0
on 1
030.0 000
PURGE: MIX
A B
Hold 0
Run 1
Fig. 14
Edit Prog
Clear 0
Time
[min]
Display while purging in LPG mode
%A
%B
2
Setup
C
D
%C
%D
GLP
23
Piston Backflushing
Backflushing the piston removes traces of salt and other decontaminants from the backside of the pistons.
Especially if you use saline solvents or buffer solution we highly recommend that you continuously backflush in order to prevent crystallization which can damage your piston seals.
For best protection and error free long time operation of the pump
head it is recommended always to backflush the piston with an
appropriate solvent, according to the following SOP.
SOP
Preparing your HPLC Pump K–1800 for back flushing
This SOP refers to the HPLC Pump K–1800.
1
Push a 1/16" ID tube onto both flushing opening, see „Piston
backflushing capillaries, 1/16“, connected by tube“, Pos. ^614`
in Fig. 3 on page 8.
2
Place the low end of the tubing in a flask.
3
Fill the priming syringe with priming liquid.
4
Connect the syringe with the tubing.
5
Press liquid through the pump head, until it flows without any
air bubbles into the container.
6
Remove tubings from flush opening.
If you want operation with continuous backflushing you can attach
two containers of rinsing liquid instead of the priming syringe. The
containers should be positioned that one container is located higher
than the other, thus ensuring liquid flow through the pump head
without any assistance.
We recommend connecting both flush openings with a tubing to
prevent vaporization of solvents and dry out of the piston chamber.
Programing the HPLC Pump K–1800
24
Programing the HPLC Pump K–1800
Programs can perform the following actions:
• Determining and setting flow rates
• Determining and setting solvent compositions
• Control of signal events
The HPLC Pump K–1800 can store up to twenty programs with a
maximum of 100 lines of commands. You can define up to nine links
between existing programs.
Features of Programs
Units of the time display are minutes with a decimal representation
of seconds, i. e. 0.3 min = 18s. All programs are saved in the pump’s
memory and are permanently available.You can enter values with
1/10 min accuracy. Time is displayed in 1/100 min steps during program execution.
Programing the solvent composition does not depend on the currently active gradient mode, i. e. HPG or LPG.
New program lines are appended in the last line with the cursor on
an asterisk. You can manually rearrange lines by setting a desired
time.
If you generate a new line, all parameters are set to status No Change,
displayed as underscore characters, see D in see Fig. 15 on page 25.
The No Change-feature allows editing desired parameters while keeping the processing of parameters which are not changed.
SOP
Creating a Program
This SOP applies to the HPLC Pump K–1800 Firmware Revision 1.0X.
Use this SOP for entering program information in your HPLC Pump
K–1800. Use „Features of Programs“ above.
1
Select the operation screen (main menu).
2
Position cursor on menu Edit Prog
3
Enter number of desired program.
4
Press any arrow key to enter edit mode for new program.
The cursor is positioned at Time 000.0 (fixed start time).
5
Position cursor on desired field.
6
Enter desired values in the desired fields according to SOPs
„Solvent composition if working in LPG or HPG gradient mode“
on page 20, „Setting the Flow Rate“ on page 20, „Setting the
Solvent Composition“ on page 20 or „Setting Events“ on
page 21.
25
Load
Prog
Link
A
View
Edit Prog
Clear 0
Load
Prog
B
View
Time
[min]
Edit Prog
Clear 0
Load
Prog
Link
View
Edit Prog
Clear 0
View
%B
%C
Flow
[ml/min]
%A
Events:
off 0
on 1
Pressure
[0.1 MPa]
%B
%C
Flow
[ml/min]
%A
Pressure
[0.1 MPa]
%C
Time
[min]
%A
%C
Setup
GLP
%D
2
Setup
GLP
%D
Events:
off 0
on 1
%B
GLP
2
Events:
off 0
on 1
%B
Setup
%D
2
01 07 _____ 200 ________
OFF 020.0
10 90
Setup
GLP
%D
Display of single steps when creating a program
7
SOP
Pressure
[0.1 MPa]
Time
[min]
Edit Prog
Clear 0
Hold 0
Run 1
Fig. 15
2
01 07 ---.- 200 -------OFF ***.*
-- --
Load
Prog
Link
Flow
[ml/min]
%A
Time
[min]
Hold 0
Run 1
D
Events:
off 0
on 1
01 07 100.0 200 00000000
OFF 000.0
90 10
Hold 0
Run 1
C
Pressure
[0.1 MPa]
01 07 100.0 200 00000000
OFF 000.0 100 0
Hold 0
Run 1
Link
Flow
[ml/min]
Position cursor on time field and press X for creation of an
additional time step.
Execution of Programs
This SOP applies to the HPLC Pump K–1800 Firmware Revision 1.0X.
1
Load the program you want to execute. Enter the desired
program number in the Load Prog-field and confirm by
pressing any arrow key.
2
Press START key to start the pump. The display changes to ON
and the pump begins continuous operation with the parameters
specified in the first program line.
Programing the HPLC Pump K–1800
26
3
Position cursor on field ON
4
Start the program by pressing the numeric key 1. The display
changes to RUN.
5
During execution of programs you can press key 0 to freeze the
current status of the pump. The display changes to HOLD and
the field Time is blinking.
6
If you press 1 you can activate program execution again or you
can press STOP to abort execution.
During program execution the current solvent composition can
be observed in fields %A and %B.
At the end of the program the pump returns to the first line of
the currently active program and continuous pumping, ON is
displayed.
SOP
Modifying and Deleting Programs
This SOP applies to the HPLC Pump K–1800 Firmware Revision 1.0X.
Use this SOP for modifying and deleting programs.
1
Enter the number of the program to be modified in field Edit
Prog.
2
Locate the value in the program you want to modify.
3
Enter new values. Old values will be overwritten. Wrong entries,
for example due to typing errors, can be corrected the same
way.
4
Confirm your entries by pressing any arrow key.
Delete program lines as follows:
5
Enter 0 (zero) in the Time field and press a arrow key. The
message Delete this line? Confirm by cursor
appears.
Pressing any numeric key or no action for a time period Š60s
aborts the process of deletion.
6
Selection of any arrow key deletes the program line.
Deletion of programs or program links:
SOP
7
Select field Edit Prog.
8
Enter 0 in the field Edit Prog
9
Confirm deletion according to steps 5 to 6 of this SOP.
Using a Wake Up-Program
This SOP applies to the HPLC Pump K–1800 Firmware Revision 1.0X.
The HPLC Pump K–1800 can execute a program at a preset time.
27
Make sure that date and time of the HPLC Pump K–1800 are set up
properly according to section „Using the SETUP Menu“ on page 13.
You can create a Wake-Up Program as follows:
1
Enter the reserved program number 30 in the field Edit Prog.
2
Enter desired commands according to „Creating a Program“ on
page 24.
3
Load reserved program 30.
While waiting for the programed time, the display is blinking. The
pump will start program execution with selected program at preset
time and switch into RUN mode.
Load
Prog
View
Hold 0
Run 1
Pressure
[0.1 MPa]
Events:
off 0
on 1
2
Time
[min]
%A
%B
%C
Setup
GLP
%D
Display of wake up program
4
TIP
Flow
[ml/min]
07 30 WAKE P:01 at:09.15
OFF
UP on: 13.06.98
Link
Fig. 16
Edit Prog
Clear 0
You can abort execution of Wake-Up Program if you enter the
number of another program.
Example for creating a program
Generation of program #07 with the following functions: Controlling
solvent gradient with constant flow rate of 1.0 ml/min. Composition
at Start 90% A and 10% B, change of composition to 10% A and
90% B during 20 minutes.
This program is based upon the configuration in section „Operating
the HPLC Pump K–1800“ on page 18. This setup must be performed
before program definition. Remember, a dash indicates that calculation of the corresponding parameter is continued.
1
Select the operation screen
2
Move cursor to the field Edit Prog, press 7 to generate program
# 07
3
Press X to enter the Edit mode for the new program.
The cursor is positioned at Time 000.0
Programing the HPLC Pump K–1800
28
4
Press T to set the flow rate: Press 1, 0, 0 and then X to enter
the value 100.0 ml/min. The display should look like part A see
Fig. 15 on page 25, showing the cursor blinking in the Time
field.
5
Press V to enter field % A , then 9 and 0 and Z to confirm
the input. The amount for % B is automatically calculated and
indicated as 10%. The display should now look like part B in the
figure.
6
Press now X again, to put in the next program line by defining
a new time step. The display now should look like part C in the
figure, having the cursor blinking on the first asterisk.
7
Now press 2 and 0 and then V to define time step 20.0 min as
well as to enter field % A.
8
Press 1 and 0 for 10% A and then Z to confirm the input. The
amount for % B is automatically calculated and indicated as
90%. Part D in the figure is showing the current situation.
This program can be executed.
Using Program Links
Program links are combinations of existing programs, which can be
created and edited like any programs.
Links use reserved program numbers 21 … 29. These numbers are
automatically converted like 21=L1, 22=L2 etc. The HPLC Pump
K–1800 can store up to 9 different links.
Links use line numbers from No01 to No99, each line referencing a
linked program. The optional parameter gives the number of runs of
that program. A wait-status can be programed. The maximum number of programs in all links referenced is 100.
Any program can be referenced multiple times in a link. A program
link can not reference other links.
SOP
Creating Program Links
This SOP applies to the HPLC Pump K–1800 Firmware Revision 1.0X.
Use this SOP for creating program links in your HPLC Pump K–1800.
You can create links between existing programs as follows:
1
Enter desired number in field Edit Prog and press V for
confirmation.
2
Press any numeric key for a line number.
3
Use V#to move the cursor to field P and choose the desired
program number.
4
Press V again to select field R
5
Enter number of runs to be performed for the selected program.
29
6
Select field Wait and enter values 1 or 0.
If Wait is set to 1, the pump waits for an external start signal or
an user pressing 1 before this line is executed. On waiting the
pump switches to wait-status.
If Wait is set to 0, the program lines of the link are processed
continuously.
Example for a program link
Part A in Fig. 17 on page 29 is showing that step, with cursor blinking
at No**. Part B in the figure is showing that programing step.
Load
Prog
A
Edit Prog
Clear 0
Pressure
[0.1 MPa]
Events:
off 0
on 1
2
01 L2 No** P-- R-- WaitOFF
Link
View
Time
[min]
Hold 0
Run 1
Load
Prog
Edit Prog
Clear 0
Flow
[ml/min]
%A
Pressure
[0.1 MPa]
%B
%C
View
Hold 0
Run 1
Time
[min]
%A
Events:
off 0
on 1
%B
%C
Setup
GLP
%D
2
01 L2 No01 P07 R05 Wait0
OFF
No** P-- R-- Wait-
Link
B
Fig. 17
Flow
[ml/min]
Setup
GLP
%D
Display while editing a program link
During execution of a link the LINK menu is available in addition to
the common display. In the LINK menu the momentary status of the
running link is shown. Move cursor to the Load Prog-field and press
Z to enter this menu page. For more information refer to Fig. 10
on page 17.
Press V to exit link menu.
SOP
Executing Program Links
This SOP applies to the HPLC Pump K–1800 Firmware Revision 1.0X.
1
Enter the desired link number into the field Load Prog and
confirm by pressing any arrow key.
2
Press START to start the pump.
The display switches to ON
Programing the HPLC Pump K–1800
30
3
Position cursor on field ON.
4
Start the link by pressing numeric key 1
The display switches to RUN
After execution of a link the HPLC Pump K–1800 stops solvent delivery, the display switches to OFF.
Connecting the HPLC Pump K–1800 to Other
Instruments
Hydraulic Connections
CAUTION
Make sure that all hydraulic connections are suited for the system pressure and flow rate of your HPLC System.
Single Connection
250 ml Head
Solvent tubings are connected to the pump head according to Figure
18 „Pump heads: Hydraulic connections“. Make sure that the flat
side of the ferrule is directed to the pump head. Make sure that the
fitting screw is fastened hand tight.
1000 ml Head
Push the tubes directly over the connectors, and secure them by
means of appropriate clamps.
31
250 ml Head
1000 ml Head
Tube connectors
Tube
Fitting screw Ferrule
Fig. 18
Pump heads: Hydraulic connections
For order numbers see Figure 21 „Explosion Diagram and list of parts of 250ml
and 1000ml pump heads“
Electrical Connections
Using the EVENT and ANALOG/ERROR/START Sockets of the
HPLC Pump K–1800
Electrical signal lines from other instruments can be connected to
• the ANALOG/ERROR/START or
• EVENTS socket or the
• RS-232 serial interface
on the rear side of the HPLC Pump K–1800, see Positions ^817`, ^815`
and ^818` in Fig. 4 on page 9.
Events can be controlled in the main menu or in programs. You can
use SOP „Setting Events“ on page 21.
Programing the HPLC Pump K–1800
CAUTION
32
Do not touch the electrical contacts of the socket lines. Electrostatic discharges can lead to damage of the electronics of the
HPLC Pump K–1800.
Connecting Plug Strips
You can use the plug strips with 2,3 or 4 connectors, enclosed in the
accessories, for easy installation of electrical connections.
1
lever latch
4
plug strip
2
3
cable
Fig. 19
Assembling plug strips
SOP
Connecting Plug Strips
Use this SOP for connecting wires to the plug strips.
1
Insert the rounded end of the lever latch into the square
opening of the selected connector of the plug strip
2
Press the catch down as indicated by arrow
3
Insert the uninsulated end of the cable into the opening under
the catch
4
Release the catch and remove the lever latch from the plug
The cable is now firmly anchored in the plug strip.
33
Connecting the Event Socket
You can control the states of individual contacts of the EVENTS
socket using SOP „Setting Events“ on page 21.
Specifications of the Event Signals
TTL (Transistor-Transistor-Logic) connections: TTL-compatible outputs (max. consumption: 40 mA, UCEmax = 24 V) referred to
GROUND
Table 1
Technical specifications of the event signal connections
State
Control Outputs
OC (Open Collector)
connections
Relay connections
0
Low (< 500 mV)
Inactive
Contact open
1
High (> 2 V)
Active
Contact closed
2
Pulse, > 2 V for
500ms
Pulse: contacts 500ms
Pulse, active for 500ms closed
Connecting the ANALOG/ERROR/START Socket
The ANALOG/ERROR/START terminal strip serves to receive or
send start or error signals from/to other instruments. Additionally, a
further voltage signal is available for monitoring the system pressure
or for controlling a slave pump.
Table 2
Technical specifications of ANALOG/ERROR/START signal
connections and picture of connector
Signal
Description
Start connections
START IN
Is activated by a 0 Volt or low signal or a short circuit
IIN = 10mA
START OUT
OC (open collector) output is active for 500 ms
Error connections
ERROR IN
When receiving a 0 V (error) signal, the message Error
signal was detected is displayed and the pump
is stopped; IIN = 10mA
ERROR OUT
OC output — active until the error condition is removed
ANALOG OUT
Analogue voltage signal — Gives measured system pressure
(1 V per 40 MPa; Offset for 0 MPa is some mV or control
voltage for slave pump B
ANALOG IN
Analogue input signal controls flow rate; default 1 V per
25ml/min for 250ml head and 1 V per 100ml/min for
1000ml head
Programing the HPLC Pump K–1800
34
Using the RS-232 Serial Interfaces
The two RS-232 serial interfaces on the rear side of the device, see
^817` in Fig. 4 on page 9, enable digital data transfer between the
HPLC Pump K–1800 and other instruments like other pumps, detectors or a PC which runs the EuroChrom software package. All the
devices are communicating with each other and form an integrated
network.
All devices are connected in a token ring in the following way: The
first RS-232 interface (the left one) of the first device is connected to
the second RS-232 interface (the right one) of the next device and so
on. The ring is closed by connecting the RS-232 interface of the last
device to the free interface of the first one.
For connections with a PC you need a Y-cable which is part of the
EuroChrom 2000 Software/Hardware package.
A
B
PC
RS-232
Y- cable
Fig. 20
Connection scheme for network of three instruments — A: Networking three
pumps; B — Connection with Y-cable and Personal Computer
35
Easy Maintenance
Changing and Cleaning the Pump Head
SOP
Removing the Pump Head
This SOP refers to the HPLC Pump K–1800.
For exchange of the pump head, or for disassembling it in order to
clean valves or replace piston seals, piston rods etc., it can easily be
removed.
1
CAUTION
SOP
Purge the pump head with a suitable cleaning agent and then
with distilled water. You can use SOP „Purging the HPLC Pump
K–1800“ on page 22.
If organic solvents remain in the pump head, danger of skin irritation may exist.
2
Remove the two solvent tubings from the „Eluent inlets“, Pos.
^615`in Fig. 3 on page 8.
3
Loosen the two „Eluent outlets to transducer“, Pos. ^61:` and
the two „Inlets to transducer“, Pos. ^714`.
4
Remove the two „Connection capillaries“, Pos. ^61;`, beginning
with the upper one („n“-shaped one).
5
Using a hexagonal spanner no. 4 (4 mm), loosen just two
diagonally opposed „Head set screws“, Pos. ^616`. Remove the
screws.
6
Carefully loosen the two remaining screws, alternating from one
to the other, approx. half a turn. This prevents the pump head
from tilting and becoming damaged. Once the spring tension
has been reduced, hold the pump head firmly in one hand while
removing the screws completely with the other hand.
7
Carefully remove the pump head.
Removing and Checking Piston Rods
This SOP refers to the following pump heads:
• 250ml steel, KNAUER order number A 4021
• 1000ml steel, KNAUER order number A 4022 .
1
Remove Pump head as described in SOP „Removing the Pump
Head“.
Easy Maintenance
36
If you only wish to check the piston rods, you don’t need to
disassemble the pump head any further.
2
Any „Piston rods“, Pos. ^614:` in Fig. 21 on page 37 may be
removed using pliers. Take the tip of the piston using the pliers,
and pull it out carefully in a straight line.
TIP
If the rods are broken, you must check the entire pump head for
damage.
SOP
Disassembling the Pump Head
This SOP refers to the pump heads 250ml and 1000ml.
1
Apply SOP "Removing and Checking Piston Rods" on page 35.
2
Loosen the two „Retaining plate screws“, Pos. ^614<` half a turn,
alternating from one to the other to avoid damaging the
„Retaining plate“.
3
Because the two screws are very tight, it may be helpful to either
clamp the pump head or to press one of its side surfaces against
a table with one hand while loosening the screws.
4
Unscrew the two screws strictly alternating due to strong force
of the „Springs“, Pos. ^6148` behind the plate, and remove
them.
5
Remove the „Retaining plate“, Pos. ^614;`.
6
You can now remove the „Guides for springs“, Pos. ^6149`, the
„Springs“, Pos. ^6148` as well as the two „Distance plates“, Pos.
^6146`.
7
Using an appropriate tool, e.g. a screw driver, carefully lever the
two „Piston seals“, Pos. ^6144`out of the „Pump head housing,
basic plate“, Pos. ^61%`
8
Using the SW 10 spanner, loosen and remove the „Spacing
bolts“, Pos. ^6147`. These bolts are seated very tightly. Follow the
tip given in step 3.
9
Lift and remove the „Pump head housing, basic plate“, Pos.
^61%`and remove the „O-shaped sealings“, Pos. ^6145`
10 As described in step 7, remove the two „Piston seals“, Pos.
^6144`out of the „Pump head housing, front block“, Pos. ^61$`.
37
^614`
^614:`
^619`
^614<`
^6143`
^6144`
^6B$`
^616`
^614;`
^6149`
^6148`
^6147`
^6146`
^6B%`
^6145`
^6144`
^6143`
^618`
^615`
Fig. 21
Explosion Diagram and list of parts of 250ml and 1000ml pump heads
Table 3
Components of the Pump Head
Position
Description
3.A
Pump head housing, front block
3.B
Pump head housing, basic plate
3.1
Piston backflushing capillaries 1/16“
3.2
Eluent inlets
3.3
Pump head set screws
3.5
Inlet valve housing
P0523
3.6
Outlet valve housing
P2759
3.10
Check valves, inlet and outlet
G0563
3.11
Piston seals
M1310 (10ml) M1300 (50ml Head)
3.12
O-shaped sealings
P2702
3.13
Distance plates
P2704
3.14
Spacing bolts
P2705
3.15
Springs
M1370
KNAUER Number
Easy Maintenance
Table 3
38
Components of the Pump Head
3.16
Guides for springs
P2706
3.17
Piston rods
P2711
3.18
Retaining plate
P2707
3.19
Retaining plate screws
R0117
Parts for inlet, see Figure 18 „Pump heads: Hydraulic connections“
Ferrule
M1057
Fitting Screw
P2738
Tubing
K0347
SOP
Assembling the Pump Head
This SOP refers to the pump heads 250ml and 1000ml.
All positions of components refer to Figure 21 „Explosion Diagram
and list of parts of 250ml and 1000ml pump heads“ on page 37.
Fig. 22 Open side of
piston seal
1
It is recommended to exchange all four piston seals located in
the pump head by new ones after disassembling the pump
head.
2
With the open side facing downwards, carefully press the
„Piston seals“, Pos. ^6144` into the „Pump head housing, front
block“, Pos. ^61$` and „Pump head housing, basic plate“, Pos.
^61%`, making sure to keep them straight.
3
Put in the two „O-shaped sealings“, Pos. ^6145`.
4
Put the two housing parts together, positioning the O-ring side
of part B against part A. Be sure that the backflushing capillaries
are positioned on the top side of the head - see label on front of
part A for orientation.
5
Insert the two „Spacing bolts“, Pos. ^6147`, screw them in with
the hand and tighten them firmly, using the SW 10 spanner,
that they are seated as securely as before.
6
Put in the two „Distance plates“, Pos. ^6146`, position the
„Springs“, Pos. ^6148` and the „Guides for springs“, Pos. ^6149`.
7
Put the „Retaining plate“, Pos. ^614;` over the „Guides for
springs“, Pos. ^6149`, having the conical bore of the plate
directed to outwards.
8
Insert the two „Retaining plate screws“, Pos. ^614<`, press the
plate down with one hand and tighten the screws with a screw
driver, strictly alternating due to strong force of the „Springs“,
Pos. ^6148` .
9
Carefully insert the piston rods, see „Piston rods“, Pos. ^614:`
without bending or quenching the rods.
10 The „Retaining plate screws“, Pos. ^614<` must be tightened that
they are seated as securely as before.
39
SOP
Installing the Pump Head
This SOP refers to the HPLC Pump K–1800 and the following pump
heads:
• 250 ml steel, KNAUER order number A 4021
• 1000ml steel, KNAUER order number A 4022.
SOP
1
Make sure that the pump head is properly assembled.
2
Position the head in a straight line onto the pump housing.
3
Tighten all four „Pump head set screws“, Pos. ^616` a few turns
by hand.
4
Alternating from one to the next, tighten two diagonally
opposed screws half a turn at a time, until the pump head is
correctly seated.
5
Tighten the two other screws.
6
Make sure that all four „Pump head set screws“, Pos. ^616` are
securely tightened.
7
Install the two „Connection capillaries“, Pos. ^61;`, beginning
with the s-shaped one, and firmly tighten all fittings.
Cleaning and Replacing Check Valves
This SOP refers to the pump heads 250ml and 1000ml .
If the check valves become dirty they will no longer open and close
correctly. You can remove the check valves for cleaning from the
pump head after loosening and removing the „Inlet valve housing“,
Pos. ^618` and „Outlet valve housing“, Pos. ^619`, and then disassemble them according to the following instructions.
1
Place the valves in a suitable cleaning solution. Use a ultrasonic
bath to clean the valve. If malfunction persists, use steps 2…5 of
this SOP.
2
Using a knife or similar, carefully remove the valve seal from the
housing, see Fig. 23 on page 40.
3
Remove the individual components by gently tapping the
housing on the table.
4
Clean the individual parts. We recommend a ultrasonic bath.
5
Assemble the check valves in reverse order, use Figure 23. Pay
attention to the correct orientation of the valve seating, see
cross section in Figure 23.
Easy Maintenance
40
Direction of flow
Housing
Valve seal
Valve seating
Valve ball
cross section
illustration
Fig. 23
Components of the check valves of all pump heads available
List of Error Codes
Table 4
Error codes in GLP Menu
Error Code
Meaning
5
Motor failure
9
ERROR IN signal detected
10
Switch off due to exceeding maximum current
12
Switch off due to exceeding maximum pressure
13
Switch off due to falling below minimum pressure
23
Motor blocked
33
Calibrating values re-initialized
34
Calibrating curve re-initialized
35
Combination from 33 + 34
41
List of Spare Parts and Accessories
Optional Pump heads
KNAUER Order
Number
Pump Head, stainless steel, 250 ml
A4021
Pump Head, stainless steel, 1000 ml
A4022
Cables
Power supply cable, 230V
M1642
RS-232 connection cable
M1703
Set of plug strips (3x4; 2x3; 1x2 connections)
including lever catch
A1402
Set of signal cables
A1404
Spare parts (Refer to Figure 21 „Explosion Diagram and list of
parts of 250ml and 1000ml pump heads“)
250 ml Head:
Check valve, Pos. ^6143`
A1080
Piston rod, 3/8 “, Pos. ^614:`
A1017
Set of piston seals for piston rod with O-Rings,
2x ^6144`, 1x ^6145`
A1046
1000 ml Head:
Piston rod 3/4 ”
A1015
Set of piston seals for piston rod with O-Rings
A1077
Declaration of Conformity
42
Declaration of Conformity
Manufacturer’s Name
Wissenschaftliche Gerätebau
Dr. Ing. Herbert Knauer GmbH
Manufacturer’s Adress:
Hegauer Weg 38
14163 Berlin, Germany
declares under sole responsibility, that the following product
HPLC-Pump K–1800
complies with the following requirements and product
specifications:
• Low Voltage Ordinance (73/23/EWG); EN 61010–1 (1993)
• Engineering Guidelines (89/392/EWG)
• EMV Ordinance (89/336/EWG)
EN 50081–1 (1992)
EN 55011 (1991) Class B,
EN 55022 (1987) Class B
EN 50082–1 (1992)
IEC 801–2 (1984),
includes IEC 41 B (sec) 81 (1992)
IEC 801–3 (1984)
IEC 801–4 (1988)
The product was tested in a typical configuration.
Berlin November, 11th 1998
Bernward Rittgerodt (Managing Director)
The CE Shield is attached to the rear of the instrument.
43
Guarantee Statement
We guarantee the HPLC Pump K–1800 for a period of 12 months
beginning from the date of dispatch from Berlin. Operation inconsistent with manufacturer's instructions or damage caused by unauthorized service personnel render the guarantee null and void. Damage
caused by blockages and wear and tear parts such as fuses and seals
are not covered by the guarantee. Claims under this guarantee are
valid only if the enclosed guarantee card is returned to us at the
address shown below within 14 days of receipt of the instrument.
Defective pumps should be sent to the manufacturer for repairs
under guarantee, see full adress.
KNAUER instruments are properly packed so that safe delivery can be
assured. In any case, the instrument shouId be unpacked and
checked for visible transport damage and complete delivery immediately after receipt of delivery. In the unlikely event of any components being either damaged or incomplete, please inform us at the
address given above within three working days of delivery. You are
also strongly advised to contact the logistics firm who delivered the
instrument.
If, after carrying out the necessary control procedures, we find a
shortage or defect covered by the guarantee, replacement or repair,
at our discretion, will be carried out free of charge. Packing and transport costs are borne by the purchaser.
Service Department and Hotline
Wissenschaftliche Gerätebau
Dr. Ing. Herbert Knauer GmbH
Hegauer Weg 38
14163 Berlin, Germany
Telephone (+49) (0)30 809727 62
Telephone (+49) (0)30 809727 26