1
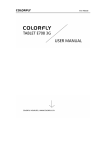
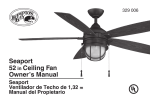
User Manual
User Manual
Foreword
Thank you for purchasing our products. This built-in
built in manual provides details including product
information and product usage, helping you understand and easily operate the product. Read all
materials provided with the product before using it.
NOTE: Please always back up data to your PC. In no event shall our company be liable for any
personall data loss or damage arising directly or indirectly from the use of this product. Our
company shall not be liable for any accidental loss caused by misunderstanding of this manual and
not be liable for third party claims arising out of the use of this product.
pro
Some functions described in this manual may be different from the actual functions of the product
since our company is committed to continuously optimizing product functions and improving user
experience. All content in this manual is subject to change
chan without prior notice.
For more information, visit our official website.
Official website: http://www.colorful.cn
i
User Manual
Contents
1 Overview ................................................................................................................................
................................
...................................... 1
Appearance Description................................................................................................
........................................ 1
2 Getting Started.............................................................................................................................
................................
............................. 2
Turning Tablet On/Off
n/Off ................................................................................................
......................................... 2
Turn tablet on ................................................................................................
................................
................................................. 2
Turn tablet off ................................................................................................
................................
................................................. 2
Turning Screen Off ................................................................................................
................................
................................................. 2
Charging and Battery ................................................................................................
................................
............................................ 2
Charge the table................................................................................................
................................
.............................................. 2
Storage Card (TF Card) Usage .............................................................................................
............................. 3
Insert a storage card ................................................................................................
....................................... 3
Browse files on the storage card................................................................
................................................... 3
Remove the storage card ...............................................................................................
............................... 3
Input Method Setting................................................................................................
................................
............................................. 4
Using Phone Call and Short Message Functions ...............................................................
............................... 4
Connecting to Networks ................................................................................................
....................................... 4
Connecting to USB Devices ................................................................................................
.................................. 4
Connecting to a PC................................
................................................................................................
................................................. 5
3 Main Screen................................................................................................................................
................................
.................................. 6
Icons on the Main Screen ................................................................................................
...................................... 6
APPS and WIDGETS Pages ................................................................................................
.................................. 6
View the APPS
PPS page ................................................................................................
...................................... 6
View the WIDGETS page ..............................................................................................
.............................. 7
Desktop Shortcut Creation................................................................................................
.................................... 7
Create an application shortcut icon on the desktop ..................................................
................................
7
Delete an application shortcut icon from the desktop ..............................................
................................
7
Wallpaper Changing................................................................................................
................................
.............................................. 7
ii
User Manual
4 Settings ................................................................................................................................
................................
......................................... 7
Wireless & Networks ................................................................................................
................................
............................................. 7
SIM management ................................................................................................
........................................... 7
Wi-Fi ................................................................................................................................
................................
................................. 8
Bluetooth ................................................................................................
................................
......................................................... 9
Mobile networks ................................................................................................
................................
............................................. 9
Audio profiles ................................................................................................
................................
....................................................... 10
Display ................................................................................................................................
................................
................................... 10
Storage ................................................................................................................................
................................
................................... 10
Battery ................................................................................................................................
................................
.................................... 10
Apps ................................................................................................................................
................................
....................................... 10
Location access ................................................................................................
................................
..................................................... 10
Security ................................................................................................................................
................................
.................................. 11
Language & input ................................................................................................
................................
................................................ 11
Backup & reset ................................................................................................
................................
...................................................... 12
Accounts ................................................................................................................................
................................
................................ 12
Date & time ...........................................................................................................................
................................
........................... 12
Scheduled power on & off ................................................................................................
.................................. 13
G-sensor Calibration ................................................................................................
................................
............................................ 13
Accessibility ..........................................................................................................................
................................
.......................... 13
Developer options ................................................................................................
................................
................................................ 13
About tablet ..........................................................................................................................
................................
.......................... 13
5 Software Installation
ion and Uninstallation ................................................................
............................................... 14
Installation.............................................................................................................................
................................
............................. 14
Uninstallation ................................................................................................
................................
....................................................... 14
6 Common Functions................................................................................................
................................
................................................... 14
Making Calls .........................................................................................................................
................................
......................... 14
When Someone Calls ................................................................................................
................................
........................................... 15
Sending and Receiving Short Messages ................................................................
............................................ 15
iii
User Manual
Music Player .........................................................................................................................
................................
......................... 16
Video Player ..........................................................................................................................
................................
.......................... 16
Camera ................................................................................................................................
................................
................................... 16
Gallery ................................................................................................................................
................................
................................... 17
File Manager .........................................................................................................................
................................
......................... 17
Email ................................................................................................................................
................................
...................................... 17
Browser ................................................................................................................................
................................
.................................. 18
7 FAQ ................................................................
................................................................................................
............................................. 18
8 Safety and Cleaning ................................................................................................
................................
.................................................. 19
Tablet Carrying................................................................................................
................................
..................................................... 19
Reducing Electricc Shock or Tablet Damage Risks ...........................................................
........................... 19
Properly Using the Data Cable and Power Adapter .......................................................
................................
20
Keeping the Tablet Exterior Clean ................................................................
..................................................... 20
Keeping the Tablet in a Safe Temperature Range............................................................
Range
............................ 21
Storing the Tablet ................................................................................................
................................
................................................. 21
Preventing Hearing Loss ................................................................................................
..................................... 21
Warning About High-Risk
Risk Activities ................................................................
................................................ 21
9 The
he Warranty Agreement ................................................................................................
........................................ 22
RMA procedure ................................................................................................
................................
....................................................... 22
Return route ............................................................................................................................
................................
............................ 22
Method: ................................................................................................................................
................................
................................ 23
This Agreement does not apply to the following conditions:
conditions ...............................................
................................
23
iv
User Manual
1 Overview
Appearance Description
1
User Manual
2 Getting Started
Turning Tablet On/Off
Turn tablet on
Hold down the Power button until the product logo appears.
Turn tablet off
Hold down the Power button until the confirmation dialog box appears, and tap Power off.
If the tablet is in sleep mode, wake up the tablet and hold down the Power button.
Turning Screen Off
Press the Power button for one second, and the screen is turned off. Press the Power button again
to turn the screen on.
Turning the screen off can reduce power consumption.
Tips: You can go to Settings > Display to set the auto-lock
auto
interval.
Charging and Battery
Charge the table
Use the included USB power charger to charge the tablet.
Tips for using the battery
If you charge the battery for the first time, charge it for more than eight hours, to maximize
the battery life.
2
User Manual
If the tablet has not been used for a long time or the battery power is used up, the tablet may
fail to be turned on when you start to charge it. This is the normal case. Turn on the tablet
after the battery is charged for more than 10 minutes.
Using data services consumes more power and reduces the tablet standby time.
The batteryy charging duration varies depending on temperature and battery use status.
When the battery power is insufficient, a notification message is displayed. The tablet
automatically shuts down when the power is too low.
Tips for reducing power consumption
Turn the screen or tablet off when you do not use the tablet.
Set a short screen auto-lock
lock interval.
Reduce the screen brightness.
Turn the volume down.
Close the WLAN connection when it is not required.
Disable data services when they are not required.
Storage Card (TF Card) Usage
Insert a storage card
Insert a storage card into the TF
T card slot as prompted.
Browse files on the storage card
Start the File Manager application and open the storage card.
Start an installed third-party
party file manager program and open the storage card.
Remove the storage card
To prevent data loss or damage, unmount the storage card before removing it.
3
User Manual
Go to Settings > Storage > Unmount SD card, push the storage card towards the
th slot, release the
storage card, and take it out.
Tips: You are advised not to perform hot-plug or hot-pull
pull on a storage card when it is used, to
prevent data loss or damage.
Input Method Setting
You can download and install your favorite input methods. You can select an installed input
method.
Go to Settings > Language & input, select an installed input method,
metho and tap
. The system
switches to the installed input method.
Using Phone Call and Short Message Functions
This tablet can be used to make and answer
answer calls, and send and receive short messages. For details
about how to make calls, answer calls, send short messages, and read short messages, see the
sections "Making Calls", "When Someone Calls", "Sending and Receiving Short Messages", and
"Contacts" in Chapter 6.
Connecting to Networks
The tablet can use the Wi-Fi
Fi function, an external 3G dongle, or a USB Ethernet adapter to
connect to a network. For details about how to set a network, see "Wireless
"
& Networks"
Networks in this
manual.
Connecting to USB Devices
The tablet supports OTG extension. Users can easily connect the tablet to USB devices such as
mouse and keyboard by using the OTG cable.
4
User Manual
Connecting to a PC
1.
Use the included USB cable to connect the tablet to a PC.
PC
2.
When the "USB connected" dialog box is displayed, tap Turn on USB storage as shown in
the following figure,, and you can copy files to the PC or copy files from the PC.
3.
After operations are complete, tap Turn off USB storage,
storage, as shown in the following figure.
Tips: You can also tap USB connected on the notification panel to display the "USB connected"
dialog box,, as shown in the following figure.
5
User Manual
NOTE: Ensure that the communication between the tablet and PC is terminated before you unplug
the USB cable from the PC. Properly
Properly close the USB device to prevent data loss or damage.
3 Main Screen
Icons on the Main Screen
Icon
Name
Description
Return
Tap this icon to the go to the previous viewed page.
Home page
Tap this icon on any page to go to the Home page.
Recently used
Tap this icon to view the recently used applications.
Search button
Tap this icon to search.
All applications
Tap this icon to view all applications.
Status display
This area displays information including time,
network, and battery power information, and you can
tap to view details.
APPS and WIDGETS Pages
View the APPS page
Tap
, and the APPS/WIDGETS page appears, displaying icons of all installed applications.
You can swipe left or right to view more applications.
6
User Manual
View the WIDGETS page
On the APP page, tap WIDGETS in
in the upper left corner or swipe left.
Desktop Shortcut Creation
Create an application shortcut icon on the desktop
On the APPS or WIDGETS page, touch and hold an icon until the desktop appears, and you can
drag the icon to any position on the desktop.
Delete an application shortcut icon from the desktop
1.
Touch and hold an icon on the desktop until a cross icon appears.
2.
Drag the icon to the cross icon. After the icon turns red, release the icon.
Wallpaper Changing
1.
Touch and hold on a blank area on the main screen. The Wallpapers, Live Wallpapers, Video
Wallpaper, and Gallery options are displayed. Tap an option to display the picture selection
page.
2.
Alternatively, go to Settings > Display and tap Wallpaper.
4 Settings
Wireless & Networks
SIM management
This item is available only after a SIM card is inserted into this tablet. This item allows you to
view and edit SIM card information, enable or disable data connection, and change other settings
7
User Manual
such as roaming.
Wi-Fi
Turn on the Wi-Fi
Fi network
1.
Go to Settings > WIRELESS & NETWORKS and tap the switch on the right to disable or
enable the Wi-Fi
Fi service.
2.
Tap
and tap Scan when the Wi-Fi
Wi Fi service is enabled to view the detected Wi-Fi
Wi
networks.
3.
Fi network to connect to it. If a password has been set for the Wi-Fi
Wi
Tap the required Wi-Fi
network, enter the password in the displayed dialog box and tap Connect.
After you successfully connect to the Wi-Fi
Wi network, the Wi-Fi
Fi connection icon is displayed
on the status bar.
Add a Wi-Fi network
Some Wi-Fi
Fi networks do not broadcast SSIDs. Therefore, you need to add such Wi-Fi
Wi networks
when you are to use them.
1.
Go to Settings > WIRELESS & NETWORKS and tap
2.
Set Network SSID and Security.
3.
Tap Save.
in the upper right corner.
Delete Wi-Fi networks
The system automatically saves connected and added Wi-Fi
Wi Fi networks and connects the tablet to
one of them when the tablet is used in the corresponding network coverage. To delete a Wi-Fi
Wi
network, perform
erform the following steps:
1.
Go to Settings > WIRELESS
WIRELE & NETWORKS and tap a connected Wi-Fi
Fi network to open it.
8
User Manual
2.
Tap Forget in the displayed dialog box.
The connection information is deleted,
deleted and you need to set information to connect to it next
time when you are to use it.
it
Set a Wi-Fi network
1.
Go to Settings > WIRELESS & NETWORKS, tap
2.
Select Network notification.
, and tap Advanced.
The system automatically notifies you of open Wi-Fi
Wi networks nearby.
3.
Tap Keep Wi-Fi
Fi on during sleep.
In the dialog box that appears, tap Always, Only when plugged in, or Never (increases
(i
data
usage) to set whether to keep Wi-Fi
Wi Fi connected when the tablet is in sleep mode and when to
keep Wi-Fi connected. If you tap Always, the Wi-Fi
Wi Fi network is always connected even when
the tablet is in sleep mode.
Bluetooth
Go to Settings > WIRELESS & NETWORKS and tap the switch on the right to disable or enable
the Bluetooth service.
Mobile networks
Enable/Disable the 3G network
After inserting a SIM card into this tablet, you can enable or disable the 3G network by
performing the following steps:
1.
Go to Settings > WIRELESS & NETWORKS and tap More.
2.
Tap Mobile networks and turn Data connection on or off.
9
User Manual
View Data usage
Go to Settings > WIRELESS & NETWORKS and tap Data usage. You can view details about the
3G card usage.
Audio profiles
Set predefined profiles to General, Silent, or Outdoor. When you set the General profile, you can
set general volumes, and set sound effects for incoming calls, notifications, and system operations.
Display
Set
et common display items such as brightness,
brightn
daydream, font size, and au-to
to lock interval, and set
personalized items including lock screen notifications, scenes, theme, and wallpaper.
Storage
View system storage status. You can select to format the SD card. After you insert an SD card or
USB storage
orage device, you can select to unmount or mount the SD card or USB storage device.
Battery
View battery power and usage.
Apps
View the downloaded, Nand Flash,
Flash running, and all applications by tab. You can uninstall or move
applications, or clear cache for applications. You are advised to move downloaded applications to
the SD card.
Location access
This item is available only in an environment with a network connected. You can set whether to
10
User Manual
allow specified applications to use your location information. The options for location information
include GPS satellites and Wi--Fi & mobile network.
Security
Screen Security
Screen lock:: By default, the screen is unlocked in slide mode; however, you can set to the
pattern or password mode.
Owner info:: You can set owner information to be displayed on the locked screen.
Encryption
After you encrypt the tablet, you must enter a numeric PIN or password to decrypt the tablet
each time you power it on.
Passwords
You can make passwords visible.
Device Administration
Device administrators:: View or deactivate device administrators.
Unknown sources:: After you select this item, applications from non-Google
non Google electronic store
can be installed.
Verify apps: After you select this item, applications to be installed are verified.
verified Applications
that may cause harm are not allowed to be installed, or a warning is displayed before you
install such applications.
Credential Storage
Trusted credentials:: Display trusted CA certificates.
Install from SD card:: Install certificates from the SD card.
Clear credentials:: Remove all certificates.
Language & input
Language & input
Language: Set the system language.
11
User Manual
Spell checker:: Set the spelling checker.
Personal dictionary:: Add words to the user dictionary.
Keyboard & Input Methods
Select an input method from the system built-in
built or third-party
party input methods. After selecting
an input method, tap
on the right to switch to it or tap Default to set it as the default
input method.
Speech
Set voice search and text-to-speech
text
(TTS) output.
Mouse/Track Pad
Set the pointer speed.
Backup & reset
Personal Data
DRM reset:: Delete all Digital Rights Management (DRM) licenses.
Factory data reset: Tap
ap this item to restore the tablet to factory settings. If you select Erase
nand flash, all data in the memory device in the tablet is deleted.
Accounts
Add account: Add a corporate or email account.
Date & time
Automatic date & time:
time indicates whether the tablet automatically obtains
obtain time from the
Internet after it is connected to a network.
Automatic time zone: indicates whether the tablet automatically obtains a time zone from the
Internet after it is connected to a network.
Set date:: After deselecting Automatic date & time, you can manually set the date.
Set time:: After deselecting Automatic date & time, you can manually set the time.
12
User Manual
Select time zone:: After deselecting Automatic time zone, you can manually select a time
zone.
Use 24-hour format:: When you select this item, the 24-hour
24 hour format is used. When you
deselect this item, the 12--hour format is used.
Choose date format:: You can select a date display format.
Scheduled power on & off
Set automatic power-on
on and power-off
power
and its frequency.
G-sensor
sensor Calibration
Calibrate the G-sensor
sensor as instructed.
Accessibility
Set services and system items such as magnification gestures, large text, and auto-rotate
auto
screen.
Developer options
USB debugging: Byy default, this item is deselected. Enable this function only when the tablet
communicates with third-party
party software installed on a PC.
NOTE: Disable this function when the tablet properly connects to a PC for charging or data copying.
About tablet
View information about this tablet.
tablet
13
User Manual
5 Software Installation and
Uninstallation
Installation
Download or copy the required applications to the local storage device or storage card, open File
Manager, select a third-party
party application file, and tap Install.
Uninstallation
Perform the following operations to uninstall a third-party
third
application:
Go to Settings > Apps, select an application, and tap Uninstall.
6 Common Functions
Making Calls
On the APPS page, tap the Phone application.
On the Phone page, you can make a call using one of the following methods:
Enter the number to be dialed on the number keypad and tap
to make the call.
call
Tap
at the top of page and view recent calls. Tap the number or person to be called.
called
Tap
at the top of the page and view all call records including incoming calls, outgoing
calls, and missed calls. Tap the number or person to be called.
Tap
at the top of the page and view contacts information. Tap the person to be called.
To end a call, tap
.
14
User Manual
When Someone Calls
When there are missed calls, a red badge on the Phone icon tells you the number of missed calls.
When there is an incoming call, the incoming call number and its carrier information are displayed
at the top and a phone icon
answer a call, drag it to
is displayed in the lower part. You can drag
to reject the call, or drag it to
to
to
to reply using a short message.
Sending and Receiving Short
Sho Messages
On the APPS page, tap the Messaging application.
By default, the Messaging page lists all sent or received messages. On the page, you can perform
the following operations:
Tap
tap
at the top to type a message, select a contact or enter the receiver's number, and
to send the message.
Tap
Tap
to search for a message.
to perform other operations such as delelting all sessions and configure messages.
When there are unread messages,
messages, a red bage on the Messaging icon tells you the number of
unread messages.
Contacts
On the APPS page, tap the People application.
On the page, you can perform the following operations:
Set your own information.
Tap
to search for contacts.
Tap
to add contact information in SIM card or in tablet storage.
Tap
to perform more operations such as deleting, editing, or sharing contacts.
In the detailed information about a contact person, tap the number to make a voice call, tap
15
User Manual
to make a video call,
ll, and tap
to send a short message to the person.
Music Player
1.
On the APPS page, tap the Play Music icon to display the playlist.
2.
Tap the song to be played. The music playing page is displayed.
The following table describes the icons on the music playing
playi page.
Operation
Icon
Play/Pause
Previous/Next
Playlist
Repeat/Random
Volume down/Volume up
Video Player
1.
On the APPS page, tap the Video Player icon to display the playlist.
2.
Tap the video to be played.
When a video is played, you can touch the screen to display the play control bar.
Tips: You can select any installed video player to play videos.
Camera
Tap the Camera icon to open the photo taking and video recording page. The common functions
are described as follows:
Photo taking: Tap
. The photo taken is automatically saved.
Front/Rear camera switch:
switch Tap
and then
to switch between the front and rear
cameras.
16
User Manual
Photo taking/Video recording:
rec
Tap
. Select
to take photos and select
to
record videos.
Video recording: Tap
to start or stop recording. The video recorded is automatically
saved.
Gallery
Tap the Gallery icon to open the gallery and tap a picture.
When viewing a picture, you can perform the following operations:
Swipe left or right to view the previous or next picture.
Tap
to perform operations such as deleting, playing a slideshow, rotating the picture left,
rotating the picture right, and cropping the picture.
Tap
Tap
to delete the picture.
picture
to share the picture through Picasa or Gmail.
File Manager
Open the File Manager application.
application. You can manage the internal storage device, storage card, and
external mobile storage devices. In the file manager,, you can copy, move, rename, delete, or cut
files.
Email
Set email:: Tap the Email icon and follow the wizard
wizard to set email information. You can add
external POP3 or IMAP email accounts provided by common email service providers such as
Sina, Sohu, Gmail, and QQ. To manually configure email information, contact your email
service provider to obtain correct account
account information. For example, you need to understand
17
User Manual
POP3/IMAP and corresponding server settings.
Receive and send emails: After successfully setting the email information, you can receive
and send emails.
Browser
Open a webpage:: Open a browser, tap the address field, enter the URL, and tap the
confirmation key (for example, the Go key) on the keyboard. The actual confirmation key
varies depending on input method.
View a webpage:: Slide your finger on the screen to browse or view other webpages.
Enlarge/Reduce a webpage:
webpage Browse a webpage, double-tap
tap to zoom in or zoom out, or
spread two fingers apart to zoom in and pinch the two fingers together to zoom out.
More operations: Tap
when you view a webpage. You can tap the options to perform
corresponding operations.
7 FAQ
1.
What can I do when the tablet does not respond or cannot be properly started?
a)
Poke the Reset button and press the Power button.
b)
Check whether the tablet fails to be turned on due to insufficient power. Turn on the
tablet
ablet after charging it for more than 10 minutes.
c)
2.
Contact a professional to upgrade the system.
Why is the standby duration of the tablet too short sometimes?
a)
The standby duration depends on factors including the brightness, network operations,
and operation frequencies. You are advised to reduce the brightness and disable
networks when they are not used.
b)
The running of some third-party
third party software may stop the tablet from entering the sleep
mode, which shortens the standby duration.
3.
Why does the system respond slowly sometimes?
18
User Manual
a)
Too many third-party
party applications are installed, which occupies large memory and
causes the slow response of the tablet. You are advised to uninstall unnecessary
software.
b)
4.
Back up data and restore the tablet to factory settings.
Why errors occur when I start an installed third-party
third
application?
The Android operating system cannot compatible with some third-party
third party software due to
hardware and software restrictions. You are advised to download third-party
third party software that is
compatible with the tablet software and hardware.
8 Safety and Cleaning
Tablet Carrying
Do not drop your tablet to the floor. You can use leather cases sold by other manufacturers to
protect your tablet from scratching.
WARNING: Your
ur tablet includes damageable parts and a rechargeable battery. Do not drop, twist,
or crush the tablet, to prevent damage.
Reducing Electric Shock or Tablet Damage Risks
Keep the tablet from water and moisture while using it. Keep your tablet away from liquid
li
sources
such as rain, drinks, or washing sinks. Do not drop food or liquid to the tablet. Clean the tablet
when it comes in contact with anything that may cause stains. Turn off the tablet before cleaning it.
If faults occur due to anything splashed to
t the tablet, contact the local dealer.
WARNING: The electronic
ic device may cause harms to humans if it is not properly used. Children
must operate the tablet under adult supervision. Keep children from touching internal device parts
or any cables.
19
User Manual
Properly Using the Data Cable and Power Adapter
Use the power adapter provided with the tablet. Adapters for other electronic devices may
look similar; however, they may pose negative impact on or even damage your tablet.
Do not disassemble or modify the power adapter.
adapter. Do not use the power adapter when it is
damaged. Otherwise, electric shock or fire may be caused.
The power adapter gives off heat when it is used. Keep the surrounding of the power adapter
ventilated, and put the power adapter away after the charging
charging is complete. Place the power
adapter on a hard and flat surface, if possible, to allow the power adapter to well give off
heat.
Do not touch the power adapter with wet hands. If the power adapter comes in contact with
water or other liquid, cut off the power
p
immediately.
Do not short-circuit
circuit the power adapter. Do not shake or mechanically vibrate the power
adapter. Do not expose the power adapter to direct sunlight. Do not use the power adapter in
high humidity places such as the bath room. Do not expose the power adapter to rain or
moisture.
Do not use the power adapter near electrical appliances such as TV set and radio set.
Hold the power adapter instead of pulling the power cord when pulling the plug. Otherwise,
the power cord may be damaged.
Place the power adapter in a place out of children's reach, to prevent safety ricks.
Ensure that the data cable matches the micro USB port and that the data cable is connected to
the micro USB port at the correct end.
Keeping the Tablet Exterior Clean
Ensure that the
he tablet is turned off. Use a soft and lint-free
lint free cloth. Keep openings from moisture.
Do not use cleaning products such as spray, solvents, alcohol, or abrasives.
20
User Manual
Keeping the Tablet in a Safe Temperature Range
Use the tablet in a temperature between 0℃
0 and 40℃.. The use duration of the tablet may be
shortened when it is used in a low temperature. Do not leave your tablet in a car. The temperature
inside a parked car may exceed the safe temperature range.
The tablet gives off heat at the rear when it is used or charged. This is normal. The rear of the
tablet enclosure transfers heat from the device inside to external cool air to give off heat.
The tablet has a built-in
in lithium battery. If not properly handled, the battery may cause fire or
overheating. Do not decompose or burn the battery when the temperature exceeds 100℃.
100
Contact
the after-sale
sale service center to replace the battery for you.
Storing the Tablet
Place the tablet in normal temperature (a temperature between 20℃
20 to 25℃ is recommended).
Take the following measures to maintain battery life:
Use the tablet to discharge it before storing it.
Turn off the tablet and charge it once about every six months.
Preventing Hearing Loss
Set the volume to a proper level. If tinnitus is
is caused, turn down the volume or stop using the
tablet.
WARNING: When you use a headphone, listening to sounds at high volumes may damage your
hearing permanently. After listening to music for a period, you get used to higher volumes which
sound simple butt may damage your hearing. If tinnitus is caused or sounds are inaudible, stop
listening and check your hearings.
Warning About High-Risk
High
Activities
The tablet is not applicable in environments with nuclear devices, airplane navigation, or
communication systems
stems or other special scenarios. Follow related rules to ensure safe use.
use
21
User Manual
9 The Warranty Agreement
For COLORFLY/COLORFUL CE-PRODUCT
CE
COLORFLY / COLORFUL products have 1 year warranty limitation:
From the date of purchase, the vendor of COLORFLY / COLORFUL provides a one-year
one
warranty for end users.
Note:
Do not open the device. Unauthorized opening and changing the device resulting in product
damage is not covered
red in this warranty agreement.
RMA procedure
Please attach a problem or fault description when sending goods. COLORFLY / COLORFUL
vendor will test and maintenance the product according to the description.
Customers will receive our confirmation test report. If there are no errors and defects as described
by the customer, RMA card will be returned. Customers must pay the shipping and insurance cost
for return shipping. RMA goods can be returned to the customer together with the new goods.
Return route
For end-users and dealers, please
lease contact your
you supplier.
For COLORFLY-COLORFUL
COLORFUL direct distributor
Before customers send back the goods to the warranty repair service center, he must apply for an
RMA number. RMA number must be clearly marked on the apparent position of the outer box.
Please attach a copy of the commercial invoice.
COLORFLY does not accept the goods do not mark an RMA number
22
User Manual
Method:
:
1. Download the RMA form from our website. Complete the RMA form
German http://www.colorful-europe.de/de/index_de.php
europe.de/de/index_de.php
English http://www.colorful-europe.de/index_en.php
europe.de/index_en.php
2. Send the
he completed form to the mailbox:[email protected]
3. COLORFL-COLORFUL
COLORFUL RMA number will be notified by e-mail
e mail in two working day
4. RMA goods must be sent together with a copy of the commercial invoice and all the
other attachments to the address of COLORFLY-COLORFUL
COLORFUL designated repair address.
Transport
port costs and transport insurance shall be borne by the customer
5. The transportation costs and shipping insurance caused by shipping the repair or replace
product back to the customer shall be borne by COLORFLY-COLORFUL
COLORFLY COLORFUL
6. The RMA goods back to the buyer have a extra 3 month warranty coverage
7. If you have any other questions about RMA,
RMA please contact:[email protected]
support@colorful
This Agreement does not apply to the following conditions:
conditions:
All damage caused by improper use or the following reasons:
1. Drop, open devices, demolition,
demolition, strong oppression, bending, drilling or other objects
penetrating, thermal shock, exposure to high humidity and high temperature, direct contact
with water, direct sunlight, put on a high temperatures plane or near an open flame, contact to
corrosive liquids
quids and materials, paints and cleaning agents. Near high magnetic radiation,
such as microwave ovens and other high-energy
high
radiation.
2. Wear parts, packaging, etc.
3. External damage.
4. Damage caused by improper use
5. Damage caused by unauthorized maintenance and alterations
6. Damage caused by abuse, such as intentional damage, negligence, accident, majeure
(earthquake, humidity, flooding, lightning, etc.), the error voltage charging, the device has
been exposed to high temperatures, mechanical damage, oxidation or rust damage.
23
User Manual
7. Serial number has been modified, deleted or lost
8. Modify the barcode, delivery date illegible
9. Model barcode and warranty card does not match
10. Damage caused by do not follow the instructions to install and use, for example: the use of
other non-rationing
rationing charger,
charger Not in the warranty period.
11. Damage
amage caused by transport or improper handling
If part of this agreement contrary with local laws, local laws effective, all other
othe parts of the
agreement is still valid.
24