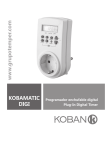
1
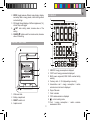
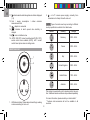
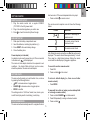
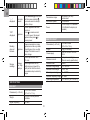
Transmission interval....................................................... 9
USER MANUAL
Specifications.................................................................. 10
Clear records..................................................................... 9
Reset.................................................................................. 9
Troubleshooting................................................................ 9
Precautions......................................................................11
CONTENTS
About Oregon Scientific..................................................11
Introduction....................................................................... 2
EU Declaration of conformity.........................................11
Overview............................................................................ 2
FCC statement................................................................. 12
Main unit – front view...................................................... 2
Main unit - back view....................................................... 3
LCD Display.................................................................... 3
Remote socket................................................................ 4
Getting started.................................................................. 5
Remote socket set up...................................................... 5
Main unit set up............................................................... 5
Set time / date................................................................. 5
Data transmission............................................................ 5
Placing / mounting main unit........................................... 6
Display modes................................................................... 6
Understanding electricity................................................. 7
Setting - General............................................................... 7
Tariff (cost rate)............................................................... 7
Power usage alert and maximum loading....................... 8
CO2 rate.......................................................................... 8
Remote socket control timer........................................... 9
EN
Wireless Appliance Manager
Model: ESM600 / ESM600U / ESM600A /
ESM600FR / ESM600IT / ESM600AU
EN
•
Introduction
Thank you for selecting the Wireless Appliance Manager
(ESM600 / ESM600U / ESM600A / ESM600FR / ESM600IT/
ESM600AU).
If cleaning of the socket is required, disconnect from
power and electrical appliance, and wipe with a dry
cloth.
NOTE Please keep this manual handy as you use your
new product. It contains practical step-by-step instructions,
as well as technical specifications and warnings you should
know about.
The Wireless Appliance Manager embodies our commitment
to environmental concerns. Aware of threats facing the
world we live in, we have combined technological knowhow, practicality and style to create this line of products that
can help you reduce your carbon footprint.
Overview
Main unit – front view
The Wireless Appliance Manager measures the amount of
energy used and calculates the running costs of household
appliances. Equipped with a control timer, this product not
only helps you identify which appliance has the highest
energy consumption but also allows you to schedule its use,
thereby saving your money as well as the environment.
1
Our aim is to make products that provide practical solutions
while enabling you and us to fulfil our environmental
responsibility. Together we can improve the world we live
in.
2
3
4
IMPORTANT
•
•
•
•
•
Do not plug other energy meters with this product.
For indoor use only.
Place this product so that it is easily accessible to the
power outlet.
Do not plug on an electrical appliance where its current
load exceeds 16 amps.
Always ensure that the plug of any electrical appliance is
fully inserted into the product’s socket.
5
1.
REMOTE: remotely turn on/off socket or activate
control timer (
); enter settings for socket control
timer
EN
2. MODE: toggle between different mode displays; display
secondary data in energy mode; confirm setting values
and exit settings
3. CH: toggle through displays of different appliances (1-4);
initiate / stop auto-toggle
SET: enter setting mode; increase value of the
4.
setting
5. SEARCH : initiate search for remote socket; decrease
value of the setting
LCD Display
1
Main unit - back view
2
8
3
9
4
10
5
11
12
1
2
3
4
1.
2.
3.
4.
Wall mount hole
Battery compartment
RESET: restarts unit
Adaptor socket
6
13
14
15
7
16
1. ENERGY: energy consumption is displayed
2. COST: cost of energy consumed is displayed
3. MAX: power usage alert; MAX LOAD: overload safety
warning
4. Currency units – £ / $ / € (depending on country)
5. Accumulative cost / energy consumption / carbon
emission since last reset is displayed
6. Days of the week
7. Clock / calendar
8. CO2: carbon emission is displayed
: unit is in setting mode
9.
10.Cost / energy consumption / carbon emission
measurement units
EN
11. : indicates which electrical appliance’s data is displayed
(1-4)
12.Cost / energy consumption / carbon emission
measurement units
: adaptor is connected
13.
: indicates at which pre-set rate electricity is
14.
charged
: main unit batteries low
15.
16. AUTO / ON / OFF: socket is switched on/off (ON / OFF);
socket control timer enabled (AUTO); tariff / socket
control timer options when in setting mode
2.
: cut off / resume power supply; manually force
transmission to attempt link with main unit
NOTE Types of sockets used vary according to different
country specification as listed in the table below.
Socket
REMOTE SOCKET
1
2
Country
Voltage
Germany
230V ~50Hz
France
230V ~50Hz
Italy
230V ~50Hz
United Kingdom
240V ~50Hz
United States
120V ~60Hz
Australia
240V ~50Hz
This product can work with up to 4 remote sockets at any one
time. Additional remote sockets can be purchased separately.
1. LED status indicator: flashes when transmitting a reading
or when searching for main unit
For more information, please contact your local retailer.*
* Features and accessories will not be available in all
countries.
1. Plug the remote socket into a regular 230/240V
(110/120V for the US) power outlet.
2. Plug in the electrical appliance you wish to use.
3. Press to check that electricity flows through.
The remote socket reception icon will show the following
status:
ICONS
Main unit is searching for
remote socket
Main unit set up
1.
2.
3.
4.
A remote socket channel
has been found
Slide open the battery compartment cover.
Insert the batteries, matching the polarities (+/-).
Press RESET after each battery change.
Close the battery door.
No remote socket found
After finding the remote socket the icon will be continuously
displayed. The search should take approximately 1 minute.
There may be a slight delay between finding the remote
socket and the data display of plugged-in appliance.
Power adaptor (not included)
An adaptor can be used to power the unit. When connected
to the main unit,
will be displayed.
The main unit and adaptor should not be exposed to wet
conditions. No objects filled with liquid, such as vases,
should be placed on the main unit and adaptor.
To search for another remote socket:
1. Press CH.
2. Press and hold on the socket.
Set time / date
The main unit will prompt you to set the date / time, continue
by pressing the following buttons:
SET to increase value or toggle options
•
• SEARCH to decrease value or toggle options
• MODE to confirm
The settings order is: 12/24 hour format, hour, minute, year,
month format (day-month / month-day), month, day.
To return to default display (i.e., there are no further
remote sockets):
• Press MODE.
To manually force link up (when previous attempt fails
or to change a remote socket):
to initiate search.
1. Press and hold SEARCH
2. Press CH repeatedly to assign a channel number.
3. Press and hold .
data transmission
The main unit will automatically search for a signal after clock
MEANING
EN
has been set or if 30 seconds elapsed without any input.
• Press and hold on remote socket.
Getting started
Remote SOCKET set up
EN
Placing / mounting main unit
Real time power
(KW)
NOTE
•
Distance between main unit and remote sockets should
not exceed 100m (328 ft).
• Minimize obstructions such as doors, walls and furniture
between the main unit and the remote socket.
• The transmission range may vary depending on many
factors. You may need to experiment with various
locations to get the best results.
To place on a horizontal surface, such as a desk:
1. Remove plastic base stand from package.
2. Align tabs with slots located below the battery
compartment.
3. Push and snap into place.
ENERGY
Accumulated
energy (KWh)
consumed since
last reset
CO2
(greenhouse
gas)
To mount onto a wall:
• Use the hole located at the back of the unit.
Current green
house gas emitted
per hour
Accumulated
green house gas
emitted since last
reset
To toggle between data displays of appliances (up to 4):
• Press CH.
Display modes
There are 3 display modes to choose from:
To auto-toggle displays of different appliances:
• Press and hold CH.
To deactivate auto-toggle function, press CH.
Real time cost of
electricity per hour
To toggle between cost / energy / CO2 displays for a
particular appliance:
• Press MODE.
COST
Accumulated cost
since last reset
To toggle between power (W) / current (A) / voltage (V)
displays in energy mode:
1. Press MODE to toggle display until energy data is shown.
2. Press and hold MODE repeatedly.
Voltage
(volts)
Electrical potential. Fixed at 220V-250V
or 120V depending on country / region.
x
Current
(amps)
Amount of electricity flowing through, e.g.,
a wire.
Power
(watts)
Amount of energy being transferred.
(KW = 1000W). This type of data is
displayed on the top line of Energy mode.
Mode
Setting
Description
COST
Tariff
Up to 4 programmable tariffs
ENERGY
Power usage
alert
Power consumption exceeds
the amount appliance should
be using
Max. loading
Overload protection
Measurement
unit
kg / lb
CO2 factor
The amount of carbon
dioxide released to produce
a unit of energy (KWh)
=
CO2
KWh is a measure of consumption. Kilowatt hour represents
the use of 1000W of electricity for 1 whole hour, which is
equivalent to ten x 100W light bulbs operating at the same
time for 1 hour.
1. Press MODE to navigate to desired screen display.
2. Press and hold SET to enter settings.
TIP Press and hold MODE to exit settings (except when
setting tariff).
Once cost rate of electricity has been inputted, the monitor
can arrive at an estimated cost. Similarly, by inputting the
carbon emission rate, the monitor can display the estimated
amount of carbon emitted as a result of the electricity
consumed.
TARIFF (COST RATE)
To determine the approximate cost of electricity consumption,
input the cost per KWh. This rate can usually be found on
the electricity bill.
NOTE This product is for educational purposes only. Its
aim is to aid understanding of the cost of operating electrical
appliances in the home. It does not replace your accurate
electricity revenue meter.
This unit allows the input of up to 4 different tariffs (cost rate)
to accommodate the different rates local utility companies
may charge consumers depending on the hour electricity is
consumed.
Setting - General
To enter settings, first ensure the corresponding mode is
displayed on the screen.
By raising awareness of consumption behaviour, better
consumption habits may be adopted which will in turn
reduce the cost of electricity bills.
EN
Understanding electricity
EN
To set cost rate:
1. Press MODE until COST is displayed.
2. Press and hold SET to enter.
3. Press MODE to enter TAR 1 setting.
Maximum loading
This safety feature is designed to protect you. Since current
should be constant, a sudden jump in current (amps)
indicates possible overloading which may be a result of
appliance malfunction, power surge (e.g., from lightning)
etc. The sensor will cut off power to the appliance to
minimise the risk of short circuiting, damage to the appliance
and even fire. The setting for maximum load varies across
countries.
Continue setting the options for all 4 tariff settings by
pressing:
SET to increase value or toggle options
•
• SEARCH to decrease value or toggle options
• MODE to confirm and move to next setting.
To set power alert and maximum loading:
1. Press MODE until ENERGY is displayed.
2. Press and hold SET to enter.
3. Set the 4 digits by pressing:
SET to increase value
•
• SEARCH to decrease value
• MODE to confirm and move to next digit.
4. Continue to set Max Loading (amp) by following step 3
above.
The setting options are: Tariff number (1-4); On/Off (except
Tariff 1), days when tariff applies (everyday, weekday,
weekend), start time for tariff (hour and minute), cost rate
(1st to 4th digit), decimal point positioning.
NOTE If there is only one electricity rate select OFF for
TAR 2-4.
Power usage alert and maximum loading
CO2 rate
Fossil fuel power stations produce carbon dioxide (CO2)
as a by-product of the production process. These gasses
have been linked to climate change. The amount of carbon
emitted is different for each utility company. For your
convenience, a default carbon emission rate (per 1KWh of
electricity produced) has been set on this unit.
Power usage alert
Appliances use varying amounts of power to operate
depending on its function and energy efficiency. This
amount is written as W or KW and can be found on a label
on the appliance.
As appliances age, their power consumption can go up quite
considerably, thereby increasing the cost of operating it. By
setting the power usage alert, this unit can alert you if the
appliance is using more electricity than it should and help
you consider if there’s a need to replace it with an appliance
that is more energy efficient.
To set the carbon emission rate:
1. Press MODE until CO2 is displayed.
2. Press and hold SET to enter.
3. Set the measurement unit by pressing
unit, then MODE to confirm.
SET to select
EN
4. Continue to set the emission rate (3 digits) by pressing:
SET to increase value
•
• SEARCH to decrease value
• MODE to confirm and move to next setting.
Transmission interval
For longer battery life, choose a longer data transmission
interval.
To change the transmission interval:
1. Press and hold MODE and CH together.
2. Press SET / SEARCH to select interval (6 / 12 / 30/
60 seconds).
3. Press MODE to confirm.
Remote socket control timer
Apart from monitoring energy consumption, this unit doubles
as a timer control for up to 4 appliances at any time. Decide
how long and when you want the appliance to work.
To set control timer:
1. Press CH repeatedly to select socket to be
programmed.
2. Press and hold REMOTE to enter settings.
3. Set the programme by pressing:
SET to increase value or toggle options
•
• SEARCH to decrease value or toggle options
• MODE to confirm and move to next setting.
The setting options are: applicable days (everyday, weekday,
weekend), switch on time (hour and minute), switch off time
(hour and minute).
Clear records
“HI” will be displayed when the memory in the unit is
full. Clear records so unit can continue monitoring and
calculating the total data.
To clear records of TOTAL data (Cost / Energy / CO2):
• Press and hold SET and SEARCH together.
Reset
Press RESET to restart the unit, main unit will search for the
remote socket which was last linked up.
Press and hold RESET and MODE together to return to
default settings.
To remotely turn on / off control timer or activate control
timer program:
1. Press CH repeatedly to select channel.
2. Press REMOTE to toggle between Auto, On, Off.
Icon
Troubleshooting
Meaning
Socket switches on/off according to set times
Socket continuously on
Socket continuously off
PROBLEM
SYMPTOM REMEDY
No display
Batteries /
Adaptor
Check batteries have been
correctly placed. If using
adaptor, check connection.
EN
“- - --“
displayed
“0.00”
displayed
Reading
does not
fluctuate
Not synchronised
Press SEARCH on the main
unit then press and hold
on remote socket to attempt
another link up.
Transmission range
Power
Appliance
Ensure appliance has been
turned on.
Press on remote socket
to cut off power. Reconnect
appliance then press to
resume power.
Appliance
Power consumption in some
appliances can be very stable.
Check figures in the row that
displays Total data to see if it
does change.
Information update
REMOTE SOCKET
128 x 64 x 46mm
(5.0 x 2.5 x 1.8 in)
Weight
150g (5.3 ounces)
240V AC 50 Hz or 120V AC
Power supply
60 Hz
16A (varies according to
Maximum current
different country specification)
Maximum load
3680W
Measure voltage range
100 - 250V AC
Measure current range
0.005 - 16A
Measure power range
0.1 - 3680W
Measure frequency range 45 - 65Hz
Operating temperature
-10°C to 40°C (14°F to 104°F)
Dimensions (L x W x H)
Check inputted cost rate /
CO2 rate
Strange
readings
Strange /
low / high
readings
Check appliances are not
malfunctioning (turned off by
itself) as this could be shown
as a sudden drop in electricity
usage.
Specifications
Main unit
Dimensions (L x W x H)
Weight
Signal Frequency
100 meters (328 feet)
unobstructed
6-30 seconds
3 x UM-3 (AA) 1.5 V batteries
7.5V 600mA AC adaptor (not
included)
119 x 104 x 28.5mm
(4.7 x 4.1 x 1.1 in)
150g (5.3 ounces) without
batteries
2.4 GHz
10
•
•
•
•
•
•
•
•
•
•
•
•
•
Do not subject the unit to excessive force, shock, dust,
temperature or humidity.
Do not cover the ventilation holes with any items such as
newspapers, curtains etc.
Do not immerse the unit in water. If you spill liquid over
it, dry it immediately with a soft, lint-free cloth.
Do not clean the unit with abrasive or corrosive materials.
Do not tamper with the unit’s internal components. This
invalidates the warranty.
Only use fresh batteries. Do not mix new and old
batteries.
Images shown in this manual may differ from the actual
display.
When disposing of this product, ensure it is collected
separately for special treatment and not as household
waste.
Placement of this product on certain types of wood
may result in damage to its finish for which Oregon
Scientific will not be responsible. Consult the furniture
manufacturer's care instructions for information.
The contents of this manual may not be reproduced
without the permission of the manufacturer.
Do not dispose old batteries as unsorted municipal
waste. Collection of such waste separately for special
treatment is necessary.
Please note that some units are equipped with a
battery safety strip. Remove the strip from the battery
compartment before first use.
Should there be any discrepancy between the English
and other language versions, the English version shall
apply and prevail.
NOTE Features and accessories will not be available in all
countries. For more information, please contact your local
retailer.
About Oregon Scientific
Visit our website (www.oregonscientific.com) to learn more
about Oregon Scientific products.
If you’re in the US and would like to contact our Customer
Care department directly, please visit: https://us.oregonscientific.com/service/support.asp
For international inquiries, please visit: https://us.oregonscientific.com/about/international.asp
EU Declaration of conformity
Hereby, Oregon Scientific, declares that this Wireless
Appliance Manager (Model: ESM600 / ESM600U / ESM600A
/ ESM600FR / ESM600IT / ESM600AU) is in compliance with
the essential requirements and other relevant provisions of
Directive 1999/5/EC and 2006/95/EC. A copy of the signed
and dated Declaration of Conformity is available on request
via our Customer Service.
11
COUNTRIES RTTE APPROVED COMPLIED
All EU countries, Switzerland CH
and Norway N
EN
NOTE The technical specifications for this product and the
contents of the user manual are subject to change without
notice.
Precautions
EN
FCC statement
Declaration of conformity
This device complies with Part 15 of the FCC Rules.
Operation is subject to the following two conditions: (1) This
device may not cause harmful interference, and (2) This
device must accept any interference received, including
interference that may cause undesired operation.
The following information is not to be used as contact for
support or sales. Please call our customer service number
(listed on our website at www.oregonscientific.com), or on
the warranty card for this product) for all inquiries instead.
We
Name:
Address:
WARNING
Changes or modifications not expressly
approved by the party responsible for compliance could void
the user’s authority to operate the equipment.
NOTE This equipment has been tested and found to
comply with the limits for a Class B digital device, pursuant
to Part 15 of the FCC Rules. These limits are designed to
provide reasonable protection against harmful interference
in a residential installation.
This equipment generates, uses and can radiate radio
frequency energy and, if not installed and used in accordance
with the instructions, may cause harmful interference to
radio communications. However, there is no guarantee
that interference will not occur in a particular installation.
If this equipment does cause harmful interference to radio
or television reception, which can be determined by turning
the equipment off and on, the user is encouraged to try
to correct the interference by one or more of the following
measures:
• Reorient or relocate the receiving antenna.
• Increase the separation between the equipment and
receiver.
• Connect the equipment into an outlet on a circuit different
from that to which the receiver is connected.
• Consult the dealer or an experienced radio / TV
technician for help.
Telephone No.:
Oregon Scientific, Inc.
19861 SW 95th Ave.,Tualatin, Oregon 97062 USA
1-800-853-8883
declare that the product
Product No.:
ESM600 / ESM600U / ESM600A /
ESM600FR / ESM600IT / ESM600AU
Product Name:
Wireless Appliance Manager Manufacturer:
IDT Technology Limited
Address:
Block C, 9/F, Kaiser Estate,
Phase 1, 41 Man Yue St., Hung Hom, Kowloon,
Hong Kong
is in conformity with Part 15 of the FCC Rules. Operation is
subject to the following two conditions: 1) This device may
not cause harmful interference, and 2) This device must
accept any interference received, including interference that
may cause undesired operation.
12