1
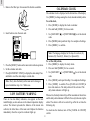
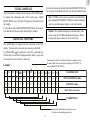
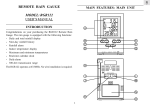
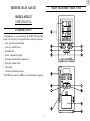
GB
REMOTE RAIN GAUGE
MAIN FEATURES: MAIN UNIT
MODEL: RGR122
USER’S MANUAL
INTRODUCTION
Congratulations on your purchasing the RGR122 Remote Rain
Gauge. The rain gauge is equipped with the following functions:
- Daily and total rainfall display
- Nine-day rainfall history
- Rainfall alarm
- Indoor temperature display
- Maximum and minimum temperatures
- Real-time calendar clock
- Daily alarm
- 100-meter transmission range
The RGR122 operates at 433MHz. No wire installation is required.
1
GB
A. FOUR-LINE LCD DISPLAY
- For displaying the total rainfall, current rainfall or rainfall
history, indoor temperature and calendar clock
H. ANTENNA
- Receives radio signal from rain collector
I. [°C/°F] SWITCH
- Selects between degree Centigrade (°C) and Fahrenheit (°F)
B. [RAIN RESET / SINCE] BUTTON
- Displays the start day for total rainfall
- Presses and hold to clear the total and current rainfall, but not
the rainfall history
- Presses and hold to reset the date stamp
J. [in/mm] SWITCH
- Selects between inch and millimeter
K. [RAIN AL ON/OFF] SWITCH
- Turns on or off the rainfall alarm
C. [RAIN SEARCH] BUTTON
- Enforces a search for the rain gauge sensor
L. [RESET] BUTTON
- Returns all settings to their default values
D. [MODE] BUTTON
- Changes among the clock, calendar and daily alarm in normal
mode
- Presses and hold to enter the setting mode
E. [TEMP MEM /
M. [CLOCK AL ON/OFF] SWITCH
- Turns on or off the daily alarm
N. BATTERY COMPARTMENT
- Accommodates two UM-3 or AA-sized batteries
] BUTTON
O. REMOVABLE TABLE STAND
- For securing the main unit on a flat surface
- Changes among the maximum, minimum and current indoor
temperatures in normal mode
- Presses and hold to clear the temperature memory in normal
mode
- Decreases a value in setting mode
MAIN FEATURE: RAIN COLLECTOR
F. [RAIN HIST/ ] BUTTON
- Displays the rainfall history in normal mode
- Increases a value in setting mode
G. RAIN ALARM [RAIN ] BUTTON
- Displays the rain alarm setting
- Presses and hold to enter the rain alarm setting mode
2
GB
INSTALLATION
"AA" UM3 1.5 V
TOP VIEW
"AA" UM3 1.5V
1. Position the main unit and rain collector within effective
range (100 meters).
2. a) Insert batteries into the rain collector.
b) Mount the rain collector on a level surface
c) Put drops of water on the cross at the base to check the
leveling
Water stay at
position 1 - 4
means the gauge
is not leveled
4
d) Use the metal ring to adjust the leveling of the rain collector
P.
Q.
R.
-
ANTENNA
Transmits radio signal to main unit
CROSS
Checks the leveling of the rain collector
BATTERYCOMPARTMENT
Accommodates two UM-3 or AA-sized batteries
METAL RING
3
GB
3. Remove the fiber tape from around the bucket assemblies.
CALENDAR CLOCK
The calendar clock is displayed on the bottom line of the display.
Use [MODE] to change among the clock, calendar and daily alarm.
To set the clock,
1. Press [MODE] to display the clock or calendar.
2. Press and hold [MODE] for two seconds.
4. Insert batteries into the main unit.
3. Use [RAIN HIST/ ] or [TEMP MEM/ ] to set the desired
value.
4. Press [MODE] and repeat from Step 3 to complete all settings.
5. Press [MODE] to confirm.
Note: The language displays for the day-of-week are (E),
German (D), French (F), Italian (I) or Spanish (S).
To set the daily alarm,
1. Press [MODE] to display the daily alarm.
2. Press and hold [MODE] for two seconds.
5. Press the [RESET] button on the main unit to initiate operation.
6. Set the calendar and clock.
7. Press [RAIN RESET / SINCE] to display the date stamp. Press
and hold to reset the date stamp to current date.
3. Use [RAIN HIST/ ] or [TEMP MEM/ ] to set the desired
value.
4. Press [MODE] and repeat from Step 3 to complete all settings.
5. Press [MODE] to confirm. Press [CLOCK AL ON/OFF] to
turn clock alarm on. The daily alarm will be activated. The
daily alarm indicator will light up.
Note : Every time the battery in the main unit is changed,
repeat installation step 4 to 7 before use.
LOW BATTERY WARNING
When active, the daily alarm will go off for one minute at the set time
and the daily alarm indicator will flash. Press any button to stop the
alarm. The alarm is still active and will go off at the set time the
following day.
There are two low-battery indicators, one appears on the total
rainfall display section and one on the indoor temperature display
section. The former represents the batteries of the remote rain
collector, the latter those of the main unit. Replace the batteries
immediately when the respective indicator lights up.
To deactivate the function, turn off the [CLOCK AL ON/OFF]
switch.
4
GB
To clear the current day rainfall, hold [RAIN RESET/SINCE] for
two seconds. Note that this will also clear the total rainfall record.
TOTAL RAINFALL
The total rainfall is displayed on the top line of the LCD display.
To display the commencing date of the record, press [RAIN
RESET/SINCE] once. The date will appear on the bottom line of
the display.
To clear the record, hold [RAIN RESET/SINCE] for two seconds.
Note that this will also clear the current (Day 0) rainfall.
Note : If “HHH” is observed on current (day 0) rainfall. Please
press and hold [RAIN RESET / SINCE] to reset the reading in
order to avoid misleading display on the total rainfall.
Caution : The rainfall reading may be influenced by other
sensor using the 433 MHz transmission frequency. Please
avoid getting those sensors too close to the unit.
RAINFALL HISTORY
The rainfall history is displayed on the second line of the LCD
display. The main unit can record up to nine days of rainfall.
Use [RAIN HIST/ ] to display the record for a particular day.
The day of the record will be displayed with a minus (-) sign. Zero
(0) means the record is for the current day.
Commenciy date of the record (the date battery is replaced or reset
the total rainfall) show on the last line of display with "SINCE" by
pressing [RAIN RESET /SINCE]
Example :
6/2 7/2 8/2 9/2 10/2 11/2 12/2 13/2 14/2 15/2
1/2 2/2 3/2 4/2
5
5
6
9
10
10
10
0
2
0
1
3
1
0
0
0
2
1
0
1
-9
-8
-7
-6
-5
-4
-3
-14 -13 -12 -11 -10
2
3
3
4
CALENDAR DAY
4
4
TOTAL RAINFALL (mm)
0
0
0
RAINFALL (mm)
-2
-1
0
DAY (show on screen)
4
CURRENT DAY
Running daily rainfall history shown on screen
(10 days record including current day)
5
GB
INDOOR TEMPERATURE
RAINFALL ALARM
The indoor temperature is displayed on the third line of the LCD
display. Use the [°C/°F] switch to select between degree Centigrade
and Fahrenheit.
Use [TEMP MEM/ ] to display the maximum and minimum
temperatures in record. The reading will go from maximum to
minimum to current and back. To clear the memory, press and hold
[TEMP MEM/ ] for two seconds.
To set the rainfall alarm,
1. Press and hold [RAIN
] for two seconds.
2. Use [RAIN HIST/ ] to increase the setting or [TEMP MEM
/ ] to decrease the setting.
3. Press [RAIN ] to confirm. The alarm will be activated.
The rain alarm indicator will light up.
The alarm will go off for one minute when the rainfall reaches the
preset value and the rain alarm indicator will flash. A reminder beep
will be emitted every minute. Once the rain alarm is on the indicator
will not stop flashing unless [RAIN AL ON/OFF] switch is turned
off or the rain alarm value is reset or normally pass to next day. To
stop the alarm and reminder beep, press any button or reset the
rainfall alarm value.
THE RESET BUTTON
This button is used only when the unit is operating in an unfavorable
way. Use a blunt stylus to hold down the button. All settings will
return to their default values.
PRECAUTIONS
To deactivate the alarm, turn off the [RAIN AL ON/OFF] switch.
This product is engineered to give you years of satisfactory service
if you handle it carefully. Here are a few precautions:
1. Do not immerse the unit in water.
2. Do not clean the unit with abrasive or corrosive materials. They
may scratch the plastic parts and corrode the electronic circuit.
3. Do not subject the unit to excessive force, shock, dust,
temperature or humidity, which may result in malfunction,
shorter electronic life span, damaged battery and distorted
parts.
4. Do not tamper with the unit’s internal components. Doing so
will invalidate the warranty on the unit and may cause
unnecessary damage. The unit contains no user-serviceable
parts.
DISCONNECTED SIGNALS
If without obvious reason the display for the main unit goes blank,
press [RAIN SEARCH] to enforce an immediate search.
If that fails, check:
- The remote rain collector is still in place.
- The batteries of the main unit and rain collector are still good.
Replace them if necessary.
- The transmission is within range and path is clear of obstacles
and interference. Shorten the distance if necessary. Then press
[RAIN SEARCH] again.
6
GB
5. Only use fresh batteries as specified in the user’s manual. Do
not mix new and old batteries as the old ones may leak.
6. Always read the user’s manual thoroughly before operating the
unit.
Power
Main unit
Remote sensing unit
SPECIFICATIONS
Main unit
Display rainfall range (total)
: 0 – 25,400 mm
(0 - 999.99 inch)
Display rainfall range
(history / daily)
: 0 – 2,540 mm
(0 - 99.99 inch)
Rainfall resolution
: 1 mm (0.04 inch)
Display temperature range
: -5.0°C to +50.0°C
(23.0°F to 122.0°F)
Proposed operating range
: -5.0°C to +50.0°C
(23.0°F to 122.0°F)
Temperature resolution
: 0.1°C to (0.2°F)
Remote Rain Collector
Proposed operating range:
General
RF Transmission Frequency
: 100 meters
: around 30 seconds
Weight
Main unit
: 173 gm
Remote sensing unit
: 260 gm
Dimensions
Main unit
: 133(142) x 90 x 25 mm
Remote sensing unit
: Dia 140 x 145 mm
CAUTION
: 433 MHz
Temperature sensing cycle
: 2 pcs UM-3 or “AA” 1.5V
alkaline battery
— The content of this manual is subject to change without
further notice.
— Due to printing limitation, the displays shown in this
manual may differ from the actual display.
— The contents of this manual may not be reproduced
without the permission of the manufacturer.
1.0° C to 60.0°C
( 33.8° F to 140.0°F)
RF Transmission Range
: 2 pcs UM-3 or “AA” 1.5V
alkaline battery
7
GB
EC-DECLARATION OF CONFORMITY
This product contains the approved transmitter module TX 02 and complies with the
essential requirements of Article 3 of the R&TTE 1999/5/EC Directives, if used for its
intended use and that the following standard(s) has/have been applied:
Efficient use of radio frequency spectrum
(Article 3.2 of the R&TTE Directive)
applied standard(s)
EN 300 220-1(2,3):1997
Electromagnetic compatibility
(Article 3.1.b of the R&TTE Directive)
applied standard(s)
ETS 300 683:1997
Safety of information technology equipment
(Article 3.1.a of the R&TTE directive)
applied standard(s)
EN 60950:1997
Additional information:
The product is therefore conform with the Low Voltage Directive 73/23/EC, the EMC
Directive 89/336/EC and R&TTE Directive 1999/5/EC (appendix II) and carries the
respective CE marking.
VS-Villingen / Germany August 2001
Gerhard Preis
R&TTE Representative of manufacturer
RTTE Compliant Countries :
All EC countries, Switzerland CH ,
Germany D , Austria A ,
France
F
and Netherlands NL
8
GB
MODEL: RGR122
REMOTE RAIN GAUGE
Instruction Manual
****
Mode D'emploi
****
Bedienungsanleitung
****
Manuale di Istruzioni
****
Instrucciones de Funcionamiento
9