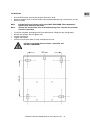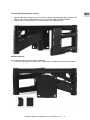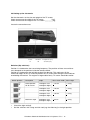
1
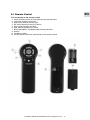
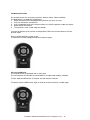
English
EN
EN
DE
NL
Electric LCD-/plasma-tv Wallmount
FR
ES
IT
DA
SV
FI
User Manual
Read this manual thorougly and store in a safe place!
EN
Content
1 GENERAL
1.1 Local aspects of the assembly/operating manual
1.2 Intended use
1.3 Improper use
1.4 Laws, directives and standards to be observed
1.5 FCC Information for Class B digital device (Power Supply)
3
3
3
3
3
2 SAFETY INFORMATION
2.1 Symbols/warnings
2.2 Symbols used on the bracket
2.3 Organizational measures
2.4 Informal safety measures
2.5 Note for those assembling the bracket
2.6 Transport and assembly
2.7 Dangers due to electrical energy
2.8 In an emergency
2.9 Maintenance and upkeep costs
2.10 Cleaning
2.11 Noise generated by the bracket
2.12 Permanent risks
5
5
5
5
5
5
5
5
5
5
5
5
3 CONTENT OF BOX
6
4 ASSEMBLY
4.1 Checking the items supplied
4.2 Packaging
4.3 Tools needed
4.4 Location
4.5 Wall plate
4.6 Mounting frame to wall plate
4.7 Opening and Locking the bracket
4.8 Placing spacers
4.9 Setting up Electronics
4.10 Connecting wires
4.11 Removing TV screen base and hanging the TV screen on bracket
4.12 Final test
4.13 External IR box
4.14 Cable holders
7
7
7
8
9
10
11
11
12
13
14
15
15
16
5 REMOTE CONTROL
5.1 Functionality of the remote control
5.2 Memory Function
5.3 Lock (child lock)
5.4 Frequency switch
17
18
18
19
6
7
8
9
20
21
21
21
TECHNICAL SPECIFICATIONS
TROUBLESHOOTING
CUSTOMER SERVICE
MANUFACTURER
10 RECYCLING
10.1 Removing the plug from the wall socket
10.2 Dismantle the bracket
10.3 Recycling
TVmotions Electrical Wall Bracket for LCD-/plasma TV’s | 2
21
21
21
EN
1 General
1.1 Local aspects of the assembly/operating manual
The guiding principle for safe use and trouble-free operation of this bracket is knowledge of
basic safety information and regulations. This assembly/operating manual contains the most
important information needed for assembling and operating the bracket safely. This assembly/
operating manual, in particular the safety information contained herein, must be carefully read
by any person assembling the bracket and using the finished product. More importantly, the
rules and regulations applying to accident prevention in the locality in which the bracket is to
be used must be observed at all times.
1.2 Intended use
The bracket must be used only as an electrically operated wall bracket for TV screens in an
open, free space. The bracket must be used for this purpose only. Do not use the bracket
outdoors. Please observe the provisions of Section 2, Safety Information. Children may
be unaware of the dangers presented by the bracket if unsupervised. Any other use than the
above shall be deemed improper. The manufacturer can in no way be held liable for damage
arising from improper use.
Intended use shall also include:
•
Follow all instructions in the assembly/operating manual and
•
Prevention of any addition or change to the bracket.
•
Do not make additions to or conversions of the bracket.
Only use the power supply provided.
- Input power: 110-240Vac, 2A, 50-60 Hz.
- Output power: 16Vdc, 2A
1.3 Improper use
•
Never use the bracket for any other unspecified purpose.
•
Do not use the bracket under wet conditions.
•
Not to be used by persons with reduced mental or physical capacities, lack of experience
or knowledge, without supervision or instructions.
1.4 Laws, directives and standards to be observed
•
Machinery Directive 98/37/EC
•
Low Voltage Directive 73/23/EEC
•
Electromagnetic Compatibility Directive 89/336/EEC
1.5 FCC Information for Class B digital device (Power Supply)
This equipment has been tested and found to comply with the limits for a Class B digital
device, pursuant to part 15 of the FCC Rules. These limits are designed to provide reasonable
protection against harmful interference in a residential environment. This equipment generates
energy that could cause harmful interference to radio/TV reception, if the device is not
connected and used in accordance with the instructions. However, it is not possible to provide
guarantees against interference. If this equipment causes harmful interference to radio or
television reception, you can check to see whether it is causing the interference by repeatedly
switching the device off and on. If this is the case, take the following actions.
•
Redirect or relocate the receiving antenna.
•
Increase the separation between the equipment and receiver.
•
Connect the equipment into an outlet on a circuit different from that to which the receiver
is connected.
•
Consult the dealer or an experienced radio/TV technician for help.
WARNING: any changes or modifications to this device not expressly approved by the
manufacturer could void the user’s authorization to operate the equipment.
TVmotions Electrical Wall Bracket for LCD-/plasma TV’s | 3
2 Safety Information
2.1 Symbols/warnings
The assembly/operating manual uses the following symbols and signs to indicate dangers:
This symbol indicates an immediate threatening situation for any person’s
life or health. Failure to adhere to such information could have serious
consequences for health.
2.2 Symbols used on the bracket
Do not place objects or parts of the body between
the moving parts of the bracket. This could cause (serious) injury.
2.3 Organizational measures
•
The bracket should best be mounted by two persons.
2.4 Informal safety measures
•
Keep the assembly/operating manual in the place where the bracket is used at all times.
2.5 Note for those assembling the bracket
•
The bracket must be assembled/operated by persons over the age of 16.
•
The persons referred to above must have read and understood the assembly/operating
manual.
2.6 Transport and assembly
•
The bracket must only be moved in a closed position.
TVmotions Electrical Wall Bracket for LCD-/plasma TV’s | 4
2.7 Dangers due to electrical energy
•
Do not connect the bracket to the electricity supply until the assembly is complete.
•
Check the electrical equipment in the bracket regularly to see that it still complies with
national legislation.
•
Do not use any wires with damaged insulation. This will increase the risk of electric
shock. If any wiring is found to be damaged, replace it immediately with new wiring.
•
Do not position the power supply near any sources of heat. The persistent heat could
damage the wire. This could easily lead to a fire or a short circuit.
2.8 In an emergency
•
If you notice any unusual defects, stay away from the immediate vicinity of the bracket.
DO NOT operate the bracket.
2.9 Maintenance and upkeep
•
The bracket and its components are low-maintenance items and need no special
regular maintenance.
•
Do not perform any repairs on the bracket or other components.
•
Do not alter the construction of the bracket.
•
Any faulty components removed must be replaced with new, original components
from the manufacturer. Use only original replacement parts made by the manufacturer.
Have any such work carried out by a specialist, making reference to this assembly/
operating manual.
2.10 Cleaning
•
Clean or take dust off with a dry or slightly moist cloth.
2.11 Noise generated by the bracket
•
These brackets generate less than 55 dB(A)
2.12 Permanent risks
This bracket has been built in accordance with the latest generally recognized safety rules.
Nonetheless, its use may constitute a risk to the health and safety of users or third parties,
damage to the bracket or to other items. The bracket must be used only:
•
for the purpose for which it was intended.
•
if it is completely safe to do so.
TVmotions Electrical Wall Bracket for LCD-/plasma TV’s | 5
EN
3 Contents of box
#
Part name
Qty
01
Bracket
1
02
Wall plate
1
03
VESA plate
1
04
Power supply
1
05
External IR box
1
06
Spiral cord
1
07
Spacers (wall protectors)
2
08
Remote control
1
09
Battery
1
10
Cable holder set
1
11
Drill pattern
1
12
Manual
1
13
Allen key
1
TVmotions Electrical Wall Bracket for LCD-/plasma TV’s | 6
EN
4 Assembly
The installation of this product should be performed by a specialist!
Do not attempt to install this product when you are uncertain of your
skills!
Before assembly, first read the safety information in Section 2.
4.1 Checking the items supplied
•
Carefully open the cardboard packaging.
•
In doing so, do not use any long knife blades. They may damage the components inside.
•
Check the parts supplied against the list in Section 3.
•
Check the contents for visible transit damage, paying particular attention to the electrical
wiring. In the event of any damage or incorrect components, contact customer
services (see Section 7).
•
Do not attempt to assemble the bracket if there is any damage or if there are any incorrect
components.
4.2 Packaging
•
Remove the packaging. Treat as household waste/paper.
•
Observe national legislation.
4.3 Tools needed
Included
• Allen key 3 mm
Excluded
•
Drilling machine + drill
•
Hammer + centre point (or other sharp point)
•
Level
Keep the original manual of the TV screen always close by.
TVmotions Electrical Wall Bracket for LCD-/plasma TV’s | 7
4.4 Location
Choose the location of the screen.
Note:
Note:
Note:
Note:
The wall should be strong and solid (for a stud wall, use the extended wall plate)
Wall should be straight and flat
Bracket can be mounted at a more off centred position and turned towards the
viewer (when preferred).
Bracket can be mounted higher then advised in the TV screen manual and tilted
towards the viewer (when preferred).
Read the manual of the TV screen for the advised location (view height and necessary free
space around the TV screen).
Choose a location with enough free space around for full movement of the bracket.
Check the position of mounting holes (on the back of the TV screen) compared to the centre
of the screen and adapt when necessary the hanging height of the bracket on the wall.
For example: if the mounting holes on the back of the TV screen are located above the centre
of the TV, the bracket should also be mounted higher to position the TV screen at the desired
height on the wall.
TVmotions Electrical Wall Bracket for LCD-/plasma TV’s | 8
EN
4.5 Wall plate
•
•
•
Use the Drill Pattern to mark the location. Ensure its level!
Mark the 4 points with a hammer and a sharp and pointed tool (e.g. centre punch or nail)
Drill the 4 holes
Note:
Note:
•
•
•
•
•
Decide the correct fixtures to be used. (NOT INCLUDED. These depend on
type of wall). Consult a specialist!
Choose the correct bolts to be used with the plugs. Use a washer for each bolt.
Consult a specialist!
Install the wall plate according to the illustration below. (Hinge pin top, facing down)
Secure with fixtures. Do not tighten fully.
Level the wall plate.
Tighten the fixtures.
Check to see that the plate is firmly attached to the wall.
If there is any doubt, please contact a specialist and
DO NOT CONTINUE!
TVmotions Electrical Wall Bracket for LCD-/plasma TV’s | 9
4.6 Mounting frame to wall plate
•
•
Mount the tube-part of the bracket to the wall plate by sliding the central tube into
the hinge pin of the wall plate.
Place the holder of the central tube against the wall plate, so that the 2 small locking
pins fit into the counter fitting holes in the wall plate.
NOTE!
Be careful the bracket is not yet secured
•
Install the 4 screws to secure the holder to the wall plate.
Wall
TVmotions Electrical Wall Bracket for LCD-/plasma TV’s | 10
4.7 Opening and locking the bracket
•
•
Open the bracket carefully by hand. If necessary, loosen the 3 locking screws with the small
Allen key (2.5 mm key deleted from text in 4.3). DO NOT REMOVE THE SCREWS!
Tighten these 3 locking screws with the bracket in half open position.
4.8 Place spacers
These spacers protect the wall against damage.
•
Place the two spacers on the back of the brackets. According to the illustration below
TVmotions Electrical Wall Bracket for LCD-/plasma TV’s | 11
EN
4.9 Setting up the electronics
Set the electronics to the size and weight of the TV screen.
Check or measure the width of the TV screen: _________ [cm]
Check or measure the weight of the TV screen: _________ [kg]
Locate the connection area:
Power
in
External
IR
Frequencies (1-2)
Screens (3-4)
Switches (dip switches):
Position 1 & 2 determine the transmitting frequency. The position of these two switches
must be equal to the position inside the remote control.
Position 3 & 4 determine the left/right angle of the bracket. This angle must fit the
width and weight of the TV screen to prevent the TV screen from hitting the wall and from
overloading the bracket. The angle of a large and/or heavy TV screen should be smaller.
Switch position
Description
Angle
Max screen width
Max weight
Safest position
for all screens
30 degrees Left
30 degrees Right
< 120 cm
< 40 kg
45 degrees Left
45 degrees Right
< 100 cm
< 40 kg
45 degrees Left
45 degrees Right
< 100 cm
< 40 kg
60 degrees Left
60 degrees Right
< 80 cm
< 40 kg
Maximum angle
•
•
Check the right setting!!
Set the switches with a long and slim tool (e.g. the Allen key) in the right position.
TVmotions Electrical Wall Bracket for LCD-/plasma TV’s | 12
4.10 Connect wires
Is the switch set correctly?
Steps:
1. Connect the spiral cable to the external IR box
2. Connect the spiral cable to the connection in the bracket
3. Connect the power cord to the socket in the bracket
4. Connect the power cord to the wall socket (100-240 Vac)
A small red light in the external IR box will now flash or blink a few times.
5.
6.
7.
Press the H (Home) button on the remote control, the bracket starts to move to its
Home and Reset position. HOLD the button until the red light starts to blink and the
bracket is fully stopped.
Check if the bracket is now fully retracted to the wall.
If not:
Disconnect the power
Reconnect the power
Repeat the process from section 5
Check again if the bracket is now fully retracted to the wall.
Repeat this action when necessary.
Bracket is now reset and ready to test.
•
•
•
•
TEST the bracket now without the TV screen.
Check the full angle and check whether the bracket is moving at the desired angle
Check that there is enough room around the bracket to move from side to side without
hitting anything – also with the TV screen in place.
Is it safe to use the bracket?
TVmotions Electrical Wall Bracket for LCD-/plasma TV’s | 13
EN
4.11 Remove TV screen base and hang the TV screen on bracket
Check the manual of the TV screen for instructions on how to remove the base of the TV screen!!
Check the manual of the TV screen for the correct size of the mounting screws!!
Any doubts please contact a specialist and DO NOT CONTINUE!
•
•
•
It would be advised to ask a second person to help with the following step!
Remove the base (including all extra unnecessary parts to reduce weight)
Mount the VESA plate to the back of the TV screen with a minimum of 4 screws.
•
•
•
It would be advised to ask a second person to help with the following step!
Attach the TV screen CAREFULLY to the bracket.
Secure the TV screen with 2 screws!
TVmotions Electrical Wall Bracket for LCD-/plasma TV’s | 14
EN
4.12 Final test
If there is any doubt, please contact a specialist and DO NOT CONTINUE!
Is everything securely mounted on the wall?
Are there any objects that could obstruct the movement?
Are the cables blocking the movement?
Are there any people, clothing, animals or body parts in or near the zone in which the bracket
moves?
Now test the bracket CAREFULLY.
Press the Home button to rest the bracket properly.
Move the bracket from side to side.
Best is to set the bracket in HOME position when not in use!
4.13 External IR box
•
Place the External IR box with double sided tape on the bottom of the TV screen.
•
Facing the small red light forwards (towards the viewer)
Alternative placement:
•
Wherever the red light is visible and the spiral cord is long enough to allow the bracket to
move freely from side to side.
•
You can extend the spiral cord or replace it by a longer one, but be sure that the wiring
sequence in both plugs is identical. Consult a specialist!
TVmotions Electrical Wall Bracket for LCD-/plasma TV’s | 15
4.14 Cable holders
Power cord
•
Cable ties to the small plastic eye in the bottom of the angled tube.
Wiring from TV screen
•
Tyraps or Velcro straps
• Keep enough space in the cables to ensure free movement of the bracket from side to side!
•
If necessary, extend the cables (scart, coaxial, etc.) from Plasma/LCD screen!
TVmotions Electrical Wall Bracket for LCD-/plasma TV’s | 16
5.1 Remote Control
5.1 Functionality of the remote control
1. Home. Bracket returns to home position (the reset position).
2. Left arrow, bracket swivels left.
3. Right arrow, bracket swivels right.
4. Up arrow, bracket tilts back to vertical
5. Down arrow, bracket tilts down.
6. Red. Memory program key & lock.
7. Blue/yellow/green. 3 programmable memory positions.
8. Battery.
9. Frequency switch.
10. Sticker. Identification and specification of the remote control.
TVmotions Electrical Wall Bracket for LCD-/plasma TV’s | 17
EN
5.2 Memory Function
The remote control has 3 memory positions; buttons Green, Yellow and Blue.
The Red button is to program the positions.
1. Direct the bracket to a desired position (position you want to save).
2. Push the red button and HOLD it
3. Push immediately one of the 3 other buttons to store the position under this button
4. Release both the buttons
5. This position is now saved under this button
To move the bracket to one of the saved positions HOLD the chosen buttons until the
bracket stops.
Every available position can be saved.
The 3 buttons can be reprogrammed over and over again.
5.3 Lock (child lock)
The remote control is equipped with a safety lock.
This lock protects the bracket for unintended or unsupervised used (by children).
To lock; hold the RED button 5 seconds and the remote is locked.
To unlock; hold the RED button again 5 seconds and the remote is useable again
TVmotions Electrical Wall Bracket for LCD-/plasma TV’s | 18
5.4 Frequency switch
To select a different transmitting frequency, change the dip switches 1 and 2.
Make sure the dipswitches 1 and 2 in the bracket are also put in the same position.
TVmotions Electrical Wall Bracket for LCD-/plasma TV’s | 19
EN
6 Technical Specifications
User Manual version
TV motions 1.1 E (1-9-2008)
Year of construction
2008
Production country
Malaysia
System
Electrical Wall Bracket for TV screens
Material
Steel and plastic
Box weight
± 11 kg
Input power
16 Vdc, 2A
Duty cycle
10 % (1 Minute on / 9 Minutes off)
Noise level during operation
55 dB(A)
Environmental temperature in use
10 - 50°C
Environmental storage temperature
10 - 40°C
Humidity in use
Only use in dry conditions!
Storage Humidity
<50%
Indoor use only!!!
TVmotions Electrical Wall Bracket for LCD-/plasma TV’s | 20
EN
7. Troubleshooting
Consult www.tvmotions.nl
8. Customer Service
When contacting the customer service, please have the following information ready:
Retailer:
9 Manufacturer
Techniekweg 27
4143 HW Leerdam
The Netherlands
www.tvmotions.com
10 Recycling
10.1 Taking the bracket out of active duty
•
Pull the power plug out of the wall socket.
10.2 Dismantling the bracket
•
To dismantle the bracket, please follow the assembly instructions from finish to start or
contact customer service.
10.3 Recycling
•
Please split all parts to their type of material. Follow the national regulations concerning
removal of waste products!
Note: In the interests of continuous improvement, the above specifications may be changed
without prior notice.
TVmotions Electrical Wall Bracket for LCD-/plasma TV’s | 21