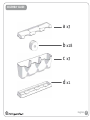
1
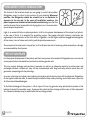
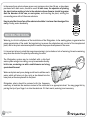
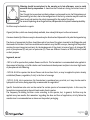
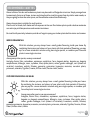
assembly guide and USER’s MANUAL
English
assembly guide
a
x3
b x18
c
x3
d x1
English 3
4 English
c
a
b
c
d
English 5
max 9
6 English
Manual de Utilização
TABLE OF CONTENTS
Minigarden System Arrangement ...................................8
Type of Substrate ..............................................................8
Filling ..................................................................................9
Seeding ................................................................................9
Planting ..............................................................................9
Watering/Fertilising ......................................................10
Renewal of Plants ...........................................................12
Renewing Substrate ........................................................12
Recommended varieties ..................................................13
INDOOR ORNAMENTALS .................................................13
OUTDOOR ORNAMENTALS AND BULBS .............................13
SEASONAL OUTDOOR: VEGETABLES, FRUITS AND AROMATICS ......14
plant CHART.......................................................................15
English
Minigarden System Arrangement
The choice of the location where you are going to install the modular
Minigarden vases is critical to the success of your planting. Whenever
possible, the Minigarden should be oriented so as to maximise its
exposure to the sun and, in the event of installation outdoors, the
plants’ exposure to dominant winds should be minimised, given that the
wind is the main factor responsible for drying plants, as it increases their
rate of evapotranspiration.
Light is an essential factor to photosynthesis, vital for the proper development of the majority of plants.
In the case of fruits, it is essential for producing sugars. The greater the light intensity, the better the
organoleptic characteristics of the fruit will be. In general, a lack of light causes an exaggerated elongation
of the stems, a loss of colour and vitality, and the plant becomes weak.
The presence of a water point is important, as it facilitates the task of watering, either manually or through
an automated drip-feed system.
Type of Substrate
For the proper development of the plants and their root system in the modular Minigarden vases, a universal
or compound substrate should be used and not ordinary garden soil.
This way, proper drainage and aeration is ensured, as well as an adequate capacity to retain water and
exchange nutrients. Garden soil may still be contaminated with fungi and may contain seeds that will
germinate, competing with the plantings.
As a rule, substrates are lighter, thus reducing the load to which the structure will be subjected. Regardless
of the type of substrate used, it should always include fertiliser when planting, and at least once a year this
fertiliser should be added again.
To facilitate drainage of the system, a 10 cm layer of Leca clay granules may optionally be placed at the
bottom of each of the modular vases. To prevent the substrate from mixing with the Leca, a filter comprised
of a Geotextile blanket may be added with the Leca clay granules.
8 English
Filling
The Minigarden is filled manually.
We suggest proceeding with filling before assembling the modular Minigarden
system. Filling is carried out up to the top mark (2 cm below the edge of the
Minigarden).
2cm(0,78 in)
SEEDING
Seeding operations may be carried out before or after the assembly of the modular
Minigarden system. In either case, seeds should be spread after the Minigarden has been
filled, and only on the exposed surface of the cavity.
Seeding is carried out by burying the seed and covering it with a thin layer of substrate
4 to 5 times thicker than the diameter of the seed. In the last Minigarden line, seeding
may be carried out over the entire area, provided that the lid is not installed (parts B).
In function of the type of plant to germinate, you may place one or more seeds per
cavity. In the case of aromatic plants, we suggest putting several seeds. Germination
time depends on the variety chosen, the climatic conditions and the location of the Minigarden system.
If the Minigarden system is outdoors, it is important to respect the seeding season for each species. If not,
germination may not take place. See the seed packaging for supplementary information and pay attention
to the validity.
Planting
When installing the Minigarden system, you may opt to purchase the plants and carry
out planting, instead of seeding, operations, thus gaining good final results more
rapidly.
This operation may be carried out simultaneously with the filling of the Minigarden
and respective assembly, or at the end when the wall has been totally assembled.
In the first case, plants should be used whose vase or root systems are not greater
than 90 mm in diameter.
<90mm
English 9
In the second case, plants whose vase or root system are less than 50 mm, or have been
purchased with bare roots, should be used. In both cases, the operation of planting
the plant involves making a hole in the substrate whose diameter should be greater
than the diameter of the vase, or root system, and inserting the plant, settling the
surrounding areas with a little more substrate.
Keep in mind that the surface of the substrate should be 2 cm lower than the edge of the
cavity. Finally, water abundantly.
PLANTING
Watering/Fertilising
HOLE
DIAMETER
Watering is critical in all phases of the installation of the Minigarden. In the seeding phase, to guarantee the
proper germination of the seeds; during planting, to ensure the adaptation and survival of the transplanted
plant; and in the plant maintenance phase to ensure the proper development of the same.
It is important to bear in mind that excessive watering is just as bad as a lack of watering. Excessive watering
may cause the death of the plant by suffocating the roots.
The Minigarden system may be installed with a drip-feed
water system using micro tubing, or may be watered manually.
In this case, a watering can with a small diameter and a long
spout should be used.
Water each plant one by one, being careful not to add too much
water, which will return via the cavity or be drained into the
base plate, without any benefit to the plant.
Minigarden plants should be watered with the frequency
necessary to maintain the moisture content of the substrate at an appropriate level. You may gauge this by
putting the tip of your finger 1 cm into the substrate. If it feels moist, watering is not necessary.
10 English
Watering should be carried out in the morning or in late afternoon, so as to avoid
excessive loss by evaporation. It should not be carried out during the hottest hours of
the day.
Don’t forget that, even when installed outdoors and exposed to rain, the Minigarden must
be watered, given that, due to the configuration of the cavity, rainwater may not reach the
lower levels and moisten the substrate enough for the needs of the plant .
For successful planting, do not forget fertiliser, indispensable for the plants to develop healthily.
Fertilisers may be chemical or organic.
Organic fertilisers, which are already widely available, have a beneficial impact on the environment.
Common chemical fertilisers are easy to dose and may be dissolved and dispensed to the plant during watering.
The choice of appropriate fertiliser should be made in function of the plants inserted in the Minigarden, and
their needs for nutrients. Fertilisers available on the market carry the NPK acronym, showing that the product
contains the most important nutrients for the development of the plants in terms of parts of nitrogen (N),
parts of phosphorous (P) and parts of potassium (K). There are different formulas of NPK fertilisers, based
on their purpose.
In general, we use:
- NPK 4-14-8 for species that produce flowers and fruits. This formulation is recommended to be applied at
the moment of planting, as it offers better root formation and development and plant structure. High levels
of phosphorous aids flowering.
- NPK 10-10-10 for species that do not flower and do not bear fruits, or may be applied to plants already
established (flowers, vegetables, fruits), in the form of coverage.
- NPK 15-15-20, rich in potassium, this formulation is considered very practical, as it may also be used in
hydroponic cultivation, being especially recommended for vegetables.
Specific formulations also exist on the market for certain species of ornamental plants. In this case, the
formulation is appropriate to the nutritional needs of each species.
The frequency for adding fertiliser varies according to the species, but, in general, fertiliser may be
applied every two months. But remember: regarding the dose and form of application, strictly follow the
manufacturer’s recommendations as shown on the product packaging.
English 11
Renewal of PlantS
It is natural that the planting success rate does not reach 100%. In this case, it is
necessary to proceed with the replacement of dead plants.
It may also be necessary to replace some plants due to poor adaptation. In either
case, the process is simple. The dead plant/plant to be replaced is removed. If it is
necessary to facilitate the removal, a little water may be poured into the cavity. This
task may be more or less difficult in function of the dimension of the roots system
of the plant to be removed.
With a planter or a spike (a pointed wooden or metal object), turn the adjacent substrate and leave
a hole ready to receive the new plant.
The diameter should be greater than the root ball of the new plant.
Proceed as indicated under the item “Planting”.
Renewing Substrate
In any vase or flower baskets, periodic replacement of the substrate is always necessary, given that, as it is a
means of waterproofing, the substrate ends up running out.
Under the Minigarden system, its replacement is indispensable and recommended for the proper development
of the plants.
All the substrate does not have to be replaced at once. For example, we suggest that during one plant
replacement operation you take the opportunity to remove 40 to 50% of the substrate adjacent to a cavity.
With recourse to a planter or a pointed object, turn and remove the greatest possible quantity of substrate,
without dismantling the Minigarden system.
After, continue to add substrate to fill in what has been removed, leaving the necessary space to insert the plant.
This operation may also be carried out without replacing the original plant. Remove the plant temporarily from
the cavity; proceed with the processing of the substrate and put the plant back, following the same steps as
under “Planting”.
Substrates degrade with greater speed when they hold seasonal fruit plants, such as strawberry, pepper and
tomato plants, etc. When decorative indoor plants are used, the substrate can last up to five years.
12 English
Recommended varieties
Almost all dwarf shrubs and herbaceous plants may be used in a Minigarden structure. Simply arrange them
harmoniously (in terms of shape, texture and colour) and be careful to group them by similar water needs, as
they are going to share the same space, and therefore be watered simultaneously.
Always choose plants suitable for each location.
Plants exist for shade, half-shade and full exposure to the sun. Most indoor plants prefer shade or moderate
sun and enjoy mild temperatures and constant moistness.
Be careful with proximity to heaters, and do not forget to spray your indoor plants both in winter and summer.
INDOOR ORNAMENTALS
With this solution, you may always have a small garden flowering inside your home. By
combining the textures and colours of your plants with their periods of flowering, you may
opt for a more minimalist solution using one single species, or combine your favourite
plants in one single structure.
Among many other species, we may recommend:
Acalypha, Easter lilies, columbines, aquimenes, aspidistras, ferns, begonia elatior, begonia rex, begonia
semperflorens, bilbergia, carex, cyclamen, lilies, spider plants, coleus, garden cabbages, cacti (almost all
varieties), carnations, orchids, fittonias, gesnerias, guzmanias, hypoestes, marantas, succulent plants,
primroses, soleirolia, Tigridias, Torenia, African violet, Persian violet, violets.
OUTDOOR ORNAMENTALS AND BULBS
With this solution, you may always have a small garden flowering inside your home.
By combining the textures and colours of your plants with their periods of flowering,
you may opt for a more minimalist solution using one single species, or combine your
favourite plants in one single structure.
Among many other species, we may recommend:
Acalypha, Easter lilies, columbines, aquimenes, aspidistras, ferns, begonia elatior,
begonia rex, begonia semperflorens, bilbergia, carex, cyclamen, lilies, spider plants,
coleus, garden cabbages, cacti (almost all varieties), carnations, orchids, fittonias,
gesnerias, guzmanias, hypoestes, marantas, succulent plants, primroses, soleirolia, Tigridias, Torenia, African
violet, Persian violet, violets.
English 13
SEASONAL OUTDOOR: VEGETABLES, FRUITS AND AROMATICS
The Minigarden is an excellent solution to have a small aroma garden or a small
vertical orchard in the kitchen or on your balcony where you may produce a large
part of the aromatics and small vegetables for use in making your dishes.
You can have an orchard and an aroma garden at home, with products that are
always fresh and at hand.
Lettuces, pepper plants, tomato plants, runner beans, broad beans, peas,
aubergines, wild mustard, onions, rocket, etc.
Strawberry plants, cantaloupe and melons, blueberries, gooseberries,
Celery, chives, coriander, lemon balm, spearmint, basil, oregano, malagueta pepper, pennyroyal, parsley,
basil, mint, coriander, etc.
14 English
PLANT SPECIES VS. ENVIRONMENTAL CONDITIONS
Adiantum capillus-veneris L.
Asparagus
Asplenium spp
Begonia
Chlorophytum comosum
Cissus
Cyclamen
Dianthus chinensis L.
Dieffenbachia
Dryopteris
Epipremnum
Fittonia albivenis
Hedera
Hypoestes phyllostachya
Kalanchoe
Nephrolepis
Pallaea
Pepperomia
Philodendron Scandens
Primula acaulis
Saintpaulia ionantha
Sansevieria trifasciata
Schlumbergera
Scindapsus aereus
Soleirolia soleirolii
Spathiphyllum
X
X
X
X
X
X
X
X
X
X
X
X
X
X
X
X
X
X
X
X
X
X
X
X
X
X
X
X
X
X
X
X
X
X
X
X
X
X
X
X
X
X
X
X
X
X
X
X
X
X
X
X
X
X
X
X
X
X
X
X
X
X
X
X
X
X
X
X
X
X
X
X
X
X
X
X
X
X
X
X
X
X
X
X
X
X
X
X
X
X
X
X
X
X
X
X
X
X
X
X
X
X
X
X
X
X
X
X
X
X
X
X
X
X
X
X
X
X
X
X
X
X
X
X
X
X
X
X
X
X
X
X
X
X
X
X
X
X
X
Humid
Very humid
X
X
X
X
X
X
X
X
X
X
Hot
Mild
Fresh
Dry between waterings
Slightly dry
between waterings
Constant humidity
Always saturated
Shadow
Half shadow
Half light
X
X
X
X
X
X
X
X
X
X
X
X
X
X
X
X
X
X
X
X
X
X
X
X
X
X
X
X
X
X
X
X
X
X
X
X
X
X
X
X
RH (air)
X
X
X
Pollination
Wind
X
X
Temperature
Insects
X
X
X
Sun
Acid
X
X
X
X
X
X
X
X
X
X
X
X
X
X
X
X
X
X
X
X
X
X
X
Water
Normal
X
Light
Light
Rocky
Rich in humus
Scientific name
Fragaria Spp.
Thymus vulgaris
Ocimum basilicum
Allium schoenoprasum
Coriandrum sativum L.
Origanum marjorana L.
Origanum vulgare L.
Petroselium crispum L.
Salvia officinalis
Foeniculum vulgare
Apium graveolens L.
Lactuca sativa
Mentha L.
Artemisia dracunculus
General use
Substrate
X
X
X
X
X
X
X
X
X
X
X
X
X
X
X
X
X
X
X
X
X
X
X
X
X
X
X
X
X
X
X
X
X
English 15
www.mini-garden.com