1
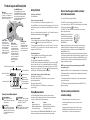
Report Mode: Tracking your results.
Replacing the Battery: Easy to do by yourself.
If the FatTrack is off, turn it on by pressing the ON button.
Replace the battery when the display becomes dim. The battery type used is a
CR2032, 3V lithium cell. Use a coin to open the battery door (on the back of your
FatTrack) by turning it counterclockwise. Place the new battery into the battery
compartment with the positive (+) symbol facing up. Replace and lock the battery
door by turning it clockwise.
Choose the Personal Profile you want to use by pressing the NEXT button until the
desired profile letter (A, B, or C) if flashing; then press the SELECT button.
The Primary Function Menu will appear. Press the NEXT button until the Report
Mode symbol
flashes. Then Press SELECT.
Once you’ve entered the Report Mode, “Body Fat %” will appear on the display.
You can browse through the following additional measurements by pressing the
NEXT button.
NOTE: When you complete taking measurements, the FatTrack automatically enters
the Report Mode and displays our body fat %.
Additional Measurements:
• Fitness Rating (1–5: 1 is the best rating based on % body fat, age, and gender.)
For more information, please see the charts in the enclosed “IMPROVING YOUR
MEASURING SKILL” guide.
• Most recent skin-fold measurement in millimeters (mm)
upper body
• Maximum skin-fold measurement in millimeters (mm)
upper body
• Minimum skin-fold measurement in millimeters (mm)
upper body
• Most recent skin-fold measurement in millimeters (mm)
middle body
• Maximum skin-fold measurement in millimeters (mm)
middle body
• Minimum skin-fold measurement in millimeters (mm)
middle body
• Most recent skin-fold measurement in millimeters (mm)
lower body
• Maximum skin-fold measurement in millimeters (mm)
lower body
• Minimum skin-fold measurement in millimeters (mm)
lower body
IMPORTANT
Body Fat % results determined by the FatTrack are estimates based on generalized
body density equations. The fitness rating is for reference only. Please consult your
doctor if you need detailed suggestions and analysis. No responsibility is assumed
for measurement inaccuracy and technique during use.
Limited Warranty
The FatTrack has a one (1) year limited warranty if purchased from AccuFitness,
LLC or an authorized reseller of AccuFitness products. If the product fails during
the warranty period, return it to AccuFitness, LLC, P.O. Box 4411, Greenwood
Village, CO 80155-4411 with your original receipt. We will repair it or replace it at
our option free of charge. Repairs due to improper use or care, negligence, product
modification, or accident are not covered under this warranty agreement.
This warranty applies only to the original purchaser. Proof of purchase is required.
Products not purchased directly from AccuFitness should be returned to the
reseller/retailer. Shipping costs to AccuFitness, LLC are the responsibility of the
purchaser; return postage will be paid by AccuFitness, LLC.
®
Thank you for purchasing the
®
FatTrack II Digital Body Fat Caliper.
While in Report Mode, you can clear the stored data by holding down the blue
MEASURE button until you hear a beep. The data for that Personal Profile is then
reset to zero.
Exit Report Mode by Pressing SELECT at any time.
The FatTrack’s accuracy and innovative features make
it the perfect workout partner for the gym or at home.
To get the best results, we highly recommend that you
read this manual carefully.
Calibration: For extra accuracy over time.
The FatTrack automatically calibrates itself, but you can also manually calibrate the
FatTrack as follows:
Turn on the FatTrack by pressing the ON button. Place your thumb over the blue
MEASURE button on the upper arm and your index finger under the bottom arm
and squeeze the arms together. Hold the arms closed for several seconds with the
blue MEASURE button depressed. “CAL” and “OK” will appear on the display and
begin to flash on and off while the FatTrack beeps. Release the arms; the FatTrack
is now calibrated.
FatTrack II
User Manual
www.accufitness.com
800-866-2727
Product Layout and Description
Blue MEASURE button:
Place your thumb gently over the
blue MEASURE button when taking
a measurement. Pressure generated
when pinching the caliper arms to
measure a skin-fold will depress the
blue MEASURE button.
ON button:
Press this button to turn the unit
on and off. Your FatTrack will
automatically turn off after several
minutes of not being used.
Getting Started:
How to take the upper, middle, and lower
skin-fold measurements.
Step 1: Turn on the FatTrack.
Press the ON button.
Step 2: Create your personal profile.
You can create and store up to 3 different personal profiles (A, B, or C).
Using the NEXT button, choose the personal profile you want to use (A, B, or C). Once
the letter profile you want to use is flashing, press the SELECT button to confirm your
selection.
Once you’ve selected a personal profile letter (A, B, or C), the Primary Function menu
will appear with the Measuring Mode symbol
flashing.
SELECT button:
Press this button to
confirm your selection
or entry and to advance
to the following step.
The selected mode
symbol, letter, or digit
will flash until you press
the select button.
Measuring Arms:
Place over the
designated measuring
site and gently close
around the skin-fold to
take a measurement.
NEXT button:
Press this button to
advance to the next
personal profile letter
or function mode. When
inputting your personal
data, press this button
to advance the flashing
value. In Report mode,
press this button to
advance through the
stored data.
Body Fat Percentage Indicator
Fitness Rating Indicator
3 Measurement Sites
Cal
Max
Min
Up
Mid
Low
mm
User Profile Indicator
Calibration Indicator
Maximum and
Minimum Skin-fold
Thickness Indicator
(in the Report Mode).
Skin-fold measurement displays in millimeters.
Primary Function Menu Symbols:
Measuring Mode:
Press SELECT when this
symbol is flashing to begin taking
measurements.
Gender Mode:
Press SELECT when this symbol
is flashing to enter your gender
(Male “M” or Female “F”).
Report Mode:
Press SELECT when this symbol
is flashing to enter Report Mode
(displays Body Fat%, Fitness Rating, and Measurement History—
see below).
Age Mode:
Press SELECT when this symbol
is flashing to input your age.
Press “NEXT” to index through the personal profiles (A, B, and C);
to use a specific profile, press “SELECT” when the desired profile letter is flashing.
The Measurement Mode symbol
will begin flashing.
Press SELECT. “Up” will begin flashing on the display. Now you are ready to
take the upper measurement.
Step 1: Gently grasp the FatTrack in
your hand with the measuring arms
between your thumb and index finger.
Gently rest your thumb over the blue
MEASURE button.
To enter your gender, use the NEXT button to choose “M” for male or “F” for female.
Press SELECT to lock in your setting. If the correct gender is already on the screen,
simply press the SELECT button.
Step 2: Locate the target area you wish to measure and, using the hand not
holding the FatTrack, pinch the appropriate skin-fold for measurement. For
best results, follow instructions found in the enclosed “IMPROVING YOUR
MEASURING SKILL” guide.
Step 4: Entering your age.
To enter the Age Mode, press the NEXT button until the Age Mode
symbol
begins to flash, then press SELECT.
Step 3: To take a measurement, gently squeeze the measurement arm closed with
your index finger pinching the target-area skin-fold inside the caliper arms. Pressure
generated from this pinching action will depress the blue MEASURE button. When
the FatTrack beeps, the measurement (in millimeters) will appear on the FatTrack
display; measurement is complete.
A two-digit number will appear with the first digit flashing.
Fat% Rate ABC
Primary Function Menu,
see below
Step 3: Select your gender.
To enter the Gender Selection Mode, press the NEXT button until the Gender Selection
Mode Symbol
begins to flash, then press the SELECT button.
Turn on the FatTrack by pressing the ON button.
Press NEXT until the first number equals the first digit of your age. Press the SELECT
button to confirm your entry. The second digit will begin flashing. Press the NEXT
button until the second number equals the last digit of your age. Press the SELECT
button to lock in your age entry. The age symbol
will begin flashing again. Press
the NEXT button. “END” will appear and flash on the display.
Step 5: Confirm or change your Personal Profile settings
Confirm Personal Profile settings:
While “END” is flashing, Press the SELECT button to lock in your personal
profile and begin measuring.
NOTE: You can undo and retake your measurement by pressing NEXT
and repeating steps 1–3.
Step 4: Press SELECT to lock in the reading and advance to the next measurement.
“Mid” will appear and flash on the display. Take your middle body measurement
using the same four steps.
“Low” will appear and flash on the display. Take your lower body measurement
using the same four steps.
Change Personal Profile settings:
While “END” is flashing, Press the NEXT button once more and repeat
steps 1 through 5.
The FatTrack will automatically enter Report Mode and Your BODY FAT % will
appear on the display.
Taking Measurements:
Tips for ensuring consistent and
accurate readings.
Your FatTrack Digital Body Fat Caliper is designed to calculate body fat
percentage accurately using the popular Jackson-Pollack 3-site measurement
technique. You will take the following 3 measurements:
Males:
Upper body (Up): Chest
Middle body (Mid): Abdomen
Lower body (Low): Thigh
Females:
Upper body (Up): Triceps
Middle body (Mid): Waist (Suprailiac)
Lower body (Low): Thigh
Please read the enclosed “IMPROVING YOUR MEASURING SKILL” booklet to
familiarize yourself with the proper measurement locations and techniques.
• Take all measurements on the right side of your body
• Carefully identify and always use the same locations for your
measuring sites
• Take measurements when skin is dry (free of lotion or sweat)
• DO NOT measure immediately after exercise due to shifts in
body fluids which can increase your skin-fold thickness.