1
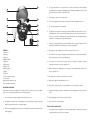
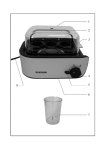
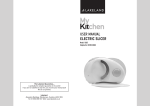
USER MANUAL
The Lakeland Guarantee....
is probably the simplest guarantee in the world!
If you are not satisfied at any time, you receive your money back!
This is our promise.
La garantie Lakeland....
est probablement la plus simple au monde!
Si vous n’êtes pas satisfait, votre argent vous est tout simplement
remboursé!
C’est notre promesse.
Die Lakeland Garantie...
ist wahrscheinlich die einfachste Garantie auf der Welt!
Wenn Sie mit unseren Produkten nicht zufrieden sind,
erhalten Sie Ihr Geld zurück!
Das ist unser Versprechen.
Lakeland
Alexandra Buildings, Windermere, Cumbria LA23 1BQ
Tel: 015394 88100 Web: www.lakeland.co.uk
STAINLESS STEEL
EGG BOILER
Model: 12922
Helpline No: 015394 88100
6
4.
Do not put the appliance or the plug in water or any other liquid. However, should the appliance
accidentally fall into water, unplug it immediately and have it checked by a qualified person before using it
again. Non-observance could cause a fatal electric shock.
5.
Never attempt to open the motor housing yourself.
6.
Do not use the appliance with wet hands, on a damp surface or when the appliance itself is wet.
7.
Do not touch the plug with wet or damp hands.
8.
This appliance is not intended for use by people (including children) with reduced physical, sensory or
mental capabilities, or lack of experience and knowledge, unless they have been given supervision or
instruction concerning use of the appliance by a person responsible for their safety. Children should be
supervised to ensure that they do not play with the appliance.
9.
Check the cord and plug regularly for any possible damage. If the cord or plug is damaged, it must be
replaced by the manufacturer or a qualified person in order to avoid a hazard.
1
2
3
7
8
9
4
10
5
11
12
FEATURES
1. Cover hood
2. Water tray
3. Egg insert
4. Measuring beaker
5. Egg piercer
6. Steam opening
7. Handle (hood)
8. Handle (egg tray)
9. Egg tray
10. Motor unit
11. Power cord with power plug
12. On/off switch
Operating voltage: 220-240V~50Hz
Power consumption: 320-380W
10. Never attempt to repair the appliance yourself. This could cause an electric shock.
11. Do not allow the cord to hang over sharp edges and keep it well away from hot objects and naked flames.
Remove the plug from the socket only by holding the plug.
12. If an extension cord is used it must be suited to the power consumption of the appliance, otherwise
overheating of the extension cord and/or plug may occur.
13. Make sure that there is no danger that the cord or extension cord may inadvertently be pulled or cause
anyone to trip when in use.
14. This appliance is not suitable for commercial use or use outdoors.
15. Never leave the appliance unattended while it is in use.
16. Always remove the plug from the socket when the appliance is not in use and before cleaning.
IMPORTANT SAFEGUARDS
Please read these instructions carefully before connecting your device to the mains, in order to avoid damage
due to incorrect use. Please pay particular attention to the safety information.
17.
1.
Incorrect operation can damage the appliance and cause injury to the user.
18. Switch the appliance off before disconnecting from the mains.
2.
The appliance may be used only for its intended purpose. No responsibility can be taken for any possible
damage caused through incorrect use or improper handling.
19. Never use the cord to carry the appliance.
3.
Before connecting the appliance to the power source, check that the current and power match those given
on the rating plate.
Danger! Nominal voltage is still present in the appliance as long as the appliance is connected to the mains
socket.
SPECIAL SAFETY INSTRUCTIONS
•
The egg boiler heats up very quickly and cools down very slowly. Watch out constantly for hot water and
steam emitted during use. Touch it only on the handles.
•
Do not use any accessories not supplied with the appliance.
•
Do not place next to hot devices (e.g. a cooker or oven).
•
Caution: the power cord must not touch the hot parts of the appliance during operation.
•
Suitable only for boiling eggs. Please do not try to heat up other foods.
•
Do not operate without the cover or the egg tray.
BEFORE USING FOR THE FIRST TIME
•
10. The hotplate on the motor unit will begin to heat up the water in the water tray.
11. Caution: parts of the unit will become very hot during and after use. While the unit is in use, touch it only
on the handles. Please watch out particularly for hot water and emitted steam.
12. Burning hazard: do not move the unit while it is in use.
13. As the water boils, hot steam will escape through the steam opening.
Remove all packaging.
•
Clean the unit (see CARE AND CLEANING).
•
There may be some harmless smoke and smell when using for the first time. Residues left over from the
manufacturing process are being burned on the surface of the unit.
OPERATION
1.
Up to 7 hen’s eggs may be boiled at a time. Please use only fresh eggs.
14. The cover must not be taken off while eggs are being boiled, as the steam will escape.
15. When the water in the water tray has completely evaporated, the eggs are ready. An alarm will sound.
16. Put the switch in position O. The alarm will stop. Pull out the mains plug.
17.
2.
3.
Place the egg tray on the motor unit.
Make a tiny hole in the tapered end of the egg using the egg piercer. Please do not use force as the egg
might break. Caution: take care as the needle of the egg piercer is very sharp. Place only one egg in each
egg insert, rounded end down.
18. Remove the egg tray by its handle. Help the eggshells to shrink by holding them under cold, running water.
The eggs are now ready to serve.
CARE AND CLEANING
•
4.
•
•
•
Lift up the cover carefully, holding it by the handle.
Pour the required quantity of cold water into the measuring beaker. The quantity of water depends upon
the number of eggs to be boiled and the hardness desired (soft, medium or hard-boiled). There are three
scales on the measuring beaker showing how much water to use.
Scale 1 – soft.
Scale 2 – medium.
Scale 3 – hard.
Cooking time approx. 5 mins.
Cooking time approx. 10 mins.
Cooking time approx. 15 mins.
Let the unit cool down completely before cleaning.
•
The cover and egg tray can be cleaned with water and washing-up liquid.
•
Use a cloth moistened with water and washing-up liquid to clean the housing and water tray. Dry them
carefully after cleaning.
•
Caution: do not allow the electrical elements in the unit to come into contact with water.
•
Descaling of the water tray: eggshells contain calcium salts which will build up in the water tray unless it
is descaled regularly. To do this, pour a little household vinegar into the measuring beaker. Fill up the
measuring beaker with water. Pour this mixture into the water tray. After 30 minutes, the mixture can be
For example: to make four soft-boiled eggs, fill the water up to marking 4 on scale 1.
poured out. Wipe the water tray dry. Please do not boil this mixture in the unit.
•
5.
If you live in a hard water area, half a teaspoon of vinegar may be added to the water. Otherwise, please
do not use any fluids other than water, and please do not place any additives (such as salt) into the water.
6.
Pour the water from the measuring beaker into the water tray. Take care not to spill any water on the
housing of the motor unit.
7.
Cover the egg insert with the cover hood. Please ensure that the egg insert and cover hood fit properly on
the motor unit.
8.
Put the on/off switch in position O (= unit off ).
9.
Connect the mains plug to a socket and put the switch in position I (= unit on ). The indicator lamp in the
switch will light up.
After cleaning we recommend you store the egg boiler in its original box.
RECYCLING YOUR ELECTRICALS
Along with many other high street retailers, Lakeland has joined a scheme whereby customers can take their
unwanted electricals to recycling points set up around the country. Visit www.recycle-more.co.uk to find your
nearest recycling point.
ELECTRICAL CONNECTIONS
THIS APPLIANCE MUST BE EARTHED
This appliance is fitted with a fused three-pin plug to BS1363 which is suitable for use in all homes fitted with
sockets to current specifications. If the fitted plug is not suitable for your socket outlets, it should be cut off and
carefully disposed of. To avoid an electric shock, do not insert the discarded plug into a socket.
Fitting a new plug
If for any reason you need to fit a new plug, the flexible mains lead must be connected as shown here. The wires
in the mains lead fitted to this appliance are coloured in accordance with the following code:
Connect BLUE to Neutral (N)
Connect GREEN & YELLOW to Earth (E)
Connect BROWN to Live (L)
13 amp fuse to be used
If the colours of the wires in the mains lead of this appliance do not correspond with the coloured markings
identifying the terminals in your plug, proceed as follows. The wire which is coloured green and yellow MUST
be connected to the terminal which is marked with the letter E (Earth) or coloured green. The wire which is
coloured blue MUST be connected to the terminal which is marked with the letter N (Neutral) or coloured black.
The wire which is coloured brown MUST be connected to the terminal which is marked with the letter L (Live)
or coloured red.
Before refitting the plug cover, check that there are no cut or stray strands of wire inside the plug. Use a 13 amp
BS1362 fuse. Only BSI or ASTA approved fuses should be used. If you are at all unsure which plug or fuse to
use, always refer to a qualified electrician.
Note: after replacing or changing a fuse on a moulded plug which has a fuse cover, the cover must be refitted
to the plug; the appliance must not be used without a fuse cover. If lost, replacement fuse covers can be
obtained from an electrical shop. This appliance complies with the following EEC Directives: 73/23 EEC (Low
Voltage Directive) and 89/336 EEC (EMC Directive).