1
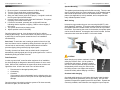
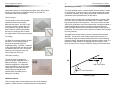
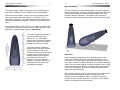
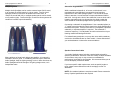
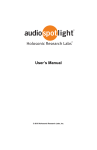
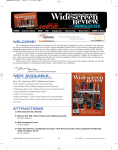
20,1, 18,3, 16,5, 14,7, 12,9
2,19, 4,17, 6,15, 8,13, 10,11
20,1,2,19,18,3,4,17,16,5,6,15,14,7,8,13,12,9,10,11
®
®
User’s Manual
© 2010 Holosonic Research Labs, Inc.
Audio Spotlight® User’s Manual
3
Introduction
"... Audio Spotlights may be the most radical technological development in
acoustics since the coil loudspeaker was invented in 1925... The audio
spotlight will force people to rethink their relationship with sound, as the
arrivals of the phonograph, the telephone and the Walkman have done
before."
- New York Times
Thank you very much for choosing the Audio Spotlight system. Years
ago as a MIT graduate student, I created the Audio Spotlight because
of deficiencies I saw in the way traditional loudspeakers made sound –
in particular, their lack of control. Never before has it been possible to
give people the power to control not only what their sound is, but also
where their sound goes – and where it doesn’t.
I founded Holosonics to commercialize the Audio Spotlight technology,
and make it available to anyone who would like to take advantage of its
unique features. As we move forward, I would like to hear from you,
regarding your experiences, successes, challenges and ideas
regarding the Audio Spotlight technology.
I and everyone at
Holosonics look forward to working with you.
Dr. F. Joseph Pompei
President and Founder
4
Audio Spotlight® User’s Manual
Important Safety Instructions
1) Read these instructions.
2) Keep these instructions.
3) Heed all warnings.
4) Follow all instructions.
5) Do not use this apparatus near water.
6) Clean only with dry cloth.
7) Do not block any ventilation openings. Install in accordance with the
manufacturer’s instructions.
8) Do not install near any heat sources such as radiators, heat registers, stoves, or
other apparatus (including amplifiers) that produce heat.
9) Do not defeat the safety purpose of the polarized or grounding-type plug. A
polarized plug has two blades with one wider than the other. A grounding type plug
has two blades and a third grounding prong. The wide blade or the third prong is
provided for your safety. If the provided plug does not fit into your outlet, consult an
electrician for replacement of the obsolete outlet.
10) Protect the power cord from being walked on or pinched particularly at plugs,
convenience receptacles, and the point where they exit from the apparatus.
11) Only use attachments/accessories specified by the manufacturer.
12) Use only with the cart, stand, tripod, bracket, or table
specified by the manufacturer, or sold with the apparatus.
When a cart is used, use caution when moving the
cart/apparatus combination to avoid injury from tip-over.
13) Unplug this apparatus during lightning storms or when
unused for long periods of time.
14) Refer all servicing to qualified service personnel.
Servicing is required when the apparatus has been
damaged in any way, such as power-supply cord or plug is
damaged, liquid has been spilled or objects have fallen into the apparatus, the
apparatus has been exposed to rain or moisture, does not operate normally, or has
been dropped.
15) Installers are required to follow sound and reasonable judgment when installing
Audio Spotlight products. Compliance with all building, safety, and fire codes is the
sole responsibility of the installer and/or end user.
16) Do not connect Audio Spotlight® devices to traditional loudspeaker amplifiers
or loudspeakers. Damage and/or hazardous conditions could result.
17) Our standard cables are not plenum rated. Please contact the factory if
special specifications are required.
WARNING: To reduce the risk of fire or electric shock, do not expose this apparatus
to rain or moisture.
are hazardous live. External
WARNING: Terminals marked with the symbol
wiring connected to these terminals requires installation by a qualified, instructed
person or the use of ready-made leads or cords.
WARNING: When mounting the speaker panel overhead, always use a secondary
fastening method in case the primary attachment fails.
Audio Spotlight® is a registered trademark of Holosonic Research Labs, Inc.
US and International patents issued and pending.
The symbol
indicates that there are hazardous voltages within the enclosure.
Do not open. Refer all servicing needs to the manufacturer, or the manufacturer’s
designated service representatives.
Audio Spotlight® User’s Manual
5
Package Contents
6
Audio Spotlight® User’s Manual
Controls
Audio Spotlight® speaker panel
SoundBeam® controller
Speaker Cable (25’)
Power Supply, Power cable
Eyebolt (6-32)
Demonstration CD
1
Optional Accessories:
MNT-1 Mounting Bracket
MNT-2 Extended Mounting Bracket
CM-1 Suspended Ceiling Mount Kit
CM-2 Suspended Ceiling Mount Kit with Bracket
2
4
5
6
1.
2.
3.
4.
5.
6.
Quick Setup
Power indicator
Volume control
Auto-level
Low freq control
High freq control
Level indicators
1
Power supply
to wall outlet
3
Glows green when power is on
Adjusts output level
Allows system to automatically adjust level
Adjust low-frequency cutoff
Adjust high-frequency leveling
First green: input signal detected
Second green: output is being optimized
(only with auto-level on)
Red light: output is clipping
Solitary red light: Fault detected
2
3
4
Audio source
(CD player, etc.
not included)
Audio Spotlight®
speaker panel
Remember: Do not connect SoundBeam® controller to traditional loudspeakers
and do not connect Audio Spotlight® speaker to traditional audio amplifiers.
Equipment damage and/or hazardous conditions may occur.
1.
2.
3.
4.
Power switch
Power input
Output connector
Audio Input
Press to turn on, press again to turn off
Receives power from included DC supply
Connects to speaker panel via included cable
RCA jack for standard line-level audio input
(mono input should use Red input)
Audio Spotlight® User’s Manual
7
8
Audio Spotlight® User’s Manual
Operation
Speaker Mounting
1.
2.
3.
4.
The speaker panel was designed for flexible mounting. There are two
sets of mounting holes: the center contains two ¼-20 threaded inserts,
and around the perimeter are four 6-32 threaded inserts. The hole
pattern (see Appendix A) is fairly standard, and is compatible with
many standard speaker mounts.
5.
6.
7.
8.
Be sure system is connected as shown in “Quick Setup”
Turn the volume knob down (counterclockwise).
Turn the system power on using the power switch.
Start your audio source (such as CD player). If a signal is received,
the first green light should illuminate.
Increase volume until two green lights are illuminated. The system
is playing at a nominal volume level.
If volume is increased, eventually the red light will illuminate,
indicating that the amplifier is clipping. Reduce volume slightly if
this occurs.
The system should now be playing music.
Adjust equalizer knobs if necessary.
Once the system is set up, it can be powered off and on without
modifying the settings. This is useful when one power source (such as
a power strip) is used to power several devices in an installation
simultaneously.
Wall / Ceiling
Holosonics recommends using our own mounting kits (MNT-1) with
®
Audio Spotlight speakers. The bracket easily attaches to the back of
the speaker with two included screws, and can mount to any suitable
flat surface. By loosening the screw on the bracket, the speaker panel
can be aimed as desired. An extension arm is also included. See the
instructions that come with the MNT-1 kit for more details.
Auto Level: To assist the user in setting an optimal volume level, the
auto-level feature can be enabled by sliding its switch to the right. The
volume knob is used normally, but the enabled auto-level feature
prevents clipping during unusually high input signals.
Formally, the auto-level feature acts as a basic audio “compressor”,
automatically reducing signal gain for high peak signal levels. It can be
disabled by sliding the switch to the left.
Fault Protection
In order to protect itself, as well as other equipment in an installation,
the Audio Spotlight is designed to detect the presence of one or more
faults. When a fault is detected, the system shuts down, and the red
light blinks alone. A fault is the result of one of three causes:
•
•
•
Disconnected or damaged speaker panel
Overheating
Overdrive
If the system is driven substantially into the clipping region, the
system will shut down to avoid poor sound output and possible
damage.
Once the system is checked, turning the system off for three seconds,
and then on again, will reset the fault.
! CAUTION
When hanging any system overhead, a backup
safety line must be used. A 6-32 eyebolt is
included for this purpose. Screw the eyebolt
into one of the four perimeter holes, and secure
independently with a strong line. Be sure that
the ceiling structure can support the weight of
the device reliably without warping or bending
Overhead cable hanging
Overhead cable hanging is useful when shining the Audio Spotlight
beam straight down, particularly from a high ceiling. Use four 6-32
eyebolts to suspend the speaker panel from steel cable. Eyebolts are
commonly available, and Holosonics can supply them upon request.
Audio Spotlight® User’s Manual
9
10
Audio Spotlight® User’s Manual
Suspended ceilings
Optimizing your sound
Suspended ceilings are not designed to support heavy loads. When
hanging an object from a suspended ceiling, be sure that it is
connected to the structural ceiling.
The Audio Spotlight uses a carefully crafted ultrasonic beam to create
a ‘virtual source’ out of the air itself. The system is technically called
an airborne parametric array, named after similar techniques used in
underwater sonar systems as early as the 1960’s.
Flush mounting:
The thin profile of the Audio Spotlight
speakers makes flush mounting
attractive and simple. Our CM-1 flushmount kit contains a support brace for
using inside the ceiling grid, and two
long screws for attaching the speaker.
Be sure to use hanging wire to attach
the support brace to the structural ceiling.
For aiming:
Our CM-2 kit combines the CM-1 kit with
the MNT-1 mount, allowing flexible
aiming of the speaker panel in a
suspended ceiling. The MNT-1 attaches
to the ceiling panel with two long screws,
two washers, and two nuts. The screws
extend up to the support brace and
connect with two more nuts.
Inherent in the conversion from ultrasound to audio is a natural 12dB
per octave slope, meaning that less ultrasound is needed to create
high frequencies than low frequencies. This can be easily corrected
with built-in equalization, but with a finite amount of energy available, a
tradeoff exists between maximum output level and low frequency
range, and high frequencies can be made maximally louder than low
frequencies. The two knobs on the Controller unit permit this exchange
to occur gracefully.
The graph below shows the way sound is controlled with the Audio
Spotlight. The thick line is the system’s approximate “natural” (i.e.
uncorrected) response, and the dashed lines show various selected
frequency ranges, adjusted with the high frequency selector knob. The
dotted lines show the effects of changing the low-frequency cutoff,
which is useful for not “using up” ultrasonic energy on low frequencies.
Ceiling tile mounting:
The AS-24 model is designed to
precisely replace a standard 2’x2’ or
600mm ceiling tile. This allows for
seamless integration in suspended
ceiling applications. Be sure that the
ceiling frame is sufficiently strong to
safely support the weight of the
speaker panel, and always use a
backup line for safety.
dB
High Freq control
Low Freq control
Frequency (log)
Additional options
There are many other mounting options for your Audio Spotlight
speaker. Please feel free to contact Holosonics for assistance.
Audio Spotlight® User’s Manual
11
12
Audio Spotlight® User’s Manual
Understanding the sound field
Basic Installation
The Audio Spotlight creates a very precise, well-controlled beam of
sound with no sidelobes or other artifacts typical of loudspeakers.
The most common use of the Audio Spotlight is to deliver sound to a
specific, isolated area. Just as with lighting, the Audio Spotlight is best
mounted directly above the listener, aimed downward (left). This
provides maximum localization. The speaker panel can also be
mounted on a wall, and angled downward, to reach the listener (right).
Because sound is created in mid-air, and not by the speaker panel,
sound actually gets louder with distance – up to about 1 or 2m,
depending on frequency. Sound also diminishes with distance more
slowly than a traditional loudspeaker, creating a more uniform field of
sound.
An illustration of the field from the 16” (or 18”) system is shown below.
Three contours are shown, at the contours of –0dB, -6dB (50%), and –
20dB (10%). Additional data is shown in Appendix B.
0m
1m
2m
The loudest sound area is directly in
front of the speaker panel at a
distance of 1-2m. Reasonable
listening areas are within the green or
purple zones. Sound levels outside
the beam are down by over 90%.
In all sound systems, audibility is
determined by sound level received
versus background noise levels.
Therefore, the beam will be perceived
as more narrow in the presence of
background noise, as any scatter
from a listener or floor will be
inaudible. This is much like the
difference in shining a flashlight in a
completely dark room versus one
with background lighting.
Reflections
While the beam generated by the Audio Spotlight system is very
narrow, the beam will reflect from surfaces (and listeners) in your
environment. To sound waves, solid surfaces are much like mirrors
are to light. Therefore, to reduce reflections, an acoustically absorbing
surface (such as carpet, padding, or curtains) should be used to ‘catch’
the beam and reduce the reflection. Generally, this is most important
only in very quiet spaces, where there is little background noise to
mask minor scattered energy.
Also, like light, reflections can be used as projection of audible sound.
By directing the beam against a surface, one can create very
interesting “virtual loudspeaker” effects. The beam will generally
maintain its directivity after projection, so it is best to ensure that the
listener is in the path of the reflected beam.
Audio Spotlight® User’s Manual
13
14
Audio Spotlight® User’s Manual
Multiple systems
Subwoofer Augmentation
Multiple Audio Spotlights can be used to create a larger field of sound,
or to increase the sound intensity in a given region. Just like visual
spotlights, beams of sound can be aimed next to each other, to
“shape” the sound field (left), or multiple speaker panels can be aimed
to one position (right). Just as with light, sound from these systems will
combine to increase output substantially.
While a traditional subwoofer is, of course, not directional, it can
nonetheless be used effectively to augment the low-frequency
reproduction of the Audio Spotlight system. The human ear, and a
listener’s attention, is most sensitive to frequencies between 600Hz
and 2kHz. As long as the level of the subwoofer is not too loud, and is
limited to reproducing only low frequencies, the slight rumble that
exists outside of the Audio Spotlight beam is generally unnoticed.
Connecting a subwoofer is straightforward. Use a standard splitter (or
“Y”) cable to send the same line-level signal to the Audio Spotlight and
the subwoofer system. Since this line level is not amplified, a powered
subwoofer, or separate amplifier, is required. The subwoofer’s
crossover frequency, if it is adjustable, should be selected to suit your
listening material and background noise.
For isolated bass reproduction, one may also use a tactile transducer,
such as the Aura Bass Shaker or Clark models. Contact Holosonics if
you need assistance or subwoofer recommendations.
Speaker Connection Cables
Many variations of these basic designs are possible – this manual is
intended to act as a guide. In considering different ways to install the
Audio Spotlight, keep the lighting analogy in mind. More often than not,
Audio Spotlights should be thought of in lighting design terms, not in
loudspeaker terms.
Your Audio Spotlight system includes a coaxial cable selected for
optimum performance. Because of the wide variety of cables available
on the market, many may or may not meet our standards for
performance, particularly at long lengths. We recommend that you do
not use third-party connection cables.
If you have specific cable requirements, such as special lengths or
types, please contact Holosonics and we are happy to offer our
assistance.
NOTE: Our standard cables are not plenum rated. Please contact the
factory if special specifications are required.
Audio Spotlight® User’s Manual
Appendix A: Speaker Panel drawings
All speaker panels are approximately 0.5” (1cm) thick.
AS-16
AS-24
15
16
Audio Spotlight® User’s Manual
Audio Spotlight® User’s Manual
17
Appendix B: Sound Field Specifications
Design Specifications:
18
Audio Spotlight® User’s Manual
Raw measurements
The plots below are actual raw field measurements of a typical Audio
Spotlight system. The speaker panel is shown as a black rectangle
centered at (0,0). The spatial dimensions (X,Y) are in meters, and
sound levels are in dB SPL.
18” Speaker (16” speaker is similar)
24” Speaker
In general, the AS-24 model provides twice the output power, an
additional octave of low-frequency reproduction, and a slightly larger
listening area.
Sound fields shown for standard 1kHz tone.
© 2003 Holosonics
Audio Spotlight® User’s Manual
19
Limited Warranty
Holosonics warrants that your Audio Spotlight system is free from
defects in material and workmanship for a period of one (1) year after
date of purchase. This warranty does not cover claims for damage
caused by accident, misuse, neglect, alteration, outdoor use,
disassembly, unauthorized repair, shipping, or modification.
Holosonics’ liability is limited to the repair or replacement, at our option,
of any defective product, and shall not include incidental or
consequential damages of any kind. Warranty is void if serial number
is defaced or removed.
Service
If your Audio Spotlight system needs service, please contact
Holosonics for a return materials authorization (RMA) number.
Received units will not be accepted without a valid RMA. Call us, or
email [email protected] .
Holosonic Research Labs, Inc.
400 Pleasant Street
Watertown, MA 02472
USA
Phone:
Fax:
Email:
Web:
617-923-4000
617-507-3474
[email protected]
www.holosonics.com
© 2010 Holosonic Research Labs, Inc. (“Holosonics”)
Audio Spotlight® and Holosonic® are registered trademarks of Holosonics.
US and International Patents Apply
v11d