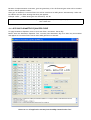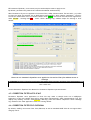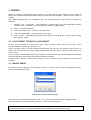
1
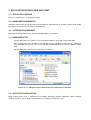
Real Sound Lab SIA · t.: +371 6788 9828 · e.: [email protected]
__________________________________________________________________________________________________________________
APEQ Communication Tool
USER MANUAL
(for software version 1.0)
__________________________________________________________________________________________________________________
APEQ Communication Tool version 1.0 User Manual, revision 1
Real Sound Lab SIA · Akadēmijas Laukums 1 · Riga · LV1050 · Latvia
Telephone: +371 6788 9828 · www.realsoundlab.com
© 2007–2009 Real Sound Lab SIA
1
Real Sound Lab SIA · t.: +371 6788 9828 · e.: [email protected]
__________________________________________________________________________________________________________________
REVISION HISTORY
Revision 1 (2009.02.26) – Initial revision
__________________________________________________________________________________________________________________
APEQ Communication Tool version 1.0 User Manual, revision 1
Real Sound Lab SIA · Akadēmijas Laukums 1 · Riga · LV1050 · Latvia
Telephone: +371 6788 9828 · www.realsoundlab.com
© 2007–2009 Real Sound Lab SIA
2
Real Sound Lab SIA · t.: +371 6788 9828 · e.: [email protected]
__________________________________________________________________________________________________________________
DISCLAIMER OF WARRANTIES
EQUIPMENT MANUFACTURED BY REAL SOUND LAB IS WARRANTED AGAINST DEFECTS IN MATERIALS AND
WORKMANSHIP FOR A PERIOD OF ONE YEAR FROM THE DATE OF PURCHASE.
THERE ARE NO OTHER EXPRESS OR IMPLIED WARRANTIES AND NO WARRANTY OF MERCHANTABILITY OR
FITNESS FOR A PARTICULAR PURPOSE, OR OF NONINFRINGEMENT OF THIRD-PARTY RIGHTS (INCLUDING,
BUT NOT LIMITED TO, COPYRIGHT AND PATENT RIGHTS).
LIMITATION OF LIABILITY
IT IS UNDERSTOOD AND AGREED THAT REAL SOUND LAB’ LIABILITY, WHETHER IN CONTRACT, IN TORT,
UNDER ANY WARRANTY, IN NEGLIGENCE, OR OTHERWISE, SHALL NOT EXCEED THE COST OF REPAIR OR
REPLACEMENT OF THE DEFECTIVE COMPONENTS OR ACCUSED INFRINGING DEVICES, AND UNDER NO
CIRCUMSTANCES SHALL REAL SOUND LAB BE LIABLE FOR INCIDENTAL, SPECIAL, DIRECT, INDIRECT, OR
CONSEQUENTIAL DAMAGES (INCLUDING, BUT NOT LIMITED TO, DAMAGE TO SOFTWARE OR RECORDED
AUDIO OR VISUAL MATERIAL), COST OF DEFENSE, OR LOSS OF USE, REVENUE, OR PROFIT, EVEN IF REAL
SOUND LAB OR ITS AGENTS HAVE BEEN ADVISED, ORALLY OR IN WRITING, OF THE POSSIBILITY OF SUCH
DAMAGES.
TRADEMARKS
CONEQ IS REGISTERED TRADEMARK OF REAL SOUND LAB SIA.
ALL OTHER TRADEMARKS REMAIN THE PROPERTY OF THEIR RESPECTIVE OWNERS.
NOTICE
EVERY EFFORT WAS MADE TO INSURE THAT THE INFORMATION CONTAINED IN THIS MANUAL WAS COMPLETE
AND ACCURATE AT THE TIME OF PRINTING. HOWEVER, DUE TO ONGOING TECHNICAL ADVANCES, CHANGES
OR MODIFICATIONS MAY HAVE OCCURRED THAT ARE NOT COVERED IN THIS MANUAL.
__________________________________________________________________________________________________________________
APEQ Communication Tool version 1.0 User Manual, revision 1
Real Sound Lab SIA · Akadēmijas Laukums 1 · Riga · LV1050 · Latvia
Telephone: +371 6788 9828 · www.realsoundlab.com
© 2007–2009 Real Sound Lab SIA
3
Real Sound Lab SIA · t.: +371 6788 9828 · e.: [email protected]
__________________________________________________________________________________________________________________
TABLE OF CONTENTS
REVISION HISTORY...................................................................................................................................................2
TABLE OF CONTENTS................................................................................................................................................4
1. INTRODUCTION....................................................................................................................................................5
1.1. ABOUT THIS MANUAL............................................................................................................................................5
2. APPLICATION INSTALLATION AND START..............................................................................................................6
2.1. APPLICATION VERSIONS.........................................................................................................................................6
2.2. HARDWARE REQUIREMENTS.................................................................................................................................6
2.3. SOFTWARE REQUIREMENTS..................................................................................................................................6
2.4. HARDWARE SETUP.................................................................................................................................................6
2.5. APPLICATION INSTALLATION..................................................................................................................................6
2.6. APPLICATION START...............................................................................................................................................7
2.7. APPLICATION VERSION INFORMATION..................................................................................................................9
3. BACKUP CORRECTION FILTER FILES FROM APEQ-2PRO UNIT...............................................................................10
3.1. SINGLE CORRECTION FILTER FILE BACKUP...........................................................................................................10
3.2. BACKUP ALL CORRECTION FILTER FILES AS PRESET..............................................................................................10
4. TRANSFER CORRECTION FILTER FILES TO APEQ-2PRO UNIT.................................................................................12
4.1. CORRECTION FILTER RESIZE.................................................................................................................................13
4.2. APPLYING DELAY TO CORRECTION FILTER...........................................................................................................13
4.3. REDUCING CORRECTION FILTER GAIN..................................................................................................................13
4.4. APPLYING PARAMETRIC EQUALIZER CURVE.........................................................................................................14
4.5. CORRECTION FILTER AUTO-SCALE........................................................................................................................15
4.6. CORRECTION FILTER FILE CHECKSUM..................................................................................................................15
5. PRESETS..............................................................................................................................................................17
5.1. SAVE CURRENT SETTINGS AS A NEW PRESET.......................................................................................................17
5.2. REMOVE PRESET..................................................................................................................................................17
6. EXITING APPLICATION.........................................................................................................................................18
7. UNINSTALLING APPLICATION.............................................................................................................................18
__________________________________________________________________________________________________________________
APEQ Communication Tool version 1.0 User Manual, revision 1
Real Sound Lab SIA · Akadēmijas Laukums 1 · Riga · LV1050 · Latvia
Telephone: +371 6788 9828 · www.realsoundlab.com
© 2007–2009 Real Sound Lab SIA
4
1. INTRODUCTION
APEQ Communication Tool makes it safe and easy to transfer correction files to APEQ-2pro unit, unaltered
or with some modifications, as well as to backup files from APEQ unit back to PC.
PRESETS functionality makes your work with APEQ -2pro unit as fast and easy as possible.
Application has simple Correction File modification tools – Gain Control and Delay, as well as interface to
Real Sound Lab Parametric Equalizer Tool.
APEQ Communication Tool supports multiple APEQ device connection to a single PC, thus allowing easy
setup of APEQ-2pro equalizer array.
Tool gives the user additional safety by automatically back-upping APEQ filter files to PC at APEQ device
detection.
Tool protects filter file integrity by checksum, making CONEQ™ filter replace process quicker, more
smooth and reliable (APEQ-2pro firmware must be updated to version 2.0.8926 or later to support this
option).
1.1. ABOUT THIS MANUAL
All example pictures shown in this manual are made for APEQ Communication Tool running under Microsoft
Windows XP SP3 with default theme installed, and APEQ-2pro device firmware version 2.0.8926
connected. Application and its dialog windows appearance may vary depending on operating system
installed and its settings.
2. APPLICATION INSTALLATION AND START
2.1. APPLICATION VERSIONS
See file “C1_history.txt” in application folder.
2.2. HARDWARE REQUIREMENTS
Hardware requirements are at the same level as hardware requirements for operating system used. APEQ2pro device is connected to PC using its USB interface.
2.3. SOFTWARE REQUIREMENTS
Supported operating systems are: Microsoft Windows 2000, XP and Vista.
2.4. HARDWARE SETUP
-
Connect APEQ-2pro unit USB port to your Computer USB port using USB A to B Leads cable.
-
Turn on APEQ-2pro unit. Computer will find APEQ unit’s USB Mass Storage Device – APEQ-2pro
removable disk. See picture 2.4.1 for an example of APEQ2P detected; unit has a default volume
label.
-
Multiple APEQ-2pro units may be connected to a single PC.
Picture 2.4.1. APEQ-2pro device Removable disk enumerated by Windows
2.5. APPLICATION INSTALLATION
APEQ Communication Tool is installed by the CONEQ™ Workshop package installation. When installing
CONEQ™ Workshop, select APEQ Communication Tool (default, see picture 2.5.1).
Picture 2.5.1. Selecting APEQ Communication Tool in process of CONEQ™ Workshop installation
2.6. APPLICATION START
To start application, run application executable or use Windows Start menu.
APEQ Communication Tool application will automatically create all necessary folders and files. If APEQ2pro unit is connected, powered up, and its initialization is completed, Tool will detect and connect it.
After enumeration, a newly detected unit appears in drop-down menu (see pictures 2.6.1 and 2.6.2). If
multiple APEQ devices are connected to PC, they all will be detected one-by one and all will appear in
selection list. User may choose device needed by using information from the drop-down menu (Windows
disk letter, user modifiable USB Mass Storage Device volume label, device type, version and serial
number).
Picture 2.6.1. APEQ Communication Tool window - APEQ-2pro unit not detected
Picture 2.6.2. APEQ Communication Tool window - APEQ-2pro unit detected
After device is detected, all its filter files will be automatically saved to “backups” folder. Individual
folder for each APEQ item is created (see picture 2.6.3). Name of this folder is constructed using device
information.
Picture 2.6.3. APEQ item individual backup folder
Open item folder. Suffixes like “~1” may be added to each saved file name to prevent file overwrite on
repeating backups for the same APEQ unit detection. Saved file names now appear in “Select file” dialog
boxes for each APEQ channel and may be easily sent back to APEQ device, modified or unmodified (see
picture 2.6.2), by pressing “Enter” key while cursor placed in the respective dialog window (see chapter 4
“Transfer correction filter file to APEQ-2pro” for details).
2.7. APPLICATION VERSION INFORMATION
Short information about application available under File->About menu.
3. BACKUP CORRECTION FILTER FILES FROM APEQ-2pro UNIT
3.1. SINGLE CORRECTION FILTER FILE BACKUP
To Backup Correction filter file from APEQ-2pro unit, press ”Backup” button for the channel of your
choice in “Select files” part of application window (see picture 2.6.2).
When “Backup” button is clicked, “Save file” dialog box appears. Select location/directory, were to
backup Correction filter file, and click “Save” button.
Picture 3.1.1. File Backup dialog box
When “Save” button in “file save dialog box” is clicked, Correction filter file is transferred from APEQ2pro unit to selected location, and dialog box closes.
Clicking of “Cancel” button will cancel backup operation.
3.2. BACKUP ALL CORRECTION FILTER FILES AS PRESET
You can backup existing Correction filter files for all channels of APEQ-2pro unit simultaneously as preset.
Click button “Backup as preset”. Preset selection dialog will appear.
Picture 3.2.1. “Save preset" dialog box
Type a new preset name or choose existing from drop-down list, and click “OK” button. If preset with this
name already exists, APEQ Communication Tool will ask for overwrite confirmation.
Picture 3.2.2. Preset overwrite confirmation dialog
After overwrite is confirmed by clicking “Yes” button, all channel filter files will be transferred from
APEQ-2pro device and saved to “presets” folder. New preset will be created, using these files.
Clicking the “Cancel” button in “Save preset” dialog or “No” in “Preset overwrite” dialog box will cancel
backup operation.
Consult chapter 5, “Presets” for preset operation details.
WARNING Files transferred from APEQ device back to PC imply all modifications (delay, gain, Parametric
EQ) done by APEQ Communication Tool previously. Repeated modifications applied to these files may
greatly reduce filter performance or even corrupt filter file. Please use modified files with care. Check
file name for added suffixes like “-0.5dB”, “_2.0ms” or “_eq” to detect if modifications have been
applied.
4. TRANSFER CORRECTION FILTER FILES TO APEQ-2pro UNIT
To transfer Correction filter files to APEQ-2pro unit, type filter path in “Select files” and press “Enter”
key (Toll will use path to last back-upped file by default), or click ”Browse” button for the channel of your
choice to open “Open File” dialog box (see pictures 2.6.2, 4.1.1).
When “Browse” button is clicked, “File Open” dialog box opens. Select Correction filter file and press
“Open” button. Press “Cancel” button to cancel file transfer.
Picture 4.1. “Open filter file” dialog
WARNING When new Correction filter file is sent to APEQ device, current unit files will be deleted and
replaced with automatically sent ones. You can see Current Correction filter files that are currently on
APEQ-2pro unit at “Current:” in “Select files” part of “Application” window (Picture 2.6.2). If you want to
keep these files for a later usage, use BACKUP functionality (See chapter 3, “Backup Correction filter
files”) or use Windows Explorer to copy them back to PC. APEQ Communication Tool also automatically
backups APEQ item filter files on device detection.
After selecting file, APEQ Communication Tool applies all provided modifications – Gain, Delay, Parametric
Equalizer curve (see later chapters for all these topics) and checks file format compatibility with APEQ
device connected.
After applying all necessary modifications to transferred file, Tool adds or corrects file name prefix
(Channel number, “1” or “2”, as required by APEQ firmware) and adds file suffix according to changes
applied. Corrected file then is sent to APEQ using USB interface, thus replacing existing filter file.
APEQ device indicates file transfer using its Front Panel indicators. Consult APEQ-2pro User Manual for
details.
When transfer is completed, unit file name (with all added prefixes and suffixes) appears in “Current:”
field of application window. Transfer process is logged in “Message log” window.
Depending on result of the file transfer, “current” file name may be marked with color (see chapter 4.4,
“Applying Parametric Equalizer curve”).
NOTE Correction filter must be MPF (minimum phase filter) with 48 kHz sample rate. APEQ uses 4096sample files (Default settings on measurement software – CONEQ™ WORKSHOP), but longer or shorter files
may be also transferred - APEQ Communication Tool will convert them automatically.
4.1. CORRECTION FILTER RESIZE
If filter file length is not supported by APEQ device, APEQ Communication Tool opens “Confirm file resize”
dialog box.
Picture 4.1.1. “Confirm file resize” dialog
User should click “Yes” button to confirm file resize or “No” button to cancel file sending process. If user
confirms file resize, file will be resized, as needed.
WARNING If long file is truncated, filter performance may be reduced. Filter gain may be altered on
either filter extending or truncating.
4.2. APPLYING DELAY TO CORRECTION FILTER
User may apply delay up to 4.979 milliseconds to Correction Filter. Use “Delay” slider according to
channel selected, or enter delay in milliseconds directly (see picture 2.6.2).
Because of implementation constraints, delay has granularity of 0.021 milliseconds. Entered delay value
will be rounded down to a nearest possible number.
After delay is modified, files will be transferred to APEQ device automatically. Suffix will be added to the
file name, shown delay will be applied.
Example: Suffix “_0.021ms” shows delay of 0.021 ms applied.
WARNING Delay apply may reduce filter performance in low frequency area.
Use it with care.
4.3. REDUCING CORRECTION FILTER GAIN
User may reduce Correction filter gain up to -6.0 dB. Use “Gain” slider according to channel selected or
enter gain in dB directly (see picture 2.6.2).
Because of implementation constraints, gain has granularity of 0.1 dB. Entered gain value will be rounded
down to nearest possible number.
After gain is modified, Correction Filter file will be transferred to APEQ device automatically. Suffix will
be added to the file name showing that delay was applied.
Example: Suffix “_-0.5dB” shows gain was reduced by -0.5 dB.
WARNING Gain correction may reduce filter precision, and thus, filter performance.
Use it with care.
4.4. APPLYING PARAMETRIC EQUALIZER CURVE
To apply Parametric Equalizer curve to Correction Filter, use button “Param EQ”.
Button starts the Parametric Equalizer Tool. Currently used Parametric EQ curve then may be modified
and applied to Correction Filter files for both APEQ-2pro device channels.
Picture 4.4.1. PE application started from the APEQ Communication Tool
PE Parametric Equalizer, once started, may be used multiple times to apply curves.
By default, parametric EQ channels are linked and modified simultaneously.
When Parametric EQ curve is applied to Correction Filter, APEQ Communication Tool will add “_eq” suffix
to filter file name and transfer file to APEQ device automatically. After transfer completion, “Current”
file will be marked with color to indicate transfer result. GREEN color marks successful filter application,
while YELLOW – warnings and RED – errors. Check “Message log” window output for warning or error
details.
Picture 4.4.2. Parametric Equalizer curve applied to Correction Filter files without errors or
warnings
WARNING Parametric Equalizer application may reduce filter precision, and thus, filter performance.
Use it with care.
Consult Parametric Equalizer User Manual for Parametric Equalizer operation details.
4.5. CORRECTION FILTER AUTO-SCALE
Parametric Equalizer curve application to filter file may result in sample scale out of APEQ-2pro
supported. In this case sample data will be scaled down automatically. APEQ Communication Tool will
display it by marking “Current” field YELLOW (“Warning”) after file transfer completion. Check “Message
log” window of the main application frame for warning details.
4.6. CORRECTION FILTER FILE CHECKSUM
By default, CONEQ™ Correction Filter files (FIR-files) as well as standard WAVE files do not support data
integrity check.
APEQ Communication Tool adds this possibility by calculating transferred data checksum and adding to
transferred file using proprietary (“system”) chunk. This chunk contains system information about file
including filter data checksum. This checksum later may be used by APEQ-2pro device to check file
integrity, and thus, to improve CONEQ™ filter update process speed and reliability.
WARNING Correction file checksum is supported by APEQ-2pro firmware version 2.0.8926 and later. Earlier
firmware versions will simply ignore system chunk.
User may check, if checksum was added to the file, by comparing file sizes – extended file has slightly
bigger size than the original.
Original files (stored on PC) are not altered. User may acquire extended file by copying files back from
APEQ-2pro to PC, using standard operating system tools, or APEQ Communication Tool file backup
functionality.
Extended files may be used by any RIFF standard compatible software. This software simply ignores added
Real Sound Lab data.
5. PRESETS
Presets is a powerful mechanism, which allows you to save integral set of settings (correct filter file
paths, gains, delays and Power Equalizer settings for both channels) altogether, and later recall it back, if
needed.
After APEQ Communication Tool installation there are 5 default presets, which cannot be deleted or
modified:
1. “Default: flat, +6 dB gain” - both APEQ-2pro channels have flat AFR (amplitude-frequency
response), with +6 dB gain. This is manufacturing setting for APEQ device.
2. “Mute” - mute both channels.
3. “Left: Mute, Right: Flat” - mute left (1) channel only.
4. “Left: Flat, Right: Mute” - mute right (2) channel only.
5. “Flat, no gain” - both APEQ-2pro channels have flat AFR, with 0 dB gain. This is equal to APEQ2pro “Bypass” mode.
5.1. SAVE CURRENT SETTINGS AS A NEW PRESET
To save current settings as a new preset, click “Save as preset” button (see picture 2.6.2). Preset
selection dialog will appear (see picture 3.2.1).
Type a new preset name or choose existing from drop-down list and click “OK” button or press “Enter”. If
preset with this name already exists, APEQ Communication Tool will ask for overwrite confirmation (see
picture 3.2.2).
After overwrite is confirmed by clicking “Yes” button, a new preset will be created using current settings:
filter files selected, Gain, Delay and Parametric Equalizer settings.
Clicking “Cancel” button in “Save preset” dialog or “No” in “Preset overwrite” dialog will cancel preset
creation.
5.2. REMOVE PRESET
To remove preset (or presets), click “Remove” button in “Presets” part of the main application frame.
Preset remove dialog will open.
Picture 5.2.1. Preset remove dialog
Select preset to be removed from the list. Use “Ctrl” and “Shift” buttons to select multiple presets.
Click “OK” button to remove selected presets or “Cancel” to cancel removal.
NOTE Preset removal will not remove Correction Filter files neither from PC, nor APEQ-2pro unit. Use
operating system tools (for example, Windows Explorer application) to remove those files.
6. EXITING APPLICATION
APEQ Communication Tool application may be closed using File->Exit menu or by closing application
window.
Prior to closing, APEQ Communication Tool will automatically shut down PE Parametric Equalizer Tool.
Current settings will be saved and then loaded at next application start, excluding Delay and Gain
controls.
7. UNINSTALLING APPLICATION
Application can be removed by the CONEQ™ Workshop uninstaller.