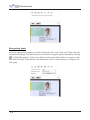
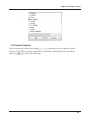
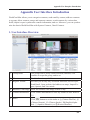
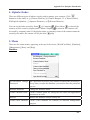
1
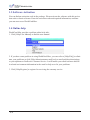
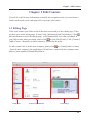
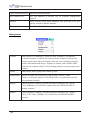
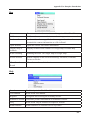
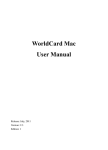
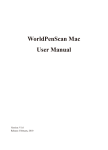
WorldCard Mac
User Manual
Release: March, 2014
Version: 3.2
Contents
Chapter 1 Getting Started.....................................................................................................1 - 1
1.1 Installation ...............................................................................................................1 - 1
1.1.1 System Requirements .....................................................................................1 - 1
1.1.2 Software Installation.......................................................................................1 - 1
1.2 Launch WorldCard Mac...........................................................................................1 - 1
1.3 Software Activation .................................................................................................1 - 2
1.4 Online help ..............................................................................................................1 - 2
Chapter 2 Add Contacts .......................................................................................................2 - 1
2.1 Using scanner ..........................................................................................................2 - 1
2.1.1 Scan the Card to Add Contacts .......................................................................2 - 1
2.1.2 Add Contacts via the Scan Wizard .................................................................2 - 1
2.1.3 Calibration ......................................................................................................2 - 2
2.2 Shift from WorldCard Mac v2.3 to WorldCard Mac v3 ..........................................2 - 2
Chapter 3 Edit Contacts .......................................................................................................3 - 1
3.1 Editing Page .............................................................................................................3 - 1
3.1.1 Contact List ....................................................................................................3 - 2
3.1.2 Edit the Contact ..............................................................................................3 - 2
3.1.3 Edit the Card Image........................................................................................3 - 3
3.2 Deleting/Restoring Contacts ....................................................................................3 - 5
Chapter 4 Manage Contacts .................................................................................................4 - 1
4.1 Add New Contacts ...................................................................................................4 - 1
4.1.1 Add a Contact Manually .......................................................................................4 - 1
4.2 Group Management .................................................................................................4 - 1
Chapter 5 Import, export, sync ............................................................................................5 - 1
5.1 Import ......................................................................................................................5 - 1
5.2 Export ......................................................................................................................5 - 2
5.3 Sync .........................................................................................................................5 - 3
Chapter 6 Managing Contacts..............................................................................................6 - 1
6.1 Send Email ...............................................................................................................6 - 1
6.2 Skype .......................................................................................................................6 - 1
6.3 Open Website and Display Map of Address ............................................................6 - 1
6.4 Route Planning ........................................................................................................6 - 1
6.5 Searches on Social Networks ..................................................................................6 - 2
Chapter 7 Advanced Functions ............................................................................................7 - 1
7.1 Settings ....................................................................................................................7 - 1
7.1.1 General ...........................................................................................................7 - 1
7.1.2 Field Display ..................................................................................................7 - 1
7.1.3 Sync, Export, Import ......................................................................................7 - 1
7.1.4 Scan.................................................................................................................7 - 3
7.2 Database....................................................................................................................7 - 3
7.2.1 Create a New Database...................................................................................7 - 3
7.2.2 Open Existing Database..................................................................................7 - 4
7.2.3 Save Database as a New File...........................................................................7 - 4
7.2.4 Rename Database............................................................................................7 - 4
7.2.5 Set Password or Change Password..................................................................7 - 4
7.2.6 Create a Restore Point.....................................................................................7 - 4
7.2.7 Restore Database.............................................................................................7 - 5
Appendix User Interface Introduction ................................................................................. a - 1
1. User Interface Overview ............................................................................................ a - 1
2. Regular Toolbar.......................................................................................................... a - 2
3. Contact Information . ................................................................................................. a - 2
4. Alphabet Index............................................................................................................ a - 3
5. Menu........................................................................................................................... a - 3
There may be newer versions of the software that was released during or after this
product’s manufacturing date. If the content in the User Manual differs from the
on-screen interface, please follow the instructions on the on-screen interface instead of the User Manual.
PenPower Technology Ltd.
Software User License Agreement
You are licensed to legally use this software program (“the Software”) by PenPower
Technology Ltd (“PenPower”) under this license agreement (“The Agreement”). If you do
not agree with any of the provisions in this Agreement, please do not install, copy or use
the Software. By using the Software, you are deemed to fully understand and accept the
provisions of this Agreement.
1. Intellectual Property
All intellectual property rights in the Software, together with all information and documents included in the packaging for the Software (including but not limited to copyrights), are property of PenPower or have been licensed to PenPower, and are protected
by relevant laws and regulations.
2. License to Use
You are authorized to use the Software on one (1) single computer only. You may not use
the Software on any other machines other than the said single computer.
3. Authority to Copy
The Software and all documents included with the Software, and copyright thereof, are
property of PenPower. You are licensed to make one (1) copy of the Software for your
personal backup purposes. All other acts of copying are strictly prohibited. The backup
copy shall not be installed nor used while the Software is being used.
You may not sell, lease, dissemble, reverse engineer, copy, translate, adapt or derive the
Software, or obtain the source code of the Software by any other means. You may not use
the Software for any purposes other than those permitted under this Agreement.
4. Business Users
If you need to install or use the Software on more than one (1) computer, please contact
PenPower or our local distributor to purchase a license for the additional use.
5. Liability
You agree to indemnify PenPower against all losses, costs, debts, settlement payments or
other expenses (including but not limited to attorneys fees) arising from your breach of
this Agreement, and you agree to compensate PenPower for all of the abovementioned
damages.
6. No Warranty
Effectiveness of a packaged software in handling information is closely related to its
software and hardware environment. The Software is published following careful
development and product testing by PenPower, but PenPower is not able to conduct tests
based on all possible combinations of software and hardware environment. Therefore,
PenPower is unable to promise nor warrant that there will be absolutely no risk of loss or
damage of information, or any other kind of loss, during installation and/or execution of
the Software. You must be fully aware of your risks in using the Software.
PenPower will provide you with the Software and support services in respect of the Software to the maximum extent permitted by law. However, PenPower does not warrant that
the Software and information included in the package of the Software contain no defects
or errors. PenPower is not liable for any indirect, special or incidental loss arising from
the Software, including but not limited to loss of profits, damage to business reputation,
cessation of work, hardware malfunction or damage, or any other commercial damage or
loss arising from commercial use of the Software.
7. Limitation of Liability and Damages
Except as expressly specified and expressly agreed to in writing by PenPower, PenPower
shall not be responsible for any damage incurred by you for any reason under this Agreement, The maximum amount of compensation payable by PenPower, in respect of any
damage incurred by you for any reason under this Agreement, is limited to the amount
you have already paid to PenPower in respect of the Software.
Under no circumstances will PenPower be held liable for the possibility of loss, notwithstanding PenPower may be aware of the possibility of such loss.
8. Prohibition Against Sublicense
You are prohibited to assign the license in respect of the Software granted to you under
this Agreement, or to grant a sublicense to another person.
9. Jurisdiction
With regards to any disputes arising from this Agreement, PenPower and you agree that
the court having jurisdiction over the business location of PenPower will be the court in
the first instance.
10. Miscellaneous
In the event that any provision of this Agreement is found to be invalid at law, such
invalidity will not affect the validity of any other provisions, or the legal enforceability of
such other provisions.
Chapter1 Getting Started
Chapter 1 Getting Started
1.1 Installation
1.1.1 System Requirements
Mac OSX 10.6 / 10.7 / 10.8 / 10
1.1.2 Software Installation
Step1: Insert the software CD.
Step2: Click Install WorldCard Mac, follow the instructions to install WorldCard Mac
software.
Step3: Connect the WorldCard Mac scanner to your Mac.
Note: If you don’t have CD-ROM drive, or you lost your CD-ROM disc, please go to PenPower’s
website (http://www.penpower.net) and choose your country/ region site to download the
software.
1.2 Launch WorldCard Mac
After installation, you may find
folder under Applications. Double click to open the
folder. Click
to run WorldCard Mac.
1-1
WorldCard Mac
1.3 Software Activation
You can find an activation code in the package. Please activate the software with this activation code to obtain a license. Enter the activation code and required information, and then
you can start to use WorldCard Mac.
1.4 Online help
WorldCard Mac provides excellent online help info:
1. Click [Help/User Manual] to find the user manual.
2. If you have some problem in using WorldCard Mac, you can refer to [Help/FAQ] to eliminate your problems or click [Help/About/customer mail box] to email problem descriptions
or your opinions to PenPower Customer Service. It will launch your email software and fill
in related environment information in the email to help us to fix your problems.
3. Click [Help/Register] to register for receiving the warranty service.
1-2
Chapter 2 Add Contacts
Chapter 2 Add Contacts
2.1 Using scanner
2.1.1 Scan the Card to Add Contacts
WorldCard Mac works with WorldCard scanner. About how to operate the scanner, please
refer to the following explanations.
Please plug the USB connector of the scanner into the USB port on the computer. Put the
card into the scanner with the text facing up, the light will continually blink during scanning.
When the light stops blinking, you can proceed to scan the back of the card. Or just click
[Skip Back] and continue to scan the next card.
Tip: Click [Preference]/ [Scan Option] to set the recognition language or other settings. For more
information, please refer to 7.1.4, [Scan Option].
2.1.2 Add Contacts via the Scan Wizard
You can scan the card via the Scan Wizard. WorldCard Mac will recognize the text on the
card to transform your cards into digital data.
Click
on the regular bar and select the front side recognition language of the card, if
you’d like to scan the back of the card, please check [Rear Side] and select the back side recognition language of the card. Start to scan the front side and then the back side of the card.
Click [Finish] and you will see the contacts you just scanned showing in the contact list.
2-1
WorldCard Mac
Tips:
1. Auto Scan: When you open the scan wizard you can begin to scan the card immediately, it
will automatically recognize the card after scanning. If [Auto Scan] is unchecked, you need to
trigger the scanner by clicking the [Scan] button.
2. Auto recognition after scanning: It will automatically recognize the card after scanning.
When [Auto recognition after scanning] is unchecked, you can review the image to see if it’s
clear or not. If it’s unclear, you can scan again and then click [Finish], the application will
recognize your card.
3. If you don’t like the card image, you can click
4. You can click
to delete it.
in the middle to exchange the front side and the back side of the card.
5. You can also execute [Run]/ [Scan] to open the scan wizard.
2.1.3 Calibration
Click [Run]/ [Calibrate Scanner] to calibrate the scanner to eliminate unclear image or
inaccurate color
2.2 Shift from WorldCard Mac v2.3 to WorldCard Mac v3
Through the WorldCard Data Exchange File (*.wcxf), you can move contacts from
WorldCard Mac v2.3 to WorldCard Mac v3 and manage contacts in WorldCard Mac v3.
Export Contacts as a wcxf file from WorldCard Mac v2.3
1. Execute [File]/ [Export] in WorldCard Mac v2.3, select [WorldCard Data Exchange
File (*.wcxf)] from the [Export Wizard] and click [Next].
2. Select which cards you’d like to export.
3. Click [Browse] to select where you’d like to save the .wcxf file and input the file
name, then click [OK] to export.
4. After exporting is completed, click [Finish] to close Export Wizard.
How to import the wcxf file into WorldCard Mac v3, please refer to 5.1, Import the
WorldCard Data Exchange File (*.wcxf).
2-2
Chapter 3 Edit Contacts
Chapter 3 Edit Contacts
If you’d like to fill in more information or modify the recognition result, you can choose a
contact on the main screen and right-click to open the edit window.
3.1 Editing Page
Click on the contact you’d like to edit in the main screen and go to the editing page. There
are three areas in the editing page: [Contact list], [Information] and [Card Image]. Click
after modification to exist the editing page, it will automatically save what you edited. If
you’d like to undo what you edited, please click
or click [Edit]/[Undo]. Click [Contact]/
[Add a Contact - Manually] to add a contact by yourself in the group.
To add a contact who is in the same company, please click
or [Contact]/[Add a Contact
- from the same company], the application will add a new contact with the company name,
address, phone number automatically filled in.
Contact List
Contacts Information
Card Image
3-1
WorldCard Mac
3.1.1 Contact List
The contact list shows you contacts in the same group to let you quickly switch between
contacts. When you click another contact, it will automatically save the modified contact. If
you’d like to modify again, please click
before switch to another contact.
3.1.2 Edit the Contact
In the contact information area, you can modify any columns you want. If you’d like to
modify another contact, just directly click the contact in the contact list. There are some
more functions, please see below:
Add a Photo: Click the photo icon next to the name column. To change or delete the photo,
click the photo again.
Arrange the column order: If there are more than one name or company information, click
to arrange the order.
Change how the address displays: Click the drop-down menu of the address column to
choose different format for address display.
Using the contact information: If there’s an icon showing next to the column, you can
click the icon to call or send the email to the contact. You can also link to the contact’s
website.
Favorites: In the card image area, you can click
to add the contact into the [Favorites]
group. Click
again to remove the contact from the [Favorites] group.
3-2
Chapter 3 Edit Contacts
3.1.3 Edit the Card Image
If the contact has a card image, you can see it in the right down corner of the edit page. You
can execute functions below:
Click
and
to view the front and back side of the card.
Click
to expand the card image, click
to zoom in and click
to zoom out the card
image.
Click
to rotate the card image to 90 degrees.
Click
to save the card image. If there’s no card image, click
to add one.
Click
to exchange front and back side of the card.
For more functions, please refer the explanations below:
Recognizing Partial Content of a Card Entry
In some cases, the information of a business card may not be completely recognized. You
may use the Partially Select and Recognize command of the Edit window. To select partially
select and recognize, click this icon
. After clicking the partially select and recognize,
you can use the mouse to select the specific area that contains the correct data. After selecting the area, select the appropriate field for the information which has been highlighted.
Reframing Command
The reframing manually command
allows you to select a specific area of a business
card to save. After the appropriate area is selected, a box will be drawn around the selected
data. If the data selected to be modified is correct, click [Yes] in the dialog box. The data
outside of the selection box will be cut off.
3-3
WorldCard Mac
Recognizing Again
Select the appropriate language(s) for the front and/or back side of the card. Then, select the
recognition language. You may then proceed with the recognize again command by clicking
or [Edit]/[Recognize]. If the card is double-sided, check [Both Sides] to recognize each
side and click [OK]. Note that the card information will be cleared when you recognize the
card again.
3-4
Chapter 3 Edit Contacts
3.2 Deleting/Restoring Contacts
Right click on a contact and then select [Delete] from the pop-up menu if you want to delete
the selected contact. The contact will be moved to
in the left down corner of the
screen. The deleted contacts will also be moved to
during the sync process.
Click
button to view the contacts which have been deleted. You can delete the
contacts permanently by right-clicking on the contacts and select [Delete] or restore the
contacts by select [Undo].
3-5
Chapter 4 Manage Contacts
Chapter 4 Manage Contacts
4.1 Add New Contacts
4.1.1 Add a Contact Manually
Click [Management/Contact/Add a Contact - Manually] from the menu on the main screen.
This will open the Editing window. Then, type your new contacts information into the fields.
About how to edit the contacts, please refer to 3.1, Editing Page.
4.1.2 Add a Contact from the Same Company
Select a contact in the list and execute [Management/Contact/Add a Contact-from the same
company], then it will open a new contact in the editing window. The application will automatically fill in the same company name, address, phone number, fax number and website
link with the contact you selected. You need to fill in the contact’s name, position, department, etc.
4.2 Group Management
You can manage contacts by categorizing them in different groups; you can also do the
advanced search, print the contact information or export/import contacts.
4.2.1 Default Group
There are default groups such as [All contacts], [Unverified], [Favorites], [Unfiled], [Google
Default Groups]. These default groups can’t be deleted or renamed, please see the following
explanations:
Unverified: It means the contact has not been edited.
Favorites: In the card image area, you can click
to add the contact into the [Favorites]
group. Click
again to remove the contact from the [Favorites] group.
Unfiled: A contact without the group information, it will be categorized in the [Unfiled]
group. It happens during the sync processing or other conditions.
Google Default Groups: After synchronizing with Google, it will remain the Google default groups such as My Contacts, Family, Friends, and Coworkers, etc.
4-1
WorldCard Mac
4.2.2 Add a New Group
1. Click [Management]/ [Group]/[New Group].
2. Type the group name in the group management area on the left.
Note:
1. The new group name can’t be the same as the existed groups.
2. Click
at the lower left corner can add a new group, too.
4.2.3 Delete Groups
Select the group you want to delete, and click [Management]/ [Group]/ [Delete group].
Note:
1. After you delete a group, if a contact in the deleted group also belongs to another group, then you
can find the contact in the other group. If a contact in the deleted group doesn’t belong to any
other group, then the contact will be move to the [Unfiled] group.
2. Click
at the lower left corner can delete the group, too.
4.2.4 Change the Group Name
Click [Management]/ [Group]/ [Rename group], and enter the new name for this group.
Note: The renamed group name can’t be the same as the existed groups.
4.2.5 Setting Groups for the Contact
To set groups for the contact, please select a contact, and execute [Management]/[Contact]/
[Setting Group] or right-click and select [Setting Group], check the groups you’d like to set
for the contact on the Group Management dialogue window, then click [OK].
4-2
Chapter 4 Manage Contacts
4.3 Search Contacts
Type the keyword in the search field
and press enter to quickly search
contacts. Click to clean the word in the search field. Click [Run]/[Clear Search Resault] or
to back to the mail page.
4-3
Chapter 5 Import, export, sync
Chapter 5 Import, export, sync
5.1 Import
WorldCard Mac supports many import sources, such as System Contacts, WorldCard Data
Exchange File (*.wcxf), card image file, DBank Space and vCard File (*.vcf). You can
import these files and manage contacts in WorldCard Mac.
Execute [Management]/[Import] or
import sources:
on the regular bar and select one of the following
System Contacts: Select [System Contacts] and click [Next], then agree WorldCard
Mac to get your information, after that, you can see your contacts imported in the
WorldCard Mac.
WorldCard Data Exchange File(*.wcxf)/ WorldCard v6(*.wcf):WorldCard Data Exchange File helps you to manage contacts in different platforms of our products. It’s the best
choice for the product that doesn’t support Gmail sync function. The operation of Gmail
sync function, please refer to 5.3.
Select WorldCard Data Exchange File/ WorldCard v6 and choose the import file. After import, you can find the imported contacts in the groups, [All Contacts] or [Unfiled].
Tips:
1. Check [Keep Original Goup], imported contacts will remain its group information and import
these groups into WorldCard Mac.
2. You can add contacts via the sync function, please refer to chapter 5.3.
Image Files (*.jpeg): Select [Image Files] and click [Next]. Choose the import file and the
recognition language. After import, you can find the imported contacts in the groups, [All
Contacts] or [Unfiled].
Tip: You can add contacts via the sync function, please refer to chapter 5.3.
DBank Space: Select DBank Space and click [Next]. Log in to the account and choose the
wcxf file you want to import. Then, click [OK] to start the import process. You can find the
imported contacts in the groups, [All Contacts] or [Unfiled].
5-1
WorldCard Mac
vCard File (*.vcf): Select vCard File and click [Next]. Select the file you want to import
and click [OK] to start the import process. You can find the imported contacts in the
groups, [All Contacts] or [Unfiled].
Note: The format that WorldCard supports are vCard v2.1/3.0.
5.2 Export
Export contacts of WorldCard Mac in different scopes and different file formats. Select
[WorldCard] data range, all of contacts in WorldCard Mac will be exported. Select [All
cards in the preview area] data range, contacts in the view you saw will be exported. Select
[Selected Record] data range, contacts you selected will be exported.
Execute [Management]/[Export], or
ways:
on the regular bar and select one of the following
System Contacts: Choose [System Contacts] and [Data range], then you can see the exported contacts in the System Contact.
WorldCard Data Exchange File(*.wcxf): Select [WorldCard Data Exchange File] and the
data range, and specify the export file folder and you can see the files in the folder.
DBank Space: Select [DBank Space] and click [Next]. Choose the data range and log in
to the account and click [OK] to export the wcxf file. You can find the exported contacts in
your DBank Space.
Image File(.jpg): Select [Image File] and the data range, and specify the export file folder
and you can see the images in the folder.
CSV File(.csv): Select [CSV File] and the data range, and specify the export file folder and
encoding format. You can see the files in the folder.
vCard File (*.vcf): Select [vCard File] and the data range and select. Specify the export
database path. You can see the contacts you exported in the database path.
Note: vCard v3.0 provides two encode format to support the export process: Google Contacts and
Mac Contacts vCard(Unicode) and MS Outlook vCard(ANSI).
5-2
Chapter 5 Import, export, sync
Tip: You can choose any contacts in the list and right-click select [Export] or click
regular bar, then choose the export options.
on the
5.3 Sync
WorldCard Mac supports much software to sync contacts, such as System Contacts and
Gmail contacts to help you manage your contacts.
Notes: Before sync, set the required information first, like account, password, directory, filter
duplicated contacts or some related settings. Please refer to 7.1.3, Sync, Import, Export.
Execute [Management]/[Sync] or click
lowing sync options:
on the regular bar and choose one of the fol-
System Contacts
1. Select [System Contacts].
2. You can see the results after syncing, and WorldCard Mac will tell you how many
contacts will be added, modified or deleted. If the changes are correct, click [synchronize] to start.
Gmail Contacts
1. Select [Gmail Contacts]
2. Enter the account and password of Gmail to access the contacts data.
3. Click [log in], and WorldCard Mac need s to be authorized to use some functions,
click [OK] to start.
4. You can see the results after synchronizing, and WorldCard Mac will tell you how
many contacts will be added, modified or deleted. If you’d like to sync again, please
click [Sync], you can also click [Cancel] to close the dialogue window.
Tip: If you don’t have a Google account, please click
page of Google.
, it will link to the register
5-3
Chapter 6 Use Contact Information
Chapter 6 Managing Contacts
6.1 Send Email
To send email to the contacts, right-click and select [Send email] or click the Email button
and select [To], [CC], [BOC], or [Attachment]. WordCard Mac will add the email addresses of the selected contacts into your default email software.
6.2 Skype
You need to install Skype software before using Skype function in WorldCard. When
you enter the contact's information area, click Phone Contact icon
beside the phone
number, you can call the contact via their mobiles or landlines, you can also send your
message by clicking button
. To use the Skype out function, you need to get the Skype
credits. When make a call to overseas, if the phone number lacks of country code, you need
to convert the information by yourself. Just select the country in the drop-down menu of
the Skype window.
6.3 Open Website and Display Map of Address
If there is any URL in the contact information, you can right-click on the contact and select
[Open Website], or click
button to open this website. Right-click on a contact and select
[Display Map of Address] or click
button to view the address information for the selected contact on the Google Map.
6.4 Route Planning
WorldCard’s [Route Planning] function allows you to query the route planning of
several contacts’ address via Google Map and two contacts’ address via Baidu Map.
6-1
WorldCard Mac
1. Select several contacts and right-click, then select [Route Planning]
2. Select the specific contacts' address or click [Select All] and then click [Next]. You can
also edit [My address] and add it into your route planning.
Tip: WorldCard will automatically save the address you typed in [My Address]. Next time, you only
need to open the drop-down menu and select the address.
3. You will see the route planning window, please make sure of the area, starting location
and destination before clicking [OK]. You can use [Move Up] and [Move Down] button
on the top right screen to change the order of the address.
Tip: You can click [Previous] to reselect the address in your route planning.
4. WorldCard will open the default browser and show you the route planning result of
Google Map or Baidu Map.
6.5 Searches on Social Networks
Select a contact and click [Run]/ [Social Networking] to search for the selected contact on
[Facebook], [Twitter], [LinkedIn] or [Weibo]. It will provide all of names and email addresses as the keyword options.
6-2
Chapter 7 Advanced Functions
Chapter 7 Advanced Functions
7.1 Settings
WorldCard Mac has many selectable Setting options to allow you to configure the operational functions of Name display, Field Display, Synchronization, Export, Import, Recognize, and User Defined Fields. Select [Settings] in the drop-down menu, or click
on the
regular toolbar.
7.1.1 General
Name display: Set name display sequence for Asian characters (Chinese, Japanese and
Korean) and Non-Asian characters.
Display map of Address: Set the electronic map you want to use for viewing contacts'
address. The option includes Auto, Baidu Map and Google Map.
1. Auto: WorldCard determines which electronic map will be used according to the country
code of the address. The address in China will be displayed via Baidu Map and other
countries' address will be displayed via Google Map.
2. Baidu Map: All the address will be viewed with Baidu Map.
3. Google Map: All the address will be viewed with Google Map.
7.1.2 Field Display
Set the display column, its width and alignment in the list view. Check or uncheck the display column in the drop-down menu of Available Field. Click [Move Up] and [Move Down]
to arrange the order of columns in Displayed Field.
7.1.3 Sync, Export, Import
Refer to the following explanations to set sync, export and import related functions of
Google Contacts, System Contacts, wcxf. Click [Apply] to save the modified settings. Click
[OK] to save and close the setting window.
7-1
WorldCard Mac
Gmail Contacts
Set ID: Click [Set up account] to enter your Google account and password. If you want to
use another Google account to synchronize with WorldCard Mac, reset your new account
and password.
Sync Record: Once you synchronize, a relationship is established, the data on both sides
will be the same every time you synchronize. For example, if you clear all the contacts in
one side, next time synchronization will remove all the contacts in another side as well.
Therefore, if you want to synchronize the contacts on both side but don't want to delete
contacts, you can click [Delete Sync Record]. When you reset sync relationship, next time
your synchronization will be a new initial synchronization to merge the data in WorldCard
Mac and Gmail Contacts. Please note that it may result in duplicate.
System Contacts
Sync Record: Once you synchronize, a relationship is established, the data on both sides
will be the same every time you synchronize. For example, if you clear all the contacts in
one side, next time synchronization will remove all the contacts in another side as well.
Therefore, if you want to synchronize the contacts on both side but don't want to delete
contacts, you can click [Delete Sync Record]. When you reset sync relationship, next time
your synchronization will be a new initial synchronization to merge the data in WorldCard
Mac and Gmail Contacts. Please note that it may result in duplicate.
Import: If you want to keep the original group of System Contact, please check [Keep
original group].
WorldCard Data Exchange File (.wcxf)
Filter Duplicated Contacts: Check [Filter Duplicated Contacts], when you import the
duplicated contacts, the application will automatically keep the latest contacts and filter the
same or older contacts.
CSV File
Export: Check the columns you’d like to display from Available Fields. Click the item in
Displayed Field, you can click [Move Up] and [Move Down] to arrange the display order.
Click [Remove] to remove the displayed column. Click [Default] to restore to the original
settings.
7-2
Chapter 7 Advanced Functions
DBank Space
Set ID: Click [Set up account] to enter your DBank account and password. WorldCard Mac
will allow you to import or export the wcxf files with DBank account.
7.1.4 Scan
You can set the scanning style as single or double side, the recognition language and the
output character of Chinese.
7.2 Database
Create a database for your contacts on different management purpose.
7.2.1 Create a New Database
1. Execute [Database]/ [Create a New Database].
2. Enter the stored path of the database, its name and password.
3. Click [OK] to create the database.
Tips:
1. Set a password for it to protect the database from others to access it. Please click [Password for
accessing this database] and enter your password.
2. You can find the database file via the saved path and name you gave.
7-3
WorldCard Mac
7.2.2 Open Existing Database
1. Execute [Database]/ [Open existing database].
2. Find your database file (*.wrp format) and click [Open].
3. If it needs a password to access it, please enter the password to open the database.
Tip: There are databases you accessed before list in the drop-down menu of database.
7.2.3 Save Database as a New File
For more convenient to manage contacts, you can save the database as a new file in a
different folder to distinguish from the original one.
1. Execute [Database]/ [Save database as].
2. Select a folder.
3. Click [Save].
7.2.4 Rename Database
1. Open the database you’d like to rename and click [Database]/ [Rename database].
2. Enter a new database name.
3. Click [OK] to change the database name.
7.2.5 Set Password or Change Password
1. Open the database you’d like to change its password setting, click [Database]/ [Set
password/Change password].
2. Select [Cancel password] or [Open password] to change the password setting.
3. Click [OK] to change the password setting.
7.2.6 Create a Restore Point
To prevent the loss when the application encounters an error during the operation, we
suggest you to manually set the restore point to backup the database. If the application
encounters an error, you can restore the database from the backup database file.
1. Execute [Database]/ [Create a restore point].
2. Enter a restore point name.
3. Click [Backup] and then you can find the backup file in the [Backup File] folder.
7-4
Chapter 7 Advanced Functions
7.2.7 Restore Database
1. Execute [Database]/ [Restore].
2. Select the restore point. You can also click [Browse Files] to check the backup file.
3. Click [Restore].
Note: If you’re currently working with a database or editing the contact information, it will clear
the current opened database and be overwritten by the backup file after you click [Restore]. If
you’d like to keep the current contacts of the database, please save the database to another file
first.
7-5
Appendix User Interface Introduction
Appendix User Interface Introduction
WorldCard Mac allows you to categorize contacts, send email by contact, add new contacts
to a group, delete contacts, merge and separate contacts, search contacts by various data
fields, import/ export/ synchronize contact information, and etc. Moreover, you can synchronize the data in WorldCard Mac with System Contacts, Gmail Contacts.
1. User Interface Overview
1
Groups Pane
The groups can be freely created, deleted, renamed, view
contacts in a specific group, and so on.
2
Menu
Find the functions you’d like to execute in the menu
3
Regular Toolbar
Provides you an easy way to find the functions, such as Sync,
Send Email, Open website, find address on maps, Import/Export, Options, and View mode.
4
Business Card Image Show the business card image if there is any.
5
Contact Information
6
Index
View contact information or click any contact to edit. Refer to
3.1.
Click
button to set the index as 注(Chinese ZhuYin), 拼
(Chinese Hanpin), 12..(Chinese Stroke), EN(English Alphabet), 日(Japanese Phonetic), or 한(Korean Phonetic).
a-1
WorldCard Mac
7
Recycle Bin
Collect deleted data and you can return them from here. Refer
to 3.2.
2. Regular Toolbar
1
2
3
4
5
6
7
1
Scan Wizard
Scan the cards, refer to 2.1.2.
2
Sync/Import/Export Exchange contacts with much software, refer to chapter 5.
3
Send Email
Send Emails to contacts, WorldCard Mac will open the default
Email software and fill in the address or attach the contact
information as a file for you, refer to 6.1.
4
Website of contact
Refer to 6.2.
5
Map of contact
Open Google Map or Baidu Map to see the contact’s location,
refer to 6.2.
6
Settings
Scanner or account settings refer to 7.1.
7
Search contacts
Type keywords in the search field to find the contact, refer to
4.3.
3. Contact Information
The contact information displays in different columns; click the contact to edit the contact
information. If the contact has a card image, it shows the contact list below. Before the
Name field, there’s an icon to show you if the contact has one-sided
or double-sided card
. You can change the field display in the [Settings]/ [Field Display].
a-2
Appendix User Interface Introduction
4. Alphabet Index
There are different types of indexes can be used to manage your contacts. Click
button to set the index as 注(Chinese ZhuYin), 拼(Chinese Hanpin), 12..(Chinese Stroke),
EN(English Alphabet), 日(Japanese Phonetic), or 한(Korean Phonetic).
You can set the index sorted by Name
or Company
. When Name
is selected, the
contacts will be sorted by display name. When Company
is selected, the contacts will
be sorted by company name. If the display name or company name of the contact cannot be
sorted by the index, the contact will be put in the group.
5. Menu
There are five main menus, appearing at the top of the screen: [WorldCard Mac], [Database],
[Management], [Run], and [Help].
Database
Set Password/ Change Set a password to protect your contacts from anyone accessing it.
Password
Every time you open the database, you need to enter the password
you set.
Rename Database
Change the database name.
Create a Restore Point
Create a restore point for saving the loss when the application
encounters an error.
Restore
Restore the database from a backup file.
Create a New Database Create a new database for contacts on different management
purpose.
a-3
WorldCard Mac
Open existing database Open an existing database.
Save Database As
Save the database to another one on different management
purpose.
Default
Show you the latest three databases you accessed to let you
quickly switch to another database.
Close
Close WorldCard Mac.
Management
Contact
Add contacts via [Manually], [from the same company], [eSignature]
or marked contacts as edited. You can also delete contacts or merge two
contacts with single-sided card images into one entry, including merging
contact information and images. Separate a contact with a double-sided
card into two separate entries. Click [Setting group] to set the group for the
contact.
Group
Add groups, delete groups and rename groups.
Synchronize
WorldCard Mac can synchronize with System Contacts, Gmail
Contacts. Select the contacts in WorldCard Mac to synchronize with the
correspondent software.
Import
Import [System Contacts], [WorldCard Data Exchange File], [Image
Files], [DBank] or [vCard Files] contact data into WorldCard Mac to
manage contacts.
Export
Export [System Contacts], [WorldCard Data Exchange File], [Image
Files], [CSV Files], [DBank] or [vCard Files] from WorldCard Mac
contacts.
a-4
Appendix User Interface Introduction
Run
Scan
Execute scan wizard to scan the card image into WorldCard Mac.
Calibrate scanner
Calibrate the scanner to eliminate unclear image or inaccurate color.
Send email
Send email, carbon copy, blind carbon copy to the selected contact,
or attach the contact information as a file in Email.
Open Website
Open the website on contact information.
Display map of
Address
Display location of the contact via Google Map or Baidu Map.
Route Planning
Planning the route via Google Map or Google Map.
Social Network
Search contacts on the social networking: FaceBook, LinkedIn,
Twitter or Weibo.
Clear Search
Result
Clear the search result in the view.
Help
Search
Find the tips in the WorldCard Mac.
User Manual
Refer to the user manual.
Register
To register for receiving the warranty service.
PenPower website Find more product information on PenPower website.
FAQ
Refer to the FAQ or connect to Penpower website.
Send feedback
Send feedbacks to customer service by Email.
a-5
PenPower WorldCard Mac
User Manual
Manufacturer: PenPower Technology Ltd.
Version: v3.2
Release: March, 2014