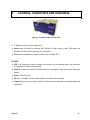
1
User Manual CONVISION V400/ V600 Plus Series Issue: December 2008 Manual Convision Systems GmbH -1- Version 3.0 December 2008 © Convision Systems GmbH All rights reserved No part of this manual may be reproduced or transmitted in any form without the prior written permission of Convision Systems GmbH. All the information and descriptions have been compiled with great care on the basis of thorough research. Despite our great care, we cannot completely rule out errors or altered applications that may lead to changed operational sequences or different results. Convision Systems GmbH can accept neither legal responsibility nor any other liability for any consequences arising from this or from unintentional errors. Convision und Fehler! Verweisquelle konnte nicht gefunden werden. are trademarks of Convision Systems GmbH. Microsoft and MS-Internet Explorer are trademarks or registered trademarks of Microsoft Corporation. Netscape and Netscape Navigator are registered trademarks of Netscape Communications Corporation. Any other trade names and product names are the trademarks or registered trademarks of the respective owners. Convision Systems GmbH cannot accept liability for increased call charges, including costs arising from accidental connection setup. Convision Systems GmbH has created this manual to the best of its ability but cannot guarantee that the programs / systems will serve the purpose aspired by the user. Convision Systems GmbH reserves the right to modify the content of the User Manual without accepting the obligation of informing third parties. We reserve the right to make technical modifications. -2- Convision V400/V600 Plus General Congratulations on purchasing a unit of the Convision V400/600Plus IP-Video server. This manual intends to convey the knowledge required to connect and handle your Convision IP-Video server. General information on configuring the required software on your computer you will find in the “Convision System Configuration“ document. You do not need any special software to operate the Convision IP-Video server since all the components are generally included in the standard software package supplied with the computer. Please read this manual before connecting your Convision IP-Video server. You can download the latest update of the Convision V400/600 Plus manual and the Convision V400/600 Plus firmware free of charge from the Convision Website (www.convision.com ). Operate the Convision V400/600 Plus exclusively with 12 V DC. Step by Step Procedures Meeting the System Requirements – refer to Chapter 2 Connecting the Components – refer to Chapter Configuring the System – refer to document “Convision System Configuration“ Setting up Your Browser – refer to document “Convision System Configuration“ Configuring Your Convision IP-Video server – refer to Chapter 5 Manual -3- Content 1 General references ............................................................................................. 6 1.1 1.2 Scope of delivery .................................................................................................. 6 Safety Instructions ................................................................................................ 6 2 System Requirements ........................................................................................ 8 2.1 2.2 Requirements for Operation in a Local Area Network (LAN)................................ 8 Software Requirements ........................................................................................ 8 3 Controls, Connectors and Indicators................................................................ 9 4 Connecting the 4.1 4.2 4.3 4.4 Connecting the Unit to the Power Supply ........................................................... 11 Connecting the Unit to the LAN .......................................................................... 11 Connecting the Cameras .................................................................................... 11 Input and Output Connections ............................................................................ 13 5 IP-Setup - Initial Configuration of the Convision IP-Videoserver................. 14 5.1 5.2 LAN without DHCP or Direct Connection............................................................ 14 Factory-Reset - Deleting the configuration ......................................................... 15 6 The HTML Pages - Operation and Configuration........................................... 16 7 Cameras - Monitoring ....................................................................................... 18 7.1.1 7.2 7.2.1 7.2.2 Controllable Camera ........................................................................................... 19 Recording and Playback ..................................................................................... 22 Recording............................................................................................................ 22 Playback / Save of Recording............................................................................. 25 8 Configuration..................................................................................................... 28 8.1 8.1.1 8.1.2 8.1.3 8.1.4 8.1.5 8.2 Cameras.............................................................................................................. 28 Selection ............................................................................................................. 28 Rename Cameras............................................................................................... 29 Video-Settings..................................................................................................... 29 Camera settings.................................................................................................. 29 Quality ................................................................................................................. 29 Events – alarm release ....................................................................................... 30 -4- Convision IP-Video server .................................. 10 Convision V400/V600 Plus 8.2.1 8.2.2 8.2.3 8.2.4 8.2.5 8.3 8.3.1 8.3.2 8.3.3 8.3.4 8.3.5 8.3.6 8.3.7 8.3.8 8.4 8.5 9.5.2 8.6 8.7 8.8 8.9 8.10 8.11 8.12 8.13 8.14 Motion Detection..................................................................................................31 Video Loss...........................................................................................................32 Timer – zeitabhängige Aktionen..........................................................................34 Device - Keys ......................................................................................................36 I / O – Input..........................................................................................................36 Action...................................................................................................................37 Speed up recording on event ..............................................................................38 Protect hard disk event........................................................................................38 Notification by E-Mail...........................................................................................39 Transferring Data via FTP- Upload .....................................................................40 I/O-Output (Duration)...........................................................................................41 Http-Alert .............................................................................................................41 Video – Out..........................................................................................................44 Time-Client-Update .............................................................................................44 Authorization - User administration .....................................................................45 Language.............................................................................................................46 Upload file...........................................................................................................47 HD-Manager ........................................................................................................47 Advanced.............................................................................................................48 Configuration – Load and Save...........................................................................50 Network - Settings ...............................................................................................51 Firmware Update.................................................................................................54 Setting Time and Date.........................................................................................55 Dome / PTZ Cameras..........................................................................................55 Event log..............................................................................................................56 System log – Recording of the event log on the hard disk..................................58 9 General Descriptions ........................................................................................59 9.1.1 9.1.2 9.1.3 FTP......................................................................................................................59 SMTP- or Mail-Server..........................................................................................59 TCP/IP and IP Address .......................................................................................59 10 Technical Data ...................................................................................................61 Appendix A Declaration of Conformity....................................................................63 Appendix B Abbildungsverzeichnis.........................................................................65 Appendix C Index.......................................................................................................66 Manual -5- 1 General references 1.1 Scope of delivery Examine after unpacking whether all parts are present. V400/V600 Plus Power pack DC 12 V / 1,5 A Power cable CD-ROM with Convision IPSetup-Tool and manual The device type and the serial number are on an adhesive label underneath the Convision IP-Video server. This information is also included on the HTML pages in the "Info" menu. In the "Info" menu, you can also check the current software version of your Convision IP-Video server. 1.2 Safety Instructions 1. Never place the Convision IP-Video server near a heating source e.g. furnace or heaters or expose it to direct sunlight. Do not cover the Convision IP-Video server. 2. Only clean your Convision IP-Video server using a moist cloth without abrasive cleaning agents. 3. Never open the Convision IP-Video server yourself. In the event of a malfunction or defect, please contact the Convision Systems GmbH support service or your dealer. Opening the unit invalidates the warranty Product Description -6- Convision V400/V600 Plus The Convision V600+ IP video servers, successor to the popular V600 series offer long-time recording with remote broadcasting, configuration and maintenance for 4-6 channels. Devices without an internal hard disk can easily be upgraded via the external Firewire (IE1394) connector. You can add up to 16 hard disks. 8000Gbyte hard disk space should be enough even for advanced CCTV demands. The whole product range works with lossless intelligent motion detection for every video channel. The sophisticated event-action handling is known as an exemplary standard for IP video servers. You can combine various events with actions like recording, email, SMS and I/O-connectors. Together with the extensive Dome/PTZ control and the video management software ConvisionSafe the system is a real multifunctional CCTV device. The stand alone IP video servers do not require any software installation. All operations will be done via a standard Internet Browser. Manual -7- 2 System Requirements 2.1 Requirements for Operation in a Local Area Network (LAN) For configuring and operating the Convision V400/600 Plus in a local area network (LAN), you need a computer with an Ethernet interface. The Convision V400/600 Plus is designed for a 10/100 Mbit/s auto sensing twisted-pair (TP) connection. 2.2 Software Requirements To be able to configure the Convision IP-Video server in a local area network you need the Internet Explorer 6 or higher and the program „IPSetup“. You will find this program on the attached Convision CD-ROM or just download it from the Convision Website under www.convision.com. You do not need any special software to operate the Convision IP-Video server since all the components are generally included in the standard software package supplied with the computer. -8- Convision V400/V600 Plus 3 Controls, Connectors and Indicators Figureg 1: Frontview of the Convision V600 F: Release an action, refer to chapter 9.2.4. Reset: when this button is activated, the Convision IP-Video server is reset. This means the Convision IP-Video server is rebooted and re-initialized. M: deletes the configuration, release an action, refer to chapter 9.2.4. Die LEDs: LED 1 – 6: these light up when a camera is connected to the corresponding port; they flash when the respective camera is being accessed. Online: is lit when the Convision IP-Video server is not configured, lights up when the systems is loaded. Active: no function now HD: (HD = hard disk) is lit when data is written to or read from the hard disk. Power: lights up as soon as the Convision IP-Video server is connected to the power supply and switched on. Manual -9- Rear View On the rear view of the Convision V600 Plus there are external connections. Figure 2: Rear View of the Convision V600 Video Out: BNC connectors (female) for a monitor CAM 1 ... CAM 6: BNC connectors (female) for 6 FBAS cameras Reset: when this button is activated, the Convision IP-Video server is reset. This means the Convision IP-Video server is rebooted and re-initialized. IEEE1394: 2 Connectors for external hard drives COM 1 RS232: Serial interface: It is used to control external devices such as a controllable camera, etc. Ethernet : 10/100 BaseT connection for operating the Convision IP-Video server in a LAN. I/O connector : Terminal strip for various inputs and outputs (refer to chapter 4.4) RS485: Serial Interface: It is used to control external devices. Power 12V-DC: connector for the power pack supplied with the unit. On/Off: used to switch the device on and off. 4 Connecting the Video server Convision IP- You configure and use a Convision IP-Video server in a LAN-network. For transmitting via ISDN, there is an ISDN-Router needed. - 10 - Convision V400/V600 Plus 4.1 Connecting the Unit to the Power Supply Plug the 12-V connector (DC = direct current) of the power pack cable into the power socket of your Convision IP-Video server Connect the power pack to the power supply socket using the power cable. Activate the on/off switch on the rear of the unit. The power LED will light up. 4.2 Connecting the Unit to the LAN In a LAN, you have to establish a connection between the Convision IP-Video server and your computer via a hub or switch using a twisted-pair cable with an RJ-45 connector. Figure 3: LAN Connection Connect one end of the TP cable to the Ethernet output on the rear of the Convision IP-Video server. Connect the other end of the TP cable to one of the inputs on the hub. For information on setting the IP addresses, please refer to Chapter 5. For detailed information on IP addresses, please refer to Chapter 9.1.3. Note: For the initial configuration, there is an additional direct connection option via a cross-connect cable. 4.3 Connecting the Cameras Connect the BNC connector to a camera input on the rear of the Convision IP-Video server. The camera is supplied with power via the power pack delivered together with the camera. For further information, please refer to the manual of the camera. Manual - 11 - Connecting a controllable camera Connect the video cable via the adapter supplied to the first camera input of the Convision IP-Video server. Connect the control cable (9pin Sub-D to 8pin mini DIN) to one of the serial inputs (COM 1 – RS232 or COM 2 – RS485) of the Convision IP-Video server. The camera is supplied with power via the power pack delivered together with the camera. For further information, please refer to the manual of the camera. Define the serial input used on the Configuration/Dome/PTZ-Cameras page (refer to chapter 7.11). If you want to connect several controllable cameras to a Convision IP-Video server, all the cameras following the first one are controlled via series cable connections of the individual cameras (8pin mini DIN connectors). Note: In some controllable cameras you have to set an internal control address. For this purpose, please use the addresses starting with "1". Note: the video lines are scheduled with 75 . Note: You cannot operate 2 different types of controllable cameras simultaneously via the Convision IP-Video server. - 12 - Convision V400/V600 Plus 4.4 Input and Output Connections Output Connections You can us the output Connections as „normally open“ (NO) or „normally closed“ (NC). Input Connections Alarm devices for various purposes can be connected to the six inputs. The Input Connections are normally open, they react to closing the contact. An indicator lamp, for example, or any other 12 V signal device (e.g. siren), can be connected directly to the outputs. Caution! Outputs: 1A/30V DC 0,3A/110V DC 0 5A/125V AC Figure 4: Wiring of the Inputs and Outputs . Manual - 13 - 5 IP-Setup - Initial Configuration of the Convision IP-Videoserver The set up of your Convision IP-Video server will be done remotely via network with the browser„Microsoft Internet Explorer 6“ (or higher) of your computer. For information on the local configuration of your computer and for information on setting up the browser, refer to document “Convision System Configuration“ (on the supplied Convision CD). For this purpose, the computer must be in the same network segment (defined by the network mask) as Convision IP-Video server. Both need an IP-address. (For more information about IP addresses and network masks refer to Chapter 9.1.3). In a LAN both can get a dynamic IP-address from a DHCPServer. LAN with DHCP When delivered in the Convision IP-Video server DHCP is active. To integrate your device in your LAN, the DHCP-Server is automatically searching for a free IP-address. The DHCP-Server configures a free IP-address and you can reach your Convision IP-Video serverfor the first connection with the DefaultHostname in your LAN http://Convision_V600Plus Start your browser and enter http://Convision_V600Plus as the URL. Your browser will display the homepage of the Convision V600Plus Under Configuration/Network you can change the name individually. 5.1 LAN without DHCP or Direct Connection If there is no DHCP-Server in your LAN or you like to configure your device via direct connection using a Cross-Connect-Cable, you have to make sure that your computer has a fix IP-address for the configuration. When delivered the Convision IP-Video server has no IP-address. With the initial configuration you have to enter the IP-address. Therefore you have to copy the configuration software "IP Setup" from the CD into a directory on your computer. Or you can download IP-Setup from the Convision Website under www.convision.com . You have to do the initial configuration every time, when you delete the configuration of the device (Factory-Reset). - 14 - Convision V400/V600 Plus Follow the initial installation procedure below to set up the Convision IP-Video server in the LAN: Install and configure your LAN network (refer to document “Convision System Configuration“). Integrate your Convision IP-Video server into your LAN network as described in chapter 0 or connect the device via a Cross-Connect-Cable with your computer. Copy the configuration software "IP Setup" from the CD into a directory on your computer. Open the Convision IPSetup program (IPSetup.exe). For this purpose, the computer must be in the same network segment (defined by the network mask) as the Convision IP-Video server. After a few moments (max. 1 min) the program will display the Convision IP-Video server. Double-click the entry and then enter the IP address and the network mask. Figure 5: Initial configuration with Convision IPSetup 5.2 Factory-Reset - Deleting the configuration If it should be necessary to set your device back to factory settings you have two following possibilities. Software Factory Reset: Please select in the main menu configuration the menu item Expert/Factory Reset. With the Software Factory Reset only the configuration of the server will be reset to factory settings. The network settings will be saved. Hardware Factory Reset: For a Hardware Factory Reset please follow these instructions: Press the Reset button on the front of the Convision IP-Video server and hold it pressed. Now switch the power button of the device on the back of and on again. After the LEDs 1,2 and 3 have lit up one after the other, you can release the button “M”. Now the device will finish booting up again. With Hardware Factory Reset the configuration of the server will be reset to factory settings and also all Manual - 15 - Network settings will be deleted, too. The initial configuration procedure then needs to be repeated. 6 The HTML Pages - Operation and Configuration After the first successful connection, enter the IP address of your Convision IP-Video server in the address line of your browser. (Microsoft Internet Explorer 6 or higher). The Homepage The homepage of the Convision V600 will be displayed. The Headline - 16 - Convision V400/V600 Plus From this page, you can access all the viewing and configuration pages. Selecting the Language The language selected upon delivery is either the default language set in the browser or English. Click on the flags to change the language. Under Configuration / System / Language (refer chapter 8.5) you can change the default language or download another language. Cameras - Play - Configuration Beside the flags for the language you have the links for the Cameras Play and Configuration. With an easy click on it you can change between them. For using all the possibilities of the Convision IP-Video server, you first have to configure the device. We refer to chapter 8 – Configuration. Manual - 17 - 7 Cameras - Monitoring In this menu you can view the images from the connected cameras. For Live-Viewing please click on the Icons left hand sided. Note: For full functionality, please use the Microsoft Internet Explorer 6 or higher and activate JavaScript and install DirectX 8.0 or higher. Quad view (je 352 x 288 Pixel) Six view (352 x 288 or 176 x 144 Pixel) Single view (704 x 576 Pixel) For the first live view you have to download the Convision ActiveX-Plugin from the Convision IP-Video server to your computer. With the first clock on one of the above shown icons, the download of the Convision active X-Plugin automatically starts. Click „OK“ and the plugin will be installed on your computer. From now on, it will be available for all further live views. Figure 6: Download of the ActiveX-Plugin - 18 - Convision V400/V600 Plus Snapshot Clicking on this during the streaming will result in a JPEG single image being taken. With the right mouse button you can save this in the context menu of your browser. Configuration of the I/O Contacts Clicking on this Icon, you will be in the menu of the I/O-Contacts (refer to chapter 9.2.5). If you click on the Icon you change the status of the I/O Contact Start and stop of the recording Clicking on this Icon you will be in the menu of the HDD-Manager. The Icon is shown with a red point, if the recording is started. The Icon is shown with a green point, if there is no recording started. (Menu of the HDD-Manager refer to chapter9.6) These Icons are only available if there is a HDD connected. 7.1.1 Controllable Camera If there is a controllable camera connected there will be the left handed Icon shown for the single view.. You can connect various controllable cameras to the Fehler! Verweisquelle konnte nicht gefunden werden., which can be operated directly via the user interface. Depending on their design, these cameras have different functions. For this reason, the user interface of the Fehler! Verweisquelle konnte nicht gefunden werden. varies, depending on the camera connected. Manual - 19 - The user interface of a fully controllable camera is shown in Figure 7. Note: The controlling of the camera is always indicated in the representation as live-stream and single opinion. Note: In some controllable cameras you have to set an internal control address.. For this purpose, please use the addresses starting with "1". Figure 7: View of a fully controllable camera 1 Snapshot – Clicking on this during the streaming will result in a JPEG single image being taken. With the right mouse button you can save this in the context menu of your browser. 2 Preset Tour - The camera can be pre programmed for up to 18 different position presets which will be displayed sequentially. 3 Camera presets– storage spaces for selected image Click on the previously stored preset values to focus the camera on those sections.. 4 Save button– opens a dialog box for storing the preset sections. 5 Current camera image – Click a point in the image to focus the camera on the selected point. 6 Horizontal pan Stepwise range panning – left/right, infinitely depending variable on the sections. panning zoom factor Panning to the left/right end position 7 Panoramic view of the entire pan/tilt Clicking on "Refresh" reconstructs the panoramic view using updated frames - 20 - area. Convision V400/V600 Plus 8 Vertical pan range Stepwise – panning infinitely up/down, variable depending on panning the zoom factor Panning to the upper/lower end position 9 Zoom – infinitely Zoom Maximum Zoom/minimum Zoom 10 in variable zooming stepwise/Zoom out stepwise Travel to the home position of the camera Depending on the type of camera connected, some of the following controls will be displayed instead of the user interface shown in Figure 7: By clicking on the triangles the camera swivels 1 to 10 steps in the direction of the arrow. The angle depends on the zoom factor. By clicking on the double arrow, the camera will be moved 10 times further in one movement than with the single arrow.. Adjusting Zoom in/Zoom out the zoom factor Setting the image sharpness range for cameras without auto focus. Close-up focus / remote focus Adjustment of Closed iris/open iris the light incidence in the lens. Saving Presets Note: If the configuration protection function is activated, administrator rights are required for the storage process. 1. For some controllable cameras you can save specific image sections as preset sections (Presets). For this purpose, focus on the desired point within the pan area of the camera. 2. Set the desired zoom factor. 3. Click on the diskette icon. A dialog box for saving the current image section related to a position number is displayed. 4. Click the desired position and assign it a name. 5. Save the data. The dialog box is closed. Now you can always focus on that point by clicking the respective position number. The names will be displayed as a tool tip whenever the mouse cursor is positioned on the number. The preset sections can also be addressed due to an event (refer to Chapter 9.2). Manual - 21 - Preset Tour 1. Configure the desired presets. 2. Click on the icon . This opens a dialogue box. 3. Click on the desired number position and input the desired amount of time. 4. Save the data. Click again on the icon . This opens a dialogue box again. 1. Start the “Tour“ by clicking on start. The black indicator and the ”Tour“ icon will change to red. 2. End the “Tour“ by clicking on “stop“. The red indicator and the “Tour” icon will change to black. You can also activate the preset tour as an action after an event. (refer Chapter 9.2). Note: If the configuration protection function is activated, administrator rights are required for the storage process. 7.2 Recording and Playback The Convision IP-Videoserver will be delivered optional with an internal hard disk. Additional you can connect external hard disk via IEEE1394 FireWire to the device. So you can record all 4 cameras with maximum speed over long time, without images are overwritten after short time. 7.2.1 Recording For recording the images you have several possibilities. Either you can start a long time recording for all cameras with maximum speed under Configuration/HD-Manager/ recording start or you configure which camera shall recording at a configured time with a configured speed (Configuration/Events/Timer). Start long time recording for all cameras For starting the long time recording for all cameras, please select Configuration/HD-Manager. - 22 - Convision V400/V600 Plus With clicking on Recording start a long time recording will be started for all cameras. You can stop the long time recording for all cameras by clicking on Recording stop. With clicking on Save harddisk name you can assign a name for the connected hard disk. You can start a hard disk scan on the appropriate button. With start low level format, you can exclude the incorrect sectors. Note: recording pictures are deleted from the hard disk. You can delete the recording pictures by clicking on Format. The allocation of hard disk storage is represented to you with the following colours: Black: marks the position of the currently described sectors Green: marks the area from the hard disk, which is still blank Blue: Purple: marks the protected area of the hard disk Red: marks the area in front of the currently position, which is not protected marks the area behind the currently position, which is not protected Time- and event-controlled recording For configure time- and event-controlled recording, please select Configuration/Events/Timer. You can configure 8 different Timer. Select a Timer and configure your individual starts and stops. Manual - 23 - Additional you can set a Timer frequency (seconds, minutes or hours) in which intervals the recording shall be made. The default is 0 seconds, which means that the recording will be started with maximum frequency. Save the data! After setting the timer you have to configure which camera (s) shall be activated by the timer. Select Add/Recording start and configure which camera shall be activated. With Delete you can cancel your timer configuration. Speed up recording on event You can define the recording speed for standard and event instances. (e.g. Motion Detection, SignalInputs). Select in menu Configuration/Action/Speed up recording on event. As standard recording speed you can choose between 1 up to 15 Images/second, maximum speed or - 24 - Convision V400/V600 Plus Smart Recording. Smart Recording is connected also with Motion Detection. If there is no Motion detected the recording will be with 1 Image/second. When there is motion detected the recording will increased with maximum speed. You have to configure the time period for the increase of the speed. A period of minimum 20 seconds is recommended! The hard disk is continuously described. Define the recording duration of events, which should be protected against overwriting. Select Configuration/Action/Protect hard disk event and define the time before and after the event, in which recorded images in a certain time shall be protected against overwriting. You can define 8 different ranges to protect your data. Note: You protect the images of all cameras at the same time. Note: You see the protected ranges represented during the evaluation with ConvisionSafe in the Motion histogram in other colour. After sighting the recorded images you can waive this protection out again directly from the program ConvisionSafe. Click with the right mouse button on the Motion histogram, you receive a context menu with the options to release everything or only one part of the images. 7.2.2 Playback / Save of Recording In the Playback menu you can view the recorded images. Manual - 25 - The date and the time are shown on the Motion- and Event-Histogram. With clicking on zoom Histogram you can zoom the data with or The pictures of the record can be selected on Histogram. The representation of the picture is added or removed by selecting and/or deselect the camera. Up to 6 cameras can be represented in the replay at the same time. For the replay of the pictures, click on the moment of the replay in the time border which is interesting for you. The replay buttons are allocates as follows: Playback bachward Stop button Playback forward goes to the first record pictures goes one picture backward goes one picture forward goes to the last record picture decelerates the Play- or Playback-speed accelerates the Play- or Playback-speed For a higher resolution of the picture you can change between a large and small representation with the button. The Event-Modus can be activated with the button. If you have configured events (e.g. MotionDetection) automatically runs the replay from event to event and shows only the relevant pictures. Additional Option By clicking with the mouse on the Motion-/Event-Histogram the following additional options are shown: Update the last recording data are update General view shows all recorded pictures in the Histogram Display hard-disk name shows to every picture the hard-disk over date and time Hide events The indicated events can be hide. If you like to handle a certain area of the recording mark the area with the left mouse button. - 26 - Convision V400/V600 Plus By clicking the marked area with the right mouse button you have further functions: Zoom Remove hard-disk protection Chancel Manual - 27 - By clicking the recorded picture you have further additional functions: 8 to show/ to hide camera name to show/ to hide time make Screenshot Configuration With the first call of the Configuration side you always see an info side with the actual firmware version of your Convision IP-Video server. Further you see the serial number of your Convision IP-Video server. Each device has its own serial number (Mac-address). The serial number of your device you can also find on the lower surface of the equipment. Under www.convision.com you can always download our newest firmware and update your Convision IP-Video server. (“Update” refer to chapter 8.10). Note: If the configuration protection function is activated, only the administrator is permitted to change the settings in this menu. 8.1 Cameras Here you can change the settings for the connected cameras, assign camera names which will show in the live view. You can change the colour, brightness and saturation of the cameras and change the compression rate. 8.1.1 Selection In the menu Cameras / Selection you have to specify which camera is connected. Furthermore you should, in order to receive any time an optimal image quality, mark, which of the connected cameras are black and white cameras and whether the cameras are able to switch at night to black and white. - 28 - Convision V400/V600 Plus 8.1.2 Rename Cameras Here you can assign camera names which will show in the live view. For this e.g. the place is suitable, at which the respective cameras are positioned. Select Cameras and Name. Define the names for the cameras and save your data. 8.1.3 Video-Settings If you select Cameras / Video-Settings you can change the resolution of the images into the HiResMode. Under Hardware Acceleration you have the possibility to change to compatible for elder cameras with bad video signals. Default is optimised. 8.1.4 Camera settings Select Cameras and settings. Select in the border on the upper right side one of the connected cameras. By default the first connected camera is indicated. For change the contrast, brightness, quality and saturation of the cameras you have under each camera image a Scale from 1 to 100% (default 50%, quality 100%). Adapt the attitudes to your needs, by clicking to the Scale a value. This is stored automatically thereby and indicated at the beginning of the line. 8.1.5 Quality Under the menu Quality you can configure the compression rate of the images. Select the camera from the toolbar above. By default the first camera is indicated. For the configuration of the quality you have a scale under the current camera image from 1% to 100% (default value 100%). Manual - 29 - Figure 8: Change the compression rate Adapt the attitudes to your needs, by clicking to the Scale a value. This is stored automatically thereby and indicated at the beginning of the line. 8.2 Events – alarm release You can define events which will trigger dedicated actions. Events can be: Motion detection from a camera, Activation of an input, Press the button at the front side of the device, or by system events. First you have to define events. Then you assign actions, which are to be released as reaction to the events. The following actions are possible: Recording start – starts the recording of a camera Recording stop – stops the recording of a camera Speed up recording on event Protect hard disk event - protection against overwriting E-Mail - emails can be send FTP - FTP-Uploads can be accomplished Outputs - can be switched fort he event duration - 30 - Convision V400/V600 Plus Time Client Update – An update of the time with the adjusted time servers is accomplished. You have to define the actions under Configuration/Action (refer to chapter 8.3). In addition all actions, with which a configuration is possible, are linked after that directly from the side of the events. 8.2.1 Motion Detection In this menu you define a threshold value for sensitivity, which means that you define from which strength of motion an action shall be released. In addition you add here the actions, which are to be released with motion. Motion is rated as event, as long as it exceeds the adjusted threshold value. After falling below the threshold value the event ends after 2 seconds. Select Events and Motion Detection. Figure 9: Motion Detection The range of the image, in which motion shall be recognized, can you specify with the help of a raster very exactly. In the default the entire range is selected and red marked. A bar line in the lower display space indicates the intensity of motion (from 0 up to 16) within the marked range. Exclude ranges You can define ranges without Motion Detection, if you like to exclude certain ranges in the image from the motion detection. There is a motion detection range for each camera. Select a camera in the upper right corner for which you want to define the motion range. Then click on Motion Detection Area in the lower left corner. You can specify the motion range, if you pull with pressed mousse button over the raster. The clear (not red marked) ranges are now excluded from the motion detection. If you pull with pressed mousse button again, the ranges will be activated (red marked) again for motion detection. In addition the following options are at the disposal: no selection (no motion is activated in the image), Manual - 31 - select all (the complete image is selected for Motion Detection) or Reset (puts back the range selection to the last stored value). Save your data and click back for further configurations. Now define the Sensivity of the Motion Detection and the Time between 2 events. The bar line in the lower image space indicates the intensity of motion (from 0 up to 16) within the marked range. Select the Sensivity of the threshold value between 1 (maximum) and 16 (minimum). If the intensity of the motion exceeds this value, it is defined as event and an action can be implemented. The bar line registered only motion in the activated, red marked part of the image. If the Motion Detection is not to release events, please select disabled. Note: The sensivity 1 – 2 frequently is caused by camera flares. Specify afterwards the periods, in which the Motion Detection is to be activated. Save your data and click back. Figure 10: Configuration Motion Detection – add the actions Click on „Add“ for select the actions for the motion detection. You can assign as many as desired actions. Repeat in addition the last two steps. In the table all caused actions in the line of the appropriate time are listed. By clicking on "delete” you can delete the allocation of the actions again. 8.2.2 Object Detection The Object Detection is a new function of the Motion Detection. With the Object Detection the alerting quality during the motion detection is substantially improved, also with the reduction of the number of false alarms. Beside of the motion intensity also the size of the object will be considered. While with the - 32 - Convision V400/V600 Plus Motion Detection also detects smaller moving objects such as birds, hare, etc., the Object Detection only release an event by detecting movements of larger objects, like persons, cars, etc. Thus the Object Detection enhances the usability of Motion detection especially for outdoor installations. Note: Before configuring the Object Detection please start the recording and simulate an object movement. Afterwards please analyze by Playback, if the object sizes and intensities of motion are optimal for your individual application. To configure the Object Detection please select in the menu Event the menu item Object Detection. With a raster you can specify the image area of the camera, for which motion is to be detected. By default, the complete image is selected and marked red. A segment display at the bottom of the screen indicates the intensity of Motion (from 0 to 16) within the marked section. Exclude Sections If you like to exclude certain areas in the image from Motion Detection, you can therefore define special areas. You can select Motion Detection for each channel by clicking the symbol of the camera, for which you want to specify the Motion Detection. Afterwards please click on the bottom on Motion Detection Area. Drag with pressed mouse button over the raster to specify the motion range. Now the not red marked areas are excluded. If you drag again with pressed mouse button it will be again activated and marked red. Furthermore the following options are available: No Selection (in complete image no Motion Detection is activated) Select all (Motion Detection for the complete image is activated) Reset (to the last saved value) Save the settings and afterwards click to back for further configuration. Now please configure the Sensitivity of Motion Detection and the Time between two events. Sensitivity is the modification of one motion field in two sequential images. The segment display at the bottom of the screen indicates the intensity of the change within the marked range. Please select with the select list a Limit between 1 (maximal) and 16 (minimal). As default we recommend a value between 4 and 6. If the intensity of the field modification is transcending this value, it is defined as event and an action can be executed. The segment display only register movements in the activated, red marked areas of the camera image. Manual - 33 - For an Object Detection the size of the object which shall be detected. Overlay the raster of the motion fields by clicking with the right mouse button on the image and select Show Motion. Afterwards select the Object Size the motion field between 2 and 25. If the Motion Detection is not to release events, please select Deactivated. You should simulate an Object Detection after configuration and check if the adjusted values for the object size and the sensitivity are optimally selected for your individual application. For checking please select in the main menu Playback the camera image of the simulation. After this please change to the large-scale display and click with the right mouse button in the image to indicate the motion fields. The Object Detection will be marked in orange in the motion histogram and the camera image is marked with a blue border. 8.2.3 Video Loss The video loss event will be triggered by a lost camera connection. You can intend actions for each camera, which shall be implemented with missing video signal. Please add here the actions, which shall be implemented if the video signal is lost. The missing video signal is recognized only if one accesses the camera, e.g. during recording or live transmission via Browser. 8.2.4 Timer You can define up to 8 different time periods and events in combination with actions. Timers release regularly returning actions (e.g. every 10 minutes) in fixed periods (e.g. each day between 8 and 16 o’clock). - 34 - Convision V400/V600 Plus Figure 11: Timer configuration in combination with actions Select Events and Timer. Select a Timer and you see a side with a week schedule . Figure 12: Timer Configuration– week schedule Under timer frequency you have to specify the possibility, with which frequency (seconds, minutes or hours) the timer shall be implemented. By default it is here every 0 seconds adjusted which means that the timer is implemented with maximum frequency. Specify, how frequently this timer shall be released, e.g. how often an E-Mail shall be send. The indication is possible in seconds, minutes or hours. Now define the time period of active inputs by specify starts and stops. Save your data and go back to Timer. Note: Renewed save of the side after the timer is started, stops the timer again. If you set the timer, you must specify now an action, which is to be implemented for the timer. Select „add“ in order to select actions, which are to be implemented at the selected times. You now receive a side, on which you can assign actions to the event. Manual - 35 - They can assign several actions. In the table all assigned actions in the line of the appropriate timer are listed. By clicking on "delete" you can delete the allocation of the actions again. Repeat the last steps for further timers. Note: All actions you want to release, should be configured before. Examine the status. 8.2.5 Device - Keys The device keys are on the front side of the device left and right sided from the LED field. Device key F Device key M Add here the actions, which are to be implemented, if a switch is operated. 8.2.6 I / O – Input The menu option I/O input serves for the configuration of the inputs. To the 4 inputs devices can be attached for announcing different alarm situations. Please you note here that only 12 V of devices may be attached. Cause here to each input (1 to 4) the actions, which are to be implemented, if a message arose. Figure 13: Configuration of the inputs Select Events and I/O-Input. Click on one of the I/O input in the first column and you received a side with a week schedule. - 36 - Convision V400/V600 Plus Figure 14: Configuration of the inputs – week schedule Assign an individual name for this input (e.g. door contact). Specify now for each weekday, at which this input should be active, one or two periods with starts and stops. Click on "time between 2 events" to define the time the timer should wait between two events, if one event follow the other in short time. In default the inputs are normally open, they react on closing the contacts. If you like to change the status of the inputs on normally closed, make sure that your alarm units support desired functionality and are correctly adjusted. Save your data and click back. Click on "add" to select actions which are implemented, if an alarm message arose. You now receive a side, on which you can assign actions from different groups to the event. You can add several actions. In the table all assigned actions in the line of the appropriate entrance are listed. Repeat if necessary the last steps for further inputs. By clicking on "delete" you can delete the allocation of the actions again. Note: All actions, which you want to release, must be configured before. Examine the status. Note: If you use an input as code switch, the code switch serves the alert stand-by for activating. Even if the start/stop of the recording is to react after the code switch, this must be specified separately. 8.3 Action Actions are triggered by events. This chapter describes which actions you can choose and how to configure them. Manual - 37 - 8.3.1 Speed up recording on event This action you can cause to an event (e.g. Motion Detection). The recording will be speed up during the event and put back after end of the event again to the default value. Select Action and Speed up recording on event. Figure 15: Speed up recording on event You can define here both the speed during the standard recording and the increased recording speed after an event. Select the data from the selection list. As recording speed you can select from 1 up to 15 images/second, maximum speed or Smart Recording. Smart Recording is combined also with Motion Detection. If there is no motion detected the recording speed is 1 image/second. If there is motion detected the recording will speed up to maximum speed. You can specify the period of speed up recording. A period of at least 20 seconds is recommended! Save your data. 8.3.2 Protect hard disk event The hard disk is continuously described. Define the recording duration of events, which should be protected against overwriting. Select Configuration/Action/Protect hard disk event and define the time before and after the event, in which recorded images in a certain time shall be protected against overwriting. You can define 8 different ranges to protect your data. Note: You protect the images of all cameras at the same time. Note: You see the protected ranges represented during the evaluation with ConvisionSafe in the - 38 - Convision V400/V600 Plus Motion histogram in other colour. After sighting the recorded images you can waive this protection out again directly from the program ConvisionSafe. ConvisionSafe is the Convision evaluation software. ConvisionSafe is delivered on the attached Convision CD or you can download it for free from our website www.convision.com . (We refer to the ConvisionSafe manual) Click with the right mouse button on the Motion histogram, you receive a context menu with the options to release everything or only one part of the images. Save your data. 8.3.3 Notification by E-Mail At predefined points in time or in response to an event, the Convision IP-Videoserver can send an email to as many as 10 addresses. You can attach an up-to-date image recorded from any camera to the e-mail. Select Actions and E-Mail. Select on of the 8 e-mails in the top button bar. Enter the e-mail address of the recipient in the "Recipient" field. If the message is to be sent to multiple recipients (max.10), separate the e-mail addresses using a semicolon. Enter the reference in the "Subject" field (e.g. alarm). Enter the message in the ”Text” box (e.g. burglary at xxx., address: xxxx etc.) The text is limited on 252 indications. You can attach images recorded by each camera to the e-mail. For this purpose, activate the checkbox next to the desired cameras. As a check you can send a Testmail at any time. If dispatching should fail, you made no or wrong entries in the menu option network regarding the Mail server and/or DNS server. Figure 16: Configuration of E-Mail Notification Manual - 39 - Save your data. Repeat if necessary the last steps for further E-Mails. 8.3.4 Transferring Data via FTP- Upload At predefined points in time or in response to an event, the Convision IP-Videoserver can transfer an image (Upload) to a web server directory via FTP. In this case, the Convision IP-Videoserver is the FTP client. You can transfer an up-to-date image recorded by any camera. Figure 17: FTP- Upload Note: The login information can be obtained from your administrator (LAN) or from your provider. Select Actions and FTP-Upload. Select one of the 8 FTP uploads in the upper button bar. Specify the name or the IP address of the server to which the images are to be transferred. Enter a login name and password with access rights to this server. Note: If an anonymous access to a server is permitted, "anonymous" is often used as the login name and the password is your own e-mail address. If the images are not to be saved in the default directory of the user, enter the path to the server directory in which the images are to be stored. Enter a name for the image file. Images will only be transferred if a file name is entered. Save the data. - 40 - Convision V400/V600 Plus Repeat the last steps for further FTP uploads, if desired. Image Names The filenames may contain wildcards so that the images can be saved on a server using consecutive numbers. Using the name "image*.jpg" will copy the images "image0.jpg" to "image9.jpg" to the server. An additional "*" needs to be entered for each digit required, i.e. the name "image**.jpg" will copy the images "image00.jpg" to "image99.jp"” to the server. The image counter is reset to zero once you save the FTP message. The following variables can be used in naming the image files: %DATE% current date %YEAR% current year %MONTH% current month %DAY% current day %TIME% current time %IP% IP address of the IP video server %SERIAL% serial number of the IP video server %SEQUENCE% Time stamp in hexadecimal numbers The variables will be replaced by their values when saving the pictures on an ftp server. For example: Image-%DATE%-%IP%_***.jpg will become Image-14_05_2002-192.168.0.123_001.jpg 8.3.5 I/O-Output (Duration) Here you can define the cyclic duration of the outputs. At the outputs directly a signal light (e.g. siren) can be attached for example. You can specify for each output an individual name, as well as the length of the cyclic duration. 8.3.6 Http-Alert Here you can make attitudes to HTTP alarms, which are sent to an alarm server. Manual - 41 - Figure 18: Http-Alert Server-Address Here you register the IP address of the server, on which the alarm receipt software is installed. Port By default it is sent over Port 80 to the alarm server. If you wish another, replace the default port by another. URL In the URL you can indicate a listing on the alarm server, as well as transfer CGI parameters. With the CGI parameters wild cards can be used. #EventName replaced through the event name, which can be:: HD full HD Write/Read Error Autostart Ping Reboot Timer x (x replaced through 1-8) Urlcall x (x replaced through 1-8) MotionDetection x (x replaced through 1-16) VideoLoss x (x replaced through 1-16) Button x (x replaced through 1-2) [for the device switches] Input x (x replaced through 1-16) Start Recording error #EventGroup replaced through the Event Group, which can be: Timer - 42 - Convision V400/V600 Plus MotionDetection Urlcalls Inputs Buttons VideoLoss Ping Reboot FaultManagement #EventNr contains the Event number, Example: VideoLoss (EventNumber = Camera Number) MotionDetection (EventNumber = Camera Number) Input (Eventnumber = Input Number) Buttons (1 = F, 2 = M) Timer (Timer Number) #HTTP_Nr - Number of the HTTP Event #MACAddress replaced through the MAC-Address (Serial-No.) of the device 00:D0:F0:xx:xx:xx (e.g. 00:D0:F0:04:01:23) Note: Regarding this, please ask the administrator of your alarm server software! Proxy Server Address If the Convision IP video server is connected by proxy server with the Internet, you can register the IP address of the Proxy server here. Proxy Port Register the port number of your Proxy-Server here. Authentication If your alarm server needs authentication, please select Basic here. User / Password Here you register user and password, with which the Convision IP-Videoserver get announced to your alarm server. Message Typ Manual - 43 - Select the transmission mechanism for the alarm server. Possible attitudes are HTTP GET or HTTP POST. Message Here you can register data like under menu option URL. The same wild cards are supported. You can send a Test-HTTP (http – Alarm notification) to the server. 8.3.7 Video – Out Under this menu option you can configure the representation individually or to groups of cameras on a video monitor. Figure 19: Video Out – Configuration Select under Action / Video Out. Specify then, which camera is to be represented for how long on your video monitor. If you would not like a camera represented (e.g. camera 6), then you register a “0” in the appropriate field. The sequencer then jumps over the representation. 8.3.8 Time-Client-Update Under menu option Time Client Update you can define settings for the time synchronisation with a time server or NTP server (Network Time Protocol). The default configuration proposes 4 time server, which you can configure another way if you want. For synchronisation of the time the Convision IP-video server tries to develop a connection to the first server. If this is successful, the time is synchronized. If not, the other time servers are selected, until a connection can be examined and the time can be synchronized. - 44 - Convision V400/V600 Plus Figure 20: TimeClient The port of the time server is 37, the port of the NTP-Server 123. By clicking the button Update you produce an update manually. 8.4 Authorization - User administration In this menu you can protect different ranges of the IP video server against unauthorized access. You can furnish further users, who can have access to different of the protected ranges. Up to 20 users are possible. On delivery your IP video server is furnished with a default user with administrator rights. default-User: admin default-Password: 1111 You can change the password of the user admin, but not the user name. 8.4.1 Settings Select Authorization/Settings to make attitudes to the Authorization. By default Digest-Authorization is adjusted. If you should not have problems during the registration, please leave it for safety reasons with the Digest Authorization. Note: The Digest Authentication functions very reliably. With the basic Authentication requests the Web server of the Browser user identification and password. The data will transfer stringer unencrypted as BASE64-code. This is not very safe. 8.4.2 User administration Select Authorization and User. Click on „Add“. Enter a name for the User. Manual - 45 - Enter a password for the User. Repeat the password, in order to exclude spelling mistakes. Activate control small boxes before the rights, which this user is to have. If you give administrator rights to the user, all rights are automatically given after storing. Save your data. Figure 21: Authorization – User management Change User data Here you change the passwords and authorizations of the individual users. Administrator rights cannot be limited. Rights Recording - Start and Stop the recording Playback- Playback the recorded images Configuration- Change the configuration Telnet Access by Telnet Web-Server Access by Browser FTP Server Access via FTP to the Convision IP-video server Camera monitoring Live-Monitoring of the cameras Camera controlling Controlling of the PTZ-Cameras in Live-Modus Output activate / deactivate Outputs 8.5 Language The menus can be indicated by default in the German and English language. With the first access to the user surface of the Convision IP-Video server the attitude of the Browsers is used. 8.5.1 Selection - 46 - Convision V400/V600 Plus Select Language and Selection. Here you can determine a language Activate in addition the appropriate control small box. Figure 22: Language selection 8.5.2 Upload file On request you receive modules with further languages from Convision. You can load these language modules from your computer into the Convision IP video server. Select Language and Upload file. To the Upload you indicate the file (ending lgf) with the complete path to the listing Click the switching surface "file transferring". Note: During the Upload of the language file do not switch the Convision IP-Video server off. Omit during the procedure every other access to the Convision IP-Video server. 8.6 HD-Manager Here you see an overview of the attached hard disks. In addition you can start / stop the recording of all cameras at the same time here. Figure 23: HD manager Manual - 47 - Hard disk Here you have the name, start time and end time of the recorded images, the addressed cameras and information about protected hard disk range for each attached hard disk. Format By clicking the button Format you delete all data of the hard disk. You also delete the system log! Note: The button „HDO“ and „Save“ are still without function. Recording start / stop Starts / stops the recording of all cameras at the same time with maximum speed. 8.7 Advanced Under the menu option advanced users you can make explicit attitudes, which go beyond the standard use of your IP video server. 8.7.1 FTP For the transmission of the images with ftp protocol (File Transfer Protocol) the Convision IP-Video server can be used as ftp server and as Ftp Client. The initiative to the data communication thereby always proceeds from the Client. As server the Convision IP-Video server reacts on the request of a Clients, e.g. the browser, and sends the requested images (FTP-Download). As Client the Convision IP-Video server selects a server and conveys one or more images configured before. A Ftp Upload is implemented. 8.7.2 Reboot Here you can force a reboot start. 8.7.3 Events 8.7.3.1 Fault Management The fault management occurs as event, if a fault on the hard disk is present and thus no recording can - 48 - Convision V400/V600 Plus take place. For the following error messages of the hard disk you can deposit an action: Hard disk full (recording stopped) Recording start error Hard disk fault (e.g. incorrect sectors) Select for the configuration Advanced/Events/Fault Management and select the error message, for which an action is to be deposited. Click Add. By clicking on "delete" you can delete the allocation of the actions again. We recommend you to configure to get information if the hard disk generates disturbance events. The following information actions are possible: - UDP - E-mail - FTP-Upload - I/O output (on/out) - I/O output (duration) - Http alarm Select this menu under Configuration / Expert There you find several possibilities of alarming in case of hard disk disturbance. Previously you have to set the following configurations: 1. Mail server settings (configuration / network) 2. E-mail account settings (configuration/action/E-mail) 3. HTTP alarm settings (configuration/action/Http alarm) 4. FTP Upload settings (configuration/action/FTP Upload) 8.7.3.2 URL - Call Serves for implementing actions via URL command. Example: On: http://'ipaddress'/config/urlevent?type=1&nr='1-8' Off: http://'ipaddress'/config/urlevent?type=0&nr='1-8' Select Advanced/Events/URL-Call. 8 URL-Calls are available. Select an URL-Call, for which an action is to be deposited. Click Add.. By clicking on "delete" you can delete the allocation of the actions again. Manual - 49 - 8.7.3.3 Ping Start a ping command for examining the network connection. To start a ping command, please select the menu item Expert / Ping. First set a valid IP address. Then fix a time interval while the ping command should be sent. Afterwards you should configure after how much faulty ping command an action (e.g., reboot) should be released. 8.7.3.4 Systemstart Under this menu option you can make an allocation of actions after a system restart. Select Advanced/Events/Systemstart and click Add. By clicking on "delete" you can delete the allocation of the actions again. 8.8 Configuration – Load and Save All configurations, which you made at your Convision IP- video server, you can store in a binary coded file (default "convision.cfg") on your computer. Select Configuration. Click on „Save configuration to file“. Specify in the memory dialogue the desired listing. - 50 - Convision V400/V600 Plus Store the file. You can load the stored file into further Convision IP-Video server of the same type and transfer the once made attitudes thus in a simple manner. Or you specify a basic configuration in this file. After unwanted changes you can re-establish so problem-free the original condition. In accordance with the transmission of the configuration file into other devices you must assign a new IP address. Note: The equipment with the IP address stored in the configuration file may not be attainable in the LAN, if the file will transfer to another device. First change the IP address after transferring. Restart the other device after that. Upload file Select your file (ending .cfg) with the complete path to the listing of your configuration file. Click on transfer data. Note: During the Upload do not switch the Convision IP-Video server off. Omit during the procedure every other access to the Convision IP-Video server. 8.9 Network - Settings If you want to integrate your Convision IP-Video server in a LAN, you can enter various IP addresses via this menu. IP-Addresses During the initial configuration using IPSetup (refer to chapter 5), you have already assigned an IP address and a network mask. This data is now displayed on this page. You can change this if desired. After a change you will be prompted to reboot the device. For this purpose, click the "Reboot" button. Note: The IP address must be clearly assigned, it may be assigned not already in the network to another computer. You can examine with the help of the ping instruction whether a IP address is still available (refer document „Convision System Configuration“). (More regarding IP addresses and net mask see chapter 9.1.3) DHCP Using the dynamic host control Protocol (DHCP) all IP addresses are assigned to Convision IPVideoserver of a LAN automatically and merged thus into the LAN. So that the IP video server is accessible always by Browser despite changing IP address, it receives a Manual - 51 - name. The default name is „Convision_V600Plus“, but you can change it if you want. The name may not contain blank characters. You can enter the names now in the Browser instead of the IP address into the address line. If you activated DHCP, all fields of IP addresses are deactivated, because in the DHCP server all addresses and the subnet mask are fixed. Figure 24: Configuration Network settings Router If you use a defualt router in your network, which makes the connection to the internet or to other IPsubnets, enter this IP-Address in the field Router. All IP addresses reached outside of the LAN are now reachable over this router. Attitude of a port number By default over HTTP port 80 the equipment one accesses. You do not need to indicate this port. If you wish another default port, please replace it. Access: Write after the IP address a colon and then the port number into the address line of the browser. e.g.: http://192.168.0.111:8050 Note: Change the port only, if you have sufficiently foreknowledge about TCP/IP. DNS-Server - Domain-Name-Service With the Domain name service a name can be assigned to each computer in the IP net. Basis of the DNS are servers with a data base, which contains each allocation name/IP address. Name server can - 52 - Convision V400/V600 Plus be both publicly accessible or also part of a private net. Example: A SMTP-Server is named „SMTP-Server.de“ A TCP/IP connection from your Convision IP-Video server can only be developed, if both terminator points are known as IP-addresses. So that you can use this name nevertheless, it must be converted into a IP address. This makes the DNS server. FTP-Server If you have activated the ftp server you can download the images of the cameras not only over HTTP protocol, but also over ftp (file transfer protocol. Note: After changes on this side a restart of the Convision IP-Video server is necessary Attitude of a port number By default over FTP port 21 the equipment one accesses. You do not need to indicate this port. If you wish another default port, please replace it. Access: Write after the IP address a colon and then the port number into the address line of the browser. e.g: ftp://192.168.0.111:2121 Note: Change the port only, if you have sufficiently foreknowledge about TCP/IP. Syslog-Server If you operate a Syslog server in your network, the Convision IP-Videoserver can send messages / error messages to the IP address of this Syslog server. If you did not integrate a Syslog server into your network, the input line should not contain an entry. The default port of a Syslog server is 514. If you adjusted your Syslog server to another port, you can change this indication under "port". Note: If you do not know the individual IP addresses, ask your system administrator. Manual - 53 - Mail-Server These data are necessary, if you want to dispatch E-Mails. Register a smtp server (Mail server), with an Mail account with registered return address, Login and password. Enter (in the Mail server registered) the return address of the Convision IP-Videoserver. Select the kind of authentication, which is demanded for announcing on the smtp server (refer to chapter9.1.2). Enter user and password for announcing on the smtp server. 8.10 Firmware Update Here you can load a new software version of the firmware into the Convision IP-Videoserver. The software is constantly updated and improved in its efficiency. You can download the current version of the software free of charge as zip file of the Convision Website www.convision.com. For the update, you indicate the complete path to the listing, into which you put the update file unpacked you after the Download on your computer Click on the button „transfer data“. Note: During the Update do not switch the Convision IP-Videoserver off. Omit during the procedure every other access to the Convision IP-Video server. Figure 25: Firmware Update Note: After an update it is possible that controllable cameras are not initialized again correctly. Switch the camera and the IP-Videoserver off. Then restart the camera first, wait for the self check of the camera and then restart the Convision IP-Video server again. - 54 - Convision V400/V600 Plus 8.11 Setting Time and Date Summer/Winter Time You can use your Convision IP-Video server also as time server for other devices in the net. Set in this case also the time belt, i.e. the deviation from GMT - Greenwich Mean time (Germany has the deviation +1, with summer time +2). Select Time/Date. Enter date and time correctly. Save your data. These two settings are constantly updated even without an external power supply via a backup battery. Your Convision IP-Video server can automatically change between summer and winter time. During summer time [Yes] is displayed, during winter time [No] is displayed. The time conversion is done in MESZ (Middle European Summer Time) and is already configured for the next few years. If you do not require this, simply delete the pre-configured time. Figure 26: Time and Date Timeserver The Convision IP-Video server cannot only get the current time from a time server, but can also pass the time to other devices. Activate in addition the time server. Now you can set in other devices, which have a time Client function, the IP address of your Convision IP-Video server as time server. 8.12 Dome / PTZ Cameras In this menu you register, which cameras are attached to the two serial interfaces (COM 1 = RS232 and COM 2 = RS485) of your Convision IP-Videoserver. Select Dome/PTZ-cameras. Select, which Dome/PTZ camera from the table is attached to COM 1 and COM 2, otherwise select "no equipment attached" (default). If several controllable cameras of one type are attached, indicate the number. Save your data. Manual - 55 - To accomplish a restart is requested, click in addition the switching surface "restart“. Note: You cannot attach 2 different controllable cameras to the two COM interfaces. Figure 27: Allocation of the serial interfaces 8.13 Event log The Convision IP-Video server logs all system events (information, errors and warnings). In this menu these events are listed. By clicking on „delete events“ you can delete the complete list. Additionally all events are stored on the hard disk (if the equipment have a hard disk). Refer to chapter 9.14. Figure 28: Event log You can change or filter the display by clicking on one of the buttons above the list. - 56 - Convision V400/V600 Plus Change the order of the entries All entries visible and refresh the display Filter: only events visible Filter: only warnings visible Filter: only errors visible Manual - 57 - 8.14 System log – Recording of the event log on the hard disk On the hard disk all events are stored on a 5 MB storage area. While the HTML side "event log" is deleted by switching the device off, the system log on the hard disk remains also after a restart. You call up the list by ftp access. If the ftp server is protected against unauthorized access, you must indicate Login and password as authorization for the ftp server. You receive a test data file with 500 KB data. If 500 KB are exceeded, a further text file with the next data is put on. ftp://<Benutzername>:<Passwort>@<IP-Adresse>/hd_logging e.g. ftp://meier:[email protected]/hd_logging 0000000000 | 14.07.2004 12:54:32 | Information | HD recording: recording started for camera 1 on HD 1 0000000001 | 14.07.2004 12:54:33 | Information | HD recording: recording started for camera 2 on HD 1 0000000002 | 14.07.2004 12:54:33 | Information | HD recording: recording started for camera 3 on HD 1 0000000003 | 14.07.2004 15:16:41 | Information | Video signal camera 2 lost. 0000000004 | 14.07.2004 15:16:42 | Information | Video signal camera 1 lost. 0000000005 | 14.07.2004 15:16:43 | Information | Video signal camera 2 ready. 0000000006 | 14.07.2004 15:16:46 | Information | Video signal camera 1 ready. 0000000007 | 14.07.2004 15:42:15 | Information | Mail #1 sent to '[email protected]' 0000000008 | 14.07.2004 16:09:32 | Information | HD recording: recording started for camera 1 on HD 1 000000000ß9 | 14.07.2004 16:09:32 | Information | HD recording: recording started for camera 2 on HD 1 0000000010 | 19.07.2004 17:46:37 | Information | The server IP address has been changed to 192.168.0.183! 0000000011 | 19.07.2004 17:46:37 | Information | DHCP-Client stopped. Note: The system log is deleted by formatting the hard disk. - 58 - Convision V400/V600 Plus 9 General Descriptions 9.1.1 FTP For transmitting images via FTP (File Transfer Protocol), the Convision IP-Video server can be used either as an FTP server or as an FTP client. It is always the client that takes the initiative for transferring data. As a server, the Convision responds to the request of a client, e.g. the browser, and sends the requested images (FTP download). As a client, the Convision IP-Video server dials up a server and transmits one or more pre-configured images. An FTP upload is performed. 9.1.2 SMTP- or Mail-Server An SMTP (Simple Mail Transfer Protocol) server forwards outgoing e-mail messages to the recipient. The address of the SMTP server can be obtained from the system administrator for a LAN connection and from your telecommunications provider for an ISDN connection. To be able to access the SMTP server, the e-mail address of the sending Convision IP-Video server must be registered with the provider. SMTP Authentication - SMTP-after-POP Some e-mail provider require authentication to prevent anyone with an unauthorised or fake e-mail address from using the SMTP server. One authentication method is SMTP Authentication. You need to enter a user name and password for this. Another authentication is a registration via POP 3 (Post Office Protocol – Protocol used to access a server which stores e-mails for other computers). If the provider requires this method for authentication, just enter the user names and password in the same way you have to to receive your e-mail. 9.1.3 TCP/IP and IP Address TCP/IP is a group of protocols with the TCP (Transmission Control Protocol) and IP (Internet Protocol) being the group's most important components. They form the widest spread solution in the area of internetworking and have established a de facto market standard. Internet addresses are used to identify computers in TCP/IP networks. They are part of the Internet Protocol and are therefore referred to as IP addresses. Manual - 59 - The structure of an IP Address An IP address consists of four numbers between 0 and 255, separated by dots, e.g. 192.168.0.53. Every IP address is made up of 2 parts. The first numbers define the network identification (network ID) the last define the device (host ID). The length of each part is defined by the network mask. (see below). To integrate a device into your local area network properly, you have to assign an IP address to the device. Note: Every device needs its own IP address. The Network Mask The network mask is used to determine which part of the IP address describes the network and which part identifies the computer in the network. Example: Assuming the IP address of a computer is 192.168.100.3 And assuming the net mask is 255.255.255.0. Then the network identification is 192.168.100. The fourth number (3) identifies the computer. Note: Incorrectly defined IP addresses and network masks very often cause errors in TCP/IP networks. For this reason, if you are not absolutely sure or if problems come up, please contact an experienced network administrator. - 60 - Convision V400/V600 Plus 10 Technical Data System Operating System Real time operating system Video input 4 BNC Video output 1 BNC Video Format PAL Compression JPEG User Interface Web browser Interface Security User Administration WatchDog Software und hardware watchdog Monitoring mode Frame Rate 80fps (PAL) Resolution (704x576), 352x288 Split layout Single/quad Hard disk status Yes Video Loss Detection Yes Recording mode Resolution (704x576), 352x288 PAL (different Zoom levels) Recording speed 80fps (20 fps/cam) PAL Hard disk storing capacity up to 300GByte internal, 8TB external via IEEE1394 Recording Modes Motion Detection, long term, event Data code Recording includes time/date informations Remote functions Network Access 10/100 Mbit Ethernet Monitoring Web browser, no software required Playback Live JPEG via Web browser Manual - 61 - Download and local Playback Evaluation via ConvisionSafe 3.0 Alarm Functions Alarm Input 4 NO digital Inputs Alarm Output 4 NC/NO relay out IO and Camera Relations 1-1, 1-n Others Evaluation Motion and event histogram, ConvisionSafe PTZ Camera Control Current list under www.convision.com - 62 - Convision V400/V600 Plus Appendix A Declaration of Conformity KONFORMITÄTSERKLÄRUNG DECLARATION OF CONFORMITY Geräteart: Video Web Server Type of equipment: Produkt / Product : Convision V400/V600 Plus Series Das bezeichnete Produkt stimmt mit den Vorschriften folgender EU- Richtlinie(n) überein: The aforementioned product complies with the following European Council directive(s): 93/97/EWG 1999/5/EG EG EMV- Richtlinie / EC EMC directive EG Telekommunikationsendeinrichtungen - Richtlinie EC Telecommunications terminal equipment directive Zur vollständigen Einhaltung der EMV- Richtlinie wurden folgende Normen herangezogen: To fully comply with the EMC directive, the following standards have been used: EN 55022 Class B EN 50081-1 EN 50082-2 : 1987 : 1995 : 1995 Dieser Erklärung liegt zugrunde: Prüfungen im EMV- Prüflabor Manual - 63 - This certification is based on: Tests in EMI test laboratory Aussteller / Holder of certificate : Convision Systems GmbH Gablonzstr. 9 38114 Braunschweig - 64 - Convision V400/V600 Plus Appendix B Abbildungsverzeichnis Frontview of the Convision V600 Rear View of the Convision V600 LAN Connection Wiring of the Inputs and Outputs Initial configuration with Convision IPSetup Download of the ActiveX-Plugin View of a fully controllable camera Change the compression rate Motion Detection Configuration Motion Detection – add the actions Timer configuration in combination with actions Timer Configuration– week schedule Configuration of the inputs Configuration of the inputs – week schedule Speed up recording on event Configuration of E-Mail Notification FTP- Upload Http-Alert Video Out – Configuration TimeClient Authorization – User management Language selection HD manager Configuration Network settings Firmware Update Time and Date Allocation of the serial interfaces Event log Manual 9 10 11 13 15 18 20 30 31 32 35 35 36 37 38 39 40 42 44 45 46 47 47 52 54 55 56 56 - 65 - Appendix C Index A Actions................................................................................32, 34 Format ......................................................................................46 FTP...........................................................................................57 Client ...................................................................................38 ActiveX-Plugin ..........................................................................17 H Anschlüsse .................................................................................9 Authentication...........................................................................57 host Identification .....................................................................58 Authorization ............................................................................43 HTML pages.............................................................................15 B HTML-Pages ............................................................................15 I Battery ......................................................................................53 Benutzermanagement ..............................................................43 I/O input....................................................................................34 Berechtigungen ........................................................................18 IEEE1394 .................................................................................21 C Camera Initial configuration ...................................................................13 Input Connections ....................................................................12 Inputs........................................................................................12 connection ...........................................................................10 Internet Browser .......................................................................13 controllable ....................................................................11, 19 IP address ..........................................................................14, 49 Camera-Tour ............................................................................21 IPSetup.................................................................................7, 14 ConvisionSafe ..........................................................................26 Iris20 D Delete K Kamera Configuration .......................................................................14 steuerbar .............................................................................18 DHCP .......................................................................................13 Kameraeinstellungen................................................................28 Domain-Name-Service (DNS)..................................................50 Konfiguration ............................................................................44 E L Ereignisanzeige........................................................................54 LAN.....................................................................................10, 49 Ethernet.....................................................................................9 LED ............................................................................................8 event-controlled recording........................................................22 long time recording.............................................................21, 22 Events ......................................................................................30 external connections ..................................................................9 F M Mac-address.............................................................................28 Mail-Server ...............................................................................52 Festplattenverwaltung ..............................................................46 Motion Detection ................................................................30, 31 Firmware ..................................................................................15 Motion Histogram .....................................................................27 - 66 - Convision V400/V600 Plus N Network identification............................................................... 58 Network mask .......................................................................... 58 Smart Recording...................................................................... 36 SMTP....................................................................................... 57 Snapshot............................................................................ 18, 19 Speed up recording ......................................................... 23, 36 O Output ...................................................................................... 12 Summer Time .......................................................................... 53 Syslog-Server .......................................................................... 51 Output Connections ................................................................. 12 T P TCP/IP ............................................................................... 57, 58 Panoramic view ....................................................................... 20 Time Client Update .................................................................. 43 timer frequency ........................................................................ 33 Password Video server........................................................................ 26 Playback ................................................................................. 26 Timeserver............................................................................... 53 TP cable................................................................................... 10 Port .......................................................................................... 40 U Preset................................................................................. 19, 20 Protect hard disk ................................................................... 24 PTZ-cameras .......................................................................... 54 Update der Firmware ............................................................... 52 Upload FTP ..................................................................................... 38 Q Sprache............................................................................... 45 Quadansicht............................................................................. 17 V R Video Loss ............................................................................... 32 Reset...................................................................................... 8, 9 W Router ...................................................................................... 50 RS485........................................................................................ 9 S serial number ........................................................................... 28 Server administration............................................................... 26 Sicherheitshinweise ................................................................... 5 Manual Wochenzeitplan ....................................................................... 33 Z Zeitpunkt .................................................................................. 32 Zeitraum................................................................................... 34 Zoom........................................................................................ 20 - 67 - * * * Convision Systems GmbH · Gablonzstr. 9 · 38114 Braunschweig Tel.: +49 531 264 50 00 · Fax: + 49 531 264 50 10 [email protected] · http://www.convision.de - 68 - Convision V400/V600 Plus Manual - 69 -