1
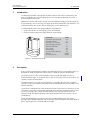
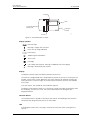
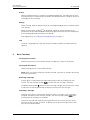
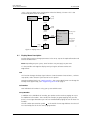
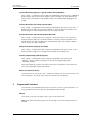
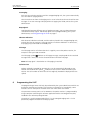
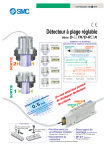
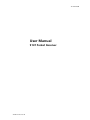
TD 92548GB
User Manual
914T Pocket Receiver
2009-03-02/ Ver. B
User Manual
914T Pocket Receiver
TD 92548GB
Contents
1 Introduction............................................................................................................. 1
2 Description............................................................................................................... 1
3 Basic Functions ........................................................................................................ 3
4 Display Menu........................................................................................................... 4
4.1 Display Menu Description ................................................................................... 5
4.2 Function Settings ............................................................................................... 6
5 Programmable Functions........................................................................................ 7
6 Programming the 914T ........................................................................................... 8
6.1 System Functions ............................................................................................... 9
7 Operation and Maintenance ................................................................................ 10
8 ATEX/IECEx Safety Instructions............................................................................ 11
9 Regulatory Compliance Statements (EU/EFTA only)........................................... 12
10 Regulatory Compliance Statements (USA and Canada only) .......................... 12
2009-03-02/ Ver. B
User Manual
914T Pocket Receiver
1
TD 92548GB
Introduction
This document provides a description of pocket receiver 914T and its functionality. The
914T is included in the On-site Paging System. This User Manual describes the 914T in
default programmed version.
Additional functions and factory settings are also included, providing a full description of
the functionality. Your system may not supply all functions described in this document, for
information about your system, please contact your system administrator.
The following documents are recommended as a complement:
• System Description, On-site Paging System, TD 91034GB
• Quick Reference Guide 914T Pocket Receiver, TD 92547GB
Characters per message
Messages stored
Characters in memory
Group paging numbers
Absence indication
Time stamp
Time display
Out of range indication
Vibrator
EX-Classification
914T
120
10
480
5
Yes
Yes
Yes
Yes
Option
Option
001
Functions
Figure 1. Pocket Receiver 914T
2
Description
914T is a robust pocket receiver used for messaging within the On-site Paging System. It is
designed for tough environments where there is a need for long text presentation.
This pocket receiver is dust and waterproof, IP 64 classified and highly resistant to
electrostatic discharges. As an option there is also an intrinsically safe version (Ex ib IIC T4)
suitable in explosive atmospheres.
The pocket receiver is easy to carry and operate. It is flexible; you pick from a range of
functions using just one button. Messages can be displayed and sent with 910/910T + Full
Roman characters.
The receiver is equipped with a two-line display, which can present 2x12 characters at the
same time. A message is automatically displayed when received. The pocket receiver stores
up to ten messages, with a total of 480 characters. Each message can be up to 120
characters long. The display normally shows your name/number in the system - the so
called identity.
While storing/charging the receiver in the T967 storage/charging rack, you receive
messages, give absence indication and save battery. You can customise the beep signal to
give a special signal for a selected kind of message.
2009-03-02/ Ver. B
1
User Manual
914T Pocket Receiver
TD 92548GB
Display
LED
Screw for
battery lid
IR Port
002
Function
button
Figure 2. Constituent parts of 914T
Display symbols
New message
Message is longer than two lines
!
Error / Out of range indication
Low battery
Audible signal switched off
Time stamp
I
Info page
Call number presentation. Message is added to one of the groups
Message is diverted to your receiver
Display
The display normally shows the identity and the current time.
The receiver is programmed with a unique identity within the system; it can be your call
number, your name or similar. Below this text, icons appears for example to notify you
when you receive a new message, or to keep track of functions you have activated like
time stamp.
If an error occurs, the symbol for error indication appears.
The display simultaneously shows 2×12 characters, longer messages automatically scroll
on the display, two lines at a time. The system administrator can change all preprogrammed texts.
Function Button
The function button is placed on the side of the receiver. All handling of the receiver is
carried out with long and short presses on this button.
LED
A flashing LED shows that a message is received. It also flashes when turning on the
receiver.
2009-03-02/ Ver. B
2
User Manual
914T Pocket Receiver
TD 92548GB
IR Port
When the pocket receiver is stored in the storage/charging rack, the radio receiver part in
the pocket receiver is automatically turned off. All communication is instead run by the IR
(infrared) port to save battery.
Battery
When not used, keep the pocket receiver in the storage/charging rack or turned off which
saves battery.
When the low battery symbol
is displayed, replace or charge the battery; the
performance of the radio receiver is otherwise not guaranteed. Use any LR3-sized battery
or the rechargeable Inductive Battery Pack (IBP1B).
To change battery, see 7 Operation and Maintenance on page 10.
Clip
The 914T is equipped with a clip that can be fastened to a pocket or another piece of
clothing.
3
Basic Functions
Turning on the receiver
Make one short press on the function button. The identity is shown in the display.
Turning off the receiver
Make two long presses on the function button.
Note: Unless you have the memory function activated, you erase all messages by turning
the receiver on and off.
Receiving a message
A beep signal is heard and the message automatically scrolls on the display for one
minute. The new message symbol
is shown until the message is accepted.
The double arrow symbol indicates that the message is longer than 24 characters. Make
a short press on the function button to display the next part of the message.
Accepting a message
Make one short press on the function button to accept a message. Once a message is
accepted, the display shows the next message. The new message symbol
stops
flashing when all messages are accepted.
If you have not read and accepted a message within the first minute, only the 24 first
characters of the message are shown. To display the rest of the message make a short
press on the function button.
2009-03-02/ Ver. B
3
User Manual
914T Pocket Receiver
TD 92548GB
Stepping through several messages
Make a short press on the function button to make the first message appear. Repeat for
next message.
Erasing a message
Step to the message you want to erase and make a long press on the function button until
******** appears.
Switching on/off the audible signal
Make a long press followed by a short press on the function button "Tone?" is displayed.
Make a long press to switch between On/Off.
When the beep signal is turned off, the symbol
signal is heard when a message arrives.
is shown in the display and no beep
Note: All pagings with high priority override a switched off audible signal.
Screensaver
By using the screensaver, a longer battery life is ensured. The screensaver function is preprogrammed and shuts the display off after a pre-set time. To activate the display again,
press the button. An incoming message turns the screensaver off automatically. After
reading the message, it is important to press the button to return to ID mode. By this, the
screensaver function is reactivated.
4
Display Menu
The display menu is your aid when you set your personal parameters.
A long press on the function button accepts and accesses the function settings while a
short press steps between the settings, ended by a long press to confirm the choice.
2009-03-02/ Ver. B
4
User Manual
914T Pocket Receiver
TD 92548GB
"Exit?" takes you back to the starting point where the identity is shown. This is also
automatically done after 30 seconds.
"User identity" Long
press
"Time"
Off?
Long
press
Short
press
Long
press
Short
press
Menu?
Short
press
Long
press
Long
press
VOL
"Call number"
"Group number"
RTC
Remind
LCD
Program?
Exit?
Short press
to step
Long press
to change
function
Exit?
003
Tone?
Figure 3. Display menu 914T
4.1
Display Menu Description
Use the display menu to change parameters in the 914T, step to the required function and
activate or deactivate it.
Note: Depending on your system, some functions may not apply to your 914T.
It is also possible to change the display text by using the software Pocket Unit
Programmer.
VOL
This function changes the beep signal volume. Choose between three volumes, a volume
step option, and a vibrator if your receiver has this option.
To receive pagings silently, see 3 Basic Functions . The system administrator can change the
melody of the signal beep, see 6 Programming the 914T on page 8.
Call Number
Your individual call number is set by your system administrator.
Group Number
In addition to the individual call number, your pocket receiver receives pagings on up to
five additional call numbers. These could, for example, be group pagings that you take
part of, or messages diverted to you. You can enable/disable pagings to each of these five
numbers.
The call number presentation symbol
at the end of the message indicates that the call
was received by one of the five extra paging numbers.
2009-03-02/ Ver. B
5
User Manual
914T Pocket Receiver
TD 92548GB
RTC, Time Stamp
The RTC (real time clock) in the paging system provides your pocket receiver with the time.
The time when the message was received is shown at the end of each message. The
function is indicated by the time stamp symbol
.
Note: The time stamp is not displayed if the message is older than 24 hours or consists of
too many characters.
Remind
If you have the remind function activated, a beep signal sounds on regular intervals until
you accept the message.
LCD
This function allows you to change the orientation of the text in the display, depending on
how you carry your receiver. The text is rotated 180 degrees.
Program?
The receiver has to be in the program mode with the text "PROGRAM" shown while
remote programming via radio.
Exit?
"Exit?" will take you to the starting point in the display menu, where the identity is
shown.
4.2
Function Settings
Make a long press followed by two short presses so "Menu?" is displayed. From here you
can choose between the following functions:
Change beep signal volume (VOL)
When "Menu?" is displayed, make a long press. "VOL" will appear, after the text a digit is
displayed. The volume levels sound from 1 (lowest) to 3 (highest). The stair symbol gives
you a beep signal that starts low and gets higher.
Press and hold the function button. Release the button at the desired beep signal.
If you have the vibrator option, this will be indicated by "VIB". "VIB + VOL 0" indicates
vibrator signal only, "VIB + VOL 1" indicates vibrator plus beep signal together with beep
signal number one.
Show individual call number (Call Number)
When "Menu?" is displayed, make a long press followed by a short press. "xxxxxxOn" is
displayed, the first part is your individual call number.
Note: Your individual call number always is enabled.
2009-03-02/ Ver. B
6
User Manual
914T Pocket Receiver
TD 92548GB
Activate/deactivate paging to a group number (Group Number)
When "Menu?" is displayed, make a long press followed by two short presses. Additional
group numbers and the text On/Off appears. Make a long press to switch between On
and Off, release the button at the desired setting. This enables/disables pagings to this
number.
Activate/deactivate time stamp function (RTC)
When "Menu?" is displayed, make a long press followed by short presses until "RTC" is
displayed. Make a long press to switch between On and Off, release the button at the
desired setting. This activates/deactivates the time stamp function.
Activate/deactivate reminder beep signal (Remind)
When "Menu?" is displayed, make a long press. Make short presses until "Remind" is
displayed. Make a long press to switch between On and Off, release the button at the
desired setting. This activates/deactivates reminder beep signal that sounds on regular
intervals until a message is accepted.
Change orientation of display text (LCD)
When "Menu?" is displayed, make a long press followed by short presses until "LCD" is
displayed. Make a long press to change the orientation of the display text.
Activate programming mode (Program?)
When "Menu?" is displayed, make a long press followed by short presses until
"Program?" appears. Make a long press to activate the programming mode,
"PROGRAM" appears.
When you program by remote, the receiver must show "PROGRAM". The receiver will
restart after receiving the correct parameters.
Return to main menu (Exit?)
Use short presses to step to the "Exit?" option that appears last in every menu level, and
make a long press. This returns you to the main menu (with the identity).
5
Programmable Functions
These functions vary depending on the 914T you have as well as system parameters. It is
the system administrator who activates the programmable functions.
Memory
This function saves your messages, even if you turn the receiver off.
Note: If you replace the battery you erase all messages, even if the memory function is
activated.
2009-03-02/ Ver. B
7
User Manual
914T Pocket Receiver
TD 92548GB
Test Paging
Each time you take the receiver out of the storage/charging rack, the system automatically
tests the receivers paging abilities.
Take the receiver out from the charging rack as usual. After three minutes check for error
messages. If an error message is displayed the test paging has failed, contact the system
administrator.
Beep Signals
To distinguish between different types of paging messages, you can choose between
seven different beep signals. More beep signals can be programmed by your system
administrator, see 6 Programming the 914T on page 8.
Absence Indication
With absence indication activated, and the receiver placed in the storage/charging rack,
anyone who tries to send you a message receives an absence indication. In some cases,
the paging may be diverted to somebody else.
Info-Page
The info-page consists of information that is regularly sent to the pocket receiver, for
example a value you need to monitor.
The info-page symbol I indicates an info-page message. Step beyond the last received
message with a short press on the function button to find the info-page.
Note: No beep signal is heard when an info-paging is received.
Call Diversion
Pagings, originally intended for someone else, can be automatically diverted to your
receiver. The call diversion symbol
indicates that the call has been diverted to your
receiver. The call number to which the call was originally intended is displayed after the
symbol.
6
Programming the 914T
The programming of 914T shall only be performed by the system administrator which sets
parameters and relevant functions in the receiver to customise its functionality. Some
functions can for example be available to the user while others are locked.
The parameter memory consists of an EEPROM. The pocket receiver is programmed by
using a computer containing the software application Pocket Unit Programmer (PUP)
included in the software package WinBK.
The receiver is usually programmed while it is in the storage/charging rack. It is also
possible to program the receiver remotely by radio.
2009-03-02/ Ver. B
8
User Manual
914T Pocket Receiver
TD 92548GB
Receiver Operation
Setting parameters provides following functions:
Display on/off
should the display be active or not when the receiver is in the
storage/charging rack.
Automatic on/off
sets the receiver to start/stop at pre-set times.
Text presentation
longer text messages either scroll on the display or are shown in
segments; this can be customised.
LED behaviour
sets the LED to blink in a customised sequence
Beep signals
can be customised, but the PUP has several standard beep signals to
choose from
Display menu
all text in the display can be changed to fit your own language or
terminology
Note: This document uses default values.
Test paging
Each time you take the receiver out of the storage/charging rack, the system automatically
tests the receiver’s paging abilities. The receiver expects a paging from the system within
three minutes after you take it out of the storage/charging rack. If this paging is not
received, an error message appears on the display.
User permissions
It is possible to restrict access to functions. You can choose to lock user parameters
preventing the user from accessing these functions. As a result, the function is no longer
accessible to the user and disappears from the receiver.
These parameters are: Remind beep signal, RTC, ICT, VoLume, Off Mode, Silent Mode, Set
Mode, LCD orientation, PROGRAMming mode and Group numbers.
6.1
System Functions
The following system functions are set in the system and work together with the 914T.
Info-Page
This function is used to for example monitor measurements. The info-page consists of
information that is automatically updated at regular intervals.
The system sends pagings containing information to the receiver. The paging is marked as
an info-page and the receiver stores the information. You find the info-page stored last in
the list of messages in the receiver. The system continues to send pagings continuously
updating the information. You can have up to six different info-pagings in the 914T.
The beep signal does not normally sound when an info-message is received; but this can
be custom set. You can, for example, specify an alarm value that triggers an alarm signal.
Auto Accept/Delete
The system can be used to send pagings that feature the commands delete and accept.
This is for example used to delete/accept a message after a pre-set time.
2009-03-02/ Ver. B
9
User Manual
914T Pocket Receiver
TD 92548GB
Auto accept/delete can for example be used as follows: In a hospital all the nurses receive
a group paging of an alarm in a room. One nurse goes to attend the patient, presses a
button that sends a command to the system that help is present. The system then sends a
group paging that clears this specific paging from all other receivers.
7
Operation and Maintenance
Storing the 914T
While the receiver is not in use, place it in the T967 storage/charging rack, to save battery.
Note: If you are using a rechargeable battery, make sure to place your receiver regularly in
the charging rack, for example every night.
Replacing the battery
The battery is placed on the bottom of the receiver. Unscrew the screw and flip up the
cover. Take the battery out. Make a long press on the function button to reset the battery
warning. Replace the battery with any LR3-sized battery or the rechargeable Inductive
Battery Pack, IBP1B. Insert it according to the markings, close the cover and firmly fasten
the screw.
IMPORTANT: Charging or replacement of battery of EX-version is not permitted in
restricted area.
Use only approved battery types in combination with EX-version.
For approved battery types, see Certificate of Conformity, PTB 08 ATEX
2040 & IECEx PTB 08.0061.
Note: It can take up to 10 seconds before the receiver starts up. Check the display that no
error messages appear.
Note: If you replace the battery you erase all messages, even if the memory function is
activated.
Charging the battery
Place the receiver in the T967 storage/charging rack. The first time you use the inductive
battery, IBP1B, charge it for approximately 14 hours. After that, store the receiver in the
storage/charging rack whenever you are not using it.
IMPORTANT: Charging or replacement of battery of EX-version is not permitted in
restricted area.
Use only approved battery types in combination with EX-version.
For approved battery types, see Certificate of Conformity, PTB 08 ATEX
2040 & IECEx PTB 08.0061.
Note: The low battery symbol
indicates a low battery. Change or charge the battery
immediately, the performance of the radio receiver is otherwise not guaranteed.
2009-03-02/ Ver. B
10
User Manual
914T Pocket Receiver
TD 92548GB
Handling error indication
The error indication/out of range symbol ! indicates that you probably are outside the
coverage area. Check that the receiver is within coverage area.
If this symbol remains, it can be an indication of system error or that the radio in the
receiver is out of order. Try to restart the receiver. If the symbol still remains, contact the
system administrator.
Note: The error indication/out of range symbol ! together with the text 914TVX.XX,
indicates a parameter error. Reprogram the receiver using the PUP.
8
ATEX/IECEx Safety Instructions
Intrinsically safe classification
II 2G EX ib IIC T4
CE 0470
IECEx PTB 08.0061
PTB 08 ATEX 2040
Charge the battery
Battery charging or replacement is NOT permitted in a hazardous area.
For approved battery types, see EC Type Examination and IECEX Scheme Certificate of
Conformity and following supplements.
The document above and the EC Declaration of Conformity can be found at:
https://www.ascom-ws.com/doc/ and http://www.iecex.com
Attention
• The product is housed in an enclosure that meets IP64. However, the ATEX/IECEx
classified transceiver is not intended to be immersed in dust or water.
• In the case of damage suspect, do not use the ATEX/IECEx classified transceiver in a
hazardous area.
• Make sure that the product marking corresponds to the site requirements.
• Before installation consult the product documentation.
• National safety rules and regulations have to be observed.
• Do not use accessories to the product without ensuring that they are suitable for use in
a hazardous area.
• Modification of the product is not permitted.
• Product repair has to be done at authorised repair shops only.
2009-03-02/ Ver. B
11
User Manual
914T Pocket Receiver
9
TD 92548GB
Regulatory Compliance Statements (EU/EFTA only)
This equipment is intended to be used in the whole EU & EFTA.
This equipment is in compliance with the essential requirements and other relevant
provisions of R&TTE Directive 1999/5/EC. The Declaration of Conformity may be consulted
at: https://www.ascom-ws.com/doc/
This equipment uses frequencies referring to different rules in the various EU&EFTA
countries. A radio communication licence is in most cases neccessary for the use of the
equipment. The frequencies required for operation of the radio equipment must be
notified and assigned prior to usage of the equipment.
10
Regulatory Compliance Statements (USA and Canada only)
FCC compliance statements
This equipment has been tested and found to comply with the limits for a Class B digital
device, pursuant to part 15 of the FCC Rules. These limits are designed to provide
reasonable protection against harmful interference in a residential installation. This
equipment generates, uses and can radiate radio frequency energy and, if not installed
and used in accordance with the instructions, may cause harmful interference to radio
communications. However, there is no guarantee that interference will not occur in a
particular installation. If this equipment does cause harmful interference to radio or
television reception, which can be determined by turning the equipment off and on, the
user is encouraged to try to correct the interference by one or more of the following
measures:
• Reorient or relocate the transmitting antenna.
• Increase the separation between the equipment and receiver.
• Connect the equipment into an outlet on a circuit different from that to which the
transmitter is connected.
• Consult the dealer or an experienced radio/TV technician for help.
Information to user
This device complies with Part 15 of the FCC Rules. Operation is subject to the following
two conditions:
(1) this device may not cause harmful interference, and
(2) this device must accept any interference received, including interference that may
cause undesired operation.
Modifications
Any modifications made to this device that is not approved by the supplier may void the
authority granted to the user by FCC to operate the equipment.
IC compliance statements
This Class B digital apparatus complies withCanadian ICES-003. Cet appareil numérique
de la Classe B conforme á lanorme NMB-003 du Canada.
2009-03-02/ Ver. B
12