1
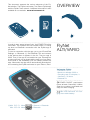
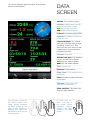
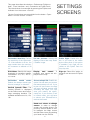
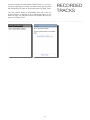
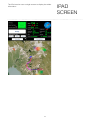
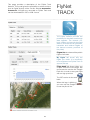
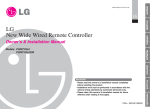
USER’S
MANUAL
For iPhone and iPad
OVERVIEW
FLYNET ALTI/VARIO
CONTROL SCREEN
MAP SCREEN
DATA SCREEN
SETTINGS SCREENS
RECORDED TRACKS
IPAD SCREEN
FLYNET TRACK
SECURITY
CONTENTS
3
3
4
5
6
7
8
9
10
11
2
This document presents the various elements of the FlyNet solution: The FlyNet variometer, The iPhone FlyNet app
and the FlyNet Track network. Additional information is also
available on our website: www.asinstrument.ch
In order to start, press at least 2 sec. the POWER ON of the
variometer. The FlyNet2 will emit sounds while it is rising
up when no Bluetooth connection with the FlyNet app is
activated.
To start a connection with the app, go to your iPhone/iPad
Settings >> Bluetooth (*). Set Bluetooth ON and connect
to the device when it appears in the list. The pin code is
0000. Then, if the app is not installed on your iPhone/iPad,
a prompt will ask you to download the app from App Store.
At the end of the installation you can directly launch the
app. Afterwards, the app will be automatically launched after connecting the FlyNet variometer to your iPhone / iPad.
OVERVIEW
FlyNet
ALTI/VARIO
Variometer FlyNet:
- Resolution: 10 cm
- Maximum altitude: 9,000 m
- Sampling rate: 50 samples / s
- Autonomy : 30 hours
- Bluetooth 2.1
POWER ON/OFF push-button
(press at least 2 seconds). It blinks
when the module is activated and
stays on while charging.
Mini USB connector for charging the module battery.
(*)With iOS 5.1 follow:
With iOS 6.0 follow:
-> General -> Bluetooth
-> Bluetooth
3
Before starting a flight, the three indicators in the top right
of the screen should be green to enjoy whole functionalities
of the FlyNet app. If your indicators are red, press on it to
see how to activate / connect the associated functionality.
Afterwards, connections to FlyNet Track Network will be automatic. The illustration below describes the different parts
of the FlyNet app.
CONTROL
SCREEN
Connection established
A green indicator indicates that the
associated functionality is activated /
connected.
Waiting for connection
A yellow indicator indicates that the
app is trying to activate / connect to
the associated functionality.
Not connected in / off
A red indicator indicates that the associated functionality (GPS, FlyNet Track
or vario) is not activated / disconnected.
-GPS must be activated to start tracking a flight and
-FlyNet Track must be connected to
exchanging data on the network *.
-The variometer connection is mandatory for starting a Flight.
Ready: After pressing this button, the
recording of the flight will start when
the pilot reaches a speed of 8 km/h.
Recording ends when no more movement are detected for 10 seconds or
by using this button.
GPS calibration: Press this button to
automatically calibrates the altitude
through the GPS. This option is available if the GPS provides an altitude
and if the FlyNet module is connected.
This button allows
to return to this current screen
This button displays This button displays
the Map screen
the Data screen
FlyNet Calibration: Press this button
to get the exact altitude according to
your GPS position and the FlyNet elevations database. The three indicators
must be green to use this feature.
The Open Menu button displays a menu for setting the module,
the GUI and view your recoreded tracks (see pages «Settings
Screens» and «Recorded Tracks»).
Manual Calibration button: It displays
a window to calibrate the altitude manually. This option is available only if a
FlyNet module is connected.
Variometer status:
5 levels and battery
charge indicator.
* The FlyNet Track network allows to:
° Share your location and your localized thermal currents.
° Receive
the positions and thermal current
shared by other users.
4
° Save, analyze or view on live your flights.
Important: FlyNet Track uses the GSM
network. The data transferred may be
charged by your carrier.
This screen is divided in a main parameters panel and an
interactive map. Users and thermal currents are displayed
on the map. A distinctive color lets you know the relative altitude of the detected thermals and other pilots using FlyNet.
MAP
SCREEN
Altitude of the FlyNet module
v-Speed: Vertical speed of the
FlyNet module.
Positive vertical speed
Negative vertical speed
h-Speed: Horizontal speed (GPS)
Compass: Available if your smartphone has one.
Definition of thermal currents and
other users colors:
The object is located
500m below
The object is located
500m above
The object is located at
the same altitude
Displays your route colored according to the rate of fall of the module
FlyNet:
Positive vertical speed
No vertical speed
Negative vertical speed
When the module goes up
enough, a circle appears
to indicate a thermal current. This data will be shared with
the other pilots in your area. The
diameter of the circle is based on
the powerfulness of the thermal
current detected.
Joe, John: Pilots using FlyNet
solution found in your area.
Your location is always
displayed in blue. The
map will be automatically adjusted in order to keep you
in the center of the map when you
are moving.
5
This screen displays flight information and provides
access to the statistics.
DATA
SCREEN
Altitude of the FlyNet module
v-Speed: Instantaneous vertical
speed of the FlyNet module.
Positive vertical speed
Negative vertical speed
h-Speed: Horizontal speed (GPS)
Compass: Available if your smartphone has one.
v-Speed Average: This vertical
speed is computed using a large
averaging. Unit are m/s. This
data can have more sense as the
instantaneous vertical speed on
turbulated thermals.
L/D ratio: Glide ratio
Altitude from start: Gap between
current and altitude on takeoff.
Above the takeoff altitude
Below the takeoff altitude
Time: Current time
Distance: Flight distance
Flight Time: Time elapsed since
the takeoff.
Pilots: Number of pilots detected
in your area.
Thermals: Total of thermals
detected and received
Show statistics: This button displays the flight statistics
The proximity sensor of
the iPhone allows switching quickly between
the Map screen to the
Data screen simply by
passing your hand over
the iPhone even if you are
wearing gloves.
A Touch pad surface on the top of
the screen allows
switching
quickly
between the Map
screen to the Data
screen.
6
This page describes the windows «Preferences FlyNet module», «User Interface» and «Connection to FlyNet Track».
This last windows is accessible by pressing the FlyNet track
indicator from the screen «Control».
The two first windows are accessible from the button «Open
Menu» from the screen «Control».
SETTINGS
SCREENS
Variometer sensivity: Defines
the sensitivity of the variometer.
I.E.: If the selection is 30 cm, the
app sounds when the variometer increases its altitude of 30
cm.
Set sat. pictures: Selects the
display mode of the map: Road
/ Satellite image.
Public flight: Enable this option is you want to be visible
by the other pilots. If this option
is enabled, your flight will be
visible on the FlyNet Track list
from the web.
Sink Alarm: Selects the beeps
threshold for negative speeds.
Possibilities: -2.5, -3.5, -4.5 m /
s or never.
Display user names: If
enabled, user names are displayed on the map.
Sign up: Select this option to
create a new account on FlyNet
Track.
Variometer sound mode:
Selects the beeps sound type.
Normal, analogic or vibration.
Screen always ON: Enable this
option if do not want your screen
that automaticaly turn off. If you
let turn off your screen, the app
will keep emitting sounds and
recording the flight. You can
save your battery life significantly but if you recieve a call
in locked mode, you will have
to unlock your iPhone/iPad to
retrieve the sound.
Vertical Speed2 Filter: The
Vertical Speed2 is displayed
on the Data screen and uses a
large averaging duration. The
available durations are: 6s, 12s,
18s.
Hand over screen to change
screen: In order to change
screen with regular gloves, the
proximity sensor allows to switch between the Map screen
and the Data screen by passing
your hand over the iPhone.
7
If you are flying not connected to FlyNet Track or if you cannot close your flight correctly, the data will be stored inside
the iPhone/iPad in order to send them later on FlyNet Track.
The first screen below is accessible from the menu on
screen Control. It displays a list of all stored flights. If you
select a flight, the second screen will appear and let you
send it on FlyNet Track.
8
RECORDED
TRACKS
The iPad version uses a single screen to display the whole
information.
9
IPAD
SCREEN
This page provides a description of the FlyNet Track
Network. This portal gives the possibility to review and analyze its flights directly online via this website www.asinstrument.ch. All flights are recorded on FlyNet Track and
can be downloaded in IGC or KML format.
FlyNet
TRACK
The FlyNet network provides the
possibility for the pilots to exchange
data together. The network collects, shares and records the flight
data on a central server (positions,
intensities and relative heights of
the thermal currents, positions of
the pilots).
Flights list tab shows all the public
fights of all users.
My flights tab shows only the
flights you made. It is necessary
to be registered on FlyNet Track to
access this tab.
Flight detail tab shows gives you
a quick overview of the flight. We
recommand to use the link Google
Earth link in order to see your flight
with an high precision.
The IGC version is also available
When this logo is blinking (
)
you can use the Google Earth file
to see the pilot is live.
10
ATTENTION The module FlyNet is an instrument
of assistance to the free flight and not a reference tool.
Consequently, the parameters and values shown should be
considered as a representation that may be incorrect and
not as reference values for the control. It is your own responsibility to evaluate the conditions and flight parameters.
Advanced Sport Instrument does not assume responsibility
and expressively disclaims liability for loss, damage injury
or accidents when using the module.
See also: www.asinstrument.ch/disclosure
SECURITY
° Do not expose directly to the wind during use. The values
measured can find them disturbed.
° Do not expose to water.
° Do not disassemble or open the device. In this case the
warranty is void.
° Do not put the unit in locations subject to extreme temperatures.
° Do not place heavy objects on the device.
° Do not get in the grease, dust, oil, solvents or other aerosols with the device.
° Do not subject the unit to strong vibrations or violent
shocks.
Advanced Sport Instrument Sàrl
Route du Lac 18
CH - 1094 Paudex
www.asinstrument.ch
[email protected]
11