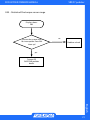
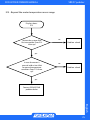
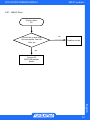
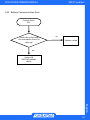
1
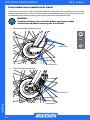
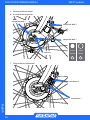
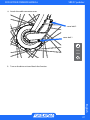
Owners Manual
English
SRS/SY pedelec
SRS/SY pedelec
SR SUNTOUR OWNERS MANUAL
SRS/SY pedelec
WARNING !
Failure to comply with the given warnings and instructions may cause
damage to the product, injuries or even death to the rider and user.
►► Be sure to read this manual carefully before using your electric bicycle.
Inappropriate usage of your electric bicycle may cause damage to the
product, serious injuries or even death to the rider.
►► Do not use damaged components – consult your authorised SR SUNTOUR
dealer immediately.
►► The battery of the electric bicycle contains chemicals which can be dangerous when used improperly, warnings included in this manual must
be followed in order to reduce the possibility of dangerous situations
resulting in injuries or possible death. Never try to open any SR SUNTOUR
device of the electric bicycle, especially not the battery. Opening any SR
SUNTOUR battery implies the risk of getting seriously injured.
it
n
o
►► Do not let the battery come into contact with water or any other liquid
other than rain or snowfall. The guarantee will be void if the battery gets
in contact with water. Whenever the battery gets in contact with liquid
immediately disconnect it to prevent dangerous situations.
u
a
►► Do not store the battery above room temperature. The battery life expectancy will be significantly reduced if the battery is stored under higher
temperatures.
►► Do not place the battery immediately close to a flame or any other heat
source. Extreme heat can cause the battery to explode. Keep the area
where the battery is charged well ventilated. Keep it free from litter and
anything combustible to avoid fire from sparks or overheating.
C
►► The battery must only be charged with the supplied charger. Using a
different charger can result in malfunction and reduced lifecycle of the
battery.
►► Charge the Li-ion battery indoors at a temperature between 0ºC to 40ºC
(32ºF -104 ºF). The Li-ion battery charger cannot charge a battery with a
temperature above 60º C or less than -3 ºC.
English
2
SR SUNTOUR OWNERS MANUAL
SRS/SY pedelec
►► If you notice a strange smell or smoke, un-plug the charger immediately
from the power socket and disconnect the battery from the charger!
Take your battery and charger to your authorized dealer for service or
replacement.
►► Disconnect the charger when the battery is fully charged.
►► Use only genuine SR SUNTOUR parts. The use of non-designated aftermarket accessories, replacement and spare parts voids the warranty of
the electric bike drive unit and might cause failure to the system.
n
o
►► Do not disassemble or modify any of the parts of the drive unit. The
warranty will be void in case of any modification.
it
►► SR Suntour electric bike units are designed for the usage on single
seated bicycles for regular and common use on regular city- and trekking bikes. The intended use of the drive unit is accordingly.
►► This instruction sheet contains important information about the correct
installation, service and maintenance of your drive unit. Nevertheless
please be informed that special knowledge and tools are essential to
install, service and maintain SR SUNTOUR drive units for electric bicycles.
Common mechanical knowledge may not be sufficient to repair, service
or maintain the devices. Therefore we strongly recommend getting your
system serviced and/or maintained by a trained and qualified bicycle
mechanic. Improper installation, service or maintenance can result in
failure of the product, accident, injury or even death.
C
u
a
►► Always be equipped with proper safety gear. This includes a properly
fitted and fastened helmet. Make sure your equipment is in flawless
condition.
►► Make sure to learn about the electric power assistance, the changed
bicycle behaviour and handling of your bike. Learn how to ride and train
your skills. Know your limits and never ride beyond those.
English
3
SR SUNTOUR OWNERS MANUAL
SRS/SY pedelec
Foreword
Dear customer,
congratulations on your new electric bicycle purchase. The bike is equipped with the SR SUNTOUR
SRS-SY-pedelec drive unit with a rechargeable Lithium-Ion battery, a display and user interface,
a torque sensor, a controller and a brushless front hub motor..
To make your ride smooth, safe and fun please take some time to read this manual carefully. It
contains information on the proper care of the drive unit of your electric bicycle and advice on
how to achieve the bikes’ and batteries’ full lifespan.
In case of any enquiries not covered by this manual please contact your local dealer.
Enjoy the riding!
What is a Pedelec?
It is legally considered as a conventional bicycle, whereas the
rider is enjoying some electrical power assistance based on
the human power brought up by the rider. Just ride like on a
conventional bike, the system will add some extra power. It feels
like having tailwind or a continuous descending ride.
In European Countries the assistance is legally limited to 250W
nominal power and a max. speed of 25km/h. Riding faster than
that is possible, but there will be no assistance when riding
faster than 25km/h.
A Pedelec is sometimes called EPAC, Light-Electric-Vehicle (LEV), Hybrid Bicycle or eBike or
electric bicycle with Pedal-Assisted-System (PAS).
Torque Sensor
Li-Ion Battery
Motor
Drive
Control
Motor drive
Hall IC
3-Phase
Brushless
Motor Driver
DC Brushless
Motor
English
schematic functional diagram
4
SR SUNTOUR OWNERS MANUAL
SRS/SY pedelec
Table Of Contents
Foreword....................................... 4
Table Of Contents......................... 5
Drive Unit Components............... 6
Display and User Interface............7
Battery, Charger and charger
adaptor.......................................... 8
Battery Charging.......................... 9
User Interface and Display......... 11
Fuel Gauge...................................... 12
Assist Mode..................................... 13
Information Modes....................... 13
Speed................................................ 14
Total Distance................................. 14
Trip Distance................................... 15
Re-setting the trip distance..................15
Trip Time........................................... 15
Re-setting the trip time..........................15
Average Speed............................... 16
Wheel Size....................................... 16
Setting the wheel diameter................. 16
Error Code.........................................17
Error Codes................................. 18
Error Code Chart............................ 18
Error troubleshooting guide..... 19
E00 - Controller Communication
Error..............................................................19
E02 - Coil Sensor Error............................ 20
E03 - Beyond the torque sensor
range.............................................................21
E05 - Torque Sensor Error......................22
E11 - Beyond the battery voltage sensor- or battery-current sensorrange................................................. 23
E12 - Beyond the battery temperature
sensor range................................... 24
E13 - Beyond the motor temperature
sensor range....................................25
E21 - Drive Battery over current, low
voltage or overvoltage............... 26
E22 - Battery Overheating.....................27
E23 -Motor Overheating....................... 28
E31 - Hall-IC Error..................................... 29
E32 - Switch Box Communication
Error................................................... 30
E33 - Battery Communication Error...31
Operating Range........................ 32
Range Influencing Factors......... 32
Maintenance and cleaning........ 33
Cleaning........................................... 33
Tightening Torque......................... 33
Disassemble and assemble front
wheel................................................. 34
Technical Specification............... 38
Motor........................................................... 38
Controller features.................................. 38
Charger........................................................ 38
Battery......................................................... 38
Conformity.................................. 38
Limited Warranty........................ 39
English
5
English
6
*
Controller
Torque sensor crankassembly
Display
Hub motor
Suspension fork
Shown on a virtual bike which may look different to the bike which this owners manual came along with
Upper holder and lock
Battery
Drive Unit Components
SR SUNTOUR OWNERS MANUAL
SRS/SY pedelec
7
English
*
Shown display layout may vary compared the display on the bike which this owners manual came along with
Mode Button
On/Off-Button
Info-Button
Display and User Interface
SR SUNTOUR OWNERS MANUAL
SRS/SY pedelec
English
8
*
Battery charger adaptor
Battery
Shown devices may vary compared the display on the bike which this owners manual came along with
Battery charger
Battery, Charger and charger adaptor
SR SUNTOUR OWNERS MANUAL
SRS/SY pedelec
SR SUNTOUR OWNERS MANUAL
SRS/SY pedelec
Battery Charging
Your bike is delivered together with a charger
and charger adaptor. Please only use these
together and don’t try to combine with other
devices.
Please note: The battery needs an initial full
charge before the first use of the bike and
after every use, regardless of the remaining
capacity of the battery. The battery doesn’t
need to be empty before charging it.
To charge the battery please follow these
steps:
1. The system must be switched off by
pressing the “on/off”-button on the display.
4. Pull the battery out upwards.
5. Connect the charger adaptor to the
charger.
2. Insert the key of the battery lock into
the upper battery holder, turn the key
counter-clockwise and keep it so while
you push the battery out to the left side
of the bike.
3. After you have pushed out the battery a
little bit to the side (depending on the
frame design) the handle can be swinged
out for an easy and safe handling.
6. Connect the charger to a 110-240V wall
socket.
English
9
SR SUNTOUR OWNERS MANUAL
7. Connect the battery to the adaptor.
8. The LED on the charger shows a red continuous light during charging.
In case the LED starts flashing fast (0.2s
on / 0.2s off) it means there is a abnormal
situation. In this case please disconnect
and reconnect the charger to the battery.
If the same flashing is showing up again
please unplug the charger and battery
and contact your local dealer.
In case the LED starts flashing slowly
(0.5s on / 1.0s off ) the temperature of
the battery is not within the specification for charging. Unplug the battery and
wait until the battery is cooling down to
room temperature.
9. When the LED is off the battery is fully
charged.
If the battery is completely discharged a
full charge will take approximately 400
minutes.
English
10
SRS/SY pedelec
10. Insert the battery into the lower cradle
and swing it back into the upper holder.
Check if the lock has snapped in by pushing the battery back out to the left.
SR SUNTOUR OWNERS MANUAL
SRS/SY pedelec
User Interface and Display
The user interface and display are located on
the handlebar. When the system is switched
on by using the on/off-switch, the LCD display
is showing the remaining battery capacity, the
chosen assist mode as well as information on
the following features:
• Remaining battery capacity
• Speed
• Average speed
• Total riding distance
• Trip distance
Any information will be displayed only when
the system is activated.
The 3-button design is providing a intuitive way
to switch between the available assist modes
and the desired ride information.
When it is dark the backlight of the screen display is turned on automatically when the drive
unit is activated. The backlight is only on as the
system is activated.
During the first setup of the bike the wheel size
have to be set on this user interface.
The system will switch off automatically after
10 minutes of inactivity.
Fuel gauge
Info-Button
Datacorrespondingtothechoiceof
information mode
On/Off-button
Mode-button
Information-indicator
11
English
Assist-mode indicator
SR SUNTOUR OWNERS MANUAL
SRS/SY pedelec
Fuel Gauge
When the main switch is turned on, the battery
fuel gauge shows up. with its 4 digit icon.
The remaining battery capacity is is represented
by illustration as follows.
English
12
Remaining capacity
Remaining capacity
100-75%
75-50%
Remaining capacity
Remaining capacity
50-25%
25-10%
Blinking 2 times per second
Blinking 8 times per second
Remaining capacity
Remaining capacity
10-0%
0%
SR SUNTOUR OWNERS MANUAL
SRS/SY pedelec
Assist Mode
The user can choose the ratio of assistance depending on his personal wish by pressing the
Mode-button “M” on the user interface.
The percentage of assist power related to the input of the rider is varied from 50%, 100% and
150%.
ss
ss
pre
pre
ss
pre
Information Modes
The ride information Speed, Total Distance, Trip Distance, Trip Time and Average Speed are shown
one after another when pressing the Information-Button “I”.
The setting mode and data re-setting modes are entered by pressing the Information Button “I”
and Mode button “M” simultaneously when the related data is being displayed.
pre
speed
wheel
size setting
pre
* setting mode
avalable
pre
ss
sim
ult
an
iou
ss
pre
total
distance
ss
trip
distance
pre
ss
average
speed
sly
* setting mode
avalable
ss
pre
trip
time
* setting mode avalable
ss
13
English
pre
ss
SR SUNTOUR OWNERS MANUAL
SRS/SY pedelec
Speed
The speed is shown in kilometres per hour.
Display speed range: 0.0 .. 60.0km/h
Display accuracy: 0.1km/h
Total Distance
The total distance is counted when the system is activated and is displayed in kilometres.
Display range: 0.0 .. 9999km
English
Display accuracy: 1km
14
SR SUNTOUR OWNERS MANUAL
SRS/SY pedelec
Trip Distance
The trip distance is counting when the system is activated.
Display range: 0.0 .. 999km
Display accuracy: 1km
Re-setting the trip distance
1. Reset the trip distance by pressing the mode- (M) and info-button (I) simultaneously while
it is displayed.
Trip Time
The Average Speed is calculated on the trip distance.
.Display range: 00.00 .. 99.59 hh:mm
Re-setting the trip time
15
English
1. Reset the trip time by pressing the mode- (M) and info-button (I) simultaneously while the
trip time is displayed
SR SUNTOUR OWNERS MANUAL
SRS/SY pedelec
Average Speed
The average speed is calculated on the trip distance.
.Display range: 0.0 .. 60.0km/h
Display accuracy: 0.1km/h
Wheel Size
The Wheel Size need to be set in order to show the correct speed.
.Nominal Wheel Diameter: 26inch, 27inch or 28inch
Setting the wheel diameter
1. Set the wheel diameter by pressing the mode- (M) and info-button (I) simultaneously while
the average speed is shown.
2. The hours start blinking and can value can be increased by pushing the mode button (M)
English
3. Press the info button (I) to adjust the diameter
4. Exit the setting mode by pressing the info-button (I)
16
SR SUNTOUR OWNERS MANUAL
SRS/SY pedelec
Error Code
When an error is recognized by the system, it is shown on the display based on the error data
from the controller. When an error is shown, the fuel gauge will not be displayed.
The error codes are shown in the chart on the following page.
English
17
SR SUNTOUR OWNERS MANUAL
SRS/SY pedelec
Error Codes
Error Code Chart
English
18
Error code
Type of error
E00
Controller communication error
E01
Coil sensor error
E02
Electric potential error
E03
Beyond of the torque sensor range
E05
Torque sensor error
E11
Beyond the battery voltage sensor range or
battery current sensor range
E12
Beyond the battery temperature sensor range
E13
Beyond the motor temperature sensor range
E21
Drive battery over current, lower/over voltage
E22
Battery overheating
E23
Motor overheating
E31
Hall-IC signal error
E32
Switch case communication error
E33
Battery communication error
SR SUNTOUR OWNERS MANUAL
SRS/SY pedelec
Error troubleshooting guide
E00 - Controller Communication Error
Display shows
E00
Restart the system after
10s interruption. Does E00
show up?
no
Problem solved
yes
Check cables and connections between battery,
controller, crank sensor
and display
no
Problem solved
yes
Contact SR
SUNTOUR pedelec
dealer
English
19
SR SUNTOUR OWNERS MANUAL
SRS/SY pedelec
E01 - Coil Sensor Error
Display shows
E02
Check cables and connectors between controller
and crank
no
Problem solved
yes
no
Exchange the coil bobbin
yes
Contact SR
SUNTOUR pedelec
dealer
English
20
Problem solved
SR SUNTOUR OWNERS MANUAL
SRS/SY pedelec
E03 - Outside of the torque sensor range
Display shows
E03
Restart the system after
10s interruption. Does E03
show up?
no
Problem solved
yes
Contact SR
SUNTOUR pedelec
dealer
English
21
SR SUNTOUR OWNERS MANUAL
SRS/SY pedelec
E05 - Torque Sensor Error
Display shows
E05
Restart the system after
10s interruption. Does E05
show up?
no
Problem solved
yes
Check cables and connectors between controller
and crank. Restart.
no
Problem solved
yes
Check coil bobbin for fixation. When re-tightened
and restart, does E05
show up?
yes
English
Contact SR
SUNTOUR pedelec
dealer
22
no
Problem solved
SR SUNTOUR OWNERS MANUAL
SRS/SY pedelec
E11 - Beyond the battery voltage sensor- or battery-current sensor-range
Display shows
E11
Restart the system after
10s interruption. Does E11
show up?
no
Problem solved
yes
Contact SR
SUNTOUR pedelec
dealer
English
23
SR SUNTOUR OWNERS MANUAL
SRS/SY pedelec
E12 - Beyond the battery temperature sensor range
Display shows
E12
Restart the system after
10s interruption. Does E12
show up?
no
Problem solved
yes
In case the battery is extremely cold or hot. Wait
for normal temperature
condition. Does E12 show
up?
yes
Remove the battery from
the bike and Contact SR
SUNTOUR pedelec dealer
English
24
no
Problem solved
SR SUNTOUR OWNERS MANUAL
SRS/SY pedelec
E13 - Beyond the motor temperature sensor range
Display shows
E13
Restart the system after
10s interruption. Does E13
show up?
no
Problem solved
yes
In case the motor is
unusual cold or hot. Wait
for normal temperature
condition. Does E13 show
up?
no
Problem solved
yes
Contact SR SUNTOUR
pedelec dealer
English
25
SR SUNTOUR OWNERS MANUAL
SRS/SY pedelec
E21 - Drive Battery over current, low voltage or overvoltage
Display shows
E21
Restart the system after
10s interruption. Does E21
show up?
yes
Contact SR
SUNTOUR pedelec
dealer
English
26
no
Problem solved
SR SUNTOUR OWNERS MANUAL
SRS/SY pedelec
E22 - Battery Overheating
Display shows
E22
Restart the system after
10s interruption. Does E22
show up?
no
Problem solved
yes
In case the battery is
unusually warm. Wait
for normal temperature
condition. Does E22 show
up?
no
Problem solved
yes
Remove the battery from
the bike and Contact SR
SUNTOUR pedelec dealer
English
27
SR SUNTOUR OWNERS MANUAL
SRS/SY pedelec
E23 -Motor Overheating
Display shows
E23
Restart the system after
10s interruption. Does E23
show up?
no
Problem solved
yes
In case the motor is
unusually warm. Wait
for normal temperature
condition. Does E23 show
up?
yes
Contact SR SUNTOUR
pedelec dealer
English
28
no
Problem solved
SR SUNTOUR OWNERS MANUAL
SRS/SY pedelec
E31 - Hall-IC Error
Display shows
E31
Restart the system after
10s interruption. Does E31
show up?
no
Problem solved
yes
Contact SR
SUNTOUR pedelec
dealer
English
29
SR SUNTOUR OWNERS MANUAL
SRS/SY pedelec
E32 - Switch Box Communication Error
Display shows
E32
Restart the system after
10s interruption. Does E32
show up?
yes
Contact SR
SUNTOUR pedelec
dealer
English
30
no
Problem solved
SR SUNTOUR OWNERS MANUAL
SRS/SY pedelec
E33 - Battery Communication Error
Display shows
E33
Restart the system after
10s interruption. Does E33
show up?
no
Problem solved
yes
Contact SR
SUNTOUR pedelec
dealer
English
31
SR SUNTOUR OWNERS MANUAL
SRS/SY pedelec
Operating Range
Assist Mode
Countryside riding
50-70km
40-60km
30-50km
Hilly Area and City
Riding
25-35km
20-30km
15-25km
Range Influencing Factors
The operating range is influenced by several factors. By knowing them it can be compensated so that the range will not be limited too much. The factors are the following:
• Temperature
• Wind
• Hill climbs
• Riding style; alternating riding speeds, especially with ongoing braking situations
• Brake friction
• Tire pressure and rolling resistance of the tire
• Riders weight
• Chosen gear ratio
• Age and condition of the battery
• Use of dynamo generator
English
32
SR SUNTOUR OWNERS MANUAL
SRS/SY pedelec
Maintenance and cleaning
Cleaning
If your bike or any component of the electric bike unit is dirty, be sure to remove the battery
before cleaning the bike. Clean it with a soft, damp cloth and neutral cleaner or a solution of
dishwasing detergent and water. Never use a high-pressure cleaner. Never bring the battery into
direct contact with water. If the battery needs to get cleaned use a moistly sponge or similar to
clean it. Never use industrial solvents or aggresive chemicals for cleaning.
Before inserting the battery make sure to dry the contacts of the lower battery holder and battery.
WARNING !
When the battery gets in contact with more water than it gets during
common rain- or snowfall there is a danger of explosion.
Tightening Torque
Bolt dimensions
Torque
[Nm]
Controller fixing bolt
Controller cover fixing bolt
Display fixing bolt
Crank fixing bolt
Coil bobbin fixing bolt
Stay plate fixing bolt
Stay cover fixing bolt
Lock cylinder fixing bolt
Upper battery holder fixing bolt
Discharge plug fixing bolt
Lower battery holder fixing bolt
Hub Axle Nuts
Torque bar bolts
Cover bolts
M5*P0.8
M4*P0.7
M4*P0.7
M8*P1.0
M4*P0.7
M5*P0.8
M4*P0.7
M5*P0.8
Tapping screw
Tapping screw
M5*P0.8
M10x1
M5*P0.8
M4xP0.7
6-8
1-1.2
4-6
45-50
1.7-2.0
6-8
1.7-2.0
6-8
0.8-1.0
0.3-0.5
4-6
20
6-8
4
33
English
Item
SR SUNTOUR OWNERS MANUAL
SRS/SY pedelec
Disassemble and assemble front wheel
As the drive unit consists a front hub motor there are some electrical connections from the controller to the front hub. This means that there are some additional steps to do, in comparison with
a standard bicycle, when removing and inserting the front wheel into the fork.
WARNING !
Remove the battery from the bike before opening any cable
connection and before removing the front wheel.
1. Remove the cable connector cover
PH3
cover bolt 2
cover bolt 1
2. Open the cable connections
connection 2
English
connection 1
34
SR SUNTOUR OWNERS MANUAL
SRS/SY pedelec
3. Take off the torque bar by opening the rest of the bolts and nuts
torque bar bolt 1
torque bar bolt 3
torque bar bolt 1
5mm
15mm
axle nut
4. Exploded View
English
35
SR SUNTOUR OWNERS MANUAL
SRS/SY pedelec
5. Remove the front wheel
6. Assemble the torque bar
torque bar bolt 1
torque bar bolt 3
torque bar bolt 1
axle nut
5mm
15mm
6-8Nm
20Nm
7. Plug-in the two connectors
connection 2
connection 1
English
36
SR SUNTOUR OWNERS MANUAL
SRS/SY pedelec
8. Attach the cable connector cover.
cover bolt 2
cover bolt 1
PH3
4Nm
9. Turn on the drive unit and check the function.
English
37
SR SUNTOUR OWNERS MANUAL
SRS/SY pedelec
Technical Specification
Motor
• Brushless Design
• Planetary Gear System
• Max. nominal Assistance Power:....................250W
• Dropout width: ....................................................135mm
Controller features
• Legal Constraints:................................................EN15194
• Tire Diameter: .......................................................26inch and 700c
• max. Speed:...........................................................25km/h
• Optional relais for Light System Power Supply (6V/3W) can be used also
with additional dynamo
Charger
• Model:......................................................................NC-SSC04ST
• Input Voltage and current:...............................AC100V-240V, 50-60Hz, 1.2A
• Output Voltage and current:...........................DC29.2V / 2.0A
• Weight:....................................................................680g
• Operating Temp. and humidity:.....................0 - 40°C / 20 - 85%RH
• Storage Temp. and humidity:..........................-20 - 60°C / 20 - 85%RH
Battery
• Model:......................................................................
• Chemistry: .............................................................Lithium Ion Manganese
• Voltage: ..................................................................24V
• Capacity .................................................................10.8Ah
• Weight: ...................................................................2800g
• Charging Temp.: ..................................................0 - 60°C
• Best charging Temp.: .........................................15 - 40°C
Conformity
English
Hereby, SR SUNTOUR Inc. declares that the drive unit SRS/SY is in compliance
with the essential requirements and other relevant provisions of EN15194.
38
SR SUNTOUR OWNERS MANUAL
SRS/SY pedelec
Limited Warranty
SR SUNTOUR warrants its pedelec drive unit to be free from defects in material and
workmanship under normal use for a period of two years from the date of original
purchase. This warranty is made by SR SUNTOUR Inc. only with the original purchaser
and is not transferable to any third party. Lodging a claim under this warranty must be
made through the dealer where the bicycle equipped with the drive unit was purchased.
To prove the original purchase the original retail invoice has to be provided.
LOCAL LAW:
This warranty gives you specific legal rights. According to the state (USA) or province
(Canada) or every other country you are living in, you may have other rights than explained within these warranty regulations. These regulations shall be insofar adapted
to the local law to be consistent with such law.
LIMITATION OF WARRANTY
This limited warranty does not apply to any defect of the suspension fork caused by:
improper installation, disassembling and re-assembling, intentional breakage, alterations or modification to the fork, any unreasonable use or abuse of the product or any
use for which this product was not intended for, accidents, crashes, improper maintenance, repairs improperly performed.
The obligation of this “Limited Warranty” is restricted to repairs and replacements of the
suspension fork or any parts of it in which there is a defect in materials or workmanship within a period of two years.
SR SUNTOUR makes no express or implied warranties of fitness or merchantability of
any kind, except as set forth above. Under no circumstances will SR SUNTOUR be liable
for incidental or consequential damages.
Damages which are caused by the use of other manufacturer‘s replacements parts or
damages which are caused by the use of parts that are not compatible or suitable to
SR SUNTOUR drive units are not covered by this warranty.
This warranty does not apply to normal wear and tear.
English
39
SR SUNTOUR OWNERS MANUAL
English
40
SRS/SY pedelec
SR SUNTOUR OWNERS MANUAL
SRS/SY pedelec
English
41
SR SUNTOUR HEADQUARTER
SR SUNTOUR INC.
#7 Hsing Yeh Rd.
Fu Hsing Industrial Zone
Chang Hua
Taiwan, R.O.C.
Tel.: +886 4 769115
Fax: +886 4 7694028
email: [email protected]
SR SUNTOUR EUROPE
SR SUNTOUR USA
SR SUNTOUR EUROPE GMBH
Am Marschallfeld 6a
83626 Valley
Germany
Tel.: +49 8024 3038152
Fax: +49 8024 4730984
email: [email protected]
SR SUNTOUR USA
503 Columbia Street,
Vancouver, WA 98660
USA
Tel.: +1 (360) 737 6450
Fax: +1 (360) 60 737 6452
email: [email protected]