1
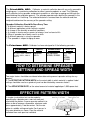
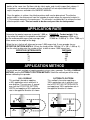
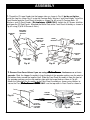
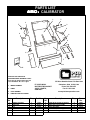
Prizelawn ARC l
SPREADER CALIBRATOR
®
Prize
Spre
a
lawn
ARC l
der C
alibr
ator
OWNERS MANUAL
The PrizeLAWN® ARC l Calibrator, a materials collection box with an easily removable
weighing pan, is used during calibration to collect granular products or seed. The Calibrator
easily attaches to the spreader and prevents granules or seed from escaping and falling to the
ground during the calibration process. The spreader operator walks behind the spreader in the
same manner as if fertilizing. The collected material is removed from the collector and then
weighed to determine the accuracy of the spreader setting.
Spreader Calibration Should Be Done Every Time:
1. A different material is being spread.
2. A different application rate or setting is needed.
3. A change in the humidity or weather conditions.
4. A change in terrain occurs: greens to fairways, level surface to hills.
5. When a spreader hasn’t been used in a while.
6. A different operator is using the spreader.
7. The spreader is subject to aging or wear.
The Prizelawn® ARC l Calibrator has been designed to fit the following spreaders:
Prizelawn®
BF-1,BF-1SS,BF-1HVO,BF1T,CBR, CBR-II, CBR-III,
CBR-IV
LESCO®
Highwheel
Mk-II™
ANDERSONS®
ANDEpro2000,
AP2000, SR2000
SCOTTS®
R7X, R8A,
SR-1,
AP2000,
SR2000
HOW TO DETERMINE SPREADER
SETTINGS AND SPREAD WIDTH
Two major factors should be considered when determining correct spreader settings for any
product:
1. The EFFECTIVE PATTERN WIDTH, or the actual width in which material is applied. Label
settings should be used as a guide only and can be effected by numerous factors.
2. The APPLICATION RATE, or the actual amount of material applied per 1,000 square feet.
EFFECTIVE PATTERN WIDTH
A simple visual pattern test can be made by
operating the spreader over a non-turf area and
evaluating the pattern. A more accurate method is to
place a row of common, disposable, aluminum cake
pans approximately 1 foot on centers. Set the rate
plate at a middle setting and make 3 or 4 passes in
the same direction as shown. Pour the material
collected from each pan into individual
bottles of the same size. Set them side by side in order, and visually inspect their volume. If
the pattern is not centered (example: volume in bottle #2 left not equal to bottle #2 right),
adjust the pattern as outlined in the OWNER’S MANUAL.
Once the pattern is uniform, the effective pattern width can be determined. The effective
pattern width is the distance out from the spreader to a point where the amount of material is
1/2 the average amount in the center pans. This distance is multiplied by 2 to achieve the total
effective pattern width. This test needs to be done only one time for each product.
APPLICATION RATE
Determine the product coverage in pounds/ 1,000 sq.
ft. by taking the weight of the product and dividing it
by the recommended square foot coverage (add
three zeroes to the weight of the bag).
EXAMPLE: Product weight: 25 lbs.
Square foot coverage: 5,000 sq. ft.
25,000 lbs./ 5,000 sq. ft.= 5 lbs/ 1,000 sq. ft.
Select the test site that will allow you to cover 1,000 square feet. If your spreader has an
EFFECTIVE PATTERN WIDTH of 10 feet, the length will be 100 feet (10’ x 100’= 1,000 sq. ft.).
Use the chart to determine the number of feet to walk to cover 1,000 square feet.
EFFECTIVE PATTERN WIDTH
DISTANCE
6’
167’
8’
125’
10’
100’
12’
84’
14’
72’
APPLICATION METHOD
There are two main methods of applying product using a rotary spreader. The 100% OVERLAP
METHOD, and the PATTERN TO PATTERN METHOD. Select the method you will be using
before calibrating the spreader.
100% OVERLAP
This method is based on applying
a 50% application rate in one pass in
one direction. The next pass is spaced
over half the EFFECTIVE PATTERN
WIDTH and applying a 50% application
rate in the opposite direction as shown.
PATTERN TO PATTERN
This method is based on applying a
100% application rate in one pass over
the full EFFECTIVE PATTERN WIDTH
and applying a 100% application rate in
the opposite direction as shown.
FULL EFFECTIVE
PATTERN WIDTH
1/2 THE EFFECTIVE
PATTERN WIDTH
OVERLAP
OVERLAP
ASSEMBLY
1. Thread the (2) Large Knobs into the hopper sides as shown in Fig. #1 but do not tighten.
Install the Legs as shown Fig. #1 using the Carriage Bolts, Washers, and Small Knobs. Install the
Front Bracket onto the Front Panel Assembly as shown Fig. #2 using (2) Carriage Bolts, (2)
Washers, and (2) Small Knobs. ( Prizelawn® CBR ONLY- loosen the (4) Screws and Nuts
and lower the (2) Side Panels. Attached the Baffle Plate to the Front Panel Assembly as shown in
Fig. #2 using (2) #10-24 Screws & Nuts.)
CARRIAGE
BOLT
SIDE PANELLOWER ON
CBR ONLY
FRONT
BRACKET
SIDE PANELLOWER ON
CBR ONLY
SMALL KNOB
& WASHER
LARGE
KNOB
LARGE
KNOB
LEG
CARRIAGE
BOLT
LEG
SMALL KNOB
& WASHER
BAFFLE PLATEPrizeLAWN
CBR ONLY
Fig. #1
Fig. #2
2. Remove Gear Cover Halves if you are using a Prizelawn , Andersons or a Scotts®
®
®
spreader. Slide the Hopper Assembly in from the back of the spreader making sure the notch in
the bottom slides around the impeller shaft. Slide the Front Panel Assembly in from the front of
the spreader making sure the side notches align with the Large Knob as shown in Fig. #3.
Attach the Collection Pan Assembly to the Front Panel Assembly as shown using Latches to
secure the Pan. (Prizelawn
Prizelawn® CBR ONLY- use the top notch in Front Panel as shown in
HOPPER
ASSEMBLY
Fig. #3
FRONT PANEL
ASSEMBLY
LATCH
USE TOP
NOTCH FOR
PrizeLAWN
CBR ONLY
COLLECTION
PAN
ASSEMBLY
LATCH
Fig. #4
3. Loosen the Small Knobs (2) and
adjust the Front Bracket to fit on the
front bumper bar. NOTE: The Front
Bracket may be turned around to better
fit your spreader. Loosen the Small
Knobs and adjust the Legs as required
to lift and level the entire assembly as
shown in Fig. #5.
BUMPER
SMALL
KNOB
LOOSEN SMALL
KNOB AND ADJUST
LEGS
TO LEVEL THE
CALIBRATOR
Fig. #5
FRONT
BRACKET
HOW TO USE & MAINTENANCE
Pour enough material into hopper to allow several passes to be made without running out of
product. Use the spreader setting on the bag as a starting point. If no setting is available, use a
middle setting.
Walk the distance of the test area as previously determined making sure to open and close the
spreader at the exact start point and close at the exact end point. Walking speed should be a
constant 2 1/2 MPH. (18 feet in 5 seconds).
When test is completed, place the spreader over a newspaper to catch any overflow of material.
Remove pan and weigh material collected and record weight. Adjust the spreader as required and
repeat test until application rate is correct.
When finished with test, return leftover material to it’s original container. Wash the calibrator
thoroughly and wipe dry. Install gear covers if removed.
WARRANTY
PSB warrants to Purchaser the following:
1. Product will be free of defects in materials and workmanship for a period of one year from date of purchase.
2. PSB will decide in its reasonable discretion if the part(s)/unit is defective.
3. The spreader or part(s) will be shipped to PSB at the customer expense with a written description of defect to the attention of PSB WARRANTY
DEPARTMENT.
4. If the spreader is used for commercial rental the Limited Warranty shall be limited to a period of 90 days.
5. All Unit and part replacement will be performed at the reasonable discretion of PSB.
6. Labor charges are not covered and the unit need not be returned to the dealer for warranty service.
7. Proof of purchase must be supplied to PSB.
PSB's sole obligation under this warranty is limited to repairing or replacing the defective part. Upon replacement of any Product or Product part, the
replaced item shall become the property of PSB. If PSB determines that the Product covered by this warranty requires service, PSB shall prepay return
shipping charges from PSB. In all other instances, such charges shall be paid by Purchaser. Except for loss or damage caused by PSB's negligence,
Purchaser relieves PSB of responsibility for all risks of loss or damage to the Product and its parts during the period the products are in transit to and
from PSB.
This warranty does not extend to any Product or parts thereof that have been allowed to corrode, subjected to misuse, neglect, accident, or modification
by anyone other than PSB or that have been affixed to any nonstandard accessory attachment or that have been used, stored, installed, maintained or
operated in violation of PSB’s instructions or standard industry practice. No agent, employee or representative of PSB has any authority to bind PSB to
any affirmation, representation or warranty concerning the Product and any affirmation, representation or warranty made by any agent, employee or
representative shall not be enforceable by Purchaser.
THIS WARRANTY EXTENDS ONLY TO THE ORIGINAL PURCHASER AND IS EXPRESSLY IN LIEU OF ANY OTHER EXPRESS OR IMPLIED
WARRANTIES, INCLUDING WITHOUT LIMITATION ANY IMPLIED WARRANTY OR MERCHANTABILITY OR FITNESS OR INTENDED USE FOR A
PARTICULAR PURPOSE AND OF ANY OTHER OBLIGATION ON THE PART OF PSB.
PSB SHALL NOT BE LIABLE FOR ANY INCIDENTAL, SPECIAL OR CONSEQUENTIAL LOSS, DAMAGE OR EXPENSE DIRECTLY OR INDIRECTLY ARISING FROM THE USE OF ANY OF THE PRODUCT INCLUDING, BUT NOT LIMITED TO, DAMAGE OR LOSS OF OTHER PROPERTY
OR EQUIPMENT, LOSS OF PROFITS OR REVENUE, COST OF CAPITAL, COST OF PURCHASED OR REPLACEMENT GOODS, OR CLAIMS OF
CUSTOMERS OF PURCHASER.
PARTS LIST
ARC I CALIBRATOR
7
1
3
7
3
2
2
6
4
5
6
7
10
8
9
11
PART OF OUR SERVICE IS
PROVIDING REPLACEMENT PARTS.
Parts may be obtained through your
local distributor. Be sure to give:
1.
MODEL NUMBER
2.
NAME
3.
PART NUMBER
4.
NAME OF PART AS SHOWN
Key
No.
1
2
3
4
5
6
Description
Hopper Assembly
Side Panel
Leg
Front Bracket
Front Panel Assembly
Large Knob
555 West Goodale Street P.O. Box 1089
IF YOUR LOCAL
DISTRIBUTOR CANNOT
SUPPLY PARTS,
CONTACT:
Columbus, Ohio 43216-1089
Phone 614-559-2655
Fax 614 221-9398
www.prizelawnspreaders.com
Req.
Part No.
Key
No.
1
2
2
1
1
2
15153
15154-1
15178
15157-1
15159
15162
7
8
9
10
11
Description
Small Knob w/ Bolts & Washers
Collection Pan Assembly
Latch Assembly
Baffle Plate (CBR Only)
Fastener Package
Req.
Part
No.
4
1
2
1
1
14001
15163-1
15170
15167
15168-1
NOTES
NOTES
© 2007 PSB COMPANY