1
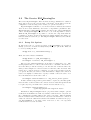
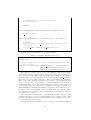
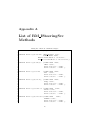
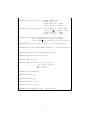
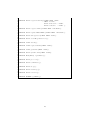
RMOST User Guide
Daniel Lorenz
University of Siegen
Deliverable of the HEP-CG Project
Version 2.1.0
July 1, 2008
Contents
1 Introduction
1.1 Overview over RMOST . . . . . . . . . . . . . . . . . . . . . . .
1.2 Steering model . . . . . . . . . . . . . . . . . . . . . . . . . . . .
2 Enable Athena jobs for steering
2.1 The Algorithm RM Spy . . . . . . . . . . . . . .
2.1.1 Minimal setup of a job options file . . . .
2.1.2 Configuration of RM Spy . . . . . . . . .
2.2 The Service RM SteeringSvc . . . . . . . . . . .
2.2.1 Setup Job Options . . . . . . . . . . . . .
2.2.2 Introduction to the RM SteeringSvc API
2.2.3 Other Service Methods . . . . . . . . . . .
2.3 RM Checker . . . . . . . . . . . . . . . . . . . . .
2.4 RM EvaluatorBase . . . . . . . . . . . . . . . . .
.
.
.
.
.
.
.
.
.
.
.
.
.
.
.
.
.
.
.
.
.
.
.
.
.
.
.
.
.
.
.
.
.
.
.
.
.
.
.
.
.
.
.
.
.
.
.
.
.
.
.
.
.
.
.
.
.
.
.
.
.
.
.
.
.
.
.
.
.
.
.
.
.
.
.
.
.
.
.
.
.
2
2
3
5
5
6
7
8
8
9
14
14
15
3 Visualization
16
3.1 The Graphical Data Browser . . . . . . . . . . . . . . . . . . . . 16
3.2 The Command Line Tool . . . . . . . . . . . . . . . . . . . . . . 19
4 Submit a Steered Job
22
5 The connection service
24
A List of RM ISteeringSvc Methods
25
B Data Type Codes
27
C List of TResultMonitorData Methods
28
1
Chapter 1
Introduction
Although Grid computing offers an enormous potential to researchers by providing seamless access to a huge collection of data and computing resources,
scientific computing still suffers by the remarkable delays between submitting a
Grid job and receiving its first feedback: Today, after submitting a long-running
Grid job, a researcher has to wait until the job has finished before he can retrieve
any output. Only then, he or she can evaluate the results and (in some cases)
see that they are not useful, because some job parameters were set incorrectly
or still need to be optimized to get significant results. Thus, the job must be
re-submitted again with a long waiting time.
Online steering, i.e., the monitoring of intermediate results combined with an
interactive control over the running job, has proved to be an effective method to
get around these problems, thus accelerating computational scientific research.
This is even more true in a Grid environment, given its long submission delays
and the insufficient accessibility of running jobs. If there would be any possibility
to steer running Grid jobs, execution time and research time could be reduced
significantly.
1.1
Overview over RMOST
RMOST (Result Monitoring and Online Steering Tool) is a steering and monitoring system for Grid jobs of the ATLAS experiment software. It can connect
to a slightly modified Grid job and make the intermediate results accessible
from within the widely used ROOT framework. It can be applied by simple
changes of the job options and then allows steering of the execution, monitoring
of the most common intermediate results which are stored in ROOT files and
upload of new job options which can be applied after a restart of the job without
resubmission. Advanced steering possibilities are given with instrumentation of
the source code, like steering and monitoring of arbitrary user defined data. On
the visualization side, an interface to ROOT is provided that makes the steering
capabilities available from within ROOT. In this manual it is assumed, that you
are familiar with Athena and ROOT.
RMOST consists of three different modules (see Fig. 1.1):
2
Figure 1.1: The different components of RMOST
The Grid job access module: It consists of the Athena components RM_SPY,
RM_SteeringSvc, RM_Checker, and RM_EvaluatorBase. which are executed
with the job on the remote worker node. These components are described in
Chapter 2.
The Visualization tools are integrated into the ROOT framework. They
are located on the user interface and are your gate to your remote Grid jobs.
Two visualization tools are provided, a graphical data browser and a command
line tool. Both tools are described in Chapter 3.
The connection service is necessary to establish a connection between the
Grid job and the visualization tool. Its use and features are describe in Chapter
5.
The name service is necessary to establish the connection service. For the
name service RMOST uses R-GMA.
RMOST is easy to integrate into existing jobs. For the most common functionality no source code changes are necessary, only changes to the job options
which compose the Athena Grid job are required. However, expert users can use
a lot more functionalities, but then source code instrumentation is necessary.
1.2
Steering model
RMOST implements a distributed shared memory (DSM) based model for online steering. The application and the visualization access both the same data
concurrently. The steered variable at the Athena job as well as the displayed
value at the user’s side are viewed as cached copies of the same shared data
object. A data object in this context can be a simple variable or a complex data
structure. It can be located in memory or on disk.
The application registers data which it shares and the user interface registers
the data it want to use from the remote job. To each registered data object
belongs a so called binding name. Each side can register only one data object
under a particular binding name. The steering system maps data objects with
3
matching binding names to each other, which means that changes of the value
in one side will be propagated to the data object at the other side.
4
Chapter 2
Enable Athena jobs for
steering
This chapter describes how an Athena job is enabled for steering via RMOST.
RMOST provides four additional Athena components RM_Spy, RM_SteeringSvc,
RM_Checker, and RM_EvaluatorBase which can be used in an Athena Grid job.
The first, RM_Spy is described in Section 2.1 and enables basic functionality for
steering. The RM_SteeringSvc encapsulates the steering API and is used by the
other components, but can also be used by customized Athena components to
steer internal variables. The RM_SteeringSvc is described in Section 2.2. The
RM_Checker allows to place additional synchronization points in the Algorithm
list (see Section 2.3). Finally, the RM_EvaluatorBase is a base class for user
defined automated evaluation and notification (see Section 2.4).
2.1
The Algorithm RM Spy
The algorithm RM Spy was designed to allow basic steering of Athena jobs
without editing the source code of any component except the job options file.
If you add the algorithm RM Spy to your job, you already have the following
possibilities:
• Monitoring of all intermediate data stored in ROOT files, which can be
downloaded or remotely accessed at run time.
• Terminate the job.
• Suspend execution.
• Execute one single event, for example if you want to monitor the changes
of one particular event. After the event has been executed, the further
execution is suspended.
• Continue execution of a suspended job.
• Restart the job without resubmission of the job.
• Change or replace the job options file. The new job options are applied
after a restart of the job without job submission.
5
• Optionally notifications can be sent at start and termination of the job.
• On early termination, the final termination can optionally be delayed for
some time. During the delay period, interaction with the job is possible.
On start of the delay a notification is sent.
This should cover most of the cases for online steering. Thus, in most cases,
online steering is easy to apply to a job. First a minimal setup of the job is
described to enable steering. Afterwards the available configuration parameters
are described.
2.1.1
Minimal setup of a job options file
To apply RM_Spy only the job options file must be edited. This section describes
the necessary modifications. Before you can use any steering components you
need to load the appropriate library. This can be done by adding the following
line to your job options file:
theApp.Dlls += [ "ResultMonitoring" ]
You can add the algorithm RM Spy to you job, by adding the following lines
to your job options file:
theApp.TopAlg += [ "RM_Spy" ]
RMSpy = Algorithm( "RM_Spy" )
The steering system uses a so called connection service (see Ch. 5) to establish connections between the Grid job and the steering tool at the user side.
If the site where the Grid job runs configured a connection service for their
site, this one is used. But if there is no connection service configured, you
can set an external one in the job options. For this purpose, the property
ConnectionService of the steering service must be set:
theApp.ExtSvc += [ "RM_SteeringSvc" ]
SteeringSvc = Service( "RM_SteeringSvc" )
SteeringSvc.ConnectionService = <my_service_host>:<port>
Hereby, you must replace <my_service_host> by the fully qualified domain
name of the host on which the connection service runs and <port> must be
replaced by the port number the connection service listens on. For example, if
the connection service was started on gcn54.hep.physik.uni-siegen.de and
listens on port 20030, the connection service is configured with:
SteeringSvc.ConnectionService =
"gcn54.hep.physik.uni-siegen.de:20030"
RM Spy supports the remote access of files with intermediate results. It
makes sure to flush the file buffers of all files in the Athena framework. To
make files available, the filenames of these files must be given to RM Spy via
the job option FileNames. It is possible to register any kind of files in this way,
e.g. ROOT files. An arbitrary number of files can be handed to RM Spy the in
following way:
6
RMSpy.FileNames +=[ "file1" ]
RMSpy.FileNames +=[ "file2" ]
The names file1 and file2 must be substituted with the physical file names
of your output files.
Caution: Make sure to use ’+=’ instead of ’=’ else all entries made
before are lost.
Now, the job supports basic steering actions and can be submitted.
2.1.2
Configuration of RM Spy
Beside the mentioned basic properties, RM_Spy has some more properties which
configure the standart notification and the delay on early termination.
The properties NotifyOnStart and RMSpy.NotifyOnEnd configure if notifications are send on job start or job termination. If the property is set to a
non-zero value, notifications are sent on start/termination of the job. If the
property is set to zero no notifications are sent. If the property is not specified
no notifications are sent by default. The following example send notifications
on job termination, but not at job start.
RMSpy.NotifyOnStart = 0
RMSpy.NotifyOnEnd
= 1
The second group of properties configure the behaviour of early termination of the job. It consists of the properties HoldOnFailure, HoldOnTime, and
MaxEvents.
The property HoldOnFailure switches the delay on early termination on or
off. If it is set to a non-zero value, a delay are added on early termination. If the
property is not defined, the default is zero which mean no delay. The following
example enables the delay:
RMSpy.HoldOnFailure = 1
RMOST decides if the termination is early by comparing the current number
of executed events with a given number of events that the job should process.
This number is defined by the property MaxEvents. If the job terminates before the specified number of events are processed, the delay is started and a
notification about the early termination is sent. The default value for this property is 100. This property takes only effect if HoldOnFailure is set to nonzero.
In the following example the property is set to the number of events that the
application should process:
RMSpy.MaxEvents
= theApp.EvtMax
Finally the delay time can be specified by the property RMSpy.HoldOnTime.
The maximum time it could wait are 30 minutes. Default are 15 minutes. This
property takes only effect if HoldOnFailure is set to nonzero.
RMSpy.HoldOnTime
= 10
7
2.2
The Service RM SteeringSvc
The service RM_SteeringSvc offers extended steering possibilities for advanced
users and is used by the other steering components. In the first section the
configuration of the steering service via the job options is described.
RM_SteeringSvc is a flexible tool to monitor and steer arbitrary user defined
data. It can be used within any other service or algorithm to publish the data.
This means that for using RM SteeringSvc the user needs to insert (instrument)
calls to the RM_SteeringSvc into the source code of the algorithm or service.
With the RM_SteeringSvc it is possible to extend own components with the
possibility to monitor and steer internal data during runtime and change parameters without restart the job. The RM_SteeringSvc API is described in the
second section.
2.2.1
Setup Job Options
In this section the job options properties of RM SteeringSvc are described.
Firstly, you need to load the necessary library in the job options file. This can
be done by adding the line:
theApp.Dlls += [ "ResultMonitoring" ]
Then, the service must be initialized:
theApp.ExtSvc += ["RM_SteeringSvc"];
SteeringSvc = Service( "RM_SteeringSvc" )
The property ConnectionService is strongly recommended to set. The
steering system uses a so called connection service to establish connections between the Grid job and the steering tool at the user side. If the site where the
Grid job runs configured a connection service for their site, this one is used. But
if there is no connection service configured, you can set an external one in the
job options. Because you can not be sure that all sites configured an connection
service it is highly recommended to specify a default connection service. For
more informations about the CS see Ch. 5.
SteeringSvc.ConnectionService = "<my_service_host>:<port>"
In this command, <my_service_host> must be replaced by the fully qualified host name of the host where the connection service runs and <port> should
be replaced by the port number the connection service listens on, e.g.
SteeringSvc.ConnectionService =
"gcn54.hep.physik.uni-siegen.de:20030"
Furthermore, RM_SteeringSvc has two properties which configure optional
notification mechanisms via email. By default, notifications are only send via
the communication channel which is also used for steering. This mechanism
has the drawback that notifications are only sent if an interactive connection
exists. To enable an additional notification mechanism via email set the property NotifyByEmail to a non-zero value. If it is set to zero or not specified
notifications are not sent via email.
8
SteeringSvc.NotifyByEmail = 1
For sending emails the target email address is required. The email address
is set to the property NotificationEmail. For example:
SteeringSvc.NotificationEmail = [email protected]
Note: The emails are send from the connection service. Thus, the
host which runs the used connection service must have configured
sendmail else no emails are sent.
2.2.2
Introduction to the RM SteeringSvc API
The RM SteeringSvc provides an API which can be used to enable steering for
internal values of own components. It offers many advanced possibilities for
expert users, others can skip this section.
Get access to steering system
In this section, it is shown how the source code can be instrumented to monitor
and steer data. For making the API known we need to include a header file to
our source file:
#include "RM_SteeringSvc.h"
For the compiler find the header files, some additional directories with header
files need to be specified in the build instructions:
<install
<install
<install
<install
<install
<install
root>/rmost-2.1.0/ResultMonitoring/ResultMonitoring
root>/rmost-2.1.0/Common/include
root>/rmost-2.1.0/GridConnection/include
root>/rmost-2.1.0/Steering/include
root>/rmost-2.1.0/Processing/include
root>/rmost-2.1.0/access/include
If you use CMT to build your Athena components, you can add the include
directories to your project by adding the following line to the requirements file:
include dirs \
<install root>/rmost-2.1.0/ResultMonitoring/ResultMonitoring \
<install root>/rmost-2.1.0/GridConnection/include \
<install root>/rmost-2.1.0/Common/include \
<install root>/rmost-2.1.0/Steering/include \
<install root>/rmost-2.1.0/Processing/include \
<install root>/rmost-2.1.0/access/include
Before you can use the service you need to get a pointer to the service
instance from the Athena framework. This can be done with the following lines
in the source code:
9
StatusCode sc;
RM_ISteeringSvc *m_SteeringSvc;
sc = service("RM_SteeringSvc", m_SteeringSvc, true);
If the return value is StatusCode::SUCCESS the steering service is available.
Make data steerable
Now the steering service is active. Every data object which shall be steerable
must be registered with the steering service. For registration an unique name
that identifies this data must be provided. In this manual this unique name is
called the binding name of the particular data object. If another data object is
already registered with the same binding name, the registration will fail.
As an example, a 32 bit integer is registered and stored in the variable myInt
with the binding name myIntName. This is done with the method registerInt():
bool rv = m_SteeringSvc->registerInt( "myIntName", &myInt,
true, true);
The return value will be true, if the value is registered successfully and false
elsewise. The first parameter is a std::string and contains the binding name.
The name is an arbitrary string, but it must be unique. The second parameter
is a pointer to the variable that contains the value.
Very important: This pointer must be valid as long as the value
is registered at the service.
The third parameter is a boolean value that indicates if the value is writeable. If it is set to true, it means that this value may be set by the steering
system. The forth value is a boolean that indicates if this value is readable by
the steering system. If it is set to true, it means that a steering tool may read
this value.
Similar commands exist for a byte, 64 bit integer, IEEE floating point number, IEEE double precision floating point number, strings, and further data
types (see appendix A) to provide standard methods to serialize and deserialize
the data.
User-defined data types
Now, it is possible to monitor and steer basic data types. Normally, a user
defines a lot of different complex data types that represent his/her results and
want to monitor this data types. Therefore, a flexible system is provided which
allows to register data of arbitrary data types. If user defined data types must
be registered, you should provide a serialize and a deserialize method for your
data type yourself. This means you must write two classes, each containing
one method derived from RM ISerializeMethod and RM IDeserializeMethod
respectively. Then you can register your data with these two classes for the data
access. For the basic data types standard serialize and deserialize methods are
provided.
For example, a data object of type myData should be registered. Then
two data access classes must be created, which are derived from the class
10
RM ISerializeMethod or RM IDeserializeMethod respectively, and overwrite
the serialize and deserialize methods. The method serialize writes all
the data to the stream os and returns the number of bytes written. The method
deserialize reads the data from the stream and stores the data in the myData
structure. The code in listing 2.1 shows a simple example.
Listing 2.1: Creating own serialization methods
1
2
3
4
5
c l a s s myData
{
int I n t 1 ;
float Float1 ;
}
6
7
8
9
10
11
c l a s s S e r i a l i z e M y D a t a : public R M I S e r i a l i z e M e t h o d
{
public :
S e r i a l i z e M y D a t a ( myData ∗ v a l u e ) ;
v i r t u a l int s e r i a l i z e ( s t d : : ostream ∗ os , s t d : : i s t r e a m
∗param ) ;
12
13
14
15
private :
myData ∗ m Value ;
};
16
17
18
19
20
21
c l a s s D e s e r i a l i z e M y D a t a : public RM ID eseria lizeM et hod
{
public :
D e s e r i a l i z e M y D a t a ( myData ∗ v a l u e ) ;
v i r t u a l void d e s e r i a l i z e ( s t d : : i s t r e a m ∗ i s ) ;
22
23
24
25
private :
myData ∗ m Value ;
};
The implementation is shown in listing 2.2:
Listing 2.2: Creating own serialization methods
1
2
3
4
S e r i a l i z e M y D a t a : : S e r i a l i z e M y D a t a ( myData ∗ v a l u e )
{
m Value = v a l u e ;
}
5
6
7
8
9
int S e r i a l i z e M y D a t a : : s e r i a l i z e ( s t d : : ostream ∗ os , s t d : :
i s t r e a m ∗param )
{
// Get w r i t e p o s i t i o n o f t h e stream
int n = os−>t e l l p ( )
10
11
12
// Write c o n t e n t o f m Value t o ostream os
∗ o s << m Value−>I n t 1 << ” ” << m Value−>F l o a t 1 ;
11
13
// Compute l e n g t h o f t h e w r i t t e n d a t a
n = os−t e l l p ( ) − n ;
14
15
16
return n ;
17
18
}
19
20
21
22
23
D e s e r i a l i z e M y D a t a : : D e s e r i a l i z e M y D a t a ( myData ∗ v a l u e )
{
m Value = v a l u e ;
}
24
25
26
27
28
29
30
void D e s e r i a l i z e M y D a t a : : d e s e r i a l i z e ( s t d : : i s t r e a m ∗ i s )
{
// TO DO:
// S e t c o n t e n t o f m Value w i t h t h e d a t a read from
istream i s
∗ o s >> m Value−>I n t 1 >> m Value−>F l o a t 1 ;
}
Now the user can register his object of type myData:
Listing 2.3: Register customized data types
1
2
// C re ate o b j e c t o f t y p e myData
myData data ;
3
4
5
6
7
// r e g i s t e r t h e d a t a i n ’ d a t a ’ as myDataObject1 r e a d a b l e
and w r i t e a b l e
bool rv = r e g i s t e r V a l u e ( RMDT UserTypes , ” myDataObject1 ” ,
new S e r i a l i z e M y D a t a (& data ) ,
new D e s e r i a l i z e M y D a t a (& data ) ) ;
Here data is a newly created object of type myData. This object is registered with the method registerValue. This object must exist as long as it is
registered. The return value is true, if the data will be registered successfully.
The first parameter contains information about the data type. RMDT UserTypes
says that it is a user defined data type. The second parameter contains the
name of the data. The third parameter is a pointer to the serialization class
used to read the data. A new instance of SerializeMyData is created which
serializes a myData object. The forth parameter is a pointer to the corresponding deserialize class. The service takes ownership of the registered instances of
SerializeMyData and DeserializeMyData and deletes them, when the object
unregister or the service finalizes. If the deserialize method is a NULL pointer,
the data will not be writeable, if the serialize method is a NULL pointer the
data will not be readable.
The serialize contains parameter param which is unused until now. The
steering API offers to specify certain parameters for reading a value. This
parameter stream is given to the serialize method. If no parameters are needed,
the param stream can be ignored.
Now arbitrary data from memory can be registered. In general any kind of
12
data in memory, in files, or somewhere else can be registered this way. But if
data from files are registered, the amount of data can quickly become too large
to send it within one message, but special support is given to data in files and
streams and special methods are provided, that can register files or streams.
bool registerFile(const std::string FileName);
This method registers a file given by its filename. The filename is also used
as binding name and must be unique under all registered data in the whole
job. When needed, the files are simply opened. The service takes no action to
flush the file buffer before the data is read on a request of the data. This file is
registered as writeable and will be overwritten, by a write command from the
steering tool
The second method for streams is more general:
bool registerFile(const std::string name,
RM_ISerializeFiles *Serialize,
RM_IDeserializeFiles *Deserialize);
In this function name is again the binding name for the registered data, but
it does not refer to a real file in any way. It simply must be unique. The
second and the third parameter are pointers to access methods to a stream similar to the registerValue method. But here you derive the access classes from
RM ISerializeFiles and RM IDeserializeFiles instead of deriving them from
RM ISerializeMethod and RM IDeserializeMethod. To create own data access classes at least the following methods must be implemented:
Listing 2.4: Serialization methods for streams
1
2
#include ” R M S e r i a l i z e F i l e s . h”
3
4
5
6
7
8
c l a s s S e r i a l i z e M y S t r e a m : public R M I S e r i a l i z e F i l e s
{
public :
v i r t u a l s t d : : i s t r e a m ∗ s e r i a l i z e ( s t d : : i s t r e a m ∗param ) ;
};
9
10
11
12
13
14
15
16
c l a s s D e s e r i a l i z e M y S t r e a m : public R M I D e s e r i a l i z e F i l e s
{
public :
v i r t u a l void d e s e r i a l i z e ( s t d : : i s t r e a m ∗ i s ,
RM filesize t offset ,
RM filesize t size ) ;
};
The serialize method does not write the data to a stream itself, but returns
a pointer to an input stream, from where the service can read the data. The
deserialize method has two additional parameters. It writes the first size bytes
of is to the position offset.
The serialize method contains again a parameter param which contains
optional information for read operations.
13
2.2.3
Other Service Methods
If you want to unregister a value, perhaps due to the fact that a value is not
available anymore or invalid, you can do it with the unregister method.
bool unregister(const std::string Name);
The only parameter is the binding name of the data to be unregistered. If
the call was successful it returns true. If no value with this name was registered
it returns false.
Any job that uses the steering service must call the check method regularly,
what means at least one the algorithms must call it once in its execute method.
It defines points where modifications to parameters are applied, steering commands are executed and intermediate results are retrieved. If the job runs the
RM Spy or RM Checker algorithm, this is done by RM_Spy or RM Checker. If the
job does not run RM_Spy of RM_Checker but uses RM_SteeringSvc, some other
algorithm must call check() in its execute method.
void check()
This method has no parameters and no return value.
Furthermore, RM_SteeringSvc provides method for controlling the execution
of the job.
• terminate(): Terminates the job.
• restart(): Restarts the job without resubmission. It perform an exec
on itself.
• stop(): The job waits at the next check call.
• step(): The job process one further check and changes then to wait
• proceed(): Continue with normal execution.
Finally, with notify the job can send a notification to the user.
notify(std::string subject, std::string message,
int priority, int event}
For a complete method list of the interface RM_SteeringSvc see Appendix
A.
2.3
RM Checker
RM_Checker is an Athena Algorithm which executes a synchronization point. It
can be instantiated multiple times, thus, it and can be used to insert additional
synchronization points between algorithms by modifying the job options file.
The advantage of multiple synchronization points are:
• Additional waiting points, and smaller steps in step execution mode. At
maximum it is possible to execute only one algorithm in each step. Thus,
more detailed information about the emergence of results are available.
14
• Improved response time on requests. Especially, if long algorithm lists
are used and the processing uses a longer time, the response time can be
reduced, because the average time until the next synchronization point is
reached is reduced.
Furthermore, RM_Checker might be used if RM_Spy is not used, but one need
at least one synchronization point in the algorithms. For example, if components
are used which register some data to the steering service, but do not call check()
themselves.
To use RM_Checker simply add it to your list of algorithms. It has no
properties.
theApp.TopAlg += [ "RM_Checker" ]
Of course the RMOST library must be loaded before.
theApp.Dlls += [ "ResultMonitoring" ]
2.4
RM EvaluatorBase
The algorithm RM_EvaluatorBase serves as base class for user defined evaluations. For every event a condition is checked, and depending on the result a
user notification can be sent. To use the class RM_EvaluatorBase, derive your
own class and overwrite the method checkCondition() and getMessage().
The method checkCondition() should perform the evaluation. If it returns
true, a notification is sent. The text of the message is defined by the return
value of getMessage(). An example is shown in Listing 2.5.
Listing 2.5: A customized autometed evaluation
1
2
3
4
5
6
c l a s s MyEvaluator : public rmost : : RM EvaluatorBase
{
public :
v i r t u a l bool c h e c k C o n d i t i o n ( ) ;
v i r t u a l s t d : : s t r i n g getMessage ( ) ;
}
7
8
9
10
11
bool MyEvaluator : : c h e c k C o n d i t i o n ( ) ;
{
// The r e s u l t from t h e e v a l u a t i o n
bool rv ;
12
// Your e v a l u a t i o n code
13
14
return rv ;
15
16
}
17
18
19
20
21
s t d : : s t r i n g MyEvaluator : : getMessage ( )
{
return ”My t e s t message ” ;
}
15
Chapter 3
Visualization
Chapter 2 described the job side of the steering tool and what the user must do
to make his data inside the remote job accessible. In this chapter the steering
and visualization tools that access the data are described. Because an established framework called ROOT used for visualization exists inside the supported
ATLAS community, the visualization is integrated into ROOT. Two components
are provided, a command line tool for use within ROOT and a graphical user
interface which can be started from within ROOT and from a shell. In section
3.1 the graphical user interface is explained, in section 3.2 the command line
tool is explained. For using the visualization within ROOT, you need ROOT
version 5, the GUI needs QT 3.3. See the RMOST Installation Guide for the
exact version with which the binaries are compiled.
3.1
The Graphical Data Browser
The graphical user interface (GUI) manages a list of steerable jobs. It tries to
connect to all known jobs and displays an overview. For each job a detailed view
in a seperate window is available which displays a list of all registered data and
their data type. For simple data types a string representation of their value is
given. Furthermore, registered streams or files can be downloaded to the local
machine. The execution of the job can be steered if the job supports this, which
is the case if the algorithm RM Spy is used.
Start the GUI
Before starting the steering tool, you need to create a Grid proxy, if it has
not already been created. The steering tool needs the proxy to authenticate
the connection to the remote job. Without a proxy the data browser can not
be started, but will only display an error message, that it could not get the
credentials.
There are two possibilities to start the data browser: You can run the data
browser from a shell or you can start the browser from within ROOT. If you
want to run the browser from a shell, run the command
ResultMonitor
16
Figure 3.1: The overview of known jobs in the GUI
To start the GUI from ROOT has the advantage that the remote ROOT
files can be inspected with the standart ROOT browser. If the GUI is started
from command line ROOT files are not displayable.
If you want to start the browser from within ROOT, you firstly need to load
the library with the visualization tools and then create an instance of the class
TResultMonitorBrowser. This will open the graphical user interface shown in
fig. 3.1. This is done with the following commands in ROOT:
.L ResultMonitor.so
TResultMonitorBrowser b
Add jobs to the list
At the beginning the job list will be empty. You can add jobs to the list by
manually typing the job ids or by loading them from a file. For example if you
submit your job with glite-wms-job-submit using the -o option which writes
the job id to a file.
To enter a job id manually select the menu item “Job identifier” and the sub
item “Add job”. A dialog box appear, where the job identifier can be entered.
To load job identifier from a file select the mnu item “Job identifier” and the
sub item “Open ID file”. The a file dialog appears, where you can choose the
file which contains the job identifier. After the job id file is opened, a list of all
job identifier in the file is dsiplayed, where you can select those jobs, which you
want to see in the steering tool. By default all jobs are selected. If you selected
all jobs click on the button “Add” in the dialog box.
The job list
No matter which method you used, the new job names should appear in the job
list. Jobs which are already in the list are ignored. You should see 4 columns
in the job list.
1. The job identifier is displayed in the first column.
17
2. The progress column shows the number of already processed events of the
job if the connection is already established, else a status of the establishment of the connection is given.
3. The thrid column is a message column. It displays short forms of error
messages or notifications. The color of a cell is changed according to the
kind of message. If a notification is available the cell is red, if an error
appeared the cell is yellow.
4. The comments column is editable for the user, to enter his commands
about the job.
If you have a large number of jobs, there exist some methods to filter the
whole list and display only jobs with certain characteristics. You can display
only connected, only disconnected, only jobs which received a notification, or
only jobs which have an error or notification. Therefore, select the menu item
“View Jobs” and the appropriate subitem. If you want to display all jobs again
select the sub item “View all”.
Detailed view of a job
To get a detailed view of a job, select the job in the list and use the menu item
“View job” and the sub item “Job details”. A new window pops up. It displays
a list of registered data with their type and, in case they have a basic type, also
their value.
If you select one row or cell, and press the ’Request’ button, the data of
this cell will be updated with the value of the remote job. If you select a file
or stream and press the ’Request’ button, the file or stream is downloaded and
stored in a local file. Therefore, a file dialog opens and you can chose a filename
where to store the file. In case you request a ROOT file, a new TBrowser is
opened and you can inspect the ROOT file. If you request the same ROOT file
several times, a TBrowser instance is started for each request. Once the browser
is opened, all values displayed in this browser steam from the state of the file,
when it was requested, even if the Athena job has progressed further. A second
browser may display different values if they have changed.
Values with a simple data type can be edited. If you then press the ’Synchronize’ button, the value entered by you is stored to the according variable in
the job. If you press the ’Synchronize’ button after selecting a file or stream, a
file dialog opens. In this file dialog you can choose a file that will be uploaded
to the job and replace the existing one if there is one. The old file that was
overwritten is lost.
On the right side of the data browser there are 5 buttons for steering the job
execution: ’Stop’, ’Restart’, ’Terminate’, ’Step’, ’Continue’. For these execution
steering buttons to work, the job must execute the algorithm RM_Spy. The
RM_Spy therefore registered the value ’nextAction’. Of course you can edit this
value inside the table and press synchronize if you know the numeric codes
for the commands as well. Now a short description of the execution steering
commands follows:
- The ’Terminate’ command terminates the job.
18
- The ’Restart’ command restarts the application without resubmitting the
job. It simply terminates the running application and executes the Athena
script anew. With the restart, the previously changed job options can be
applied. The restart only works, if the job options file is registered at the
algorithm RM Spy.
- The ’Stop’ command, makes the job suspend further job execution, until
a ’Continue’ or ’Step’ command is given.
- The ’Step’ command makes the job execute one further event and switches
then to the waiting state.
- The ’Continue’ command lets a waiting job resume with its execution.
At the bottom of the window is a text box, which prints text messages
concerning the job.
Notifications
On urgent events the job can send notifications to the user. This notifications
are displayed by the steering tool if it is connected. If a notification arrives at the
GUI, the notification cell of the job is painted red and optionally a window pops
up with the full message. Furthermore the notification is printed to the text box,
at the bottom of the detailed view for a job. By default, the popup widnows
are enabled. They can be disbaled by selecting the menu item “Notification”
and the sub item “Disable popup widgets”.
The coloring of the notification view should help the user to identify the
occurence of important new events in some jobs. The coloring can be reset
to normal color, thus, you are informaed if a new event occurs. To reset the
coloring select the menu item “Notifications” and teh sub item “reset all”. Then
the color for all jobs is reset. If you coose the sub item “reset selected” only the
selected jobs are reset.
3.2
The Command Line Tool
The command line interface gives access to the remote job from the ROOT
command line. The command line tool needs ROOT version 5. For accessing
the remote Grid job a valid proxy certificate is necessary, else the creation of
the command line tool instance will quit with an error. Now, start ROOT and
load the result monitoring and steering library by typing:
.L ResultMonitor.so
For accessing the remote job, you must create an instance of TResultMonitorData.
Every instance of this class represents one remote job. This can by done with:
TResultMonitorData
RM_Data
After that, connect this instance with the remote job. Again only one tool
can connect to a certain job at a time and only the user that submitted the job
can access the job. A second call to connect close the existing connection and
restarts the connection process. The connect call needs as parameter the job id
which was returned at job submission.
19
RM_Data.connect("<job_id>")
where you need to replace <job_id> with the identifier of the job you want to
connect to. For example:
RM_Data.connect("https://grid-rb.physik.uni-wuppertal.de:9000
/6cN8yhqbuubkqk3Gsp8fvw")
If you want to monitor or steer the data of the job, you must register an
instance of the same data type with the same identifier as in the remote job.
Since the methods for data registration are the same as in RM SteeringSvc, this
works analog to registering the data described in Chapter 2.2. E.g. if you want
to get the values of the eventCounter registered by the algorithm RM Spy, firstly
declare an integer variable in which the tool stores the value, and then register
this integer with the TResultMonitorData instance. The variable name and
the identifier name may not be the same, of course.
// Declare variable which will contain the value
int eventCounter
// Register the variable
RM_Data.registerInt ("eventCounter", &eventCounter)
Now the variable is registered, but still no data exchange happened. To
retrieve the value from the remote job and store it in the registered variable the
method getValue("<name>") can be used. If you need several different values
the asynchronous way is much faster. In the asynchronous way we first request
all necessary data except the last variable. Because all requests are answered
in the same order they are requested, if the last variable is returned the other
requests before are answered, as well.
// Blocking retrieval of one value
RM_Data.getValue("eventCounter")
// a, b, c, d are already registered
// Asynchronous requests
RM_Data.requestValue ("a")
RM_Data.requestValue ("b")
RM_Data.requestValue ("c")
// The last request is blocking
RM_Data.getValue ("d")
The requestValue method has as only parameter the name of the requested
data. It sends a request to the job, but it does not wait for the answer. Incoming messages are reviced from the checkmethod , which is also nonblocking.
getValue calls check until the answer has returned, it is recommended to use
the getValue method for the last data request.
The next important question is how to set a value. The value of ’eventCounter’ can not be set in the job, so it is assumed we have another integer
named integer1 that is already registered with the name ’integer1’.
20
// Set value on local machine
int integer1 = 100
// Register integer1
RM_Data.registerInt("integer1", &integer1, true, true)
// Set the value at remote job
RM_Data.synchronize ("integer1")
Here we set the value of ’integer1’ to 100 and then call the synchronize()
method. This method sets the variable in the job to the value stored in integer1
when the job executes the check() method the next time.
If you need a value regularly you can subscribe for it. Then you get the updated value each time the job performs the check() method. This should not be
done for large amounts of data or even files. A call to unsubscribe("<name>")
cancels the subscription. Both methods have one parameter which specifies the
name of the data. To subscribe for a value, this value must be already registered. If you subscribe for a value, you must make sure to call the check method
regularly on the visualization side. Else the buffer overflows and the data is lost
or an error occurs.
// Subscribe for eventCounter
RM_Data.subscribe ("eventCounter")
// Unsubscribe for eventCounter
RM_Data.unsubscribe ("EventCounter");
A list of all registered data from the job is returned by getTable(). This
method returns a TObjArray of objects of type TRMVarEntry. Every instance of
TRMVarEntry has two members, the name and the data type. Below is a short
example for the use of getTable and TRMVarEntry.
// get Table
TObjArray *table = RM_Data.getTable()
// get first entry
TRMVarEntry *entry = table->First()
// get name of first entry
TString name = entry->getName()
// get data type of first entry
int dt = entry->getType()
A list of available data types and their numeric codes can be found in Appendix
B.
Files and user defined data can be registered in the same way, like in they
are registered to RM_SteeringSvc; see Ch. 2.2. Once they are registered, they
are requested like any other data type. A full list of available methods of the
command line tool TResultMonitorData can be found in App. C.
21
Chapter 4
Submit a Steered Job
Once the application is prepared for steering, the job can be submitted. Because
the components needed for steering are not in the standard distributions of the
middleware, Athena, and ROOT, some shared libraries need to be sent with
the job or downloaded by a startup script (see also the Installation Guide:
http://www.hep.physik.uni-siegen.de/grid/rmost/doc/InstallationGuide.pdf)
The bash script for downloading the necessary parts of latest RMOST version
and setting up RMOST on a WN is:
Listing 4.1: Script setup rmost.sh which downloads and sets up RMOST on a
WN
1
2
3
4
5
6
wget h t t p : //www. hep . p h y s i k . uni−s i e g e n . de / g r i d / rmost /
v e r s i o n s / rmost−wn−l a t e s t . t a r
t a r −x v f rmost−wn−l a t e s t . t a r
cd rmost −∗
export LD LIBRARY PATH=$PWD/ l i b : $LD LIBRARY PATH
export PATH=$PWD/ b i n :$PATH
cd . .
You can execute the script at the beginning of your standard startup script
which might then look like:
Listing 4.2: The wrapper script my script.sh
1
2
3
4
#! / b i n / bash
s o u r c e s e t u p r m o s t . sh
s o u r c e $VO ATLAS SW DIR/ s o f t w a r e / 1 3 . 0 . 3 0 / s e t u p . sh
s o u r c e $SITEROOT/ A t l a s O f f l i n e / 1 3 . 0 . 3 0 / A t l a s O f f l i n e R u n T i m e
/cmt/ s e t u p . sh
5
6
7
8
export LD LIBRARY PATH=$PWD: $LD LIBRARY PATH
export PATH=$PWD:$PATH
athena . py myAthenaJobOptions . py
Furthermore, the gLite job description file (JDL file) must be modified. For
transferring the setup_rmost.sh script with the job, it must be added to the
InputSandbox.
22
InputSandbox={"setup_rmost.sh", "my_script.sh",
"myAthenaJobOptions.py"};
To submit the job run:
glite-wms-job-submit -a --vo atlas <my_jdl_file>
Where you exchange <my_jdl_file> by the name of the job description file for
your job.
23
Chapter 5
The connection service
For the steering tool to connect to the job it needs a connection service, except
the case that the worker node has inbound connectivity from the internet in a
range of ports. The connection service can be installed permanently by an site
administrator somewhere or started by a user. The only requirement is that the
connection service needs one open port in a firewall, where it can be contacted
from the outside world. The connection service can run under any account with
a user or machine certificate.
To start a connection service you need either create a proxy certificate before
or have a access to a host or service certificate. If you use your proxy certificate
the service can only be contacted as long as the proxy is valid. The connection
service can be stared with.
rmost_cservice <port>
where <port> is the port number the connection service listens on. The port
number is the only required parameter.
If you want to start the CS as a demon, add the parameter -demon.
rmost_cservice <port> -demon
Then you can close your session or log off without stopping the CS.
By default, the CS writes its log output to /tmp/rmost cservice.log. Another file can be specified for the logging output with -log <logfilename>.
Also an alternative PID file can be specified with -pid <pidfilename>. The
CS writes its process id into the PID file and is used by scripts the terminate running connections services. The default location of the PID file is
/tmp/rmost cservice.pid.
To establish an interactive connection, the connector needs the address of the
target job. To get this information the connector requests a name service. By
default, R-GMA is used as name service which provide its own communication
system. If a job uses another name service which has no own communication
structure, the name service is contacted via the CS. Then, all requests are sent
to the CS, which invokes the name service client, which is a dynamically loadable
library. Thus, if your connection service should support another name service
than the default R-GMA-based name service you can specify the name service’s
client library with the parameter -ns <library>.
24
Appendix A
List of RM ISteeringSvc
Methods
1
Listing A.1: Methods of RM ISteeringSvc
v i r t u a l bool c o n n e c t ( char ∗ j o b ) ;
2
3
4
5
6
v i r t u a l bool r e g i s t e r V a l u e ( RM DataType dtype ,
const char∗ name ,
RM ISerializeMethod ∗ S e r i a l i z e ,
R M ID es e r ial i z e Met h o d ∗ D e s e r i a l i z e ) ;
7
8
v i r t u a l bool r e g i s t e r B y t e
( const char ∗name ,
char ∗ value ,
bool w r i t e a b l e = true ,
bool r e a d a b l e = true ) ;
v i r t u a l bool r e g i s t e r I n t
( const char ∗name ,
int ∗ value ,
bool w r i t e a b l e = true ,
bool r e a d a b l e = true ) ;
v i r t u a l bool r e g i s t e r L o n g
( const char ∗name ,
long ∗ value ,
bool w r i t e a b l e = true ,
bool r e a d a b l e = true ) ;
9
10
11
12
13
14
15
16
17
18
19
20
21
22
23
24
25
26
v i r t u a l bool r e g i s t e r F l o a t ( const char ∗name ,
f l o a t ∗ value ,
bool w r i t e a b l e = true ,
bool r e a d a b l e = true ) ;
27
28
29
30
31
v i r t u a l bool r e g i s t e r D o u b l e ( const char
∗name ,
double ∗ value ,
bool w r i t e a b l e = true ,
bool r e a d a b l e = true ) ;
25
32
33
34
35
36
v i r t u a l bool r e g i s t e r S t r i n g ( const char ∗name ,
char ∗∗ value ,
bool w r i t e a b l e = true ,
bool r e a d a b l e = true ) ;
37
38
39
40
41
v i r t u a l bool r e g i s t e r A c t i o n T y p e ( const s t d : : s t r i n g name ,
rmost : : RM ActionType ∗ value ,
bool w r i t e a b l e = true ,
bool r e a d a b l e = true ) ;
42
43
44
45
v i r t u a l bool r e g i s t e r F i l e ( const s t d : : s t r i n g name ,
rmost : : R M I S e r i a l i z e F i l e s ∗ S e r i a l i z e ,
rmost : : R M I D e s e r i a l i z e F i l e s ∗ D e s e r i a l i z e ) ;
46
47
v i r t u a l bool r e g i s t e r F i l e ( const s t d : : s t r i n g f i l e N a m e ) ;
48
49
v i r t u a l bool re g i s t e rR O OT F ile ( const s t d : : s t r i n g f i l e N a m e )
;
50
51
v i r t u a l bool u n r e g i s t e r ( const char∗ name ) ;
52
53
v i r t u a l bool c l e a r R e g i s t r a t i o n ( ) ;
54
55
v i r t u a l void check ( ) ;
56
57
58
59
60
v i r t u a l void n o t i f y ( s t d
std
int
int
: : string subject ,
: : s t r i n g message ,
priority ,
event ) ;
61
62
v i r t u a l void t e r m i n a t e ( ) ;
63
64
v i r t u a l void s t o p ( ) ;
65
66
v i r t u a l void s t e p ( ) ;
67
68
v i r t u a l void p r o c e e d ( ) ;
69
70
v i r t u a l void r e s t a r t ( ) ;
71
72
v i r t u a l void sendUpdate ( s t d : : s t r i n g name ) ;
26
Appendix B
Data Type Codes
Data Type
byte
int
long
float
double
C-string
steering value
stream
ROOT file
for internal use
data block of fixed size
procedure
notification
boolean
user defined type
Numeric Code
1
2
3
4
5
6
7
8
9
10
11
12
13
14
15
27
Sybolic Name
RMDT Byte
RMDT Int
RMDT Long
RMDT Float
RMDT Double
RMDT String
RMDT ActionType
RMDT File
RMDT ROOTFile
RMDT Internal
RMDT DataBlock
RMDT Procedure
RMDT Notification
RMDT Bool
RMDT UserTypes
Appendix C
List of TResultMonitorData
Methods
1
Listing C.1: Methods of TResultMonitoringData
v i r t u a l bool c o n n e c t ( char ∗ j o b ) ;
2
3
4
5
6
v i r t u a l bool r e g i s t e r V a l u e ( rmost : : RM DataType dtype ,
const char∗ name ,
rmost : : R M I S e r i a l i z e M e t h o d ∗ S e r i a l i z e ,
rmost : : RM ID es e r ial i z e Met h o d ∗ D e s e r i a l i z e ) ;
7
8
v i r t u a l bool r e g i s t e r B y t e
( const char ∗name ,
char ∗ value ,
bool w r i t e a b l e = true ,
bool r e a d a b l e = true ) ;
v i r t u a l bool r e g i s t e r I n t
( const char ∗name ,
int ∗ value ,
bool w r i t e a b l e = true ,
bool r e a d a b l e = true ) ;
v i r t u a l bool r e g i s t e r L o n g
( const char ∗name ,
long ∗ value ,
bool w r i t e a b l e = true ,
bool r e a d a b l e = true ) ;
9
10
11
12
13
14
15
16
17
18
19
20
21
22
23
24
25
26
v i r t u a l bool r e g i s t e r F l o a t ( const char ∗name ,
f l o a t ∗ value ,
bool w r i t e a b l e = true ,
bool r e a d a b l e = true ) ;
27
28
29
30
31
v i r t u a l bool r e g i s t e r D o u b l e ( const char
∗name ,
double ∗ value ,
bool w r i t e a b l e = true ,
bool r e a d a b l e = true ) ;
28
32
33
34
35
36
v i r t u a l bool r e g i s t e r S t r i n g ( const char ∗name ,
char ∗∗ value ,
bool w r i t e a b l e = true ,
bool r e a d a b l e = true ) ;
37
38
v i r t u a l bool r e g i s t e r F i l e ( const char ∗ f i l e N a m e ) ;
39
40
v i r t u a l bool re g i s t e rR O OT F ile ( const char ∗ f i l e N a m e ) ;
41
42
v i r t u a l bool u n r e g i s t e r ( const char∗ name ) ;
43
44
v i r t u a l bool c l e a r R e g i s t r a t i o n ( ) ;
45
46
v i r t u a l void check ( ) ;
47
48
v i r t u a l void r e q u e s t V a l u e ( char ∗name ) ;
49
50
v i r t u a l void g e t V a l u e ( char ∗name ) ;
51
52
v i r t u a l bool s y n c h r o n i z e ( char ∗name ) ;
53
54
v i r t u a l TObjArray ∗ g e t T a b l e ( ) ;
55
56
v i r t u a l bool p r o c e e d ( ) ;
57
58
v i r t u a l bool t e r m i n a t e ( ) ;
59
60
v i r t u a l bool s t o p ( ) ;
61
62
v i r t u a l bool n e x t S t e p ( ) ;
63
64
v i r t u a l bool r e s t a r t ( ) ;
65
66
v i r t u a l double getTime ( ) ;
29