1
Contents
1
2
3
4
5
6
7
8
9
10
11
12
13
14
15
16
17
Copyright and Legal Information
1
Your phone
3
Getting started
6
Making a call
10
Answering a call
12
Calls list and contact list
13
Menu navigation
15
Messages
16
Sounds
21
Extras
24
Settings
26
Services
28
Troubleshooting
30
Safety information
33
Regulatory Compliance and SAR Statements
37
End User License Agreement
39
Warranty Statement
42
1
Copyright and Legal Information
DOCUMENT. SENDO RESERVES THE RIGHT TO
REVISE THIS DOCUMENT OR WITHDRAW IT AT
ANY TIME WITHOUT PRIOR NOTICE. UNDER NO
CIRCUMSTANCES SHALL SENDO BE
RESPONSIBLE FOR ANY LOSS OF DATA OR
INCOME OR ANY SPECIAL, INCIDENTAL,
CONSEQUENTIAL OR INDIRECT DAMAGES
HOWSOEVER CAUSED.
Copyright Information
Part number: 8E30-26011-50002,
Edition 2.
Copyright Sendo 2003. All rights reserved.
Printed in the Netherlands.
ΣΕΝ∆Ο is a registered trademark, or trademark, of
Sendo International Ltd. and/or its affiliates.
Reproduction, transfer, distribution or storage of
part or all of the contents in this document in any
form without the prior written permission of Sendo is
prohibited.
T9 Text Input is a registered trademark of Tegic
Communications. All rights reserved. T9 Text input
is licensed under one or more of the following U.S.
Patents: 5,818,437, 5,953,541, 5,945,928,
6,011,554 and additional patents are pending
worldwide.
Export Information
This phone may be subject to export regulation of
the United Kingdom and other countries. Diversion
contrary to law is prohibited. You must comply with
all applicable export laws, restrictions and
regulations of the United Kingdom or foreign
agencies or authorities, and shall not export, or
transfer for the purpose of re-export, the phone or
any part of the phone in violation of any applicable
restrictions, laws or regulations, or without all
necessary approvals.
For Your Safety
DISCLAIMER
You should observe and follow the guidelines given
in this manual for the safe and efficient use of your
phone. Failure to comply with these guidelines and
requirements may void your warranty and may
invalidate any approvals given to the phone. Please
see the Important Safety section of this manual
before you use the phone.
The information contained in this user guide is
written for the Sendo phone model 300. Sendo
reserves the right to make changes and
improvements to the products and any of the
features of the products described in this document
without prior notice
THE CONTENTS OF THIS DOCUMENT ARE
PROVIDED "AS IS". EXCEPT AS REQUIRED BY
APPLICABLE LAW, NO WARRANTIES OF ANY
KIND, EITHER EXPRESS OR IMPLIED,
INCLUDING, BUT NOT LIMITED TO, THE IMPLIED
WARRANTIES OF MERCHANTABILITY AND
FITNESS FOR A PARTICULAR PURPOSE, ARE
MADE IN RELATION TO THE ACCURACY,
RELIABILITY OR CONTENTS OF THIS
1
Copyright and Legal Information
The wireless phone described in this manual is
approved for use in GSM 900 and 1800 networks.
1
Copyright and Legal Information
1
Approved Accessories warning
Use only batteries, charger and accessories
approved by Sendo for use with this phone model.
The use of any other types may invalidate any
warranty applying to the phone, and may be
dangerous. For availability of approved
accessories, please check with your dealer or visit
www.sendo.com.
When you disconnect the power cord of any
accessory, grasp and pull the plug, not the cord.
Network Services
A number of features included in this guide are
called network services. They are services
provided by wireless service providers. Before you
can take advantage of any of these network
services, you must subscribe to these service(s)
from your home wireless service provider and
obtain instructions for their use. Some of these
network services may not be available when
roaming on a network other than your home
network.
2
2
Your phone
2
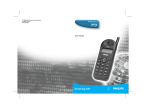
!
Wrist/neck strap loop – Used to attach a
wrist strap or neck strap.
"
#
Earpiece
Display – Graphical indicators, menu
options and other information are shown
here.
$
Up and down keys – Used to scroll through
menus and options.
%
Left soft key – This key performs the function
immediately above it on the display
&
Right soft key (and Power key) – A long
press of this key will switch the phone on
and off. A short press of this key performs
the function immediately above it on the
display.
'
Quick access key – The function of this key
will vary depending on the model of your
phone. It provides quick access to a certain
function such as messaging.
(
Clear key – This erases text or takes you
back to your previous step, depending on
the context. A long press of this key takes
you back to the main screen.
)
Charger/accessories connector - Insert the
charger connector here. This connector is
also used to connect appropriate
accessories such as a hands-free kit.
3
Your phone
Layout
Your phone
2
Menus
4
2
Your phone
Symbol description
Main screen
µ
Battery indicator
Empty icon indicates a very weak
battery level. Solid icon indicates a
fully charged battery level
New text message
All incoming calls are diverted
Keypad locked
λ
Battery charging
Signal strength indicator
No bars indicates a very weak
signal.
Four bars indicates a very strong
signal
New voice mail message (this icon
is network dependent)
Silent mode active
Alarm clock set
In calls list
ν
Shows that a call was incoming
ο
Shows that a call was outgoing
ξ
Shows that a call was missed
Indicates the messages which
have not yet been read
κ
Indicates the smiley messages
which have not yet been read
Indicates the messages which
have been read
ϕ
Indicates the smiley messages
which have been read
In messages list
Lists
In lists shows the option that is currently activated
5
Getting started
3
3
Getting started
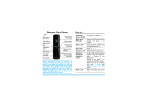
Inserting the SIM card
To use your phone, you must first insert the
SIM card supplied by your service provider,
and then charge the battery.
Slide the SIM into place, starting with the
shorter edge first, making sure that the goldcoloured contacts of the card are touching
the contacts of the phone.
ζ Note: You cannot insert or remove the
SIM unless you remove the battery. If
you need to remove the battery, press
down on the tab at the centre of the
bottom edge of the battery and lift out.
ζ Note: Always turn your phone off before
you insert or remove the battery.
Removing the back cover
Press down on the area on the top of the
back cover, slide the cover down and lift off.
ζ Warning: Keep all SIM cards out of small
children’s reach. The SIM card is easily
damaged by scratches or bending, so
be cautious when inserting and
removing the card.
6
3
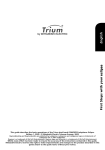
Replacing the back cover
Insert the battery into the phone, starting
with the top edge first. Align the tabs on the
edge of the battery with the tabs on the back
of the phone. Make sure the gold-coloured
contacts of the battery are touching the
contacts on the phone. Push down into
place.
Place the cover onto the back of the phone
and slide the cover into place making sure
the tab at the top of the cover clicks into
place.
Charging the battery
You must charge the battery for at least 12
hours before using the phone for the first
time. After this, the battery will normally take
several hours to charge.
If you need to remove the battery, press
down on the tab at the centre of the bottom
edge of the battery and lift out.
ζ Note: Always turn your phone off before
Insert the connector on the charger lead into
the connector on the bottom of the phone.
Plug the charger into a wall socket. When
charging commences, the battery icon will
change into a charger cable icon. When the
battery is fully charged, the battery icon will
reappear and you can disconnect the
charger.
you insert or remove the battery.
Once you connect the charger, you can
switch your phone on. If the battery is
completely empty, it may take a few minutes
7
Getting started
Inserting the battery
Getting started
3
before you can make or receive a call once
you plug the phone into a charger.
Note
ζ Note: When the battery is completely
Use only batteries approved by Sendo and
recharge your battery only with the chargers
approved by Sendo. When a charger is not in use,
disconnect it from the power source. Do not leave
the battery connected after the battery indicator
shows that the battery is full, or for longer than a
single day, since overcharging may shorten its life.
If left unused a fully charged battery will discharge
itself over time.
discharged it may take some time for the
battery charging icon to appear after
you have connected the charger.
Charging and Discharging
Please observe the following notes and
precautions regarding the use of batteries
and related equipment.
For longer operation times, discharge the battery
from time to time by leaving your phone switched on
until it turns itself off and the battery is fully
discharged.
Note
If you remove your battery you will find the phone’s
label on the back portion of the phone. This label
includes information about the phone, such as the
model number.
Do not attempt to discharge the battery by any other
means.
Do not remove the phone’s label. In the unlikely
event that you ever need to make a warranty claim
or seek assistance with respect to use of your
phone, you may be asked for this information.
Never use any charger or battery that is damaged or
worn out.
Use the battery only for its intended purpose.
Warning: Do not short circuit the battery. All
batteries can cause property damage, injury or
burns if a conductive material such as jewellery or
keys comes into contact with the exposed terminals.
The material may complete an electrical circuit and
become quite hot. Exercise care in handling your
phone battery. For example, avoid carrying your
phone battery loose in a pocket or purse. This
product is designed for use with Sendo-approved
batteries only. Use of unapproved batteries may be
dangerous and may cause damage to the battery or
the phone and may void your warranty.
Note that a new battery's full performance is
achieved only after two or three complete charge
and discharge cycles. The operation times provided
are reasonable estimates and may be affected by
network conditions, charging and phone usage.
The battery can be charged and discharged
hundreds of times, but it will eventually wear out.
When the operating time (talk time and standby
time) is noticeably shorter than normal, it is time to
buy a new battery.
8
3
Getting started
Note
Leaving the battery in hot or cold places, such as in
a closed car in summer or winter conditions, may
reduce the capacity and lifetime of the battery.
Always try to keep the battery between 15°C and
25°C (59°F and 77°F). A phone with a battery that
has been exposed to temperature extremes may
temporarily not work, even when the battery is fully
charged.
Dispose of the battery properly. Comply with all
local laws or regulations in disposing of your battery.
Do not dispose of batteries in a fire.
Powering up/down
To switch the phone on, press δ.
If the phone asks for a PIN code, enter the
code that is supplied with the SIM card. The
code will be displayed as asterisks (*).
When complete, press γ, OK.
Wait a few seconds while the phone
searches for the network. Once the network
has been found, the main screen appears
and your phone is ready to be used. The
main screen shows the network name and
two icons giving the signal strength (top
right) and battery level (top left).
To switch the phone off, press and hold δ.
9
Making a call
4
4
Making a call
Dialling a number
Emergency calls also may not be
possible when certain network services
or phone features are in use. Do not rely
on your wireless phone as your only
method of emergency communications.
1 Key in the area code and number that
you want to call then press γ, Call to
dial.
If you make a mistake, press χ to delete
a single digit. To delete the entire number
and return to the main screen, press and
hold χ.
Making calls from the contact list
1 Press ; from the main screen. You
can also press δ, Contacts then select
the Search option.
2 You can adjust the earpiece volume in a
call by using the up and down keys
: ;.
2 Type in the first letters of the name or
scroll and find the one that you want.
3 To end the call, press δ, End.
3 Press γ, Call to dial.
Making an international call
Speed dialling
1 Press and hold 0 until the plus sign "+"
is displayed. This replaces the
international access code.
This feature allows you to dial a number
simply by pressing and holding the
assigned key from the main screen.
2 Enter the country code, area code, and
phone number.
To add a speed dial number to a contact list
entry:
1 Press δ, Contacts from the main screen
and then select the Search option.
3 Press γ, Call to dial.
Making an emergency call
2 Type in the first letters of the name or
scroll and find the one that you want.
1 Key in the emergency number for your
present location (e.g. 999, 911, 112 or
other official emergency number).
Emergency numbers vary by location.
3 Press and hold one of the keys 2 to
9 until the key number appears on the
left of the screen, beside the name. This
indicates that the speed dial is
successfully assigned.
2 Press γ, Call to dial.
ζ Warning: The phone must be switched
on, open, properly charged and used in
a service area with adequate signal
strength to make an emergency call.
ζ Note: 1 is normally reserved for
voicemail.
10
4
Making a call
Making calls using speed dial
1 Press and hold the number key assigned
to the contact you want to call.
To remove a speed dial number from a
contact list entry:
1 Scroll to the name in the contact list.
2 Press and hold the number key already
assigned to the name, until the key
number is removed from the left of the
screen, beside the name.
Making a call from the calls list
The phone stores a list of your recent
incoming, outgoing and missed calls.
To dial a number from the calls list:
Press : to access the list from the main
screen. Scroll and find the entry that you
want and press γ, Call to dial.
Adjusting the volume
The earpiece volume can be adjusted
during a conversation. Press : to make
the speech louder and ; to make it
quieter.
11
Answering a call
5
5
Answering a call
To answer a call:
be able to accept another call). You will
not be able to switch.
Press γ, Accept to accept a call.
Press δ, Reject to reject a call.
In call options
When you are in a call, you can press γ,
Options. These could be:
ζ Note: If you can’t answer a call, but you
don’t want to reject it, press ; to
silence the ringtone.
Contacts
Gives you access to the contact list.
Call waiting
Hold/Unhold
Puts the active call on hold/reactivates the
held call.
This feature means you are informed of a
second incoming call by an audible tone in
the earpiece.
Mute/Unmute
Switches the microphone off/on.
ζ Note: Please refer to the Services
chapter of this guide for more
information on how to activate Call
Waiting.
Send message
Allows you to send a text message.
SIMToolkit
Gives you access to the SIM Toolkit.
Press δ, Reject to reject the second call.
Swap
Swaps between the current call and the
call on hold.
Press γ, Accept to put the current call on
hold and activate the second call.
To end the active call and return to the held
call, press δ, End.
End all
Ends all calls.
To switch between calls, press γ, Options
and then select the Swap option.
ζ Note: Your network may not support call
waiting or may require you to subscribe
to this feature. If you do not have call
waiting or are roaming on another
network, accepting a second call will
end the first call (or you simply may not
12
6
Calls list and contact list
6
Using the contact list
The phone stores a list of your recent
incoming, outgoing and missed calls.
The names and numbers you enter into your
contact list are stored on the SIM card.
The list stores up to 30 entries.
To access your contact list entries, press
; from the main screen.
An icon on the left of the screen indicates the
type of call:
ν
Incoming call
ξ
Missed call
ο
Outgoing call
Storing a name and number
1 Press δ, Contacts from the main screen.
2 Use the up and down keys : and
; to scroll to the Add new option,
then press γ, Select.
Making a call from the calls list
3 Enter the area code and phone number,
then press γ, OK.
Press : to access the list. Scroll and
find the entry that you want and press γ,
Call to dial.
4 Enter the name you wish to store in the
contact list, then press γ, OK. Use the
keypad as explained in the table in the
Messages section to enter the characters
and to switch between lower case, upper
case, and numeric modes.
Calls list options
When you have selected an entry in the calls
list, you can open a list of options by
pressing δ, Options:
ζ Tip: You can store a name and number
Save no.
Save the number to your contact list.
by entering the number in the main
screen. Press δ, Contacts, select the
Save option and enter the name.
Send message
Send a text message directly to this entry.
Details
View the details for this entry.
Correcting an entry
Whilst entering contact information,
pressing χ deletes the character
immediately to the left of the cursor.
Pressing and holding χ deletes all of the
text that you have entered.
Delete
Delete this entry.
Delete all
Delete all entries in the calls list.
13
Calls list and contact list
Using the calls list
Calls list and contact list
6
Fixed names
To change a contact’s details, select the
contact in the contact list and press δ,
Options, then select Change.
This service allows you to restrict your
outgoing calls to certain selected numbers
from your SIM card. This feature is
dependent on your service provider.
Adding a speed dial number
1 Press δ, Contacts from the main screen
and then select the Search option.
Your phone will ask for the PIN2 code to
activate this function. This code may have
been supplied with your SIM. If not, contact
your service provider.
2 Type in the first letters of the name or
scroll and find the one that you want.
3 Press and hold one of the keys 2 to
9 until the key number appears on the
left of the screen, beside the name. This
indicates that the speed dial is
successfully assigned.
When this feature is activated, a new
contact list is made visible in place of your
standard one. Only numbers from this
contact list can be dialled. You can add
numbers to this contact list in the same way
as adding numbers to your normal contact
list, with the exception that you have to enter
the PIN2 code. This code may have been
supplied with your SIM. If not, contact your
service provider.
ζ Note: 1 is normally reserved for
voicemail.
Removing a speed dial number
1 Scroll to the name in the contact list.
2 Press and hold the number key already
assigned to the name, until the key
number is removed from the left of the
screen, beside the name.
Contact list options
When you have selected a name you can
open a list of options by pressing δ,
Options. This menu will allow you to change,
delete, display details and send a message.
14
7
Menu navigation
7
* To lock/unlock the keypad, press γ,
then * from the main screen. The
locked symbol,
is displayed on the
main screen when the phone is locked.
Scrolling
You can scroll from one menu to another
using the up and down keys : and
;.
* To enter/exit silent mode press γ then
# from the main screen. The silent
symbol,
is displayed on the main
screen when the phone is in silent mode.
When you find the menu that you are looking
for, press γ, Select to enter the menu.
ζ Note: If the vibrate function is set to on,
Press End, back or χ to return to the
previous level.
the phone will still vibrate whilst in silent
mode.
SIM Toolkit
ζ Note: If the phone is switched off whilst
Your service provider may offer some
special services or applications. The name
of the menu may change to indicate the type
of service, for example “Information”.
in silent mode, the phone will return to
the previous volume setting once
switched on again. This is provided as a
safety feature to help ensure no calls are
missed.
For more details, please contact your
service provider.
* To enter a pause while dialling, press and
hold # until the letter p appears. This
will insert a pause of 3 seconds.
Shortcuts
* Press : from the main screen to
access the calls list. From here you can
call, save, chat and send messages to
any of the entries.
* Press ; from the main screen to
access your contacts list. From here you
can call, save and send messages to any
of the entries.
15
Menu navigation
To enter the main menu, press γ, Menu
from the main screen.
Messages
8
8
Messages
Text messages
Time/date
Displays the date and time of the
message.
You can send and receive SMS (text)
messages of up to 160 characters to/from
another compatible phone. Almost all
modern mobile phones accept this format.
Forward
Sends the message to someone else.
Reading a text message
Sending a text message
When you receive a text message, the
envelope µ icon is displayed at the top of
the main screen.
To send a text message:
1 Enter the Messages menu and select the
Send option.
1 Press γ, Read to display the new
message directly from the main screen.
2 Select New to type in a new message or
select Saved to select a message from a
list of saved messages.
2 To read old messages select Read from
the Messages menu.
3 When you have entered the text, press
γ, Send.
3 Use the : and ; keys to scroll
through the message.
4 Enter the destination phone number, or
press δ, Contacts and select a name
from your contact list.
4 Press δ, Options to access the following
message options:
5 Press γ, Send to send the message.
Delete
Removes the message.
ζ Note: If you reply to a message, you do
Reply
Sends a text message to the sender.
not have to re-enter the number. This is
done automatically.
Call
Calls the sender (or, if there is a number in
quotes in the message, this number is
called instead).
Save no.
Adds the sender’s phone number to your
contact list.
16
8
Reading a Smiley SMS
Send a Smiley with your text message to
compatible phones. All other phones will
display an Internet style Smiley.
When you choose a message that has a
Smiley in it, the Smiley appears on the
screen for 3 seconds or until a key is
pressed. Then the message appears. After
this time the message reads as normal. A
message with a smiley attached has a κ
icon if new and a ϕ if read.
1 Enter the Messages menu, select the
Send option and then select Smiley. The
following list will be displayed:
*
*
*
*
*
Emotions
Celebrations
Sports
Animals
Others
ζ Note: If replying to or forwarding an SMS
(text) message, the Smiley will not
display and only appears on a new
message.
2 Select the category you would like to view
and then use the : and ; keys to
scroll through the Smileys. Press γ,
Select on the Smiley you would like to
add to your message.
Entering text, numbers and symbols
You can enter text, numbers and symbols in
a number of ways. The current input mode is
indicated at the bottom of the screen by one
of these icons:
3 You can now type the rest of your
message. Your message text is restricted
to 156 characters to allow space for the
Smiley.
4 When you have entered the text, press
γ, Send.
5 Enter the destination phone number, or
press δ, Contacts and select a name
from your contact list.
α
Multitap text input - lower case
β
Multitap text input - upper case
θ
Numeric mode
η
T9 predictive text input (lower case)
ι
T9 predictive text input (upper case)
You can switch between Multitap, numeric
and predictive text modes by repeatedly
pressing *.
6 Press γ, Send to send the message.
ζ Note: When you select a field that
requires text or numeric entry, the phone
automatically changes to the
appropriate input mode.
17
Messages
Sending a Smiley SMS
Messages
8
The table below lists the characters
associated with each key on the numeric
keypad:
Key
1
2
3
4
5
6
7
8
9
0
#
for the cursor to reappear before entering
the second.
Also, you will notice that some intelligent
features are built in. For example, when
entering the first word in a sentence, the text
input mode changes automatically from
upper case to lower case after the first letter.
List of characters available
1.,@‘?!":;¿¡
abc2àäåæç
def3éè
ghi4ì
jkl5
mno6ñòöø
pqrs7ß
tuv8üù
wxyz9
0 (numeric mode only)
Space (short press)
Some punctuation marks (including full
stops, hyphens and apostrophes) are
available on 1. Alternatively, press and
hold # to pick a symbol to insert from the
character table (see the Entering symbols
section below).
When you have finished entering a word,
press # to enter a space and move on to
the next word.
ζ For all input modes, a long press on #
displays a table showing all the symbols
available. See the Entering symbols
section later in this chapter for details.
For example, to enter the name "Ross" when
you are in lower case mode:
Multitap standard text input
1 Press * to enter upper case mode,
When you are in Multitap mode (sometimes
called multipress mode), you enter a letter
by pressing the number key on which the
letter is printed. Press the key repeatedly
until the required character is displayed. If
you pass the character you want, keep
pressing the key to scroll through all the
characters again.
2 Press 7 three times, to display "R", you
will then return to lower case mode.
3 Press 6 three times, to display "o".
4 Press 7 four times, to display "s". Now
pause slightly until the cursor reappears.
5 Then press 7 four times, to display "s".
For example, to enter the letter “r” press 7
three times.
If a word you are entering contains two
consecutive letters which are located on the
same key, enter the first one and then wait
18
8
number key repeatedly until the number is
displayed.
To save time when you are writing a text
message, your phone has a built-in
dictionary feature which uses the letters that
you are typing to complete the word.
To enter a number in predictive text input
mode, press the number key and then scroll
through the characters (by pressing 0)
until the number is displayed.
This input method allows you to simply
press each key once. For example, to write
the name "Ross", press 7, then 6, then
7, then 7 just once each.
If you have multiple numbers to enter, it is
often more convenient to use the numeric
input mode. Press * repeatedly to
change the mode to θ. Now whenever you
press any of the number keys, only the
number is entered.
The word may change as you type, but don’t
worry about what is on the screen until you
have finished the word. Sometimes different
words share the same sequence of key
presses. If the finished word is wrong, press
0 to scroll through other possibilities. If
the word that you are looking for is still not
there, press * repeatedly to change the
text mode to β or α and enter the word
again.
Entering symbols
For all input modes, a long press on #
displays a table, similar to the one below,
showing all the symbols available to you:
After you have completed a word, press the
space key # to enter a space and move
on to the next word. Press and hold # to
pick a symbol to insert from the table (see
the Entering symbols section below).
.
&
*
§
,
‘
=
√
ÿ
é
ö
1
Ÿ
è
ø
2
“
<
ε
¿
ì
ß
3
|
/
>
»
ì
?
_
#
À
à
@
;
£
Œ
ä
Ä
ü
4
Ä
ù
5
É
Ñ
6
(
$
¥
—
å
ò
Ö
7
)
%
¤
”
æ
ñ
Ø
8
:
+
ƒ
÷
ç
Æ
Ü
9
To enter a symbol:
Some intelligent punctuation (including full
stops, hyphens and apostrophes) are also
available on 1. The punctuation mark is
completed when you enter the next
keystroke.
1 Using the : and ; keys, scroll to
the row containing the symbol you want.
2 Press the numeric key (1 to 9) to
select the symbol.
Entering numbers
For example, to enter the symbol %, scroll to
the 2nd row then press 8.
To enter a number in upper case or lower
case text input mode, simply press the
19
Messages
Predictive text input
Messages
8
Calling your voice mail
Message settings
When you have a new message in your
voice mailbox, your phone displays either
the voice mail icon λ in the main screen or
a text message sent from the network. This
depends on your service provider.
This menu has the following options:
Status report
Allows you to set whether or not you wish
to be informed when your correspondent
has received the text message.
ζ Note: Voice mail is a network service
Centre number
Allows you to enter or change the service
centre number for text messaging.
provided by your service provider. You
may have to subscribe to this service.
This service may not be available when
roaming.
Voice mail
Allows you to enter or change your voice
mail number.
To call your voice mailbox, either:
Characters
Allows you to choose whether you want to
enter text in GSM (Latin characters) or
Unicode (Non Latin characters) mode.
Unicode characters take up more room on
your phone so the length of a standard
text message is restricted to half the usual
number of characters.
* Press γ, Call if displayed in the main
screen, or
* Press and hold 1, or
* Select the Voice mail option from the
Messages menu.
If the phone asks for the voice mailbox
number, enter it and press γ, OK. The
number can be obtained from your service
provider.
Broadcast messages
Your service provider may offer Cell
Broadcast. This could be information on the
traffic, weather, events, or local information
which is broadcast by the network to all
mobiles in a specific area. When you
activate this feature, you may receive
messages about the selected topic. Contact
your service provider for more details.
20
9
Sounds
9
in either entry mode.
4 You can now compose your ringtone - the
keys represent the following notes:
Ringer
Select this option to set the ringtone for
incoming calls.
Composer
Select this option to open the ringtone
composer. Using the ringtone composer,
you can create and modify your own
ringtones, to personalise your phone.
ζ Note: It is only possible to save 5
1
C
5
G
2
D
6
A
3
E
7
B
4
F
8
Enters a rest (text mode only).
9
Changes the scale of the note - in the
range 1-4.
0
Changes the duration of the note.
Each press decreases the duration
of the note - full note, half note,
quarter note, eighth note, sixteenth
note and thirty-second note.
#
Changes a normal note to a sharp
and a sharp back to a normal note.
*
Changes a normal note to a dotted,
double dotted or 2/3 note.
χ
Erases the previous note. A long
press will clear all notes.
ringtones whether you have composed
them yourself or received them as a
message. To save more, you will have to
overwrite an existing ringtone.
To compose a ringtone:
1 Select the Composer option from the
Sounds menu.
2 Scroll and select one of the five ringtones.
3 You now have two options:
Text
5 Once you have composed the ringtone
press γ, Options to display the following
menu options:
Display notes in text format.
Graphic
Play
Allows you to play your ringtone.
Display notes in a graphical format.
21
Sounds
ζ Tip: A short press of the : and
; keys will move you between notes
This menu allows you to configure the
various sounds that the phone plays when
you receive a call or a new text message, or
some other event occurs.
Sounds
9
the : and ; keys to increase and
decrease the volume level.
Tempo
Allows you to choose from a list of tempos
at which to play your ringtone.
To enter/exit silent mode press γ then #
from the main screen. The silent symbol,
is displayed on the main screen when the
phone is in silent mode.
Save
Allows you to save your ringtone. You will
be prompted to enter a name for your
ringtone.
ζ Note: If the vibrate function is set to on,
Delete
Allows you to delete your ringtone.
the phone will still vibrate whilst in silent
mode.
Send
Allows you to send your ringtone as a
message. This will be sent as a standard
Smart Messaging monophonic ringtone.
ζ Note: If the phone is switched off whilst
in silent mode, the phone will return to
the previous volume setting once
switched on again. This is provided as a
safety feature to help ensure no calls are
missed.
Receiving a ringtone
If you have received a ringtone (received as
a message) press γ, Options. The menu
displayed allows you to play, save or delete
the ringtone. If you press χ the ringtone
and message will be deleted.
Key tones
This option allows you to set the type of
keypad tones that you would like to hear
when pressing the keys.
Your Sendo S300 can receive standard
Smart Messaging monophonic ringtones.
You have the following options:
Off
No sound emitted when a key is pressed.
ζ Note: It is only possible to save 5
ringtones whether you have composed
them yourself or received them as a
message. To save more, you will have to
overwrite an existing ringtone.
On
Short, low volume tones.
DTMF
These are standard tones, as used in
touch tone phones. Each number has its
own specific tone.
Volume
Select this option to change the volume
setting for ringtones and alert sounds. Use
22
9
Equalizer
Select this option to set the vibrate function
for incoming calls or text messages.
Select this option to alter the earpiece audio
settings of your phone.
You have the following options:
Off
Deactivates the vibrate function.
Choose from these settings for optimum
audio quality:
• Treble
On
Sets the phone to vibrate for an incoming
call or text message.
Vibrate then ring
Sets the phone to vibrate for a few
seconds before the phone starts to ring.
ζ Note: This option is not available on all
models. None of the vibrate settings
affects any of the sounds settings.
Events
This option allows you to set the alert tones
to on or off for the following events:
• New message • New broadcast
• Low battery
• Low credit
ζ Note: Alert sounds can only be applied
to those services supported by your
service provider. When roaming, certain
services may not be supported. Contact
your service provider for details.
23
• Normal
• Bass
Sounds
Vibrator
10
10
Extras
Tenpin
Extras
FlippIT
Select Tenpin from the
Extras menu. To start a
new game, select New.
Select FlippIT from the
Extras menu. To start a
new game, select New.
The aim of the game is to
knock as many of the pins
down as possible. The game is played over
10 frames and in each frame you have two
attempts to knock down all of the pins.
There are 6 levels; 3x3 is
the easiest.
The objective of the game is to change the
white discs to black discs. You do this by
selecting one of the discs by pressing the
5 key. This turns a white disc to black or
black to white, but also turns all of the discs
directly above, below, to the left and to the
right, to the opposite colour.
You can position the ball on the lane by
pressing 4 or 6 to move across the
lane.
To bowl the ball straight press 5 when the
Swing bar is positioned in the centre of the
bowling ball.
You can move the cursor from one disc to
another using the keys in the grid shown
below. On the right of the screen you will see
the number of moves that you have made so
far, and also the smallest number of moves
that it is possible to complete the level in.
To bowl at an angle press 5 when the
Swing bar is to the left or right of the bowling
ball.
Try to get the top score of 300 and enter
your name on the Hi-score table!
With each higher level the grid gets bigger
and bigger, and harder!
Type your name using the keypad and
press γ, OK to see the Hi-score table.
Press OK again to return to the game menu.
FlippIT and Splash keys
24
10
Extras
Splash
Quaddro
Select Splash from the
Extras menu. To start a
new game, select New.
Select Quaddro from the
Extras menu. To start a
new game, select New.
An incomplete pipeline is
displayed starting at the
top left of the screen and water is slowly
flowing towards the open end.
The objective of the game
is to drop your counters
into the slots along the top of the board, in
the attempt to create a line of four,
horizontally, vertically or diagonally.
The goal is to connect the open end of this
pipe to the outlet at the bottom right of the
screen before the water overflows!
When you drop a counter, it will fall all the
way to the bottom or sit on top of any other
counters that are in that column. So, think
carefully before you play!
To do this you are supplied with pieces of
straight and bent pipe, which are shown on
the right of the screen.
You move the flashing cursor left and right
along the top of the screen using the 4
and 6 keys. Pressing 5 will drop the
counter into the column.
The piece at the top of these is the next
piece that you must place on the board. You
move the cursor using the keys on the grid
shown above in the FlippIT game. The 5
key places the section in the position of the
flashing cursor. However, be careful, once
you have put down a piece you cannot
move it.
The # key drops your bombs. You are
provided with 3 bombs. These bombs will
delete the piece where the cursor is
positioned. Use them wisely.
Once you have managed to complete the
pipes, you can press * to speed up the
water, to finish the level.
With each level, it gets faster and faster!
Good luck!
25
11
11
Settings
Languages
Settings
Note
This menu allows you to change the
language of the phone.
The alarm will sound even if the phone is switched
off. The phone will power on (if battery power is
available) but you will not be able to receive or make
calls. If the volume was set to silent mode before the
phone was switched off, the alarm will still sound as
silent mode is cancelled when the phone is
switched off. Once the alarm finishes, the phone will
switch off automatically.
Alarm
You can use your phone as an alarm clock.
Set the alarm to On and enter the time when
you require the phone to ring (in 24 hour
format). When it rings press:
δ, Off to switch it off, or
Setting time and date
γ, Snooze to stop the alarm for ten minutes.
Go to Set date and press γ, Select. Enter
the date and press γ, OK.
The alarm will then sound again.
Please observe the following notes:
Go to Set time and press γ, Select. Enter
the time in 24 hour format, Press γ, OK.
Note
The date and time will be stored.
When activated, the alarm will sound for
approximately 40 seconds before switching off (if
you do not press δ, Off or γ, Snooze).
Auto redial
When this function is activated, the phone
will automatically redial a number when the
call attempt fails. If the other user’s phone is
busy, the phone will wait a few seconds
before each attempt, and then beep when it
succeeds.
If the alarm activates during a call, the phone will
beep and the display will flash to indicate that the
alarm is active. As described above, press δ, Off
to switch it off, or γ, Snooze to stop the alarm for
ten minutes.
If the volume is set to silent mode, the alarm will
activate but there will be no sound. The phone will
still vibrate if the vibrate feature is on.
Auto answer
This function is only applicable when certain
hands-free accessories (e.g., a personal
hands-free headset) are connected to the
phone. When you receive an incoming call
with this feature activated, the phone rings
three times before automatically accepting
the call.
26
11
If you enter the wrong PIN or PIN2 code
three times, the SIM card is locked and you
may be asked to enter a PUK (Personal
Unlock Key) code - these may be different
for PIN and PIN2. The PUK codes may be
listed in the information that you received
with your SIM card or they may only be
available from your service provider.
When this function is activated, you can
answer an incoming call by pressing any
key, except δ, Reject.
Security
Your PIN (Personal Identity Number) code is
a code that you can use to protect your
phone from unwanted users. This is the
number that the phone may ask for at switch
on. The options are as follows (depending
on what PIN activation settings you have
selected):
ζ Note: Sendo cannot provide your PUK
codes. Contact your service provider for
information.
Activate PIN
Enter your PIN at switch on (if your SIM
card supports this).
Deactivate PIN
You do not have to enter your PIN at
switch on.
Change PIN
Select this to change your PIN code.
Change PIN2
Some network services require a separate
security code - the PIN2 code. Select this
option to change your PIN2 code.
To activate, deactivate or change the PIN
code, you need to enter the current PIN
code. To change the PIN2 code, you need
to enter the current PIN2 code. If you don’t
know your PIN code or PIN2 code, contact
your service provider.
27
Settings
Any key answer
Services
12
12
Services
ζ Note: Your network may not support all
Network selection stays manual until you
switch to automatic mode.
of these features. Any unsupported
features will not be shown in the menu.
ζ Note: The ability to select alternative
networks will depend on the service, or
roaming, agreement of your service
provider.
Commands
This menu allows you to send special
commands to the network to get specific
information. This could be information such
as the time and date, your own phone
number, or the amount of credit remaining
on your SIM card. The commands, and
whether this feature is available, can be
obtained from your service provider. You
can store the number of the command and
a name. Once stored, scroll to the command
and press γ, Send to get the required
information from the network.
Send number
This menu allows you to select whether you
hide your identity or not when you call
someone.
There are two options:
Activate
Your phone number is sent to your
correspondent when you call.
Deactivate
Your phone number is not sent to your
correspondent when you call.
Network selection
This menu allows you to choose how the
phone searches for the network.
Status
Display the current status of this feature.
You have two options:
Automatic
The phone searches all available
networks and automatically selects one.
Cost/timers
This menu contains all information on the
amount of time you have spent on calls.
Manual
The phone searches all available
networks and, when finished, displays a
list of all the networks found. You can
scroll up and down with : ; to
select the network that you wish to use.
Once you select a network, your phone
will always try to select this network.
This menu offers five options:
Balance
Displays the amount of credit that you
have left on your prepaid card.
Outgoing
Displays the total time that you have spent
on your phone on outgoing calls.
28
12
2 Scroll to the Service no. option, then
press γ, Select.
Limit
Allows you to view and set the maximum
cost limit that you can go up to.
Call waiting
This menu allows you to activate or
deactivate the call waiting feature. For more
information on Call waiting, please see the
Answering a call section of this guide.
Rate
Allows you to set the price per unit, and
enter the currency in which you wish the
call costs to be displayed.
Divert
This network feature allows you to divert
your incoming calls to your voice mailbox or
to another number.
The following options are available:
All conditional
When activated, the calls you specify here
are diverted when the phone is busy, not
answered or unreachable. Select Voice,
Fax, Data or All calls.
All calls
When activated, the calls you specify here
are diverted. Select Voice, Fax, Data or All
calls.
Service numbers
Your service provider may have preprogrammed some useful numbers into
your SIM card. These numbers normally
give access to special services. For more
information contact your service provider.
29
Services
1 Press δ, Contacts to display the contact
list menu, scroll using : ;.
Incoming
Displays the total time that you have spent
on your phone on incoming calls.
Troubleshooting
13
13
Troubleshooting
Problem
Possible cause
Possible corrective action
Fully charge the battery and then press δ.
Phone does not power Battery empty
on
Phone does not
charge
Battery contacts dirty
Clean contacts on battery and phone with a dry cloth,
attach battery, wait a few seconds and press δ.
Battery empty
Charge for 2 hours. Don’t worry if the battery icon
does not change immediately.
Disconnect and try again.
Charger incorrectly connected Check the mains socket, and the connection to the
phone.
Battery
How long should I charge the
battery the first time?
12 hours continuous.
I don’t get as much
battery life as I
expected
The phone uses battery power Charge the phone regularly.
when it is switched on even if it
is not in a call. Making calls and
playing with the different
functions of the phone will run
down the battery faster. The
stated battery life is under
optimum conditions.
“Insert SIM” is
displayed when I
switch on the phone
SIM card is incorrectly inserted Check that the SIM card is positioned correctly, and
or missing. SIM card is
that the metal clip is slid across. Try again. Visually
damaged or dirty
check the SIM and clean the contacts with a dry
cloth. Try again.
The PIN code is
blocked
3 incorrect entries
Enter the PUK (Personal Unlock Key) code supplied
with the SIM card. If you do not have this code,
contact your service provider.
The PIN2 code is
blocked
3 incorrect entries
Enter the PIN2 PUK (Personal Unlock Key) code
supplied with the SIM card. If you do not have this
code, contact your service provider.
“NCK Code” is
displayed on my
handset
The handset is locked to a
network and a SIM from another
network has been placed in the
phone
Remove the SIM and insert the correct network SIM.
Sendo cannot supply your NCK code.
Warning: If you enter the wrong NCK code you could
block the phone.
30
13
Possible cause
Possible corrective action
“Blocked” is displayed The NCK code has been
Return the handset to your service operator or to an
on my handset
entered incorrectly 10 times and authorised Sendo service centre for resetting.
the handset has been security
disabled
A key on the keypad is The keypad is not seated
not working
correctly after removing and
replacing the phone’s plastic
cover
Remove the phone’s plastic cover and re-seat the
keypad correctly.
Key lock on
The keypad may be locked. Check the screen for the
symbol. Press γ and * in quick succession
to unlock the keypad.
Poor display
Low temperature
Move to a warmer place and let the phone warm up.
Can’t connect to
network
Weak signal
Move into an area of better coverage. If you are in a
building, move towards a window.
Invalid SIM card
Contact your service provider.
Network not allowed
Try reselecting the network. Switch off and then back
on.
Weak signal
Check that the service provider name is displayed on
the screen. If not, try to reconnect to the network or
move to an area with a better signal.
Phone is switched off
Press δ for a few seconds.
Check the number
Use the full area code and country code in the
number.
Can’t make/receive
calls
Call key not pressed
After dialling the number you must press γ, Call.
Network is busy
If you hear rapid beeps, then the network is busy.
Hang up and try again.
Call barring or fixed dialling is
activated
Check the fixed dialling settings. Otherwise check
the call barring settings with your service provider.
Not registered with service
provider
After purchasing your phone, you may need to call
your service provider to activate the line.
No credit left on your prepaid
card
Recharge your credit.
31
Troubleshooting
Problem
Troubleshooting
13
Problem
Possible cause
Possible corrective action
Low earpiece volume Low setting
Press : when you are in a call to increase the
volume.
Low ringer tone
Low setting
Go into the Sounds menu, select Volume and
increase the setting.
Cannot enter some
words
Wrong entry mode
Your phone has T9 text input (i.e. it guesses what
words you are trying to enter). To enter a special
word press * repeatedly to change to normal
Multitap mode (α or β).
“Message list full” is
Your SIM card memory is full of Go into the Read menu of the message menu and
displayed in the main text messages, therefore you
delete some of your messages.
screen
can not receive any more
messages.
Some features do not Feature not supported by the
work
operator or your subscription.
Call your service provider.
Some menus are
missing
Call your service provider.
There are restrictions on your
SIM card or subscription.
I can only enter names Your phone is in Unicode mode. Change the Characters setting to GSM mode. See
of up to 7 characters in
the Message settings section for more information.
my contact list
32
14
Safety information
14
using it with your phone. Do not connect
incompatible products.
Do not use your phone if the antenna is damaged.
Replace the antenna only with one approved by the
manufacturer. Unapproved antennas or
modifications may damage your phone, degrade
its performance and violate local regulations. This
phone is equipped with an internal antenna on the
top area of the phone. Do not touch or cover the
antenna area unnecessarily while a call is in
progress as it may interfere with reception. Contact
with the antenna affects call quality and may cause
your phone to transmit at a higher power level than
otherwise needed. Hold your phone as you would
any other phone.
The charger is compatible only with power sources
indicated on its label. Do not connect the charger to
a power source of a different voltage or frequency.
Do not use the charger outdoors or in areas where
it may become wet. Unplug the charger from the
wall socket using the body of the charger, not the
cord. Locate the cord so that it will not be tripped
over, stepped on or damaged. Do not use the
charger if it is damaged. Unplug the charger from
the wall socket before cleaning it. Use a slightly
damp cloth for cleaning, and allow the charger to
dry fully before plugging it in.
Only use accessories approved by Sendo. Using
unapproved accessories with your phone may
result in degraded performance, fire, electric shock
or injury, and may void the warranty. Please check
with your dealer for the availability of approved
accessories. Your phone is intended for use only
with chargers approved by the manufacturer. Any
other use will invalidate any approval given to your
phone and may be dangerous.
Drive Safely
Do not use a hand-held telephone while driving.
Give your full attention to driving. If using a handheld phone, pull over safely and park the vehicle in
a safe location first. Always place the phone in its
holder; do not place the phone on the passenger
seat, near an airbag or where it can break loose in
a collision or sudden stop.
Always obey local laws and regulations regarding
the use of a cellular phone in the areas where you
drive. In some areas, it is illegal to use a cellular
telephone while driving, and hands-free operation
is required in many other areas. Do not hold your
phone in your hand while driving.
Do not use a headset (such as a headset that
covers both ears) that interferes with your ability to
hear emergency vehicle sirens or the warning horns
of other vehicles. Driving safely always comes first!
Operation
Remember to follow any special regulations in force
in any area and always switch off your phone
whenever you are instructed not to use it, or when
its use may be illegal or cause interference or
danger. Most modern electronic equipment is
shielded from RF signals. However, certain
electronic equipment may not be shielded against
the RF signals from your wireless phone.
Read the user’s manual of any accessory or device
and its operation and safety instructions before
33
Safety information
IMPORTANT SAFETY INFORMATION
You should observe and follow these guidelines for
the safe and efficient use of your phone. Failure to
comply with these guidelines and requirements
may void your warranty and may invalidate any
approvals given to your phone.
Safety information
14
Children
and other health care facilities when any
regulations posted in these areas instruct you to do
so, as equipment that could be sensitive to external
RF energy may be in operation.
Your phone is not a toy. Do not allow small children
to play with it. They could hurt themselves or others.
Children could also damage the phone or make
calls that increase your telephone bill.
Vehicles
Pacemakers
RF signals may affect improperly installed or
inadequately shielded electronic systems in motor
vehicles (e.g. electronic fuel injection systems,
electronic anti-skid (anti-lock) braking systems,
electronic speed control systems, air bag systems).
Check with the supplier or its representative
regarding your vehicle. You should also consult the
supplier of any equipment that has been added to
your vehicle.
Do not place your phone or any accessories in the
area over an airbag or in the airbag’s deployment
area. An airbag inflates with great force, and
serious injury could occur.
Using your phone in a vehicle demands special
considerations. The fitting of any accessories to a
vehicle should only be undertaken by a suitably
qualified person to ensure that vehicle systems are
not adversely affected, and that the accessory
gives optimum performance.
Only qualified personnel should service the phone,
or install the phone in a vehicle. Faulty installation or
service may be dangerous and may invalidate any
warranty that may apply to the unit.
Check regularly that all wireless phone equipment
in your vehicle is mounted and operating properly.
Sendo recommends that a minimum separation of
20 cm (or 6 inches) be maintained between a
wireless phone and a pacemaker to avoid potential
interference with the pacemaker. These
recommendations are consistent with the
independent research by, and recommendations
of, Wireless Technology Research. Persons with
pacemakers:
* Should always keep the phone more than 20 cm
(or 6 inches) from their pacemaker when the
phone is switched on;
* Should not carry the phone in a breast pocket;
* Should use the ear furthest away from the
pacemaker to minimise the potential for
interference.
* If you have any reason to suspect that
interference is taking place, switch off your
phone immediately.
Hearing Aids
Some wireless phones may interfere with some
hearing aids. In the event of such interference, you
should consult your service provider.
Do not store or carry flammable liquids, gases or
explosive materials in the same compartment as
the phone, its parts or accessories.
Medical Equipment
Operation of wireless phones may interfere with
inadequately protected medical devices. Consult a
physician or the manufacturer of the medical
device to determine if it is adequately shielded from
external RF energy. Turn off your phone in hospitals
Switch off your phone before boarding a noncommercial aircraft or when instructed to do so on
a commercial airline. The use of wireless
34
14
IMPORTANT!
This phone, like any wireless phone, operates using
radio signals, wireless and landline networks as
well as user-programmed functions that cannot
guarantee connection in all conditions. Do not rely
solely upon your wireless phone for emergency
communications (e.g. medical emergencies).
Remember, to make or receive any calls, the phone
must be switched on and in a service area with
adequate signal strength. Emergency calls may not
be possible on all wireless phone networks or when
certain network services and/or phone features are
in use. Check with local service providers.
Posted Areas
Turn off your phone in any area where posted
notices so require.
Potentially Explosive Atmospheres
Turn off your phone and do not remove its battery
when in any area with a potentially explosive
atmosphere, and obey all signs and instructions. It
is rare, but your phone or its accessories could
generate sparks. Sparks in such areas could cause
an explosion or fire resulting in property damage,
bodily injury or even death. Areas with potentially
explosive atmospheres are often, but not always,
clearly marked. They include: Fuelling areas, such
as petrol stations, below deck on boats, and fuel or
chemical transfer and storage facilities. Follow
these guidelines also when you enter areas where
fuel odours are present, such as when a gas leak
occurs in a home; areas where the air contains
chemicals or particles, such as grain, dust or metal
powders; and any other area where you would
normally be advised to turn off your vehicle engine.
Turn off your phone when at gas or petrol stations
(service stations). Users are reminded of the need
to observe restrictions on the use of radio
equipment in fuel depots (fuel storage and
distribution areas), chemical plants or where
blasting operations are in progress.
To make an emergency call:
1 If the phone is not on, switch it on.
ζ Note: Some networks may require that a valid
SIM card be properly inserted in the phone.
2 Press and hold the Clear key χ for several
seconds to ready the phone for calls.
3 Key in the emergency number for your present
location (e.g. 999, 911, 112 or other official
emergency number). Emergency numbers vary
by location.
4 Press the Call γ key.
If certain features are in use (Key guard, Locking,
Call Restricting, etc.), you may first need to turn
those features off before you can make an
emergency call.
When making an emergency call, follow all
instructions of the emergency operation and do not
hang up until requested do so.
Blasting Areas
To avoid interfering with blasting operations, turn
your phone off when in a "blasting area" or in areas
posted "turn off two-way radio". Obey all signs and
instructions.
35
Safety information
Emergency Calls
telephones in an aircraft may interfere with the
operation of the aircraft and may be illegal.
Safety information
14
* Avoid exposing your phone to any severe
Servicing
shocks, extreme (hot or cold) temperatures or
moisture.
* Keep your phone away from open flames such
as lit candles or cigarettes.
* Use only the supplied or an approved
replacement antenna. Unauthorised antennas,
modifications or attachments could damage the
phone and may violate regulations governing
radio devices.
* If the phone, battery, or any accessory is not
working properly, take it to your nearest
qualified service facility. Back up all data before
taking your phone to a service centre as
maintenance or recovery of data is not
guaranteed. If you have any sensitive
information, please back it up and then delete it
from your phone before taking your phone to the
service centre.
Do not attempt to disassemble or repair your
phone, as you may damage the phone or injure
yourself and will void your warranty. Only qualified
personnel at an authorised service centre should
perform repairs. Your phone does not contain any
consumer serviceable parts. Make back up copies
of all data and delete security sensitive data before
sending your phone in for repair.
Back Up Data
To avoid loss of important information, remember to
make back up copies of all data regularly.
Disposal
Your battery and other components may require
precautions to be taken for safe disposal. The
battery type is indicated on the battery label. Please
follow all local and/or governmental laws and
regulations when disposing of your phone or
battery.
Care and Maintenance
Follow these care and maintenance instructions to
improve the performance and life of your phone.
Failure to follow the suggestions may invalidate
your phone’s warranty:
* Keep it and all its parts and accessories out of
small children's reach.
* Keep it dry.
* Do not use or store it in dusty or dirty areas.
* Do not attempt to take the phone apart.
* Do not drop, throw or shake it.
* Do not use soaps, chemicals, cleaning solvents,
or strong detergents to clean it. Use a moist
cloth to wipe it.
36
15
Regulatory Compliance and SAR Statements
Where can I go if I want more information?
There are several good sources of information by
government and international agencies on the
general issue of mobile phones and health:
World Health Organisation (WHO)
www.who.int/emf
To communicate with the network, mobile phones
emit low levels of radio waves (also known as
radiofrequency or ‘RF’ energy) when being used.
Governments around the world have adopted
comprehensive guidelines, developed by
independent scientific organizations, governing the
exposure to RF energy. Mobile phones are
designed to operate within these stringent limits.
U.S Food and Drug Administration
www.fda.gov/cdrh/ocd/mobilphone.html
U.K National Radiological Protection Board
www.nrpb.org.uk
The Mobile Manufacturers Forum, the international
association of mobile phone manufacturers, also
has a comprehensive website – www.mmfai.org - to
help answer consumer questions on health issues.
What is SAR?
SAR stands for Specific Absorption Rate which is
the unit of measurement for the amount of RF
energy absorbed by the body when using a mobile
phone. Although the SAR is determined at the
highest certified power level in laboratory
conditions, the actual SAR level of the phone while
operating can be well below this value. This is
because the phone is designed to use the minimum
power required to reach the network. Therefore, the
closer you are to a base station, the more likely it is
that the actual SAR level will be lower.
Sendo SAR Statement
THIS MOBILE PHONE MEETS REQUIREMENTS
FOR EXPOSURE TO RADIO FREQUENCY
ENERGY.
Your mobile phone is a radio transmitter and
receiver. It is designed and manufactured not to
exceed the limits for exposure to radio frequency
(RF) recommended by international guidelines.
These limits are part of comprehensive guidelines
and establish permitted levels of RF energy for the
general population. The guidelines were developed
by independent scientific organisations through
periodic and thorough evaluation of scientific
studies. The guidelines include a substantial safety
margin designed to assure the safety of all persons,
regardless of age and health.
The exposure standard for mobile phones employs
a unit of measurement known as the Specific
Absorption Rate, or SAR. The SAR limit
recommended by international guidelines is 2.0
Watts/Kg*. Tests for SAR are conducted using
standard operating positions with the phone
Does a lower SAR mean that a phone is safer?
No. Variations in SAR do not mean that there are
variations in safety. While there may be differences
in SAR levels among phone models, all mobile
phones must meet RF exposure guidelines.
Where can I get the SAR values for my phone?
SAR information for new model phones will be
included with the materials that come with the
mobile phone. In addition, this information will be
available from the website of your mobile phone
manufacturer.
37
Regulatory Compliance and SAR Statements
Mobile Manufacturers Forum statement:
Understanding SAR
15
Regulatory Compliance and SAR Statements
15
Regulatory compliance
transmitting at its highest operating power level.
Although the SAR is determined at the highest
operating power level, the actual SAR of the phone
while operating normally can be well below the
maximum value. This is because the phone is
designed to operate at multiple power levels so as
to use only the power required to communicate with
the network. In general, the closer you are to a base
station, the lower the power output of the phone.
The highest SAR value for the Sendo 300 model
phone when tested for use at the ear is 1.5 W/Kg
Your phone has been designed to comply with
applicable standards when used correctly in
accordance with the user instructions. Sendo GSM
900/1800 phones and accessories have been
tested and certified for compliance with the
following EC Directives and international
standards, as applicable:
European (EC) Directives
1999/5/EC (R&TTED)
Always read and follow the operating and safety
instructions that came with your phone.
* The SAR limit for mobile phones used by the
public is 2.0 Watts/Kg (W/Kg) averaged over ten
grams of body tissue. The guidelines incorporate a
substantial margin of safety to give additional
protection for the public and to account for any
variations in measurements.
89/336/EEC (EMCD)
73/23/EEC (LVD), as amended by 93/68/EEC
International Standards
IEC/UL/AS-NZ/BS EN60950 (Electrical Safety)
EN301 489-7 (EMC)
EN301 489-1 (EMC)
EN301 511 (GSM900/DCS1800)
International SAR (Human Exposure) Standards
EN50360/EN50361 (European)
IEEE Std C95.3 (USA)
ACA SAR Standard 1999 (Australia)
38
16
End User License Agreement
integrated product and may be used with the
phone only as set forth in these licensing terms.
3. LIMITATIONS ON END USER RIGHTS.
(a) You may not copy, distribute, or make derivative
works of the Software.
(b) You may not use, modify, translate, reproduce
or transfer the right to use the Software or copy the
Software except as expressly provided in this
Agreement.
(c) You may not resell, sublicense, rent, lease or
lend the Software; except you may permanently
transfer all of your rights as set forth in the
Agreement only as part of a permanent sale or
transfer of the phone, provided the recipient agrees
to the terms of this Agreement.
(d) You may not reverse engineer, reverse compile,
disassemble or otherwise attempt to discover the
source code of the Software (except to the extent
that this restriction is expressly prohibited by law) or
create derivative works based on the Software.
(e) You shall not display, modify, reproduce and
distribute any of the Stock Files included with the
Software.
(f) You agree that you shall only use the Software in
a manner that complies with all applicable laws in
the jurisdiction in which you use the Software,
including, but not limited to, applicable restrictions
concerning copyright and other intellectual
property rights.
4. COPYRIGHT.
Licensor and/or its software suppliers own the
Software and all rights, without limitation including
proprietary rights therein, and their respective
affiliates and are protected by international treaty
provisions and other applicable national laws of the
country in which it is being used. The structure,
organisation and code of the Software are the
valuable trade secrets and confidential information.
2. END USER RIGHTS AND USE.
Licensor grants to you a non-exclusive, nontransferable end user right to install the Software or
use the Software installed on the phones. The
Software is licensed with the phone as a single
39
End User License Agreement
END USER SOFTWARE LICENSE AGREEMENT
This Software License Agreement ("Agreement") is
between You and Sendo International Ltd and/or
one of its affiliates ("Licensor"). The Agreement
authorises you to use the Software specified in
Clause 1 below, which may be included on your
phone, stored on a CD-ROM, sent to you by
electronic mail, downloaded from Licensor's Web
pages or servers or from other sources under the
terms and conditions set forth below. This is an
agreement on end user rights and not an
agreement for sale. Licensor continues to own the
copy of the Software and any other copy that you
are authorised to make pursuant to this Agreement.
Read this Agreement carefully before installing,
downloading or using the Software. Further, by
installing, downloading and/or using the Software,
you agree to the terms and conditions of this
Agreement.
1. SOFTWARE.
As used in this Agreement, the term "Software"
means, collectively: (i) all the software in your
phone, all of the contents of the disk(s), CDROM(s), electronic mail and its file attachments, or
other media with which this Agreement is provided;
(ii) related Licensor or third party software; (iii)
digital images, stock photographs, clip art or other
artistic works ("Stock Files") (iv) related explanatory
written materials ("Documentation"); (v) fonts (vi)
upgrades, modified versions, updates, additions
and copies of the Software, if any, licensed to you
by Licensor (collectively "Updates") and (vii) any
other possible documentation related thereto.
16
End User License Agreement
16
5. MULTIPLE COPIES / UPDATES.
If the Software supports multiple platforms or
languages, if you receive the Software on multiple
media, or if you otherwise receive multiple copies of
the Software, the number of phones on which all
versions of the Software are installed shall be one
phone. If the Software is an Update to a previous
version of the Software, you must possess a valid
end user right to such previous version in order to
use the Update and you may use the previous
version for ninety (90) days after you receive the
Update in order to assist you in the transition to the
Update. After such time you no longer have a right
to use the previous version, except for the sole
purpose of enabling you to install the Update.
6. COMMENCEMENT & TERMINATION.
This Agreement is effective from the first date you
use or install the Software. Your end user rights
automatically and immediately terminate without
notice from Licensor if you fail to comply with any
provision of this Agreement. In such event, you
must immediately delete, destroy or return at your
own cost and expense, and without entitlement to
any refund of the purchase price, the phone and
the Software, and all related material to Licensor.
7. EXCEPT AS EXPRESSLY PROVIDED IN THE
LIMITED WARRANTY FOR THE PHONE, YOU
ACKNOWLEDGE THE SOFTWARE IS PROVIDED
"AS IS" WITHOUT WARRANTY OF ANY KIND
EXPRESS OR IMPLIED. TO THE MAXIMUM
EXTENT PERMITTED BY APPLICABLE LAW
NEITHER LICENSOR, LICENSOR’S SOFTWARE
SUPPLIERS OR THEIR RESPECTIVE AFFILIATES,
NOR THE COPYRIGHT HOLDERS MAKE ANY
REPRESENTATIONS OR WARRANTIES, EXPRESS
OR IMPLIED, INCLUDING BUT NOT LIMITED TO
THE WARRANTIES OF MERCHANTABILITY OR
FITNESS FOR A PARTICULAR PURPOSE OR THAT
THE SOFTWARE WILL NOT INFRINGE ANY THIRD
PARTY PATENTS, COPYRIGHTS, TRADEMARKS
OR OTHER RIGHTS. THERE IS NO WARRANTY BY
LICENSOR OR BY ANY OTHER PARTY THAT THE
FUNCTIONS CONTAINED IN THE SOFTWARE
WILL MEET YOUR REQUIREMENTS OR THAT THE
OPERATION OF THE SOFTWARE WILL BE
UNINTERRUPTED OR ERROR-FREE.
8. NOT FAULT TOLERANT
THE SOFTWARE MAY CONTAIN TECHNOLOGY
THAT IS NOT FAULT TOLERANT AND IS NOT
DESIGNED, MANUFACTURED, OR INTENDED
FOR USE IN ENVIRONMENTS OR APPLICATIONS
IN WHICH THE FAILURE OF THE LICENSED
SOFTWARE COULD LEAD DIRECTLY TO DEATH,
PERSONAL INJURY, OR SEVERE PHYSICAL OR
ENVIRONMENTAL DAMAGE OR FINANCIAL
LOSS.
9. LIMITATION OF LIABILITY.
TO THE MAXIMUM EXTENT PERMITTED BY
APPLICABLE LAW, IN NO EVENT SHALL
LICENSOR OR LICENSOR’S SOFTWARE
SUPPLIERS OR THEIR RESPECTIVE AFFILIATES
AND EMPLOYEES BE LIABLE FOR ANY LOST
PROFITS, REVENUE, SALES, DATA OR COSTS OF
PROCUREMENT OF SUBSTITUTE GOODS OR
SERVICES, PROPERTY DAMAGE, PERSONAL
INJURY, INTERRUPTION OF BUSINESS, LOSS OF
BUSINESS INFORMATION OR FOR ANY SPECIAL,
DIRECT, INDIRECT, INCIDENTAL, ECONOMIC,
COVER, PUNITIVE, SPECIAL OR
CONSEQUENTIAL DAMAGES, HOWEVER
CAUSED AND WHETHER ARISING UNDER
CONTRACT, TORT, NEGLIGENCE, OR OTHER
THEORY OF LIABILITY ARISING OUT OF THE USE
OF OR INABILITY TO USE THE SOFTWARE, EVEN
IF LICENSOR OR ITS SOFTWARE SUPPLIERS ARE
ADVISED OF THE POSSIBILITY OF SUCH
DAMAGES. BECAUSE SOME COUNTRIES/
STATES/JURISDICTIONS DO NOT ALLOW THE
40
16
product produced by use of such technical data,
including processes and services, in violation of
any applicable restrictions, laws or regulations, or
without all necessary approvals.
12. APPLICABLE LAW & GENERAL PROVISIONS.
This Agreement shall be governed by and
construed in accordance with the internal laws of
the United Kingdom without regard to its conflicts of
laws rules.
This is the entire agreement between Licensor and
you relating to the Software and it supersedes any
prior representations, discussions, undertakings,
end user agreements, communications or
advertising relating to the Software.
41
End User License Agreement
EXCLUSION OR LIMITATION OF LIABILITY, BUT
MAY ALLOW LIABILITY TO BE LIMITED, IN SUCH
CASES, THE LIABILITY OF LICENSOR, ITS
SOFTWARE SUPPLIERS AND THEIR RESPECTIVE
AFFILIATES AND EMPLOYEES SHALL BE LIMITED
TO, AT LICENSOR’S OPTION, EITHER (A) RETURN
OF THE PRICE PAID LESS A REASONABLE
AMOUNT FOR USAGE, OR (B) REPAIR OR
REPLACEMENT OF THE SOFTWARE THAT DOES
NOT MEET THE LIMITED WARRANTY PROVIDED
WITH THE PHONE AND WHICH IS RETURNED IN
ACCORDANCE WITH THE REQUIREMENTS OF
THE LIMITED WARRANTY. Nothing contained in
this Agreement shall prejudice the statutory rights
of any party dealing as a consumer. Nothing
contained in this Agreement limits Licensor's
liability to You in the event of death or personal
injury resulting from Licensor's negligence if law
prohibits such a limitation. Licensor is acting on
behalf of its software suppliers and their respective
employees and affiliates for the purpose of
disclaiming, excluding and/or restricting
obligations, warranties and liability as provided in
this clause 9, but in no other respects and for no
other purpose.
10. TECHNICAL SUPPORT.
Licensor has no obligation to furnish You with
technical support except as agreed in writing
between You and Licensor in the Limited Warranty
provided with the phone.
11. EXPORT CONTROL.
The Software may be subject to export regulation of
the United Kingdom and other countries. You agree
that You shall comply with all applicable export
laws, restrictions and regulations of the United
Kingdom or foreign agencies or authorities, and
shall not export, or transfer for the purpose of reexport, any Software, product or technical data
received under this Agreement or any Software or
Warranty Statement
17
17
Warranty Statement
Global Warranty
Sendo International Limited (“Sendo”) warrants, subject to the exclusions and limitations set forth below, that
your cellular phone, battery and accessories (collectively “Product”) is free from defects in materials and
workmanship according to the following terms and conditions:
1. The limited warranty for the Product commences on the date of purchase and continues for a period of
one (1) year from that date. Upon request from Sendo, you, (the “Consumer”) must prove the date of the
original purchase of the Products by dated itemised receipt.
2. The limited warranty extends to the original purchaser of the Product, the Consumer, and is not assignable
or transferable to any subsequent purchaser or user.
3. The warranty extends only to Consumers who purchase the Product in the market for its intended sale.
4. During the limited warranty period, Sendo will repair, or replace, at Sendo's sole option, any defective
parts, or any parts that will not properly operate for their intended use with new or refurbished replacement
items if such repair or replacement is needed because of a malfunction or failure of the Product during
normal usage. No charge will be made to the Consumer for any such parts. Sendo will also pay for the labour
charges incurred by Sendo in repairing or replacing the defective parts. This warranty does not apply to any
damage or failure to operate caused by use of the Product other than in accordance with the instructions
contained in the User Manual, or for periodic maintenance or repair due to normal wear and tear. Sendo's
limit of liability under the limited warranty shall be the actual cash value of the Product at the time the
Consumer returns the Product for repair, determined by the price paid by the Consumer for the Product less
a reasonable amount for usage. Sendo shall not be liable for any other losses or damages. These remedies
are the Consumer's exclusive remedies for breach of warranty.
5. The warranty will be invalidated if any of the following circumstances are applicable:
a) The Product has been subject to abnormal use, abnormal conditions, improper storage, exposure to
moisture or dampness, unauthorised modifications, unauthorised connections, unauthorised repair, misuse,
neglect, abuse, accident, alteration, improper installation, or other acts which are not the fault of Sendo,
including damage caused by shipping.
b) Physical damage to the surface of the Product, including scratches or cracks in or to the outside casing
or Liquid Crystal Display, or damages caused by dropping the Product.
c) The Product has been damaged from external causes such as liquid, water, collision with an object, or
from fire, flooding, sand, dirt, windstorm, lightening, earthquake or damage from exposure to weather
conditions, an Act of God, or battery leakage, theft, blown fuse, or improper use of any electrical source,
damage caused by computer or internet viruses, bugs, worms, Trojan Horses, cancelbots or damage
caused by the connection to other products not recommended for interconnection by Sendo.
d) The Product has been altered or repaired by anyone other than an authorised Sendo service centre or if
it has been used with unapproved accessories or other ancillary items.
e) For adaptations or adjustments made to the Product to comply with local standards in any country other
than one for which the Product was designed and manufactured.
42
17
i) The defect or failure to operate was caused by the defective function of the cellular system or by
inadequate signal reception.
6. Any implied warranty of satisfactory quality, merchantability, or fitness for a particular purpose or use, shall
be limited to the duration of the foregoing written warranty. Otherwise, the foregoing warranty is the
Consumer’s sole and exclusive remedy and is in lieu of all other warranties, express or implied. Sendo does
not warrant uninterrupted or error free Internet or data connections. Sendo shall not be liable for special,
incidental or consequential damages, including but not limited to, loss of anticipated benefits or profits, loss
of savings or revenue, punitive damages, loss of use of the product or any associated equipment, loss of
data, cost of capital, cost of any substitute equipment or facilities, downtime, the claims of any third parties,
including customers, and injury to property, resulting from the purchase or use of the product or arising from
breach of the warranty, breach of contract, negligence, strict tort, or any other legal or equitable theory, even
if Sendo knew of the likelihood of such damages. Sendo shall not be liable for delay in rendering service
under the limited warranty, or loss of use during the period that the product is being repaired or loss of data.
7. Some jurisdictions do not allow limitation of how long an express or implied warranty lasts and so the one
year warranty period referred to above may not apply, to you, the Consumer. Some jurisdictions do not allow
the exclusion or limitation of incidental and consequential damages and so to the extent that such limitations
are not allowed, the above limitations or exclusions may not apply, to you, the Consumer. This limited
warranty gives the Consumer specific legal rights and the Consumer may also have other legal rights under
the legislation of some jurisdictions. These legal rights vary from jurisdiction to jurisdiction and are not
prejudiced by anything contained in this limited warranty. It also means that in some jurisdictions our
responsibility to you the Consumer may be more extensive than in other jurisdictions.
8. The Consumer shall take the following steps to make a claim under this limited warranty:
Please do not ship the Product for service without first contacting the nearest Sendo Authorised Service
Centre.
Contact information for the world-wide network of Sendo authorised service centres is available at
www.sendo.com.
If the Product qualifies for in-warranty service, the Consumer must prove the date of the original purchase of
the Products by a dated proof of purchase.
Back up all data. If the Consumer has sensitive information stored on the Product copy it to another device
and delete it from the Product before repair.
43
Warranty Statement
f) Loss or integrity of any user data stored in the Product or any storage device used in conjunction with the
Product at any time
g) The Sendo authorised service centre was not advised by the Consumer in writing of the alleged defect or
malfunction of the Product within fourteen (14) days after the expiration of the applicable limited warranty
period.
h) The Product serial number plate or the accessory data code has been removed, defaced or altered.
Warranty Statement
17
The Consumer must ship the Product prepaid and insured. Expenses related to removing the Product from
an installation are not covered under this limited warranty.
If the Product is returned for service and the Product is deemed out of warranty under the terms and
conditions of this warranty, the Consumer will be notified and given an estimate of the applicable charges.
If the estimate is refused a minimum service fee for collection, inspection and quotation of said product would
be due.
9. Subject to any more extensive legal rights granted to the Consumer by law of the Consumer’s jurisdiction,
Sendo neither assumes nor authorises any authorised service centre or any other person or entity to assume
for it any other obligation or liability beyond that which is expressly provided for in this limited warranty
including the provider or seller of any extended warranty or service agreement.
10. This is the entire warranty between Sendo and the Consumer, and supersedes all prior and
contemporaneous agreements or understandings, oral or written, and all communications relating to the
Product, and no representation, promise or condition not contained herein shall modify these terms.
11. This limited warranty allocates the risk of failure of the Product between the Consumer and Sendo. The
allocation is recognised by the Consumer and is reflected in the purchase price of the Product.
12. Diagnostic instructions and other service information is available free of charge at www.sendo.com.
Information on out of warranty repair costs and charges is available at www.sendo.com.
Note: Register your warranty at www.sendo.com/warranty/index.aspx as soon as you
purchase your phone. This information is stored for support purposes.
44
Declaration of conformity
We:
Of:
Sendo International Ltd.
Sendo Base Station, Hatchford Brook, Hatchford Way, Sheldon,
Birmingham, B26 3RZ, United Kingdom
Declare under our sole responsibility that the product referenced within this user guide and uniquely
identified by the IMEI and type number affixed to the product, to which this declaration relates, is in
compliance with the essential requirements of the Radio and Telecommunications Terminal Equipment
Directive (R&TTE) 1999/5/EC.
The conformity assessment procedure referred to in Article 10 and detailed in Annex IV of directive 1999/5/
EC has been followed with the involvement of BABT, Claremont House, 34 Molesey Road, Walton-OnThames, KT12 4RQ. England.
A copy of the original declaration of conformity is available for download from the Sendo website.
Class of equipment: This product is designated Class 1 equipment (R&TTED 1999/5/EC), the use of which
is harmonised throughout all EU member states. This product is designated for use on licensed GSM 900/
1800 MHz networks.
www.sendo.com
8E30-26011-50002
Printed in the Netherlands.

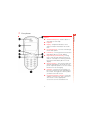

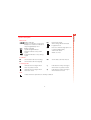
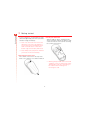
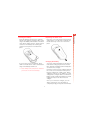


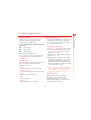

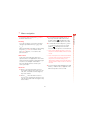


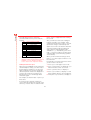


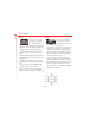


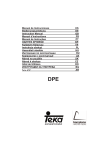
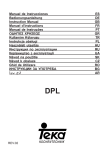

![[[[ ]]] Inhaltsverzeichnis](http://vs1.manualzilla.com/store/data/006790718_1-3e8b99485de3776a5639fa28085f2212-150x150.png)