1
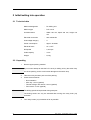
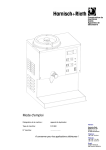
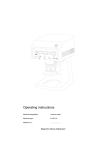
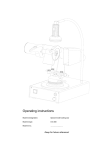
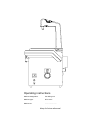
Operating instructions
Machine designation:
Pin drilling unit
Machine type:
D-PI 120 A
Machine no:
............................
Keep for future reference!
Dear customer,
Thank you for the confidence you have placed in us by purchasing this pin drilling unit.
For this unit to be of service to you for many years to come, please take the time to
read these operating instructions carefully, especially before using the unit for the first
time.
Contents
1
Safety..................................................................................................................... 2
1.1 Intended use................................................................................................... 2
1.2 Possible dangers ............................................................................................ 2
1.3 Approved operators ........................................................................................ 2
1.4 Safety measures at the site of operation........................................................ 3
1.5 Marking of safety references contained in these instructions ........................ 3
2
Initial/setting into operation ................................................................................ 4
2.1 Technical data ................................................................................................ 4
2.2 Unpacking....................................................................................................... 4
2.3 Identification and description of the unit components .................................... 5
3
Operation .............................................................................................................. 6
3.1 Inserting the pin drill (changing the drill) ........................................................ 6
3.2 Checking and/or adjusting the basic drill settings .......................................... 7
3.3 Zero alignment of the pin drill ......................................................................... 8
3.4 Adjusting the drilling depth of the pin drill....................................................... 8
3.5 The positioning marks (- rings)....................................................................... 9
3.6 Working procedure and laser function ......................................................... 10
3.7 Aligning the laser module ............................................................................. 10
3.8 Laser data and positioning the required signs ............................................. 10
3.9 Electronic drill monitor .................................................................................. 11
3.10Unit modifications ......................................................................................... 11
4
Cleaning/Maintenance ....................................................................................... 12
4.1 Cleaning the dust trough .............................................................................. 12
4.2 Cleaning the swivel nut (changing the drill).................................................. 12
4.3 Maintenance ................................................................................................. 12
5
Warranty conditions........................................................................................... 13
6
EC declaration of conformity ............................................................................ 14
D-PI 120 A - 23.02.2002 / Vers.: 2 / 230V
1
1 Safety
1.1 Intended use
The D-PI 120 A Pin drilling unit is intended for use in dental laboratories for
setting bore holes for fixing pins in saw models. This unit is designed
exclusively for drilling plaster and similar materials.
Unauthorized modifications and additions are not permitted for safety reasons!
The conditions for operating, maintaining and cleaning the unit, as described in
these operating instructions, must be strictly adhered to.
1.2 Possible dangers
The D-PI 120 A pin drilling unit is safe when used as intended. However, when
not used with due care its use can lead to injuries, e. g. by carelessly touching
the drill surface with your finger (exit opening of the drill) during an ongoing
drilling job. In order to prevent the D-PI 120 A pin drilling unit from starting
accidentally and thus causing injuries, it should be switched off at the main
switch when left unsupervised.
− Before maintenance work and cleaning, the unit should be switched off and
disconnected from the mains supply (i. e. the mains plug should be pulled):
− Never remove any of the safety devices or put any of these out of function
by modifying the unit accordingly.
− Before accessing any of the incorporated electric components, the unit
should be disconnected from the mains supply!
1.3 Approved operators
This unit should only be operated by dental technicians and other persons with
appropriate training.
The operator of the machine should make sure that the operating instructions
are accessible to the operating personnel. The operator should make sure that
they have been read and fully understood by the operating personnel. Only
then should they be allowed to operate the machine.
2
D-PI 120 A - 23.02.2002 / Vers.: 2 / 230V
1.4 Safety measures at the site of operation
The installation surface should be flat and stable. Make sure by endorsing
appropriate corporate instructions and control mechanisms that the pin drilling
workplace always complies with the pertinent accident prevention regulations.
Foreign bodies should not be inserted through the ventilation openings of the
unit.
1.5 Marking of safety references contained in these instructions
Note
Refers to tips and other particularly helpful pieces of information.
Caution
Refers to particular ways of operation or handling, the non-adherence of which
can lead to malfunctioning, damages or other kinds of trouble.
Danger
Refers to dangerous situations, in which injuries can occur.
D-PI 120 A - 23.02.2002 / Vers.: 2 / 230V
3
2 Initial/setting into operation
2.1 Technical data
Machine designation
:
Pin drilling unit
Machine type
:
D-PI 120 A
Unit dimensions
:
Width 195 mm, depth 240 mm, height 410
mm
Electrical connection
:
230 volts/50 Hz
Overvoltage category
:
II
Power consumption
:
approx. 50 watts
Electrical fuses
:
2x 1,6 A/T
Drill speed
:
2,750 rpm
Collet capacity
:
3 mm
Weight
:
8,8 kg
2.2 Unpacking
1.
Remove upper packing material.
By no means attempt to take the D-PI 120 A pin drilling unit by the switch loop
out off the packing, as this could cause damages to the switch loop.
Caution
2.
Take the unit by the laser pole out of the packing.
3.
Check the accessories.
−
−
−
−
Documentation
Allen key 1,5 mm (special)
Tubular hexagon box wrench 19 mm (special)
Fork wrench 10 mm (special)
The drilling spindle is kept locked during transport.
Note
The drilling stroke can only be activated after turning the rotary knob (16)
clockwise.
4.
4
Turn rotary button (16) clockwise as far as possible.
D-PI 120 A - 23.02.2002 / Vers.: 2 / 230V
2.3 Identification and description of the unit components
1
Sheet steel casing
2
Limit stop for switch loop
3
Switch loop
4
Aluminum cover
5
Plastic worktable
6
Laser module
7
Control lamp (drill)
8
Screw
9
Laser pole
10
Safety contact
11
Dust trough
12
Arrow marking
13
Regulator (laser)
14
2
fuses
for
feeble
currents 1,6 A/T
14 a Switch (drill feed speed)
15
16
Numbered dialing ring
Control
knob
(drilling
depth)
17
Control lamp “Ready“
18
Main switch
A/B Areas
for
lifting
off
aluminum cover
Fig. 1: Identification of the unit components
The D-PI 120 A pin drilling unit consists of a sheet steel casing (1), which
houses the electrical and electronic components, the drilling spindle with
driving motor, the drilling spindle guide as well as the feeding mechanism and
motor. An easily removable aluminum cover (4) with an inserted plastic work
top (5) covers the drilling spindle and the dust trough (11). The laser pole (9),
the incorporated laser module (6) and the drill control lamp (7) are screwed
onto the casing. The switch loop (3) activates the automatic drilling procedure.
Note
The unit can be picked up and carried by the laser pole. However, under all
conditions, you should prevent the laser module and the laser pole from being
exposed to jolting and knocking. Also pressure against the laser module should
be avoided by all means.
D-PI 120 A - 23.02.2002 / Vers.: 2 / 230V
5
3 Operation
3.1 Inserting the pin drill (changing the drill)
(See fig.1 and 2 pages 5 and 6)
You can use all commercially available pin drills with a shaft diameter of 3 mm.
The unit can be adjusted to all drill lengths and is set at works to a drill length
of 38 mm.
The diameter of the collet chuck (24) is 3 mm.
1.
When the cover (4) is removed and bolt (20) is in the long hole you can lock
the drilling spindle (23) with the fork wrench included (10 mm).
See section “4.2 Cleaning the swivel nut (changing the drill)“.
Caution
2.
Loosen swivel nut (22) with the tubular hexagon box wrench (19 mm) and
insert the pin drill (21) as far as possible into the collet chuck (limit stop: 25).
3.
The limit stop is set at works to a drill length of 38 mm.
4.
Now fasten the pin drill by slightly tightening the swivel nut with the tubular
hexagon box wrench (19 mm).
5.
Remove the wrenches (10 mm) and (19 mm) and put the cover back on again.
10 mm Fork wrench (10 mm)
19 mm Tubular hexagon box
wrench (19 mm)
Fig. 2: Inserting the pin drill
20
Bolt
21
Pin drill
22
Swivel nut
23
Drilling spindle
24
Collet chuck
25
Limit stop
27
Projection on fork wrench
(10 mm)
6
D-PI 120 A - 23.02.2002 / Vers.: 2 / 230V
3.2 Checking and/or adjusting the basic drill settings
(See fig.1 and 3 pages 5 and 7)
1.
Establish connection to mains supply 230 volts/50 Hz.
2.
Set main switch (19) to “ON“.
3.
Briefly push switch loop (3) down.
Drill rotates and performs a complete stroke!
Danger
4.
Drilling spindle (23) returns to lowest position.
5.
The drill tip should now be 4 mm below the upper edge (26) of worktable (5).
6.
Use the projection (27) on the fork wrench (10 mm) to check the distance of 4
mm.
7.
If the above mentioned distance is not equal to 4 mm or if you are using drills
that are not equal to 38 mm as set at works, then you need to adjust the length
limit stop screw (28) with the Allen wrench (1.5 mm) included in the delivery
appropriately.
SW 10
Fork wrench (10 mm)
5
Worktable
23
Drilling spindle
26
Upper edge
27
Projection on the fork
wrench
28
Length limit stop screw
Fig. 3: Adjustment of the basic drill position
D-PI 120 A - 23.02.2002 / Vers.: 2 / 230V
7
3.3 Zero alignment of the pin drill
(See fig.1 and 4 pages 5 and 8)
By briefly pressing the switch loop (3) down you activate several drill strokes. In
doing so you should observe the upper returning point of the drill tip.
Turn the control knob (16) to set this returning point so that it is level with the
upper edge of the worktable (5).
Note
Only carry out adjustments with control knob (16) with the drill completely
withdrawn.
To check the zero position of the drill precisely you can place the fork wrench
(10 mm) on the exit opening of the drill in the worktable (5).
Now adjust the rotary numbered dialing ring (15) on the control knob (16) so
that the zero and the arrow marking (12) above coincide. The number zero
signals the zero position of the drill.
3.4 Adjusting the drilling depth of the pin drill
(See fig.4 page 8)
If you set the control knob (16) by turning it clockwise, for instance to the
number 7 (arrow marking (12), then you achieve a drilling depth of 7 mm in the
model.
The drilling depth and the pin being used must match.
12
Arrow marking
15
Numbered dialing ring
16
Control knob
Fig. 4: Adjusting the drilling depth of the pin drill
8
D-PI 120 A - 23.02.2002 / Vers.: 2 / 230V
3.5 The positioning marks (- rings)
(See fig.5-10 page 9)
The positioning marks facilitate the positioning of pin drillings, in particular for
tooth tips and when space is lacking.
5
Plastic worktable
21 Pin drill
30 Edge of the drill exit opening
31 Outer edge of denture model
32 1st positioning ring
33 2nd positioning ring
34 Section through denture (lower jaw)
Fig. 5: Identification of the individual components
Fig. 6: Outer edge of model
coincides with the edge of the
drill exit opening (arrow).
Fig. 7: Outer edge of model
coincides with positioning ring 1
(arrow).
Fig. 8: Outer edge of model
coincides with positioning ring 2
(arrow).
Fig. 6
fig. 9
Fig. 7
Fig. 8
A
approx. 2.0 mm
B
approx. Ø 2,5 mm
C
drilling as in fig. 7
D
approx. 1,2 mm
E
approx. Ø 2,8 mm
fig. 9: Denture model with
inserted dowel pins, e. g. with
Ø approx. 2.5.
fig. 10: Denture model with
inserted parallel pins with
collar, e. g. with Ø approx. 2.8.
fig. 10
D-PI 120 A - 23.02.2002 / Vers.: 2 / 230V
9
3.6 Working procedure and laser function
(See fig.1 page 5)
1.
Switching on the main switch (19) activates the laser module (6). The laser ray
must hit the drill tip exactly.
2.
Align the model ground smooth and level with the laser point.
3.
The brightness of the laser point can be adjusted to the light conditions at the
operator's workplace with the regulator (13).
4.
Press the model firmly onto the worktable (5) and press the switch loop (3)
briefly as far as possible (limit stop 2). Drilling is carried out. Green control
lamp (7) lights up during the drilling procedure.
5.
If the unit is switched on for longer than 2 min. without being used then the
laser is switched off automatically.
6.
The laser module can be reactivated by pressing the switch loop once again.
3.7 Aligning the laser module
(See fig. 1 page 5)
If the laser beam no longer coincides with the drill due to improper treatment,
e. g. jolting or knocking and similar negligence then it can be re-adjusted.
1.
Loosen screw (8) on flange.
2.
Fasten a piece of hard paper or something similar to the worktable and drill
from below until the tip of the drill can just about be seen.
3.
This gives an ideal target for the laser module which can be re-adjusted by
being shifted sideways.
4.
Then re-tighten screw (8).
3.8 Laser data and positioning the required signs
Laser class
:
Laser class 2
Power output
:
< 1 mW
Wave length
:
660 - 680 nm
Norm according to which the product was :
classified
DIN EN 60 825: July 1993
The laser warning sign is stuck to the middle of the laser pole.
LASER EMISSION
DO NOT LOOK INTO THE RAY
LASER CLASS 2
10
The laser instruction label is stuck to the rear side of the unit.
D-PI 120 A - 23.02.2002 / Vers.: 2 / 230V
3.9 Electronic drill monitor
(See fig. 1 page 5)
The engaged drill power from factory is observed electronically with a
microprocessor.
This prevents a break or a lift of very fine or low models.
Should the engaged drill-power not be sufficent please contact the technical
support of the company H+R (Tel.: 07181/9678-0).
Note
The control lamp (7) can have three different colours. It depends on the drill
power:
green coluor: Performing drill forces are below the engaged power level.
yellow colour: Performing drill forces are a bit below the engaged power level.
red colour
Performing drill forces have reached the maximum power level.
When the light of the control lamp is permanent red and changes not to green,
then the drilling resistance is to high and the drill goes beck into the home
position.
Note
The drilling operatino is now interrupted and has not reached the engaged
drilling deep.
The drilling operation must be repeated on the same modell position.
If by further drillings the drilling operation will be interrupted then check your
drill and change him if necessary.
Attention
When the drill is still all right, you use probably a extreme hard model gypsum
and the engaged drill power from the factory must be modified.
3.10 Unit modifications
Note
−
The position (inclination angle ) of the switch loop (3) can be changed.
−
The size of the laser point (laser focus) may only be altered as mentioned in
the special instructions.
When required, please request separate instructions and/or corresponding
tools.
D-PI 120 A - 23.02.2002 / Vers.: 2 / 230V
11
4 Cleaning/Maintenance
4.1 Cleaning the dust trough
(See fig. 1 page 5)
1.
Switch unit off at the main switch (19).
2.
Remove aluminum cover (4) by lifting it off simultaneously at points (A) (finger
trough) and (B) (front edge).
The current supply of the pin drilling unit is interrupted by the safety contact
(10) as soon as the aluminum cover is removed.
Note
3.
Clean the dust trough (11) with a vacuum cleaner or with a brush,. When
cleaning the pin drilling unit tilt it backwards.
The pin drilling unit should not be cleaned with compressed air.
Note
4.2 Cleaning the swivel nut (changing the drill)
(See fig. 1 and 2 pages 5 and 6)
Note
1.
Remove the aluminum cover (4) as described in “4.1 Cleaning the dust trough“.
2.
Clean the swivel nut (22) with a brush with the pin drill clamped in.
The swivel nut must be cleaned every time you change the drill, because dust,
falling into the collet chuck while the drill is being changed, could possibly
damage it..
The pin drilling unit should not be cleaned with compressed air.
4.3 Maintenance
The pin drilling unit is maintenance-free.
12
D-PI 120 A - 23.02.2002 / Vers.: 2 / 230V
5 Warranty conditions
This device conforms to the current safety regulations and was subjected to extensive
testing before leaving the works.
We grant a 12 months guarantee, in which we are obliged to carry out all repairs
resulting from material or fabrication faults free of charge.
The warranty expires if repairs are not carried out by specialized dealers or by us.
Replacements for reasons covered by the guarantee do not lead to an extension of the
original guaranty period.
Normal wear and tear or damages resulting from incorrect operation are not covered by
the terms of warranty.
In order to be able to provide you with a comprehensive service we ask you to fill out the
guarantee return form (attached at the beginning of these instructions) and send it to us
by fax or letter (window envelope).
Fax no.: 0 71 81/ 73 13 9
-------------------------------------------------------------------------------------------------------------Fold here for window envelop --------------
Copy
Guarantee return form
Machine
designation:
Pin drilling unit
Machine type:
D-PI 120 A
Machine no.:
Date of purchase:
Maschinenbau
Harnisch+Rieth GmbH & Co.
Postfach 1260
Dealer/Store:
From:
D-73644 Winterbach
Date/signature:
6 EC declaration of conformity
as stipulated by the EC directive for machines
89/392/EEC, Appendix II A
We herewith declare that due to its design the machine specified below is in
conformity with the basic safety and health requirements of the EC directives.
In the event of modifications of the machine not approved by us this certificate
looses its validity.
Name of the manufacturer
: Harnisch+Rieth
Address of the manufacturer
: Küferstraße 14-16, 73650 Winterbach
Machine designation
: Pin drilling unit
Machine type
: D-PI 120 A
The following pertinent EC directives were applied:
EC machine directive (89/392/EEC), corresponding to 9. GSG regulation of 12.05.93
EC low voltage directive (73/23/EEC), corresponding to 1. GSG regulation of 11.06.79
EC EMC directive (89/336/EEC), corresponding to EMC law of 09.11.92
Following harmonizing standards were applied:
DIN EN 292
DIN EN 61 010-1
DIN EN 60 825
: Safety of machines.
: Safety regulations for electric measuring, controlling and laboratory devices.
: Emission safety of laser equipment, classification of installations,
requirements and user guidelines.
DIN EN 55 014
: Interference suppression of electrical apparatus and installations.
DIN EN 55 104
: Electromagnetic compatibility, noise resistance requirements (category I).
A technical documentation is available.
The operation instructions belonging to the machine are also available.
Director of the Quality Control Department
Winterbach, 06th September, 1995
14