1
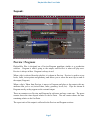
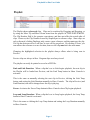
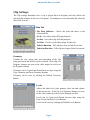
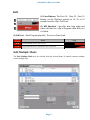
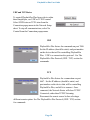
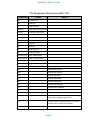
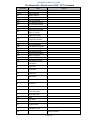
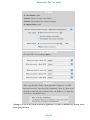
PlaybackPro Plus
3.6 User Guide
v3.6e
PlaybackPro Plus User Guide
!
!
Table of Contents
PlaybackPro Plus Operation ......................................................................................2
Before You Begin .......................................................................................................2
Layout .........................................................................................................................3
Preview / Program ......................................................................................................3
Playlist ........................................................................................................................4
Clip Settings ...............................................................................................................5
Navigation Controls ....................................................................................................6
Show Controls ............................................................................................................6
Take .........................................................................................................................7
Program’s End .........................................................................................................8
Kill ..........................................................................................................................9
Edit Multiple Mode ....................................................................................................9
SimpleSync Basics ......................................................................................................10
Controls .....................................................................................................................11
Direct Command .......................................................................................................11
Clock Sync ................................................................................................................11
NTP Basics ................................................................................................................12
Networking ...............................................................................................................12
Setting up an NTP Server .........................................................................................13
Setting up NTP Clients .............................................................................................14
Troubleshooting NTP ...............................................................................................15
UDP and TCP IP Basics ............................................................................................16
The UDP and TCP PlaybackPro Plus Protocol ........................................................17
Keyboard Shortcuts ...................................................................................................19
System Settings ..........................................................................................................20
Page 1
PlaybackPro Plus User Guide
Operation
Before You Begin:
PlaybackPro Plus is a multi channel player, with more extensive controls for
advanced operators than PlaybackPro.
In order to do Cuts and Transitions, a Preview clip must be pre-rolled while the
Program clip is playing. When a clip is placed in Preview it is automatically and
immediately pre-rolled, even if a clip is playing in Program. This is different than in
PlaybackPro.
Subsequently, the operator must be aware of machine limitations
(especially disk bandwidth). When doing a mix transition, two clips are playing
simultaneously, which requires much greater computer resources. For HD playback, a
MacPro with an internal or external RAID array is recommended.
PlaybackPro Plus can be used with the SimpleSync application for easy and flexible
multiple machine synchronization (sync rolls). PlaybackPro Plus requires Mac OSX
10.5 (Leopard) or newer. 3GB of RAM or more is recommended.
PlaybackPro Plus scales to any hardware, but may be limited by the computer’s
processor speed, disk bandwidth and graphics power.
It is designed to run on a system with two outputs (or a laptop with an external
output). The primary screen (the one with menus) is for the interface. The secondary
output (which can be reordered under Displays, in the Hardware Section of System
Preferences) is for playback.
PlaybackPro Plus automatically adjusts to the aspect ratio of the external display. To
manually change the output resolution (or aspect ratio if no external display is
present), click Setup in the top right corner of the Program Screen.
When a Show File is opened, the application looks for the USB Enabler Key. If not
found, a dialog box will be displayed. If you have an Enabler Key, insert it and click
Okay. If you do not have a key, click Run As Demo. Demo mode is fully-functional,
except for a watermark that is displayed on the output. Demo mode is generally used
for setting up a show off-line, or learning the application.
PlaybackPro Plus saves shows as individual documents.
created and switched between.
Multiple shows can be
Clips are not stored internally within the Show File, they are simply references of
clips on a hard drive or network. For best results, store on a drive other than where
the operating system and application reside. Virtually any file type can be played by
installing third-party QuickTime plug-ins.
Page 2
PlaybackPro Plus User Guide
Layout:
Master Controls
Playlist
Show Controls
Preview!
Controls
Program
Controls
Preview / Program:
PlaybackPro Plus is designed on a Preview/Program paradigm, similar to a production
switcher. Program is what’s going to the output, and Preview is what will play next.
Preview is always in blue. Program is always in red.
When a clip is selected from the playlist, it is shown in Preview. Preview is used to set up
levels, fades, in/out points and geometry, and allows you to select the next clip to send to
the output (Program).
When a clip is Taken from Preview, it moves to Program and plays to the output with any
attributes that you’ve set (in/out Points, fades, geometry, levels, etc). Clips are shown in
Program exactly as they appear on the external output.
There are counters over Preview and Program for reference and easy count-outs. The green
counter shows the time elapsed relative to the In Point. The red counter shows the time
remaining relative to the Out Point.
The aspect ratio of the output is reflected in the Preview and Program sections.
Page 3
PlaybackPro Plus User Guide
Playlist:
The Playlist shows referenced clips. Clips can be reordered by Dragging and Dropping, or
by using the Move Up and Move Down items from the playlist ACTION POPUP MENU.
The Clip Number field is for operator convenience, and does not affect the actual order of
clips. However, the Clip Number is used by SimpleSync to reference clips. Since clips are
only referenced, clicking Duplicate only creates a new reference, and does not copy the clip.
If a clip has been moved or is off-line, its text will be grayed out. By clicking ‘Locate’ you
can redirect the reference to a new location, however the clip must have the same name.
Changing the highlighted selection in the playlist always affects what is being seen in
Preview.
Preview clips are always in blue. Program clips are always in red.
The playlist can easily be printed or saved as a PDF file.
Link and Link Duration: When a clip that’s set to Link begins playback, the next clip in
the Playlist will be loaded into Preview, and the Link Temp button in Show Controls is
activated.
This is the same as manually selecting the next clip in Preview, clicking the Link Temp
button, and setting the Link Duration manually in Show Controls. The clip in Preview (and
Link Duration) can still be changed once the clip is playing.
Freeze: Activates the Freeze Temp button in Show Controls when Clip begins playback.
Loop and Loop Duration: When a clip that’s set to Loop begins playback, the Loop Temp
button in Show Controls is activated.
This is the same as clicking the Loop Temp button and setting the Loop Duration manually
in Show Controls.
Page 4
PlaybackPro Plus User Guide
Clip Settings:
The Clip settings determine how a clip is played back in Program, and only affects the
selected clip (whether in Preview or Program). All settings are saved automatically when the
Show File is saved.
Main Tab
• File Path Indicator - Shows the path and name of the
referenced file.
• Set In - Sets where clip will begin playback.
• Set Out - Sets where clip will end playback.
• Set Slate - Used to set the Slate image for that clip.
• Fade-In Duration - Tells clip how long to Fade-In on start.
• Fade-Out Duration - Tells clip how long to Fade-Out on end.
Geometry
Controls the size, aspect ratio and positioning of the clip
being previewed and will be stored as altered. If the clip is in
Program, changes are seen on the video output (as well as in
the Program section).
Geometry can be Copied and Pasted between clips using the
Copy Geometry and Paste Geometry Buttons.
Geometry can be reset by clicking the Default Geometry
Button.
Levels
Affects the black level, gain, gamma, color, hue and volume
of the current clip. If the clip is in Program, changes are seen
on the video output (as well as in the Program section).
Levels can be Copied and Pasted between clips using the
Copy Levels and Paste Levels Buttons.
Levels can be reset by clicking the Default Levels Button.
Page 5
PlaybackPro Plus User Guide
Navigation Controls:
These are used for finding specific parts of a clip to set In, Out and Slate points.
There is a set of controls for both Preview and Program.
1
2
3
4
(1) Goto In / Out - Moves the playback position to the In or Out Point.
(2) Control Buttons - Fast Reverse, Play-Pause Toggle, Pause, Play and Fast Forward
buttons (in order).
(3) Shuttle - Temporarily changes the playback speed. Primarily used to set up a clip
in Preview, however it can be used in Program. Clips in Program always begin
playback at normal speed.
(4) Scrubber - Used to find specific parts of a clip so that In, Out, and Slates can be
set. Primarily used in Preview, however can be used while in Program. When a
Preview clip is Taken to Program, it starts from its In Point regardless of the Scrubber
Position.
Show Controls:
Take
Program’s End
Kill
The Show Controls breakdown into 3 areas: Take, Program’s End and Kill. Each is
covered in the following sections.
Page 6
PlaybackPro Plus User Guide
Take:
1
2
3
(1) Take Duration - Controls how the Preview clip transitions to Program when Take
is clicked. A negative number creates a Dissolve (-3.00 = 3 second dissolve), zero
creates a Cut, and a positive number creates a Delay (+3.00 = 3 second Delay).
(2) Fade On Take Duration - If Take is clicked while a clip is playing in Program,
and the Link Duration is +0.00 or greater (a Cut or Delay), this control fades Program
video and audio for the designated duration, before performing the Cut or Delay.
(3) Take - Takes Preview clip to Program. When a clip is already playing in Program,
Take Duration determines how it is transitioned (i.e. Dissolve, Cut or Delay).
If there is nothing playing in Program, clicking Take causes the Preview clip to begin
playing immediately (as a Cut), regardless of the Link Duration.
Possible Take Transitions:
1
2
3
(1) Take
Duration
(2) Fade On
Take
Duration
On Take (3)
N/A
N/A
When Program is not playing, Preview will Cut to Program.
-x.00
N/A
Preview will Mix to Program for x seconds.
+0.00
+0.00
+0.00
+y.00
Preview will Cut to Program.
Preview will Cut to Program after Program fades for y seconds.
+0.00
+2.00
Preview will Cut to Program after Delay of x seconds.
Preview will Cut to Program x seconds after Program fades for y seconds.
Image
No Program Playing
Mixing Preview and Program Clips
Cutting Preview and Program Clips
Delay between Preview and Program Clips
+x.00
+2.00
Legend: Blank Not Applicable
Page 7
PlaybackPro Plus User Guide
Program’s End:
2
4
3
1
5
(1) Link Duration - Controls how the Preview clip
transitions to Program when Link Temp is selected and
Program clip has reached its end. A negative number creates
a Dissolve (-3.00 = 3 second dissolve), zero creates a Cut,
and a positive number creates a Delay (+3.00 = 3 second
Delay).
(2) Link Temp - Temporarily Links or Unlinks Preview and Program based on the Link Duration. A
negative number creates a Dissolve (-3.00 = 3 second dissolve), zero creates a Cut, and a positive
number creates a Delay (+3.00 = 3 second Delay). Preview clip will not play if either Freeze Temp
or Loop Temp is selected. This does not affect the clip’s permanent Link setting.
(3) Freeze Temp - Temporarily freezes Program clip when it reaches its Out Point. A freeze can be
terminated by either unselecting Freeze Temp, Taking a Preview Clip, or clicking Kill (esc).
Program clip will not Freeze if Loop Temp is selected. This does not affect the clip’s permanent
Freeze setting.
(6) Loop Temp - Temporarily Loops or Un-loops Program clip. Click Kill (esc) to immediately end
a loop, or Take if a clip is loaded in Preview. This does not affect the clip’s permanent Loop setting.
(8) Loop Duration - Controls how a loop will transition upon itself. A negative number creates a
Dissolve (-3.00 = 3 second dissolve), zero creates a Cut, and a positive number creates a Delay
(+3.00 = 3 second Delay).
1
2
3
Link
Link Freeze
Duration Temp Temp
4
Loop
Temp
5
Loop
Loop, Freeze, and Link Transitions:
Duration
No Program Playing
O
O
O
Program will End.
Loop
◉
◉
◉
◉
◉
◎
◎
-x.00 Program will loop with a Mix of x seconds.
-0.00 Program will loop with a Cut.
-x.00 Program will loop with a Delay of x seconds.
Freeze
Program will Freeze.
Program is Frozen.
Link
-y.oo
+0.00
+y.00
◉
◉
◉
◎
◎
◎
◎
◎
◎
Preview will Mix to Program for x seconds.
Preview will Cut to Program.
Preview will Cut to Program after Delay of x seconds.
Legend
✖ Button Activated
O Button NOT
Blank Not Applicable
Page 8
Image
PlaybackPro Plus User Guide
Kill:
(1) Goto Buttons: The Goto 10 / Goto 20 / Goto 30
buttons set the Playback position to 10, 20 or 30
seconds from the clip’s Out Point.
1
2
(2) Kill Duration - Specifies how long audio and
video will fade for a clip in Program when Kill (esc)
is clicked.
3
(3) Kill (esc) - Ends Program playback. Preview will not Link.
Kill
Duration
+0.00
+x.00
Result
Image
Program will End, Preview will not start.
Program will fade-out for x seconds, Preview will not start
Edit Multiple Mode:
The Edit Multiple Mode may be selected from the Action Menu. It controls common settings
across multiple clips.
Page 9
PlaybackPro Plus User Guide
!
SimpleSync Basics
SimpleSync controls multiple computers running PlaybackPro Plus simultaneously
(sync roll), and is a companion to the PlaybackPro Plus application.
It utilizes Apple’s Bonjour technologies for easy discovery and communication over
TCP/IP networks (ethernet, etc.). SimpleSync acts as a command server, while
instances of PlaybackPro Plus act as clients.
Clips can be loaded into Preview on PlaybackPro Plus clients by typing their Clip
Numbers directly into SimpleSync. Clip Numbers can be assigned to the same, or to
different clips, on each computer. This makes sync roll recall easy.
PlaybackPro Plus utilizes QuickTime for video decoding, which is based on each
computer’s real time internal clock. Successive frames will still occur at the expected
time, even if a frame needs to be dropped.
If clips on different computers are started at exactly the same time, they will remain in
sync as long as their internal clocks do not drift apart during the duration of the clip.
OSX’s built in NTP (Network Time Protocol) can be used to eliminate clock drift for
extremely accurate sync (for further information see NTP).
!
To use SimpleSync, select it from the
Connection popup menu. SimpleSync
must be running on the network for this
option to be available. Select No
Control from the Connection popup
menu to stop all communications.
!
!
Page 10
PlaybackPro Plus User Guide
1
SimpleSync Controls:
2
(1) Sync Type: Determines how PlaybackPro Plus clients
are cued.
3
(2) Client List - A list of connected PlaybackPro Plus
clients.
(3) Show Controls - These controls affect Take, Kill and
Goto 10/20/30.
Direct Command:
Direct Command is quick and easy, but should only be used when absolute
synchronization isn’t necessary.
When Direct Command is used, PlaybackPro Plus clients are triggered in nearly
instantaneous succession. There may be a small latency between triggering the first
computer and the last one, especially when a large number of computers are used.
The clocks can also be synchronized using NTP to negate any effect from drifting
clocks (see NTP Basics).
!
Clock Sync (NTP):
Clock Sync assumes the client computers’ clocks are in perfect sync. Each computer
is assigned a time in the very near future to begin playback. The delay before the cue
allows communication between all computers to occur, eliminating the latency that
may happen with Direct Command. The delay may be increased if there are a large
number of computers.
!
Page 11
PlaybackPro Plus User Guide
NTP Basics:
NTP is built into Mac OSX and it is used by
the ‘Set Date and Time’ Preference Pane. It
generally acts as a client of an Apple time
server, but can point to a time server on a local
network. Although not an exposed feature in
OSX, it can also be turned into a time server.
NTP is setup by a configuration file called
ntp.conf that is placed in the directory /etc.
Since the /etc directory is hidden from the user,
unix commands are used to copy it into place
via Apple’s terminal application.
WARNING
Mac OSX supports network
multihoming. Multihoming allows
computers to have multiple
simultaneous network connections
(i.e. wireless and ethernet).
It is very important to only have a
single point of connection between
SimpleSync (Server) and
PlaybackPro Plus (Clients) when
synced together.
!
Networking:
Computers should be networked with a gigabit ethernet switch.
The ntp.conf files provided by DT Videolabs assume the use of the 192.168.1.x
address range. Other address ranges may be used, but the client ntp files would have
to be modified.
The server (ntp and SimpleSync) should have the address 192.168.1.100.
PlaybackPro Plus clients should use 192.168.1.101 through 192.168.1.200. All
computers should use net mask 255.255.255.0. All other fields in the Networking
preference panel should generally be left blank unless internet access is absolutely
required.
All other network ports such as Airport (wireless) must be turned off.
Page 12
PlaybackPro Plus User Guide
Setting up an NTP Server:
The time server is generally the computer designated to run SimpleSync. This
process can only be run on OSX 10.6 or earlier.
Download the Extras Folder from www.dtvideolabs.com/download.html. Once
opened, move the ntp.conf file within the ‘ntp.conf for server’ folder to your Home
Directory.
!
Launch Apple’s Terminal Application and enter the following command:
sudo cp ntp.conf /etc
You may get a warning and may be asked for your password.
The configuration file for the server contains the following text:
server 127.127.1.0 prefer
fudge 127.127.1.0 stratum 0
The first line tells the Mac to use its own internal clock (127.127.1.0) as its time base,
and the second line tells it to serve that same time to clients.
Once this file has been properly moved into the /etc directory with the Unix
command, 127.127.1.0 will automatically show up in the field next to Set Date and
Time. Entering 127.127.1.0 directly into the field will not work. The checkbox to
the left should be enabled. Once complete, restart the server and move on to the
clients.
Page 13
PlaybackPro Plus User Guide
!
!
Setting up NTP Clients:
Download the Extras Folder from www.dtvideolabs.com/download.html. Once
opened, move the ntp.conf file within the ‘ntp.conf for client’ folder to your Home
Directory.
Launch Apple’s Terminal Application and enter the following command:
sudo cp ntp.conf /etc
You may get a warning and may be asked for your password.
The configuration file for the clients contains the following text:
server 192.168.1.100 maxpoll 64
This line tells ntp to sync to an NTP server at 192.168.1.100 and to poll it every
minute.
Once this file has been properly moved into the /etc directory with the Unix
command, 192.168.1.100 will show up in the field next to Set Date and Time
Automatically. Entering 192.168.1.100 directly into the field would not tell the client
to poll the server more often. The checkbox to the left should be enabled. Once
complete, restart the computer.
!
Page 14
PlaybackPro Plus User Guide
Troubleshooting NTP:
A simple way to determine if the clocks are locked is to:
1) uncheck the Set Date and Time Automatically checkbox
2) set the time ahead 1 hour
3) save the time
4) Enable the checkbox.
The time should reset to the time on the server.
Another way is to open the Terminal App and enter ntpq -p. You should get a reply
that looks like this:
remote
refid
st t
when poll
reach delay offset
jitter
=======================================================
*local 192.168.1.100
2 u 168
512
377
96.551 7.941 685.438
!
When NTP is working correctly, offset and jitter should be non-zero values.
If clocks are not synchronizing, verify that the server is reachable on the network by
using the ping command:
ping 192.168.1.100
Ping can be exited by typing command / period. If the server can’t be pinged, check
network connections and settings.
When rebooting, it is best to restart the server a minute or so before restarting the
clients.
!
!
!
Page 15
PlaybackPro Plus User Guide
UDP and TCP Basics
To control PlaybackPro Plus from a device other
than SimpleSync, use UDP or TCP IP control.
Select UDP Listen or TCP Listen from the
Connection popup menu in the Network Setup
sheet. To stop all communications, select No
Control from the Connection popup menu.
UDP
PlaybackPro Plus listens for commands on port 7000.
Set the IP address (should be static) and port number
on the device that will be controlling PlaybackPro
Plus. UDP is a connection-free protocol. See The
PlaybackPro Plus Protocol (UDP / TCP) section for
commands.
TCP
PlaybackPro Plus listens for a connection on port
4647. Set the IP address (should be static) and
port number on the device that will be controlling
PlaybackPro Plus, and tell it to connect. Once
connected, the Network Status will show TCP/IP
Connected, rather than TCP/IP Listening.
Disconnect the remote source before selecting a
different remote option. See The PlaybackPro Plus Protocol (UDP / TCP) section
for commands.
Page 16
PlaybackPro Plus User Guide
The PlaybackPro Plus Protocol (UDP / TCP)
Command
Effect
Return
PR
Previous Clip
NX
Next Clip
CL
Clear Preview
GOxxxx
Load clip xxx into Preview
GTxxxx
Load clip xxx and Take
TA
Take
KL
Kill
10
Goto 10
20
Goto 20
30
Goto 30
SL
Loop Program
EL
Unloop Program
GExx.xx.xx.xx
Goto Time Elapsed
GRxx.xx.xx.xx
Goto Time Remaining
PA
Pause
PL
Play from current location
GN
program clip name
GU
program clip number
GD
program clip duration
VN
preview clip name
VU
preview clip number
VD
preview clip duration
TE
program Time elapsed
TR
program Time remaining
PS
Playback Status
LS
Loop Status (YES/NO)
AN
All clip names, comma delimited. Commas in
names will be replaced with periods.
AU
All clip numbers, comma delimited. Commas in
numbers will be replaced with periods.
AD
All clip durations, comma delimited.
Continued…
Page 17
PlaybackPro Plus User Guide
The PlaybackPro Plus Protocol (UDP / TCP) Continued
Command
Effect
SIxxxx
Select Clip by ID
TIxxxx
Take Clip by ID
ID
Return Clip IDs
EI
Goto In Preview
EO
Goto Out Preview
ER
Fast Reverse Preview
EF
Fast Forward Preview
E-
Step Back Preview
E+
Step Forward Preview
ES
Mark In Preview
EE
Mark Out Preview
EP
Play/Pause Preview
OI
Goto In Program
OO
Goto Out Program
OR
Fast Reverse Program
OF
Fast Forward Program
O-
Step Back Program
O+
Step Forward Program
OS
Mark In Program
OE
Mark Out Program
OP
Play/Pause Program
I-
Link Minus
I+
Link Plus
L-
Loop Minus
L+
Loop Plus
T-
Take Minus
T+
Take Plus
K-
Kill Minus
K+
Kill Plus
F-
Take Fade Minus
F+
Take Fade Plus
SA
Save
IT
Link Temp
LT
Loop Temp
FT
Freeze Temp
BF
Window to Front
SF
Return
Show File Name
Page 18
PlaybackPro Plus User Guide
Keyboard Shortcuts:
Clips can be loaded into Preview by typing in the Clip Number. If a mistake is made while
entering, the Delete key will cancel it.
Show Files
Navigation Controls - Program
New Show ...........................shift command (⌘) N
Toggle Play in Program ............shift / option space
Open Show ..................................command (⌘) O
Step Forward in Program ..............shift / option →
Close Show .................................command (⌘) W
Step Backward in Program ...........shift / option ←
Save Show ....................................command (⌘) S
Play Faster in Program ...................shift / option ↑
Save Show As ....................shift / command (⌘) S
Play Slower in Program...................shift / option ↓
Page Setup ...........................shift /command (⌘) P
Goto In ................................shift / command (⌘) -
Print ..............................................command (⌘) P
Goto Out ............................shift / command (⌘) =
!
Show Controls
Select Previous Clip ..............................................↑
Select Next Clip ....................................................↓
Clear Preview......................................................←
Take ...............................................................return
Kill .....................................................................esc
Decrease Take Duration .............................option ;
Increase Take Duration...............................option ‘
Decrease Link Duration ............................option A
Increase Link Duration ..............................option S
Decrease Fade On Take Duration .............option D
Increase Fade On Take Duration ...............option F
Decrease Loop Duration ...........................option G
Increase Loop Duration ............................option H
Decrease Kill Duration ..............................option J
Increase Kill Duration ..............................option K
Toggle LoopTemp .....................................option L
Toggle Link Temp ...........................shift / option L
Toggle Freeze ...................shift / control / option L
Goto 10 ......................................................option 1
Goto 20 ......................................................option 2
Goto 30 ......................................................option 3
!
Navigation Controls - Preview
Toggle Play in Preview .......................option space
Step Forward in Preview .........................option →
Step Backward in Preview......................option ←
Play Faster in Preview ..............................option ↑
Play Slower in Preview ............................option ↓
!
Clips
New Clips .............................................command (⌘) N
Delete Clip .....................................command (⌘) delete
Duplicate Clip.......................................command (⌘) D
Select Previous Clip.......................................................↑
Select Next Clip .............................................................↓
Preview Mark In ....................................command (⌘) [
Preview Mark Out ..................................command (⌘) ]
Preview Mark Slate ................................command (⌘) \
Program Mark In..........................shift / command (⌘) [
Program Mark Out .......................shift / command (⌘) ]
!
Edit
Cut ........................................................command (⌘) X
Copy......................................................command (⌘) C
Paste ......................................................command (⌘) V
Select All ...............................................command (⌘) A
!
Window
Toggle Full Screen ................................command (⌘) F
Minimize to Dock ................................command (⌘) M
!
Help
Display Help ...........................................command (⌘) ?
Goto In ..........................................command (⌘) Goto Out.......................................command (⌘) =
!
Page 19
PlaybackPro Plus User Guide
System Settings:
When using PlaybackPro Plus in a show, it is important to set some global system
settings. All of the following settings are found in ‘System Preferences’:
Screensaver
Set Start Screen Saver to never
Sleep
Set Sleep to never
Uncheck: Put the hard disks to sleep when possible. THIS IS IMPORTANT!
Graphics
When using a MacBook Pro with multiple graphics cards (MacBook Pro late
2008), use the ‘Higher Performance’ setting in Energy Saver.
Page 20
PlaybackPro Plus User Guide
Sound
Set Alert Volume to zero
Uncheck: Play user interface sound effects
Uncheck: Play feedback when volume is changed
Set Output Volume to full.
CDs and DVDs
CDs and DVDs: Set everything to Ignore
Flip4Mac
When using Flip4Mac Windows Media QuickTime Component, it is VERY
important to uncheck ‘Open Local Files Immediately’ (Note: It is better to use
Flip4Mac to transcode video to another codec, like ProRes 4:2:2, rather than
run directly in PlaybackPro Plus).
Although it is not in the System Preferences application, it is best to unmount any network shares
before going into show.
Page 21