1
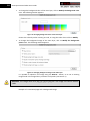
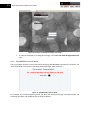
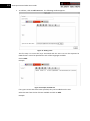
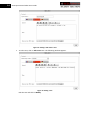
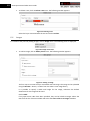
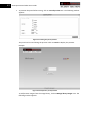
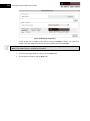
Securepoint Network Access Controller (NAC) Portal Editor User Guide Business Class Secure Mobility Version 1 Securepoint Portal Editor User Guide 2 1 Table of contents 1 Table of contents ............................................................................................................................. 2 2 Table of figures................................................................................................................................. 3 3 Introduction ..................................................................................................................................... 4 4 Launching the Portal Editor.............................................................................................................. 4 5 Description of portal components ................................................................................................... 5 6 Portal customization ........................................................................................................................ 6 6.1 Background page ...................................................................................................................... 6 6.2 Main layer ................................................................................................................................. 9 6.2.1 SECUREPOINT reserved block .......................................................................................... 11 6.3 Texts ........................................................................................................................................ 12 6.4 Images ..................................................................................................................................... 15 6.5 Open-access URLs ................................................................................................................... 16 7 Portal management ....................................................................................................................... 16 3 Securepoint Portal Editor User Guide 2 Table of figures Figure 1: SECUREPOINT portal display table ........................................................................................... 4 Figure 2: SECUREPOINT portal editor ...................................................................................................... 4 Figure 3: Basic portal components .......................................................................................................... 5 Figure 4: Window displaying layer-related information ......................................................................... 5 Figure 5: Page menu items ...................................................................................................................... 6 Figure 6: Changing the page background color....................................................................................... 6 Figure 7: Changing the page background image ..................................................................................... 7 Figure 8: Example of a background page with image ............................................................................. 7 Figure 9: Changing the page title ............................................................................................................ 8 Figure 10: Example of a page with a title ................................................................................................ 8 Figure 11: Main layer menu items .......................................................................................................... 9 Figure 12: Resizing main layer ................................................................................................................. 9 Figure 13: Example of a portal with a resized main layer ....................................................................... 9 Figure 14: Changing background color of the main layer ..................................................................... 10 Figure 15: Changing background image of the main layer.................................................................... 10 Figure 16: Example of a background page with image ......................................................................... 11 Figure 17: SECUREPOINT reserved block .............................................................................................. 11 Figure 18: Reserved block in standard mode: connection data ............................................................ 12 Figure 19: Reserved block in standard mode: user feedback ............................................................... 12 Figure 20: Items on the Text menu ....................................................................................................... 12 Figure 21: Adding a text ........................................................................................................................ 13 Figure 22: Example of HTML text .......................................................................................................... 13 Figure 23: Adding a URL within a text ................................................................................................... 14 Figure 24: Editing a text......................................................................................................................... 14 Figure 25: Deleting a text ...................................................................................................................... 15 Figure 26: Image menu items ................................................................................................................ 15 Figure 27: Adding an image ................................................................................................................... 15 Figure 28: Deleting an image................................................................................................................. 16 Figure 29: Adding an open-access URL ................................................................................................. 16 Figure 30: Items on the File menu......................................................................................................... 16 Figure 31: Running the portal preview.................................................................................................. 17 Figure 32: Example of a portal preview ................................................................................................ 17 Figure 33: Managing image library........................................................................................................ 18 4 Securepoint Portal Editor User Guide 3 Introduction This guide is intended for system and/or network administrators responsible for installing and configuring the Securepoint NAC. It comes in addition to the installation guide and is primarily concerned with use of the SECUREPOINT portal editor. This editor is used to customize the portal’s appearance (adding images, text, logos, etc.), so that it reflects the organization within which SECUREPOINT is being used. 4 Launching the Portal Editor The table displaying all available portals (the Configuration/Customization/Captive portal menu in the administration tool) offers an icon for each portal, used to run the portal editor (“Editor” column). Example: Figure 1: SECUREPOINT portal display table Click on the icon on the portal to be modified to launch the portal editor. This displays: Figure 2: SECUREPOINT portal editor 5 Securepoint Portal Editor User Guide 5 Description of portal components A SECUREPOINT portal always comprises a background page, a main layer and a block reserved for SECUREPOINT display (entering login information, feedback messages, etc.). The figure below shows the various elements on the portal: Figure 3: Basic portal components Both the background page and main layer can be customized. As regards the SECUREPOINT reserved block, only the text display colour and the background color can be changed. In addition to these customizations, it is possible to position images, text and open-access URLs on the portal. For example, the default SECUREPOINT portal includes the SECUREPOINT logo, the word “Welcome” and flags for the various languages available. All these objects are handled (created/changed/deleted/moved) using the concept of layers. When an object (and therefore a layer) is selected, its position and dimensions (in pixels) are displayed in the window reserved for this purpose at the top-left of the portal. This window can be positioned anywhere on the portal editor. Figure 4: Window displaying layer-related information Layers can be moved on the portal simply by using drag and drop. 6 Securepoint Portal Editor User Guide The portal editor offers five menus for manipulating all these components: File The “File” menu is used to show a preview screen of the changes made, to save the changes, manage the image library and to exit the editor. Page The “Page” menu is used to change the colour and/or image on the background page. It can also be used to customize the page title. Main layer The “Main layer” menu is used to change the background colour and/or background image for the main layer. It can also be used to re-size the main layer. Text The “Text” menu is used to add/edit/remove text. Picture The “Image” menu is used to add/edit/remove an image. 6 Portal customization 6.1 Background page To customize the background page, click on Page menu. The following menu is displayed: Figure 5: Page menu items To change background color, click on Modify the background color item. The following window appears: Figure 6: Changing the page background color Choose the colour by either entering its code, or using the colour chart. Click on Modify. To change the background picture, click on Modify the background picture item. The following window appears: 7 Securepoint Portal Editor User Guide Figure 7: Changing the page background image It is possible to upload a new image using the Browse... button, or to use an existing image found in the image library common to all portals (see Section 7). Attention: The image must be a png, gif, jpg or jpeg file. The image size cannot exceed 2 MB. Example of a customized page with a background image: Figure 8: Example of a background page with image To remove the display of a background image, click on Do not show background picture. 8 Securepoint Portal Editor User Guide To edit the page title in the Web browser displaying the portal, click on Edit the title item. The following window appears: Figure 9: Changing the page title Enter the page title for each of the languages available and click on Modify. Example with title page saying “Aquarium”: Figure 10: Example of a page with a title Note: The portal preview needs to be run to see the title that appears in the Web browser page title bar. 9 Securepoint Portal Editor User Guide 6.2 Main layer To customize the main layer, click on Main layer menu. The following menu is displayed: Figure 11: Main layer menu items To resize the main layer, click on Resize the main layer item. The following window appears: Figure 12: Resizing main layer Enter the new size, giving the width and height of the main layer in pixels. Attention: The size of the main layer must not be smaller than the size of the block reserved for SECUREPOINT. Example of a portal with a resized main layer: Figure 13: Example of a portal with a resized main layer 10 Securepoint Portal Editor User Guide To change the background color of the main layer, click on Modify the background color item. The following window appears: Figure 14: Changing background color of the main layer Choose the colour by either entering its code, or using the colour chart. Click on Modify. To change the background image of the main layer, click on Modify the background picture item. The following window appears: Figure 15: Changing background image of the main layer It is possible to upload a new image using the Browse... button, or to use an existing image found in the image library common to all portals (see Section 7). Attention: The image must be a png, gif, jpg or jpeg file. The image size cannot exceed 2 MB. Example of a customized page with a background image: 11 Securepoint Portal Editor User Guide Figure 16: Example of a background page with image To remove the display of a background image, click on Do not show background picture item. 6.2.1 SECUREPOINT reserved block The portal editor includes a block reserved for displaying SECUREPOINT information. The block’s size varies depending on the portal’s operating modes (standard, SMS, email, etc.). Figure 17: SECUREPOINT reserved block For example, for standard operating mode, the block will initially hold login information (login and password) and then user feedback (see screenshots below). 12 Securepoint Portal Editor User Guide Figure 18: Reserved block in standard mode: connection data Figure 19: Reserved block in standard mode: user feedback Attention: It is important not to add anything to the SECUREPOINT reserved block. Only the colour of text displayed by SECUREPOINT and the background color can be changed. To change the SECUREPOINT block, click on the Modify the reserved block on the Main layer menu. 6.3 Texts To customize the portal by adding text, click on Text menu. The following menu is displayed: Figure 20: Items on the Text menu 13 Securepoint Portal Editor User Guide To add text, click on Add a text item. The following window appears: Figure 21: Adding a text The first step is to name the layer associated with the text. Text can be expressed in HTML format. It must be specified for each of the languages available. Click on Add. Example: Figure 22: Example of HTML text If any open-access URLs have been specified, they can be added into the text. Select the URL from the list of those available and click on Add. Example: 14 Securepoint Portal Editor User Guide Figure 23: Adding a URL within a text To edit a text, click on Edit a text item. The following window appears: Figure 24: Editing a text Edit the text and click on Modify. 15 Securepoint Portal Editor User Guide To delete a text, click on Delete a text item. The following window appears: Figure 25: Deleting a text Select the layer associated with the text and click on Delete. 6.4 Images To customize the portal by adding images, click on Image menu. The following menu is displayed: Figure 26: Image menu items To add an image, click on Add a picture item. The following window appears: Figure 27: Adding an image The first step is to name the layer associated with the image. The image can be uploaded using the Browse… button, or taken from the editor’s own image library. It is possible to specify a width and height for the image; otherwise the default dimensions for the image will be used. Click on Add. If any open-access URLs have been specified, they can be linked to images. Select the URL from the list of those available and select the Insert a link in an image checkbox. 16 Securepoint Portal Editor User Guide To delete an image, click on the Delete a picture item. The following window appears: Figure 28: Deleting an image Select the layer associated with the image and click on Delete. 6.5 Open-access URLs To add an open-access URL to the portal, click on Add an open-access URL item from the Text menu. The following window appears: Figure 29: Adding an open-access URL Select the URL to be added from the list of URLs. Enter the text (associated with the URL) to appear on the portal, and click on Add. 7 Portal management Portal management functions are available from the File menu. The menu is as follows: Figure 30: Items on the File menu 17 Securepoint Portal Editor User Guide To preview the portal before saving, click on Launch preview item. The following window appears: Figure 31: Running the portal preview The portal can be sized during the preview. Click on Launch to display the preview. Example: Figure 32: Example of a portal preview To add/remove images from the image library, click on Manage library images item. The following window appears: 18 Securepoint Portal Editor User Guide Figure 33: Managing image library A new image can be added to the library using the Browse… button. To remove an image, select the image from the list of those available and click on Delete. Note: The image library is shared by all portals. To save the changes made to a portal, click on Save item. To exit the portal editor, click on Quit item.