1
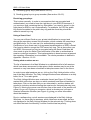
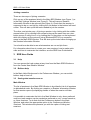
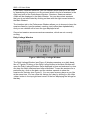
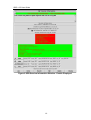
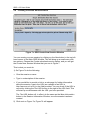
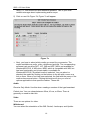
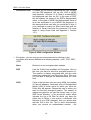
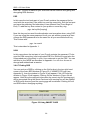
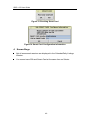
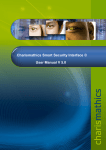
User Guide for SDR v2.5 29 September 1998 Version 15 (DRAFT) University College London, Computer Science Department SDR v.2.5 User Guide Acknowledgements This user guide is based on the UKERNA SHRIMP User Guide which will be available from http://www.ja.net/service_development/video/service_developments/shrimp/index.html. The current document has been updated to incorporate security which is now part of SDR. Disclaimer UCL cannot accept any responsibility for any loss or damage resulting from the use of the material contained in this document. The information is believed to be correct, but no liability can be accepted for any inaccuracies. ii SDR v.2.5 User Guide Copyright note SDR: Copyright (c) 1995,1996, 1998 University College London All rights reserved. Redistribution and use in source and binary forms, with or without modification, are permitted provided that the following conditions are met: 1. Redistributions of source code must retain the above copyright notice, this list of conditions and the following disclaimer. 2. Redistributions in binary form must reproduce the above copyright notice, this list of conditions and the following disclaimer in the documentation and/or other materials provided with the distribution. 3. All advertising materials mentioning features or use of this software must display the following acknowledgement: This product includes software developed by the University of California, Berkeley and the Network Research Group at Lawrence Berkeley Laboratory. 4. Neither the name of the University nor of the Laboratory may be used to endorse or promote products derived from this software without specific prior written permission. THE REGENTS AND CONTRIBUTORS AS IS AND ANY EXPRESS OR PROVIDE IMPLIED WARRANTIES, INCLUDING, THIS SOFTWARE IMPLIED WARRANTIES, INCLUDING, BUT NOT LIMITED TO, THE IMPLIED WARRANTIES OF MERCHANTABILITY AND FITNESS FOR A PARTICULAR PURPOSE ARE DISCLAIMED. IN NO EVENT SHALL THE REGENTS OR CONTRIBUTORS BE LIABLE FOR ANY DIRECT, INDIRECT, INCIDENTAL, SPECIAL, EXEMPLARY, OR CONSEQUENTIAL DAMAGES (INCLUDING, BUT NOT LIMITED TO, PROCUREMENT OF SUBSTITUTE GOODS OR SERVICES; LOSS OF USE, DATA, OR PROFITS; OR BUSINESS INTERRUPTION) HOWEVER CAUSED AND ON ANY THEORY OF LIABILITY, WHETHER IN CONTRACT, STRICT LIABILITY, OR TORT (INCLUDING NEGLIGENCE OR OTHERWISE) ARISING IN ANY WAY OUT OF THE USE OF THIS SOFTWARE, EVEN IF ADVISED OF THE POSSIBILITY OF SUCH DAMAGE. iii SDR v.2.5 User Guide Contents 1 Introduction ............................................................................................ 1 2 Getting started........................................................................................ 2 3 SDR User Guide...................................................................................... 5 3.1 Help............................................................................................................... 5 3.2 Balloon help ................................................................................................. 5 3.3 Seeing what sessions are on ...................................................................... 5 3.4 Joining a session......................................................................................... 7 3.5 SDR Session Information Window (Normal Interface) .............................. 8 3.6 Creating a Session Announcement.......................................................... 13 3.7 Making a Quick Call ................................................................................... 21 3.8 SDR Preferences Window ......................................................................... 24 3.8.1 SDR Preferences Window – Sessions......................................... 24 3.8.2 SDR Preferences Window – Interface ......................................... 25 3.8.3 SDR Preferences Window – Tools .............................................. 26 3.8.4 SDR Preferences Window – Web................................................ 27 3.8.5 SDR Preferences Window – You................................................. 27 3.8.6 SDR Preferences Window – Security .......................................... 28 3.8.6.1 Generating DES Key............................................................... 29 3.8.6.2 Receiving Encrypted /Authenticated sessions ........................ 31 3.8.6.3 Viewing an authenticated and encrypted session ................... 32 3.8.6.4 Generating and Receiving keys ............................................. 33 3.8.6.5 Generating Group keys........................................................... 33 3.8.6.6 Receiving and storing Key information.................................... 38 3.8.6.7 Ending SDR ............................................................................ 39 4 Known Bugs ......................................................................................... 40 iv SDR v.2.5 User Guide Appendix Appendix 1 Security Technology ............................................................... 46 Appendix 2 Configuration and Software to use with SDR ....................... 52 v SDR v.2.5 User Guide Figures FIGURE 1 SDR V.2.5 MAIN WINDOW FIGURE 2 SDR DAILY LISTINGS WINDOW FIGURE 3 SDR DAILY LISTINGS WINDOW - SHOWING SESSIONS ON 9TH JUNE FIGURE 4 SDR SESSION INFORMATION WINDOW FIGURE 5 SDR SESSION INFORMATION WINDOW - INVITE BOX OPEN FIGURE 6 SDR SESSION INFORMATION WINDOW - DETAILS DISPLAYED FIGURE 7 A SDR CREATE NEW SESSION WINDOW FIGURE 8 X509 CONFIGURATION WINDOW FIGURE 9 DES PASSWORD WINDOW FIGURE 10 SDR QUICK CALL WINDOW FIGURE 11 SDR MAIN WINDOW - SHOWING PRIVATE SESSIONS FIGURE 12 SDR PREFERENCES WINDOW - SESSIONS FIGURE 13 SDR PREFERENCES WINDOW - INTERFACE FIGURE 14 SDR PREFERENCES WINDOW - TOOLS FIGURE 15 SDR PREFERENCES WINDOW - WEB FIGURE 16 SDR PREFERENCES WINDOW – YOU FIGURE 17 SDR PREFERENCES WINDOW – SECURITY FIGURE 18 SDR CREATING DES ENCRYPTION KEY WINDOW FIGURE 19 PASSPHRASE USED TO DECRYPT THE KEY FILE AND DES ENCRYPTED SESSIONS FIGURE 20 SDR V2.5 MAIN WINDOW FIGURE 21 ADDING PGP PUBLIC KEY FIGURE 22 PGP PASSWORD WINDOW FIGURE 23 KEY GENERATION (PGP, X509, DES) WINDOW FIGURE 24 GENERATING DES KEY FIGURE 25 MAIL AGENT NAME WINDOW FIGURE 26 COMP EXMH WINDOW FOR SENDING DES FIGURE 27 X509 KEY GENERATION INFO FIGURE 28 USING MAIL AGENT TO SEND X509KEYFILE FIGURE 29 PGP KEY GENERATION WINDOW FIGURE 30 PASSWORD FOR PGP RSA PRIVATE KEY FIGURE 31 USING MAIL SYSTEM TO SEND PGPKEYFILE FIGURE 32 USING SMART CARD FIGURE 33 CHECKING SMART CARD FIGURE 34 SMART CARD CONFIGURATION INFORMATION vi 1 6 7 8 11 12 13 19 20 21 24 25 26 26 27 28 29 29 30 30 31 32 34 34 34 35 35 36 37 37 38 39 40 40 SDR v.2.5 User Guide 1 Introduction SDR (Multicast Session Directory) v2.5 is a tool which assists the user in setting up and joining conferences. SDR v2.5 differs from previous versions of SDR in that is supports secure conference announcement. This means that it is possible to announce sessions to a specific group of people only. It is also possible to have the actual conferences encrypted as well. Conferences which have been announced using SDR are listed in the tool’s main window (see Figure 1), rather like a TV listings guide. (Encrypted announcements will not be listed in previous versions of SDR, which do not support secure conferencing). In the case of authentication, the digital signature is checked and the encrypted sessions are decrypted for the right group. Figure 1 SDR v.2.5 Main Window More information about each session can be obtained by clicking on its name in the list. A window will appear with further details about the event, security information and an invitation to join. When you join a conference using SDR the appropriate tools for that session will automatically be started up on the right addresses and with the right parameters. Alternatively, the user may decide to start up only a few of the tools. Not only the session announcement, 1 SDR v.2.5 User Guide but also the session itself may be private; this is ensured by enabling the tools to encrypt the data stream with a pass phrase. The pass phrase may be entered automatically, or through SDR With SDR anyone can create and advertise their own secure conferences, and invite other people to join if they wish. It provides a framework for setting up secure conference session announcements and automatically configures the relevant tools. Once a conference has been set up it will be announced to other users of SDR for a certain period of time (usually specified by the organiser of the conference). During this period other SDR users can join the session. If they have the appropriate keys they can check the authentication and decrypt the session. It is also possible to invite someone for a quick 5minute consultation or a full meeting - like making a phone call. SDR can receive and send encrypted and authenticated session announcements using technology such as DES, PGP and X.509. Figure 1 shows two authenticated sessions in the public sessions, which are signed using PGP and X509 technologies respectively. In the private sessions of Figure 1, four sessions are shown which are encrypted with DES, X509 and PGP and authenticated with PGP and X509 SDR can generate and send keys required for authentication and encryption. Eventually it will also be possible to use Smart Card technology to authenticate a session announcement or access encrypted information in a secured repository. 2 Getting started Starting up SDR on a Unix machine: To start up SDR, type: Prompt> SDR Starting up SDR on Windows95/NT4.0 PC: Press the Start button, select run… This will open a small window. In the Open field of this window type sdr then press the OK button. This will bring up the Main SDR Window. SDR allows you to customise the interface. The default interface will give you “short labels” on all the buttons, allowing the interface to take up very little space on the screen. However, when learning how to use SDR, seeing the “long labels” is more helpful. This guide, however, is based on the interface showing “short labels” and “Technical interface”. In order to change the interface to show the technical interface, click on the Prefs button at the top of the Main SDR Window. This will open the SDR Preferences Window (see Figure 12). Select the tab labelled Interface and 2 SDR v.2.5 User Guide you will get the window in Figure 13. You may need to make the following changes: In the View Session box, select Technical Interface. In the Label Detail box, select Short labels (expert mode). Then click the Save & Apply Preferences button in the bottom right hand corner of the window. Quick guide to using SDR SDR is like an online TV listings guide: SDR lists all the sessions (including authenticated and encrypted sessions, after checking the signature and decrypting the sessions) that are currently scheduled to happen on the Mbone. SDR will also let you join the sessions (i.e. automatically start up the relevant tools on the correct addresses/ports) by the click of a button. SDR lets you announce your own (secure) sessions. (SDR can be used to generate symmetric and asymmetric keys. Smart Cards can be used to encrypt personal information to be used for authentication and encryption.) SDR allows you to make quick calls or multimedia “phone calls” to other SDR users. A quick call is really the same as any other session, except that only people you invite to your quick call will be notified of the call/session. The Main SDR Window (see Figure 1) contains a list of sessions, which are either on or have been announced to take place sometime in the future. An icon, telling you which type of session it is, precedes each session: Is a broadcast, i.e. the session is not interactive. New users may join the session but they may not participate, i.e. actively send audio and/or video. Is a meeting, i.e. an interactive session. Is a test session. Secure test, broadcast and meeting icons are the negative image of test, broadcast and meeting icons. Generation of Group Keys In order to encrypt and authenticate a session, you will need to have the right keys. Generating and sending group keys can be done automatically in SDR by: 1) Establishing a group membership, with an e-mail list. 3 SDR v.2.5 User Guide 2) Generating group keys (See section 3.8.6.5). 3) Sending group keys to group member (See section 3.8.6.5). Receiving group keys. This is done manually. In order to see sessions that are encrypted and authenticated, you need to have the right keys in your SDR Environment. If you receive e-mail containing the key information, you need to store it in the right place for SDR to use it automatically. For example, for PGP the public key should be added to the public key ring and the secret key should be added to secret key ring. Using a Smart Card You can use a Smart Card as your private identification to encrypt and decrypt the repository access list information, which contains the secret keys and public keys. Or you can use it for authenticating a session using the Certificate on your smart card. In the present implementation of SDR, a Smart Card can be used to encrypt the PGP secret key ring. This is done when you quit SDR. If the secret key ring is encrypted using the Smart Card then the user needs to give the Smart Card information to be able to authenticate a session or decrypt a session. This implementation is done because at present the repository information is not available. The whole procedure is defined in Appendix 1 Section 1.2.2.2. Seeing what sessions are on The list of sessions in the Main Window is an alphabetical list of all sessions which have been announced to take place; thus a session may be on at the moment or may have been scheduled to take place some time in the future. In order to see what sessions are on, click on the Daily Listings button at the top of the Main Window. The Daily Listings Window shows sessions on a daily basis, like a TV or radio guide. The Daily Listings Window uses a calendar format (see Figure 2). Dates marked with a blue box are days on which sessions have been scheduled to take place. Click on the date that you are interested in, and the window will expand to include a window showing the sessions for that particular day (see Figure 3). Moving the mouse over the time line or the name of the session will cause it to go red. Clicking on a session, which is showing red, will open a Session Information Window (see Figure 4), giving you more information about that session. Due to a software bug, not all sessions are displayed in the Daily Listings Windows, i.e. there may be sessions, which have been announced, but are not displayed in the Daily Listings Window for the relevant day. This bug does not effect the basic functionality; it will be fixed but has low priority. 4 SDR v.2.5 User Guide Joining a session There are two ways of joining a session: Click on any of the sessions listed in the Main SDR Window (see Figure 1) or in the Daily Listings Window (see Figure 2). This will cause a Session Information Window to be opened (see Figure 4). Check that the session is supposed to be on, and join by clicking the Join button in the bottom left hand corner. This will start up all the tools needed to join the session. The other, and quicker way, of joining a session is by clicking with the middle mouse button (or by clicking both mouse buttons at the same time on a twobutton mouse if using Linux, or by holding the Ctrl-key down on the keyboard while left-clicking on the mouse if using Windows95/NT4.0) on a session name in the Main SDR Window. This will start up the tools without bringing up the Session Information Window. You should now be able to see what sessions are on and join them. For information about how to create your own sessions, how to make quick calls and how to customise the interface, see the SDR User Guide below. 3 SDR User Guide 3.1 Help You can access the help system at any time from the Main SDR Window or from the Create New Session Window. 3.2 Balloon help In the Main Help Window and in the Preferences Window, you can switch balloon help on and off. 3.3 Seeing what sessions are on Main Window The list of sessions in the Main SDR Window is by default a list of all sessions in alphabetical order. By clicking on a session, a Session Information Window for that session opens up displaying details of when the session will take place. It is possible to customise the list in the Main Window to only show preferred sessions (each session can be marked as preferred or not), current sessions, or future sessions. To do that click the Preferences button in the Main Window, and select the appropriate option in the Preferences Window Sessions. This window also presents you with the option of hiding test sessions. 5 SDR v.2.5 User Guide If you select Preferred Sessions, you can choose which sessions to be listed by deselecting the sessions you do not want listed in the list of sessions in the right hand side of the Preferences Window - Sessions. Sessions marked visible will be displayed in the Main Window. You can also select sessions that you do not want listed by clicking on them with the right mouse button in the Main Window. The Interface tab in the Preferences Window allows you to choose to have the sessions listed by type (broadcast, meeting, test) rather than alphabetically. And you can choose not to have the type displayed at all. Greyed out session announcements are sessions, which are not currently running. Daily Listings Window Figure 2 SDR Daily Listings Window The Daily Listings Window (see Figure 2) displays sessions on a daily basis, like a TV guide. Clicking on the Daily Listings button in the Main Window will open the Daily Listings Window. Days displayed in blue and enclosed in a box are days for which sessions have been scheduled. To see the sessions for a particular day, click on the date, and the window expands to show the sessions for that day (see Figure 3). You can open as many days as you like at the same time. You can close the listings for a day by clicking on the Hide <date> button in the top right hand corner of the box displaying the listings for that day. 6 SDR v.2.5 User Guide Figure 3 SDR Daily Listings Window - Showing Sessions on 9th June The lines to the left of the session names indicate when the session will be on. If the line goes all the way across, the session is continuous. If the sessions are shorter lines, the end of the lines indicate what time the session will be on. The session “kre’s wb”, for example has been announced to take place between 3 p.m. to 6 p.m. Even if a session is advertised to take place, this does not guarantee activity. 3.4 Joining a session Joining a session just means starting up the tools used for the session on the right addresses and in the right format. A meeting between research partners in Europe will typically make use of audio, video and a text editor. The one who calls the meeting will announce the session in SDR. Come the time for the meeting, all participants can join the session through SDR which will automatically start up the right tools on the right addresses. Joining a session from the Main Window The easiest way to join a session is by clicking on the session name in the Main Window with the middle mouse button (or by holding both mouse buttons down at the same time on a two-button mouse if using Linux, or by holding the Ctrl-key down on the keyboard while left-clicking on the mouse if using Windows95/NT4.0). This will start up all the tools needed for that session. Joining a session from the Session Information Window Another way of joining a session is through the Session Information Window (see Figure 4), which can be accessed by clicking on a session name in the Main Window or on the session name or timeline in the Daily Listings Window. 7 SDR v.2.5 User Guide In the Session Information Window, click on the Join button. Starting tools individually You can start up the tools individually by clicking on the button corresponding to the tool you want to start up. If only one tool, e.g. audio, is used in the session, you must press Join to start up the audio tool. 3.5 SDR Session Information Window (Normal Interface) Information about which media are used , address formats, etc Name of creator Link to web page When the session will be on Category Conference Title Conference Description Delete the session (Creator only) Authentication Information Encryption information Dismiss the session Starts up the tools used in this sessions Allows you to invite other sdr users to take part in the session Record the session Edit the session information (creator only) Figure 4 SDR Session Information Window 8 SDR v.2.5 User Guide The Session Information Window gives the following information about the session: • The icon in the top left-hand corner will tell the type of session: broadcast, meeting or test. If you click on the icon, it will describe the session type in words. • To the right of the icon is the name of the session followed by type of security and if it is authenticated the type used to authenticate (PGP or X.509); and if it is encrypted, the type used to encrypt (PGP, X.509 or DES) • The box underneath the name contains a short description of the session. • The box underneath the description tells you when the session is going to be on. Sessions can be on just once for a couple of hours, or for a set period of time, and so on. • The Authentication Information button expands the Session Information Window to include a box giving you the authentication Information. It gives the name of the person who signed the session and the date when the signature was created in the case of PGP. In the case of X.509 the Distinguished Name of the user and the certificate issuer who signed the session is shown. • The Encryption Information button expands the Session Information Window to include a box giving you the name of the user for whom decryption was successfully done. • The More Information button is a link to a web page. Depending on the preferences you have set, clicking this button will either start up a web browser or use a web browser already running for displaying the web page. The button will only be there if the person who created the session has provided a link to a webpage. The Preferences – Web Window allows you to choose which web browser to use for viewing the web page. You have a choice of Netscape, Mosaic or SDR’s own built-in browser. Alternatively, you can paste the URL into a web browser of your own choice. • The Contact Details button expands the Session Information Window to include a box giving you the name, telephone number, and email address of the person who created the session (if supplied) (see Figure 6). It also tells you which application or version of SDR was used for creating the session announcement. • Under the Contact Details button, a box giving you more information about the media used in the session is shown (see Figure 6). There will be a line in the box for each tool (audio, video, text and/or whiteboard) to be used in the session. Listed alongside the name of each media will be its format, 9 SDR v.2.5 User Guide the protocol used, the address and port that the media will be started up on and any other options specific to the individual medium. • If the session uses more than one type of media, the name of each of the media will appear on a button. Clicking the button will start up the tool for that medium only. This is useful if you accidentally close down one of the tools during a session, and need to start up that tool again. If there is only one medium in the session, the name will not appear on a button, and you must click the Join button in order to start up the tool. If you chose the normal interface for viewing sessions, these details will initially be hidden, but can be viewed by clicking the Media Details button which will appear instead. • The Join button starts up all the tools for the media used in the session. • The Invite button expands the Session Information Window to contain a box for inviting other SDR users to join the session (See Figure 6). You can invite users even though they are using previous version of SDR. In order to invite other SDR users, you must know their username and the name of the computer, which they are currently using. So in order to invite John Smith with username johnsmith, on his computer called “myhost.example.ac.uk”, you must type in “[email protected]”. Note that this is not the email address of John Smith, but his username followed by the address of the computer on which he is currently working. • There is an address book, to which you can add people that you often invite. Press Browse to browse existing entries in the address book and to add new entries. • When you invite another SDR user, a window will pop up on his or her screen, informing them that they have been invited this particular session – it will provide the information available in the Session Information Window – and ask them to accept or reject the invitation. Subsequently you will get a window popping up on your screen, saying whether your invitation has been accepted or rejected. You can invite as many people as you like to take part in a session. 10 SDR v.2.5 User Guide Figure 5 SDR Session Information Window - Invite box open The session invitation is not encrypted; such encryption will be implemented in a later version of SDR. If you receive an encrypted message you can still invite another user who does not have the encryption key to join the session • In principle, the Record button allows you to record the sessions digitally. This function has been implemented for a specific recorder (MMCR1). Because recording functionality is independent of SDR, the SDR is shipped with its record button not enabled. The release of MMCR includes a protocol to enable the record button. • Dismiss closes the window. • If you have created the session yourself, you will have in addition a Delete button, which will delete the session announcement. The session announcement will disappear immediately from your own screen, but it may take a few minutes before it disappears from the screens of other SDR users. • If you have created the session yourself, you will also have an Edit button, which brings up a window where you can edit the details of the session. The Edit Window is very similar to the Create New Session Window described below (see Figure 7). 1 MMCR (Multicast Multimedia Conference Recorder) is a recording tool for recording and playing back multicast conferences. The tool is being developed at UCL. 11 SDR v.2.5 User Guide Figure 6 SDR Session Information Window - Details Displayed 12 SDR v.2.5 User Guide 3.6 Creating a Session Announcement Figure 7 a SDR Create New Session Window You can create your own session by clicking on the New button in the top lefthand corner of the Main SDR Window. This will bring up a small menu with two options. Choose the Create advertised session option, and you will get the Create New Session Window that you see in Figure 7. This is what you must do: 1) On Figure 7a do the following: • Give the session a name. • Type in a description of the session. • If you would like to provide a link to a web page for further information about the session, type in the URL (an example of an URL is http://www.cs.ucl.ac.uk) in the field provided. You can check if the URL is correct by clicking the Test URL button to the right of the URL field. This will start up a web browser with the URL you have provided. The Test URL button will, in effect, do the same as the More Information button in the Session Information Window, once the session has been created. 2) Click next on Figure 7a, Figure 7b will appear. 13 SDR v.2.5 User Guide Figure 7b • Click on the Test button to select the type of session desired. You will get the choice of Test, Meeting and Broadcast. This is for the information of other users only: no settings will be affected. 3) Click on next on Figure 7b, Figure 7c will appear Figure 7c (normal interface) Next, you should set when the session is going to be on. 14 SDR v.2.5 User Guide Click on the Once button and you will get a menu with the following items: Once, Daily, Weekly, Every Two Weeks (the two greyed out options Monthly by Date and Monday through Friday are not yet available). Select the one appropriate for your session. Next, you select the date when your session is going to be on, or the day of the first session, if it is to be a regular event, by clicking on the up or down arrows next to the from field. You then select the time when the session is due to begin by clicking on the up or down buttons next to the at field. You then select how long you think the session will go on for by clicking on the up or down arrows next to the for field. The minimum is 30 minutes; the maximum is 4 weeks. Finally, if your session is to be repeated, e.g. weekly, you need to select how many weeks it is going to be repeated for. • Note: Your session will only be announced in SDR when you are running SDR yourself, i.e. if you quit SDR, the session disappears from all other people’s SDR until you restart your SDR. 4) Click next on Figure 7c, Figure 7d will appear Figure 7d • Area Reached allows you to specify how far you would like your session to reach. Local Scope will keep your session roughly within your campus or site, Region covers about a continent, and World will make your session available world-wide. Admin scope is a more accurate way of scoping than 15 SDR v.2.5 User Guide using TTL, and should be used whenever possible. Talk to your local network manager about implementing admin scope. 5) Click on next On Figure 7d, Figure 7e will appear Figure 7e • Next, you have to select which media you need for your session. The media available are audio, video, whiteboard and text. The corresponding software tools could be RAT, VIC, WB and NTE (WB is not available for Windows95/NT4.0. A WB clone, WBD, which is compatible with WB, but has less functionality and is less stable, is available for Windows95/NT4.0). By default audio is selected. You can select or deselect the media by clicking on the buttons to the left with a cross or a tick on them. When a tool has been selected, the field with the name of the medium becomes a button. Clicking this button will give you a list of options applicable to that specific medium. These are: Audio Receive-Only Mode: Use this when creating a session of the type broadcast. Packet size: You can chose between 20ms, 40 ms, or 80ms. There is generally no need to alter this. Video There are no options for video. Whiteboard You can select the orientation of the WB: Portrait, Landscape, and Upside- 16 SDR v.2.5 User Guide down Landscape, depending on what you want to use the whiteboard for. Sometimes imported postscript images will appear upside-down in the whiteboard, and the Upside-down Landscape mode is needed in order to see the images the right way round. The whiteboard normally starts up in receive-only mode. In order to have it start up in a mode where you can write as well, you need to select the Send/Receive Mode. Text There are no options for text. For each medium, you can select the format (not all the tools have format which can be set): Audio The formats available are: PCM, DVI, GSM, LPC and Redundancy. If all participants in the session are using the audio tool RAT (as opposed to the audio tool VAT), you should select Redundancy. If some of the participants are using the audio tool VAT, you should select DVI. Video The formats for video are: H.261, nv, M-JPEG and Cell B. SDR will automatically allocate addresses and port numbers to the media 6) Click next on Figure 7e, Figure 7f will appear Figure 7f 17 SDR v.2.5 User Guide You need to provide contact detail for the session. 7) Click on next On Figure 7f, Figure 7g will appear Figure 7g • Authentication: you can choose the type of authentication by clicking on the authentication button and choosing one of the following options: “none”, PGP, X509, PGP+CERT, X509+CERT. Note: To use X509 you should set X509STATE (see Appendix 2) None The session is a plain session, not authenticated. PGP/PGP+CERT List the secret keys available for authentication, Click on the key which you want to use for the digital signature and provide the password in the lower window. If you choose PGP+CERT then the Certificate is also sent. If you have encrypted your secretkey ring using the smart card then secring.pgp exists in your SDR home directory. Then choosing the PGP option will open a window requesting the Smart Card location and password. For more detail on Smart Card see Appendix 1 Section 1.2.3. 18 SDR v.2.5 User Guide X509/X509+CERT A window will be opened requesting the PSE location and the PSE password. Set up your PSE or MPSE (see Appendix 1 Section 1.2.2.3 how to create MPSE) and password and click on OK. In the case of PSE, this will display the owner of the PSE’s distinguished name. In the case of MPSE the distinguished name of all of the certificates in your MPSE are displayed. In this case select the user who you would like to sign. If your certificate is stored on Smart card then give the location of Smart Card and the password. For more detail of using Smart Card see Appendix 1 Section 1.2.3. Figure 8 X509 configuration Window • Encryption: you can encrypt your announcement by clicking on the encryption and choose between the following options: “none”, PGP, DES, X509. None Results in a non-encrypted plain session. PGP Lists the Public Keys available for Encryption, click on the user you want to send the encrypted session to. The session is always encrypted also with the most recent key created on your Secret Key Ring. This is so you are able to decrypt the announcement you have sent. X509 If this is the first time you are using X509, the window in Figure 8 appears-; otherwise a list of Distinguished Names (DN) of those users for which you have the Public Key will appear. Choose the user to whom you want to send the encrypted session. The session is always encrypted for you and the chosen user. In your SDR home directory, a file pks-als.txt exists which includes the list of all DNs for which you have the public key in PKList. If you receive a certificate, and add this to your PSE manually, then you should also add the DN to this file. This is done automatically when you receive an authenticated session - the 19 SDR v.2.5 User Guide public key is added to your PSE/MPSE and the DN of the sender is added to pks-als.txt. Note: To use X509 you should set X509STATE on (see Appendix 2) Figure 9 DES Password Window DES If you have not entered your passphrase in the SDR main window, Figure 20, then the window in Figure 9 will appear requesting the passphrase to decrypt the keys, clicking on OK will list the available DES Keys. If you have already entered the pass-phrase in Figure 20 when you started SDR, the list of keys will appear that has been created using the Pref./Security window. Click on the key that you want to use to send a symmetric encryption session. 8) Click next on Figure 7g, Figure 7h will appear Figure 7h 20 SDR v.2.5 User Guide Press Accept and this will set and send your session. You can amend the information by using Back buttons. Cancel will abort and lose any information you have entered 3.7 Making a Quick Call Figure 10 SDR Quick Call Window Setting up a quick call is very similar to creating a new session. The main difference is that the session will only be announced to people whom you invite. If they accept the invitation, the session will appear in both yours and their Main SDR Windows under Private Sessions (see Figure 20). At present you can not authenticate and encrypt session invitation this is planned to be implemented in later stage. The following procedure must be followed: • You must give the session a name. • You can select the Expected Duration of the session by clicking on the 5 mins button, which will then give you a list to choose from. This will not affect the session. Selecting an expected duration is only to inform the people you invite of how long they can expect the quick call to last. • You can select the Purpose of the session by clicking on the Group Chat button, which will again give you a list to choose from: Group Chat, Small Meeting and Large Meeting. Again, this is only to inform the people you are going to invite of your intent for the session. • Area Reached allows you to specify how far you would like your session to reach. Local Scope will keep your session roughly within your campus or site, Region covers approximately a continent and World will make your session world-wide. • Next, you have to select which media you need for your quick call. The media available are audio, video, whiteboard and text. The corresponding software tools could be RAT, VIC, WB (not available for Windows95/NT4.0) and NTE. By default audio is selected. You can select or deselect the media by clicking on the buttons on the left with a cross or a tick on them. When a media has been selected, the field with the name 21 SDR v.2.5 User Guide of the medium becomes a button. Clicking the button will give you a list of options applicable to that specific medium. These are the same as for setting up sessions: Audio Receive-Only Mode: Use this when creating a session of the type broadcast. Packet size: You can chose between 20ms, 40 ms, or 80ms. You generally do not need to alter this. Video There are no options for video. Whiteboard You can select the orientation of the WB: Portrait, Landscape, and Upsidedown Landscape, depending on what you want to use the whiteboard for. Sometimes imported postscript images will appear upside-down in the whiteboard, and the Upside-down Landscape mode is needed in order to see the images the right way round. The whiteboard normally starts up in receive-only mode. In order to have it start up in a mode where you can write as well, you need to select the Send/Receive Mode. Text There are no options for text. For each medium, you can select the format (where applicable): Audio The formats available are: PCM, DVI, GSM, LPC and Redundancy. If all participants in the session are using the audio tool RAT (as opposed to VAT), you should select Redundancy. If some of the participants are using the audio tool VAT, you should select DVI. Video The formats for video are: H.261, nv, M-JPEG and Cell B. (Please note that the H.261 used by VIC is called intra-H.261 and is not a complete implementation of H.261) Whiteboard There is only one format for whiteboard. 22 SDR v.2.5 User Guide Text There is only one format for text. SDR will automatically allocate addresses and port numbers to the media. • As opposed to “creating” a session, you invite people for a quick call. A quick call can be thought of in the same terms as a phone call - you do not announce a phone call beforehand. It is less formalised than a preannounced session. The Invite button expands the Session Information Window to contain a box for inviting other SDR users to join the quick call (See Figure 5). In order to invite other SDR users, you must know their username and the name of the computer, which they are currently using. So in order to invite John Smith with username johnsmith, on his computer called “myhost.example.ac.uk”, you must type in “[email protected]”. Note that this is not the email address of John Smith, but his username followed by the address of the computer he is currently working on. There is an address book, to which you can add people that you often invite. Press Browse to browse existing entries in the address book and to add new entries. When you invite another SDR user, a window will pop up on their screen, telling them that you have invited them for this particular session – it will provide the information in the Session Information Window – and ask them to accept or reject the invitation. Subsequently you will get a window popping up on your screen, saying whether your guest has accepted or declined your invitation. You can invite as many people as you like to take part in a quick call. As soon as someone accepts an invitation, the quick call will be announced on both their and your own Main SDR Window under Private Sessions (see Figure 11) 23 SDR v.2.5 User Guide Figure 11 SDR Main Window - Showing Private Sessions 3.8 SDR Preferences Window In this section, we shall go through all the options that SDR offers. Press Cancel to undo any changes that you may have made in the Preferences Window since you last pressed Save Preferences or Save & Apply Preferences. Press Apply Preferences to accept the changes you have made in the Preferences Window. The changes will only apply for this particular SDR session. Next time you start up SDR, the preferences will be as before. Press Save & Apply Preferences to accept the changes you have made. These changes will apply for all uses of SDR until the preferences are changed again. 3.8.1 SDR Preferences Window – Sessions It is possible to customise the list in the Main Window to show only preferred sessions (each session can be marked as preferred or not), current sessions, and future sessions. To achieve this click the Preferences button in the Main Window, and select the appropriate option in the Preferences Window Sessions (see Figure 12). This window also allows you to hide test sessions. If you select Preferred sessions, you can choose which sessions are to be listed by “hiding” the sessions you do not want listed in the list of sessions in the right-hand side of the Preferences Window - Sessions. Sessions marked 24 SDR v.2.5 User Guide visible will be displayed in the Main SDR Window. You can also hide sessions by clicking on them with the right mouse button in the Main SDR Window. The Interface tab in the Preferences Window allows you to choose to have the sessions listed by type (broadcast, meeting, test) rather than alphabetically. And you can choose not to have the type displayed at all. Figure 12 SDR Preferences Window - Sessions 3.8.2 SDR Preferences Window – Interface You can select normal or technical interfaces for creating and viewing sessions in the SDR Preferences Window - Interface (see Figure 13). The technical interface for creating sessions gives you more options in the Create New Session Window, and the technical interface for viewing sessions displays media details as default as opposed to having to press the Media Details button to display them. Long and short labels apply to button names. If you chose short labels, the Main SDR Window will be smaller, thus taking up less space on the screen. This might be desirable if you have SDR running all the time. Session Listing refers to the list of sessions in the Main SDR Window. By default they are listed alphabetically. If you select List by Session Type, type or category will list sessions. All meetings will be listed together, all broadcasts will be listed together and all test sessions will be listed together. By deselecting the Show session type, you can choose not to have the icons showing the session type displayed. 25 SDR v.2.5 User Guide Figure 13 SDR Preferences Window - Interface 3.8.3 SDR Preferences Window – Tools There are two audio tools, which are normally used for multicasting audio on the Internet, RAT and VAT. When you join a session which makes use of audio you will get a small window asking you if you want to use RAT or VAT. You can make either RAT or VAT your default audio tool by deselecting VAT or RAT respectively. You can deselect a tool by clicking on all the boxes containing the word RAT or VAT in the SDR Preferences Window - Tools (Figure 14). The video tool NV has been disabled in the same way in Figure 14. Figure 14 SDR Preferences Window - Tools 26 SDR v.2.5 User Guide 3.8.4 SDR Preferences Window – Web Whenever a link to a web page is supplied for a session, there is a More Information button in the Session Information Window. You can decide which web browser to use for reading the web page by selecting the appropriate option in the SDR Preferences Window - Web (see Figure 15): • Select Use web browser already running if either Mosaic or Netscape is already running and you would like to use it for displaying web pages. • Select Start web browser if you want to use Mosaic or Netscape and if you want SDR to start up the web browser automatically when required. • Select the third option if you would like to use SDR’s built in web browser. If need be, you can enter a proxy. A proxy is a computer used as a web cache. You should ask your local systems administrator for your local proxy. • If you want to use another web browser altogether, you can select Add URL to Clipboard and subsequently paste the contents into a web browser of your choice. Figure 15 SDR Preferences Window - Web 3.8.5 SDR Preferences Window – You You can enter your name, email address and telephone number in the SDR Preferences Window - You (see Figure 16). These are the default values used by SDR when creating a session. You can also provide a SIP alias. A SIP alias is just another name that other participants can use when inviting you to join a session or a quick call. If you do not provide a SIP Alias, they have to use your username, which might be 27 SDR v.2.5 User Guide something unwieldy such as “ucacimt”. If you provide a SIP Alias, they can use that (although the hostname still has to be added to the Alias). The SIP Server URL functionality has not been implemented yet. When it is, you will be able to enter the name of a local machine which listens to SIP requests in order to forward them to another location. This means that you do not have to know on which machine the person you want to invite is currently working. Figure 16 SDR Preferences Window – You 3.8.6 SDR Preferences Window – Security In order to encrypt your session using DES you need to generate DES keys. The following section shows how to generate DES keys. 28 SDR v.2.5 User Guide 3.8.6.1 Generating DES Key Figure 17 SDR Preferences Window – Security Click on the Add encryption group button and the window in Figure 18 will appear Figure 18 SDR Creating DES Encryption Key Window Fill in the information and then Click OK: If you have not set a passphrase then the window in Figure 19 will appear. After setting up the passphrase for decrypting your key files and looking at Decrypted sessions, the group name will appear in the window in Figure 17. 29 SDR v.2.5 User Guide Figure 19 Passphrase used to decrypt the key file and DES encrypted Sessions Figure 20 shows the main window that appears after the passphrase has been set, next time you start SDR. You need to type the passphrase to view DES encrypted sessions. Figure 20 SDR v2.5 Main Window 30 SDR v.2.5 User Guide 3.8.6.2 Receiving Encrypted /Authenticated sessio ns Authenticated Sessions: PGP If you have the Public Key of the user who signed the payload then the Authentication is a success if not the authentication fails. Figure 21 Adding PGP Public Key PGP/CERT if you have the Public Key of the user who signed the payload and the signature is verified, then the Authentication is a Success; Otherwise the Certificate received is used to check the signature. After checking the authentication using the received public key, Figure 21 will appear. Clicking Yes will add the received Certificate the Public Key ring. This key can be used subsequently as an untrusted key for checking authenticated sessions and sending encrypted session. X509 If you have not already configured SDR with X509 information then the window in Figure 8 will appear allowing you to enter the PSE/MPSE location and the passphrase. Then if your PSE has the public key of the sender and the signature is verified, the authentication will be a success, otherwise it fails. Note1: To use X509 set X509STATE on (see Appendix2). Note2: there is a bug in Secude software which means that you always have to send the certificate with the signed data. Consequently X509 always sends the certificate and selecting X509+CERT sends the whole certification path up to the root certificate. X509+CERT If the certificate is sent and you do not have the Public key in your PSE/MPSE PKList, then the public key is added to PKList and the DN is added to the pks-als.txt file. In the case of MPSE the public key is added to MPSE.1, i.e. your first PSE in MPSE. Thus subsequent authenticated sessions from the same user will be a success if the signature is verified. Encrypted Sessions PGP This requires the private keys to decrypt the message, If you do not have the private key or wrong passphrase then the decryption fails and you do not see the session. If you have 31 SDR v.2.5 User Guide the private key for the public key that is used to encrypt the session, then it will ask you for the password to use your PGP Private Key. The window in Figure 22 will appear. Figure 22 PGP Password Window Entering the password and Clicking OK will display the decrypted session in the lower window of Figure 20: If you are using the same passphrase for all your secret keys (see appendix 1 section 1.2.1.1) then choose “Same pass”. If your secret key ring is encrypted then a window appears requesting the location of Smart Card and password to decrypt the secret ring file. For more detail see Appendix 1 Section 1.2.3. X509 If this is the first time you are using X509 then the window in Figure 8 will appear. Otherwise it will use the secret key from your PSE/ MPSE and decrypt the session. If the session is encrypted with a Public key found in PSE/MPSE, then the decryption is a success. Otherwise it fails and you do not see anything. Note: To use X509 set X509STATE on (see Appendix 2) DES If you have the key which is used to encrypt the session in your key file then the decryption is a success otherwise it fails and you do not see anything 3.8.6.3 Viewing an authenticated and encrypted se ssion The Main SDR Window contains a list of sessions, authenticated and unauthenticated sessions in the top upper frame and encrypted sessions in the lower Frame of the window in Figure 20, These sessions are either on now or have been announced to take place sometime in the future. An icon, telling you which type of session it is precedes each session: Is a broadcast, i.e. the session is not interactive. New users may join the session but they may not participate, i.e. actively send audio and/or video. Is a meeting, i.e. an interactive session. 32 SDR v.2.5 User Guide Is a test session. The sessions can be viewed by clicking on the required session in Figure 20. If the session is authenticated and/or encrypted then there will be an Authentication Info button and an Encryption Info button as shown in the window in Figure 4 and the icons will be the inverse of the above icons. The foreground and background colours on the top of the window in Figure 20 frame have meaning. For example it the colour is green then the authentication was successful; if it is blue then there was no authentication; if it is pink then the authentication failed. The colour of text in the top frame of the window in Figure 20 shows the encryption status. If it is red then the encryption was a success. The text shows the type and status of encryption and authentication with the session name. In Figure 4 the Encryption was PGP and a success and the authentication was PGP and trustworthy (The public key was found in the public key ring file). If it uses the certificate, which was sent by the session then the status is integrity. Clicking on the Encryption Information button will open the encryption information frame, which will display the information on the key used for decryption. Clicking on the Authentication button opens the authentication Information. If you created a session yourself, then you will be able to delete or edit the session as shown in Figure 4. 3.8.6.4 Generating and Receiving keys Before you generate keys you need to get an e-mail system which has the capability of sending information securely; for example Exmh can send encrypted and authenticated text body part using PGP. Eudora can send PGP and S-MIME authenticated and encrypted messages. Next you need to establish a group membership, possibly with an e-mail list. Section 3.8.6.5 describes how to generate DES, X509 and PGP keys and how to use your chosen mail system to send it to the group members. Section 3.8.6.6 will show you how to store keys to be used by SDR. 3.8.6.5 Generating Group keys You can generate group keys (PGP, X509 or DES) by clicking on the “Help” button on the top frame of the Main SDR Window in Figure 20. This will bring up a small menu with two options. Choose the key setup option, and you will get the key generation Window that you see in Figure 23. 33 SDR v.2.5 User Guide Figure 23 Key Generation (PGP, X509, DES) window The following describes clicking on each button for generating required Key. Make DES Key Clicking on this button causes the window in Figure 24 to appear. Fill in the required information and Click OK. This will create a file called deskeyfile in your SDR home directory, which has the Encryption group and the Encryption key information. Figure 24 Generating DES Key After Clicking on OK the window in Figure 25 will appear, you can use any mail system that can send the information securely and include the file deskeyfile to send to the group. Figure 25 Mail Agent name window 34 SDR v.2.5 User Guide E.g. if you use the Exmh mail system with PGP then you have: Figure 26 Comp Exmh window for sending DES Make X509 Key Clicking on Make X509 Key button the window in Figure 27 will appear. Fill in the required information and Click OK. This will create a file called x509keyfile in your SDR home directory, which has a uuencoded file containing the created PSE and the password as shown in Figure 28. This file can be included in your mail agent to be sent to the required group. Note: You need to set X509STATE (see Appendix 2) Figure 27 X509 Key Generation Info 35 SDR v.2.5 User Guide Figure 28 Using Mail Agent to send x509keyfile Make PGP Key Clicking on Make PGP Key the window in Figure 29 will appear. Follow the instruction on Figure 29. You need to type the RSA password, which was used in Figure 29 again in Figure 30. This will create a file called pgpkeyfile in your SDR home directory, which includes the password, Public key and Private Key as shown in Figure 31. At present implementation this only works on Solaris; on a PC you need to do it manually using pgp –kg and follow the instruction displayed on your terminal. When the keys are created you need to add the secret key and the public key and the password to your E-mail message and send it. 36 SDR v.2.5 User Guide Figure 29 PGP Key generation Window Figure 30 Password for PGP RSA private key 37 SDR v.2.5 User Guide Figure 31 Using Mail system to send pgpkeyfile 3.8.6.6 Receiving and storing Key information When you receive key information through e-mail then you should set up SDR according to the keys you have received. The following keys can be sent using SDR DES The text part of your message contains the group name and the Encryption Key. To store this information on SDR click on Prefs button in the Main SDR Window, select the Security tab and the window Figure 17 will appear. Click on Add encryption group button and the window in Figure 18 will appear. Fill in the information with your received group name and Encryption key and then 38 SDR v.2.5 User Guide Click OK. The key is added to your SDR and can be used for encrypting and decrypting DES sessions. PGP In this case the text body part of your E-mail contains the password (to be used with the secret key), the public key and the secret key. Edit the text part and save the publickey and secretkey in two different files (From Begin to End). To add the key files content to your public or secret key ring: pgp –ka keyfile [keyring] Now this key can be used for authentication and encryption when using PGP. If you are using the same password for all your sdr session group keys then change the RSA password to be the same for all your received secret key. This is done with: pgp –ke userid This is described in Appendix 1. X509 In this case where the text part of your E-mail contains the password (To be used for RSA secret key) and uuencoded PSE file. Edit the file and save the UUencoded part of the body in a file. Use uudecode to get the PSE. You can add this to your MPSE as described in Appendix 1 or use it on its own to decrypt and authenticate a session. 3.8.6.7 Ending SDR You can end your SDR by clicking on the Quit button in the top right hand corner of the main SDR window of Figure 20. If X509STATE is set (see Appendix 2), then the window in Figure 32 will appear. Click YES and the window in Figure 33 will appear. Clicking OK the window in Figure 34 will appear. After filling the required information the secret ring file (secring.pgp) will be encrypted using the Smart Card and a file secring.enc will be created in SDR home directory and the secring.pgp will be deleted. Clicking NO will end SDR without changing anything. Figure 32 Using SMART CARD 39 SDR v.2.5 User Guide Figure 33 Checking Smart Card Figure 34 Smart Card Configuration Information 4 Known Bugs Not all announced sessions are displayed in the Calendar/Daily Listings Window. You cannot use x509 and Smart Card at the same time on Solaris. 40 SDR v.2.5 User Guide Glossary Bandwidth ! "!#$&%#'! )(') *( ,+-*.!#+-)!#)*+-%0/214356,!#')! 7 × 89:9;9=< ! 5> +7@?2A < 5>B/ CIF C -'DE(>F4 )G?2H! IJ! )(,$!#(>K!#;JL!#!#7 MON;P 3 PRQOQ 5>! 3%# Codec CTS > UBVW1 C *X/ C 7YZ>)>% (!#()>%#[!#(>! %\!#(%# >)']^D C _Y" @/ C`S V@1 C > *&+77YZ! )(*)>%#( >>!#.>)'Y!#*.H a!#+7 57)),+-> 5>+J! Y"% bT >!#(>! J>%\!#(>)>%#[ < -;>YcK[Id ef),+-*Y"Z!#( >!#(>! J>%\!#(>)>%# < +7egJ>)>%#(>.!#(%#))K +7! YXhi7 .>>!#j < 5>%#"b"RJ ('5*ek *jY-!# !#>(*!#5>%#"b"*l)+7 -*>/ DES V@)1:)+7Zb"5"!#'mn> DVI @>!#)+7>!#)(&> o/ Framegrabber pY!#+7j)!#+7'+75) [Y!#>L& >.L"!#K& *a >)>%#(>_Y!# +7q/ Frames per second (fps) r2)& >K )K&*sY!#>7!#.>(_ !#!#*>?2L !#'H L 5>*+-*)tuH5vw/wr2)L)!#(>sx)L& >. )y?nJ < [&c [!#'6! !#7'7RJ_Y!#*!#.>(q/ M 9 H5!#J&> +7>Zb$H;&%#%\[!#`Y!#*y/nr\)q?2&>+77.!#+7"!# +7%#> .>+75> < %#R ! I!#)(%#>z(>K < *sY-!# & >.*+-*)+7 % b/w{p! x'+75 !#'_JJ* !#(>)>%45> +7!#(%#(> ! x)B?kY!#*|}+77)H6)+7! )(~r < [&d7 P | 8J9 ek!#%# < ! 5>+77)tXA < 5>v7!#5> H+J% b+7+75) < %#q/ Gamma correction }> @; f fc;:4I ;@ ;c:::4I ;@2 I:Gx 6 c4"2Oc fR0s"; f; I: xy c::G4JO2 x 2 H¡ c f ¢x:R:2;k2Oc:4 ¢:J 41 SDR v.2.5 User Guide :G£ c:;n¤k¢ ;q2kc I: o2kH¡: :4ZOG¥;: f¥;Z Iy¦*R: : s ¥2HyH p;c¦>¦§=:: sRk:G£ c:;\k2H;@ I:Gx 6: X:cOZ: GR 6y¤c¢ ;GXy¨q f fR:0R4 : "k;n£ R\c;:4I cW¤c¢ ;I k:c; fgHc4f;:¥ : ©x ªncc ¥:4 «¬ ¦L ;cf ¤4HO4 yHcfc;:4 :cks :H4@:® ¯J°±²³^´4µ^¶ w·R±²³ ¸O f c¹ µ^: ;I I:Gx 6@2\c\:::k;\¥ cfcO ¡;:RO;c ¯J ;c :;:4R¤; -ªcfc f "º RgXcO:; Hcf 2µ^:4O f o}cgkZ:c ºwc:f¶ ¡:fc;Hc&6¹X GSM @>!#)+7>!#)(&> o/ H.261 D r\»_Y!#>7)+7>!#)(&)> o/ IP address DE¼_tXD½ >¼ [x+7%#v7> *> )!#¾>. !#+7%\!#*RJ!#H!# H+7$)[Hd ek)&>+75>RX/wr¢)DE¼_>> !#!# +7&6+-!#('$)7lx)+7-&6+)!#5>!#x|0|I5>! > )c)> % !#5>ZIb/ JPEG ]^!#>7)+7>!#)(&> H&!#%#%4!#(>G/2D )>)!#(> +75> !#' )¿;! +-*.5>R < b$>! ! (%#!#)( À)+7>Zb ÁÂ!# "!#*?2*)+7K+7!#> 7% &b*/kVW*+-*!#( 5>+7> < _ >7H(>! )&>!#>(L¾>%#! Ib/ Kilobits per second (Kbps) r2)A < 5 )K < % [5>Z!#+-!#5>>[_J >+7e¡[Ã+7 >))'!#)'!# ! (> !#)(!#*>/2F\ Y-< !#*+-*&6< )+7!#(o?wKA < 5*%#) < . >!# < Y 8 P;Q A < 5>B?2%#!#(5>!#x|zJ*|}5>! +-7&6)+7L,Ä+7%\@ Å@[Id eftir r2ÄÆ 8wÇ vn/2mkÂrwr\Ä/ Lecture mode @'5)!#!#)!#_H-7|0d)b` !#!#l)!#+7'!#)+76>J >%#)b$lx)L%#"b"Rs>!#! '* c!#)!#!#u_%# >)J,!#lJK[Id eO/wr¢% (c.5>%#)bR!#*%#"b"o?wK !#_ !#[ [ ! >%#*¤5>+7ek[B/ Loss Rate r2)5> +7-;(5>+7ek[!#) )J!#*_%#&>> !#)('J >)!#!#/ 42 SDR v.2.5 User Guide LPC @>!#)+7>!#)(&> o/2Ä! )>¼6>!#+J! Y- C *X?4È=A < 5 G/ Mbone r2)% !#+->&>+75> < %# < +7e < )Rx)D#6)[4/2D >+7 7% b +7!#&[&d ef7R)%#%#!#ek! (!#%#>)>% J!#+7>¤ +7>5 < %#. < |}[Id ek> )É'* %#@/ Multicasting ÊL% !#+->&J!#(!#)>!#)(,>!#q?wY!#>7[+y/4lx)D#6)>! Ëd)b d!#+-$ J"b < )b'K!#!#;z*¤!#$ +7! Y! )(_ !#& )!#-? Ì7Í"Î 6+7! Y"! 4? R7)% b$5>75>%#Âd Í"ÏXÐ ! 6¤ d!#%#%\ +7! Y! ¢/r2)!#)e^! >> < < ! (! < [Hd7_!#+->&>tu%#!#ek& %#*5+7>%#%#| < [&d7lH'_x%#5% b"v7>) < >+7>¤ t r ]Ñ|)!#()>%#> .;J_b"Òd[cb"`'*)É')+7' [vw/ Multicast address @> *H% !#+7&©+7)Hz*)+7!#)()%# < ! l >)(> POP2Ó / P / 9 / 9 | P:P2Ó / P / P;N:N / P;N:N Å@[qÔkÊK% !#+7&>>> *¤ < >( *5*'! '>"Y-+-L .% !#+7&>!#*>?2! x)c ('7|I!#%\5)>!#(* !#)(,mkVW~*/ Network congestion p+7)>! !#'! '>'D#¼$[I$ egd Â;*R H!#+K!#;Õ0+J* !#;jx)L)[H'* e¡!#[L( *"*Hsx) Rx [)%#>)K 5>>+-ekJ* >!#+7> o/ NTE Å@[Id egr\3\>1:! NTSC Å@)!#)>%r2%#Y!#!#'mn)> C >q/wr¢jx%#Y!#!#_*)+7>!#(* !#l»q/½m:/½Ë/ PAL ¼@% "KÄ¢!#q/wr\_% [Y!#!#$-+7!#(!#$1R *5q/ PCM 43 SDR v.2.5 User Guide @>!#)+7>!#)(&> o/¢¼%# C >Ê'>%#"!#?2Ö Q A < 5> Q | < ! |I%#"Ã*)+7> Q A×)Ø/ µ Port p»V@¼_tX»*V@)J>(> Ù¼ [+7%#v7 < )!#¾>__ < >+7>¤*J!#?2>))%# < Y N 9;9:9 / Å@[qÔnr\5*Z*) < *& < .>(>z*5*_!#'>"Y-)+7q?4! ($>!#%45-;>!#(!#)(mkV@~*/ Protocol p>&> J"([Y*zl_ )&7!#& )!#- <&b"[¤Id7G/w_r\+7 >5>R+7 [ Y *G?w;.[+7Id5> eRcY !#) x%#[+7'7)>)!#+7)J!#7 +7)!#+7)!#)%#!#e¡&>H%#%#>.5>< [x+7%0/ QCIF Ú >ZJ* C K'DE.>(F\ "d! '!#7)!#7)* 8 Ö Ç 3 8 ÓRÓ 5>! 3%#B/ PGP ¼ }IbjÛ$¼ ! Y>+b RAT ~ < &>@>!#jr2% Receive-only p+7)>! !#Ëd x%\!# +)! Y-K!#) * .)!#>? < R +7>)[) >).! 4/ Redundant audio encoding +7))!#¾>Â5> [+(>!#¤5>+7ek[>%#*[)6+7)o?2% [ <>.)5>)6'!#+7)l!#Y"( 5!#*>'+7ek-[R>x)_J "! (4!#?d%¢)'+7! >(!#)%#L(5!#>5>+7!#ek([(b| < +7%#ek&4,?w x *>Y !#-'!#*5%#)b" < +7ef!#)&J*7!#%#)+7©/ RSA p5*5%#>5> < %#!#+Kek[b)+7Zb"5"!#'>% ( ! Ù[Y"%#*5 < bjÊLD r 5> H~'~! Y"&¢?kW>!\mk)>.!#X?k)%#7'@>%# RTP 44 SDR v.2.5 User Guide ~*%#|zr\!#¼6[+7%4!#*'>55>%#!#+7"!#'% [Y"%\5 J*+-*%x))>5> [Y!# *%#|z!#K55>Z>H.% !#>!#+7)!#+7"!#*/ SCIF mk5> C 7'D½>(LF4 ))d! '>!#7)!#)7Ö 9 Ó 3 N Ö Ç 5! 3%#G/ SDR ÊL% !#+->&>mk!#*'VW!# *+OZbT%0/ Silence suppression mk!#%#*)+75>5 *!#'!#!#'5>+7ek[Y"!#+7.&b"¤[6+7_) *RJ5>R < >))'!#)''>!#&b"¤ < b[3:5>% ! !#(.7|}7H " 57+7¿ N 9;Ü "Y! )(>> 5! < %#q/ TTL rwr\Ä@&J>)>Hs!#_.%#! Y"q?k[ ! )Ã&>% !#+7& 5>>+-ek>(>+7l )Y%\[Y"c)DE* [4/wr\K&J>)>> Y>%#> qÔ 8nÇ Ý mk! Ó Ö Ý »7A Ç M Ý 1: 5> 8 P Ö=|R{p %# Unicasting Þ ßà)á#â7ã>ä¤åâ-æ*à)à)ç*âOåá#æà$á#äãè>æá#à;å)åæè>æá#àå*â7æààçâåá#æ-à'é>ç[åHê'ç7çà p åIêdæäè>çâ7á#ë&á#âLìãâ7í)á#àç*äBî VAT ï^á#äßã>ð4Þ@ß)ñ>á#æ_ò\ææ*ð WB óôí)á åçé>æãõ ñ 45 SDR v.2.5 User Guide Appendix 1 Security Technology Here we provide a brief introduction to some security mechanisms used in our implementation of SDR. 1.1 Symmetric Encryption Symmetric cryptography uses the same key to encrypt and decrypt data. Symmetric encryption is quite fast and is generally used when encrypting large amounts of data. However, it does not work well in situations where an individual would exchange encrypted data with more than a few people. The problem is finding a secure and convenient way to exchange secret keys with all of the parties with whom one might communicate. For this reason, this type of cryptography, by itself, is not practical for a typical internet application. The following are two of the more popular symmetric algorithms, which are used in the above package - or, in the case of Triple DES, might be so used in the future. 1.1.1 DES The Data Encryption Standard, developed in the 1970s by IBM, is now widely used around the word. DES uses a 56-bit key 1.1.2 Triple DES Triple DES is a variant of the DES algorithm that involves encrypting every session three times with the DES algorithm. Triple-DES has been shown to be significantly stronger than single DES. It is normally used with two different DES Keys, and then has an effective key length of 112 bits. 1.2 Public Key Cryptography Public Key Cryptography (PKC) solves many of the data exchange problems of symmetric key cryptography. Public key cryptography uses a pair of keys that are related mathematically. One of the keys is made available to the public, and the other is kept private. Messages that are encrypted with the public key can only be decrypted with the private key; hence this mechanism is asymmetric. Public key cryptography also provides the ability to digitally sign a message. A digital signature electronically verifies the identity of a data sender and the integrity of the data itself. Two popular software packages, which are based on PKC, are PGP and Secude 1.2.1 PGP 2.6 Pretty Good Privacy (tm) (PGP), from Network Associates, is a high security cryptographic software application for MSDOS, Unix, VAX/VMS, and other computers. PGP allows people to exchange files or messages with privacy, authentication, and convenience. PGP is based on public key cryptography. PGP combines the convenience of the Rivest-Shamir-Adleman (RSA) public 46 SDR v.2.5 User Guide key cryptosystem with the speed of symmetric cryptography. It uses message digests for digital signatures, data compression before encryption, good ergonomic design, and sophisticated key management. PGP uses "message digests" to form signatures. A message digest is a 128-bit cryptographically strong one-way hash function of the message. It is somewhat analogous to a "checksum" or CRC error checking code, in that it compactly "represents" the message and is used to detect changes in the message. Unlike a CRC, however, it is computationally infeasible for an attacker to devise a substitute message that would produce an identical message digest. The message digest is encrypted by the private key to form a signature. Documents are signed by prefixing them with signature certificates, which contain the key ID of the key that was used to sign it, a private-key-signed message digest of the document, and a timestamp of when the signature was made. The receiver uses the key ID to look up the sender’s public key to check the signature. The receiver's software automatically looks up the sender's public key and user ID in the receiver's public key ring. The key ID of the public key used to encrypt them prefixes encrypted files. The receiver uses this key ID message prefix to look up the private key needed to decrypt the message. The receiver's software automatically looks up the necessary private decryption key in the receiver's private key ring. 1.2.1.1 Changing PGP password The window in Figure 22 will appear every time to receive an encrypted session encrypted using PGP. Typing the password will save it for duration of sdr. But you can choose to have the same password for all your PGP group secret key. In this case when the window in Figure 22 appears for the first time, choosing the “Same Password”. And type in the password, which you are using for your sdr pgp session. When you receive pgp key then make sure that you change the password. This can be done using pgp –ke. E.g. suppose you receive group1 secrte key with password group1 and group2 with password group2 then after adding the secret key to your key ring change the passphrase for both group1 and group2 to be the same say sdrpgppass. > pgp -ke Pretty Good Privacy(tm) 2.6.3i - Public-key encryption for the masses. (c) 1990-96 Philip Zimmermann, Phil's Pretty Good Software. 1996-01-18 International version - not for use in the USA. Does not use RSAREF. Current time: 1998/08/05 13:43 GMT A user ID is required to select the key you want to edit. Enter the key's user ID: group1 Editing userid "group1" in key ring: '/cs/research/poda/violet/gmontass/.pgp/pubring.pgp'. Key for user ID: testgroup1 47 SDR v.2.5 User Guide 512-bit key, key ID D35A2CB1, created 1998/06/25 You need a pass phrase to unlock your RSA secret key. Key for user ID: testgroup1 512-bit key, key ID D35A2CB1, created 1998/06/25 Enter pass phrase: Pass phrase is good. Current user ID: testgroup1 Do you want to add a new user ID (y/N)? n Do you want to change your pass phrase (y/N)? y Enter pass phrase: Enter same pass phrase again: Secret key ring updated... 1.2.2 Secude There are many security toolkits. Our implementation of SDRv2.5 uses Secude, so we give a brief overview of its facilities. The Secude development kit is a library that offers well-known and established symmetric and asymmetric cryptography for popular hardware and operating system platforms. The development kit consists of a set of functions which allows the incorporation of security in practically any application (e.g. client/server, email, office applications) and documentation in Hypertext Markup Language (HTML) which describes in detail the C programming interface. There are also various commands collected in a security command shell to ensure an immediate deployment of security. 1.2.2.1 Secude development kit provides: • asymmetric cryptographic functions such as RSA, DSA • symmetric cryptographic functions such as DES, Triple DES, IDEA, RC2, RC4 • hash functions such as SHA, SHA-1, MD5, RIPEMD-160 • Diffie-Hellman key agreement • security functions for proof of origin, data integrity, non-repudiation and confidentiality on the basis of digital signatures and also symmetric and asymmetric encryption • X.509 certification functions, handling of certification paths and handling of revocation lists • Public Key Cryptography Standards (PKCS) • defined interfaces such as Authentication Framework (AF), Generic Security Services-API (GSS-API) • Privacy Enhanced Mail (PEM, MailTrusT) 48 SDR v.2.5 User Guide • commands for signing, validating, coding and decoding of files • commands for the operation of certification authorities and the interaction between certification authorities and certified users • all external data codlings according to ASN.1 BER and DER • all functions take the millennium into account • safe storage of all security relevant information of the user in a so-called personal security environment (PSE) • optionally support for B1-chipcard readers and Smart Cards (Deutsche Telekom, Schlumberger and GemPlus) is available - thus upgrading to • Secude Security Grade High • optionally available is secure access to the public X.500 Directory for storage and production of certificates and revocation lists via LDAP 1.2.2.2 Secude PSE and Smart Card Technology With the Secude security infrastructure every participant is in possession of a private and a public key. The public key is certified by a certification authority (CA) and digitally signed. This procedure is comparable to the issuing of an ID card. Secude keeps each user’s keys in a Personal Security Environment (PSE). The PSE is protected with a password or PIN (Personal Identification Number), which only the owner of the PSE should know. The PSE is available in two versions, as software PSE or as a Smart Card. The use of Smart cards simplifies security operations, and is mandatory in some secure applications. For this reason we have ensured that the secure conferencing described in this report is compatible with the Smart card supported by the present version of Secude. 1.2.2.3 Multiple PSE The Multiple-PSE file may be seen as a virtual directory, containing all of your PSEs in one file. This analogy is very close to the true nature of MPSEFiles, as they really contain separate PSEs, which do not share anything. Every one has its own PIN and Key pair(s). Attached to each PSE in a MPSEFile is a label, which should help you to remember the purpose for that special PSE. PSEs in a MPSEFile are chosen by adding a so-called selector to the MPSEFiles name. Let us suppose, for example, that a MPSEFile mpse contains three PSEFiles that can be opened using the names mpse.1, mpse.2 and mpse.3. For the purpose of using the multiple PSEs in SDR you need to have the same PIN for all your PSEs. Suppose you have three different PSEs: group1.pse with password passgroup1, group2.pse with password passgroup2 and group3.pse with password passgroup3. The first activity is to change the password to your chosen password say passtest. To change the password you do the following: secude psemaint -p group1.pse 49 SDR v.2.5 User Guide Enter PIN for group1.pse: passgroup1 PSE group4.pse> chpin Enter old pin: passgroup1 Enter new pin: passtest PIN changed passtest Reenter new pin: Do the same for group2 and group3. To create mpse do : secude pseconv -o mpse -M group1.pse group2.pse group3.pse This will create a multi pse in your homedirectory. Then if you receive a group4.pse with password testtest, make sure to change the password testtest to have the same password as mpse, in the same way as above, that is passtest before adding it to mpse. secude pseconv -o mpse -M group1.pse group2.pse group3.pse group4.pse Now you can use this mpse with pin passtest in your SDR. 1.2.3 Using the Secude Smart Card In Secude the PSE is available in two versions: Software PSE and Smart Card PSE. The Smart Card PSE contains the owner's secret key that is protected by a PIN, the issuer public key and the serial number. You can use the Smart Card with SDR in two different ways as follow: 1.2.3.1 Using Smart Card with X509 At present the SDR Implementation uses Smart Card as another PSE. If you would like to use smart card to authenticate or decrypt, then you should configure your SDR with the Location of your Smart Card and PIN in Figure 34. Then your secret key on your smart card is used to authenticate the session. On receiving any encrypted message, encrypted with your public key, the secret key on your Smart Card is used to decrypt the message. Unfortunately Secude would not allow you to add the Smart Card PSE to your MPSE. So you can either use Smart Card PSE, Software PSE or MPSE. Note1: X509STATE must be set to be able to use X509 and Smart Card 1.2.3.2 Using Smart Card with PGP If you are using PGP and X509 then make sure that your Software PSE or MPSE and the Smart Card have the same password. Then the Smart Card is used to encrypt your Secret Key ring this is done manually as: secude pkcs7enc ENVELOPED-DATA –p smartcard -i $SDRHOME/pgp/secring.pgp -o $SDRHOME/pgp/secring.enc 50 SDR v.2.5 User Guide rm -f $SDRHOME/pgp/secring.pgp or Click on Yes when Quitting from SDR. The above will use Public Key of Smart Card to encrypt your pgp secret key ring. The result will be a secring.enc in your SDR PGP home directory. If the file secring.enc exists in your $SDRHOME/PGP, when SDR needs to use PGP for authentication or checking the encrypted session the window Figure Appendix1-1 will appear. This is for you to check if Smart card is placed in the drive. Clicking OK will cause the window in Figure Appendix1-2 to appear, which requires SDR to be configured with your Smart Card Location and PIN. Figure Appendix1-1 Checking the Smart Card Window Figure Appendix1-2 Smart Card Configuration Window 51 SDR v.2.5 User Guide Appendix 2 2.1 Configuration and Software to use with SDR The PGP System PGP can be obtained from http://www.ifi.uio.no/PGP or http://www.pgpi.com/download/. Most of these instructions are obtained from the official PGP documentation. For full details on how to install PGP, see the separate PGP Installation Guide, in the file SETUP.DOC. To install PGP on your MSDOS system, you have to copy the compressed archive PGP2.6.3i.ZIP file into a suitable directory on your hard disk (like C:\PGP), and decompress it. Installing on Unix is generally similar to installing on MSDOS, but you may have to compile the source code first. A Unix makefile is provided with the source release for this purpose Setting up PGP to work with SDR After installing PGP, you should modify your AUTOEXEC.BAT file, and make the SDR directory, e.g. On MS-DOS mkdir c:/SDR/SDR Add the following line to your Autoexec.bat: set path=c:\windows;…………..c:\PGP set home=c:\sdr set PGPPATH= c:\pgpkeys On Unix with csh mkdir .SDR in your home directory setenv PGPPATH $home/.SDR/pgp If you already have a pgp directory containing the pub/secring files then just make a link e.g. if your pgp directory is in $home/.pgp then ln -s ~/.pgp ~/.SDR/pgp If you have not run PGP before, the first step after installation is to make a pair of keys for yourself by running the PGP key generation command "pgp kg". Read the "RSA Key Generation" section of the pgp manual. There two type of the keyring pgp generated in your c:/SDR/SDR/pgp on PC or $home|/.SDR/pgp one for storing private keys called secring.pgp and the other storing public keys called pubring.pgp. These two types of key rings are the principal method of storing and managing public and private keys. Rather than keep individual keys in separate key files, they are collected in key rings 52 SDR v.2.5 User Guide to facilitate the automatic lookup of keys either by key ID or by user ID. Each user keeps his own pair of key rings. An individual public key is temporarily kept in a separate file long enough to send to your group, each member of which will then add it to their key ring. You can use pgp -kx to extract a key from your keyring and pgp –ka to add a key to your key ring. To see a quick command usage summary for PGP, just type: pgp -h 2.2 Secude: This can be obtained from http://www.darmstadt.gmd.de/secude/ If you want to receive or send x509 authenticated and encrypted sessions then set X509STATE=on in your environment. This can be done by: On PC: Add the following line to your Autoexec.bat: set X509STATE=on On Unix, if you are using the C Shell Add the following line to your .cshrc setenv X509STATE on If the X509STATE is set in the environment then you need to download and install Secude on your system Installing Secude Secude (formerly SecuDE - Security Development Environment) is a security toolkit that incorporates well-known and established symmetric and public-key cryptography. It offers a library of security functions, security APIs and a number of utilities. Installation: after downloading Secude from Darmstadt [XXXXX] follow the instruction in the readme file. To use Secude with SDR you need to add the location of Secude to your path environment: ON PC: As Secude comes with a licence agreement printout it is not useable on PC with sdr. But you can get a version of secude without the licence agreement from UCL. Edit Autoexec.bat and add the Secude directory to your path On Unix 53 SDR v.2.5 User Guide Add the Secude home directory to your path 2.3 Tcl and Tk Library SDR requires the use of Tcl/Tk. SDR has been tested with Tcl/Tk v8, and this version should be downloaded from http://www.scriptics.com/ and installed. You will need to have two programs to execute Tcl/Tk scripts: tclsh, a command shell for Tcl-only scripts; and wish, which is like tclsh but includes the Tk widget. Depending on your platform (Unix or PC) download from the above URL. • Installing Tcl/Tk on Windows95/NT4.0 The easiest way to get started with Tcl/Tk is to install it under Windows95/NT4.0. Just follow the steps on the download page, and download the self-extracting binary. Once it has finished downloading, double click on the file you received to start the selfextraction process. • Installing Tcl/Tk on UNIX Follow the instructions on the download page. For UNIX, you must download the source code and run “make”. Full instructions are included in the tcl release. 54