1
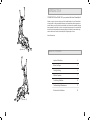
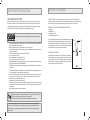
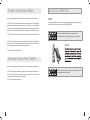
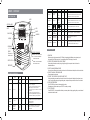
FOR MODEL : Andes 2 Andes 3 ELLIPTICAL USER’S GUIDE 821E_Rev.1.1.indd 1 2/09/09 08:55:02 AM INTRODUCTION CONGRATULATIONS and THANK YOU for your purchase of this Horizon Fitness elliptical! Whether your goal is to win races or simply enjoy a fuller, healthier lifestyle, an Horizon Fitness ellipticalcan help you attain it – adding club-quality performance to your at-home workouts, with the ergonomics and innovative features you need to get stronger and healthier, faster. Because we're committed to designing fitness equipment from the inside out, we use only the highest quality components. It's a commitment we back with one of the strongest frame-to-brake warranty packages in the industry.You want exercise equipment that offers the most comfort, the best reliability and the highest quality in its class. Horizon Fitness delivers. (Andes 2) TABL E OF C ON TEN TS Important Precautions 4 Before You Begin 5 Folding/Unfolding 6 Elliptical Operation 7 Conditioning Guidelines 16 Troubleshooting & Maintenance 21 Exclusions And Limitations 25 (Andes 3) 2 3 I M P O RTA N T PRECAUTIONS SAVE THESE INSTRUCTIONS Read all instructions before using this elliptical. When using an electrical product, basic precautions should always be followed. It is the responsibility of the owner to ensure that all users of this elliptical are adequately informed of all warnings and precautions. If you have any questions after reading this manual, contact Customer Tech Support at the number listed on the back panel of this manual. WARNING To reduce the risk of burns, fire, electrical shock or injury to persons: • If you experience chest pains, nausea, dizziness, or shortness of breath, stop exercising immediately and consult your physician before continuing. • Maintain a comfortable pace. Do not sprint above 80 rpms on this machine. • To maintain balance, it is recommended to keep a grip on the handlebars while exercising, mounting or dismounting the machine. • Do not wear clothes that might catch on any part of the elliptical. • Do not turn pedal arms by hand. • Make sure handlebars are secure before each use. • Do not insert or drop any object into any opening. • Unplug elliptical before moving or cleaning it. To clean, wipe surfaces down with soap and slightly damp cloth only; never use solvents. (See MAINTENANCE) • This elliptical should not be used by persons weighing more than 250 pounds. Failure to comply will void the warranty. • This elliptical is intended for in-home use only. Do not use this elliptical in any commercial, rental, school or institutional setting. Failure to comply will void the warranty. • Do not use elliptical in any location that is not temperature controlled such as but not limited to: garages, porches, pool rooms, bathrooms, car ports or outdoors. Failure to comply may void the warranty. • Use the elliptical only as described in this manual. • Keep the topside of the foot support clean and dry • Care should be taken when mounting or dismounting the equipment. Before mounting or dismounting, move the pedal on the mounting or dismounting side to its lowest position and bring the machine to a complete stop. • Disconnect all power before servicing the equipment. BEFORE YOU BEGIN CONGRATULATIONS on choosing your elliptical. You’ve taken an important step in developing and sustaining an exercise program! Your elliptical is a tremendously effective tool for achieving your personal fitness goals. Regular use of your elliptical can improve the quality of your life in so many ways. HERE ARE JUST A FEW OF THE HEALTHBENEFITS OF EXERCISE: • Weight Loss • A Healthier Heart • Improved Muscle Tone • Increased Daily Energy Levels The key to reaping these benefits is to develop an exercise habit. Your new elliptical will help you eliminate obstacles that prevent you from exercising. Inclement weather and darkness won't interfere with your workout when you use your elliptical in the comfort of your home. This guide provides you with basic information for using and enjoying your new machine. LOCATION OF THE ELLIPTICAL Place the elliptical on a level surface. There should be 6 feet of clearance behind the elliptical, 3 feet on each side and one foot in front for the power cord (See diagram to the right). Do not place the elliptical in any area that will block any vent or air openings. The elliptical should not be located in a garage, covered patio, near water or outdoors. At NO time should pets or children under the age of 12 be closer to the elliptical than 10 feet. At NO time should children under the age of 12 use the elliptical. Children over the age of 12 should not use the elliptical without adult supervision. It is essential that your elliptical is used only indoors, in a climate controlled room. If your elliptical has been exposed to colder temperatures or high moisture climates, it is strongly recommended that the elliptical is warmed up to room temperature before first time use. Failure to do so may cause premature electronic failure. 4 5 FOLDING YOUR ELLIPTICAL TRAINER Note: It is important to always follow the correct order of steps when folding your elliptical trainer. STEP 1:The first step is to position the elliptical pedal arms in the proper position. The pedal armscan be positioned in two different positions for convenience. The first position is to rotate the leftpedal arm so that it is in the backmost position (the left pedal arm wheel should be positioned at therear of the elliptical trainer). The second position would be to rotate the right pedal arm in the back-most position. STEP 2: Carefully raise both the pedal arm (in the backmost position) and guide rail simultaneously. EL L IPTICAL OPERATION POWER Your programmable elliptical is powered by a power supply. The power cord must be plugged into the power jack, which is located in the front of the machine near the STABILIZER TUBE. WARNING STEP 3:Press and hold the lock latch button located underneath the guide rail end cap.Align thelock latch with the lock latch receiver located underneath the pedal arm.Insert the lock latch receiv-er into the lock latch.Release the lock latch button once the lock latch is secure. Do not operate the elliptical if the power cord or plug is damaged. If the elliptical appears not to be working properly, do not use the elliptical. MOVING STEP 4: Repeat process for alternate side. UNFOLDING YOUR ELLIPTICAL TRAINER Note: It is important to always follow the correct order of steps when unfolding your elliptical trainer. STEP 1:Firmly grasp both the left pedal arm and guide rail. Press and release the lock latch receiv-er from the lock latch. Carefully lower the pedal arm and guide rail, standing to the side to avoidany accidental release of the alternate pedal arm and guide rail. WARNING Our ellipticals are well built and heavy, weighing up to 200 lbs! Use care when moving and get additional help if necessary. STEP 2: Repeat process for alternate side. 6 7 ANDES 2 CONSOLE A. KEY FUNCTION USER CONTROL MODE MANUAL / PROGRAM USER SEX PULSE RPM / SPEED CALORIES SPEED RPM 0.0~99.9 km/h 0~15~99 DISTANCE 0.00~99.99 KM(ML) CALORIES 0~999 CAL AGE HEIGHT HEART SYMBOL PROGRAMS (P1 - P12) ENTER - confirm function value + UP : Choose Control Mode & Increase function value DOWN : Choose Control Mode & decrease function value RECOVERY B..DISPLAY DESCRIPTION DISPLAY SCOPE MANUAL P1~P12 SET SCOPE 1~16 LEVEL (±1LEVEL) 1~12 MEMORY Y Y RESET SIMPLE ILLUMINATION N Set up Resistance-Load from Level 1-16 N 1. P1~P12,12 fixed diagram. 2. Every time you choose one PROGRAM, correspondent diagram will display on the centerof dot matrix. 3.Diagram choice by turning UP、DOWN-Knob,and ENTER for confirmation. 4.After selecting program, blinking diagram will show in dot matrix, turning UP/DOWN-KNOB for adjusting LEVEL and ENTER -KEY for TIMEsetting,TIME symbol blinks. 8 Y Y Y Y 1. Count UP CALORIES value when start exercise, no setting 2.If setting, when count down to 0,system will STOP . Y N Under setting GENDER, please choose GIRL or BOY ±1 Y N Under setting "AGE", initial value is 25. ±1 Y N Under setting Height"H.T", initial value160CM(60INCH) 20-50-150 (KG) 40-100-350 (LB) ±1 Y N ON/OFF blink N N N 0~990 ±10 in circ uit 10 -25 -99 100 -160 -200 (CM) 40 -60 -80 (INCH) Display actually workout speed. Display actually workout RPM. 1. Count UP DISTANCE value when start exercise, no seating. 2.If setting, when count down to 0,system will STOP . Under setting Weight: "W.T", initial value. 50KG(100LB) 1. Display with blink as per Heart Rate Hi / Fast & Low slow. 2. No Heart-Rate detected SYMBOL will be gone. ROTARY / PUSH KNOB: START / STOP PROGRAM N N C.HOW TO START RESET: Press reset function value. ITEM N N GENDER WEIGHT DISTANCE N N 0.00~99.9 0 ±0.1 CIRCUIT USER (PROGRAM) U1~U4 TIME 0:00~99:59 MINU SEC MINU SEC 0:00~99:0 0 ±1 MINU CIRCUIT Y N 1.USER can set PROGRAM diagram by himself 2. Press ENTER KEY for line setting and UP、DOWN Knob for adjusting LOAD level. 3. One saved value each. Y Y 1. Count UP TIME value when start exercise, no seating. 2.If setting, when count down to 0,system will STOP TIME value blinks 1. POWER ON Make sure plug in right power adaptor (6V / 500mA), and regarding with different country system pin, and then powering on: BI with long tone for 1 second together with LCD full display for 2 seconds. 2. PRE-SET USER/ AGENDA / AGE / HEIGHT / WEIGHT User inputting his/her real user data (sex / age/ height / weight) into computer to stove it to be used in calculated reference. 3. SELECT MANUAL/PROGRAMS/ USER User can choose different control mode to start his work out. See below is main description of each control mode. 4. EXECUTE MANUAL / PROGRAMS/ USER Execute selected control mode. 5. PRE-SET TIME / DISTANCE / CALORIES / HEART RATE Setting and inputting user wanted function value of above, the function value of display will count down to zero; or user can not inputting these, just forget setting value, computer will know your workout is from 0 to end value. 6. PRESS ENTER/UP/DOWN Use UP / DOWN key to increase / decrease function value. After setting each function value to press “ENTER” to confirm your setting 7. TEST RECOVERY Press RECOVERY , the computer will calculate your recovery value on display regarding with your user data and actual workout function value. 9 D. CONTROL MODE DESCRIPTION Set the resistance level using the dot matrix display then (if required) set exercise parameters TIME/DISTANCE / CALORIES / PULSE then press START/STOP to START manual program. PROGRAM 12 automatic adjusting programs with control exercise (P1~P12), Resistance level can be adjusted during PROGRAM DIAGRAM is flashing. PERSONAL Create your own Program profile through U1~U4 by setting the resistance level for each individual segment. Then the Program will be automatically saved for future use. U0 ENTER can be set the same as U1~U4 but this Program cannot be memorized. RECOVERY: Rate When you have finished your workout, press RECOVERY. For Score Condition (from testHeart HR minus end HR) Excellent Above 50 F1 RECOVERY to function correctly, it needs your Heart Rate Good F2 40 ~ 49 F3 Average 30 ~ 39 input. TIME will count down from 1 minute and then your F4 Fair 20 ~ 29 Poor F5 10 ~19 fitness level from F1 to F6 will be displayed. Very Poor Under 10 F6 NOTE: When measure user’s RECOVERY state , no other function can be workable. F 1 ~ F6 = RECOVERY HEART RATE LEVEL Get the result from F1 - F6. ANDES 3 CONSOLE MANUAL A. KEY FUNCTION CONTROL MODE MANUAL / PROGRAM WATT/ PERSONAL/HRC RPM / SPEED FUNCTION VALUE WATTS /CALORIES DISTANCE DISPLAY USER DATA PULSE / HRC E. OPERATION 1.After power-on U1 by default but you can select any User ENTER by turning the UP/DOWN key the press the ENTER key for confirmation. Input user data, sex, age, height, weight on top –right window. Then press ENTER key for confirmation. 2. Function Control display will flash indicating you can select the Programs P1-P12 by turning UP/DOWN key and then press ENTER key for confirmation. Any of the default values can be changed by pushing the ENTER key until the desired program profile is flashing. Press the ENTER key again for confirmation. 3. When the Program and other protocols are entered press START/STOP key and begin your workout. PROGRAMS (P1-P12) START / STOP RECOVERY RESET ROTARY / PUSH KNOB: QUICK START ENTER - confirm function value + UP : Choose Control Mode & Increase function value DOWN : Choose Control Mode & decrease function value F. TIPS 1. Option: Plug in AC Adaptor (6 VOLT, 500mA). 2. Keep moisture away from computer. B.DISPLAY DESCRIPTION ITEM DISPLAY SCOPE MANUAL 10 PROGRAM P1~P12 PERSONAL U1~U4 SET SCOPE MEMORY RESET 1~16 LEVEL (±1LEVEL) Y N 1~12 Y N Y N SIMPLE ILLUMINATION Set up Resistance-Load from Level 1-16 1. P1~P12,12 fixed diagram. 2. Every time you choose one PROGRAM, correspondent diagram will display on the centerof dot matrix. 3.Diagram choice by turning UP、DOWN-Knob, and ENTER for confirmation. 4.After selecting program, blinking diagram will show in dot matrix, turning UP/DOWN-KNOB for adjusting LEVEL and ENTER-KEY for TIME setting ,TIME symbol blinks. 1.USER can set PROGRAM diagram by himself 2.Press ENTER KEY for line setting and UP、 DOWN Knob for adjusting LOAD value. 3. One saved value each. 11 Watt Constant H.R.C. 10~350 55%、 75%90%、 IND(TARGET) 10~350 ±5 circuit 55%、 75%、 90%、 IND(TARGET) Y Y N 1. fixed value: 100. 2. Turn UP/DOWN for adjusting WATT value when exercise. N 1. choice your want H.R.: 55%、75%、90%、IND. 2.(55%、75%、90%、IND) symbol blink during setting, constant light after choosing and then step to time setting, TIME symbol blinks. TIME 0:00~99:59 MINU SEC MINU SEC 0:00~99:00 ±1MINU CIRCUIT Y Y 1. Count UP TIME value when start exercise, no seating. 2.If setting, when count down to 0,system will STOP TIME value blinks SPEED 0.0~99.9 km/h N N N Display actually workout speed. RPM 0~15~99 N N N WATT 0~999 N N Y Display actually workout RPM. UNDER START: 1. Sensor input, display value in 3 seconds. 2. No sensor input, reset to 0 in 6 seconds. 1. Count UP DISTANCE value when start exercise, no seating. 2.If setting, when count down to 0,system will STOP . DISTANCE 0.00~99.99 KM(ML) 0.00~99.90 ±0.1 CIRCUIT Y Y CALORIES 0~999 CAL 0~990 ±10 in circuit Y Y 1. Count UP CALORIES value when start exercise, no setting. 2.If setting, when count down to 0,system will STOP . Y N Under setting "AGE" , initial value is 25. Y N Under setting GENDER, please choose GIRL or BOY. N Under setting Height "H.T" , initial value 160CM(60INCH). N Under setting Weight: "W.T", initial value. 50KG(100LB) Y Y i.e. calculating forum D N N 1. Display with blink as per Heart Rate Hi / Fast & Low slow. 2. No Heart-Rate detected SYMBOL will be gone. AGE ±1 10-25-99 GENDER HEIGHT 100-160-200 (CM) 40-60-80 (INCH) ±1 Y WEIGHT 20-50-150 (KG) 40-100-350 (LB) ±1 Y HEART RATE P,30~240 HEART SYMBOL ON/OFF blink 0 30~240 N C.HOW TO START 3. PRE-SET USER/ AGENDA / AGE / HEIGHT / WEIGHT User inputting his/her real user data (sex / age/ height / weight) into computer to stove it to be used in calculated reference. 4. SELECT MANUAL/PROGRAMS/ USER User can choose different control mode to start his work out. See below is main description of each control mode. 5. EXECUTE MANUAL / PROGRAMS/ USER Execute selected control mode. 6. PRE-SET TIME / DISTANCE / CALORIES / HEART RATE Setting and inputting user wanted function value of above, the function value of display will count down to zero;or user can not inputting these, just forget setting value, computer will know your workout is from 0 to end value. 7. PRESS ENTER/UP/DOWN Use UP / DOWN key to increase / decrease function value. After setting each function value to press “ENTER” to confirm your setting 8. TEST RECOVERY Press RECOVERY , the computer will calculate your recovery value on display regarding with your user data and actual workout function value. D. CONTROL MODE DESCRIPTION MANUAL Set the resistance level using the dot matrix display then (if required) set exercise parameters TIME/DISTANCE / CALORIES / PULSE then press START/STOP to START manual program. PROGRAM 12 automatic adjusting programs with control exercise (P1~P12), Resistance level can be adjusted during PROGRAM DIAGRAM is flashing. WATTS CONSTANT User can default WATTS value at his/her desire 10-350 watts between 10~350 watts by using the UP/ DOWN knob. To fix WATTS constant value and then press ST/STOP key. Use WATTS control mode to train yourself in different WATTS constant 1. POWER ON Make sure plug in right power adaptor (6V / 1A), and regarding with different country system pin, and then powering on: BI with long tone for 1 second together with LCD full display for 2 seconds. 2. BUILT-IN Heart Rate Receiver with chest Belt The computer with built-in Heart Rate receiver , the user can put on chest belt to detect the Heart Rate beat.; How to put on chest belt, please refer Chest Belt user manual. 12 13 PERSONAL Create your own Program profile through U1~U4 by setting the resistance level for each individual segment. Then the Program will be automatically saved for future use. U0 ENTER can be set the same as U1~U4 but this Program cannot be memorized. H.R.C HEART RATE CONTROL- Select your own target Heart Rate of choose one of the preset programs 55%, 75%,or 90%. Please enter your age into the User Data to ensure that your target heart rate is set correctly. The PULSE display will flash when you have reached your target heart rate according to the Program you have chosen. i. 55% -- DIET PROGRAM ii. 75% -- HEALTH PROGRAM iii. 90% -- SPORTS PROGRAM iv. TARGET—USER SET TARGET HEART RATE RECOVERY: Rate When you have finished your workout, press RECOVERY. Score Condition (from testHeart HR minus end HR) Excellent Above 50 F1 For RECOVERY to function correctly, it needs your Heart Good F2 40 ~ 49 F3 Average 30 ~ 39 Rateinput. TIME will count down from 1 minute and then F4 Fair 20 ~ 29 Poor F5 10 ~19 your fitness level from F1 to F6 will be displayed. Very Poor Under 10 F6 NOTE: When measure user’s RECOVERY state , no other function can be workable. F 1 ~ F6 = RECOVERY HEART RATE LEVEL Get the result from F1 - F6. E. OPERATION 1. After power-on U1 by default but you can select any User ENTER by turning the UP/DOWN key the press the ENTER key for confirmation. Input user data, sex, age, height, weight on top –right window. Then press ENTER key for confirmation. 2. Function Control display will flash indicating you can select the Programs P1-P12 by turning UP/DOWN key and then press ENTER key for confirmation. Any of the default values can be changed by pushing the ENTER key until the desired program profile is flashing. Press the ENTER key again for confirmation. 3. When the Program and other protocols are entered press START/STOP key and begin your workout. 14 F. TIPS 1. Option: Plug in AC Adaptor (6 VOLT, 1A). 2. Keep moisture away from computer. MONITORING YOUR HEART RATE Feedback Your Horizon Fitness elliptical trainer (Andes 3) offers two heart rate feedback options. You may choose to use the heart rate handlebars, or the chest transmitter for a hands free workout.Andes 2 just offers One heart rate feedback options. Heart Rate Handlebar Place the palm of your hands directly on the heart rate handlebars. Both hands must grip the bars for your heart rate to register. When griping the handlebars, do not grip tightly. Holding the grips tightly may elevate your blood pressure. Try to maintain moderate pressure while holding onto the heart rate handlebars. It is recommended that you hold the handlebars only long enough the see your heart rate readout on the console. You may experience an erratic readout if consistently holding the handlebars. Telemetric Chest Transmitter Prior to wearing the chest transmitter on your chest, moisten the two rubber electrodeswith water. Center the chest strap just below the breast or pectoral muscles, directly overyour stermum, with the Horizon Fitness logo facing out. NOTE: The chest strap must be tight and properly placed to receive an accurate and consistent readout. If the chest strap is too loose, or positioned improperly, you may receive an erratic or inconsistent heart rate readout.(Andes 3 only) If you have any problems with the heart rate function please refer to the troubleshooting section. Warning! The heart rate function is not a medical device. Various factors may affect the accuracy of your heart rate reading. The heart rate reading is intended only as an exercise aid. 15 C ON D I T ION I N G GU I D E LI N E S ALWAYS CONSULT YOUR PHYSICIAN BEFORE BEGINNING AN EXERCISE PROGRAM. HOW OFTEN? (Frequency of Workouts) The American Heart Association recommends that you exercise at least 3 to 4 days per week to maintain cardiovascular fitness. If you have other goals such as weight or fat loss, you will achieve your goal faster with more frequent exercise. Whether it’s 3 days or 6 days, remember that your ultimate goal should be to make exercise a lifetime habit. Many people are successful staying with a fitness program if they set aside a specific time of day to exercise. It doesn’t matter whether it’s in the morning before breakfast, during lunch hour or while watching the evening news. What’s more important is that it’s a time that allows you to keep a schedule, and a time when you won’t be interrupted. To be successful with your fitness program, you have to make it a priority in your life. So decide on a time, pull out your day planner and pencil in your exercise times for the next month! HOW LONG? (Duration of Workouts) For aerobic exercise benefits, it’s recommended that you exercise from between 24 and 60 minutes per session. But start slowly and gradually increase your exercise times. If you’ve been sedentary during the past year, it may be a good idea to keep your exercise times to as little as five minutes initially. Your body will need time to adjust to the new activity. If your goal is weight loss, a longer exercise session at lower intensities has been found to be most effective. A workout time of 48 minutes or more is recommended for best weight loss results. HOW HARD? (Intensity of Workouts) How hard you workout is also determined by your goals. If you use your machine to prepare for a 5K workout, you will probably work out at a higher intensity than if your goal is general fitness. Regardless of your long term goals, always begin an exercise program at low intensity. Aerobic exercise does not have to be painful to be beneficial! There are two ways to measure your exercise intensity. The first is by monitoring your heart rate (using the grip pulse handlebars or a wireless chest transmitter - may be sold separately), and the second is by evaluating your perceived exertion level (this is simpler than it sounds!). PERCEIVED EXERTION LEVEL A simple way to gauge your exercise intensity is to evaluate your perceived exertion level. While exercising, if you are too winded to maintain a conversation without gasping, you are working out too hard. A good rule of thumb is to work to the point of exhilaration, not exhaustion. If you cannot catch your breath, it’s time to slow down. Always be aware of these warning signs of overexertion. 16 STRETCHING STRETCH FIRST Before using your product, it is best to take a few minutes to do a few gentle stretching exercises. Stretching prior to exercise will improve flexibility and reduce chances of exercise related injury. Ease into each of these stretches with a slow gentle motion. Do not stretch to the point of pain. Make sure not to bounce while doing these stretches. 1. STANDING CALVE MUSCLE STRETCH Stand near a wall with the toes of your left foot about 18" from the wall, and the right foot about 12" behind the other foot. Lean forward, pushing against the wall with your palms. Keep your heels flat and hold this position for a count of 15 seconds. Make sure that you do not bounce while stretching. Repeat on the other side. 2. STANDING QUADRICEPS STRETCH Using a wall to provide balance, grasp your left ankle with your left hand and hold your foot against the back of your thigh for 15 seconds. Repeat with your right ankle and hand. 3. SITTING HAMSTRING & LOWER BACK MUSCLE STRETCH Sit on the floor with your legs together and straight out in front of you. Do not lock your knees. Extend your fingers towards your toes and hold for a count of 15 seconds. Make sure that you do not bounce while stretching. Sit upright again. Repeat one time. 17 THE IMPORTANCE OF WARM UP & COOL DOWN WARM UP The first 2 to 5 minutes of a workout should be devoted to warming up. The warm-up will limber your muscles and prepare them for more strenuous exercise. Make sure that you warm-up on your product at a slow pace. The warm up should gradually bring your heart rate into your Target Heart Rate Zone. COOL DOWN WEEKLY L OG SHEETS WEEK # DAY WEEKLY GOAL DAT E DI S TA NCE CA L O RI E S T I ME C O M M EN T S SUNDAY MO NDAY TUESDAY Never stop exercising suddenly! A cool-down period of 3-5 minutes allows your heart to readjust to the decreased demand. Make sure that your cool down period consists of a very slow pace to allow your heart rate to lower. After the cool-down, repeat the stretching exercises listed above to loosen and relax your muscles. WEDNESDAY THURSDAY FRIDAY SATURDAY WEEKLY TOTALS : ACHIEVING YOUR FITNESS GOALS WEEK # DAY An important step in developing a long term fitness program is to determine your goals. Is your primary goal for exercising to lose weight? Improve muscle? Reduce stress? Prepare for the spring racing schedule? Knowing what your goals are will help you develop a more successful exercise program. Below are some common exercise goals: • Weight Loss - lower intensity, longer duration workouts • Improve Body Shape and Tone - interval workouts, alternate between hi and low intensities • Increased Energy Level - more frequent daily workouts • Improved Sports Performance - high intensity workouts • Improved Cardiovascular Endurance - moderate intensity, longer duration workouts If possible try to define your personal goals in precise, measurable terms, and then put your goals in writing. The more specific you can be, the easier it will be to track your progress. If your goals are long term, divide them up into monthly and weekly segments. Longer term goals can lose some of the immediate motivation benefits. Short term goals are easier to achieve. Your console provides you with several readouts that can be used to record your progress. You can track Distance, Calories and Time. KEEPING AN EXERCISE DIARY To make your personal exercise log book, photocopy the weekly and monthly log sheets, which are located on the following pages, or you can print them off of your computer by going to:As your fitness improves, you can look back and see how far you’ve come! WEEKLY GOAL DAT E DI S TA NCE CA L O RI E S T I ME C O M M EN T S SUNDAY MO NDAY TUESDAY WEDNESDAY THURSDAY FRIDAY SATURDAY WEEKLY TOTALS : WEEK # DAY WEEKLY GOAL DAT E DI S TA NCE CA L O RI E S T I ME C O M M EN T S SUNDAY MO NDAY TUESDAY WEDNESDAY THURSDAY FRIDAY SATURDAY WEEKLY TOTALS : 18 19 M O N TH LY LO G SHEETS TROUBLE S HOOTING Your Fitness Gear elliptical is designed to be reliable. However, if you do experience problems with your elliptical, please reference the troubleshooting guide listed below. PROBLEM:The console does not turn on. SOLUTION:Verify the following: •The outlet the machine is plugged into is functional. Double check that the breaker has not tripped. •The correct adapter is being used. Only use the adapter provided or authorized by Fitness Gear. •The adapter is not pinched or damaged and is properly plugged into the outlet AND the machine. •The power switch is turned to the ON position (may not apply to all models). • Turn off the machine and unplug power cord. Remove the console and check that all connections to the console are secure and not damaged or pinched. PROBLEM:The console lights up but the Time/RPM’s do not count. SOLUTION:Verify the following: •Turn off machine and unplug power cord. Remove the console and check that all connections to the console are secure and not damaged or pinched. •If doing the above does not fix the problem, the speed sensor and/or magnet may have become dislodged or damaged. PROBLEM:The resistance levels seem to be incorrect, seeming too hard or too easy. SOLUTION:Verify the following: • The correct adapter is being used. Only use the adapter provided or authorized by Fitness Gear. • Reset the console and allow the resistance to reset to the default position. Restart and retry the resistance PROBLEM:The roller wheels appear to be leaving particles on the guide rails. SOLUTION: This is considered normal wear of the elliptical wheels. To remove, simply wipe off the roller wheels and guide rails with a damp cloth. PROBLEM:The elliptical makes a squeaking or chirping noise. SOLUTION:Verify the following: • The elliptical is on a level surface. • Loosen all bolts attached during the assembly process, grease the threads, and tighten again. 20 21 HEA RT RAT E T R O U B LE S H O O T I N G PROBLEM: There is no heart rate reading. SOLUTION: Remove the console and verify that the heart rate cables are attached properly, making sure that the cables are securely inserted into the console. Check your exercise environment for sources of interference such as high power lines, large motors, etc. YOU MAY EXPERIENCE AN ERRATIC READOUT UNDER THE FOLLOWING CONDITIONS: • Gripping the heart rate handlebars too tight. Try to maintain moderate pressure while holding onto the heart rate handlebars. • Constant movement and vibration due to constantly holding the heart rate grips while exercising. • When you are breathing heavily during a workout. • When your hands are constricted by wearing a ring. • When your hands are dry or cold. Try moistening your palms or rubbing them together to warm. • Anyone with heavy arrhythmia. • Anyone with arteriosclerosis or peripheral circulation disorder. • Anyone whose skin on the measuring palms is especially thick. NOTE: Outside interference sources such as computers, motors and fluorescent lights may cause the heart rate reading to be erratic. If the above troubleshooting section does not remedy the problem, discontinue use and turn the power off. The following information may be asked of you when you call. Please have these items readily available: • Model Name • Serial Number • Date of Purchase (receipt or credit card statement) In order for Customer Tech Support to service your elliptical they may need to ask detailed questions about the symptoms that are occurring. Some troubleshooting questions that may be asked are: • How long has this problem been occurring? • Does this problem occur with every use? With every user? • If you are hearing a noise, does it come from the front, back or inside? What kind of noise is it (thumping, grinding, squeaking, chirping etc.)? • If you are having a resistance problem, what is occurring? Is the resistance always too hard or too easy? Does the resistance respond when pushing the buttons on the console? Does the resistance constantly cycle through the levels during the workout? • Has the machine been maintained per the maintenance schedule? • Does the problem occur when using the handlebars? Without using the handlebars? C OM M ON PR OD U C T QU ESTION S ARE THE SOUNDS MY ELLIPTICAL MAKES NORMAL? Our ellipticals are some of the quietest available because they use belt drives and friction free magnetic resistance. We use the highest grade bearings and belts to minimize noise. However, because the resistance system itself is so quiet, you will occasionally hear other slight mechanical noises. Unlike older, louder technologies, there are no fans, friction belts, or alternator noises to mask these sounds on our ellipticals. These mechanical noises, which may or may not be intermittent, are normal and are caused by the transfer of significant amounts of energy to a rapidly spinning flywheel. All bearings, belts and other rotating parts will generate some noise which will transmit through the casing and frame. It is also normal for these sounds to change slightly during a workout and over time because of thermal expansion of the parts. WHY IS THE ELLIPTICAL I HAD DELIVERED LOUDER THAN THE ONE AT THE STORE? All fitness products seem quieter in a large store showroom because there is generally more background noise than in your home. Also, there will be less reverberation on a carpeted concrete floor than on a wood overlay floor. Sometimes a heavy rubber mat will help reduce reverberation through the floor. If a fitness product is placed close to a wall, there will be more reflected noise. HOW LONG WILL THE DRIVE BELT LAST? The computer modeling we have done indicated virtually thousands of maintenance free hours. Belts are now commonly used in far more demanding applications such as motorcycle drives. CAN I MOVE THE TRAINER EASILY ONCE IT IS ASSEMBLED? Your elliptical has a pair of transport wheels built into the front legs. It is easy to move your elliptical by rolling it on the front transport wheels. It is important that you place your elliptical in a comfortable and inviting room. Your elliptical is designed to use minimal floor space. Many people will place their ellipticals facing the TV or a picture window. If at all possible, avoid putting your elliptical in a unfinished basement. To make exercise a desirable daily activity for you, the elliptical should be in a comfortable setting. CAN I PEDAL BACKWARDS ON MY ELLIPTICAL? Your elliptical allows you to pedal both forward and backwards to exercise and strengthen a wider range of muscles. Answering these and other questions will give the technicians the ability to send proper replacement parts and the service necessary to get you and your Fitness Gear elliptical running again! 22 23 24 watt rpm level 15 20 25 L1 3.2 6.2 7.1 8 L2 4.2 7 9 11 L3 5.2 8.6 11.3 L4 6.1 10 L5 7.1 11.8 16.4 L6 8.1 13.5 19.3 14 30 35 40 45 50 55 60 65 70 75 80 12.5 17 85 90 95 100 105 110 115 120 125 130 135 140 68 76 91.5 103 81.5 87 94.5 102 110 118 126 133 143 153 112 120 129 138 148.5 159 171 182 193 203 22 27 31 35 42.5 50 55 60 23 30 36 42 47 56.5 66 73 80 14 21.5 29 38 46 54 61 73 85 134 144 154 167 180 193 206 220 233 251 268 18 26.5 35 45 55 65 75 89 103 116 129 147 164 177 189 205 220 234 248 265 282 302 322 53 65 78 90 106 122 136 150 172 194 208 222 241 260 277.5 295 314 333 357 380 21 17 31 41 95.5 106 120 25 36.5 48 62 75 90 104 122.5 141 157.5 174 200 225 242 258 281 303 323.5 344 365 385 412 439 L7 9 14.8 21.4 28 40.5 53 69 84 99 114 192 219 246 266 285 308 331 L8 10 16.7 24.4 32 78 95 114 132 155.5 179 199.5 220 251 281 303 325 351 377 404.5 432 456 480 510 540 46 60 135 156 174 355 379 400 421 450 478 L9 11 18.7 27.4 36 51.5 67 86 104 125 145 195 219 243 275 306 331 356 386 415 438 461 491 520 556 592 L10 12.1 20.4 30.2 40 57.5 75 96 116 139 161 187.5 214 241 268 302 336 364 391 423 454 483 512 541 569 605 641 L11 13.2 22.5 33.3 44 82 104 126 151 175 203.5 232 260.5 289 325 361 391 421 457 493 521.5 550 582 613 650 687 L12 13.6 23.1 34.2 45.3 64.2 83 106 129 154 178 206.5 235 264 293 329 365 398 430 464 497 L13 13.9 23.5 34.9 46.3 65.7 85 109 132 157 181 210 239 268.5 298 334 370 402 434 470 506 536.5 567 598 629 666 702 L14 14.2 23.9 35.5 47 66.5 86 110 134 159 184 213 242 271.5 301 338 374 406 438 474 510 L15 14.4 24.4 36.2 48 67.5 87 112 137 163 188 216.5 245 275.5 306 343 380 411 442 479 515 545.5 576 608 639 675 710 L16 14.6 24.8 36.9 49 68.5 88 114 139 165 191 220.5 250 280 382 415 447 482 517 63 170 310 346 529 541 548 561 592 623 659 695 572 603 634 670 706 579 612 644 679 714 25 D: Entsorgungshinweis Horizon Fitness/Vision Fitness - Produkte sind receyclebar. Führen Sie das gerät am Ende der Nutzungsdauer einer sachgerechten Entsorgung zu (örtliche Sammelstelle). GB: Waste Disposal Horizon Fitness/Vision Fitness products are recyclable. At the end if its useful lifeplease dispose of this article correctly and safely ( local refuse sites). F: Remarque relative à la gestion des dèchets Les produits Horizon Fitness/VisionFitness sont recyclables. A la fin sa durrèed‘utilisation, remettez I´appareil à un centre de gestion de dèchets correct (collectelocale). NL: VerwijderingsaanwijzingHorizon Fitness/Vision Fitness producten zijn recycleerbaar. Breng het apparaataan het einde van de gebruiksduur naar een vaekundig verzampelbunt voorrecycling. E: Informaciones para la evacuaciònLos productos de Horizon Fitness/Vision Fitness son riciclables. Cuando se terminala vida ùtil de un aparato o una màquina, entrèguelos an una impresa local deeleiminaciòn de residuos para su reciclaje. I: Indicazione sullo smaltimentoI prodotti Horizon Fitness/Vision Fitness sono reciclabill. Quando I‘apparecchionon servirà più, portatelo in un apposito punto di raccolta della Vostra città(Punti di raccolta comunall). PL: Wskazòwka dotyczàca usuwania odpadòw.Producty firmy Horizon Fitness/Vision Fitness podlegajà recyklingowi. Pod koniecokresu o‘ywalnoÈcl pros‘z oddac urzàdzenie do wlaÈciwego punkto usuwaniaodpadòw (lokalny punkt zbiorczy). 020909