1
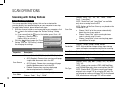
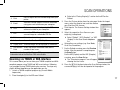
High Performance Document Scanner User Guide FOR WINDOWS All trademarks are the property of their respective owners and all rights are acknowledged. Images and screenshots used in this User Guide may vary according to the devices used and its operating system. Images and screenshots shown inside are example only. ENGLISH DEUTSCH FRANÇAIS ITALIANO ESPAÑOL PORTUGUÊS РУССКИЙ SAFETY AND PRECAUTIONS General Precautions Never store the unit in hot, or very cold, or humid or dusty places. For an extended storage period, we recommend storing the unit in a cool and dry place. If the scanner is left in extreme cold or hot conditions, allow it to adjust to normal room temperatures before use. Only use accessories included with the scanner. When left unused for a long period of time, remove the power plug from the outlet. Always handle the unit with care. Avoid dropping and strong impact. Avoid objects (e.g. neckties, long hair, etc) being caught in the scanner during a scanning operation. Do not scan sharp objects or hard abrasive surfaces to avoid damage to the lens and other parts. Do not scan documents with glue, grease, correction fluid, or wet ink on it which can cause malfunctions. Operate the unit on a level, well-grounded work surface, and free of excessive vibration. Don’t open the unit. Risk of electric shock. When moving the scanner, disconnect the power cord and connection cable. When doing maintenance on the scanner, remove the power plug from the outlet. Do not leave the scanner within the reach of children. Environmental Information Discarded electrical and electronic appliances are recyclable and should separate from the household waste. Please actively support in conserving resources and protecting the environment by returning this appliance to the collection centers (if available). 2 CONTENTS SAFETY AND PRECAUTIONS .................................................................2 Scanning with iDocScan Program........................................................14 CONTENTS .............................................................................................3 Setting Up the Scan Settings .........................................................14 UNPACK .................................................................................................4 Scanning a Single-Page Document ................................................16 SCANNER PARTS...................................................................................5 Scanning Multi-Page Documents ..................................................16 SYSTEM REQUIREMENTS .....................................................................6 Overview of the iDocScan Panel ....................................................16 INSTALLATION .......................................................................................7 Scanning via TWAIN or WIA interface ..................................................17 Assembling the Rear Tray ......................................................................7 Useful Scanner Features ......................................................................18 Installing Software .................................................................................7 Scanning Business Cards ..............................................................18 Installing the Scanner Driver ...........................................................7 Scanning Long Paper ....................................................................18 Installing Other Software .................................................................8 MAINTENANCE ....................................................................................19 Connecting the Scanner .........................................................................8 Cleaning the Scanner ..........................................................................19 PREPARATIONS .....................................................................................9 Cleaning the ADF Parts .................................................................19 Turning On/Off the Scanner....................................................................9 Cleaning the Flatbed Glass ............................................................19 Automatic Power-Off Function .........................................................9 Calibrating the Scanner ........................................................................20 Placing Original(s) .................................................................................9 Replacing the Separation Pad ..............................................................20 Inspecting Original(s) .....................................................................9 Clearing Document Jams in the ADF ....................................................21 Placing Documents in the ADF ......................................................10 Tips for Preventing Document Jams ..............................................21 Placing Cards in the ADF ...............................................................11 TROUBLESHOOTING ...........................................................................22 Placing Document on the Flatbed ..................................................11 SPECIFICATIONS .................................................................................25 SCAN OPERATIONS .............................................................................12 Scanning with Hotkey Buttons .............................................................12 Setting up Hotkey Buttons .............................................................12 Starting Hotkey Scanning ..............................................................13 3 UNPACK Make sure following items are included. Scanner Rear Tray (See p.7) Power Adapter (See p.8) USB Cable (See p.8) Separation Pad (See p.20) Installation CD (See p.7) (*) User Guide Calibration Sheet (See p.20) (*) The following are included in the Installation CD: Scanner Driver (TWAIN and WIA / iDocScan D20 Program/ Hotkey Utility / Calibration Utility) (for Windows) ABBYY FineReader ArcSoft Media Impression Adobe Acrobat Reader 4 SCANNER PARTS 2 1 3 Parts Functions 1 ADF Cover Opens the cover of the ADF (Auto Document Feeder) when maintenance is required. 2 Width Guides Adjusts the Guides to match the document width. 3 ADF Input Tray Holds the documents to be fed into the ADF (Automatic Document Feeder) for scanning. 4 Operation Panel 2 4 A B C D E A Power LED Emits green light when the scanner is turn on. B Power Button Turns on or off the power. C SCAN Button Performs Hotkey scanning of the image files. D PDF Button Performs Hotkey scanning of the multi-page PDF files. E PANEL Button Opens the iDocScan D20 program. 5 Flatbed Cover Opens to reveal the Flatbed Glass. 6 Flatbed Glass Holds the single-page document to be scanned. 7 Power Jack Connects the Power Adapter. 8 USB Port Connects the USB Cable to a computer. 9 Rear Tray Slots Used to mount the Rear Tray. 5 6 7 8 9 5 SYSTEM REQUIREMENTS Following minimum system requirements are recommended to obtain the best performance for running your iDocScan scanner. Computer with Intel Pentium 1.3GHz CPU or higher SVGA color screen 2GB RAM or greater USB 2.0 Hi-Speed CD-ROM or DVD-ROM drive 1GB available hard disk space for software installation Supported operating systems: Windows XP, Vista, 7, 8 and 8.1 NOTE: The scanning speed and performance are determined by the specifications of your computer. The higher specification of your computer, the better the scanner will be performed. 6 INSTALLATION Assembling the Rear Tray Installing Software Follow below steps to attach the Rear Tray to the scanner for holding the paper as it exits from the ADF. Please complete the software installation before connecting the scanner. NOTE: Do not connect USB Cable to the scanner or your computer when starting installation process. 1. Locate the Rear Tray Slots on the lower back of the scanner. 2. Insert the Rear Tray tabs into the slots on the scanner. Installing the Scanner Driver The scanner comes with the scanner driver that is packaged with TWAIN / WIA driver, Hotkey Utility and the iDocScan D20 program. You can either scan from any TWAIN-compatible applications by selecting a TWAIN or WIA user interface, or you can use the Hotkey Utility for Hotkey scanning, or you may also use the iDocScan D20 program for scanning as your preference. 1. Insert the Installation CD into your CDor DVD-ROM drive. The installation menu will open automatically. 3. Flip open the extension on the Rear Tray. NOTE: If the installation menu does not open automatically, double click on the CD- or DVD-ROM icon in the “Computer” or “Windows Explorer”, then click on the AUTORUN.exe icon. 2. In the main menu, select "Scanner Driver". 3. Click “Next” when the Welcome screen is displayed, then follow on-screen instructions to complete installation. 4. Click "Finish" when the installation is complete. 5. Remove the Installation CD from your computer. 7 INSTALLATION NOTE: If you want to uninstall the scanner driver, be sure to exit the iDocScan D20 hotkey by right-click on the icon from the Show Hidden Icons in the taskbar before uninstalling process. Connecting the Scanner Installing Other Software 2. With your computer turned on, connect the USB Cable to the USB Port on your computer and the other end to the side of the scanner. Following applications are included with the scanner, please install them to get the functions of the scanner to work properly. To install these applications, return to the CD main menu and click on the application you want to install. Adobe Acrobat Reader - Adobe Acrobat Reader is a program to open, view, search, and print PDF files. For a complete operation of the PDF function of the scanner, please install this program. ABBYY FineReader - ABBYY FineReader allows to scan text and convert it to a text document in a word processing program. For a complete operation of the OCR function of the scanner, please install this program. ArcSoft MediaImpression - ArcSoft MediaImpression is a program that allows you to read, edit and organize images. NOTE: Click the “Browse the CD” from the CD main menu to browse the full contents of the Installation CD. 8 1. Connect one end of supplied Power Adapter to the scanner’s DC IN jack, and the other end to a power socket. PREPARATIONS Turning On/Off the Scanner Placing Original(s) Power Button Inspecting Original(s) Please inspect your original(s) before scanning to prevent paper jams and protect documents. 1. Press the Power Button to turn on the scanner. The Power LED turns GREEN when the scanner is turned on. 2. Your computer then recognizes that a scanner has been plugged into the USB Port and automatically loads the Hotkey Utility ( ) in the taskbar to run the scanner. You may need to click on the "Show hidden icons" arrow in order to find the Hotkey Utility icon ( ). To turn off the power press the Power Button for 3 seconds until the Power LED turns off. Ensures staples and paper clips have been removed prior to scanning as they may cause damage to the scanner and document. Do not feed paper with wet ink or liquid correction fluid, curls, wrinkles, folds, irregular shapes or tears into the ADF tray. Do not scan fragile photos and important originals using the ADF as misfeeding may wrinkle or damage them. Use the flatbed instead. Do not overload the ADF Input Tray. The paper capacity is 60 sheets for the plain paper or 20 cards for the business cards. If a stack of plain paper or business cards cannot be fed into the ADF properly, try to reduce the number of plain paper or cards in the stack. When scanning a stack of small business cards or other small paper, place the long side of the paper parallel with the Width Guides. We recommend that long paper to be fed in ADF Input Tray one sheet at a time. Automatic Power-Off Function By default, when the scanner has no operations for 15 minutes, the scanner will automatically turn the power off, and the Hotkey Utility ) when the power is off. will then be disabled ( To resume the function and the Hotkey Utility ( Button to turn on the scanner. ), press the Power Do not use sheets other than those with the specified size, quality, and weight as the Specification (p.24) to feed in the ADF tray. Do not mix different paper types and paper sizes. 9 PREPARATIONS Placing Documents in the ADF 1. Fan the stack of the documents to loosen them. 4. Slide either side of the Width Guide to the mark indicating the desired paper size. A5 B5 A4 LTR 2. Straighten the top edges of the documents on a level of surface. 5. Place your single-sided documents face down with the tops in first, and then slide the stack into the ADF tray. Place your double-sided documents with the first page face down with the tops in first, and then slide the stack into the ADF tray. Verify that the Width Guides touches the edges of the stack. 3. Slightly lift the ADF Input Tray until the legs are fully extended and held in position. 10 PREPARATIONS Placing Cards in the ADF Placing Document on the Flatbed 1. Place the stack of cards face down with the long side parallel with the Width Guides. 1. Lift open the Flatbed Cover. 2. Adjust the Width Guides to center the cards. Make sure the Width Guides touch the edges of the cards. 2. Place single-page document face down on the Flatbed Glass. Position the document as indicated by the position arrow mark. TIPS: Choose “Name Card” from the Scan Size in the Scan Setting Window when scanning a stack of cards in the ADF. 3. Close the Flatbed Cover. 11 SCAN OPERATIONS Scanning with Hotkey Buttons Scan Size Choices: “Auto”, “A4”, “A5”, “B5”, “Letter”, “Name Card”, “Long Sheet”. NOTE: “Name Card” and “Long Sheet” are available only when scanning from the ADF. NOTE: Options of the Scan Size may vary based on the Resolution is set. Choose “Auto” to let the scanner automatically detect the size of your original. Choose “Name Card” when scanning business cards in a batch up to 20 cards. Choose “Long Sheet” when scanning long paper up to 635mm in length. Resolution Choices : 100dpi, 200dpi, 300dpi, 600dpi. NOTE: High resolution images occupy more storage space and require more processing time for scanning. Save Path Set a file location to save the scanned files. Default Reset the Setting to the default settings. Setting up Hotkey Buttons The scanner provides Hotkey buttons that can be customized for scanning directly to a specified location on your computer in one step. To setup Hotkey buttons, please follow these steps: 1. With the scanner turned on and connected to your computer, click icon in the taskbar to open the “Button Settings” dialog. the icon in the taskbar, press Start > All If you cannot find the Programs > iDocScan D20 > Hotkey Utility to activate it. 2. Click the Edit button to open the “Scan Setting” and the “PDF Setting” window for changing the settings. Basic Settings Properties Description Choices: “Flatbed”, “ADF (Simplex)”, “ADF (Duplex)”. Scan Source Scan Mode 12 ADF (Simplex): Choose when scanning multi-page single-sided documents fed in the ADF. ADF (Duplex): Choose when scanning multi-page double-sided documents fed in the ADF. Flatbed: Choose when scanning single-page document placed on the flatbed glass. Select a mode for scanning your original(s). Choices: “Color”, “Gray”, “B&W”. Scan Settings File Type Choices: JPEG(*.jpg), BMP (*.bmp), TIFF(*.tif), MultiTIFF(*.tif). NOTE: Image can be saved as JPEG at 600 dpi/Color and 1200 dpi/Color only when scanning from the ADF. NOTE: Choose Multi-TIFF when scanning multi-page originals into a single TIFF by using the ADF only. Do not attempt to create a multi-page TIFF file that exceed 2GB, otherwise no multi-page TIFF will be created. SCAN OPERATIONS PDF Settings Searchable PDF Check the checkbox to convert document into a textsearchable PDF file. NOTE: Choose PDF when you need to scan multi-page documents and convert it to a single PDF file. OCR Language Choose a language for text recognition. Advanced Settings Deskew Blank Page Removal Image skew generally occurs when the original is placed incorrectly in the ADF tray. Tick the checkbox to automatically straighten skewed pages as much as possible to maintain it’s original size. NOTE: Deskew is only enabled when the Scan Size set to “Auto”. Tick the checkbox to automatically remove the blank page(s) from the scanned document(s). For example, when scanning a stack of documents containing both double-sided and single-sided documents. This function works best with white or light-colored pages. Depending on the originals, some pages that are not blank may be detected as blank due to a small amount of text. Starting Hotkey Scanning You can perform Hotkey scanning using either the SCAN or PDF Button on the Operation Panel of the scanner, PDF Button Scan Button or click the icon in the taskbar to open the “Button Settings” window. Scan Button PDF Button Hotkey scanning with the SCAN Button: 1. Place the original(s). Refer to the “Placing Original(s)” section for the ADF or the flatbed. 2. Select the respective Scan Source as your original(s) to be placed. Select “Flatbed”, “ADF (Simplex)”, or “ADF (Duplex)” in the Scan Source dropdown list. 3. Press the SCAN Button. The “Scanning in progress” bar will appear showing the scan status. After the scan is complete, the image will be saved in the specified location with automatically generated filename. 13 SCAN OPERATIONS Hotkey scanning with the PDF Button: 1. Place the original(s). Refer to the “Placing Original(s)” section for the ADF or the flatbed. 2. Select the respective Scan Source as your original(s) to be placed. Select “Flatbed”, “ADF (Simplex)”, or “ADF (Duplex)” in the Scan Source dropdown list. 3. Press the PDF Button on the scanner. The “Scanning in progress” bar will appear showing the scan status. After the scan is complete, the PDF file will be saved in the specified location with automatically generated filename. Scanning with iDocScan Program Scan Tab Scan Settings Properties Description Choices: “Flatbed”, “ADF (Simplex)”, “ADF (Duplex)”. Setting Up the Scan Settings 1. Press the PANEL button on the scanner, or press Start > All Programs > iDocScan D20 > iDocScan D20 to launch the iDocScan D20 program. PANEL Button Marquee Handles Scan Preview Exit The iDocScan D20 program is specially designed to work with this scanner for easy scanning and other functions. Before you begin scanning, make sure you have set up the scan settings properly. Preview Window Scan Settings Window Scan Source Scan Mode ADF (Simplex): Choose when scanning multi-page single-sided documents fed in the ADF. ADF (Duplex): Choose when scanning multi-page double-sided documents fed in the ADF. Flatbed: Choose when scanning single-page document placed on the flatbed glass. Select a mode for scanning your original(s). Choices: “Color”, “Gray”, “B&W”. Choices : 100dpi, 200dpi, 300dpi, 600dpi, 1200dpi. (Scan) tab to launch the Scan Setting window for 2. Press the changing the settings. 14 Resolution NOTE: “1200dpi” is available only when scanning from the Flatbed. SCAN OPERATIONS Advanced Setting for ADF Choices: “Auto”, “A4”, “A5”, “B5”, “Letter”, “Name Card”, “Long Sheet”. Deskew Image skew generally occurs when the original is placed incorrectly in the ADF tray. Tick the checkbox to automatically straighten skewed pages as much as possible to maintain it’s original size. NOTE: Deskew is only enabled when the Scan Size set to “Auto”. Blank Page Removal Tick the checkbox to automatically remove the blank page(s) from the scanned document(s). For example, when scanning a stack of documents containing both double-sided and single-sided documents. This function works best with white or light-colored pages. Depending on the originals, some pages that are not blank may be detected as blank due to a small amount of text. NOTE: “Name Card” and “Long Sheet” are available only when scanning from the ADF. Scan Size NOTE: Options of the Scan Size may vary based on the Resolution is set. Choose “Auto” to let the scanner automatically detect the size of your original. Choose “Name Card” when scanning business cards in a batch up to 20 cards. Choose “Long Sheet” when scanning long paper up to 635mm in length. Choices: JPEG(*.jpg), BMP (*.bmp), TIFF(*.tif), MultiTIFF(*.tif). File Type NOTE: Image can be saved as JPG at 600 dpi/Color and 1200 dpi/Color only when scanning from the ADF. NOTE: Choose Multi-TIFF when scanning multi-page originals into a single TIFF by using the ADF only. Do not attempt to create a multi-page TIFF file that exceed 2GB, otherwise no multi-page TIFF will be created. Advanced Setting for Flatbed Use the Brightness and Contrast sliders to adjust the pre-scanned image with a value between -127 to 127. Image Control Press the Reset button to reset the values to 0. NOTE: Brightness and Contrast does not support the Scan Mode set to “B&W”. For details on functions of the iDocscan D20 program, press the Information tab on the iDocScan D20 main window. 15 SCAN OPERATIONS Scanning a Single-Page Document 1. Place the original on flatbed. Refer to the “Placing Original(s)” section for flatbed. (Scan) tab to launch the scan setting window. 2. Press the Select “Flatbed” in the Scan Source. 3. 4. Press the Preview button to preview your image in the preview window at the right side. When the image appears, you can resize the scan area by dragging the marquee handles. Press the Scan Button. 5. The “Scanning in progress” bar will appear showing the scan status. After the scan is complete, the image will be saved in the default file location with automatically generated filename. window, and the scanned images will be displayed as thumbnails. Overview of the iDocScan Panel The following is a brief overview of the functions of the iDocScan D20 program. For detailed functions of the iDocScan D20 program, press the Information tab on the iDocScan D20 main window. 1 2 3 4 5 (Exit) button to return to the iDocScan D20 main 6. Press the window, and the scanned image will be displayed as a thumbnail. 6 7 8 9 10 Scanning Multi-Page Documents 1. Place the originals in the ADF tray. Refer to the “Placing Original(s)” section for the ADF. (Scan) tab to launch the scan setting window. 2. Press the Select “ADF (Duplex)” or “ADF (Simplex)” in the Scan Source 3. dropdown list as your original(s) to be placed. 4. Press the Scan Button to start scanning. The “Scanning in progress” bar will appear showing the scan status. After the scan is complete, the images will be saved in the default file location with automatically generated filename. 5. Press the 16 (Exit) button to return to the iDocScan D20 main 11 Items Functions 1 Scan Launch the scan setting window to start a scan. 2 Save Save the scanned image in the preferred file folder, filename, and the location. 3 Edit Edit your scanned image with tools such as Crop, Rotate CW90°, Rotate CCW90°, Flip H, Flip V, Zoom in, Zoom out, Fit, and 1:1 ratio. SCAN OPERATIONS Refer to the “Placing Original(s)” section for the ADF or the Flatbed. 4 Print Press it to print out the scanned image from your printer. 5 Email Send the scanned image as an email attachment using your email software on your computer. 3. Press the Pictures button from the main page. Under the Import menu, select the Acquire icon, and then choose your iDocScan D20 scanner. 6 OCR Perform text recognition by using the OCR software installed on your computer. 4. Click Acquire. The Scanner Setting window then appears. 7 PDF Launch the PDF setting window to convert the scanned image to a searchable PDF file. 5. Select the respective Scan Source as your original(s) to be placed. 8 Delete Delete the selected image. 9 Information Access the iDocScan D20 Help file. 10 Display Area Scanned Images will be displayed as thumbnails. 11 File Location Shows the default file location field and the Field number of total scans. For details on functions of the iDocscan D20 program, press the Information tab on the iDocScan D20 main window. Scanning via TWAIN or WIA interface This scanner allows you to scan from your TWAIN-compliant and WIAcompliant program using TWAIN and WIA user interface. Following is an example of using TWAIN interface for scanning. The steps may slightly different depending on the application you use. Select “Flatbed”, “ADF (Simplex)”, or “ADF (Duplex)” in the Scan Source dropdown list. 6. Setup other scan settings (e.g. Scan Mode, Scan Size, Resolution). 7. For the Flatbed scanning, press the Preview button. After the preview is complete press the Scan Button. For the ADF (Duplex) and the ADF (Simplex) scanning, press the Scan Button. The “Scanning in progress” bar will appear showing the scan status. (Exit) button to close the Scan Setting window, the 8. Press the scanned image(s) will then be imported in the program. 1. Launch a TWAIN-compliant program (e.g. Arcsoft Media Impression). 2. Place the original(s) in the ADF or on flatbed. 17 SCAN OPERATIONS Useful Scanner Features Scanning Long Paper Use following features when scanning special types of paper. Scanning Business Cards 1. Place your long paper in the ADF. Refer to the “Placing Original(s)” section for the ADF. 1. Place a stack of business cards in the ADF. Refer to the “Placing Original(s)” section for the ADF. 2. Press the PANEL button on the scanner to launch the iDocScan Settings or click the icon in the taskbar to open the “Button Settings” window. 2. Press the PANEL button on the scanner to launch the iDocScan Settings or click the icon in the taskbar to open the “Button Settings” window. 3. Select the respective Scan Source as your original(s) to be placed. Select “ADF (Simplex)” for scanning single-sided long paper, or “ADF (Duplex)” for scanning double-sided long paper. 3. Select the respective Scan Source as your original(s) to be placed. Select “ADF (Simplex)” for scanning singlesided cards, or “ADF (Duplex)” for scanning double-sided cards. 4. Select the “Name Card” from the Scan Size dropdown list. 5. Press the Scan Button to start scanning. The “Scanning in progress” bar will appear showing the scan status. After the scan is complete, the images will be saved in the default file location with automatically generated filename. (Exit) button to return to the iDocScan D20 main 6. Press the window, and the scanned image(s) will be displayed as thumbnails. Load a maximum of 20 business cards in a stack in the ADF. If the stack of cards cannot be fed properly, try to reduce the number of cards in the stack. 18 4. Select the “Long Sheet” from the Scan Size dropdown list. 5. Press the Scan Button to start scanning. The “Scanning in progress” bar will appear showing the scan status. After the scan is complete, the images will be saved in the default file location with automatically generated filename. (Exit) button to return to the 6. Press the iDocScan D20 main window, and the scanned image(s) will be displayed as thumbnails. By default, the scanner can accept the long paper up to maximum 635mm in length. The bottom of the scanned image will be cut off if longer than 635mm. Please verify your original before scanning. MAINTENANCE Cleaning the Scanner Cleaning the Flatbed Glass Dust and residues can build up on the Scanner’s rollers and glasses to affect image quality. Clean the rollers and glasses periodically to get the best scanning results. 1. Use a clean, lint-free cloth sprayed with some mild liquid glass cleaner. Cleaning the ADF Parts 2. Lift open the Flatbed Cover. 3. Wipe the entire surface of the Flatbed Glass and the Exposure Glass. 1. Use a clean, lint-free cloth sprayed with some mild liquid glass cleaner. NOTE: Never spray the cleaner directly onto the scanner. NOTE: Never spray the cleaner directly onto the scanner. 4. Close the Flatbed Cover when cleaning is finished. 2. Lift open the ADF Cover. 3. Wipe the pickup rollers from side to side. Rotate the rollers to clean all around the surface, and then clean the pinch rollers. 4. Wipe the Separation Pad from top to bottom. Be careful not to snag the cloth on the plastic springs on the pad. 5. Close the ADF Cover when cleaning is finished. Separation Pad Exposure Glass Flatbed Glass Pinch rollers Pickup rollers CAUTION: WHEN CLEANING THE SCANNER, BE SURE TO REMOVE THE POWER PLUG FROM THE OUTLET FOR SAFETY. 19 MAINTENANCE Calibrating the Scanner Replacing the Separation Pad When scanned image’s colors appear not to match the colors of the original, or colors appear in the white areas of the images, calibration helps to correct these problems by compensating variations in the scanner components that happens over time. The Separation Pad in the ADF part is a consumable item. After approx. 30000 times of scanning, it may become worn. Replace the Separation Pad when it is worn, damage or misfeeding continues to occur after cleaning. A spare Separation Pad is included with the scanner, please replace it as following steps. 1. Turn on the power of the scanner. 2. Press Start > All Programs > iDocScan D20 > Calibration Utility to open the calibration screen. 1. Turn off the power, and then lift open the ADF Cover. 3. Remove the plastic foil on both sides of the Calibration Sheet. 4. Insert the Calibration Sheet into the ADF tray with the arrow mark facing up and forward. 5. Press “Calibrate” to start calibrating. The Calibration Sheet will be gradually fed through the ADF. A progress bar will appear indicating the calibration process. Mechanical sounds produced during the calibrating process are normal. 6. Press “Close” after “the calibration is done” window appears. 20 2. Press both springs on each side of the Separation Pad, pull the pad backwards and lift it off the ADF Cover. MAINTENANCE 3. Hold the spare Separation Pad and align the springs with the slots on the ADF Cover. Press each spring and then push downward until it locks into place. 2. Carefully remove the jammed document by pulling evenly with both hands to avoid tearing. 3. Close the ADF Cover back in place. Clearing Document Jams in the ADF If a document jam occurs, a mechanical noise will produce and an error message will appear. Carefully remove the jammed paper as following. 1. Turn off the power, and then lift open the ADF Cover. Tips for Preventing Document Jams Do not overload the ADF Input Tray. The paper capacity is 60 sheets for the plain paper or 20 cards for the business cards. Do not remove paper from the ADF Input Tray during scanning. Do not scan folded, wrinkled, curled, torn paper, or paper with clips or staples. Fan and straighten paper before placing in the ADF Input tray. Do not mix different paper types and paper sizes. Use only the standard size and weight of paper as specification. Use the flatbed to scan very thick, extra thin, fragile, glossy paper or other items that cannot go through the Automatic Document Feeder. When scanning the small business cards or other small paper, place the long side of the paper parallel with the Width Guides. Make sure the Width Guides touch the edges of the paper. 21 TROUBLESHOOTING Problems Solutions My computer can’t detect the scanner or the scanner doesn’t start scanning. Check the power supply and cable are connected correctly. Be sure to restart your computer after the scanner driver is installed. Check if the power of the scanner is turned on . Feeding errors and document jams occur in the ADF. Refer to the “Clearing Document Jams in ADF” section for removing the jammed paper, and also read the “Tips for Preventing Document Jams“. Be sure the ADF Cover is closed properly. Refer to the “Cleaning the ADF parts” section for cleaning the ADF. Check If the Separation Pad appears worn, refer to the “Replacing the Separation Pad” section. Inspect your original(s) if they are distorted or damaged. Refer to the “Cleaning the Scanner” section to clean the ADF parts and the Flatbed Glass. Verify the scan quality in the software setting and increase the resolution. Make sure you have placed the original(s) correctly in the ADF or flatbed as the Scan Source setting. Make sure the paper is facing the correct direction. Scan a blank page to verify if the lines or stains continue to appear, clean the scanner. Refer to the “Cleaning the Scanner” section to clean the ADF parts and the Flatbed Glass. Refer to the “Calibrating the Scanner” section to calibrate your scanner. Place the original(s) correctly in the ADF and flatbed. Align the documents with the Width Guides and do not exceed the ADF tray capacity. Tick the “Deskew” checkbox in the Scan Size set to “Auto”. Originals with darker backgrounds and dark text are difficult to deskew. Deskew may not work properly when deskewing dark images. Poor scan quality. White or blank page(s) found. Vertical lines or stains appear on scanned images. Scanned images appear skewed, incomplete or cropped. Deskew doesn’t work properly. 22 TROUBLESHOOTING Problems Solutions Scanning speed is slow. Text created by the OCR software is incorrect. Scanned images cannot be sent as email attachments. Adjust the scanner software to reduce the resolution and decrease the file size. Lower quality settings generally results in faster scanning speeds. The BMP format requires a longer time for scanning than other formats. Select a resolution of minimum 300 dpi in the software settings. The OCR software may not always convert all text correctly. Please check the document for any errors that the OCR may have missed. The OCR recognition result is generally more accurate with the text-based digital images. Images with mixed content (text, images, and graphics all in the one page) may result less accurate. Set the scanner color settings to “B&W” if the text is black against a white background. Check if the quality of the original document is poor through the OCR recognition process. Be sure that you have a default email client installed and configured, in order to use the Email function in the iDocScan program. Ensure the scanned images do not exceed email size limitations The OCR function in the iDocScan program cannot be used. Be sure that AABBYY FineReader in the Installation CD is installed in your computer before using the OCR function. File Type can’t be changed to BMP at 600 dpi and 1200 dpi in ADF. The File Type will automatically change to the JPEG format when you scan documents at 600dpi and 1200 dpi in the ADF (Simplex) and ADF (Duplex) for best performance. Message “Insufficient disk space...” appears. Scanning multi-page documents can consume a large amount of disk space over time, scanning may stop because of insufficient disk space. Please clear the destination location from time to time. Memory becomes insufficient and scanning stops. When scanning conditions that consume a large amount of the computer’s memory, scanning may stop due to insufficient memory. Exit the application and change the scanning conditions, such as reduce scanning resolution. Make sure your computer meets the memory and other system requirements as specified. 23 TROUBLESHOOTING 24 Problems Solutions Image saved in the multi-page TIFF format cannot be opened by other applications. Multi-page TIFF cannot be created. Scanning a large document to multi-page TIFF file may cause the scanner to stop working due to insufficient memory of computer. Alternatively you can save as multi-page PDF using the scanner’s PDF button. Saving multi-page TIFF images will create very large files, make sure you have enough hard disk space to save the multi-page TIFF images. Do not attempt to create a multi-page TIFF file that exceed the 2GB limit. If the file size exceeds 2GB, no multi-page TIFF will be created. Not all applications accept the multi-page TIFF format. Applications that do not support multi-page TIFF format will import and display only the first page of the document. Open the file using the applications that support the multi-page TIFF format. SPECIFICATIONS Scanner type Color Duplex ADF (automatic document feeder) and flatbed scanner Scan Speed (*) 20ppm/40ipm (color, 200 dpi, A4, 70 g/m2 ) 20ppm/40ipm (gray, 200dpi, A4, 70 g/m2 ) 20ppm/40ipm (B&W, 200dpi, A4, 70 g/m2 ) Capacity 60 pages at 80 g/m2 (20 lb), Max thickness: 6 mm (0.24”) Scanning Side Duplex (double sided) and Simplex (single sided) Input Tray Width 9.5” (242 mm) Scan Area Max. W216mm x L356mm (W8.5” x L14”) Min. W50mm x 90mm (W2” x L3.5”) Scan Size Auto A4 (W210mm x L297mm / W8.3” x L11.7”) A5 (W149mm x L210mm / W5.9” x L8.3”) B5 (W176mm x L250mm / W6.9”xL9.8”) Letter (W216mm x L279mm / 8.5” x 11”) Name Card (W55mm / W2.2”) Long Sheet (W216mm x L635 mm / W8.5” x L25”) Paper Weight Plain Paper: 50-130 g/m2 (14 - 35 lb) Card Stock: 0.3mm (Max. 20 cards) Paper Thickness 0.07mm - 0.16mm (Normal), 0.4mm (max) Optical Resolution 100dpi - 600dpi Daily Duty Cycle 3000 sheets Separation Pad Lifetime 30000 Scans ADF (Automatic Document Feeder) 25 SPECIFICATIONS Scan Area Max. 216mm x 300mm (8.5” x 11.8”) Scan Speed (*) approx. 5 sec per page (Color, 300 dpi, A4) Scan Size Auto A4 (W210mm x L297mm / W8.3” x L11.7”) A5 (W149mm x L210mm / W5.9” x L8.3”) B5 (W176mm x L250mm / W6.9”xL9.8”) Letter (W216mm x L279mm / W8.5” x L11”) Optical Resolution 100 dpi - 600 dpi; Maximum1200 dpi for TWAIN & iDocScan Program Flatbed File Format Output JPEG(*.jpg), BMP (*.bmp), TIFF(*.tif), Multi-TIFF(*.tif), PDF (*.pdf) Power Saving Auto power off after no operation for 15 minutes Compatibility TWAIN Compliant (for Windows XP / Vista / 7 / 8 / 8.1) WIA Compliant (for Windows 7 / 8 / 8.1 only) Dimension L430 mm x W334 mm x D100 mm (L16.9” x W13.15” x D3.94”) Weight 4.5 kgs (9.92lbs) Power Supply 12V/2A (Input : 100V ~ 240V, 50/60Hz) Operation Temperature 10 °C - 35 °C (59 °F - 95 °F) (*) The Scan Speed may vary according to the operation environment of the scanner and the computer, and the contents of the original. 26