1
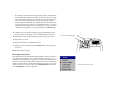
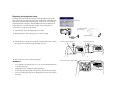
Replacing the projection lamp
The lamp hour timer in the About menu counts the number of hours the
lamp has been in use. Fifty hours before the specified end of the lamp’s life,
the message “Replace lamp” briefly appears on the screen at each startup
and in the Interactive Display. After 50 additional hours, the lamp will no
longer light. You can order new lamp modules from your dealer. See
“Accessories” on page 41 for information.
1 Turn off the projector and unplug the power cable.
About menu
computer 2
audio out
R
S-video 1
L
audio in
video 2
computer 1
serial control
network
audio in
monitor out
computer in
turn off and unplug
the projector
video in
2 Wait 60 minutes to allow the projector to cool thoroughly.
wait 60 minutes
3 Turn the projector upside down and remove the lamp door by loosening
loosen the screw on lamp door
the captive screw and then prying the lamp door out.
4 Remove the two screws on the lamp module.
remove the screws on lamp module
WARNINGS:
•
To avoid burns, allow the projector to cool for at least 60 minutes before
you replace the lamp.
•
Unplug the power cord before replacing the lamp.
•
Do not drop the lamp module. The glass may shatter and cause injury.
•
Do not touch the glass lamp screen. Fingerprints can obscure projection
sharpness.
pry the lamp door off
•
Be extremely careful when removing the lamp housing. In the unlikely
event that the lamp ruptures, small glass fragments may be generated.
The lamp module is designed to contain most of these fragments, but
use caution when removing it. Before replacing the lamp, clean the
lamp compartment and dispose of cleaning materials. Wash hands after
lamp replacement. his product has a lamp which contains a very small
amount of mercury. Dispose of it as required by local, state or federal
ordinances and regulations. For more information see www.eiae.org.
5 Carefully remove the lamp module by grasping and lifting the metal
bail wire. Dispose of the lamp in an environmentally proper manner.
remove module using bail wire
6 Install the new lamp module, making sure that it is properly seated.
7 Replace the two screws.
8 Replace the lamp door and tighten the screw.
9 Plug in the power cable then press the Power button to turn the projector back on.
10 Reset the lamp hour timer.
Resetting the lamp timer
If the lamp timer has reached the maximum number of hours for the projector lamp, the LED on the projector’s keypad will show a lamp error (see
“LED behavior and meaning” on page 16). To reset the lamp timer, press the
decrease volume button on the remote and then the increase volume button
within 3 seconds. At that point the LED will turn green and you can power
on the projector. You can also navigate to the Settings>Service menu and
select Lamp Reset to reset the lamp timer.
reset lamp time in Service menu