1
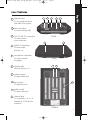
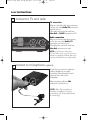
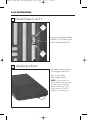
teleloop amplifier
Your local representative:
International: +45 3917 7101 • germany (kostenlose Rufnummer): 0800/1844736
u.s.: 800.227.0735, then press 7 • canada: 800.263.8700 • website: www.phonicear.dk
© 2005 Phonic Ear A/S
921-21-110-00/Rev.
GB use r g u i d e
o t h e r res o u r c e s o n l i n e a t w w w. p h o n i c e a r. d k
Puzzle Loop User Guide_UK.qxd
09-09-2005
09:53
Page 6
table of contents
LOOP function . . . . . . . . . . . . . . . . . . . . . . . . . . . . . . . . . . . . . . . . . . . . .
2
LOOP features . . . . . . . . . . . . . . . . . . . . . . . . . . . . . . . . . . . . . . . . . . . . .
3
LOOP accessories . . . . . . . . . . . . . . . . . . . . . . . . . . . . . . . . . . . . . . . . . . .
4
LOOP instructions . . . . . . . . . . . . . . . . . . . . . . . . . . . . . . . . . . . . . . . . . .
5
Troubleshooting . . . . . . . . . . . . . . . . . . . . . . . . . . . . . . . . . . . . . . . . . . .
10
Warranty . . . . . . . . . . . . . . . . . . . . . . . . . . . . .. . . . . . . . . . . . . . . . . . . .
11
Puzzle Loop User Guide_UK.qxd
09-09-2005
09:53
Page 7
LOOP function
LOOP is the PUZZLE system’s teleloop amplifier. LOOP transfers the sound from TV and radio
directly to your hearing aid (or telemagnetic receiver) and you receive the sound loud and clear.
LOOP can also receive alarms from the PUZZLE system’s alerting transmitters (DETECT DOOR and/or
OBSERVER). When an alarm is received, the signal from the radio or the TV is turned down and
an alarm signal is heard instead. LOOP can receive up to seven different alarms apart from the
alarm for battery change. Each alarm has its own unique sound pattern, which makes it easier to
distinguish between the different alarm signals. The individual sound patterns are set on the
alerting transmitters (DETECT DOOR and/or OBSERVER).
Important
Use only cables and jack plugs supplied by an authorized Phonic Ear representative/installer or
LOOP may be damaged.
2
Puzzle Loop User Guide_UK.qxd
09-09-2005
09:53
Page 8
LOOP features
1
2
3
4
English
1 channel tuner
To set personal code for use
with other PUZZLE systems
5
2 loop connection
To connect teleloop cable
3 12V AC/18V DC connection
To connect 12volt
power transformer
back
6
7
4 radio/TV connections
To connect radio,
television, etc.
5 microphone connection
To connect external
microphone
6 indicator light
Shows that power is on
front
8
9
7 volume control
To adjust volume level
8 bass control
To adjust bass levels
10
9 treble control
To adjust treble levels
10
channel type
To set channels to “X” or “Y”.
Maintain in “X” Position for
normal use
bottom
3
Puzzle Loop User Guide_UK.qxd
09-09-2005
L OOP accessories
09:53
Page 9
(included with LOOP system)
11 teleloop cable
Installed in rooms where
LOOP will be used
11
12 teleloop cable clips
To secure the teleloop cable along
the wall, floor and/or ceiling
13 screwdriver
12
To adjust bass and treble controls
and to set personal code
14 connector set
13
Includes:
• Adaptor, SCART/phono
• Adaptor: 6,3mm (.25in) plug stereo
to 3,5mm (.125in) stereo jack
14
• Connector cable: 2m (6.5ft),
3,5mm (.125in) plug stereo to 3,5mm
(.125in) stereo plug
• Stereo cable: 2m (6.5ft),
3,5mm (.125in) stereo plug
to 2 x phono plug
15
Power transformer
(optional in some countries)
(not shown)
LOOP accessories
(not included, sold separately)
16 Clip microphone
Placed in front of source loudspeaker if
sound source cannot be attached to teleloop
amplifer by an output connection. Can also
be used to amplify conversations.
16
17
boundary microphone (not shown)
18
cusion loop (not shown)
4
Puzzle Loop User Guide_UK.qxd
09-09-2005
09:53
Page 10
LOOP i n s t r u c t i o n s
1
top view of room
sofa
2
door
1
TV
2
English
1 teleloop installation
Place teleloop cable
along wall, floor, or
ceiling of room where
LOOP will be used and
secure with cable clips.
To avoid cable damage,
run cable under carpet,
behind baseboard or
around doorframe.
ATTENTION: Make sure that
teleloop cable is fully stretched out.
If cable is too long, shorten it to fit
room size.
Cushion LOOP (sold separately)
Place cushion loop pad under a cushion in the seat where you are listening
to the sound source. The cushion loop
limits the range of the teleloop and
possible “interference ability”. It can
also be easily moved around the room
as necessary.
2 connecting teleloop cables
2
1
3
1
Remove gray Loop connector from back of unit.
2
Loosen cable connection
screws on the Loop
connector.
3
Strip ends of cable to
expose 1 cm of wire.
Insert ends of cable into
connector holes and
tighten screws using the
screwdriver.
Replace gray connector
into Loop hole on unit.
5
Puzzle Loop User Guide_UK.qxd
09-09-2005
09:53
Page 11
LOOP instructions
3 connect to TV and radio
TV connection
Plug one end of the cable (from connector
set) into one of the Radio/TV connections
on back of LOOP.
Then plug other end of the cable into
Line Out or SCART connection on TV.
Radio connection
Plug one end of the cable (from connector set) into one of the Radio/TV
connections on back of LOOP.
Then plug other end of the cable into
Line Out connection on radio.
NOTE: Sound sources other than
TV and radio can be connected to LOOP.
Contact an authorized Phonic Ear representative/installer for more information.
4 connect to microphone
(optional)
If sound source cannot be attached to
teleloop amplifier by an output
connection, then microphone can be
placed in front of the source
loudspeaker.
Plug microphone cable into Mic
connection on back of LOOP.
NOTE: When Clip microphone or
boundary microphone are used for
conversations, the TV and radio should
be switched off.
6
Puzzle Loop User Guide_UK.qxd
09-09-2005
09:54
Page 12
LOOP instructions
English
5 connecting transformer
1
1
2
2
Plug transformer cord into
12V AC 18V DC connection on back of LOOP.
Plug transformer into
wall socket. Red light on
front of LOOP should go on.
6 selecting personal code
Use Channel tuner on back of
LOOP to set personal code.
NOTE: Use the screwdriver
included with LOOP to turn
dial to desired setting.
All other PUZZLE alarm transmitters
and receivers should be set to the
same personal code.
7
Puzzle Loop User Guide_UK.qxd
09-09-2005
09:54
Page 13
LOOP instructions
7 Channel type X and Y
Y
Y
Dip switch on underside of LOOP
should be in “X” position as standard to use channels 0-F. (16)
X
X
8 adjusting volume
Use volume control on front of
LOOP to adjust volume level:
Min = Lowest volume
Max = Highest volume
NOTE: As a general rule, the
volume should be adjusted so that
you don’t experience irritating
changes in volume when you
change between “M” and “T”
positions on your hearing aid.
8
Puzzle Loop User Guide_UK.qxd
09-09-2005
09:54
Page 14
LOOP instructions
English
9 adjusting bass and treble
1
2
1
2
Turn left control on
bottom of LOOP clockwise
to increase bass level and
counterclockwise to
reduce bass level.
Turn right control on
bottom of LOOP clockwise
to increase treble level
and counterclockwise to
reduce treble level.
NOTE: Use the screwdriver
included with LOOP to adjust
bass and treble controls.
10 hearing aid setting
Set hearing aid to “T”
position when using teleloop.
9
Puzzle Loop User Guide_UK.qxd
09-09-2005
09:54
Page 15
troubleshooting
Should your LOOP teleloop amplifier not function satisfactorily, please check the list below:
The red light on the front of LOOP unit does not come on
• Check to see that the wall contact is switched on.
• Switch off the wall contact for 10 seconds and then switch it on again.
The red light on the front of LOOP comes on, but there is no signal
when the TV or radio is turned on
• Check that the volume is correctly adjusted. See 8 .
• Check that all the connections are connected properly.
• Check that your hearing aid is set to the T-position (telecoil).
The red light on the front of LOOP comes on, but no signal is heard when
one of PUZZLE system’s alerting transmitters is activated
• Check that the personal code on LOOP and PUZZLE systems’ transmitters are the same.
See 6 .
LOOP gives a signal for no apparent reason
• Change the personal code using the turner marked Channel on the back of LOOP.
See 6 .
The signal from LOOP sounds distorted
• Check that the volume is not too high. See 8 .
If you still have trouble after trying the ideas above please contact your local authorized
Phonic Ear representative/installer (see information on back cover).
test and approval
Hereby, Phonic Ear, declares that this LOOP is in compliance with the essential requirements
and other relevant provisions of Directive 1999/5/EC.
Waste from electronic equipment
must be handled according to
local regulations.
10
Puzzle Loop User Guide_UK.qxd
09-09-2005
09:54
Page 16
warranty
time period of warranty
This warranty will go into effect upon the date of original purchase of this equipment, and will
remain in effect for one calendar year (two years inside the EU) from that date as long as the instrument remains the property of the original consumer.
what is covered by this warranty
Any electronic component which, because of workmanship, manufacturing, or design defects,
fails to function properly under normal use during the life of this warranty will be replaced or
repaired at no charge for parts or labor when returned to the factory service center. Transportation
in is paid by the customer. If it is determined that repair is not feasible, the entire unit may be
replaced with an equivalent unit upon mutual agreement of the manufacturer and customer.
what is not covered by this warranty
1 Malfunctions resulting from abuse, neglect, or accident.
2 Peripheral accessories as itemized within the product brochure, when such items are returned
after 90 days from the original purchase.
3 Alkaline batteries (if applicable).
4 Instruments connected, installed, used, or adjusted in a manner contrary to instructions provided by the manufacturer.
5 Consequential damages and damages resulting from delay or loss of this instrument. The
exclusive remedy under this warranty is strictly limited to repair or replacement as herein
provided.
6 Products damaged in transit unless investigated by the shipper and returned to the
warrantor with the investigation report.
Phonic Ear reserves the right to make changes in the design or construction of any of its instruments at any time without incurring any obligation to make any changes whatsoever on units
previously purchased. This warranty is in lieu of all other expressed warranties. All expressed and
implied warranties will terminate upon the expiration of this written warranty. No representative or person is authorized to represent or assume for us any liability in connection with the
sale or use of our products other than as set forth above.
The above warranty does not affect any legal rights that you might have under applicable
national legislation governing sale of consumer goods. Your distributor may have issued a warranty that goes beyond the clauses of this limited warranty. Please consult your distributor for
further information.
what to do if you need service
If you require service under the terms of this warranty, carefully package the instrument to prevent damage and return it to your distributor (see information on back cover). Please provide
your receipt, a detailed description of the problem, your full name, billing address, and telephone
number.
11
English
one-year limited warranty is issued to the original consumer of this product(s) by Phonic Ear
(two years inside the EU).
Puzzle Loop User Guide_UK.qxd
09-09-2005
09:53
Page 5